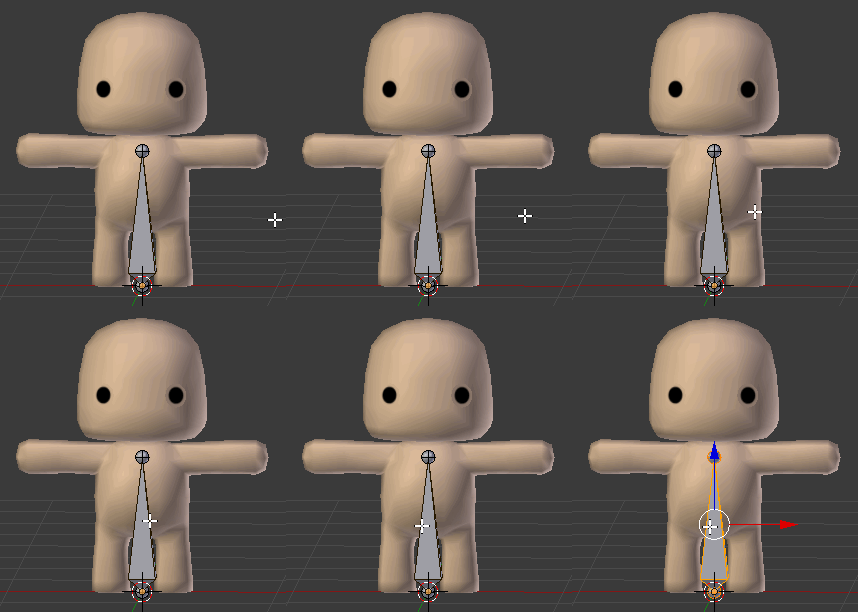
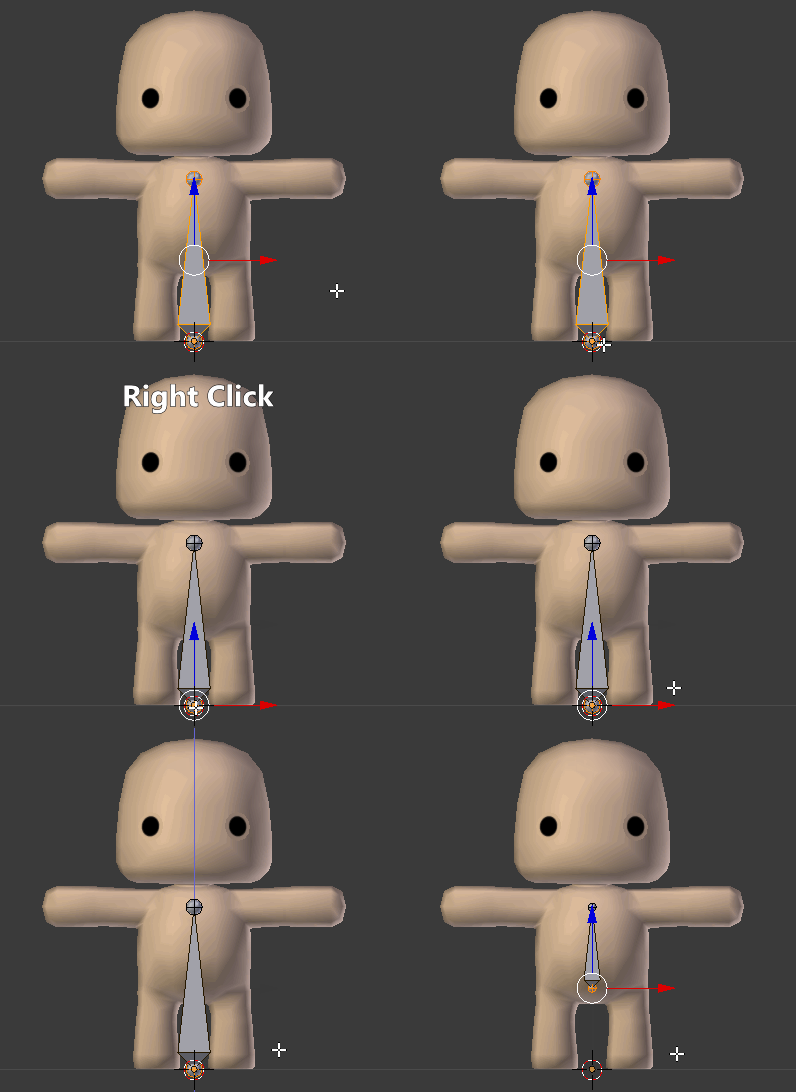
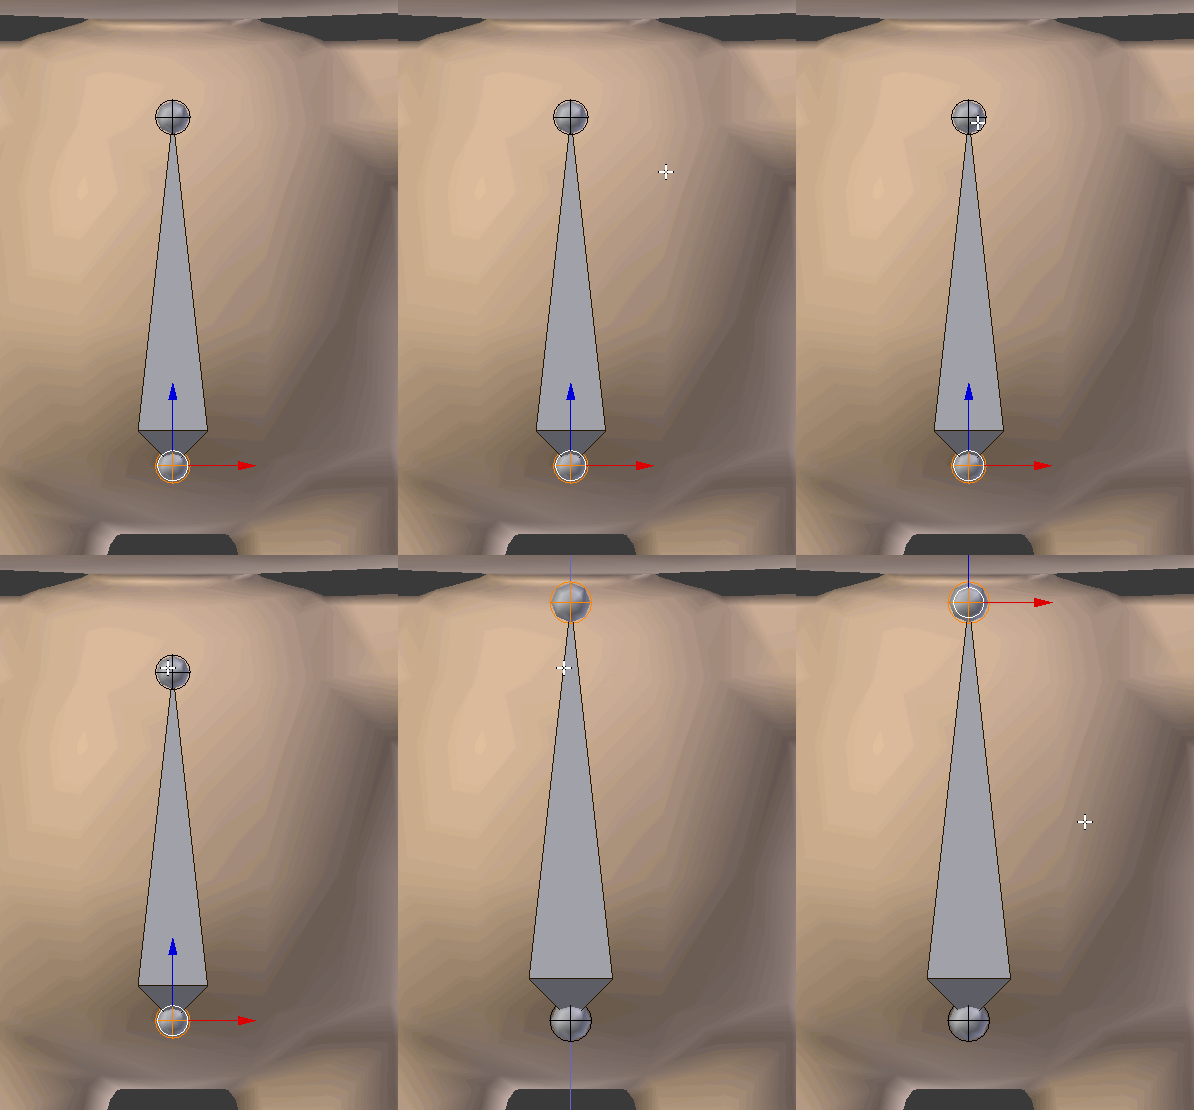
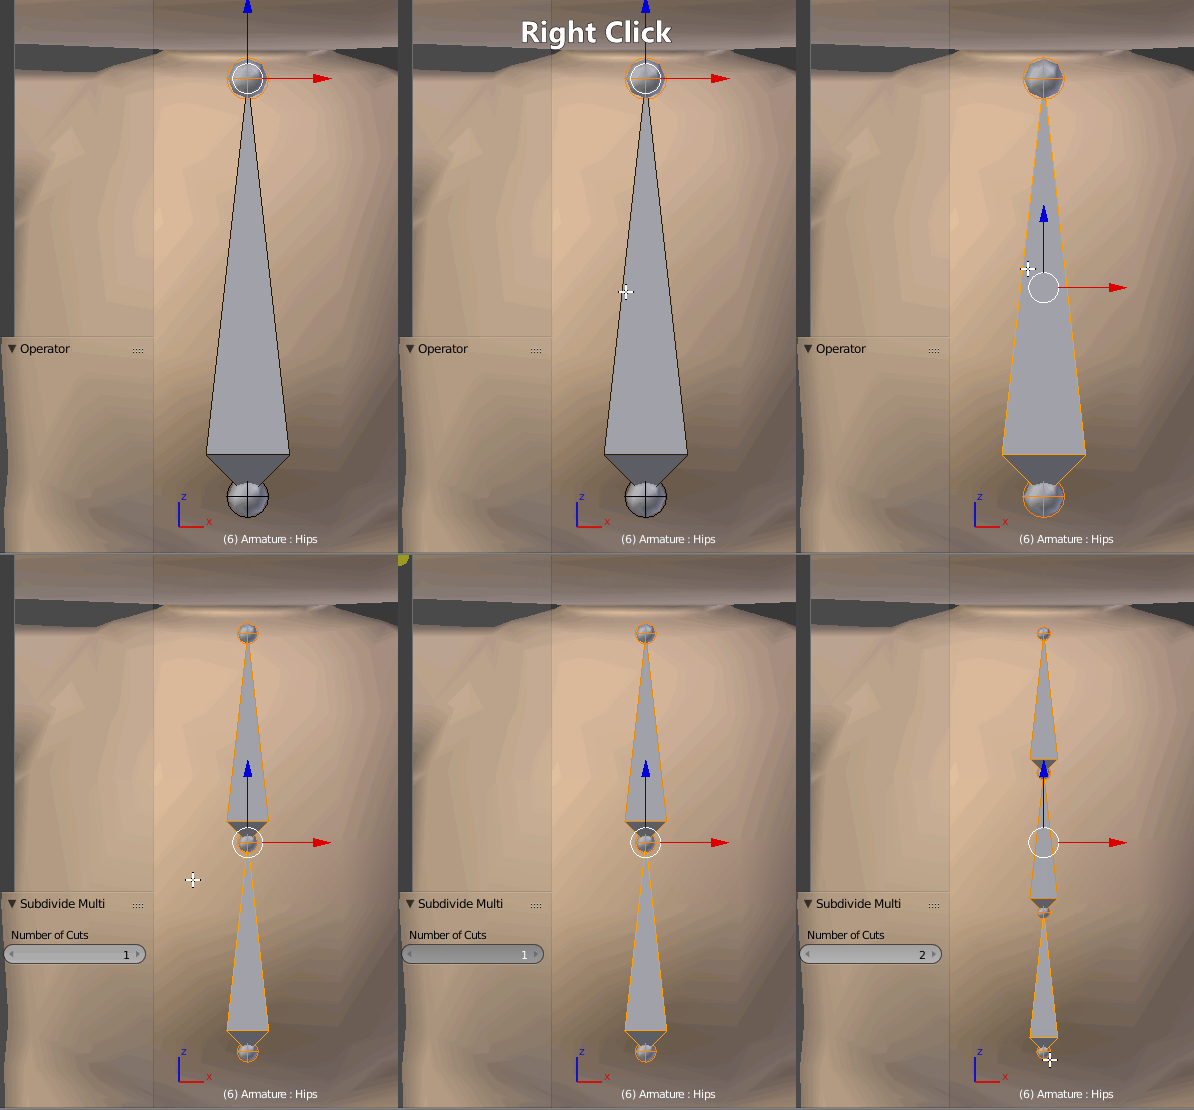
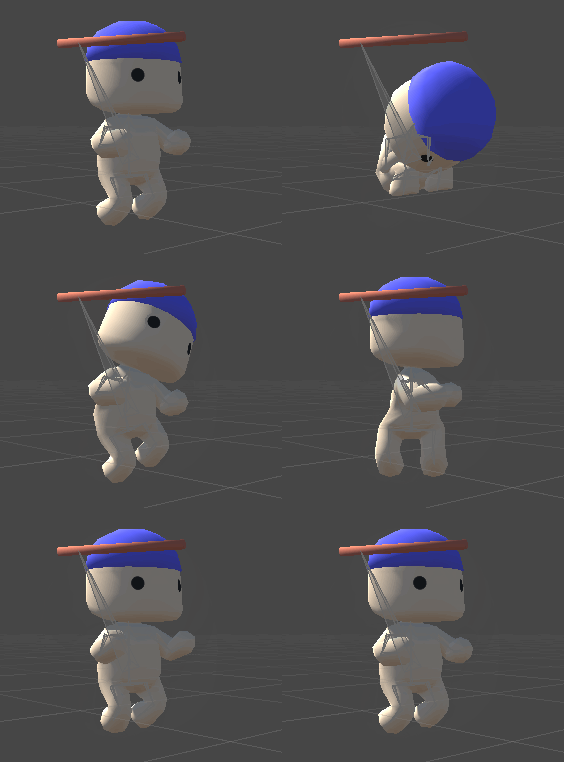
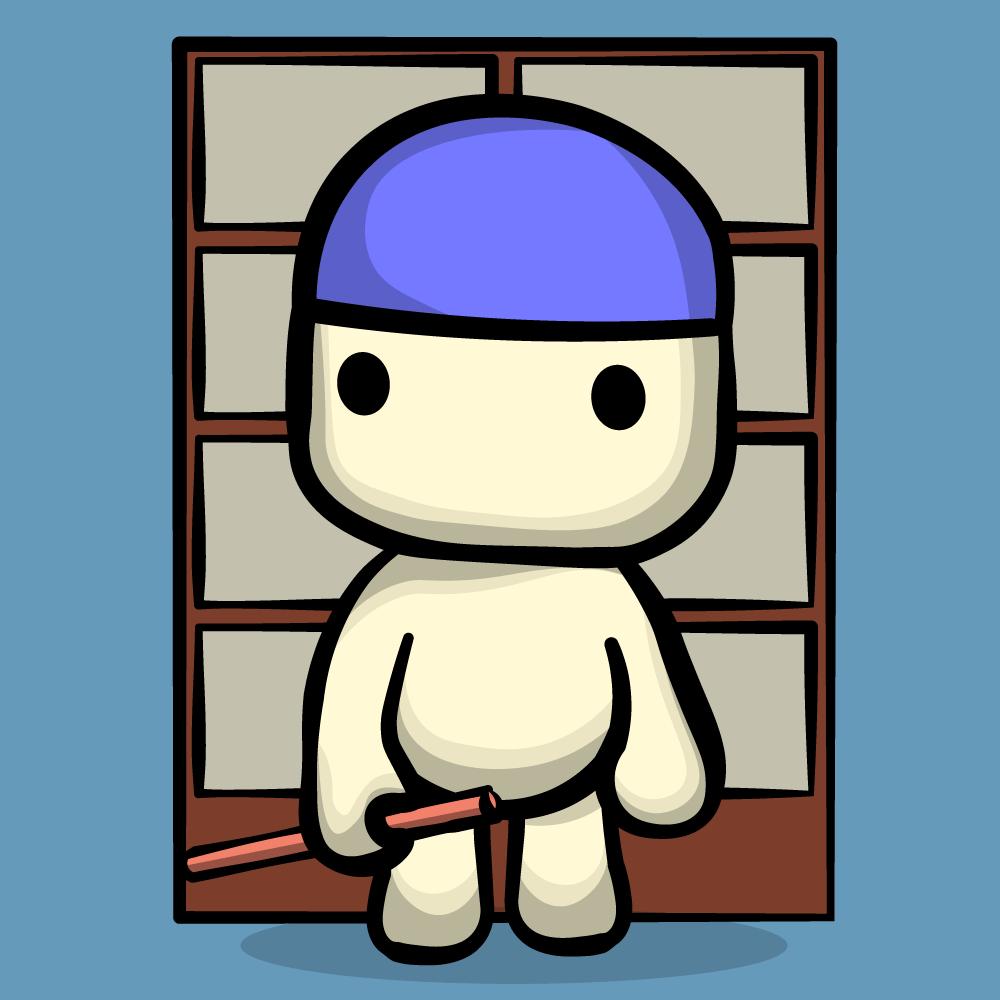
How to create character in blender
How to create character in blender
How to create a character in Blender for Unreal Engine
Contents
Introduction
A project often needs a 3D model, but no suitable model is freely available. The first thought that came to me was to use a character generator. However, the existing known generators are ordinary morphs based on the template of someone else’s model. So I had to create the model myself.
Concept
The most important thing is to understand what you want. My project targets smartphones and realism is very difficult to convey using low poly models. So I decided to stick with the cartoon style. By the way, I really love cartoons.
The first thing I did was collect the references.
When I more or less decided on the character, I was already collecting references for individual details, such as a braid, pauldrons and so on.
The main thing is not to be afraid to collect them. I had 20–30 references for each detail.
Next, I launched Krita and started sketching the character. The first ones were completely unsuccessful, but at some point I stopped there and began to develop it.
Modeling
After doing something similar to concept art in Krita I launched Blender and started modeling low poly model. It was my mistake and of course, nothing worked for me. I couldn’t get the model I wanted right away, so I started making a high poly model.
Since I’m bad with anatomy, sorry, I used references for block-out. You can also use ready-made body parts from MakeHuman, Fuse or something else.
Next, switch to sculpting mode and turn on the Dyntopo. Play around with tweaking the details and customize for yourself.
I didn’t want to bother with a feet and a toes, so I sculpted the boots right away. I also had problems with a collarbone, so I also sculpted a shirt.
Next, I sculpted the skirt, bracelets, pauldrons and so on. First, I sculpted the shape of the clothes, and then I applied collision and cloth physics.
Select body and apply collision physics.
Create a cube and change its sides to fit patterns. Delete only the faces on the left and right sides. The remaining edges will be seam lines.
Delete the top and bottom sides.
Apply cloth physics in object mode and check Sewing.
Also check collision properties.
You can play with the settings and achieve the desired result. Start the animation to sew the cloth.
The internet is full of body and head meshes, but I preferred Ushiyama-san. In addition, this mesh makes it easier to sculpt a cartoon head.
Retopology
After the high-poly model is ready, you should retopologize. Before you start, you need to stock up on head (and body) mesh references so you don’t miss out on the main edges. There are different decimates that can create LODs, but if you want make it manually, just use Snap and Poly Build.
Next, I retopologize all the objects and merge these objects into one mesh and remove the hidden faces.
Unwrapping
After the model is ready, you need to mark seams. Seams are best done in places away from the eyes. You can also find references of seams on a head and body in the Internet. It is not recommended to make seams in the middle of the face, but otherwise Blender didn’t do a good UV layout. Try to make fewer seams and test UV layout by pressing UV | Unwrap.
As you can see, there are problems with the islands, a small island of the face, although this is the main detail of the model. For convenience, I have created groups of vertices that correspond to the island. The island of the face was scaled and rotated, and the rest of the islands were packed in relation to the face.
Texturing
Each vertex group can be painted in its own special color. I mapped out some rough details in Texture Paint mode and saved this texture.
In Krita, I painted over the islands with my colors, worked on the light and shadow and added details (hood, folds).
In GIMP, I applied textures that were cut from some pictures and converted to black and white. Simply put, I made material patterns and applied them to the main texture.
If we load the texture in Blender, we will see inconsistencies at the seams.
My solution is extremely trivial: I selected Smear and smeared the inconsistencies in Texture Paint mode and resave this result.
However, after such manipulations, artifacts may appear in the texture.
Using cloning, smudging or a brush, you can remove these artifacts and resave the texture.
Since I already have groups of vertices, I can give each group its own material and bake a metallic and roughness map or painting manually.
You can also get a normal map by baking a high-poly model onto a low-poly model, but since I drew some details in the texture and didn’t create meshes, there was nothing to bake and I used NormalMap Online service. Please note that normal map still needs to be processed in the GIMP or something else.
Rigging and Animation
I was extremely lazy to deal with skeleton and skinning, so I decided to use Mixamo service. I just uploaded my model and downloaded the animations I needed.
Unfortunately, Mixamo didn’t create the bones for the braid. There were also problems with the skinning of the pauldrons.
I opened Blender again, created the bones for the braid.
It is necessary to select the required vertices, create a vertex group and name it the same as the bone that will control this group.
Import in Unreal Engine
In principle, this model is already ready for export to Unreal Engine. After importing the model, you will notice that the shapes are incorrect in the physics asset.
Remove all these shapes and switch Show All Bones.
Create a shape for each bone. To do this, select the desired bone and select Add Shape | Add Capsule. We also set up constraints between shapes and collisions.
The Physics Type of the shapes on the braid — Simulated. The physics type for other shapes — Kinematic.
Let’s open Skeletal Mesh and click by Section Selection. Select your model on which to simulate a cloth.
Press LBM and select Create Clothing Data from Section and press Create.
Apply the clothing data.
Select Activate Cloth Paint, chose your cloth data name in Clothing window and paint over those vertices that should be cloth. Don’t paint everything white. Better to do gradient or paint over the most significant places.
Next, import the running and jumping animations from Mixamo and select the existing skeleton.
Next, we create Blend Space ( Animation | Blend Space) and move animations to sequence recorder.
Also, we create Animation Blueprint.
Set Speed and IsinAir variables in Event Graph.
Node RigidBody is needed so that the braid moves while moving.
Node Slot “DefaultSlot” is needed in order to play some kind of animation (ex., shoot by pressed LBM).
In order for the model to be in place during animation, EnableRootMotion and Force Root Lock flags should be turned on.
Unfortunately, this doesn’t work with Running Slide animation from Mixamo. My solution was this: I took the Hips bone and put it in its original position on each frame.
Select sliding animation and Create | Create AnimMontage. You can select this montage in Play Anim Montage node.
And some changes for sliding in character blueprint.
Of course, it’s worth tweaking the physics and doing some light processing on textures, but I’ll leave that for later, for now this result is enough.
Create Clothing for a Character With Blender
Blender is an open-source 3D modeling and animating platform. It is versatile and easy to use. We will be using Blender to import and create animated clothing for our character. You can also use Blender to export your character into pretty much any game engine, specifically Unity.
Downloading Blender
If you don’t already have Blender, let’s download it by going to the Blender website. Blender can be used for rigging, modeling and animating your character and other objects. The Blender interface can be intimidating at first glance, but once you understand it you can unleash the power of its many tools for developers.

Go ahead and open Blender. The standard layout is five windows, like the example above. We need to change from Blender Render to Blender Cycles. On the top bar to the right, you will see a tab where you can change your current view to Cycles.
Importing Your Character
Along with modeling your character from scratch, Blender allows you to import different types of file extensions. We used MakeHuman to create a ready-made character. You can learn more about MakeHuman in my previous tutorial. Go to File > Import, and then choose your character’s file type.

All About the Mesh
Every character or object contains a mesh. This is a universal part of an object which is understood by editing and game platforms. To be exact, a mesh is a collection of vertices, edges, and faces that describe the shape of a 3D object, according to Wikibooks. It is important to note that any object with a large number of vertices will slow down an animation or gameplay. Once you import your character, you can view your vertex count on the top bar.
Editing Our Mesh
There are a couple of different ways to create clothing for your character. For the sake of this tutorial, it is important to save your original character in Blender. After we edit the mesh you cannot change it, so save two files: one with your original character, and the other with your character with clothes—for example, Tom_with_a_Cool_suit, etc.

After importing your character, go into Edit Mode. When you are in Edit Mode, your vertices will appear black. In this mode, you can choose, resize and delete vertices on the mesh. To edit your mesh, you will use the point, line and box editing/vertex mode as highlighted above. You must hold Shift to choose multiple vertices.

To highlight the clothes, we will need to press C in Edit Mode. A circle will appear. You can make the circle larger or smaller by using the wheel on your mouse. To highlight, scroll over the vertices with the left mouse button held down. Be careful with clicking the right mouse button as it will delete your chosen vertices in the circle range. You will be using the right and left mouse buttons to do all of your detailed work around the neck and arms.


Grid View
A shortcut to choose a large area on both sides of your mesh is to go into Grid View (see the sample below). The allows you to quickly make pants and shirts. Be aware that if you choose a very large area, you might mistakenly choose an unwanted section of the mesh. Therefore double check before you separate the mesh.

Separating the Mesh
Once you have outlined the outfit that you want, we need to separate it from the rest of your character. While your vertices are selected, click P on the screen while in Edit Mode. A box will appear. Choose Separate from Selection. If you look under the Hierarchy, you will see a replica of your body, for example, Chest001. Go to Object Mode and select this new object, and you will see it outlined on your character. Let’s rename it; if it’s a shirt, name it accordingly.
.jpg)
Once you separate the mesh, you can edit it to your liking. By pressing A and selecting all of the vertices, you can change the size and shape by using your toggle keys. In my case, I wanted my character to wear a skirt, so I created a shirt and then used the Line Vertex Mode to drag down the shirt.
Adding a Texture
To make clothes look like clothes, we need to add a realistic texture to them. There are tons of textures you can find online. For example, for leather, search for a leather texture. Then save it in a folder you can access with your character.
In Edit Mode, go to Material in your bottom right window. Make sure that you have selected the piece of clothing you would like edited. Click Add, as in the sample below. Browse for your texture, choose the texture, and rename. Hit Assign.

Adding a Modifier

At times, we would like to change the look of our clothing. For example, we would like a jacket to be thicker than the jeans or a cape to look heavier. We can achieve this by adding a Solidify Modifier. Go to Tools > Add Modifier and choose Solidify Modifier. You can then edit the number. The higher the number, the thicker the material. Try not to go overboard.
Quick Tools & Shortcuts
Fabric Animation
Adding animation to your fabric is not as difficult as it sounds. Blender allows you to add a Cloth physic to your objects. Before we begin, we will need to add a pinning group. If we don’t add a pinning group (which holds up the fabric), the cloth will fall straight to the ground.
In Edit Mode, choose the Vertices Point menu as highlighted below. Depending on your clothing, you will need to choose points where you need the fabric to hold up. If you created a cape, choose points where the fabric meets the shoulders. In my skirt sample below, you can see I chose points by the waist.

To create a pinning group, choose multiple points in your fabric by holding select and right-clicking the points. Then go into Vertex Groups, click Add, and name it PinGroup. You will see it added into your Hierarchy.

Go back to Physics, and you will now see pinning underneath the Damping section. Click it and choose PinGroup. Go back to Object Mode and click Play. You will slowly see your fabric move.
Now we will need to do two things. The first is to add a Wind Field, and the second is to add Collision to your character, as you may notice the fabric is probably going through it.
Tip: To make it easier to see, it may be a good idea to make other parts invisible by clicking the Eye in the Hierarchy.
Select your character’s body in the Hierarchy, or by going to Object Mode and clicking the body in the viewport. Go to Physics and choose Collision.
Let’s add a Wind effect. Go to the bottom bar and choose Add > Field > Wind. Move the object in front of your character and hit Play. If you don’t like the wind effect, you can change it in the physics menu under Wind.
Conclusion
The more you use Blender and the tools provided above, the easier it will be. Remember that you can edit any vertex on your character.
Congratulations! You have now created clothing for your character.
Создание персонажей в Blender и Unity
Визуально персонажи 3D-игр имитируются с помощью использования моделей, текстур и анимаций.
В прошлом для применения одинаковых анимаций персонажи должны были иметь полностью идентичные скелеты. Это ограничивало разнообразие персонажей, потому что их рост и пропорции тоже должны были быть одинаковыми. Например, в старых играх FIFA все игроки имели одинаковые размеры, потому что создание отдельного скелета и набора анимаций превратилось бы в настоящий кошмар.
К счастью для разработчиков игр, сегодня большинство движков имеет систему, позволяющую многократно использовать анимации при условии совместимости скелетной иерархии. Такая система позволяет использовать одинаковые анимации для персонажей всех форм и размеров. В Unity эта система называется Mecanim. Она обеспечивает удобную настройку анимаций, смешивание между ними и перенос гуманоидных анимаций между моделями.
Возможность многократного применения анимаций позволяет использовать анимации из Asset store и с таких вебсайтов, как mixamo.com, для ваших собственных персонажей. Это экономит кучу времени!
В этом туториале вы узнаете, как подготовить гуманоидную модель в Blender и как перенести её в Unity. В частности, вы научитесь следующему:
Приступаем к работе
Для прохождения этого туториала вам необходимо следующее:
Откройте папку заготовки (starter) проекта и перейдите в папку Assets\RW\Models. Откройте в Blender файл CuteCharacter.blend.
В файле содержатся следующие данные:
Заметьте, что она отзеркалена по оси X, это сильно упростит весь процесс работы. Справа показано простое изображение загруженной текстуры:
Первый шаг к анимированию этого персонажа — выполнение риггинга.
Создаём риг персонажа
Риггинг — это создание арматуры, скелета модели. У арматуры есть несколько соединённых костей, к которым можно прикрепить вершины, чтобы они двигались при перемещении кости.
Переместите мышь в окно 3D View, чтобы переключить на него фокус. Затем добавьте новую арматуру — удерживайте Shift и нажмите A, чтобы открыть Add Menu. Выберите Armature > Single Bone.
Мы создали арматуру и её самую первую кость, которую также называют корневой костью (root bone). Не снимая выделения с арматуры, найдите в разделе Display вкладки Properties флажок X-Ray и поставьте его.
Теперь арматура будет видна сквозь персонажа. Это упростит создание скелета.
Прежде чем приступать к созданию полной структуры, важно понять, как её нужно настроить для совместимости с Humanoid Avatar движка Unity.
Из-за особенностей привязки костей к собственной системе Unity некоторые ключевые кости являются обязательными.
Unity ожидает наличия минимум 15 костей, а именно:
Убедитесь, что арматура всё ещё выделена и нажмите на Tab, чтобы перейти в режим Edit. Выберите корневую кость, нажав на неё правой клавишей мыши.
Примечание: в Blender для выбора объектов используется правая клавиша мыши. Нажатие левой клавиши мыши изменяет позицию 3D-курсора — небольшого жёлтого круга с красно-белым кольцом вокруг. При перемещении 3D-курсора все новые объекты создаются в его новой позиции, а для нашего туториала это не требуется. Для сброса позиции 3D-курсора можно нажать Shift + S, откроется меню Snap Menu, после чего выбрать Cursor to Center.
Откройте вкладку Bone на панели Properties справа, чтобы можно было быстро вносить изменения, и переименуйте корневую кость в Hips, введя имя в поле ввода названия и нажав Enter.
Позвоночник
Настало время создавать структуру костей!
Выберите нижнюю сферу кости Hips и нажмите по порядку G, Z, 0.5 и Enter, чтобы переместить её туда, где должен быть пупок.
Теперь выберите верхнюю сферу и нажмите G, Z, 0.1 и Enter, чтобы немного переместить её вверх.
Примечание: если вам плохо видно происходящее, то можно приближаться и отдаляться при помощи колеса мыши.
Чтобы создать несколько костей позвоночника, нам нужно подразделить кость Hips на три части. Выберите кость Hips, нажмите W, чтобы открыть меню Specials и выберите Subdivide. По умолчанию эта операция разделяет кость на две части, поэтому измените значение Number of Cuts в нижней части панели Tool слева на 2.
Примечание: если вы не видите ползунок Number of Cuts, то переместите курсор мыши под текст Subdivide Multi внизу слева и прокрутите вверх, чтобы сделать его видимым.
После разделения позвоночника новые кости называются Hips.001 и Hips.002. Это плохой способ наименования костей; переименуйте кости, по очереди выделив их и изменив имя в правой панели Bone.
Назовите верхнюю Chest, а среднюю LowerSpine.
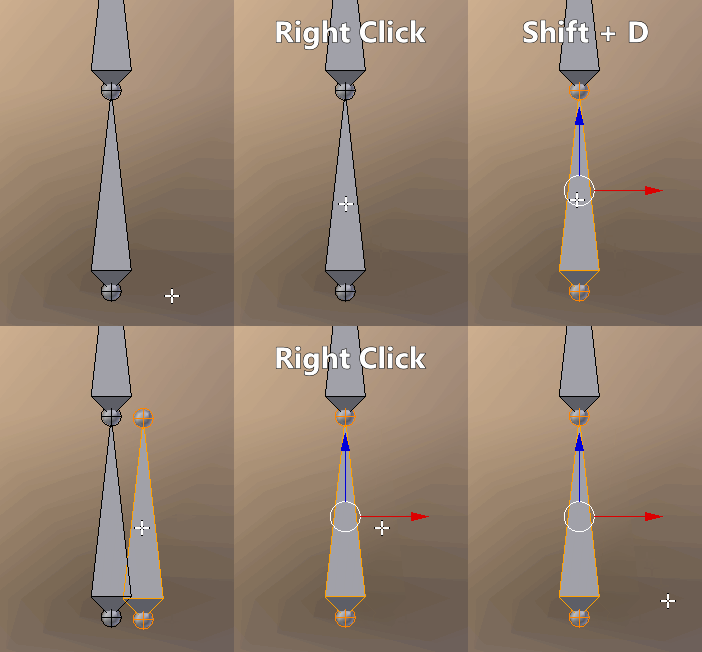
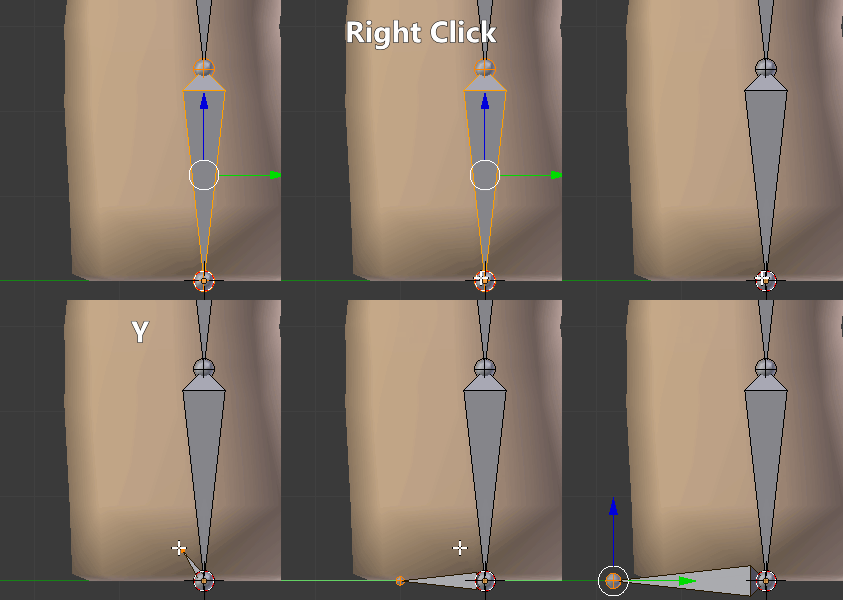
Теперь перейдём к костям ног. Дублируйте кость Hips, выбрав её и нажав Shift + D, а затем для подтверждения нажмите правую клавиши мыши.
Если посмотреть на панель Bone справа, то можно увидеть, что выбрана кость с именем Hips.001. Переименуйте её в UpperLeg.L. L означает left, «левая». Так мы будем понимать, с какой мы стороны костей и это поможет нам в дальнейшем при отзеркаливании.
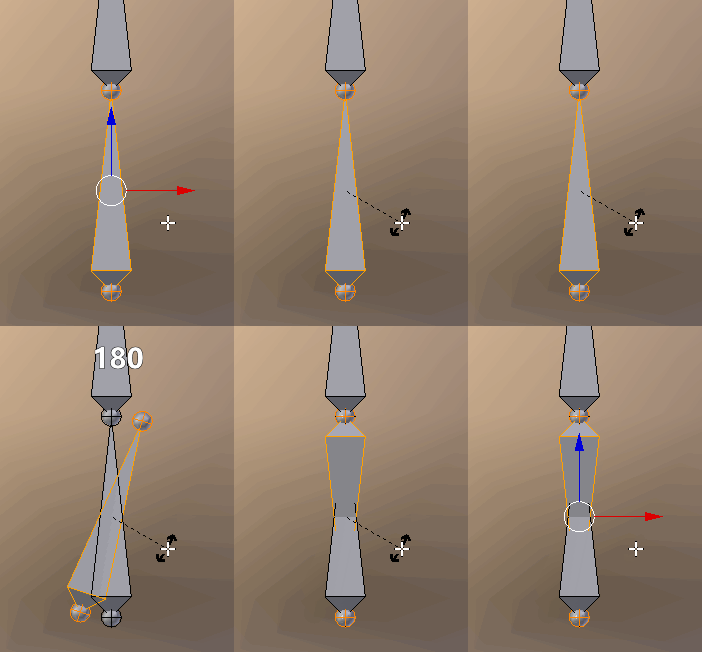
Поверните кость UpperLeg.L по оси Y, нажав R, Y, 180 и Enter.
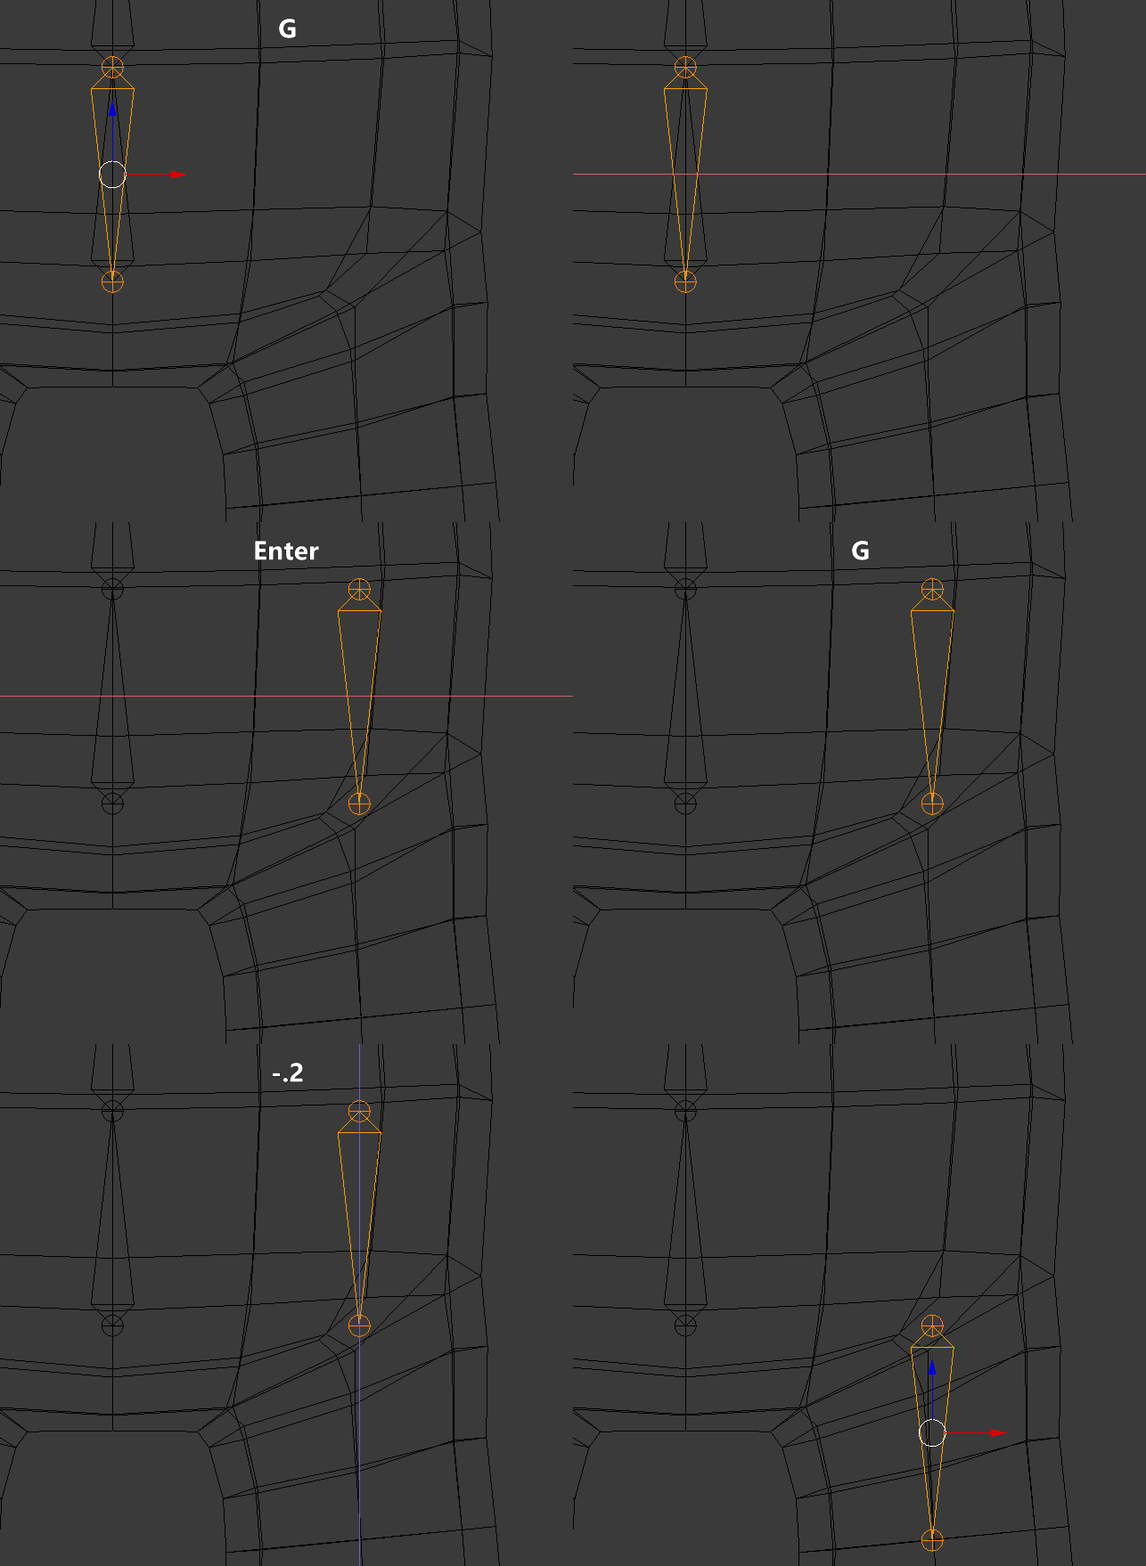
Теперь переместите на место по горизонтали, нажав G, X, .23 и Enter. Затем нажмите G, Z, -.2 и Enter, чтобы переместить её вертикально.
Примечание: на картинке выше показан режим wireframe, чтобы подчеркнуть, где находится кость. Включить или отключить этот режим можно нажатием на Z.
Выберите нижнюю сферу (также называемую коннектором) и переместите её вниз, нажав G, Z, -.3 и Enter.
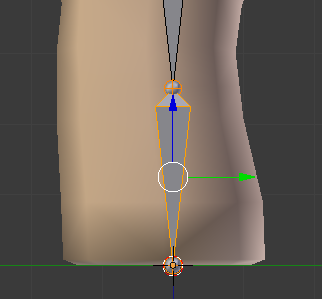
Чтобы ногу можно было сгибать, её необходимо разделить. Выберите кость UpperLeg.L, нажмите W и выберите Subdivide для разделения ноги на две части. В результате у нас получится две кости ноги; назовите нижнюю LowerLeg.L.
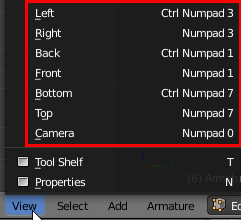
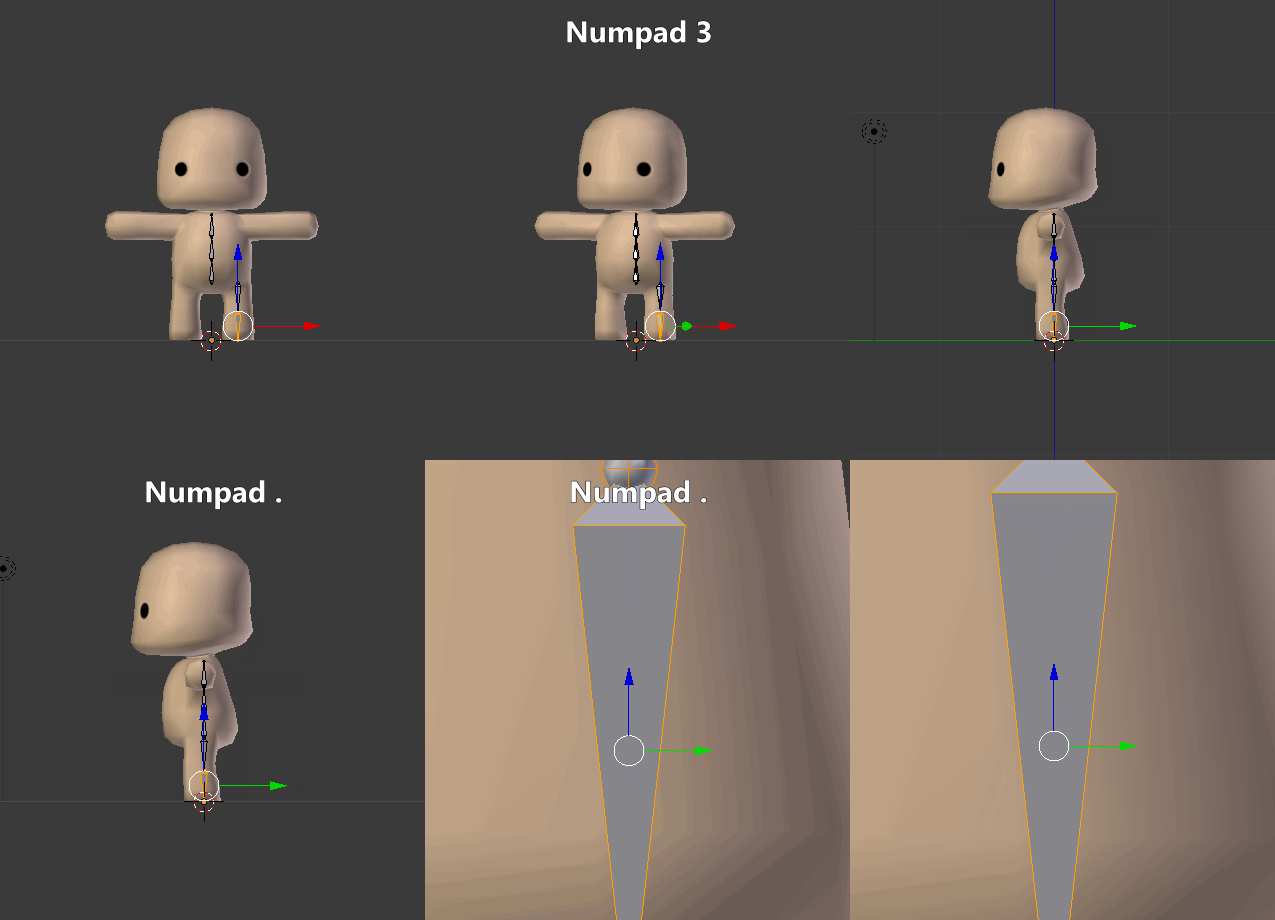
Последняя часть ног — это ступни. Переключитесь на вид сбоку, нажав 3 на алфавитно-цифровом блоке (Numpad), после чего нажмите на клавишу «точка» (.), чтобы сфокусироваться на голени.
Примечание: если на клавиатуре нет алфавитно-цифрового блока, то переключаться между видами можно нажатием на кнопку View в нижней части экрана.
Немного отдалите окно просмотра, чтобы видеть большую часть голени.
Теперь выберите нижний коннектор и чтобы создать стопу, экструдируйте его, нажав E, Y, -.18 и Enter.
Переименуйте созданную кость в Foot.L в панели Bone.
Теперь неплохо было бы сохранить файл. Нажмите CTRL + S и щёлкните левой клавишей мыши на появившемся имени файла. Периодически сохраняйте свою работу, Blender — достаточно стабильное приложение, но иногда может «крашиться».
Вернитесь в вид спереди, нажав 1 на алфавитно-цифровом блоке. Прежде чем переходить к голове, нам нужно сделать кость таза родительской для ноги. К счастью, сделать это довольно просто!
Выберите UpperLeg.L и найдите в разделе Relations панели Bone раскрывающийся список Parent. Нажмите на него и выберите Hips.
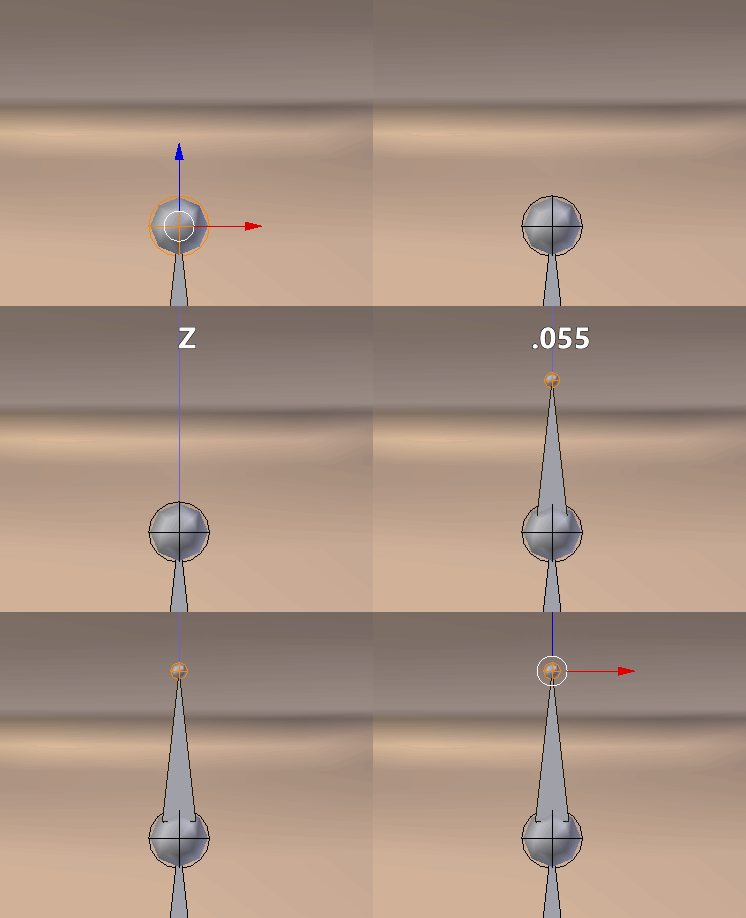
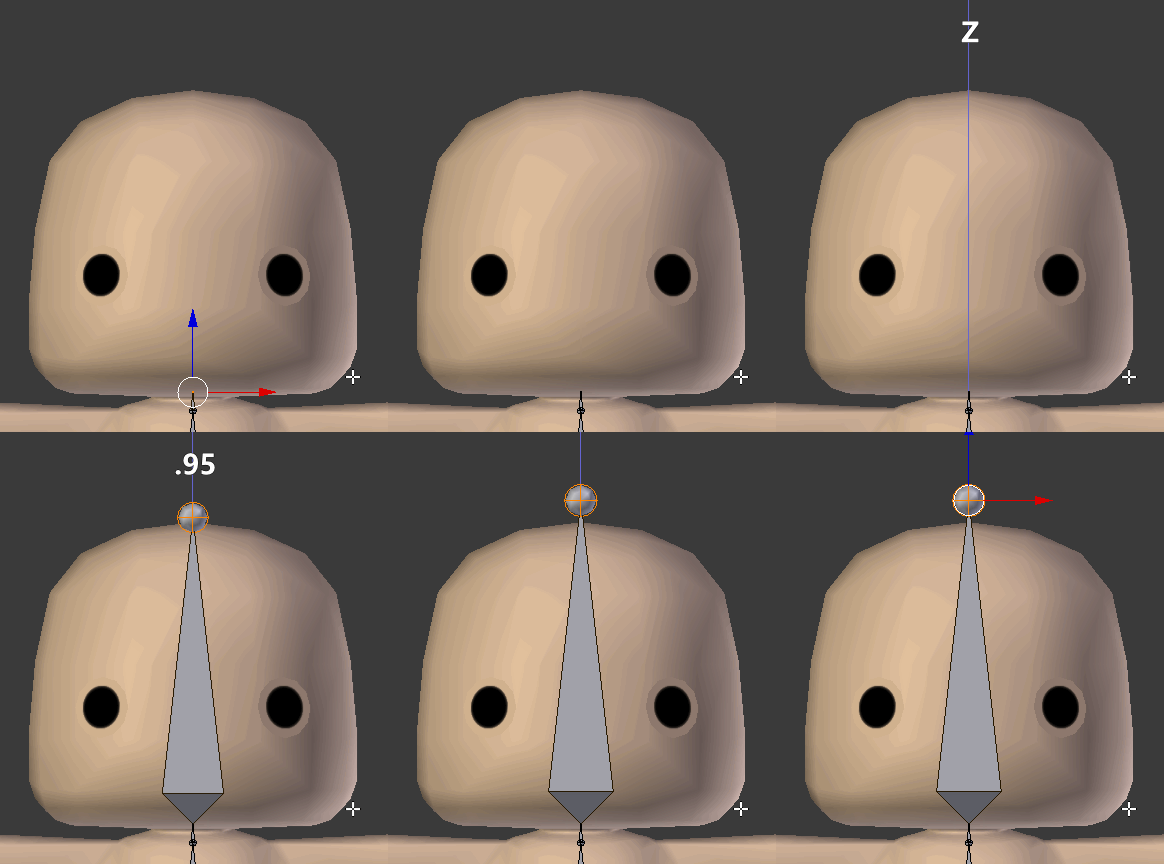
Приступим к голове! Выберите коннектор в верхней части кости Chest, нажмите E, Z, .055 и Enter. Это будет кость шеи, так что назовите её в панели Bone Neck.
Чтобы добавить кость головы, не снимайте выделение с верхнего коннектора и нажмите E, Z, .95 и Enter.
Назовите созданную кость Head.
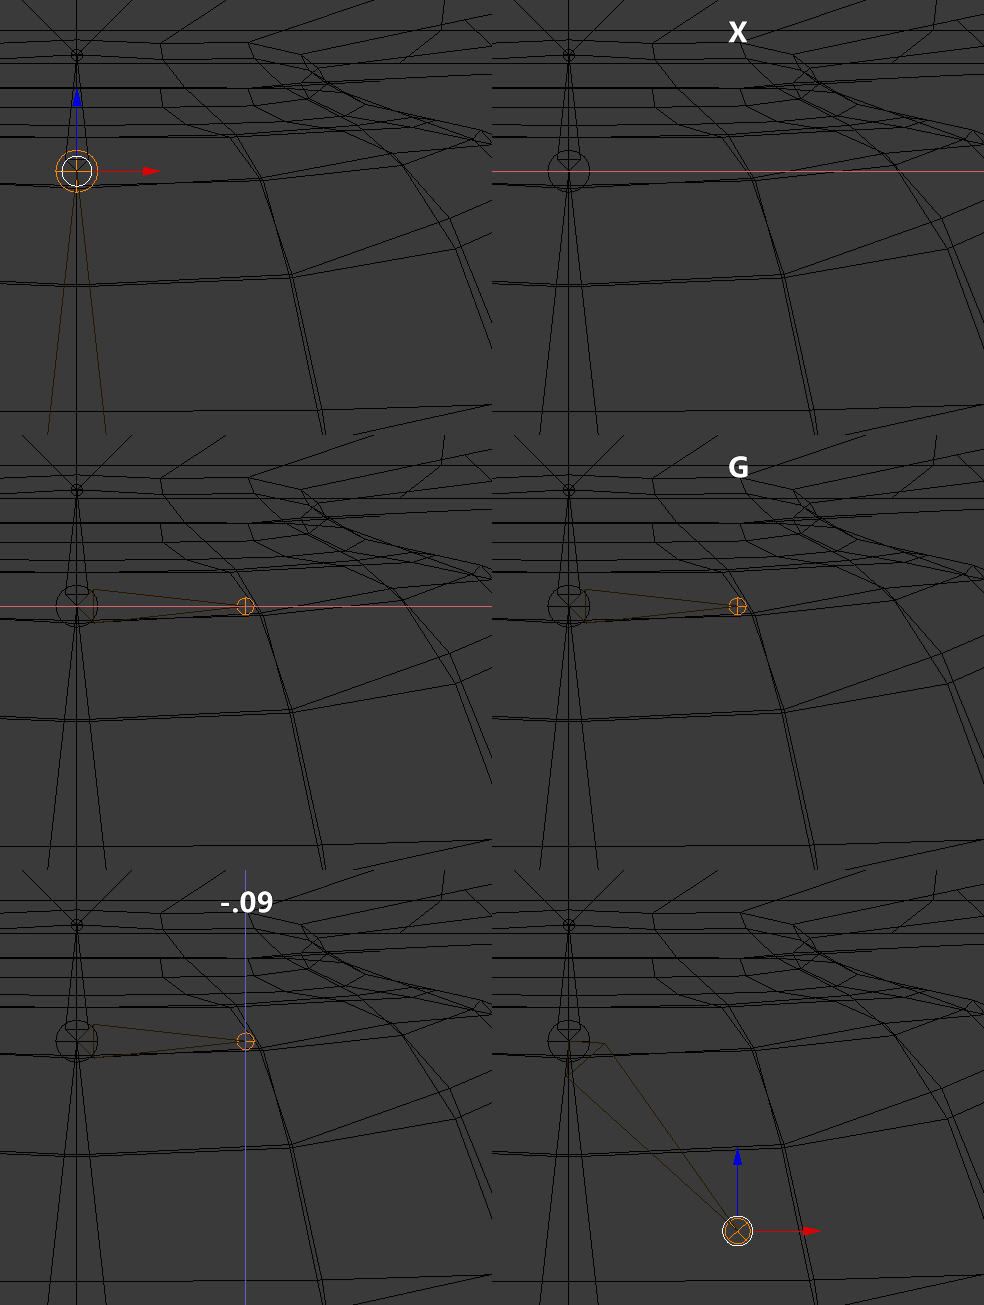
Далее приступим к коннектору левого плеча. Выберите верхний коннектор кости Chest и нажмите E, X, .08 и Enter, чтобы добавить новую кость. Немного переместите её вниз, выбрав правый коннектор и нажав G, Z, -.09 и Enter.
Назовите эту кость ShoulderConnector.L. Эта кость будет прикреплять плечо к грудине. Для протокола: это ни в коем случае не анатомически корректно, но нам это и не требуется.
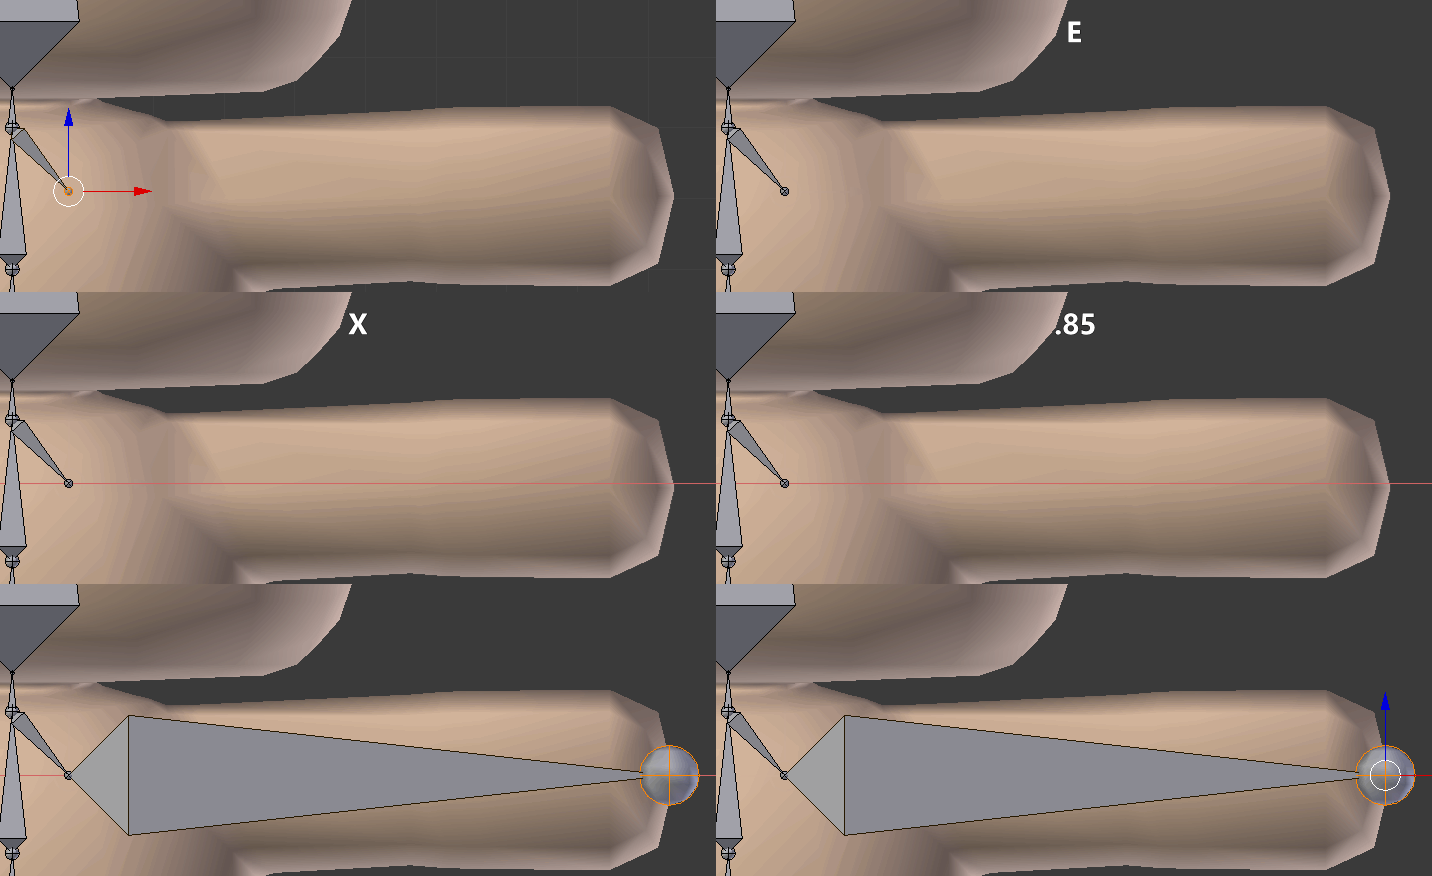
Снова выберите самый правый коннектор и нажмите E, X, .85 и Enter. Так мы создадим одну большую кость, которую нужно будет разделить, чтобы создать оставшиеся кости с левой стороны.
Выберите созданную кость, нажмите W и выберите Subdivide. Измените количество разрезов внизу слева на 3, чтобы получить четыре части.
Назовите эти кости следующим образом, начиная слева направо:
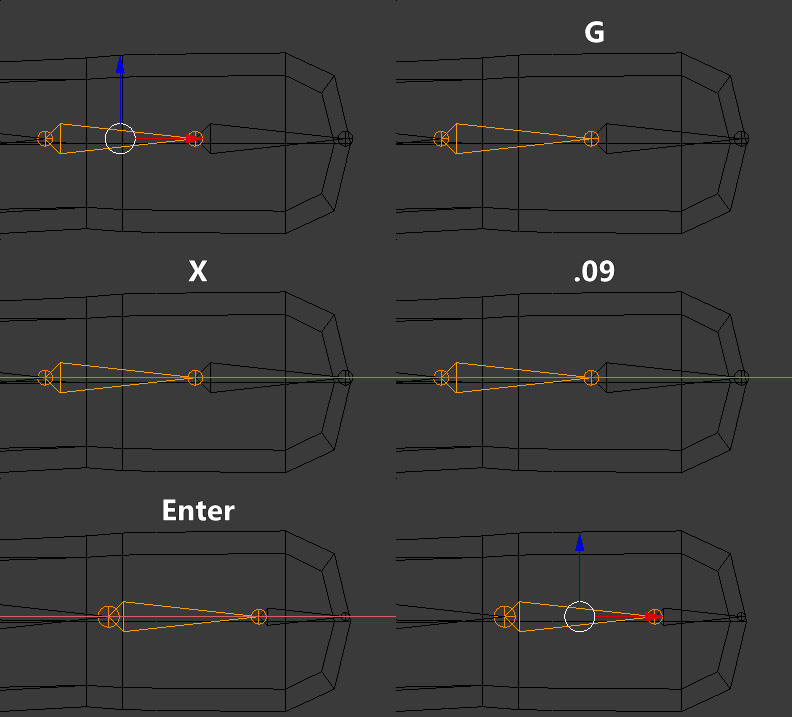
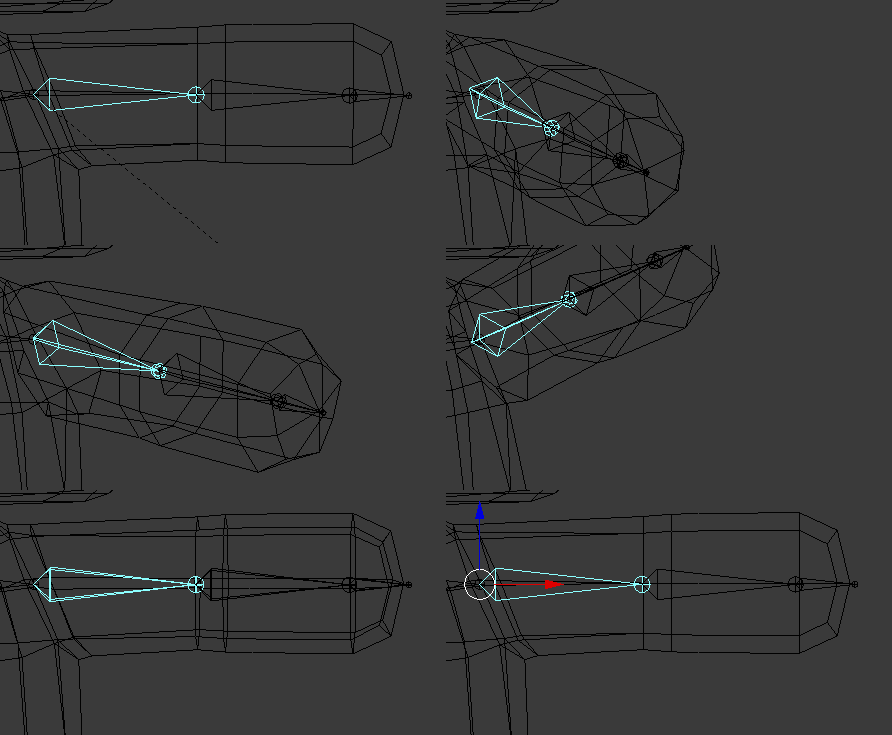
На первый взгляд текущее расположение этих костей выглядит неплохо, но из-за того, как расположен коннектор между частями руки (его можно назвать локтем), рука не сможет правильно сгибаться. Нажмите Z, чтобы перейти в режим wireframe, и посмотрите сами:
Красная линия обозначает, где локоть находится сейчас, а белая — точку сгиба руки на меше. Чтобы исправить это, выберите LowerArm.L и переместите её вправо, нажав G, X, .09 и Enter.
Пока мы работаем только с левой частью. Но как насчёт правой?
Не знаю, как вы, а я воспользовался бы любой возможностью упростить свою работу. Поэтому следующим шагом будет зеркальное отражение костей слева направо нажатием всего нескольких клавиш.
Отзеркаливание
С версии 2.79 в Blender есть удобная новая функция для быстрого отзеркаливания костей арматуры всего за несколько простых шагов! До появления этой функции приходилось дублировать, отзеркаливать вручную, изменять названия и задавать роли костей. Если вам когда-нибудь доводилось это делать, то вы знаете, как это долго.
Для начала снимите выделение со всех костей, нажав A, чтобы не осталось оранжевых контуров выделений.
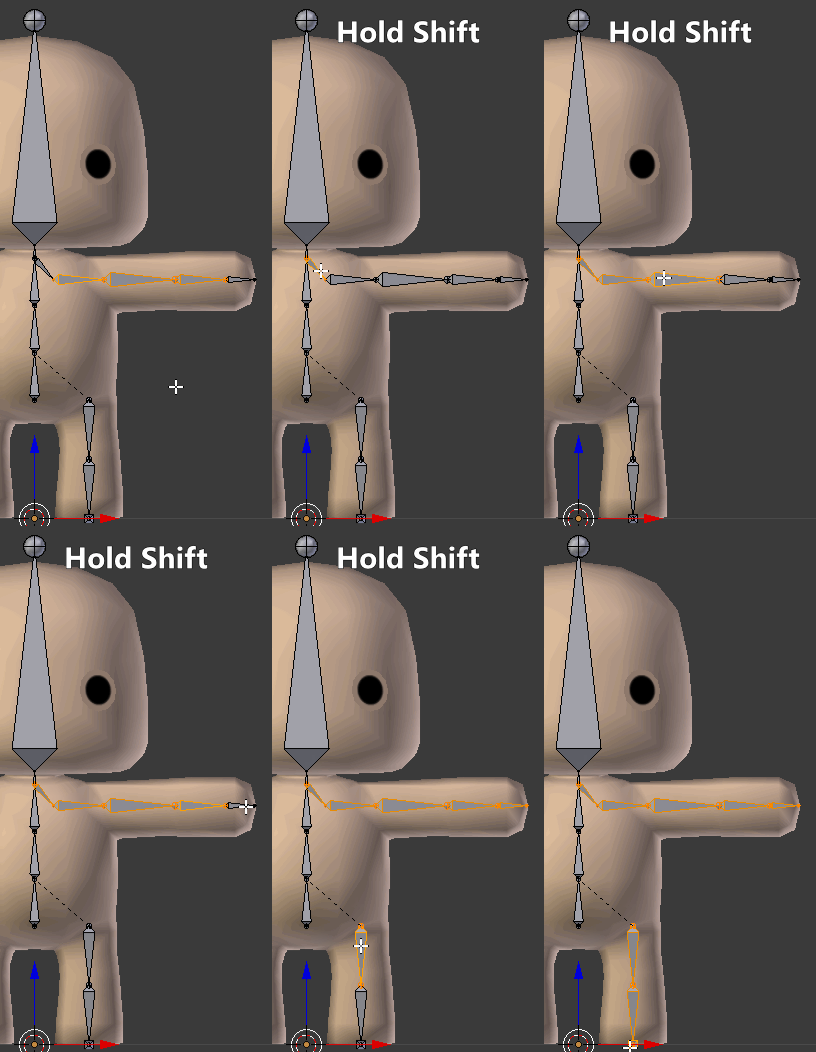
Далее выберем кости только с левой стороны (левая сторона персонажа находится справа от вас), удерживая Shift и щёлкая правой клавишей мыши каждую кость. Не забудьте о ступне!
Выбрав эти кости, нажмите W и выберите Symmetrize.
И этого достаточно, чтобы получить идеальную зеркальную версию выбранных костей:
Кроме того, в конце названий костей будет вместо .L буква .R, обозначающая их позицию.
Сохраните файл и приготовьтесь к риггингу.
Рисование весов
Рисование весов (Weight painting) — это процесс привязки костей к 3D-мешу. Каждая кость прикрепляется к группе вершин с определённой величиной веса.
Вес определяет «жёсткость» перетягивания вершин за костью.
Выполнение этой задачи вручную может занять много времени, потому что придётся самостоятельно рисовать вес каждой отдельной кости. К счастью, Blender может взять на себя основную часть рутинной работы, автоматически нарисовав веса в зависимости от близости костей к вершинам.
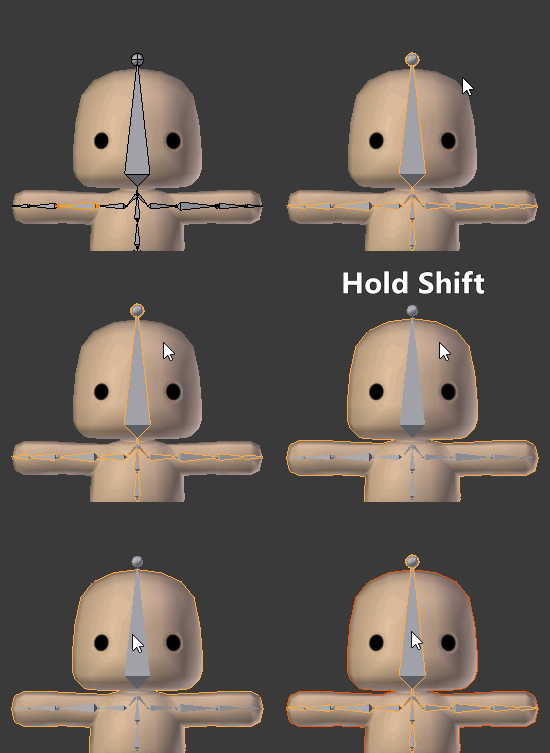
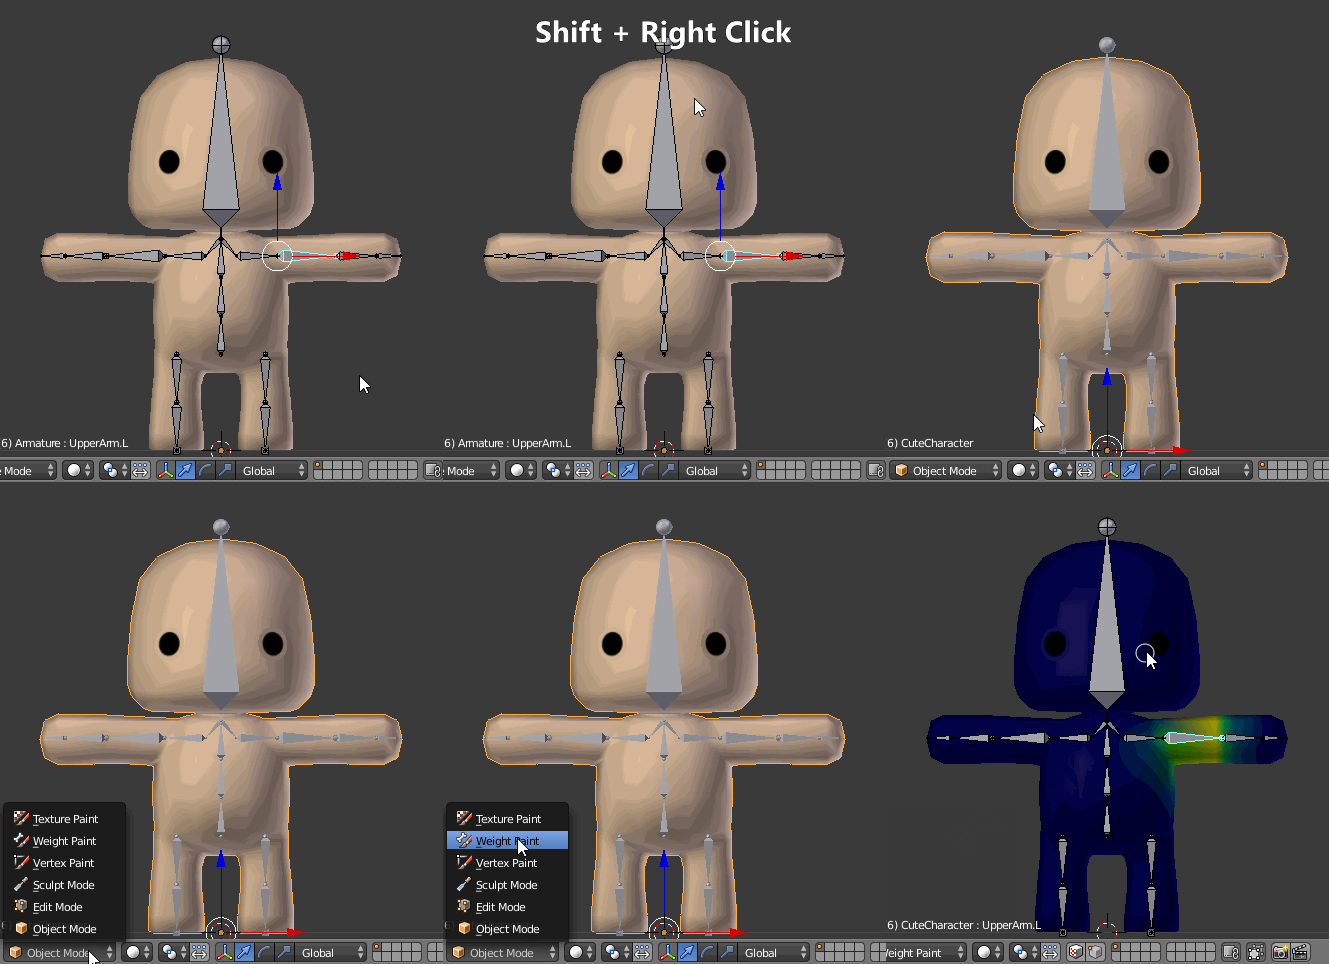
Нажмите Tab, чтобы переключиться в Object mode. Сначала выберите модель, затем удерживайте Shift и нажмите ПКМ на арматуре, чтобы выбрать и её тоже.
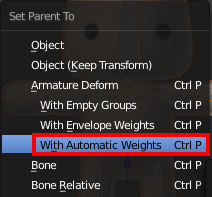
Теперь нажмите CTRL + P, чтобы открыть меню Parent и выберите With Automatic Weights, чтобы сделать модель родителем арматуры и выполнить автоматическое рисование весов.
Визуально разница может быть незаметна, но теперь кости присоединены к мешу.
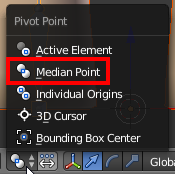
Прежде чем приступать к проверке, убедитесь, что Pivot Point находится в режиме Median Point, проверив нижнюю панель:
Включите режим Median Point, если там всё ещё выбран режим 3D Cursor.
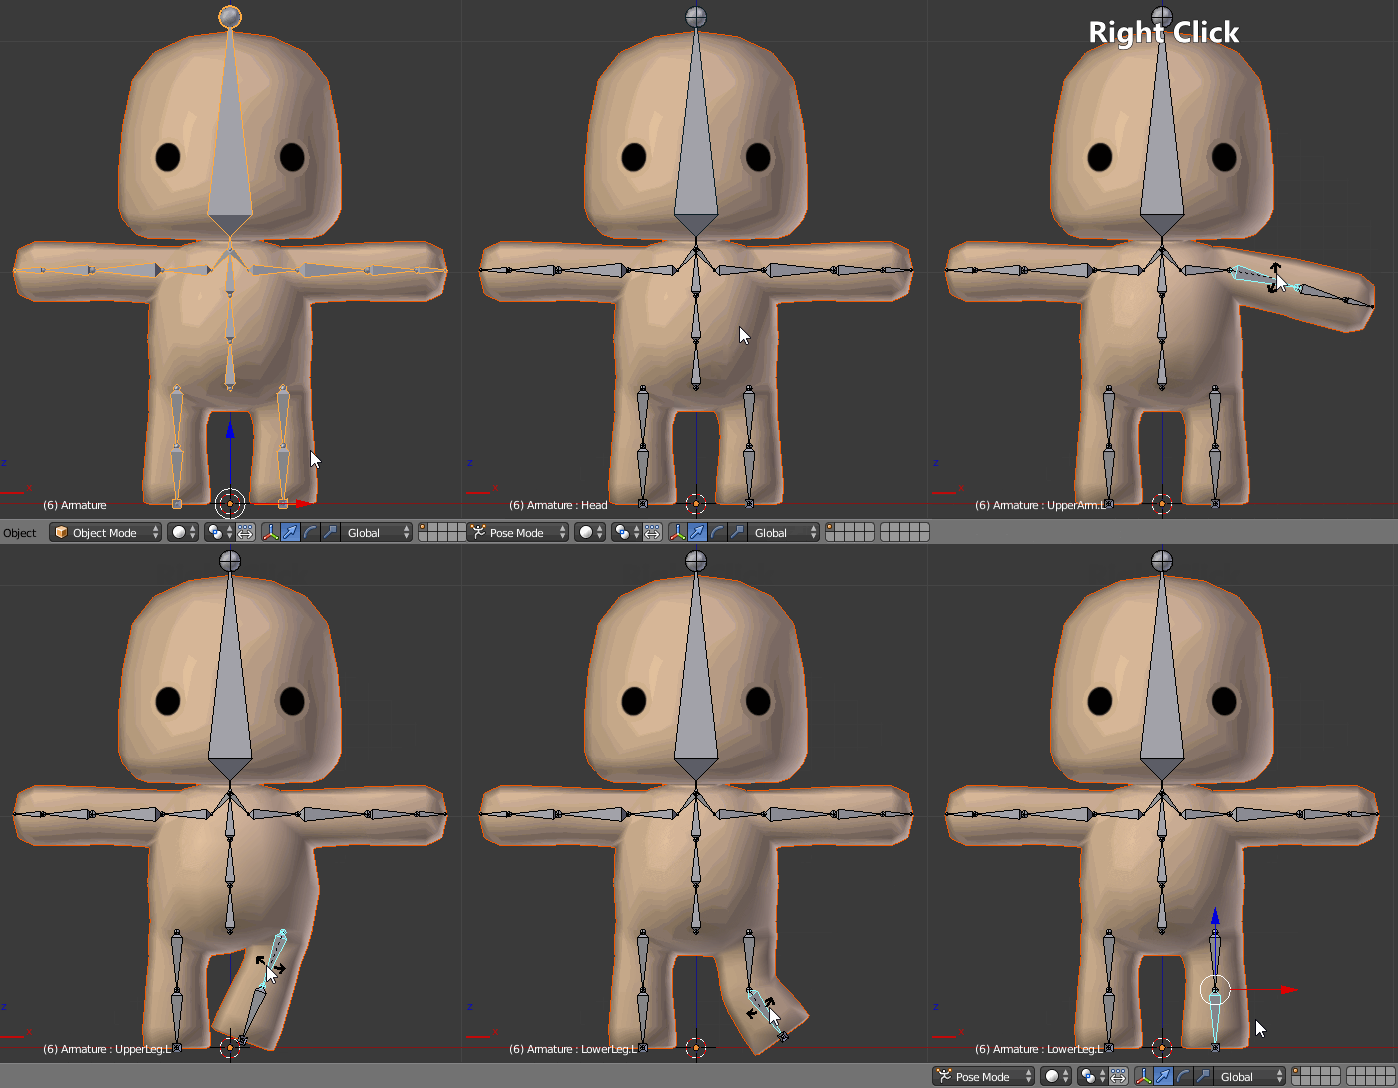
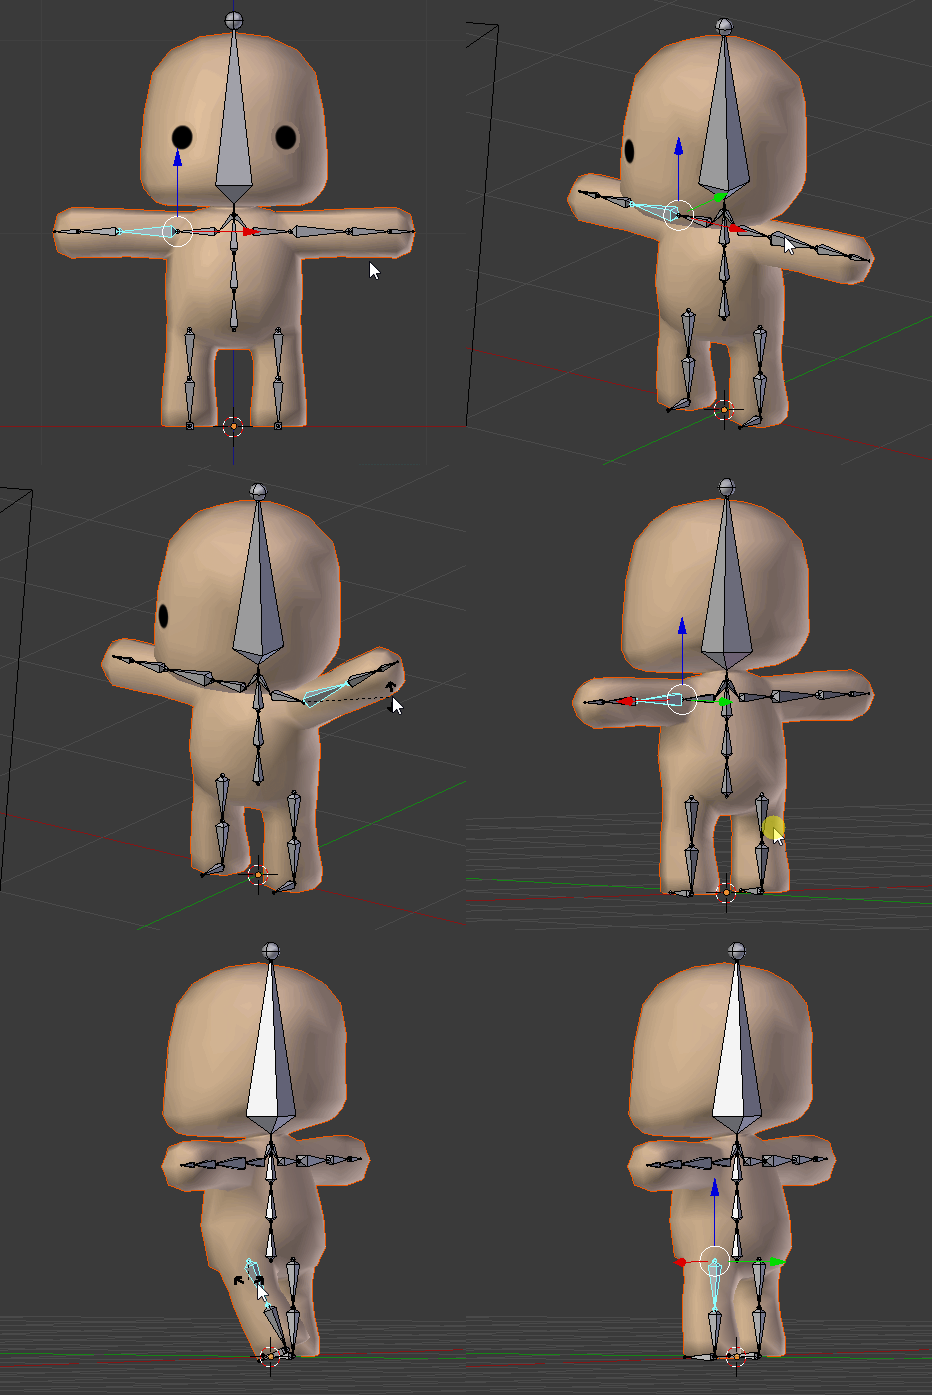
А теперь начинается интересное! Переключитесь в режим Pose, выберите кость и поверните её, нажав R и перемещая курсор мыши. Проделайте это с каждой костью в центральной и левой части модели, чтобы убедиться, что все веса назначены верно.
Повертите окно обзора в разные стороны и проверьте вращение под другими углами, нажав колесо мыши и перемещая мышь в разные стороны.
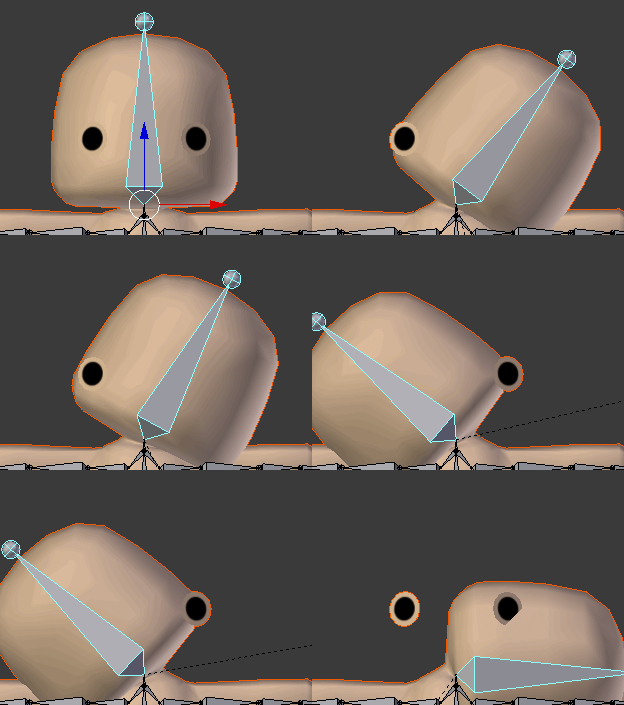
Проверив все кости, вы можете заметить, что глаза не двигаются вместе с головой, что выглядит немного странно, если не сказать больше:
Чтобы прикрепить глаза к голове, нам придётся всё-таки самим назначить веса. Не выходите из режима Pose арматуры, удерживайте Shift и нажмите ПКМ на модели, чтобы тоже выбрать её. Теперь перейдите в режим Weight Paint. Мы готовы к рисованию весов.
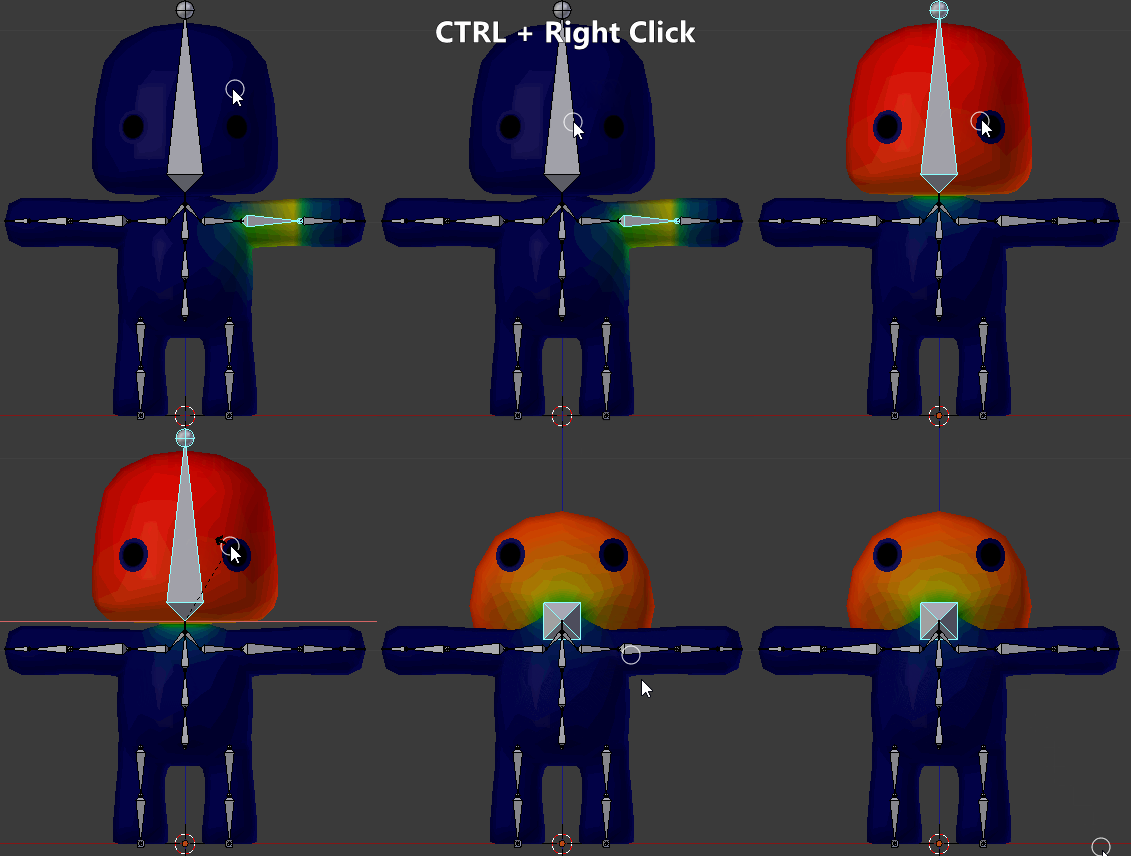
В этом режиме можно выбирать кости, удерживая CTRL и щёлкая ПКМ на кости. Выберите кость Head и поверните её назад, нажав R, X, -90 и Enter.
Чтобы прикрепить глаза к кости Head, выберите кисть Add в разделе Brush панели Tool слева.
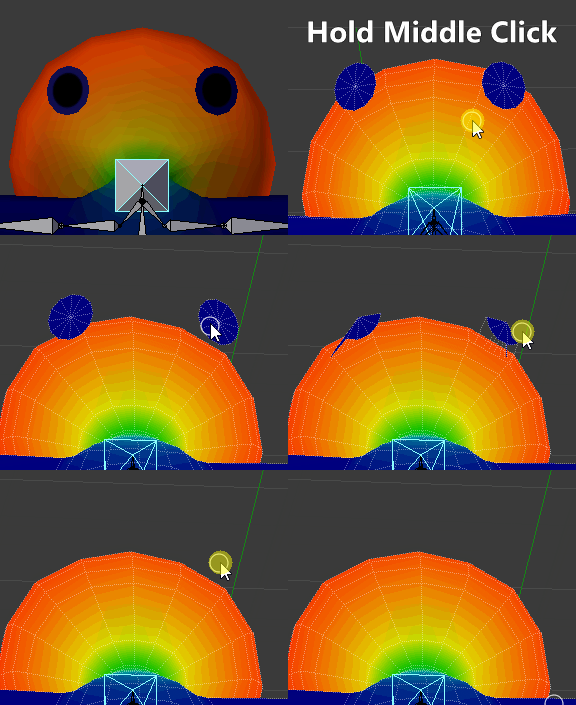
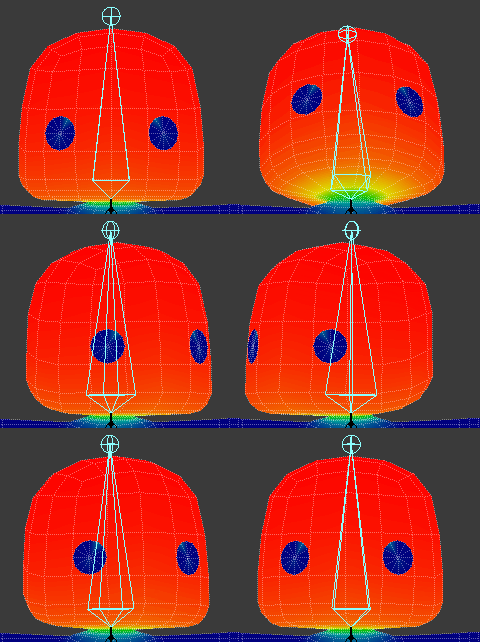
Нажмите Z, чтобы переключиться в режим wireframe и поверните окно обзора так, чтобы хотя бы один из глаз больше не находился на передней части головы. Теперь выполните раскраску вершин глаз, чтобы увеличить вес, пока глаза не перестанут висеть в воздухе.
Вес можно увидеть визуально по цвету на меше; значения изменяются от 0 (тёмно-синий) до 1 (ярко-красный). Чтобы проверить результаты, вернитесь в вид спереди, нажав numpad 1 и Alt (или Option) + R для сброса поворота кости Head.
Теперь глаза правильно прикреплены к голове.
Примечание: показанный выше поворот выполнен вращением трекбола. Этот режим вращения можно активировать повторным нажатием R после начала поворота.
Завершив базовое рисование весов, можно приступить к деталям.
Добавление аксессуаров
Аксессуары в этом контексте — это объекты, прикрепляемые к персонажу, но не являющиеся частью его тела. В этом разделе мы рассмотрим два способа прикрепления объектов: к самой модели и как отдельного многоразового объекта, прикрепляемого к кости.
Сначала мы нажмём Z, чтобы выйти из режима wireframe и нажмём A, а затем Alt (или Option) + R, чтобы сбросить поворот всех костей.
Редактирование персонажа
Первый способ добавления деталей к персонажу проще, но накладывает определённые ограничения. При работе с самой моделью, которая зеркально отражена, вся добавляемая геометрия будет копироваться из левой стороны в правую, и наоборот. Поэтому на одну из сторон невозможно добавить что-нибудь уникальное. Поскольку геометрия является частью этой конкретной модели, её также нельзя заново использовать для других персонажей. Такой способ идеален для любой ситуации, в которой подобные ограничения не являются проблемой.
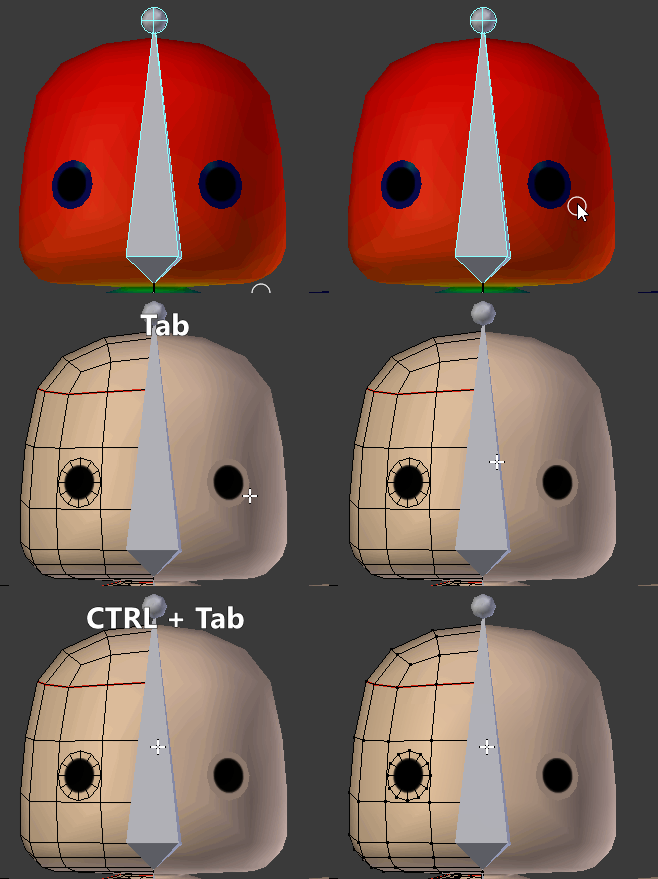
Если вы повторяли за мной действия туториала, то сейчас находитесь в в режиме Weight Paint. И это хорошо, потому что после добавления шляпы нам нужно снова заняться рисованием весов. Нажмите Tab, чтобы перейти в режим Edit mode и начните с переключения режима выделения на Vertex, нажав CTRL + Tab и выбрав в меню Vertex.
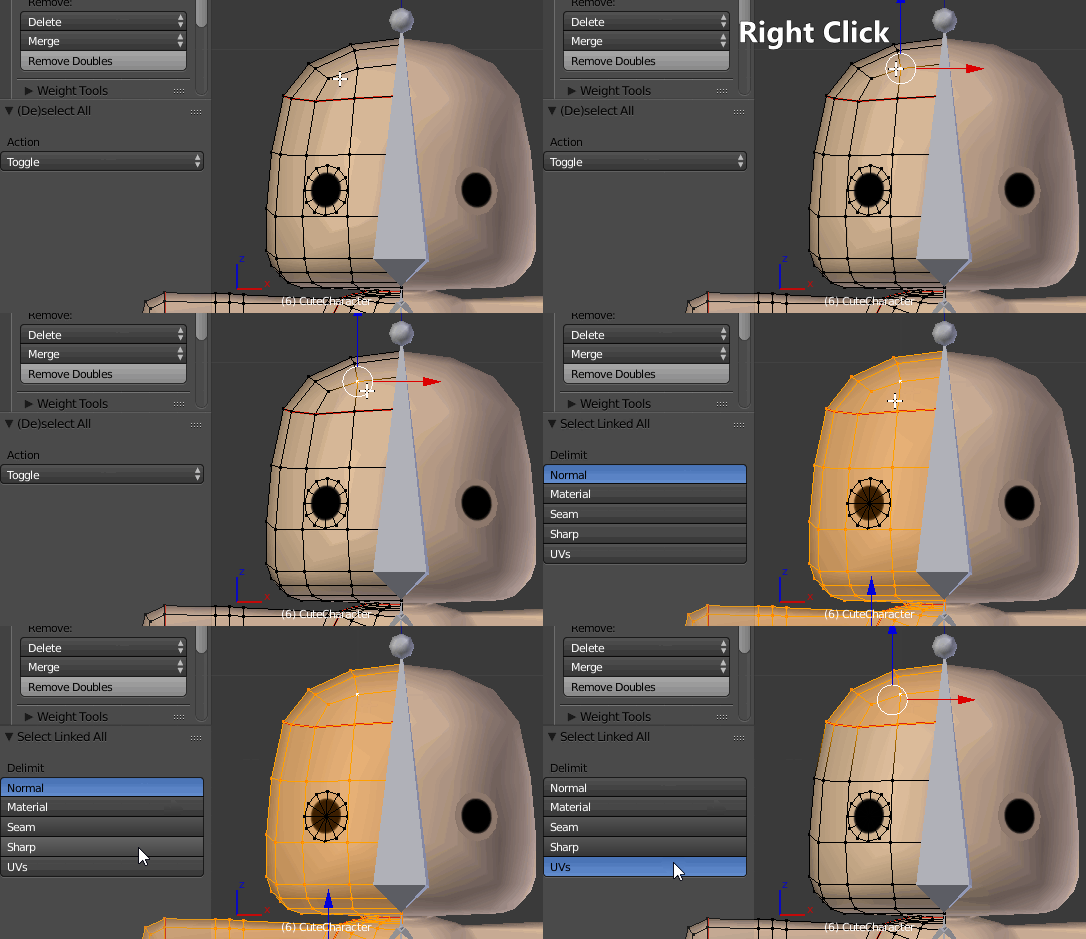
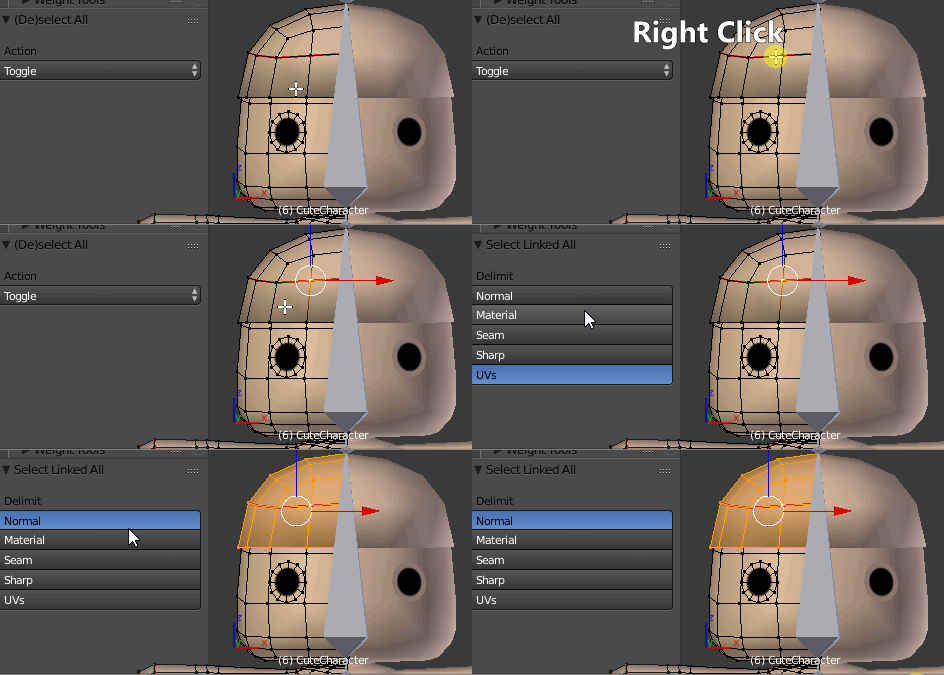
Теперь выберите ПКМ любую вершину в верхней части головы, находящуюся выше красной линии (которая является используемым для текстурирования UV-швом). Нажмите CTRL + L для выбора всех присоединённых вершин, так мы выберем всю модель. Теперь выберите UV delimiter, выбрав в нижней левой панели >UVs.
Теперь будет выбрана только верхняя часть головы.
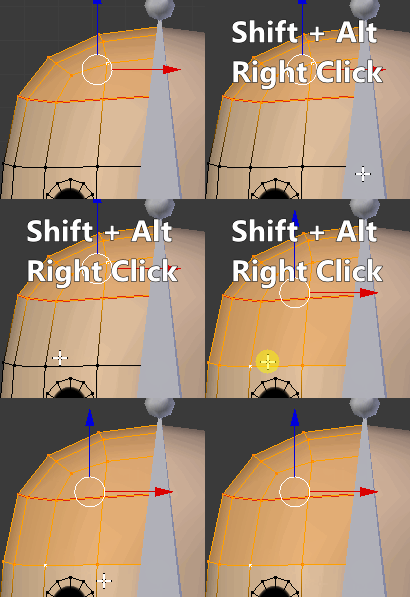
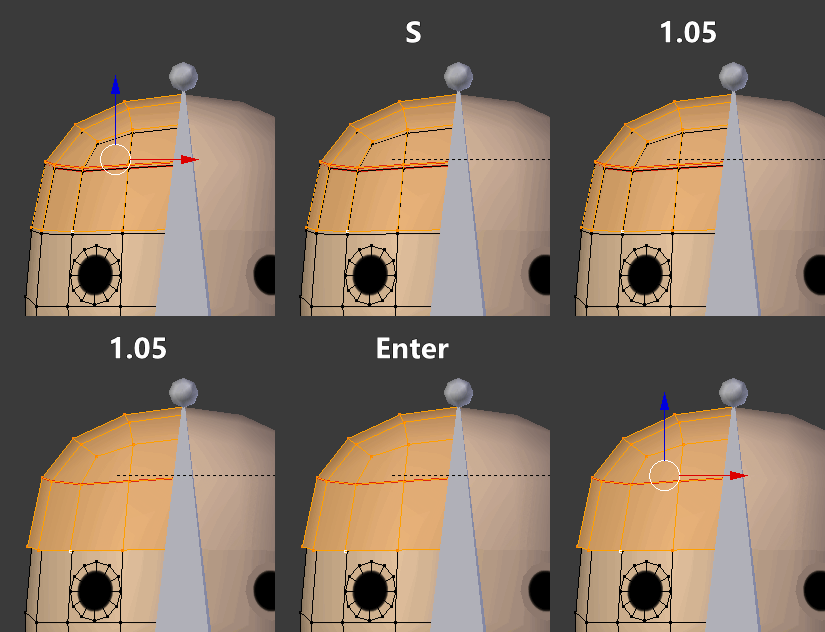
Выберите также edge loop под ней, удерживая Shift и Alt (или Option), а затем нажав ПКМ на любой из первых горизонтальных рёбер ниже.
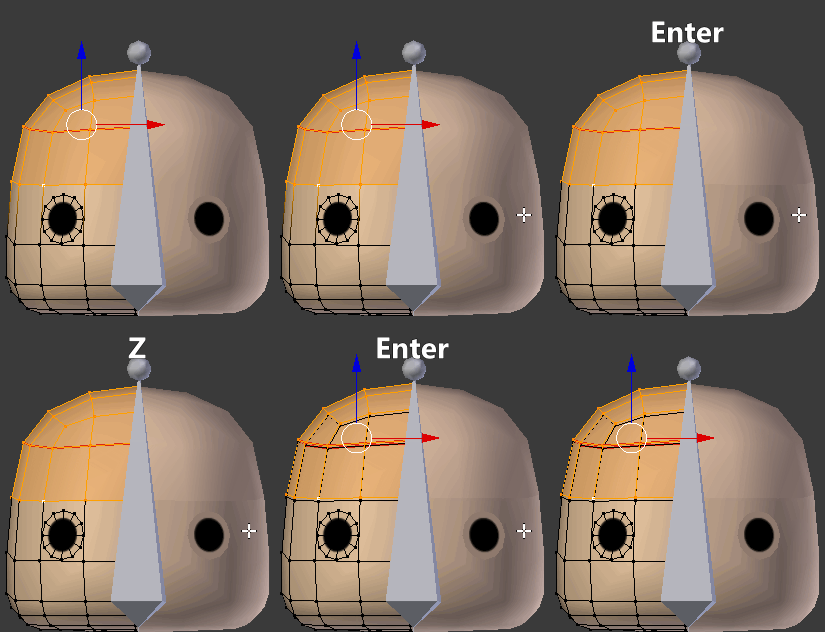
Теперь дублируйте выбранные грани, нажав Shift + D, а затем Enter. Немного переместите дублированные грани, нажав G, Z и 0.01.
Затем отмасштабируйте всё выделенное, нажав S, 1.05 и Enter.
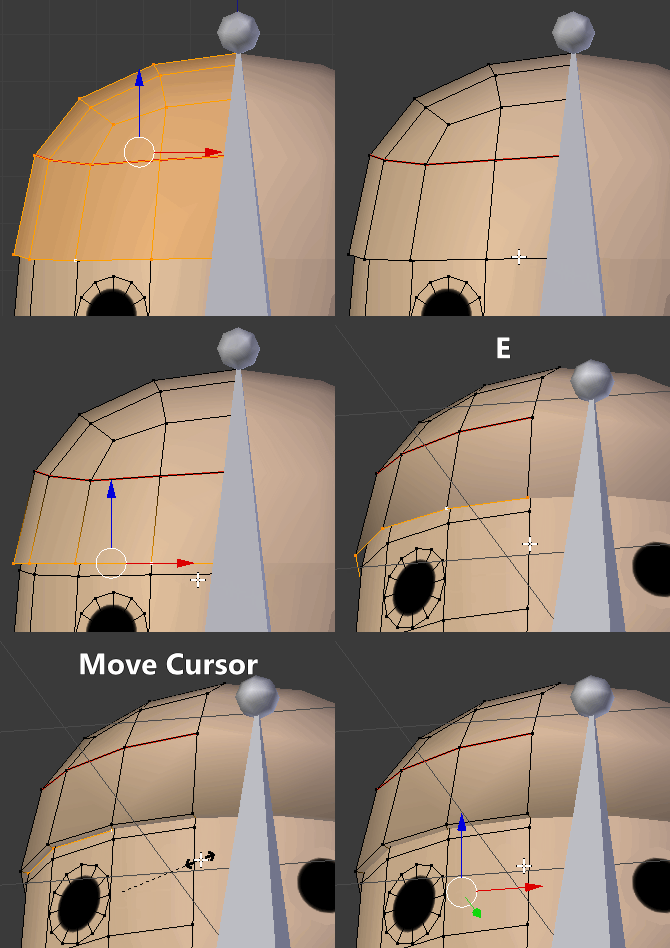
Так мы немного сместим шляпу с головы, чтобы избежать Z-конфликта граней.
Шляпа пока похожа на висящий в воздухе кусок тела, поэтому чтобы прикрепить её к телу, сделаем следующее:
Это придаст шляпе немного глубины, чтобы она хорошо выглядела со всех сторон и в ней не было дыр. Однако шляпа из человеческой кожи — это не совсем то, чего бы нам хотелось. Для изменения цвета нам нужно сначала развернуть её UV-координаты, чтобы они красиво лежали на текстуре.
Выберите всю шляпу, выбрав любую её вершину и нажав CTRL + L. В этот раз измените ограничитель на Normal, чтобы выбрать все соединённые вершины.
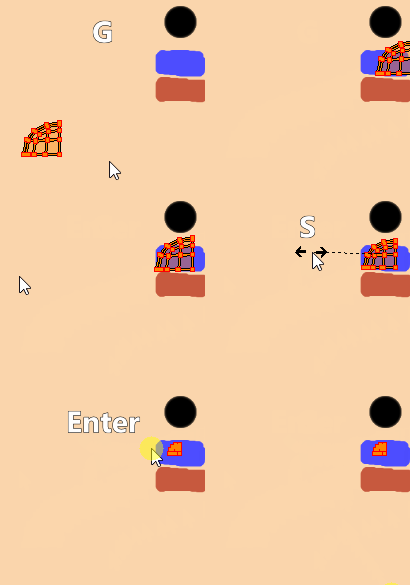
Для нашей шляпы мы выполним одну из простейших в мире развёрток: из вида. Нажмите numpad 1, чтобы перейти в вид спереди, затем нажмите U, чтобы открыть меню Unwrap и выберите Project From View.
Если вы посмотрите на правую сторону окна Blender, в которой показана текстура, то заметите, что туда добавилось несколько вершин, похожих на половину шляпы:
Можно выбрать все вершины, переместив курсор мыши на текстуру и нажав A. Действия в Blender чувствительны к контексту и зависят от расположения курсора, поэтому пусть он пока находится внутри этой области текстуры.
Теперь нажмите G, чтобы переместить UV на синее пятно, подтвердите перемещение нажатием Enter, а затем отмасштабируйте выбранное, чтобы оно уместилось в пределах синей области: нажмите S и подтвердите клавишей Enter.
Если теперь посмотреть на персонажа, то можно увидеть, что его шляпа стала синей.
Можно изменить изображение текстуры, чтобы сделать любой другой цвет.
Теперь снова переместите курсор влево, рядом с моделью и нажмите Tab, чтобы вернуться в режим Weight Paint. Немного поверните кость Head, чтобы проверить, прикреплена ли шляпа.
Похоже, нам повезло! Поскольку вершины шляпы близко к кости Head, они добавились автоматически. Если бы этого не случилось, то нам пришлось бы раскрашивать шляпу вручную, как мы это делали с глазами.
Теперь мы рассмотрим создание и прикрепление отдельного объекта.
Прикрепление объектов
Перейдите в режим Object mode и нажмите Shift + A, чтобы открыть меню Add. Выберите Mesh > Cylinder, чтобы добавить в сцену новый цилиндр.
Предлагаемый по умолчанию цилиндр слишком велик, поэтому настроим его параметры в нижнем левом углу: изменим Radius на 0.04, а Depth на 1.2.
Благодаря этому цилиндр станет тоньше и короче.
Сделаем цилиндр гладким, нажав на кнопку Smooth в разделе Shading панели Tool Shelf слева.
Пока нашему цилиндру не назначено никакого материала. Чтобы назначить материал, откройте вкладку Material в панели Properties справа и выберите CuteMaterial из раскрывающегося списка рядом с кнопкой New.
Чтобы превратить цилиндр в коричневый посох, нам для начала потребуется выполнить UV-развёртку. Нажмите Tab, чтобы перейти в режим Edit mode, нажмите U, чтобы открыть меню Unwrap, и выберите Project From View.
Переместите курсор мыши на текстуру справа, нажмите G, чтобы переместить UV на коричневый кусок текстуры. Подтвердите перемещение клавишей Enter и уменьшите масштаб нажав S и переместив мышь так, чтобы UV поместились внутри этого куска.
Теперь посох стал коричневым. Не волнуйтесь о неправильном расположении, скоро мы им займёмся.
Откройте вкладку Constraints панели Properties. Добавьте новое ограничение (constraint), нажав на раскрывающийся список Add Object Constraint и выбрав Child Of.
Constraints используются для ограничения позиции, поворота и масштаба объекта. В нашем случае я сделал цилиндр дочерним объектом кости руки персонажа. Благодаря этому при создании анимаций объект будет постоянно прикреплён к руке. Это очень упрощает предварительный просмотр анимации и позволяет ограничить пересечения объекта с телом.
Задать ограничение очень просто. Нажмите на раскрывающийся список Target и выберите Armature. Теперь нажмите на раскрывающийся список Vertex Group и выберите Hand.R.
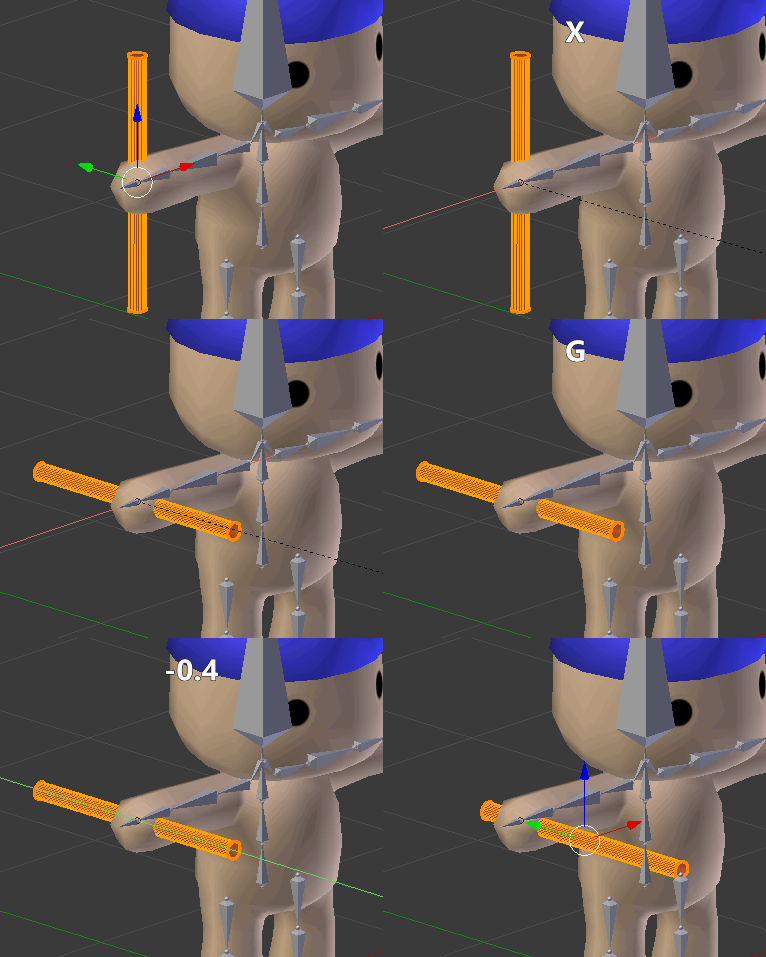
После этого вы заметите, что посох мгновенно прикрепился к правой руке персонажа. Однако его позиция и поворот не совсем верны. Поверните посох по оси Z на 90 градусов, нажав R, X, 90 и Enter. Теперь переместите его немного вперёд, нажав G, Y, -0.4 и Enter. Так намного лучше!
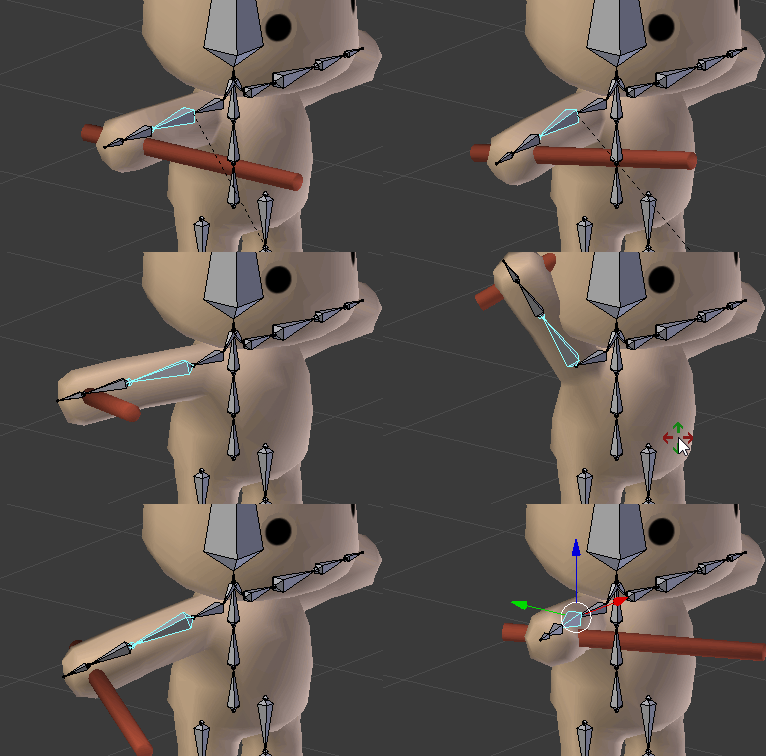
Пришла пора испытать посох. Вернитесь в режим Object mode, нажав Tab, выберите арматуру и переключитесь в режим Pose mode с помощью раскрывающегося списка в нижней части экрана. Поверните окно просмотра так, чтобы чётко видеть посох, выберите UpperArm.R и немного поверните её, нажав R и перемещая мышь. Посох будет следовать за рукой, как будто персонаж его держит.
Персонаж и его аксессуары готовы. Сохраните файл, наша работа здесь закончена.
Теперь мы займёмся экспортом модели и арматуры в Unity.
Экспорт в другие форматы
Примечание: если вам не интересно экспортировать модели в другие форматы, чтобы делиться ими с людьми, то можете пропустить этот раздел. Просто сохраните файл и закройте Blender.
Экспортировать в FBX из Blender очень просто. Для начала выберите в верхнем меню File > Export > FBX (.fbx).
Вы увидите режим экспорта. В отличие от большинства приложений, Blender не открывает отдельное окно, а вместо этого заменяет содержимое всего окна.
Можно выбрать место сохранения файла, выбрав папку слева или введя местоположение в поле сверху. Параметры экспорта указаны в нижнем левом углу окна:
Эти параметры экспорта по умолчанию подходят для Unity, но существует вероятность того, что в более сложных сценах они могут создать хаос, потому что экспортируют всё, даже источники освещения и камеры. Чтобы экспорт был чистым, внесите следующие изменения:
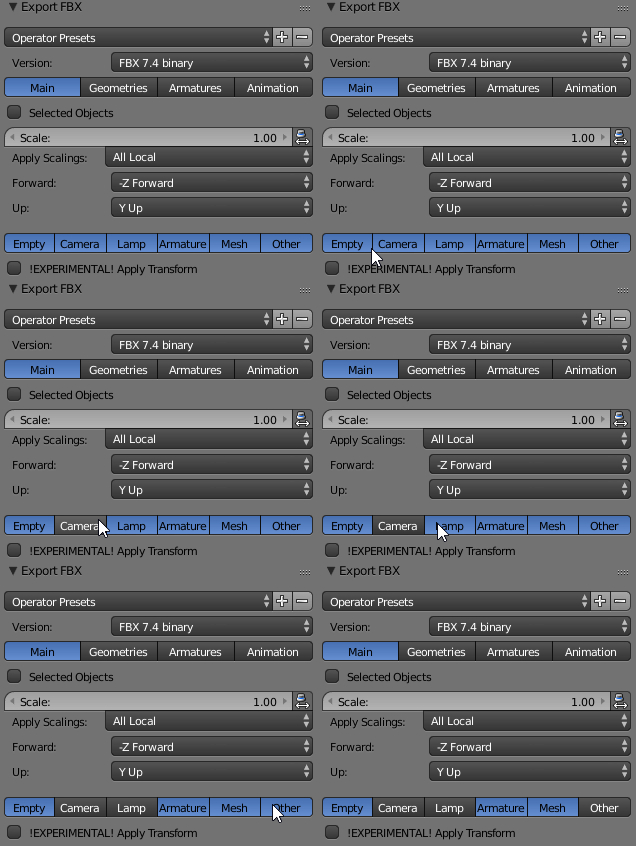
Снимите выделение с Camera, Lamp и Other. Это можно сделать, удерживая Shift и нажимая на опции, которые нужно отключить.
Если выбраны только такие опции, то никакие нежелательные объекты не экспортируются. Теперь поставьте флажок !EXPERIMENTAL! Apply Transform под этими опциями. Он применит позицию, поворот и масштаб всех объектов. Это означает, что неоднообразные значения будут сброшены; например, если поворот имел значения (X:23, Y:125, Z:7), то он будет сброшен на (X:0, Y:0, Z:0).
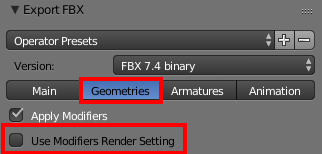
Переключитесь на вкладку Geometries, нажав на кнопку Geometries, и снимите флажок Use Modifiers Render Setting. Это позволит сохранить высокое количество полигонов внутри для рендеринга в Blender, но оставит его низким внутри Unity.
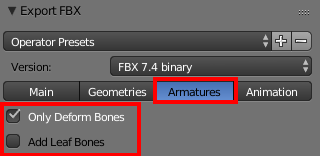
Далее откройте вкладку Armatures, поставьте флажок Only Deform Bones и снимите Add Leaf Bones. Это не позволит приложению Blender добавлять к арматуре лишние кости. Leaf bones необходимы только для совместимости с Maya. Non-deform bones, например, контролирующие кости, необходимы только в ПО моделирования для выполнения точной настройки; в таких игровых движках, как Unity, они бесполезны.
Опции Animation по умолчанию настроены правильно, так что менять их не нужно.
Настроив всё это, было бы слишком скучно каждый раз заниматься этим каждый раз при экспорте файла. И тут нам помогут пресеты. Мы можем сохранить все эти параметры во внутренние опции Blender для использования в будущем.
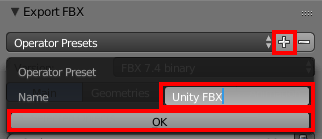
Для этого нажмите на кнопку + рядом с раскрывающимся списком Operator Presets, введите в текстовое поле название пресета и нажмите на кнопку OK. В этом туториале мы назовём его Unity FBX.
Если открыть теперь раскрывающийся список Operator Presets, то можно выбрать только что созданный пресет:
После этого параметры мгновенно будут применены. Пресеты работают для всех файлов, поэтому теперь вы можете запросто экспортировать любой файл Blender в FBX для использования в Unity.
Сохраните файл и закройте Blender. Наконец настало время перейти в Unity и воспользоваться нашей моделью.
Настройка гуманоида
Откройте заготовку проекта в Unity и посмотрите на окно Project.
Вот краткое описание папок:
Разобравшись с этим, давайте приступим к использованию персонажа!
Привязка аватара
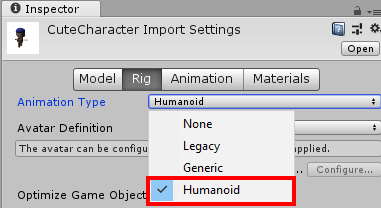
Для начала выберите модель CuteCharacter из папки Models и откройте в Inspector вкладку Rig. Откройте раскрывающееся меню Animation Type и выберите Humanoid.
Так мы сообщим, что персонаж является гуманоидом, чтобы Unity могла использовать его соответствующим образом. Теперь нажмите Apply, чтобы сохранить эти параметры.
После краткого повторного импорта вы заметите, что появилась кнопка Configure…. Нажмите на неё, чтобы приступить к связыванию костей с системой Mecanim движка Unity’.
Посмотрите на окно Scene и поверните окно так, чтобы персонаж смотрел на вас. Заметьте зелёные кости; их использует движок Unity. При нажатии на любую из них будет выбрана соответствующая кость и в Hierarchy, и в Inspector.
Использование движком Unity костей напоминает работу кукловода. Вместо непосредственного использования файлов анимации для обновления костей в каждом кадре он считывает значения и применяет их к каждому гуманоиду на основании его определения Avatar. Это обеспечивает гибкость при работе с разными формами тел. Возьмём для примера персонажа, с которым мы работали — его пропорции нереалистичны, но это не имеет значения, ведь его скелет имеет необходимые кости: позвоночник, руки, ноги и т.д. Некоторые из костей могут быть короче, чем у большинства людей, но они всё-таки присутствуют.
Теперь посмотрим на Inspector: вы видите фигуру человека с разбросанными по ней зелёными и серыми кругами. Все сплошные круги необходимы для работы системы Avatar. Если какие-то из них отсутствуют, то они становятся красными, и вы не сможете правильно анимировать персонажа.
Пунктирные круги — это дополнительные кости для более сложных ригов. Все серые части отсутствуют, но необязательны. Например, у нашего персонажа нет пальцев.
Ниже представлено полное описание костей, и именно здесь нужно связывать части тела с костями. Если какой-то из кругов красный, то нужно назначить (или переназначить) кость. Созданный нами скелет полностью отвечал требованиям уже при импорте в Unity, поэтому никаких настроек не требуется. Ура!
Нажмите на кнопку Apply в нижнем правом углу и щёлкните кнопку Muscles & Settings в верхней части Inspector. Это позволит просматривать и настраивать виртуальные мышцы.
Вы увидите три раздела:
Раздел Per-Muscle Settings содержит подразделы, которые можно разворачивать нажатием на стрелки. В каждом из них есть отдельные превью. Эти подразделы позволяют указать минимальные и максимальные углы, чтобы избежать наложений в вашей модели.
Разверните раздел Left Arm и попробуйте перетаскивать ползунок Arm Down-Up. Заметьте, что происходит при минимальном значении:
Примечание: если персонаж слишком тёмный, чтобы создавать силуэт, то можно отключить в окне Scene освещение сцены, нажав на небольшой значок солнца в верхней части.
Рука движется через тело персонажа. Плохо!
Чтобы исправить это, переместите ползунок превью в наименьшее значение и измените minimum angle раздела Arm Down-Up на -20.
Сделайте то же самое для Right Arm > Arm Down-Up.
На этом мы закончим настройку мышц. Можно настроить и другие мышцы, чтобы предотвратить наложение, но в этом туториале мы остановимся на перемещении рук вверх-вниз.
Нажмите кнопку Apply в нижнем правом углу для сохранения изображений в Avatar и нажмите Done, чтобы закрыть режим привязки.
Теперь настало время добавить персонаж в сцену и дать ему воспроизводимую анимацию.
Использование персонажа
Чтобы добавить персонажа, перетащите модель CuteCharacter из папки Models в Hierarchy.
Задайте для CuteCharacter поворот (X:0, Y:180, Z:0), чтобы он смотрел в камеру.
Создайте новый контроллер анимаций, нажав правой клавишей на папке RW\Animation Controllers и выбрав Create > Animation Controller.
Назовите его CharacterController и дважды нажмите на него, чтобы открыть окно Animator. Теперь перетащите анимацию Idle из папки RW\Animations на сетку Animator, чтобы сделать её анимацией по умолчанию.
Далее выберите CuteCharacter в Hierarchy и нажмите на кнопку-селектор рядом с полем Controller. Выберите в окне выбора CharacterController.
Вот и всё! Нажмите на кнопку Play, чтобы увидеть персонажа в действии.
Теперь снова нажмите на кнопку Play, чтобы остановить сцену, и нажмите CTRL + S, чтобы сохранить изменения.
Куда двигаться дальше?
Поздравляю, вы выполнили туториал. Готовый проект можно скачать отсюда.
В этом туториале вы научились следующему:
Чтобы узнать больше о Blender, изучите следующие туториалы:
Creating Reusable Characters With Blender and Unity
Characters in video games are often as memorable as the accompanying gameplay and music. In this tutorial, you’ll learn how to prepare a humanoid model using Blender and how to bring it into Unity.
Version
Artists create 3D characters for your favorite games with the use of models, textures and animations.
In the past, characters needed to have the exact same skeleton to share animations. This limited character diversity as their height and proportions had to be the same as well. As an amusing example, the older FIFA games had players all be the same size because creating a separate skeleton — and a set of animations — would have been a nightmare.
Nowadays, most game engines come with a system to allow reusing animations as long as the skeletal hierarchy is compatible. This allows you to use the same animations for characters of all shapes and sizes. In Unity, this system is called Mecanim. It allows for easy set up of animations, the blending between them and retargeting of humanoid animations between models.
Being able to reuse animations allows you to use animations from the asset store and websites like mixamo.com for your own custom characters. This saves a ton of time!
In this tutorial, you’ll learn how to prepare a humanoid model using Blender and how to bring it into Unity. More specifically, you’ll learn how to:
Time to jump right in!
Getting Started
Before you begin, verify you meet the following requirements:
Download the source materials by clicking the link at the top or bottom of this tutorial and unzip it somewhere.
Open the Starter folder and navigate to the Assets\RW\Models folder. Now open CuteCharacter.blend in Blender.
The file contains the following:
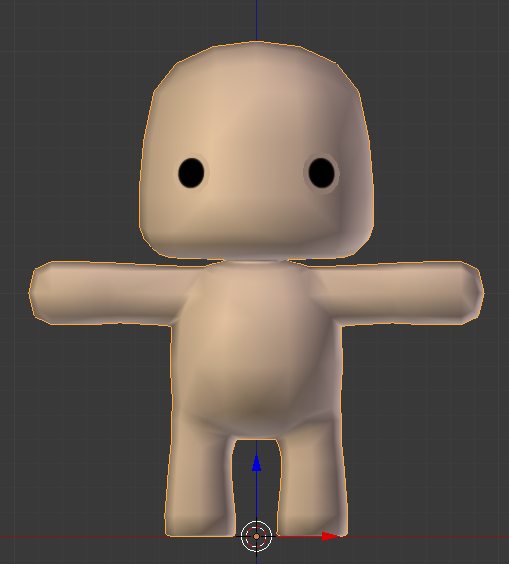
After opening the file, you should see the character model on the left:
Note that it’s mirrored on the X-axis, meaning its left and right side are identical. This will make the whole process a lot easier along the way.
The right side of Blender has a simple texture image loaded:
Time to get to work! The first step to animating this character is rigging it.
Rigging the Character
Rigging is the art of creating an armature, the skeleton of the model. An armature has bones to which you can connect vertices, so they move along whenever a bone gets moved around.
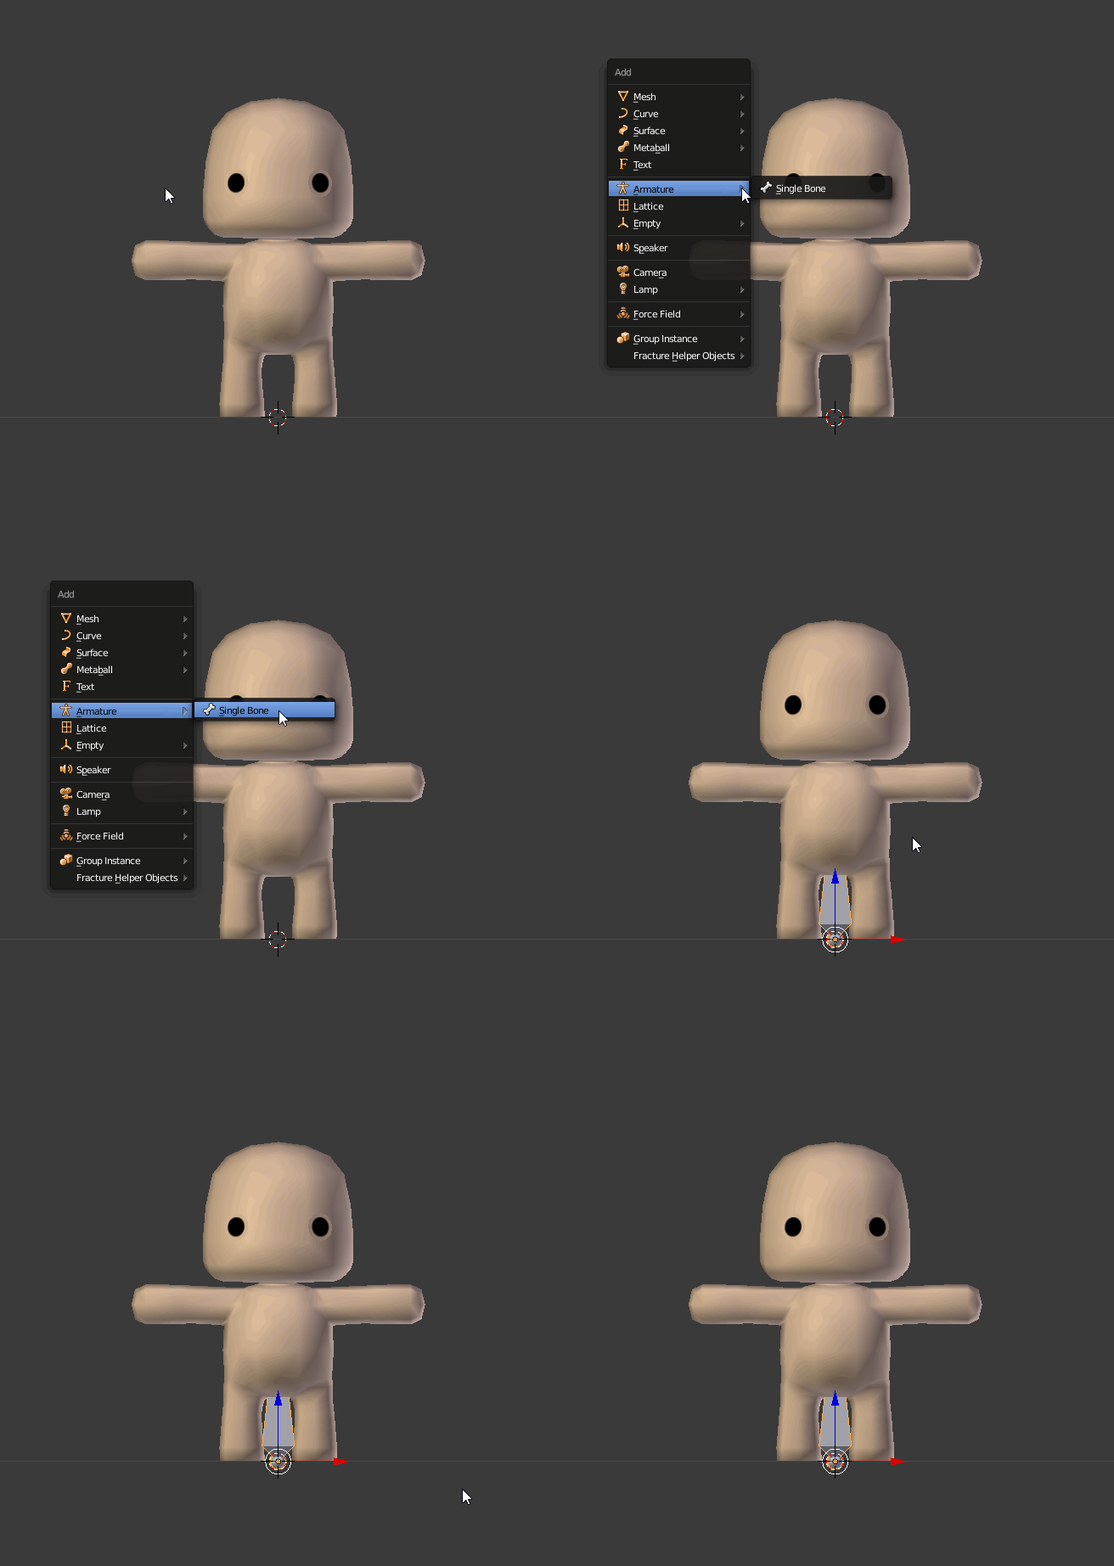
Hover over the 3D View to bring it into focus. Now add a new armature by holding Shift and pressing A to open the Add Menu. Next, select Armature to add the first bone.
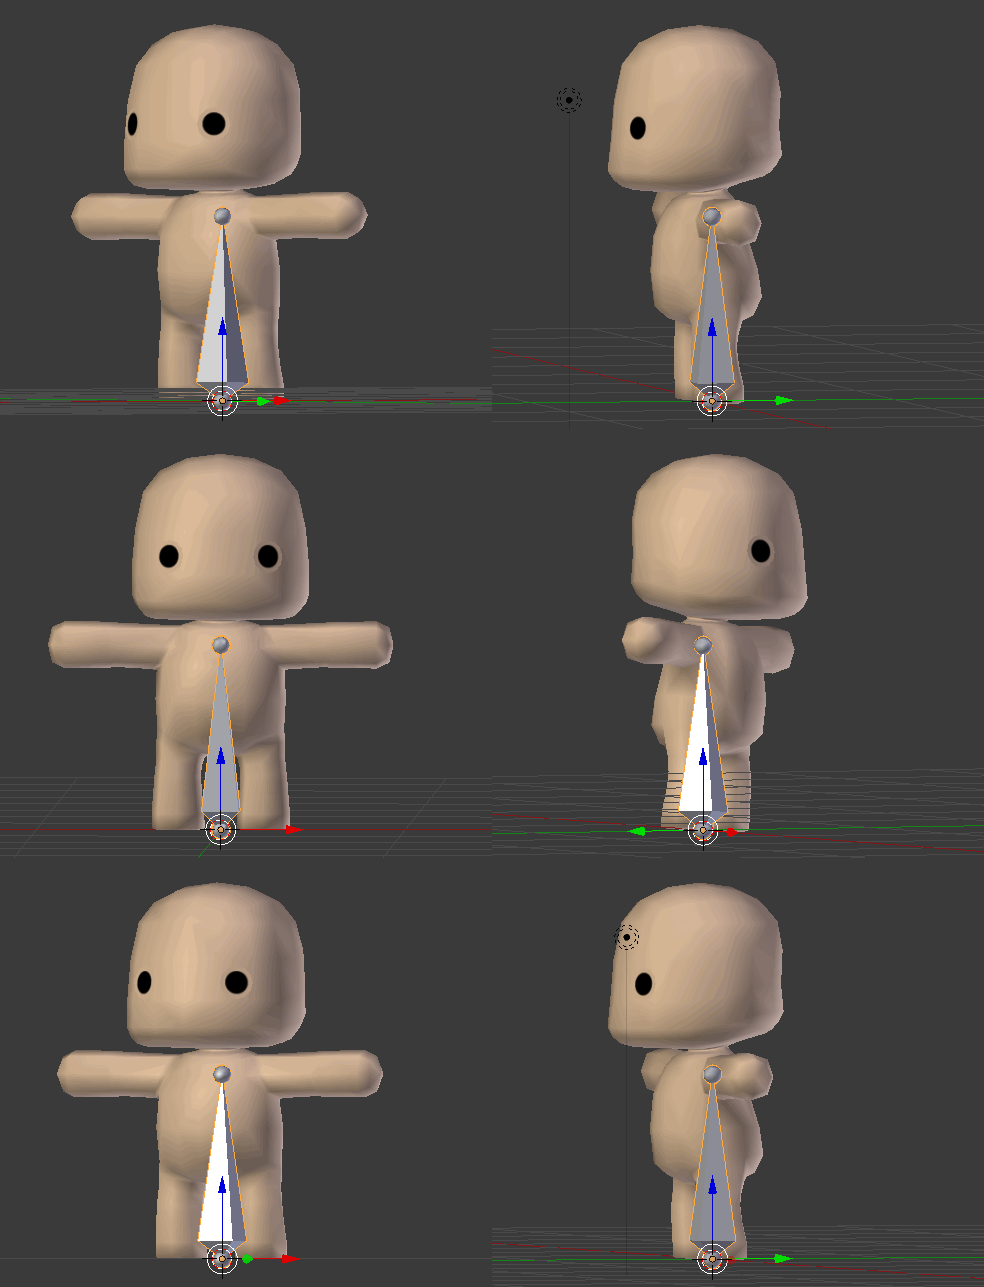
You’ve now created the armature and its first bone, also known as the “root bone”. With the armature still selected, find the In Front check box in the Viewport Display section of the Object Properties tab and check it.
The armature is now visible through the character making the skeleton creation process a lot easier.
Before diving in and creating the full skeletal structure, it’s important to understand how it needs to be set up to be compatible with Unity’s Humanoid Avatar.
Due to the way Unity maps the bones to its own system, some key bones are necessary.
Unity expects at least 15 bones, which are:
The rig you’ll be creating includes all of the above bones and some extra ones for added stability when animating.
Make sure the armature is still selected and press Tab to enter Edit mode. Next, select the root bone by clicking it.
Now open the Bone Properties tab on the right in the Properties editor and rename the root bone to Hips by entering it in the name field and pressing Enter.
Spine
With the first bone made, you can now transform it into a spine for the character.
Select the bottom, sphere shaped connector of the Hips bone. Next, press G, Z, 0.5 and Enter in sequence to move it up around where you’d expect the center of the hips to be.
Now, select the top connector and press G, Z, 0.1 and Enter to move it up a bit.
To get more spine bones, you’ll need to subdivide the Hips bone in three pieces. Select the Hips bone, right-click to open the context menu and select Subdivide. By default, this makes a single cut, splitting the bone into two pieces. To increase the number of cuts, open the Subdivide menu at the bottom left of the 3D view and set Number of Cuts to 2.
With the spine split, the new bones are named Hips.001 and Hips.002. That’s not a good way of naming bones; rename the bones by selecting each one and changing the name in the Bone Properties tab of the Properties editor on the right like you did with the Hips bone.
Name the top one Chest and the middle one LowerSpine.
Next up are the leg bones. Duplicate the Hips bone by selecting it and then pressing Shift + D. Next, move it a tad to the right and right-click at the end to reset the position of the new bone.
If you look at the Bone Properties tab on the right, you’ll see a bone named Hips.001 selected.
Rename this bone to UpperLeg.L. The L stands for left, this makes it clear what side the bone is on and will help with mirroring later on.
This bone needs to point down and be placed right above the knee. To start off, rotate the UpperLeg.L bone 180 degrees on the Y axis by pressing R, Y, 180 and Enter in succession.
Now move it in place horizontally by pressing G, X, .23 and Enter in that order. After that, press G, Z, -.2 and Enter to get it in position vertically.
Select the bottom connector and move it down by pressing G, Z, -.3 and Enter in that order.
You now have one large bone for a leg. If this character had wooden peg legs, this would’ve been perfect already! Most people have knees so they can bend their legs though, so you’ll need to make it bendable.
To do that, select the UpperLeg.L bone, right-click and select Subdivide to split the leg in two (ouch!). This results in two leg bones with a connector in the middle that will act a knee. Go ahead and the new bottom bone LowerLeg.L.
The last part of the legs are the feet. Switch to a side view by pressing 3 on your numpad and press period (.) on your numpad to focus on the lower leg.
Now select the bottom connector and extend it to make a foot bone by pressing E, Y, -.18 and Enter.
Next, rename the newly created bone to Foot.L using the Bone Properties tab.
Now might be a good time to save the file. Press CTRL + S and you’ll notice a small notice appearing at the bottom of the window. Feel free to do this periodically, better safe than sorry!
Switch back to the front view by pressing 1 on your numpad. Before moving on to the head, you’ll need to parent the leg to the hips. Luckily this is pretty simple!
Select UpperLeg.L and expand the Relations section of the Bone Properties tab. Click on the Parent drop-down and select Hips.
Torso
On to the head! Select the connector at the top of the Chest bone, press E, Z, .055 and Enter consecutively. This is the neck bone so name it Neck in the Bone Properties tab.
To add the head bone, keep the top connector selected and press E, Z, .95 and Enter in that order.
Name the newly created bone Head.
Next is the left shoulder connector. Select the top connector of the Chest bone and press E, X, .08 and Enter to add the new bone. Move it down a bit by selecting the rightmost connector and pressing G, Z, -.09 and Enter.
Name this bone ShoulderConnector.L. This bone will connect the chest to the shoulder. None of this is anatomically correct in any way, and it doesn’t need to be. :]
Next up is the arm itself! Select the rightmost connector of ShoulderConnector.L and press E, X, .85 and Enter in that order. This creates one large bone that needs to be split up to create the remaining bones for the left side.
Select the newly made arm bone, right-click and choose Subdivide in the context menu. Change the number of cuts in the bottom left to 3, so you get four pieces in total.
Name these bones as follows, from left to right:
The way these bones are laid out might look good at first glance, but because the way the connector between the arm pieces sits (also known as an elbow), the arm won’t be able to bend correctly. Hold Z to open the shading menu and drag your cursor to the left to enter the wireframe view.
Now take a look at the bend in the arm:
The red line indicates where the elbow is now and the white line indicates the arm’s bending point on the mesh. To fix this, select LowerArm.L and move it to the right by typing G, X, .09 and Enter.
Now switch back to Solid rendering by holding Z and moving your cursor to the right.
That’s it as far as adding bones goes. How about the right side though? Well, I don’t know about you, but I’ll take any shortcut I can get to get the work done! That’s why the next step is mirroring the bones on the left to the right with a few keystrokes.
Mirroring
Blender has a nifty feature to quickly mirror the bones of an armature in just a few simple steps! To start off, deselect all bones by holding Alt/Option and pressing A. Next, select the bones on the character’s left side (the right side when seen from the front) by holding Shift and clicking the bones one-by-one. Don’t forget about the foot!
With those bones selected, right-click and select Symmetrize in the context menu. This is all you need to do to get a perfect mirrored version of the selected bones:
The bones will also all have .R automatically at the end of their name instead of .L to signify what side of the body they’re used for.
Now save the file and prepare to move on to rigging.
Weight Painting
Weight painting is the process of binding bones to a 3D mesh. Each bone gets attached to a group of vertices with a certain amount of weight.
The weight decides how “hard” the vertices will be pulled and pushed by the bone.
Doing this manually would take a while since you’d have to paint the weight of every single bone. Luckily, Blender can take care of most of the grunt work by automatically weight painting based on how close the bones are to the vertices. This works by parenting the model to its armature and letting Blender automatically assign weights.
Press Tab to switch to Object mode. Click on the character model to select it, then hold Shift and click the armature to select that as well. The order you do this in is important, as the last selected object will be the parent. Now press CTRL + P to open the Parent menu and choose With Automatic Weights to parent the model to the armature and perform automatic weight painting.
On to the cool part! Select the armature, then change to Pose mode with the drop-down at the top left. Now select a bone and rotate it around by pressing R and moving your cursor around. Do this with each bone on the center and the model’s left side to check if everything the bones were weighted correctly.
After checking all of the bones, you may have noticed the eyes don’t move with the head, which looks a bit weird, to say the least!
To attach the eyes to the head, you’ll need to do some actual weight painting. Keep the armature in Pose mode, then hold Shift and click the model to add it to the selection. Now enter Weight Paint mode and prepare to do some painting.
This mode shows both the bones and the weight attached to them on parts of the model.
Start off by deselecting all bones by pressing ALT/Option + A. Next, hold Shift and click on the Head bone to select it. The weight colors go from dark blue, to green and finally red. As you can see, the eyes are dark blue, which means they aren’t attached to the head bone at all! To attach those eyes to the head bone you’ll need to increase their weight.
For easier access to the eyes and to strengthen the effect of adding weight, rotate the head bone backward by pressing R, X, -90 and Enter in that order. It looks grizzly, but don’t worry, he won’t feel a thing!
To attach the eyes to the Head bone, it needs some weight added to it. To start off, select the Add brush in the Brush section of the tool panel at the top left. By default, this is set to Subtract.
Now paint on the eyes to increase the weight until the eyes aren’t floating anymore.
To check out the result, reset the view by pressing numpad 1 and press Alt (or Option) + R to reset the rotation of the Head bone. The eyes are now correctly connected to the head.
With the basic weight painting done, it’s time to add some details.
Adding Accessories
Accessories in this context are objects that are attached to the character but aren’t a part of its body. This section discusses two ways of attaching objects: to the model itself and as a separate, reusable object that connects to a bone.
The former is a simple hat, and the latter is a weapon for the character to hold.
Before continuing, press A two times followed by Alt (or Option) + R to reset the rotation of all bones.
Editing the Character
The first way of adding more details to your character is easier to work with, but it comes with some limitations. As you’ll be working on the model itself — which is mirrored — all geometry added will be copied from the left side to the right and vice-versa. This makes it impossible to add anything unique to one side. Because the geometry is a part of a particular model, it also can’t be reused for other characters. It’s perfect for any situation where those limitations aren’t a problem.
If you’ve followed along with the tutorial until now, you’ll probably still be in Weight Paint mode. Press Tab to enter Edit mode and start off by switching the selection mode to Vertex by pressing 1 on your number row or by clicking the first button right of the mode dropdown.
Now select any vertex above the red line (which is an UV seam used for texturing) on top of the head by clicking on it. Next, press CTRL + L to select all connected vertices, this selects the whole model. Now select the UV delimiter by selecting UVs in the bottom left panel. The top of the head will be selected now.
Select the edge loop underneath as well by holding Shift and Alt (or Option) and then clicking on any of the first horizontal edges below.
Now duplicate the selected faces by pressing Shift + D and then clicking. Move the duplicated faces up a bit by pressing G, Z and 0.01 followed by Enter to confirm.
Next, scale the whole selection up by pressing S, 1.05 and Enter. This moves the hat away from the head a bit, so you don’t end up with some of the faces Z-fighting.
The hat is still floating around, so do the following to attach it to the model:
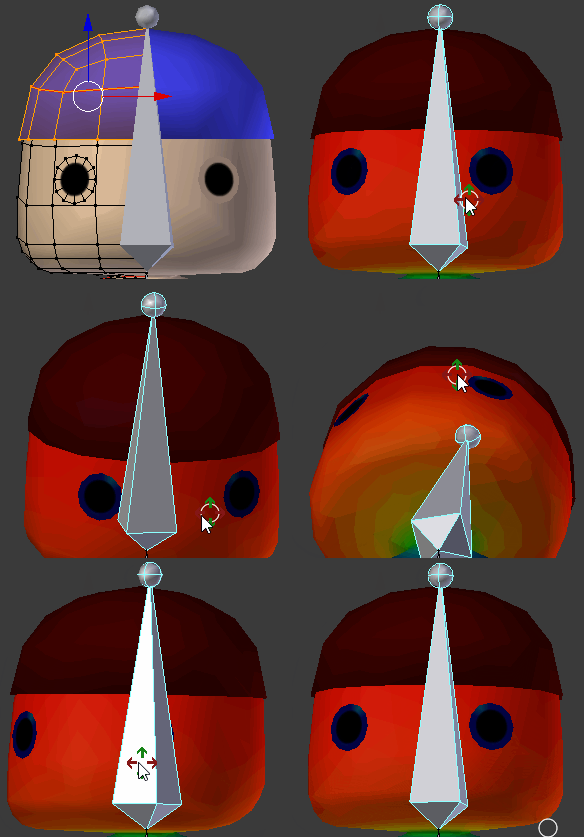
This gave the hat some depth so it can look all right from all sides without any holes. A hat made from human skin probably isn’t what you had in mind though! To change the color, you’ll have to unwrap its UVs first so it can fit nicely on the texture.
Select the entire hat by selecting any vertex on the hat and then pressing CTRL + L. Change the delimiter to Normal this time to select all the connected vertices. For this hat, you’ll perform one of the easiest unwraps in existence: from the current view. Press numpad 1 to get a front view, then press U to open the Unwrap menu and select Project From View.
If you look at the right side of the Blender window where the texture is visible, you’ll notice some vertices were added that look similar to half of the hat:
You can select all of these by moving your cursor over to the texture and pressing A. Actions in Blender are context sensitive depending on where your cursor is placed, so make sure to keep it somewhere inside the region of the texture for now.
Now press G to move the UVs over to the blue splotch, confirm the movement by clicking and then scale the selection down until it fits inside the blue region by pressing S and confirming by clicking again.
If you now look at the character again, you’ll notice his hat turned blue!
Now, position the cursor back somewhere near the model on the left and press Tab to return to Weight Paint mode. Rotate the Head bone around a bit to check if the hat is connected.
It looks like you’re in luck! Because the vertices of the hat are all so near to the Head bone, they’re included automatically. If this wouldn’t be the case, you’d have to paint the hat like you did with the eyes.
Next up is creating and attaching a separate object.
Attaching Objects
For this part, you’ll be creating a simple staff that will act as a weapon for the character to hold. It’s easy to imagine a sword, an axe or even a magic wand instead, but creating a complex weapon is outside the scope of this tutorial.
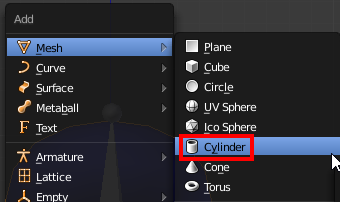
Get into Object mode and press Shift + A to open the Add menu. Select Mesh > Cylinder to add a new cylinder to the scene.
The default cylinder is too big, so adjust the cylinder parameters in the bottom left: change Radius to 0.04 and set the Depth to 1.2.
This makes the cylinder thinner and shorter. Now make the cylinder smooth by right-clicking to open the context menu and selecting Shade Smooth.
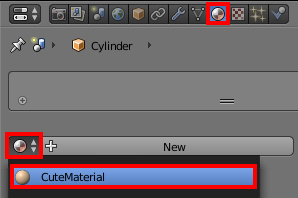
The cylinder doesn’t have any material assigned yet, so it looks grey and bland. To assign a material, open the Material tab in the Properties editor on the right and select CuteMaterial from the drop-down next to the New button.
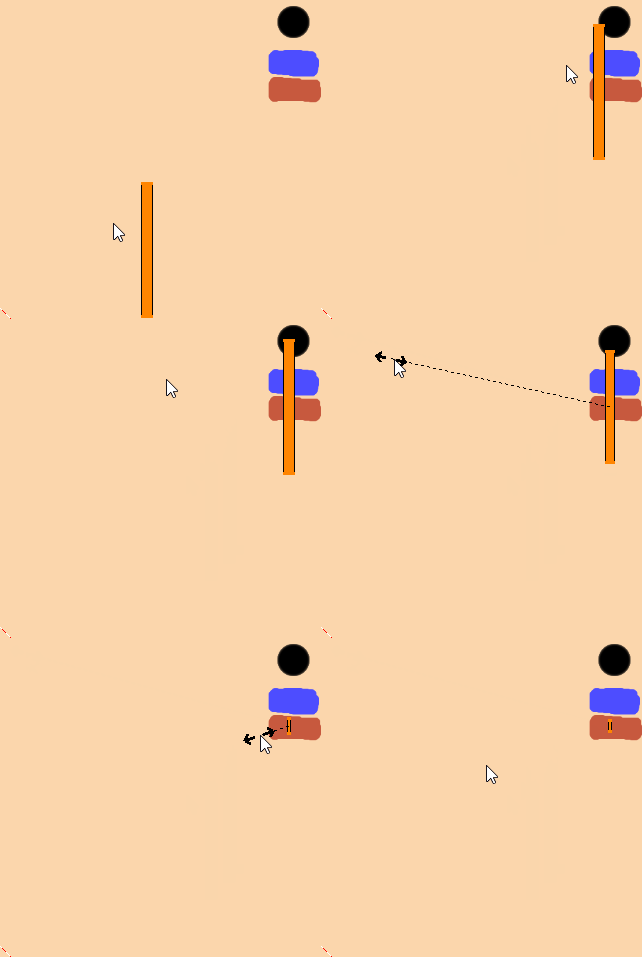
To turn the cylinder into a brown staff, you’ll need to unwrap its UVs first. Press Tab to enter Edit mode, press U to open the Unwrap menu and select Project From View.
Move your cursor over the texture on the right, press G to start moving the UVs and move it over the brown patch on the texture. Confirm the movement with Enter and scale it down by pressing S and moving your mouse, so the UVs fit inside.
The staff is now brown colored. Don’t worry about the awkward positioning; you’ll be dealing with that next.
Open the Object Constraint Properties tab in the properties editor. Add a new constraint by clicking the Add Object Constraint drop-down and selecting Child Of.
Constraints limit the position, rotation and/or scale of an object. In this case, it’ll be used to parent the cylinder to the hand bone of the character. This way — if you create any animations — the object will be attached to the hand at all times. This makes previewing the animation a lot easier and allows you to prevent the object from intersecting with the body.
Setting up the Child Of constraint is straightforward. Click the Target drop-down and select Armature. Now click the Bone drop-down and select Hand.R. You can type the name of the bone in this fields to make selecting it easier.
After doing this, you’ll notice the staff snaps to the character’s right hand. The position isn’t quite right though, so move it forward a bit by pressing G, Y, -0.4 and Enter. Much better!
Time to put the staff to the test. Select the armature and switch to Pose mode. Now rotate the view so you can see the staff clearly, select UpperArm.R and rotate it around a bit by pressing R and moving your mouse around. The staff will keep following the hand around as if the character held it.
The character and its accessories are now done. Save the file and pat yourself on the back for a job well done!
Next up is exporting the model and the armature to Unity.
Exporting to Other Formats
Exporting to FBX with Blender is easy. To start, select File > Export > FBX (.fbx) in the top menu.
You’ll now see a Blender File View window. You can choose a location to save the file by choosing a folder on the left or by typing in the location directly at the top. The export settings are at the right side of the window:
These default export settings will work with Unity, but there’s a chance they might make a mess in more complex scenes as it will export everything, even lamps and cameras. To make a clean export, make the following changes:
In the Include section, deselect Camera, Lamp and Other. You can do this by holding down Shift and clicking the options you want to disable.
With these options selected, you won’t get any undesired objects exported. Now check the Apply Transform checkbox at the bottom of the Transform section. This applies the position, rotation and scale of all objects. That means any non-uniform values will be reset; if the rotation was set to (X:23, Y:125, Z:7), for example, it will be set to (X:0, Y:0, Z:0).
Next, open the Armatures section, check Only Deform Bones and uncheck Add Leaf Bones. This prevents Blender from adding extra bones to the armature. Leaf bones are only needed for compatibility with Maya. Non-deform bones like control bones are only needed in the modeling software to make precise adjustments; they’re useless in a game engine like Unity.
The default Animation options are fine, so you don’t need to tinker with those.
Now that you have all of this set up, it would be tedious if you needed to do this every single time you want to export a file. That’s where the presets come in. You can save all of these settings in Blender’s internal options for later use.
To do this, click the + button next to the Operator Presets drop-down at the top, type a name for the preset in the textbox and click the OK button. For the sake of this tutorial feel free to name it Unity FBX.
If you now open the Operator Presets drop-down, you can select the newly made preset:
Save the file and close Blender. It’s finally time to jump into Unity and use the model!
Setting Up a Humanoid
Open the starter project in Unity and look at the Assets folder in the Project view.
Here’s a quick overview of what these are for:
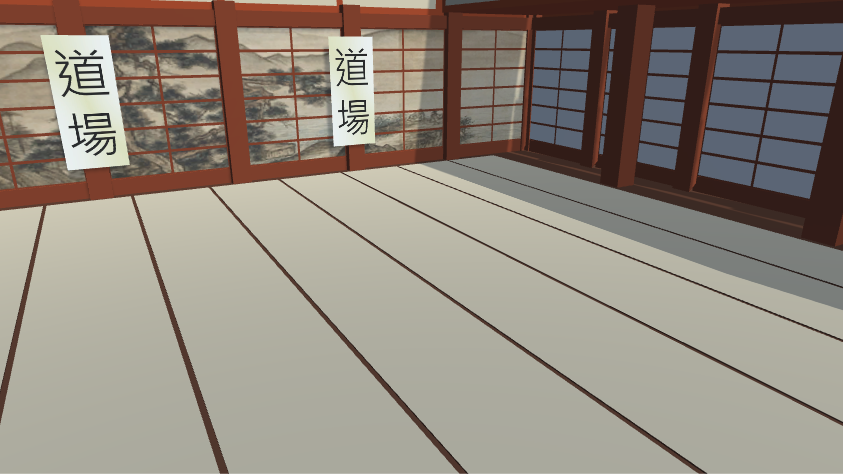
If it’s not already open, open the Dojo scene from the Scenes folder.
With the overview out of the way, on to using the character!
Avatar Mapping
To start, select the CuteCharacter model in the Models folder and open the Rig tab in the Inspector. Open the Animation Type drop-down and select Humanoid.
This flags this character as a humanoid one, so Unity can use it as such. Now click Apply to save these settings.
After a short re-import, you’ll notice the Configure… button is now enabled. Click this button to start linking the bones to Unity’s Mecanim system.
Look at the Scene view and rotate the view around until the character faces you. Notice the green bones; these are the ones Unity uses internally. Clicking any of these will select the corresponding bone in both the Hierarchy and in the Inspector.
The way Unity uses these bones is by acting like a puppeteer. Instead of straight up using animation files to update the bones every frame, it reads the values and applies those to every humanoid based on their Avatar definition. This allows for flexibility when it comes to body shapes. Take the character you’ve been working on, for instance; its proportions are not realistic, but that doesn’t matter as its skeleton is also adjusted to fit while still having the essential bones like a spine, arms, legs, etc. Some of the bones may be shorter than in most humans, but they’re there.
Now focus on the Inspector, you’ll see a human shape with green and gray circles spread around. All solid circles are necessary for the Avatar system to work. If any of these are missing, they’ll turn red, and you won’t be able to animate the character correctly.
The dotted ones are optional bones for more complex rigs. Any body parts that are grayed out are missing, but not essential. This character doesn’t have any fingers for example.
Below that is the full overview of the bones, and this is where you need to link body parts to bones. If any of the circles are red, you’ll need to (re)assign a bone. The skeleton you’ve made is entirely up to spec when it comes to Unity, so no adjustments are necessary. Hurray!
Switch to the Muscles & Settings tab at the top of the Inspector. This allows you to view and tweak the virtual muscles.
You’ll now see three sections:
The first one has several sliders you can move from left to right to test if the muscles are mapped correctly. Try them out and see what they do. Note that the finger ones won’t have any effect since the character doesn’t have any fingers. Press the Reset All button after every test to reset all preview sliders.
The Per-Muscle Settings section contains sub-sections that can be unfolded by clicking the arrow next to them. Every one of these has some more specific previews and allows you to specify the minimum and maximum angles to prevent overlapping for your specific model.
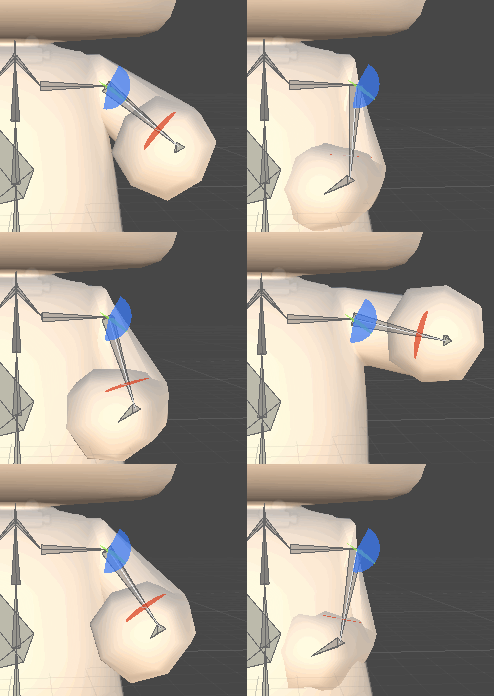
Expand the Left Arm section and try sliding around the Arm Down-Up slider. Notice what happens with the minimum value selected:
The arm is moving through the character’s body. Ouch! To fix this, set the preview slider to its lowest value and change the minimum angle of Arm Down-Up to -20.
Do the same for Right Arm > Arm Down-Up.
That concludes the tweaking of the muscles. There are more muscles you can tweak to prevent overlapping, but for the sake of this tutorial you can leave them at their default settings.
Press the Apply button at the bottom-right to save the changes to the Avatar and press Done to close the mapping mode.
Now it’s time to add the character to the scene and give it an animation to play.
Using the Character
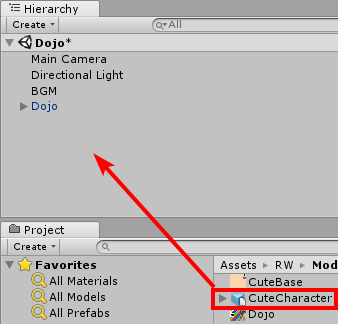
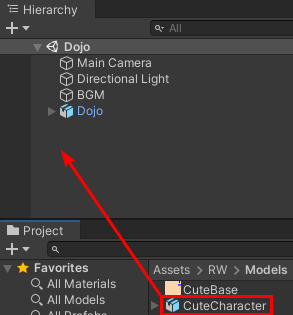
To add the character, drag the CuteCharacter model from the Models folder into the Hierarchy.
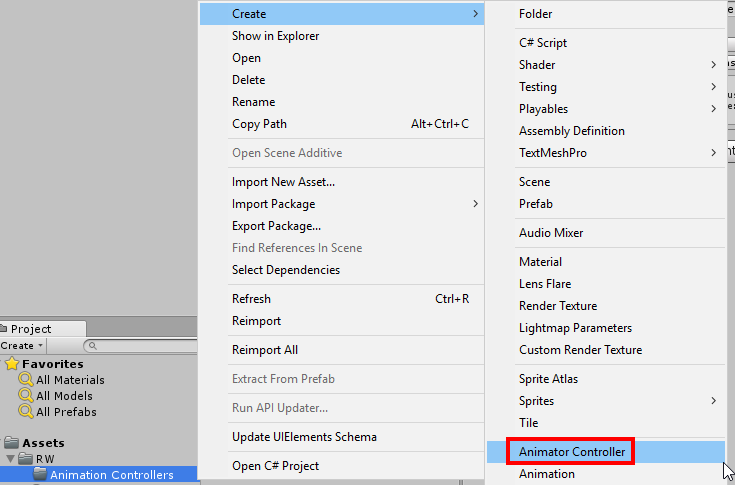
Now set the rotation of CuteCharacter to (X:0, Y:180, Z:0), so it’s facing towards the camera. Next, create a new animation controller by right-clicking the RW\Animations folder and selecting Create > Animation Controller.
Name it CharacterController and double-click it to open the Animator window. Now drag the Idle animation from the RW\Animations folder onto the Animator grid to make it the default animation.
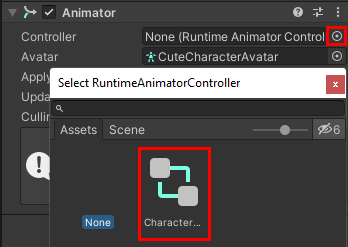
Next, select CuteCharacter in the Hierarchy and click the selector button next to the Controller field. Select CharacterController in the selection window.
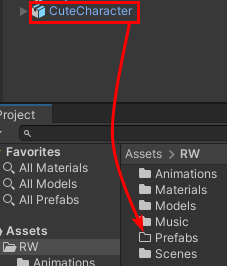
As a final step, you’ll need to attach the weapon the character’s right hand. To do this, start off by make the character into a prefab by creating a new Prefabs folder in the Assets/RW folder and dragging CuteCharacter to it.
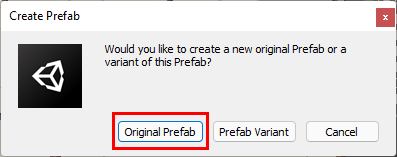
A popup will appear asking you what type of prefab you want to create, select Original Prefab here.
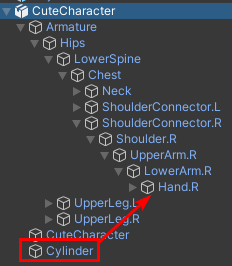
Now double click the CuteCharacter prefab you just created to open it in Prefab Mode. Expand CuteCharacter in the Hierarchy and drag Cylinder to Hand_R to parent it. This is the limitation of adding a separate object as I discussed earlier. Not doing this will result in the weapon just floating around the character.
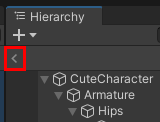
Now exit Prefab Mode by clicking the arrow button below the + button at the top left of the Hierarchy.
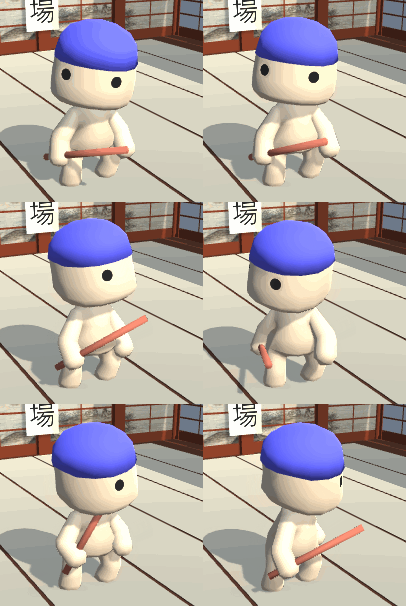
That’s it! Press the play button to see the character in motion.
Now press the play button again to stop the scene and press CTRL + S to save the changes you’ve made.
Where to Go From Here?
Congratulations on finishing this tutorial. You can download the final project using the link at the top or bottom of this tutorial.
In this tutorial, you learned how to:
To use the knowledge you’ve gained, you can create some accessories yourself and give them a different color or pattern. If you know some modeling, you can also create a character from scratch and rig it.
To learn more about Blender, check out these tutorials:
To learn more about Mecanim and the Avatar system, read this blog post by Unity.
Thanks so much for reading this tutorial to the end. If you have any questions or comments, feel free to join the discussion below.
How To Make A Simple Character Model In Blender?
Please enable JavaScript
It is one of the first objects that beginners try to create, the centerpiece of 1000’s of works of art that litter forums and social media platforms across the internet. It’s what almost everyone who wants to learn blender wants to be able to do.
To create a character model you first start by researching existing characters and the fundamentals of anatomy. you then use your reference material in Blender and begin creating a low poly based. Then you iterate over the model adding more detail until you reach the point where you can move on to textures, materials, and rigging.
Each step is just as important as the one before it. When designing a character it is not a case of learning tools but instead learning the workflow for creating a specific kind of asset. Many new artists try to learn character modeling and the tools for it at the same time. A lot of people find Blender hard to learn because they try to create character models too soon, as we discuss here.
But we recommend starting off learning the tools themselves, getting comfortable with the user interface, and get just a little bit of experience creating simpler objects first. Then we can focus on the workflow for a character model.
Research And Reference Material
Before diving headfirst into Blender and creating a character model from scratch, consider how long it will probably take you to complete your model, or if you even know what you are doing. Characters are very complex shapes for a beginner artist to try and create with lots of moving parts for rigging and animation. Even when the base geometry of a character model is done you still need to think about materials, textures, clothing, and hair.
What Are You Creating?
When we talk about character modeling we are not talking specifically about human characters, but rather an object that represents a human, animal, alien, or general creature that could be animated. The general process remains the same, pick what type of character you want to create, and then research it.
Let’s create an example, say you want to create a character model and an adult male wearing a suit and holding a briefcase. You should research two things here, starting with the general look of the model. How are you going to want to model to look in terms of its appearance?
The second factor to research is the anatomy of the character type. So for a human character, you should have a basic understanding of human anatomy. This may sound pointless given the wide variety of character designs across cartoons, anime, video games, and animations. The general shape of characters like Gru in Despicable Me is clearly different from what you would see in a video game, like call of duty.
Yet all characters created for these high production projects are based on the rules of human anatomy, of how the skeletal and muscular systems are constructed. Then in some cases, like Despicable Me, the character designs are altered for a more cartoony look, while always staying true to the notion that they are clearly recognized as human characters.
Setting Your Reference Material In Blender
Even once you have done all the research you think is necessary, avoid starting your model without any reference material on hand. There are different means in Blender of using reference material. One example setup is to add an image editor to the top corner of the interface and load in some reference material of the type of character that you want to create.
Having a second monitor can work wonders as a backup as well. You could have Blender up on your primary monitor and then several reference images in your secondary monitor to refer to.
Adding Your Reference Image To Blender
If you don’t have that second monitor, then you will need to make room in your interface to import your reference material. Using the modeling workspace gives us the most room to work with, as we don’t have the timeline at the bottom. We can either change our outliner panel to an image editor, or we can add an additional panel on top and make that the image editor.
To add a reference image using the second approach, which keeps the outliner panel, complete the following steps.
If you want to just replace the original outliner panel with the image editor you can skip the first three steps.
Adding Reference Material In The Viewport
In addition to the reference material for the character design, you should also look at adding a reference image for the character anatomy as well.
Rather than adding this to the image editor, have your anatomy reference in the 3D viewport, adding as a background image that you can design the base of your model on. Think of this as 3D tracing, where you are trying to copy the dimensions of the background image as much as possible.
To add an image into the 3D viewport, complete the following steps…
You can also use the ‘Import images as planes’ add-on as a third option for bringing in your reference material. Simply go to the preferences panel, add on tab, and type ‘import image’ in the search bar, then install. But this is less useful as it does not have the same settings as the other two options and needs more work to set up.
Building The Low Poly Base
When all of your reference material is in place and Blender is set up the way that you want it, the next step is to create a low poly model that takes on the most basic shape of your character model.
Workflows
From here you could go about creating your model in any number of ways. 3D modeling is a creative skill set where there is never just one way to go about doing things. Its down to the artist to determine what the best approach is for them to achieve the final result. So let us cover just a few ways in which we can go about creating the base of our model.
Head First
A very common way of creating a character model is to start with the head and then work our way to the body, before finishing at the limbs. The head is normally the most important aspect to get right as it is the focal point of almost any character’s appearance. Getting the proportions correct for the head will also make it easier for the artists to keep the rest of the body to the correct proportions as well.
Body First
Another way of stating your character is with the body, which is normally the largest part of most characters. Once the dimensions of the body are set up the artist can very easily begin modeling any of the limbs or the head, so there is a bit of freedom as to how the artist wants to approach the model.
Separate limbs
A less common approach is to create each part of the body independently, and then connect each part together at the end to build the finished character. The main advantage to this is it makes it a bit easier to create each part by itself, as you are working with less complex shapes when they are separate from each other.
However, this approach makes it easier to get the wrong proportions if you do not have good reference material. You also need to make sure that the topology is correct as well. For example, the end of the arm is a circle of 32 vertices, to properly connect to the hand, the hand will also need 32 vertices at the wrist so that you can bridge the two parts together.
Minimalist Approach
This involves using as few tools as possible until the structure of the model is completed. For example, we start from a cube as the head and use the subdivide tool to add some extra geometry, then we extrude down to create the neck and then the rest of the body.
Your character model may at first look like a robot from a 1960’s SciFi show but once the base shape is established you can then use the subdivision surface and vertex slide tools to make it look a bit more human.
Duplicating The Base As Its Own Asset
Before moving on to the next stage, think about the purpose of the model you are creating. If this type of model is something that you will be making more of in the future then does it make sense to always start from scratch, or can you start with a generic base that saves you time on each subsequent model.
Creating an asset library speeds up your potential workflow over time. The more objects and assets you can create the less time you will spend in the future recreating them if you have a library to store them in.
The Old Method
With Blender, the old method of reusing an asset was to either link or append it from another file. Appending allows you to import an object or any data block over from one file to another and then create a duplicate or ‘proxy’ of that data that be used and edited in the new file.
Linking does the same thing but without creating the proxy data by default. This means that when you link an object for example you can adjust its transform data, like its rotation, but you cannot edit the object itself as you are effectively borrowing the asset from its source file.
The key issue with both of these tools is the need to locate the correct project each time and then dive through several folders looking for the data block that you want to use.
The Asset Library
A much more convenient way of doing things is to store reusable assets in a single library that can be accessible at any time. Other the years’ addons have been created to generate these libraries although most of them do require some form of internet connection to use if they link to external assets.
Blender now has its own asset library for artists to use, and the library itself can easily be accessed as an editor type. With the new asset library, an artist can store an asset in either the local library or an independent location on their browser. By storing it in the local library you can reuse that asset multiple times in the same project by simply dragging and dropping it into the viewport.
You cannot use these assets in other projects if you store them in the local library, for that you need to create a neutral file location where all of your projects can access straight through the asset library editor.
Adding The Base Detail
When we talk about the base detail for a character model, we are referring to the parts of the model that require additional work before it truly begins to look like a character. Take our existing low poly base, what do you think is the next step. For the body, it could be creating the fingers and toes or refining the shape of the back or limbs. For the head, this could involve generating the nose and eyes, or the mouth and ears.
At this stage, the artist may start to use a few more of the tools at their disposal. For example, creating the nose and eyes may require the use of the inset and delete tools to create a good topology. There may be a few aspects of the model that do not yet follow the rules of anatomy for that character.
For example, the human back curves out on the upper half to make room for the vital organs. The width of the arms decreases as you get closer to the wrist/hand. The knee sticks out slightly compared to the rest of the leg.
All of these examples of what you need to think about when creating the base detail that will transform your model from a doll to an actual character.
Adding The Finer Detail
With each step in the process, our character model gets closer to being in a usable state. We avoid using the term finished state because no model is ever truly finished, as there is nearly always something that can be altered or improved.
Finer details for a human character may include things like fingernails, belly buttons, abdominal muscles, or face wrinkles.
Tip: Don’t waste time working on the finer details of an area that will never be seen. For example, if your character is wearing a shirt, then there is little point in modeling the belly button unless at some point the model is going to be used without the shirt.
The 80/20 Rule
In projects of almost any industry, you can apply the 80/20 rule, where 80% of the work is achieved in the first 30% of time spent on a project. Take this character model for example, where we added in the reference material, built a low poly base, and adding the detail necessary to make the object look human. When the base detail is added we can say that we are around 80% of the way there towards completing the project.
The other 20% is the finer detail and anything to go on top. However, what you will find is that the 80/20 ratio flips here in terms of time spent. An artist will spend roughly an hour bringing the model up from scratch to having all the base detail. that’s the 1st 80% done, but the finer detail used to create the unique look of the model, the final 20%, may take four hours to complete.
Sculpting
It’s at this stage of character creation that artists begin to use more advanced modeling tools like the sculpting toolkit to really add detail to their characters. Sculpting is a very different workflow from normal modeling in that it focuses on refining what is already there. If you don’t want to use the sculpting workflow to add those wrinkles to the forehead or define the biceps and triceps of the upper arm, then you don’t have to. But the process can take a lot longer depending on how much detail you want to add.
On the flip side, you could create a model, even a character, while exclusively using the sculpting toolset. Again, it can take longer overall to build up the basic shape, but it is still a perfectly viable workflow.
The ideal workflow for a character though is to create that base model using the traditional modeling tools, and then refining the details with sculpting brushes.
You can check out our article here if you want to learn more about Blender as a 3D modeling tool.
All The Rest
When you have finally finished the geometry of the model, you can then move on to the secondary aspects that will make your character truly feel complete. For any character model you will at this point need to and materials and textures across the body, bake your details onto a low poly model*, create some clothes for them to wear**, and set up a big for animations if you plan on making them do more than just pulling the basic T-pose.
Materials And Textures
The materials that we apply to our models will be key to transforming these objects into true works of art. The choice of material, along with the correct lighting conditions, can make an object or scene appear truly realistic. For a human character, you should look to apply a skin texture and a material that has subsurface scattering if you want to go full realism.
Make sure that all other areas of your character model have textures and materials applied to them as well, such as the hair, fingernails, and eyes. Leave out any part of the body and it will stick out more than just a sore thumb.
Textures may require the use of UV maps, especially for the eyes. A UV map is a 2D projection of a 3D object’s geometry and allows the artist to more easily map textures to that object.
A texture is also a part of a material data block. This means that you have to create the material first to define how the object appears under a source of light and then apply a texture to generate the actual pattern.
Clothes
If designing an animal you can probably skip this step, or not, it depends on exactly what the model is being created for after all. But for human characters, we tend to want clothing to some degree. Don’t forget that any area that will have clothes covering it does not need any real detail, in fact, you could even delete the geometry of the body that won’t be shown entirely, as a way to save memory.
Clothes are a little bit more challenging than the body itself, but a good way to go about things would be to use the character model as a mannequin and work on your clothing using the mannequin to help define the correct shape and sizing.
Much like the body itself, you will need to make sure that the materials and textures are applied to individual items of clothing.
Another tip here is to create each item of clothing as its own object, and then once everything is done join all the meshes up together to form a single character object. You could also parent the clothes to the base model as another option.
Baking
This is mainly for video game assets that are created in Blender with the purpose of being exported to a game engine like Unity or Unreal Engine. While it is becoming less important as these game engines become more optimized baking remains an important skill to at least have knowledge of. This is the process of taking information such as light, texture, and geometry data and mapping it onto a model.
Before baking, the artist needs to retopologise the model. This involves creating a new lower poly version of that character using simple modeling tools such as the extrude tool. The aim is to create a model that has a very similar shape to the original with far less and much cleaner geometry.
We would then apply the baking process, transferring the detail from the high poly model over to the new character. this will give the low poly model a much more detailed appearance, but the topology itself remains comparatively low and easy for a game engine to work with.
Rigging
When creating your model for the 1st time it will follow either a T-pose or a star pose, as these poses keep the limbs away from the body and make the modeling process much easier compared to creating a model with their arms by their side. By creating a rig the model can be repositioned into any pose that you want.
A strong rig makes for great flexibility for limb movement and can allow you to position your model in any pose you want such as a kung fu pose, hand wave or sitting down cross-legged.
A rig is also required if any time of actual animation is required from the model. The rig allows the character to be moved in a natural way and allows the artist to animate each part of the body independently.
How To Use The Group Input And Group Output Nodes In Geometry Nodes?
If you are new to the geometry nodes system, then you will first need to learn how the two core nodes of the procedural modeling system are used. These are
A Beginners Guide To Using Geometry Nodes In Blender
For decades now the standard workflow for creating 3D models and scenes has been the use of editing tools to make changes to objects in real time using a viewport
What Version Of Blender Has Geometry Nodes?
Geometry Nodes is a relatively new workflow introduced in Blender to procedural create 3D models and scenes using the visual scripting method that is nodes. But because it is one
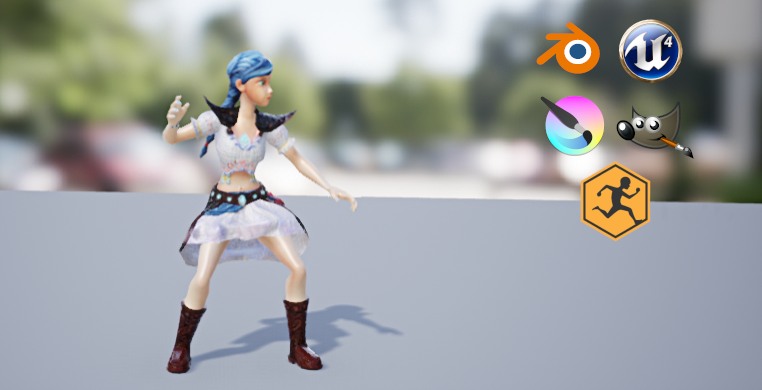
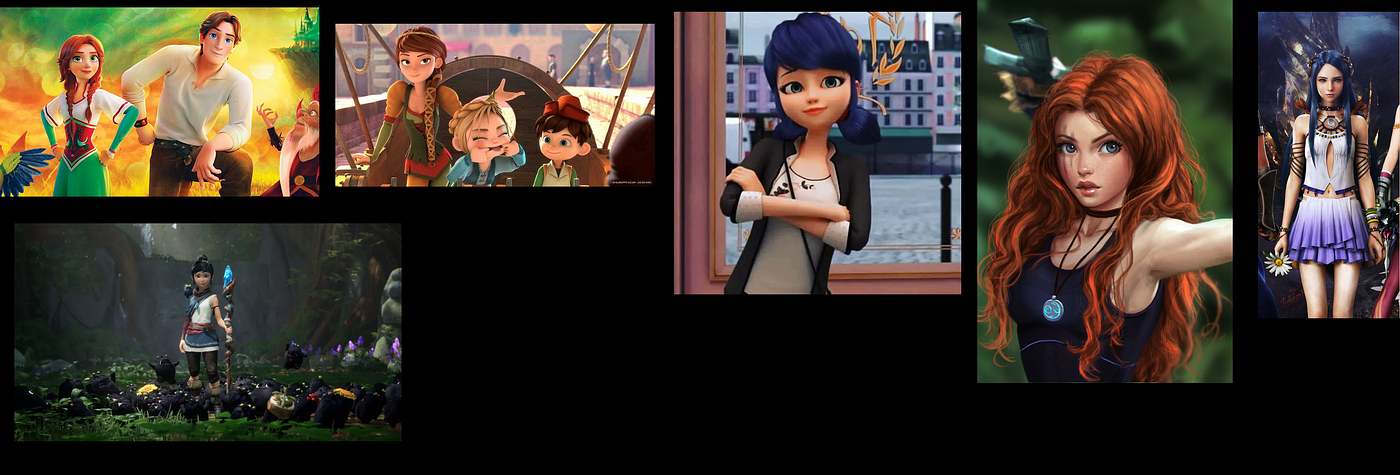
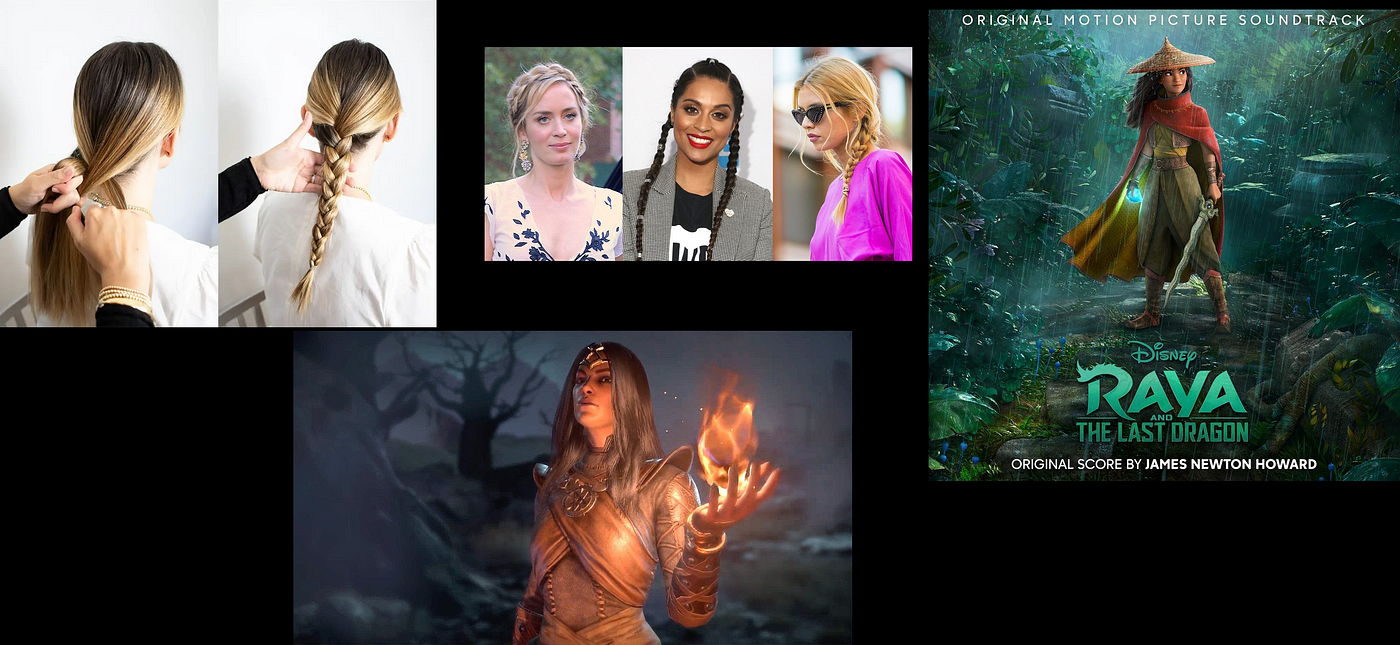
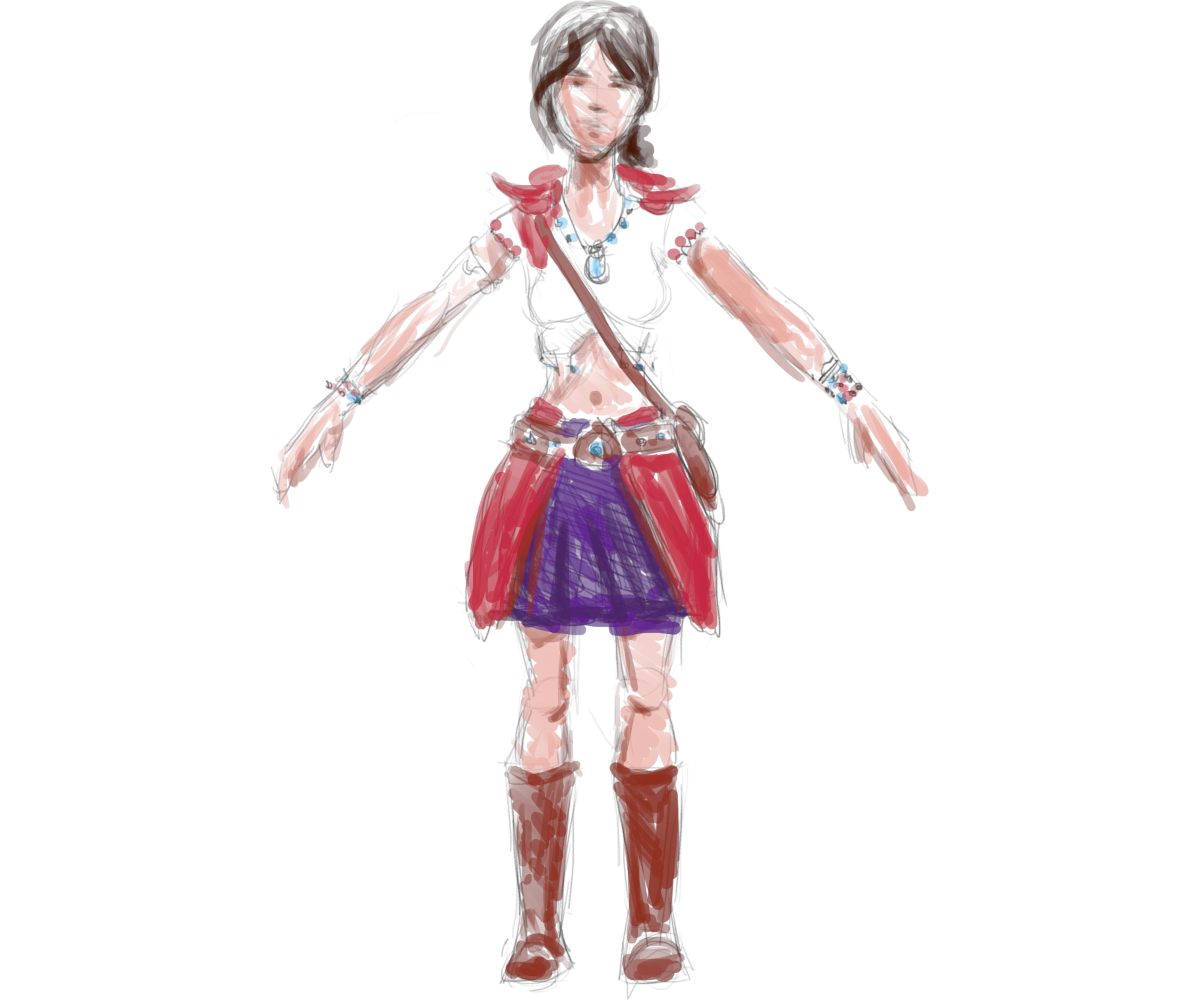
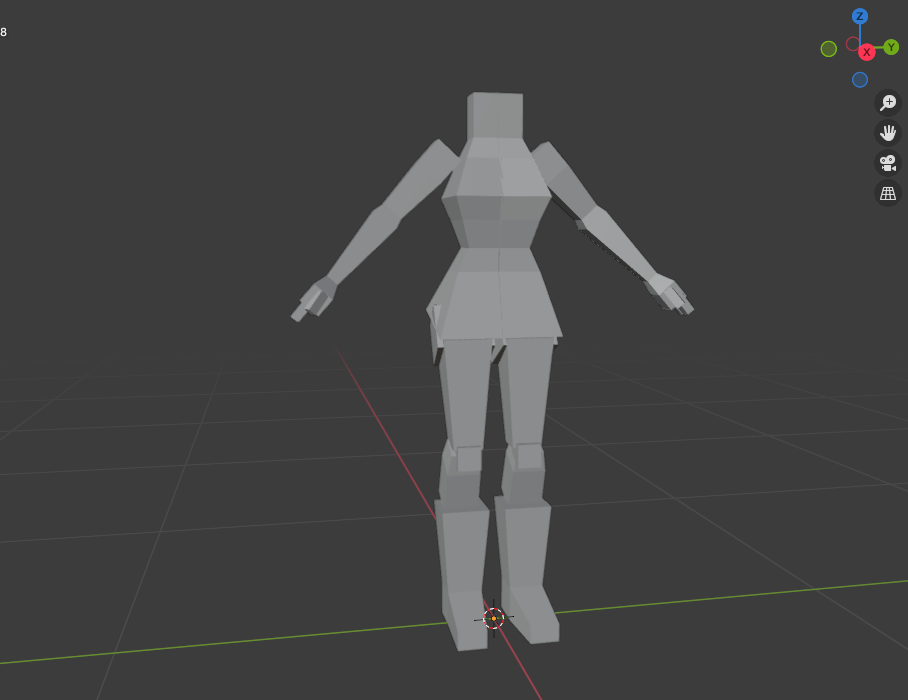
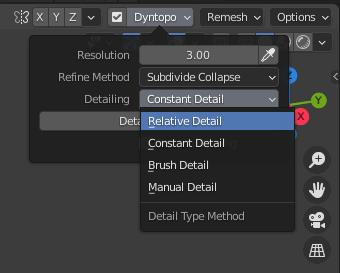
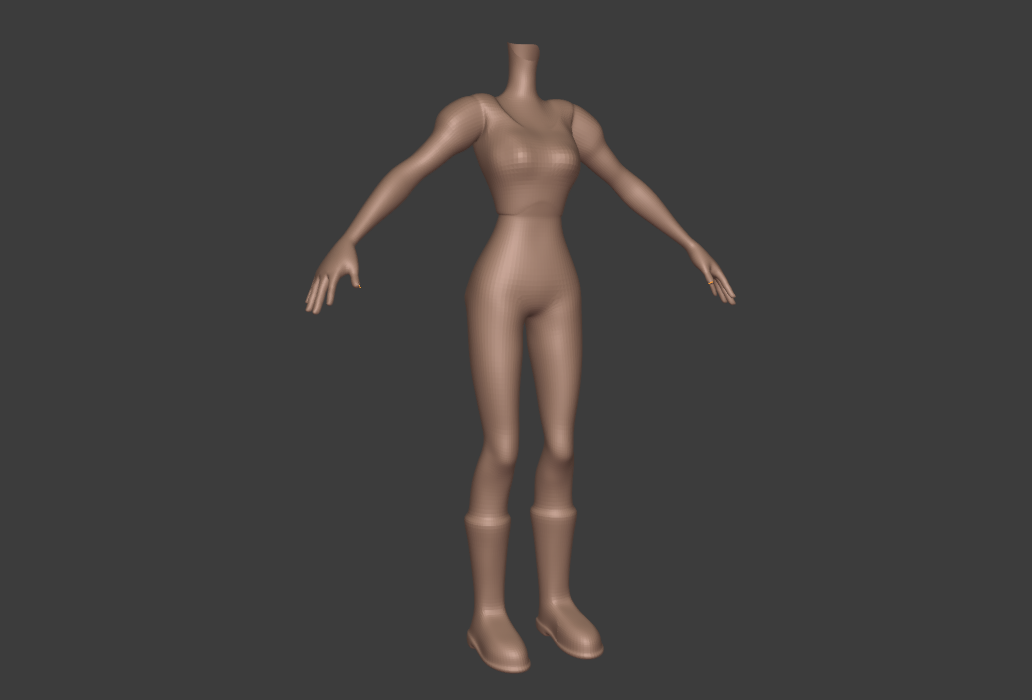
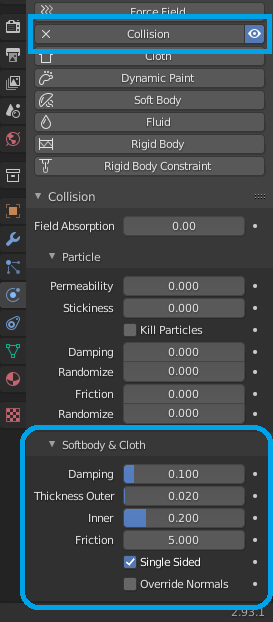
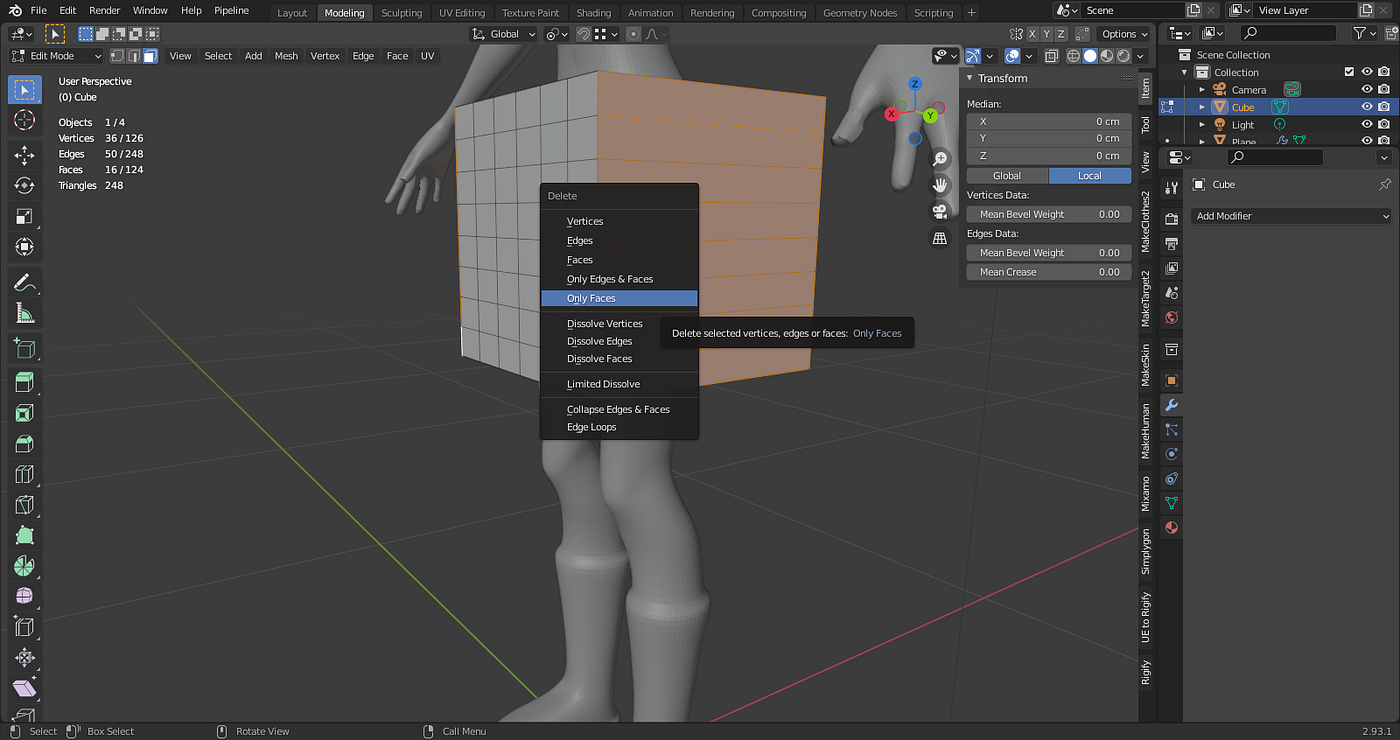
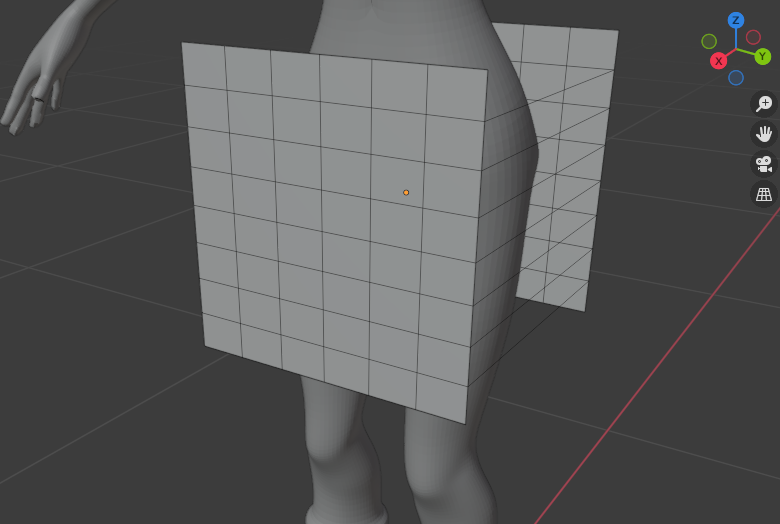
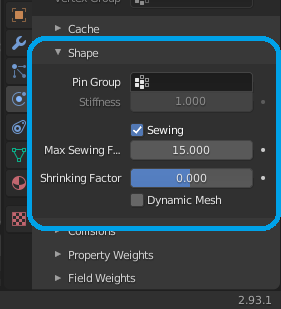
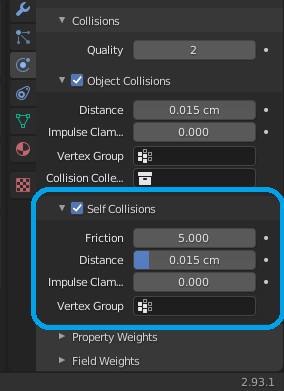
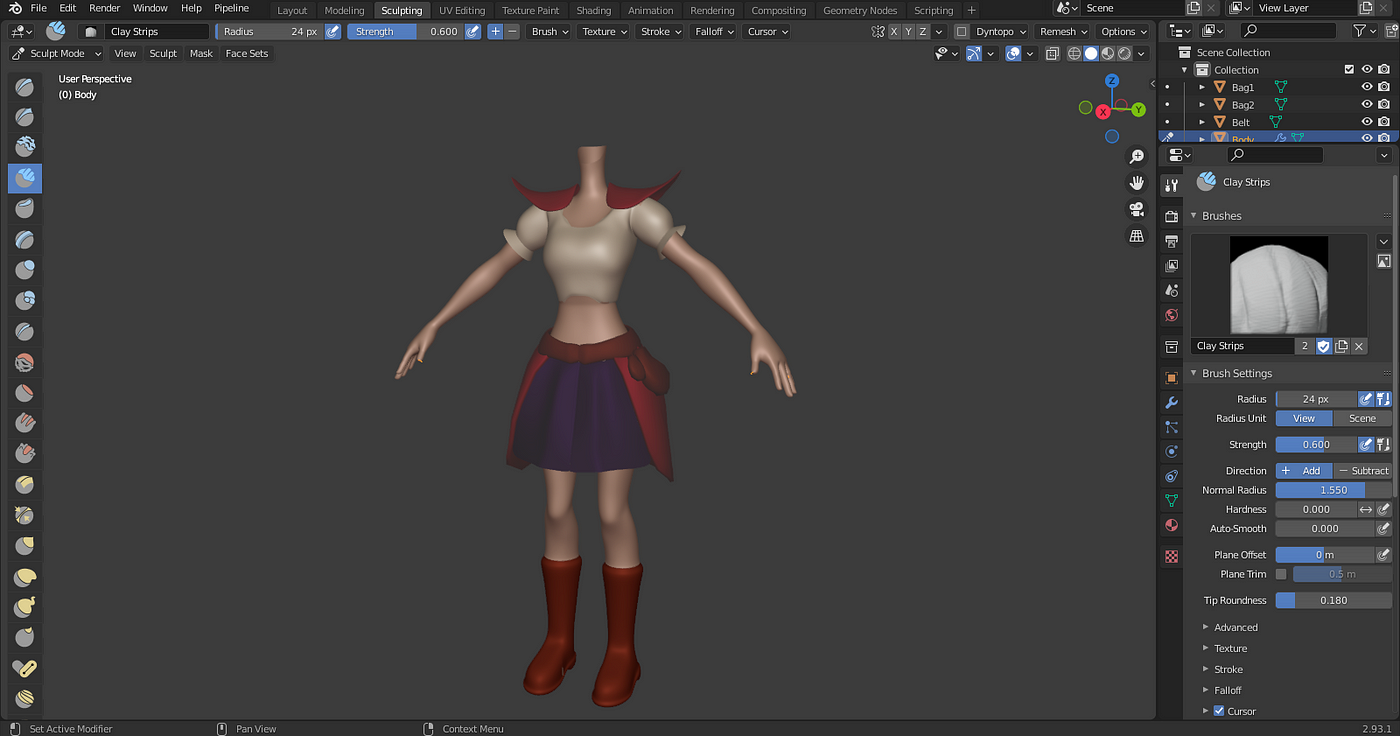
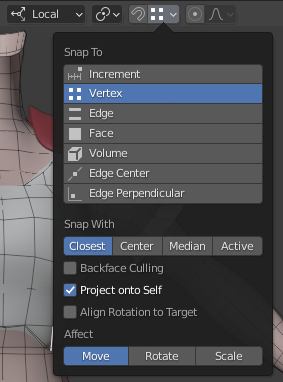
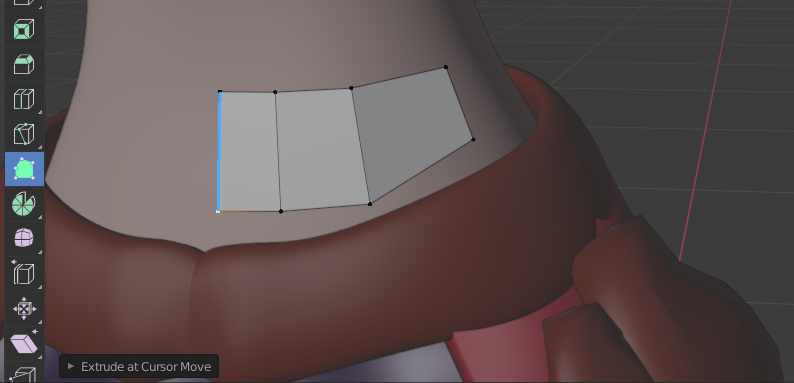
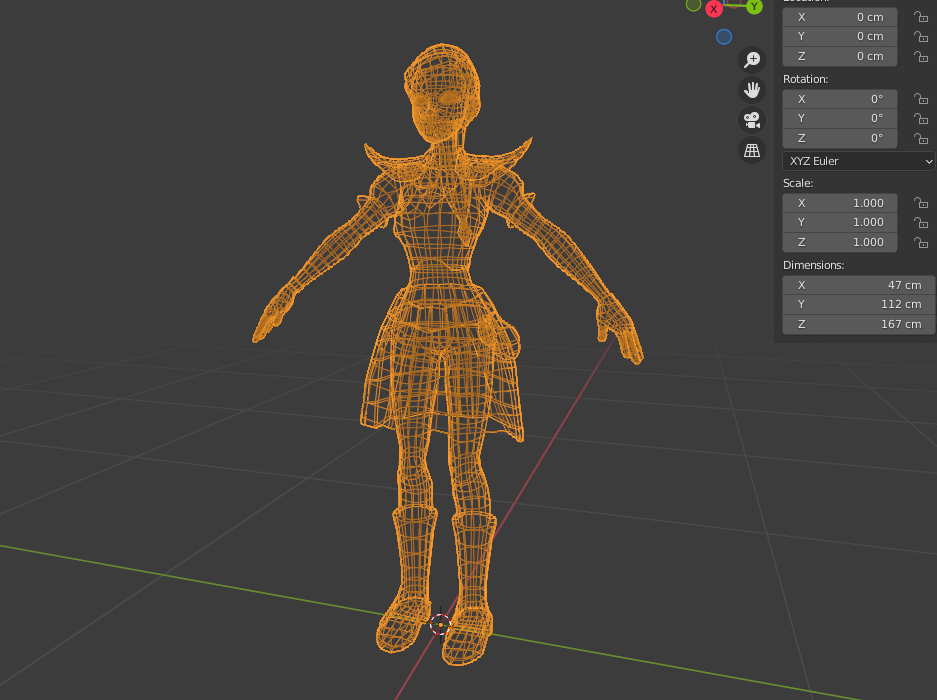
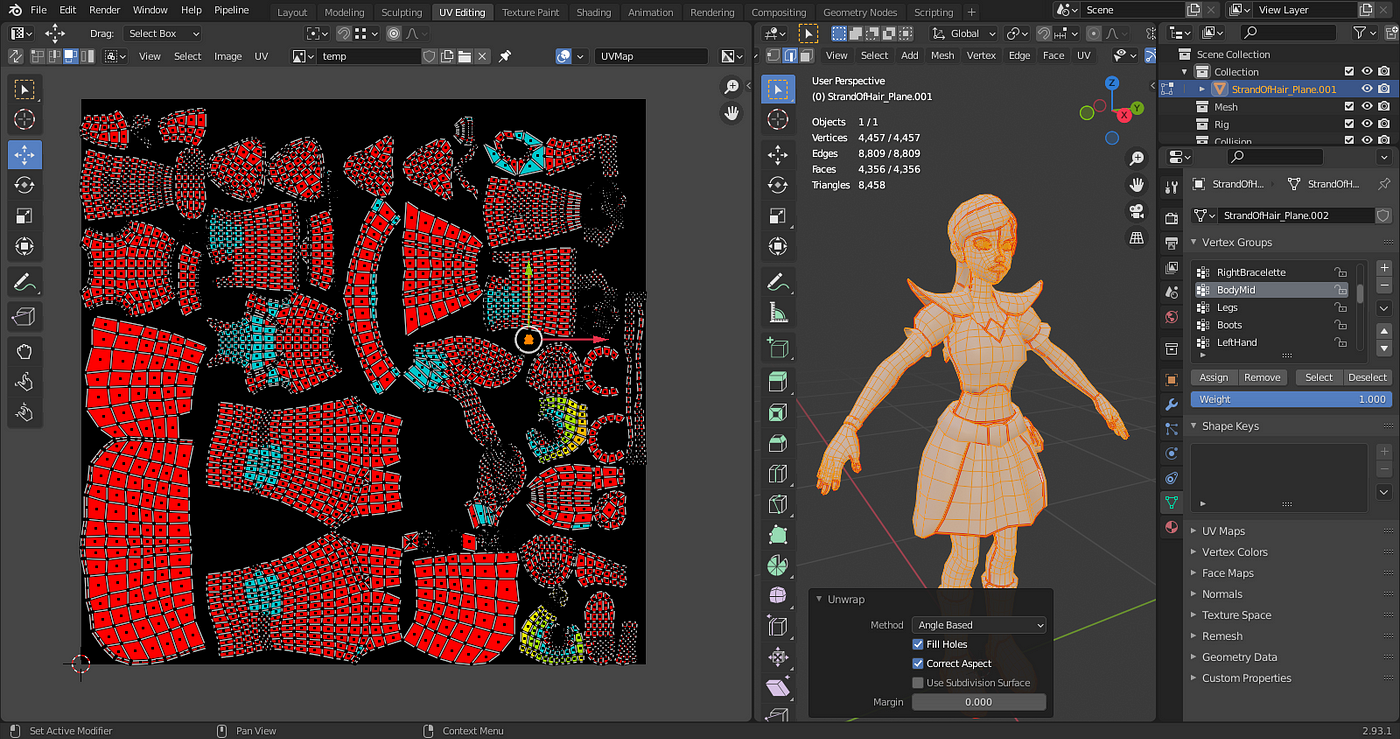
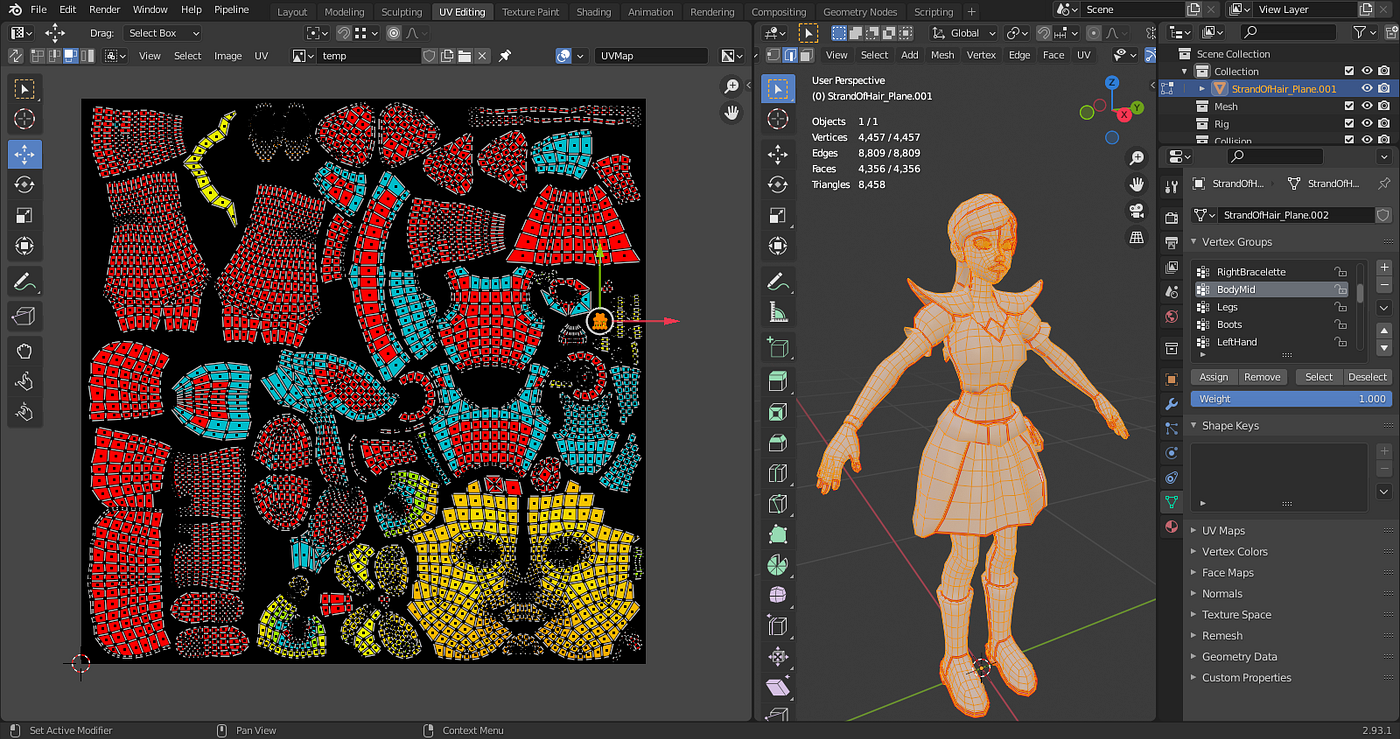
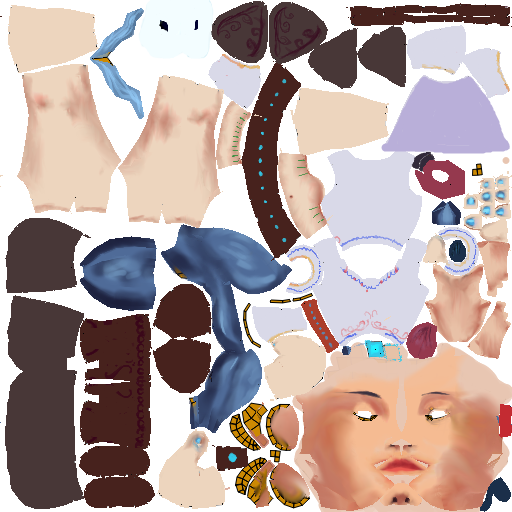
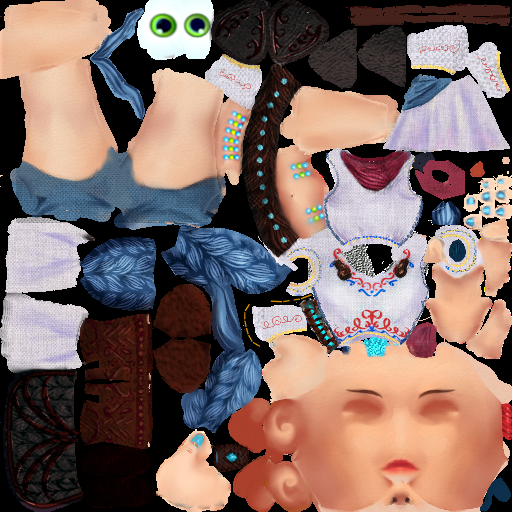
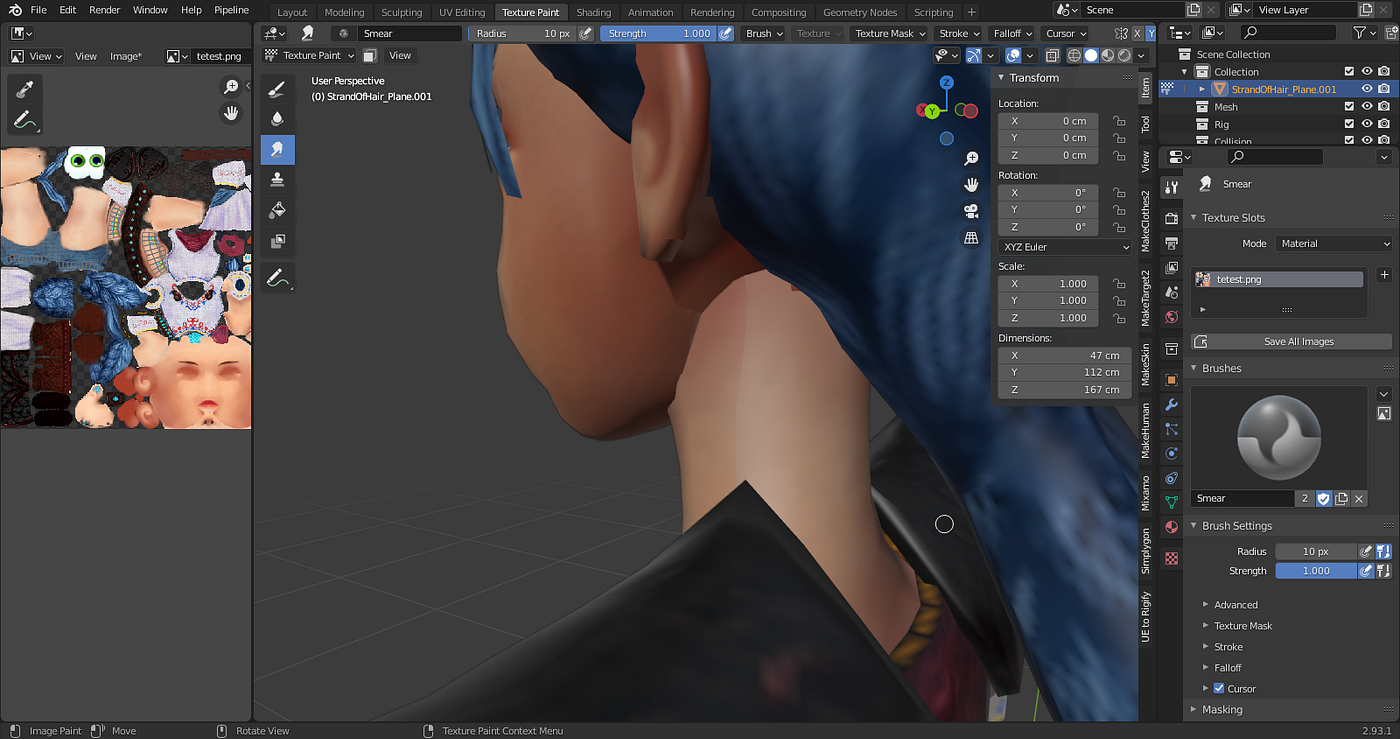
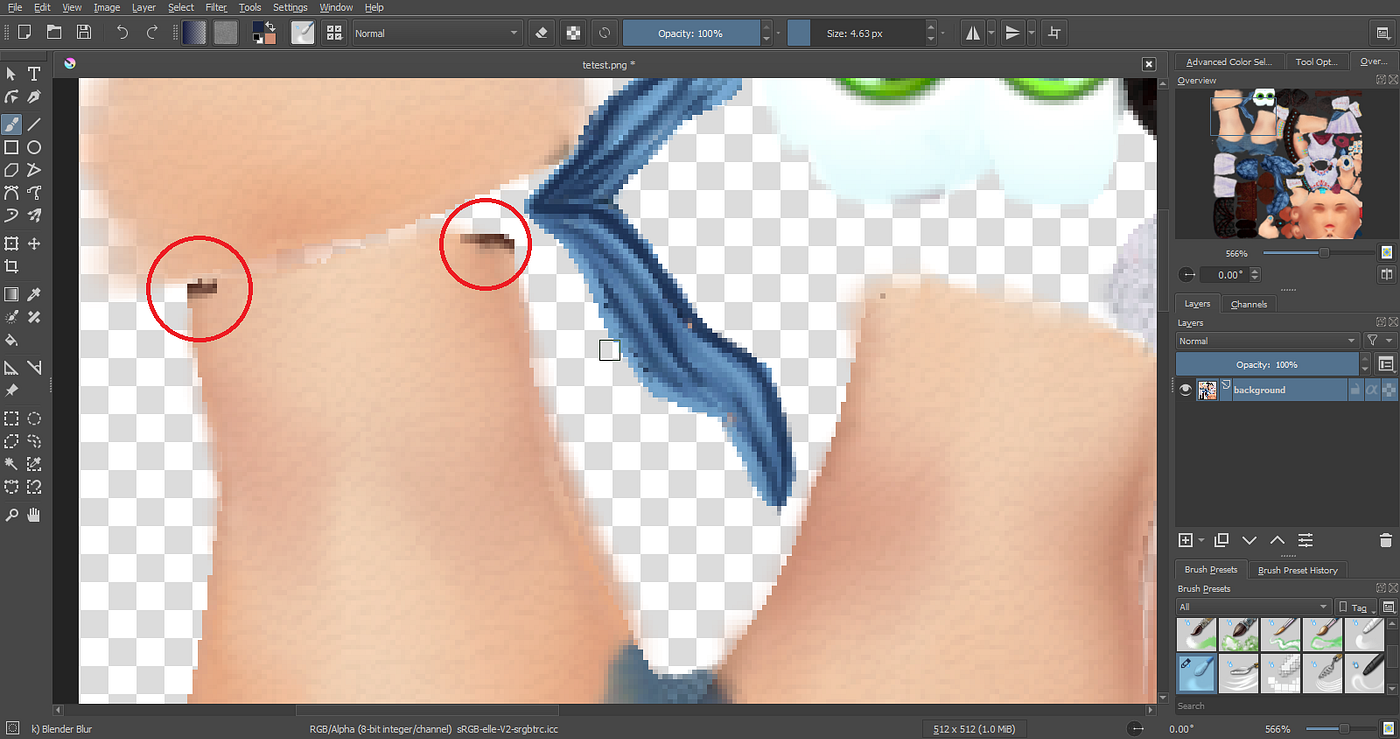
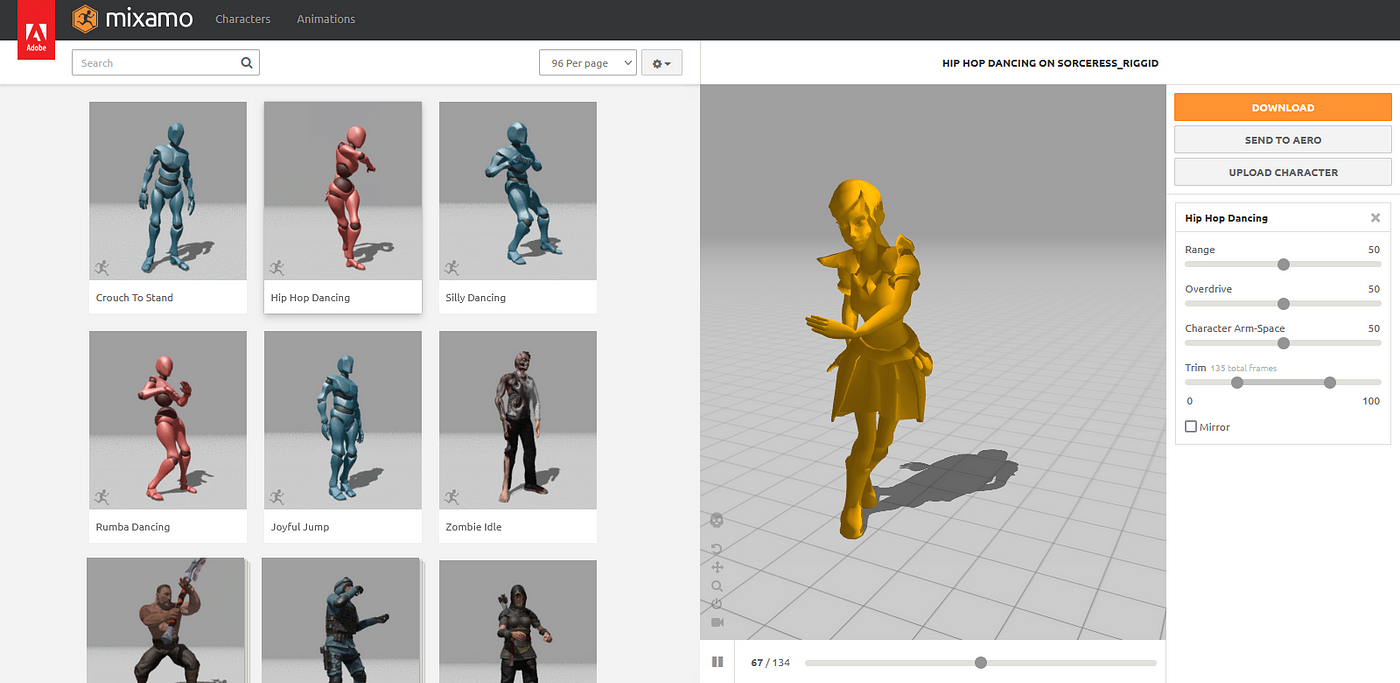
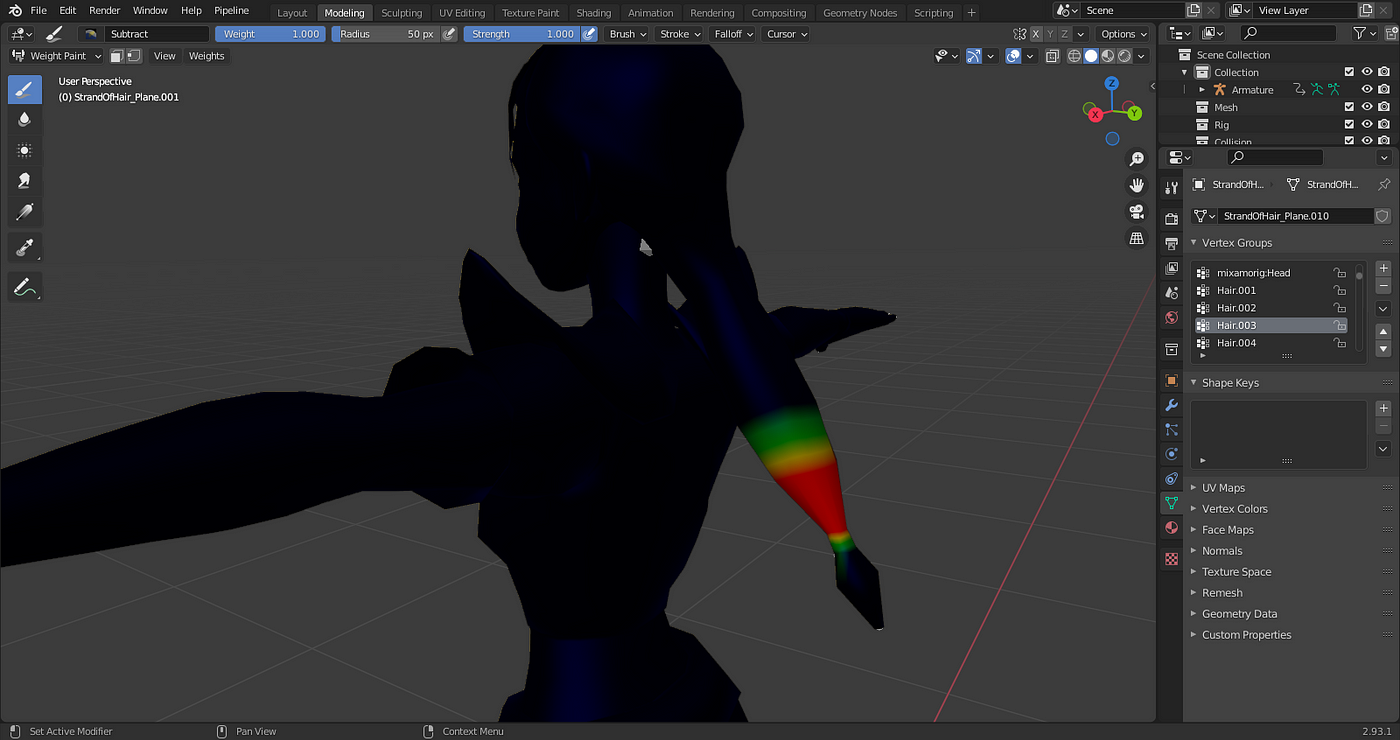
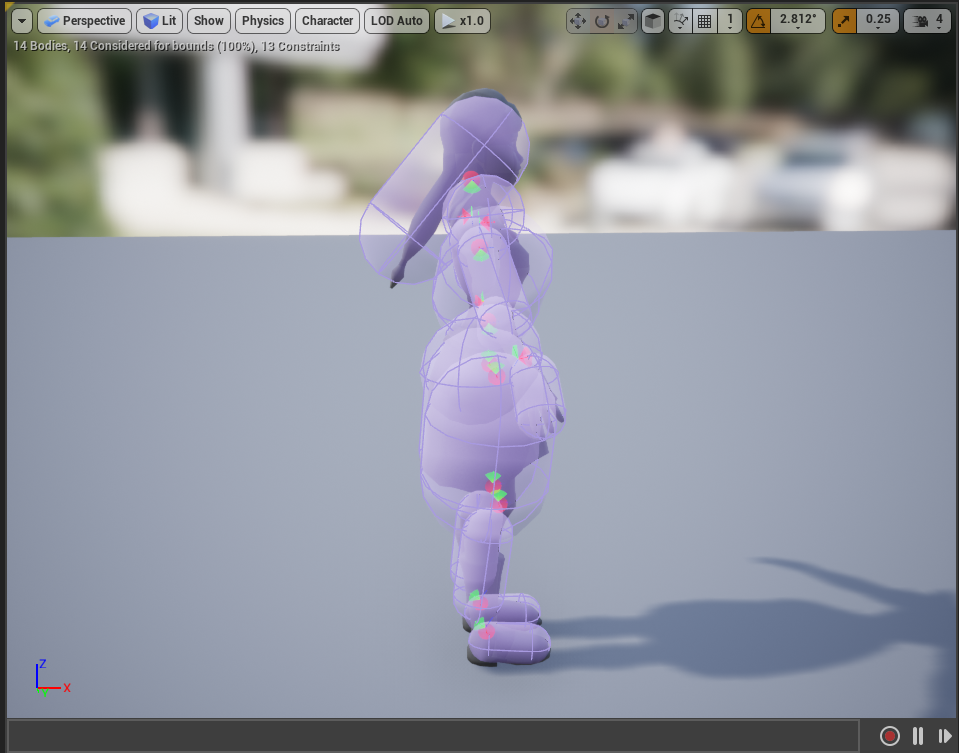
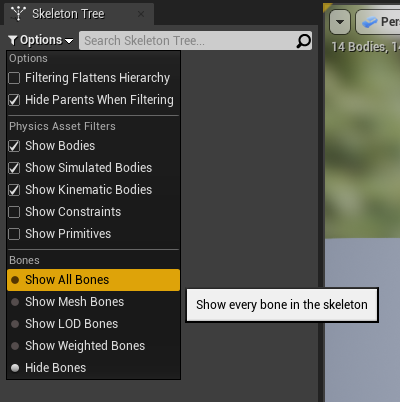
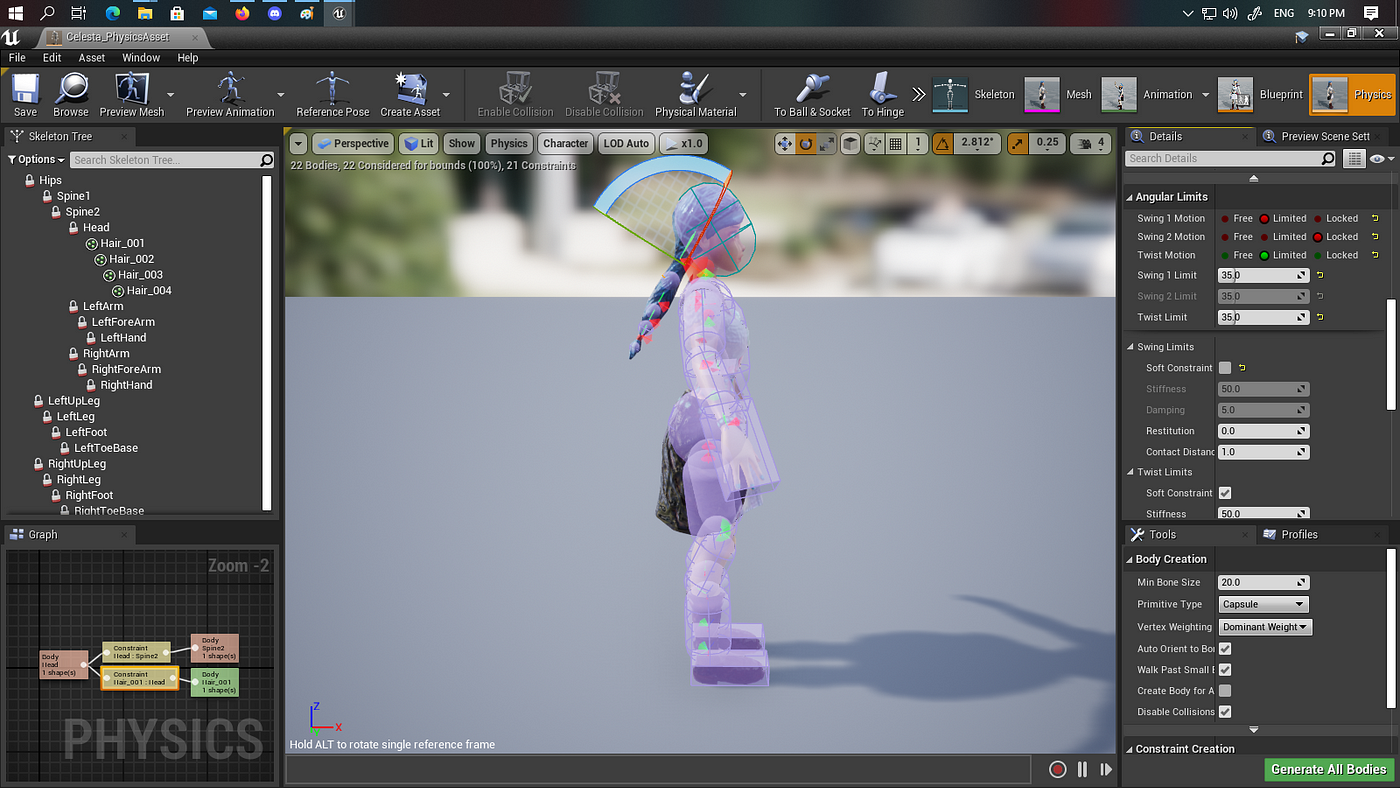
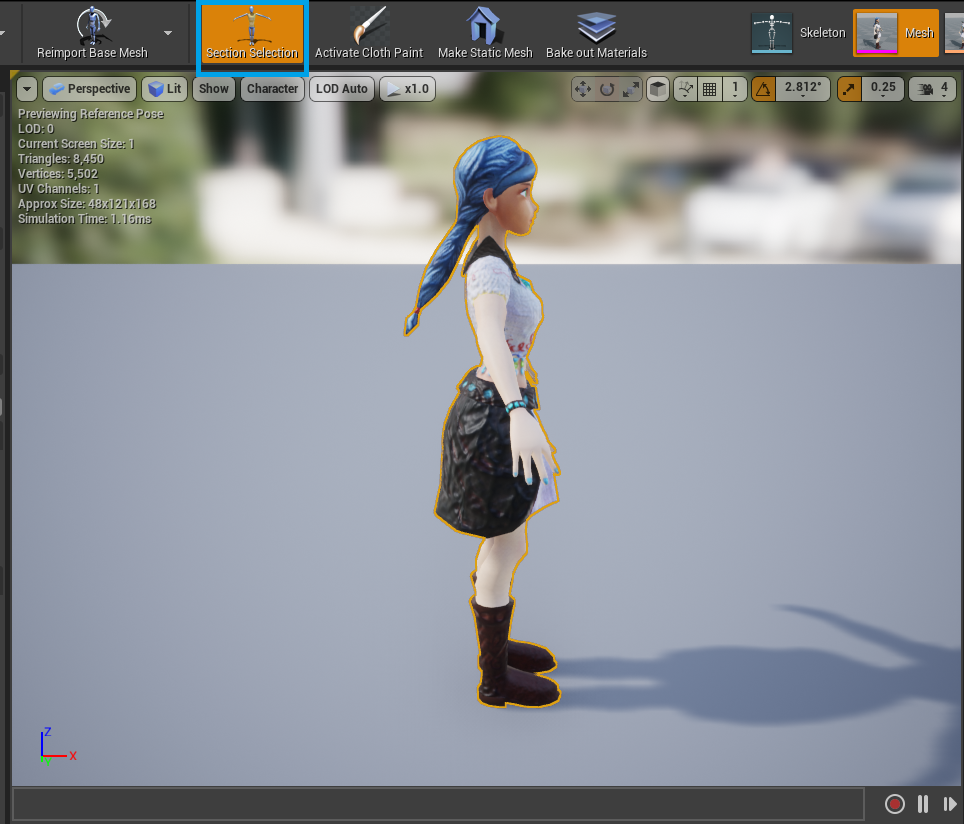
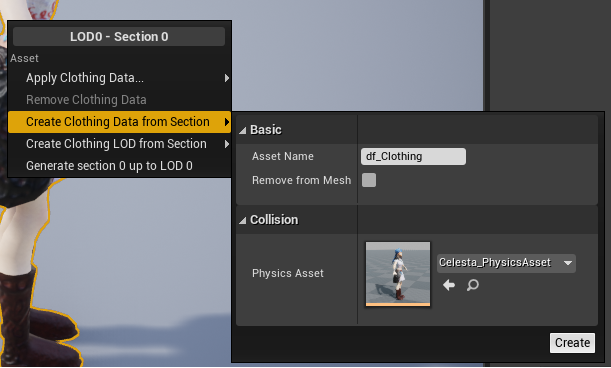
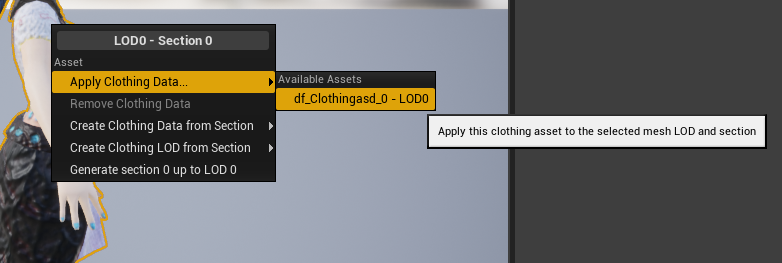
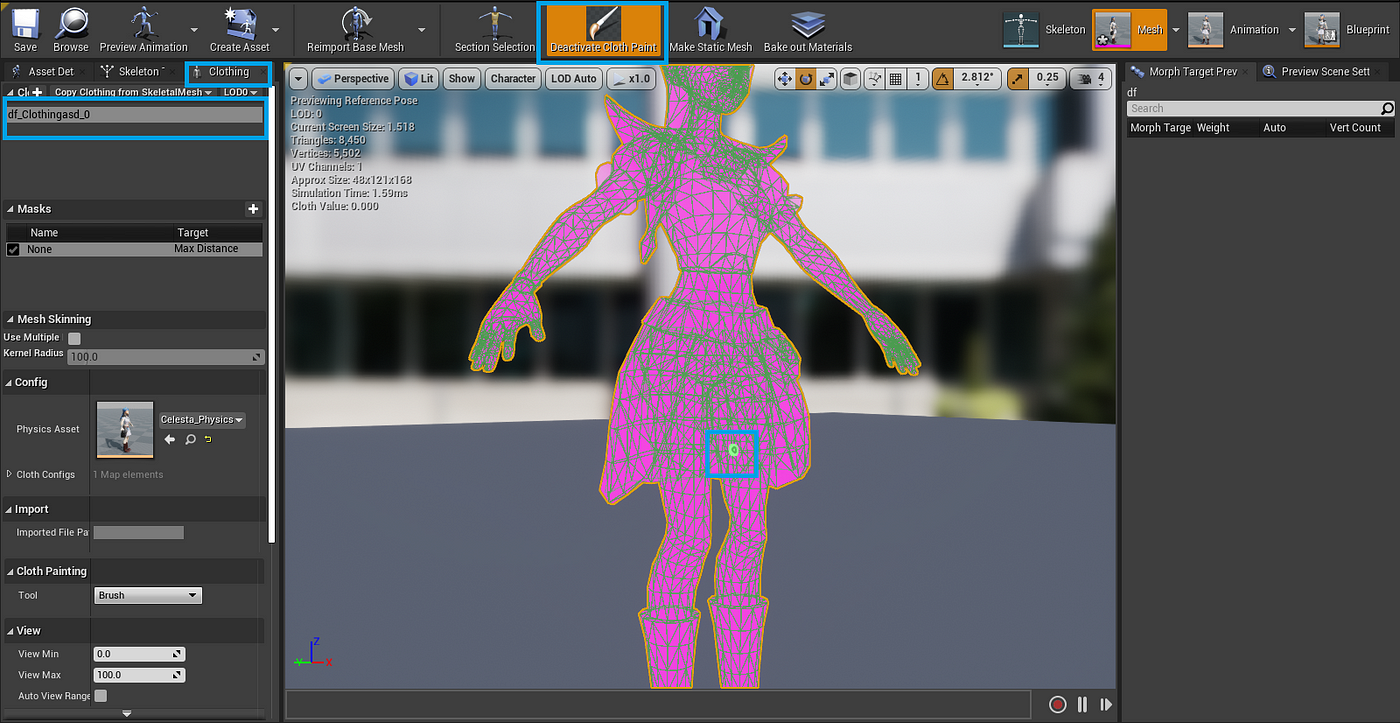
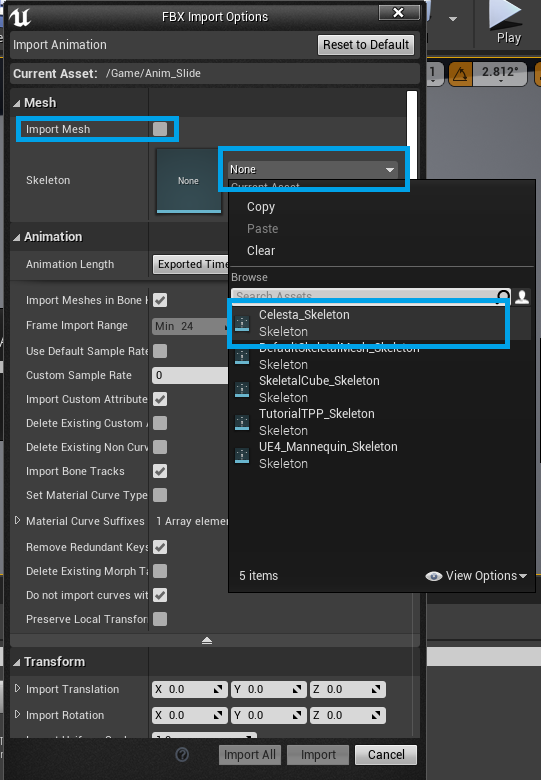
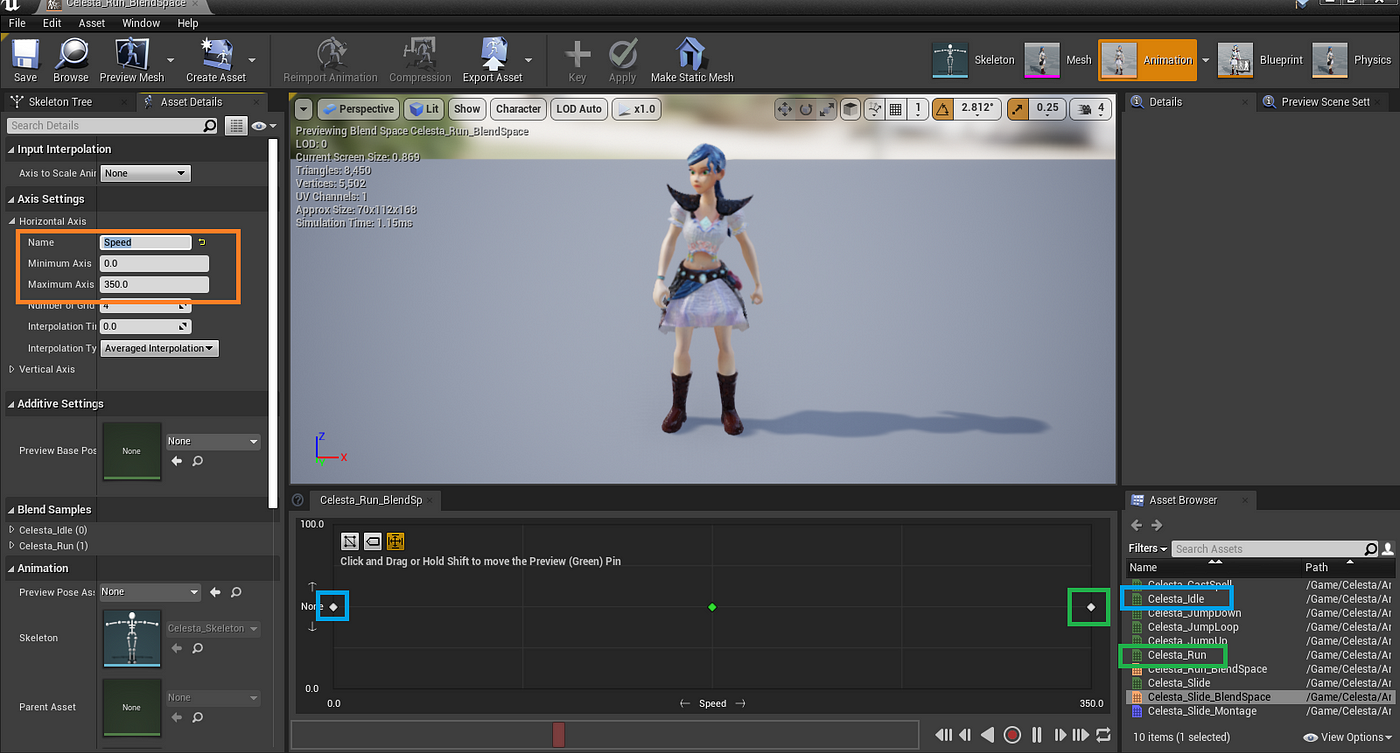
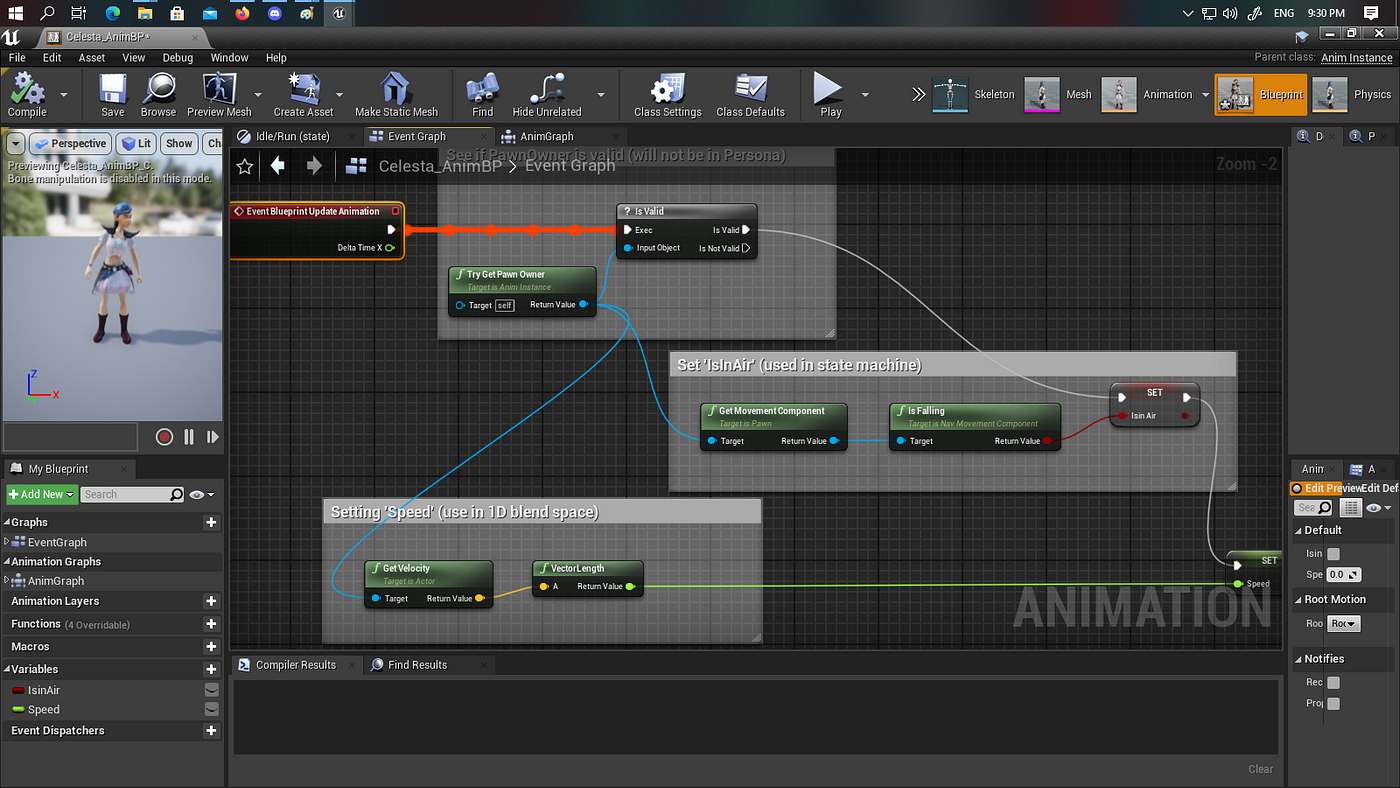
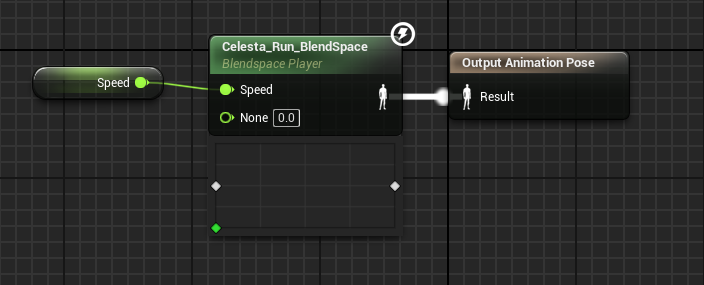

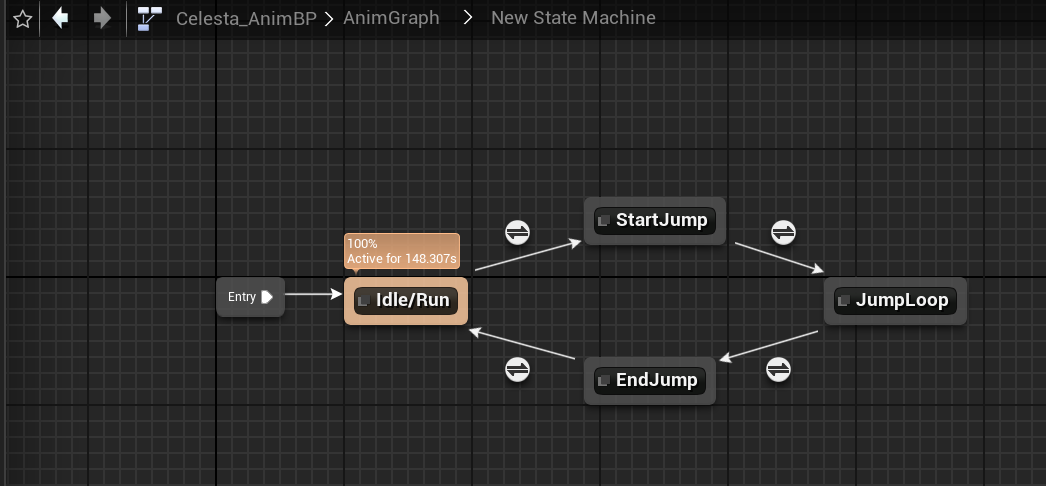


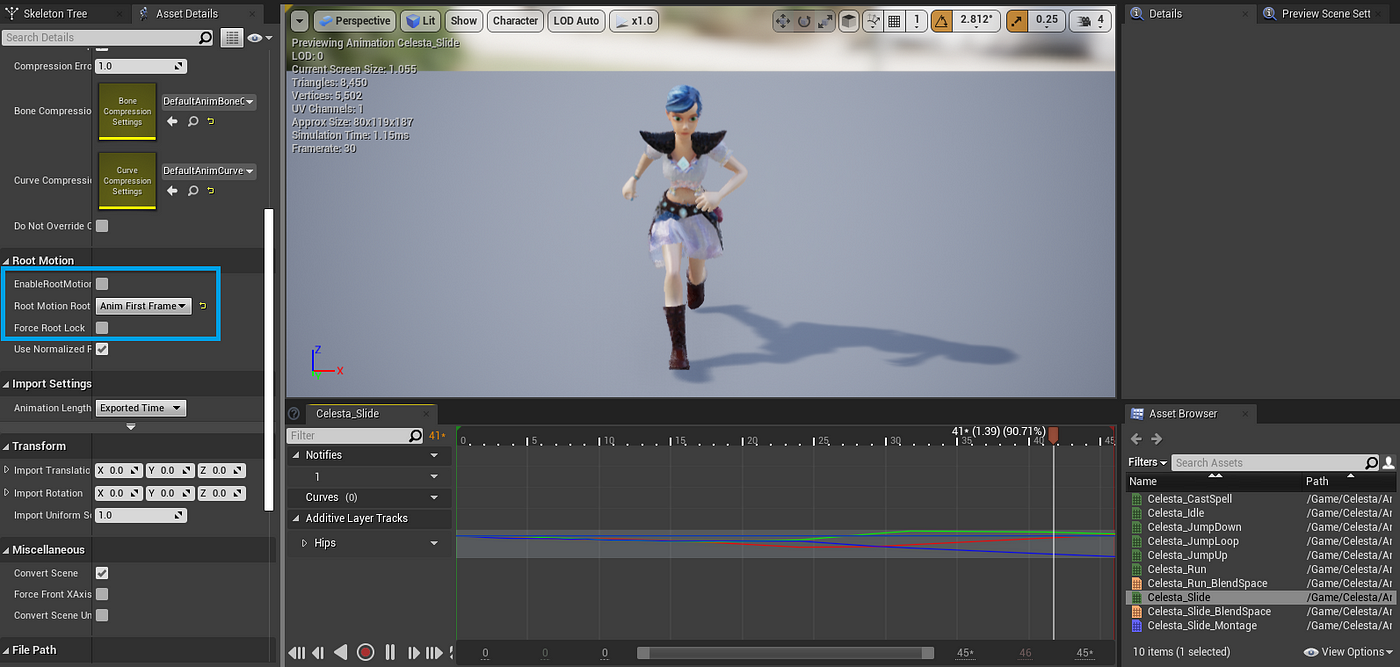
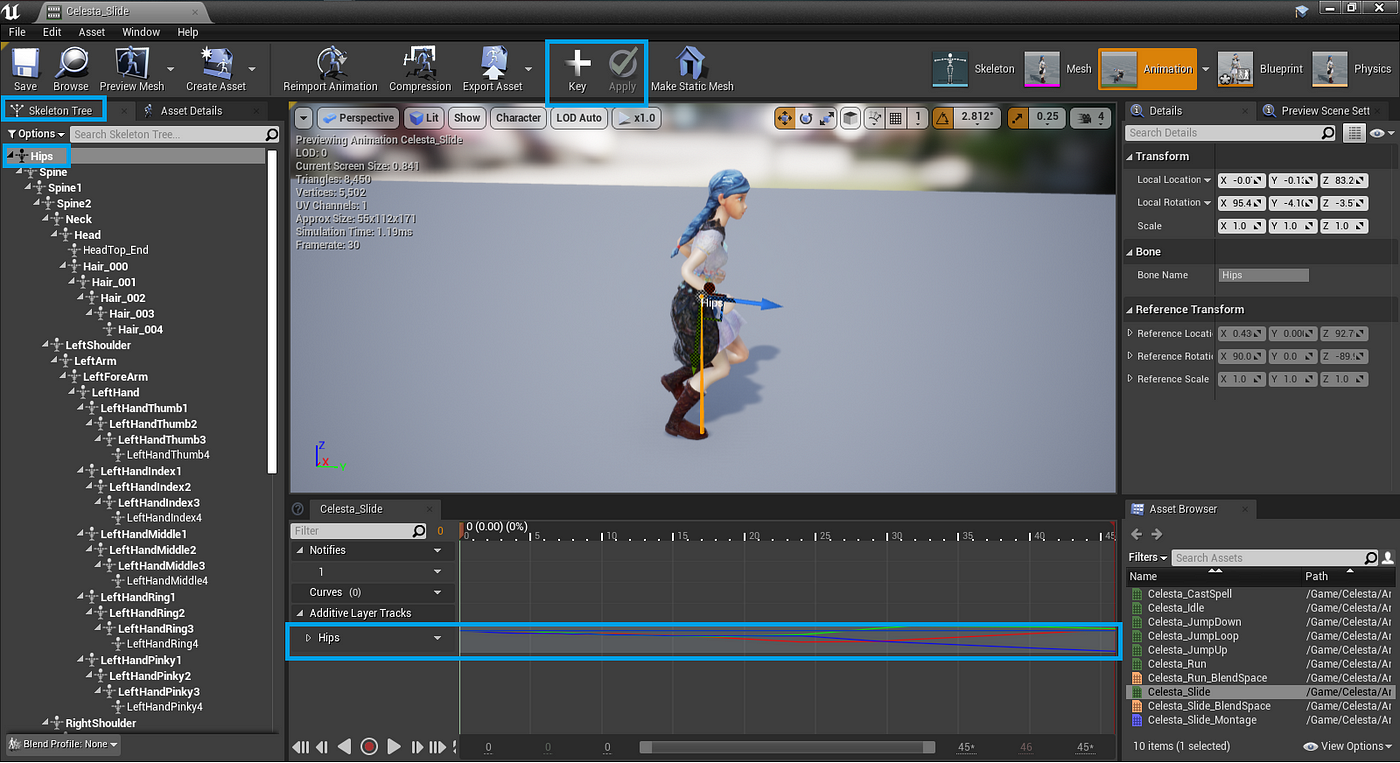


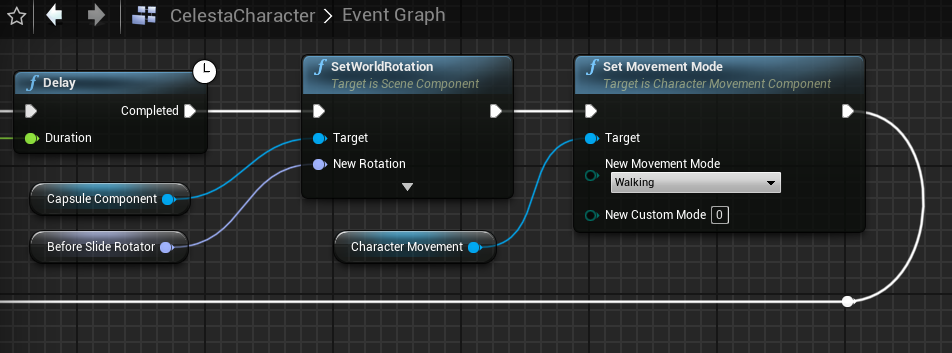


.jpg)
.jpg)


