How to create nft collection
How to create nft collection
Пошаговая инструкция как создать NFT коллекцию на Golang + Ethereum (часть 1)
История началась пол года назад, когда ко мне пришел мой старый знакомый художник и предложил создать NFT коллекцию на блокчейне Ethereum. Скажу сразу, я никогда не интересовался криптой и на тот момент понятие не имел, что такое NFT и как они устроены.
В этой статья я не буду рассказывать, что такое NFT и для чего они нужны, вместо этого я сосредоточусь на технической части, т.к. когда я начинал материала было крайне мало и приходилось додумывать некоторые решения самому.
После проведенного небольшого исследования, мне удалось разбить изначальную задачу из абстрактного “создать NFT коллекцию” на более мелкие и конкретные, а именно:
с генерировать 10 000 уникальных изображений
с генерировать 10 000 метаданных к каждому изображению
загрузить 10 000 изображений вместе с метеданными в децентрализованное хранилище
создать смарт-контракт для NFT токенов
загрузить созданный смарт-контракт в mainnet Ethereum
создать сайт, который будет взаимодействовать с нашим смарт-контрактом с помощью web3, где собственно пользователи и смогут менять свои эфиры на наши NFT токены
Казалось бы пустяки, а нет, на каждом этапе меня поджидали непредвиденные моменты, о которых мы сейчас и поговорим.
Как с генерировать 10 000 уникальных изображений?
Почему именно 10 000? Ответ достаточно прост, большинство популярных NFT проектов, предлагают коллекции именно из 10 000 NFT токенов. Каждый создатель, сам волен решать сколько NFT токенов он хочет выпустить, но мы решили не отходить от канона и тоже сделали 10 000 токенов.
Итак, как же все таки с генерировать 10 000 уникальных изображений? Конечно же с помощью автоматического наложения слоев друг на друга. Немного поразмыслив, мы с художником пришли к выводу, что для нашего проекта нам нужны следующие слои:
В общем количестве, у нас получилось приблизительно 175 уникальных слоев в формате png, что более чем достаточно, чтобы получить 10 000 уникальных персонажей. Теперь осталось совсем ничего, а именно написать утилиту, которая на входе будет принимать заготовки в виде слоев, а на выходе будет отдавать готовых персонажей.
Писать я буду на Golang, итак поехали. Для начала, нам нужно описать 2 структуры в пакете domain, одна для слоев, а другая для холста.
Давайте более подробно рассмотрим обе структуры.
Итак, когда базовые структуры описаны, мы можем перейти к написанию сервиса, который собственно и будет комбинировать наши слои в определенном порядке.
Код сервиса достаточно простой, на входе сервис принимает список слоев и параметры холста, а на выходе возвращает байты сгенерированного изображения. Хочется отметить, что Go обладает достаточно хорошей библиотекой для работы с изображениями и именно с ней мы будем работать, собственно код:
Отлично, когда код для генерации изображений готов, мы можем переходить к генерации метаданных.
Для начала, стоит отметить, что именно в метаданных хранятся все свойства и ссылки на картинки для NFT токенов, а также именно по метаданным, большинство торговых площадок выполняют поиск NFT токенов. Поэтому очень важно выбрать правильный формат для метаданных.
В каком формате должны быть метаданные для NFT токенов?
Т.к. NFT токены основаны на ERC-721 стандарте, а сам стандарт никак не описывает в каком формате должны быть метаданные, мы вольны использовать любой формат какой только захотим.
Но если мы хотим, чтобы наши NFT токены могли полноценно торговаться на таких пощадках как opensea, мы должны следовать следующему JSON формату:
Отлично, когда мы разобрались с форматом, давайте опишем структуру для хранения метаданных на Go:
Перед тем как приступать к генерации метаданных, нам нужны готовые ссылки на загруженные в децентрализованное хранилище изображения. В следующей статье, я расскажу как загружать изображения в децентрализованное хранилище, а также продолжим работать с метаданными.
Tutorial: Create Generative NFT Art with Rarities
Introduction
Marquee NFT projects like Cryptopunks and Bored Ape Yacht Club have generated hundreds of millions of dollars in revenue, and have made several of their owners millionaires.
What the aforementioned projects (and most other successful NFT projects today) have been in common is that they are PFP projects. This means that they usually are a collection of 10,000+ avatars where each avatar is unique and has a set of traits.
In this tutorial, we will show you how to generate a collection like this with custom rarities. We will be using a library created by the Scrappy Squirrels team to accomplish this. At the end of this tutorial, you would have generated your own custom avatar collection with associated metadata.
Pre-Requisites
Python and pip installed on your computer
Our library is written in Python so you will need to have this installed on your computer. You will also need pip which will install important packages for us.
Go to this website and download the latest version of Python. You do not need to know how to program (in Python or otherwise) to follow this tutorial.
An Artist (preferred but not required)
You will also need an artist who knows their way around digital art to create your own custom collection. However, this is not required to follow this tutorial. We will be providing you with certain test images to play around with.
The Scrappy Squirrels Collection
As part of this tutorial, we will walk you through the process of creating the Scrappy Squirrels NFTs, a real project that we have launched. This tutorial (and every subsequent one) has been created as part of our roadmap goals to make NFTs and blockchains more accessible to people. Do check out our Discord for more details. (Go on, we will wait :))
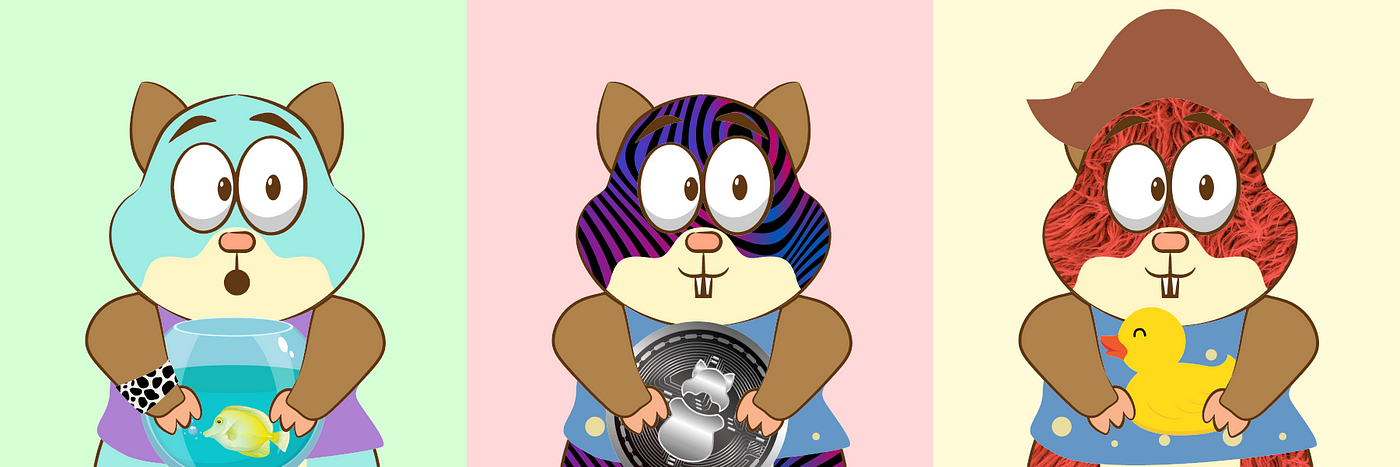
The squirrels have been generated using over 85 traits. Here are a few samples.
The Generation Process
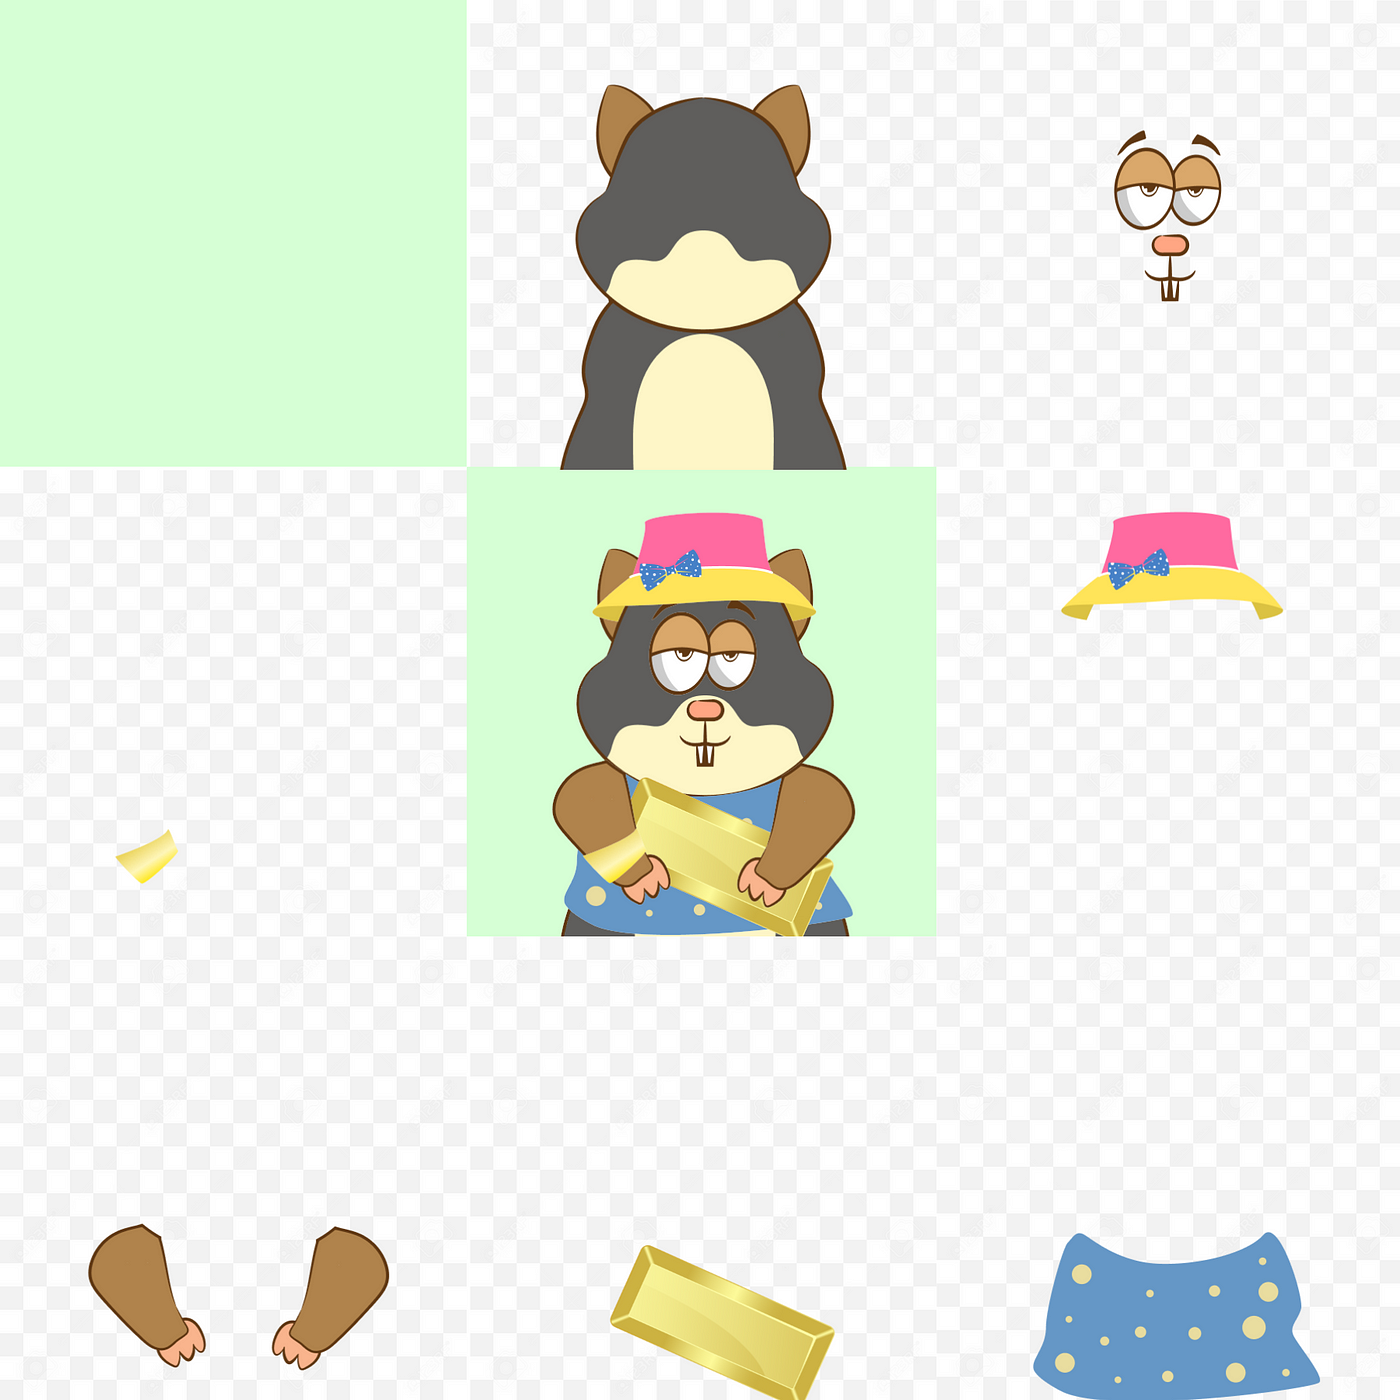
The squirrels that you see above were generated by stacking PNG images on top of one another. Although no blue-chip NFT projects describe how they generate their art, we are certain that this is what they do too. Almost every NFT avatar that you see is a set of stacked PNG images (which makes the claims that they are just JPEGs false. Checkmate, NFT critics).
Starting from the top right, if you stack every trait image clockwise, one after the other, you will end up with the image in the center. Here are few things to note:
Therefore, the artist’s job is to create multiple images of various trait categories. You can have as many or as few trait categories as you want. Do keep in mind though that the number of possible combinations increases exponentially with the number of traits categories.
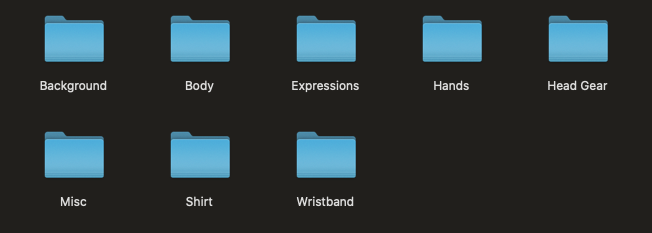
In the Scrappy Squirrels project, we created 8 trait categories.
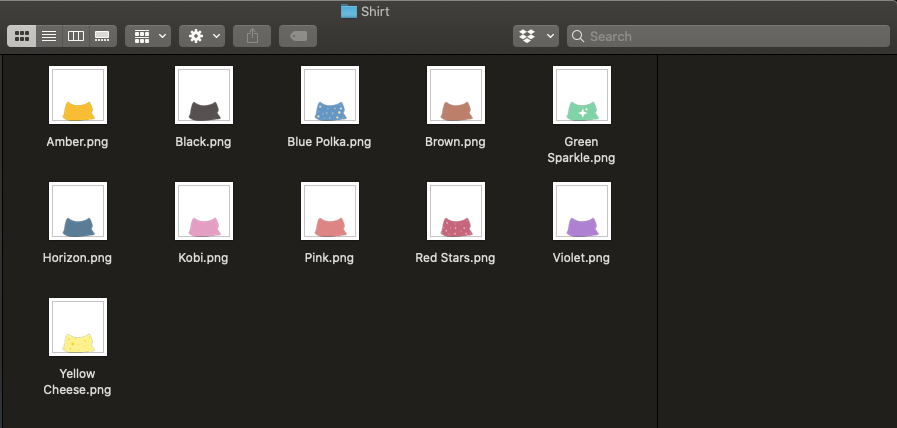
Each trait category had a varying number of trait images. For instance, we had 11 different shirts to work with.
Now, it’s your turn. You will need to decide on trait categories that you want to work with and generate trait images for each category. Make sure they satisfy the conditions mentioned above (should be of the same dimension, should be correctly positioned, etc). Also, make sure you name the trait images appropriately. What you name your image is what will appear in the metadata file.
Once you are done with this, we are now ready to use the library to generate our collection automatically! If you are not an artist (or do not have access to one), don’t worry! We have some sample images that you can play around with.
NOTE:
At present, the library is only capable of handling PNG images. We will be adding support for other media types soon.
Download repository and install required packages
Once you’ve downloaded the repository, open your Terminal or Command Prompt, and run the following command:
Running this command will install three important Python packages that our library depends on:
Add your custom assets
In the generative-art-nft repository that you downloaded, you will see that there is an assets folder. If you have your custom trait artwork available with you, go ahead and replace the contents of this folder with your assets. In our case, our assets folder had 8 subfolders representing categories named appropriately (see above), and each subfolder had trait images of that particular category.
If you do not have custom artwork, leave the default assets folder as is.
Configure the config.py file
This is the last (and perhaps, the most important step) before we can generate our avatar collection. Open the config.py file and fill it up according to the instructions below.
The config file consists of a single Python variable called CONFIG. CONFIG is a Python list (encapsulated by []). It contains a list of trait categories in the order that they need to be stacked. The order here is extremely important. Here is a sample configuration.
Each trait category is represented as a Python dictionary (encapsulated by <>). All that needs to be done is define these trait category dictionaries in order in the CONFIG list.
A trait category dictionary has 5 keys that it needs. These are id, name, directory, required, and rarity_weights. When creating a new layer (or replacing an existing one), make sure all these keys are defined.
This is how you go about assigning value to each key.
Configuring rarity weights
The rarity_weights key can take three values: None, ‘random’, or a Python list. Let’s explore each value one by one.
None
If you set the rarity_weights value to None, each trait will be assigned an equal weight. Therefore, if you have 5 traits, each trait will appear in roughly 20% of the avatars.
In case required is False, it will be equally likely to not get that particular trait at all. In the previous case, if the required property was set to false, then each trait would appear in roughly 16.6% of the avatars. Another 16.6% of avatars would not have that particular trait at all.
‘random’
Setting rarity_weights to ‘random’ (note the parenthesis) would randomly assign weights to each category. We strongly recommend you do not use this feature. Always resort to either equal or custom user-defined rarity.
Python List
This is probably the most common way of assigning rarity weights.
The first thing to do is to go to your trait category folders and sort the trait images by Name. For instance, sorting the Wristbands folder will yield this for us:
You can see that we have 9 different kinds of wristbands. Now, we need to define a Python list (encapsulated by []) where each number represents a weight assigned to a particular trait in ascending order.
If required is set to True, then the number of weights should be equal to the number of traits for that category. If required is set to False, then the number of weights should be equal to the number of traits plus one.
In our case, if wristbands were required, we would define nine weights in the list and if it wasn’t required, we would define ten weights. In the latter case, the first weight would be the weight associated with not having the wristband at all.
Let’s take a look at the rarity_weights we defined for Wristbands.
Since wristbands aren’t required, we have set ten weights (nine plus one). The first weight is the weight associated with not having a wristband at all. The second weight is associated with the Cheetah band, the third weight is associated with the Giraffe band, and so on. Note the alphabetical order here.
The higher the weight, the more common a particular trait is. For instance, Cheetah has a weight of 5, and not having a band has a weight of 100. This means that having a Cheetah band is 20 times rarer than not having a band at all.
Generating the collection
Once you’ve configured the config.py file, it is now time to generate your collection. Open up your Terminal (or Command Prompt) and navigate to the generative-art-nft folder (using the cd command).
Now, run the following command:
Running this command will initiate the image generation program. It will first check that the config.py file is valid. Next, it will tell you about the total number of distinct possible combinations.
It will then ask you how many avatars you’d like to create. We suggest creating 20% more than what you want to create so you have plenty left over even after the removal of duplicates. In our case, we chose to create 12,000 avatars although we wanted 10,000. It will then ask you to name the collection, and will then begin the generation process.
It took us approximately 30 minutes to generate 11,957 avatars (after removing duplicates). The images and their related metadata will be available in the output folder.
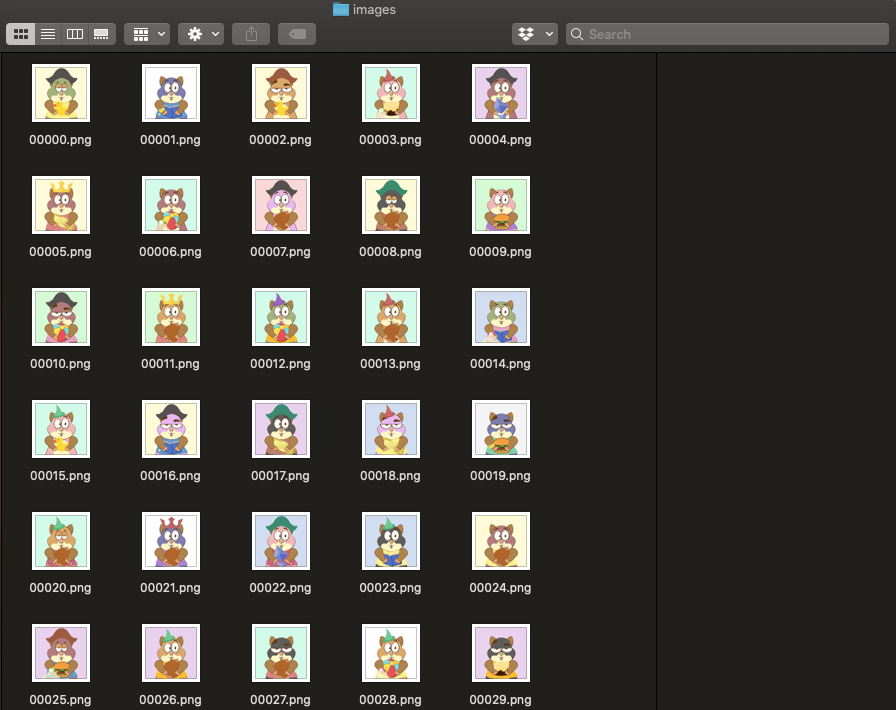
The images folder will look something like this (note that this is only a sample and not the final squirrels that we generated).
The metadata file is a CSV file that you can import into Excel and analyze (for things like which trait is the rarest, which trait combination is the most common, avatar rarity ranking, etc.)
Conclusion
And there you have it! You have generated your very own avatar collection.
So are we now ready to launch the next big NFT project? Not quite. You will need to upload these images to IPFS, allow your users to mint them into NFTs, and create community and buzz around your project.
If you have any questions or would like us to add additional features to this library, please reach out to us on our Discord server, or drop them in the comments below. We will try to address as many of them as possible.
Until next time!
About Scrappy Squirrels
Scrappy Squirrels is a collection of 10,000+ randomly generated NFTs. Scrappy Squirrels are meant for buyers, creators, and developers who are completely new to the NFT ecosystem.
The community is built around learning about the NFT revolution, exploring its current use cases, discovering new applications, and finding members to collaborate on exciting projects with.
Creating your own NFT from scratch and listing it on OpenSea
Introduction
NFTs (or Non-Fungible Tokens) have become increasingly popular, first after the CryptoKitties game was released (and saturated the Ethereum network) and lately when the creator of Twitter sold its first tweet as an NFT for almost 3 million dollars.
So … what it is an NFT?
An NFT or Non-Fungible Token is a unique digital asset (that may represent non-digital assets), which uses the blockchain to ensure its authenticity. This type of token is a great resource to be used in platforms or organizations that offer different types of products where they need to prove unique properties and attributes such as:
And what it is the ERC721 standard?
The ERC-721 (Ethereum Request for Comments 721), proposed by William Entriken, Dieter Shirley, Jacob Evans, Nastassia Sachs in January 2018, is a Non-Fungible Token Standard that implements an API for tokens within Smart Contracts.
It provides functionalities like to transfer non fungible tokens from one account to another, to get the current token balance of an account, to get the owner of a specific token, as well as the total supply of the token available on the network.
Also allows optional implementation of metadata for your tokens.
Tools & Development Assets
Pre-requisites to go through the article:
Here is a brief description of each element we use throughout the process based on its documentations:
After putting in context the different elements that we will use … Let’s get started!
Metadata
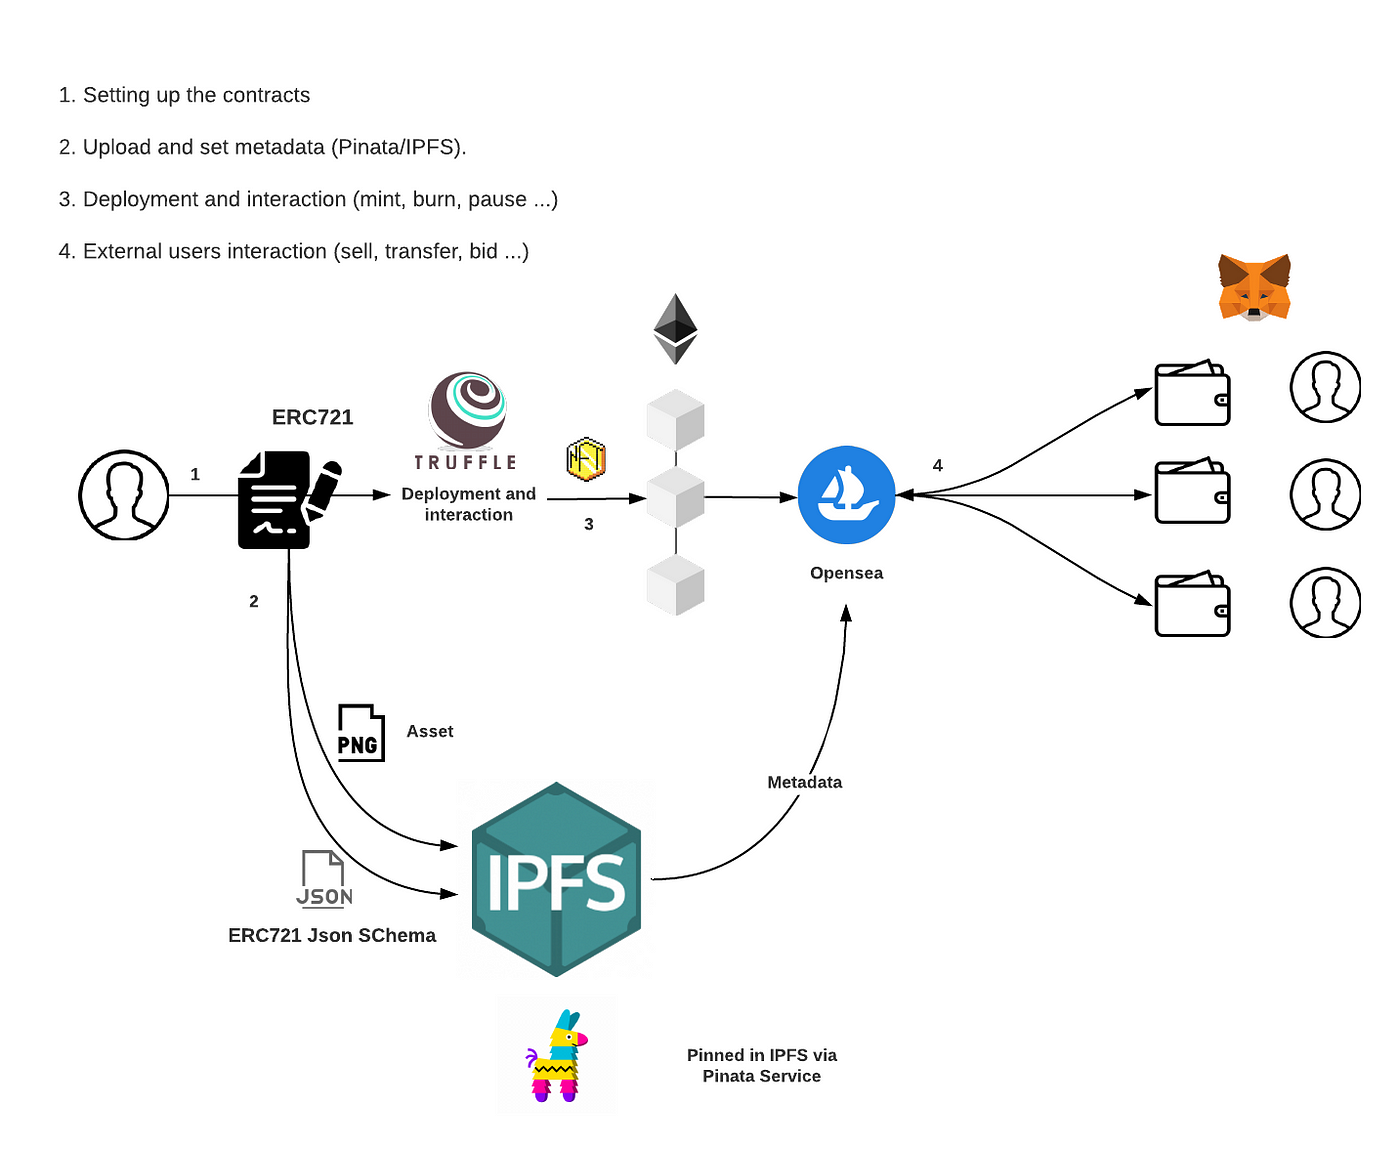
There are many approaches to solve the metadata storage. For this article I’ve chosen to do it off-chain (so, I’ll host the metadata out of the blokchain) but in a decentralized way using IPFS to retrieve the metadata.
I’d recommend you to read more about it in this article from Opensea’s Blog, in which they explain pretty well what are the circunstamces when it comes to talk about metadata and it’s de/centralization :
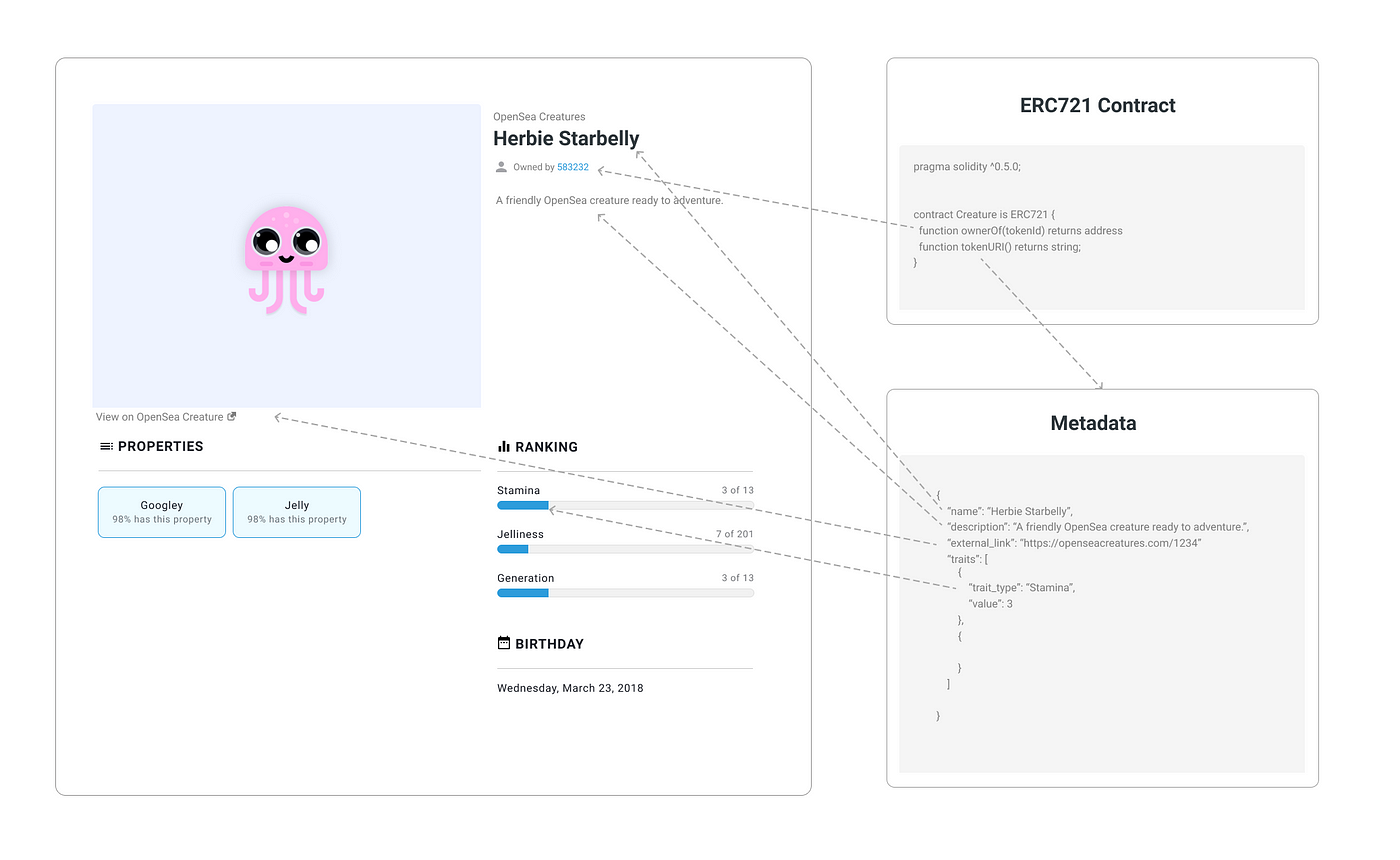
To retrieve the data we have off-chain, OpenSea reads the ERC-721 Json Schema, what makes things easier.
Since we are going to deploy static NFT, we will need to set-up all the metadata in advance for every token we want to deploy.
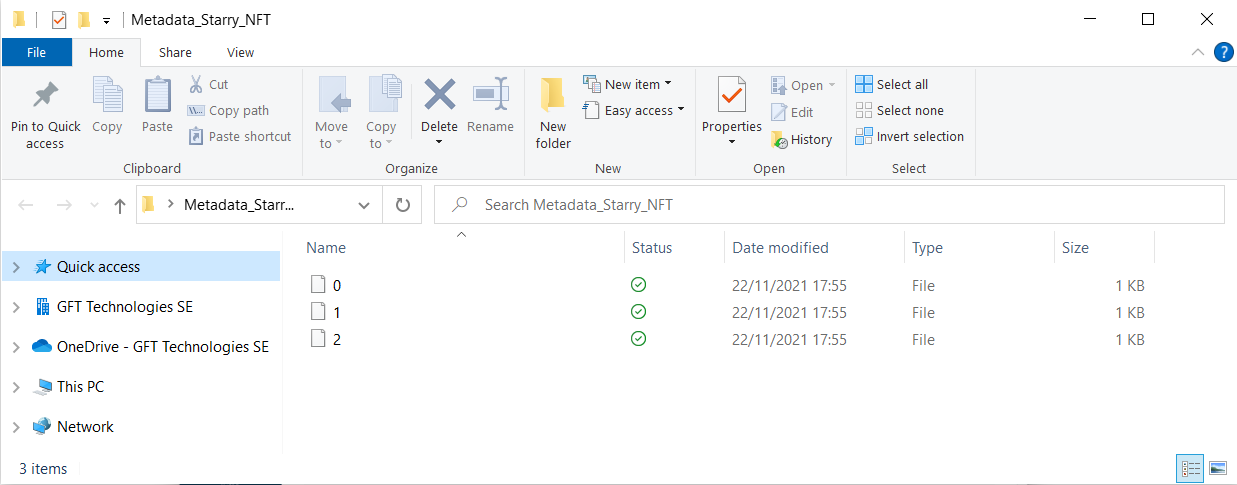
To do this, we will write the metadata of every token we want to create in individual text files (with no file extension, but following the json schema), and then we will put them all in the same directory, which we will upload later to IPFS to pin it with Pinata.
This is a reference for the ERC721 Json Schema:
This would be a real example of an NFT metadata:
And in the following image we could see how the result would be according to the OpenSea conventions (more info about metadata standards in here):
You can check the links below the article if you want to see examples already made and its result.
Upload metadata to IPFS & Pinata
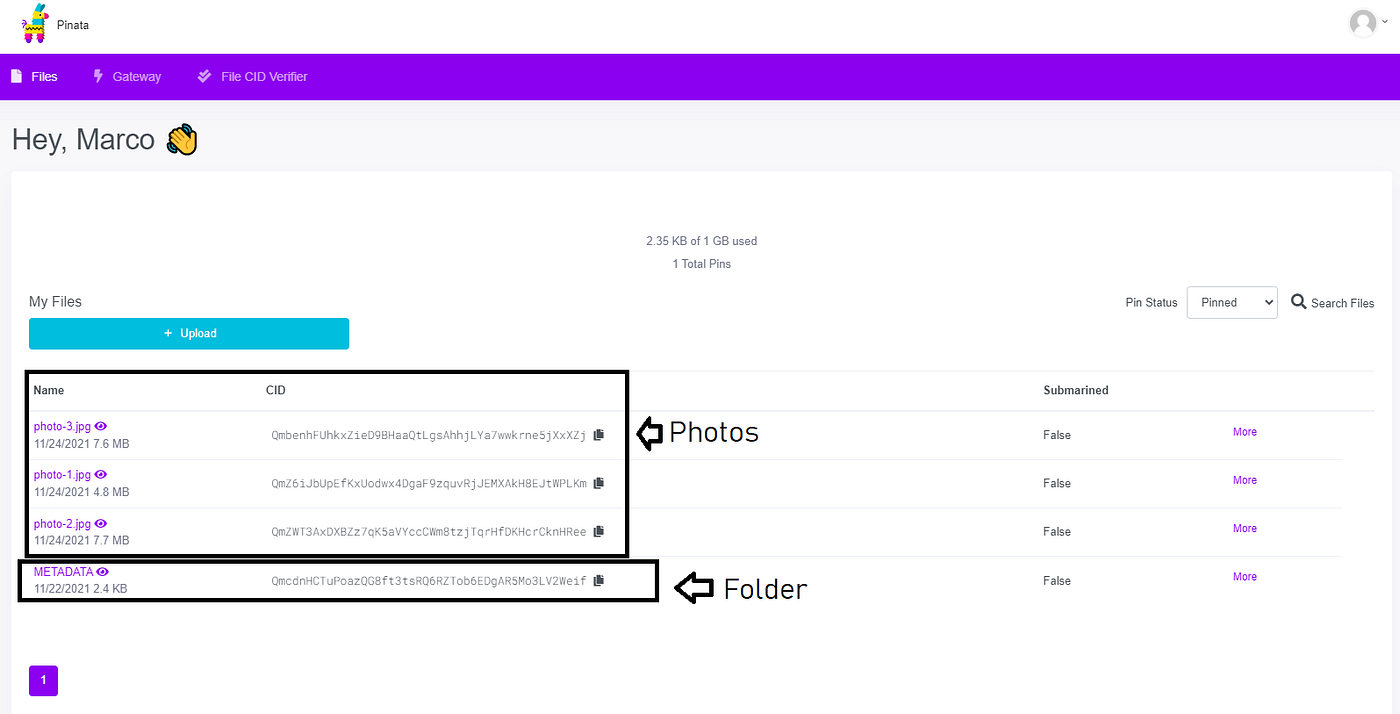
First thing we will do is upload the images to Pinata that we want to attach to our tokens, it will allow us to keep the image stored immutably and decentralized manner.
After that, we’ll see our image in ‘ My Files’. Click on it and copy the URL to the metadata text file associated.
Finally, we should have a folder as the one below containing the different files with our metadata.
We will finally upload the folder to Pinata.
And it will give you an URL that you will need later for the contract deployment script.
If you click on it, should bring you to a folder like this:
Should be something like this:
You can check inside how my examples have been done.
Setting up the environment
You will need WSL2 to execute every command on Windows OS
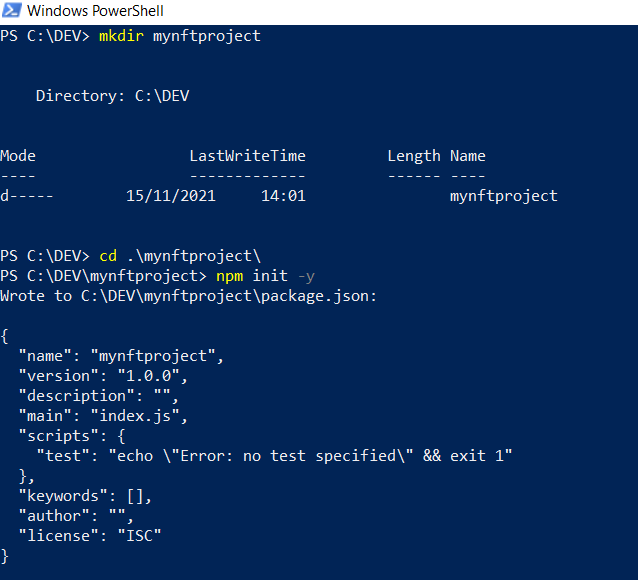
Start creating a new project:
Then, install OpenZeppelin Contracts which contains many different Solidity files which we will use for our ERC721’s implementation:
And installing the development framework for deployment, which will be Truffle for this tutorial:
Setting the Truffle project
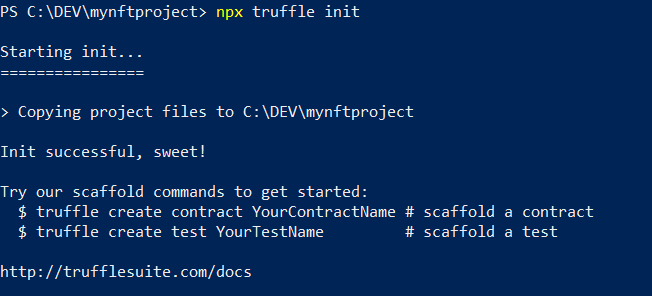
To use most Truffle commands, you need to run them against an existing Truffle project. So the first step is to create a Truffle project.
This command will create a directory called ‘ contracts’ and a configuration file (‘ truffle-config.js’), a Javascript file which can execute the necessary code to create and manage your truffle environment configuration, e.g:
We’ ll do a dive into this file later.
Smart contracts and deployment files.
ERC721 & Extensions
Smart-contracts in Solidity are kind of similar to the “classes” concept in the OOP paradigm. Contracts contain persistent data in state variables, and functions that can modify these variables. Calling a function on a different contract (instance) will perform an EVM function call and thus switch the context such that state variables in the calling contract are inaccessible.
We are going to use Preset ERC721PresetMinterPauserAutoId which is an ERC721 that is preset with the ERC721 standard and its extensions.
Basically we are importing different Solidity smart contract with different functionalities in just one file that combine all of them to give us most of the potential of the standard.
openzeppelin-contracts/ERC721PresetMinterPauserAutoId.sol at master ·…
OpenZeppelin Contracts is a library for secure smart contract development. …
And these functionalities allow us to execute different transactions related to NFTs and the ERC721 standard :
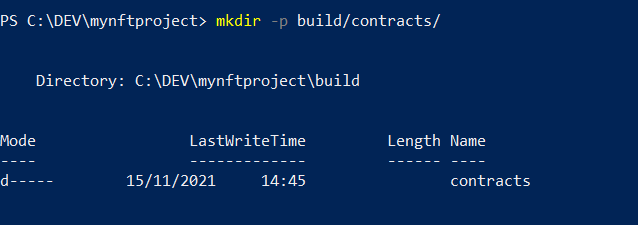
The Preset contracts have already been compiled, so we only need to copy the artifacts to the build/contracts directory:
Deploy contract script
Using your IDE create 2_deploy_token.js in the migrations directory with the following contents:
Here we are setting (in order) :
Migrations
As written in Truffle docs: Migrations are Javascript files that help you deploy contracts to the Ethereum network. These files are responsible for staging your deployment tasks, and they’re written under the assumption that your deployment needs will change over time.
So, migrations are really useful when you want to manage the interactions of a bigger project and you want to deploy different smart-contracts than rely on each other at different times.
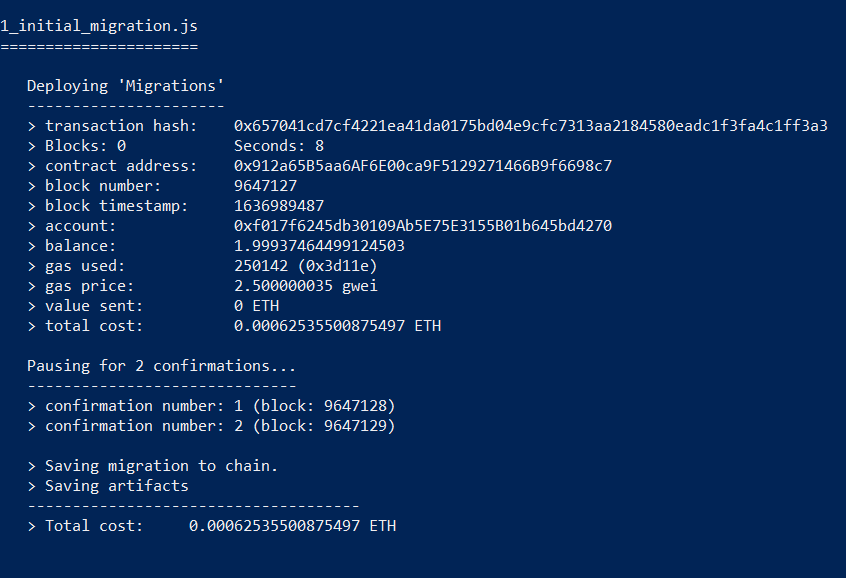
You can find this file inside the migrations directory as ‘1_initial_migrations.js’
And it’s Solidity code, which you can find in the contracts folder inside your project directory.
Deploy to a public testnet (Rinkeby)
An Ethereum testnet is a network very similar to the main one but in which the ether has no value and can be obtained for free. This makes them especially useful for purposes like testing the transactions cost.
We will deploy to Rinkeby public testnet as OpenSea supports Rinkeby (as well as Ropsten, Göerli … ) for testing.
What do we need to deploy on a public testnet?
Connect to a node in the testnet
Easiest way to access a testnet is via a public node service such as Infura.
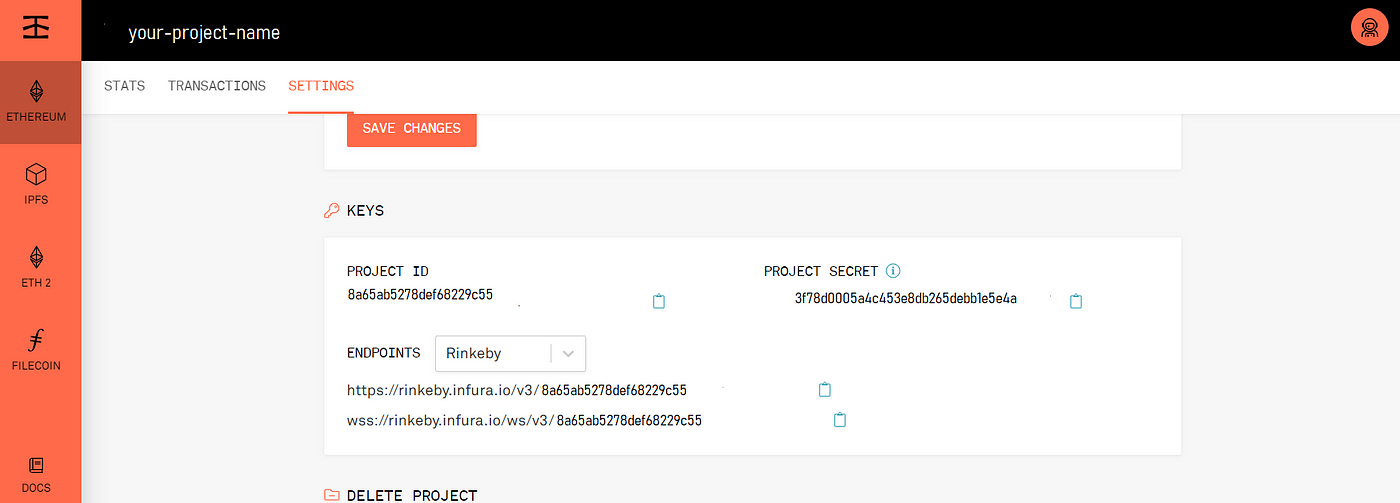
Create an account on Infura, set up a new project and get the ‘ProjectID’ since we will need it later.
Create a new testing account
To send transactions on a testnet you need an Ethereum account. Truffle and mnemonics package provides you this:
*(If you don’t have it installed, you’ll be asked for it)
And this will print on your console screen a serie of words which you will need to sign the transactions with your account, so keep them to write them later in the secrets.json file.
Keep your mnemonics safe, even for testing purposes.
Update your networks configuration in our Truffle configuration file
Since we are using public nodes, we will have to sign all our transactions locally.
We will use @truffle/hdwallet-provider together with our set of mnemonic words previously generated.
Through the Infura endpoint we will tell the provider how to connect to the Rinkeby testnet.
After the installation is completed, we will modify the truffle-config.js file with a new connection to the Rinkeby’s testnet.
Should look like this:
A secrets.json file is required inside the project directory in order to not hardcode your mnemonics and your projectId (from Infura). You can use any other secrets-management solution you like as long as it’s safe.
In this case, the file used should contain something like this:
Fund your testing account
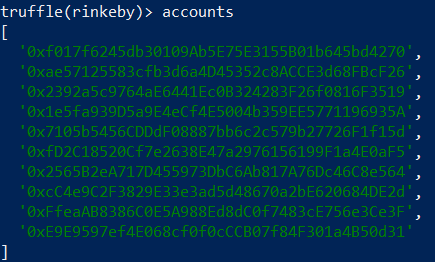
To get the testing accounts Truffle is providing you in the project, execute:
This command will drop a list with the different accounts you can use:
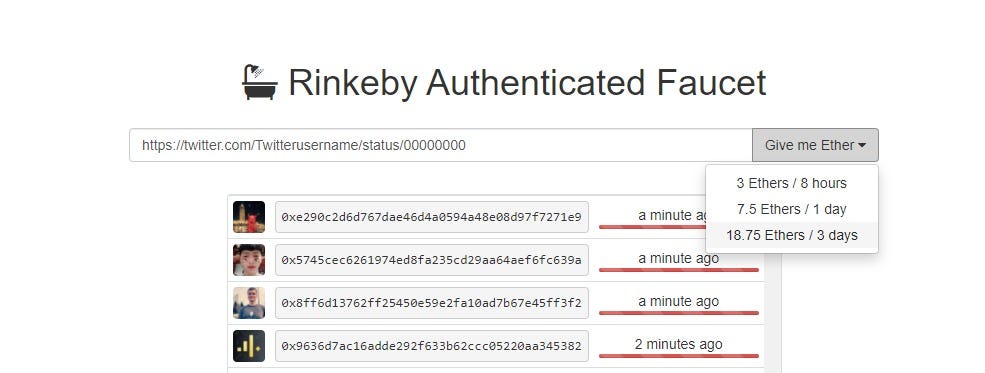
Now, (if everything is alright) you got your Rinkeby ethers so you can start to spend some rETH!
Deployment
Again on your project directory, execute these commands:
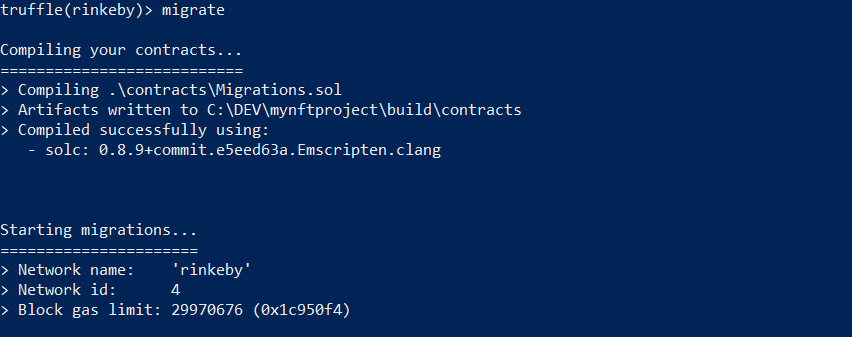
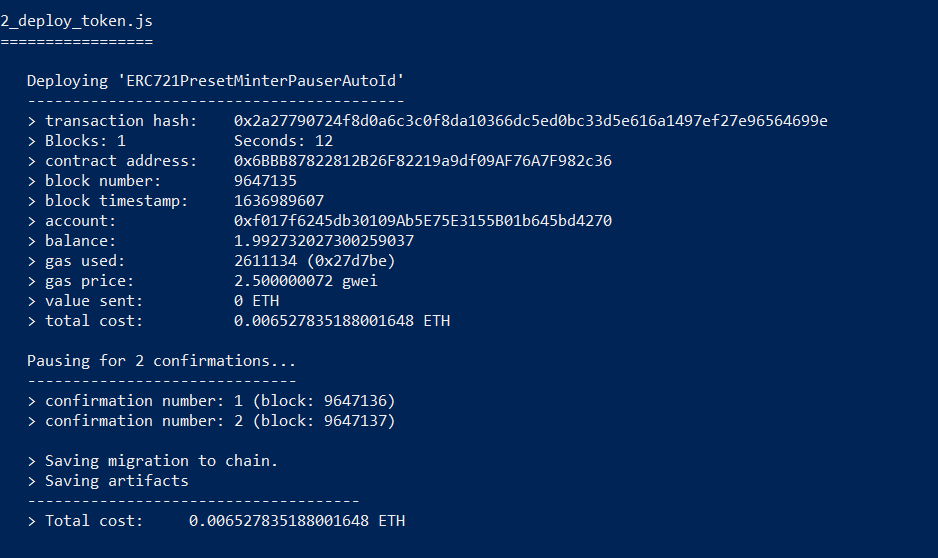
And now deploy your contract:
Once the contract has been deployed
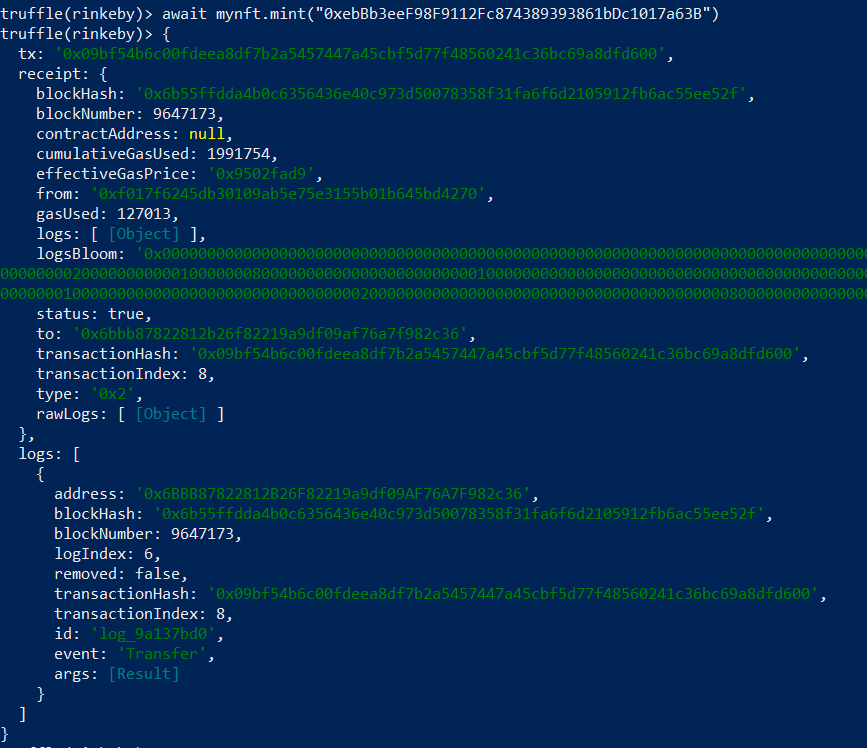
If everything has gone as it should, you should be able to interact with the contract, so we will mint 1 NFT :
OpenSea
Now we will list our NFT in OpenSea to make it visible and buyable by anyone.
To obtain the address of our contract on Rinkeby we can use the Truffle console:
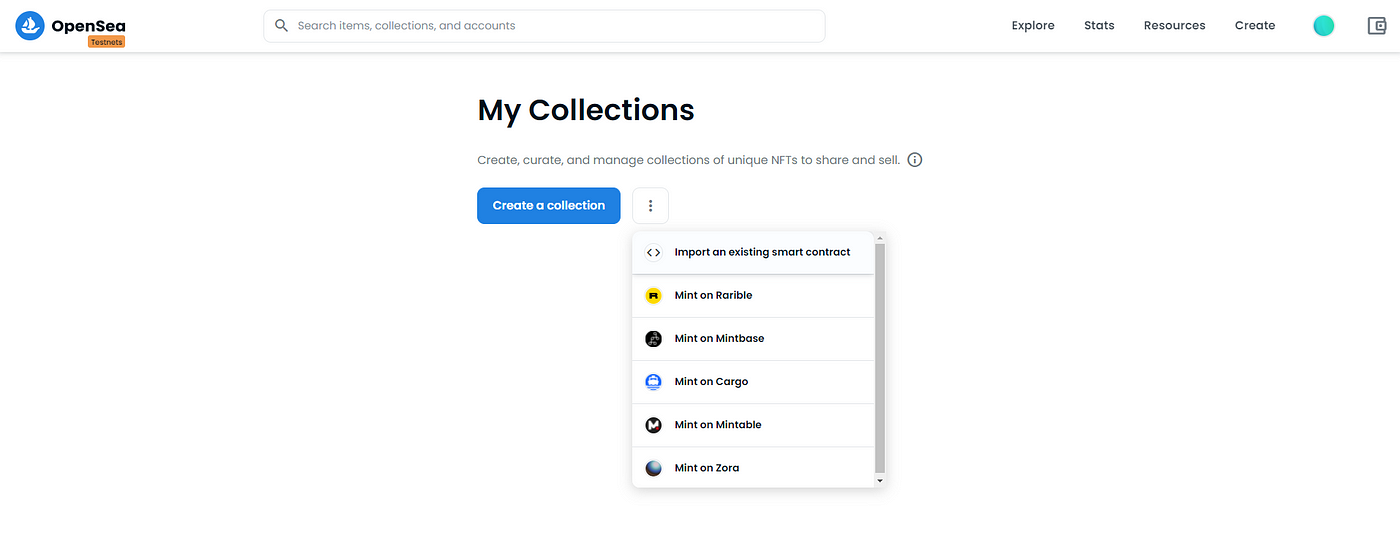
Go to Opensea and click on ‘ My Collections’, and then the three vertical dots to ‘Import an existing smart contract’.
After choosing ‘ Live on testnet’, copy & paste your smart contract address:
You may receive the following message: ‘ We couldn’t find this contract. Please ensure that this is a valid ERC721 or ERC1155 contract deployed on Rinkeby and that you have already minted items on the contract’.
This is a common issue, Opensea will display your tokens, but it might not be instantaneous. As long as you can see the token contract and transactions on Etherscan Rinkeby, you know it is a valid ERC-721 contract and has minted X items. Sometimes you have to wait 12/24 hours to get their NFTs to appear.
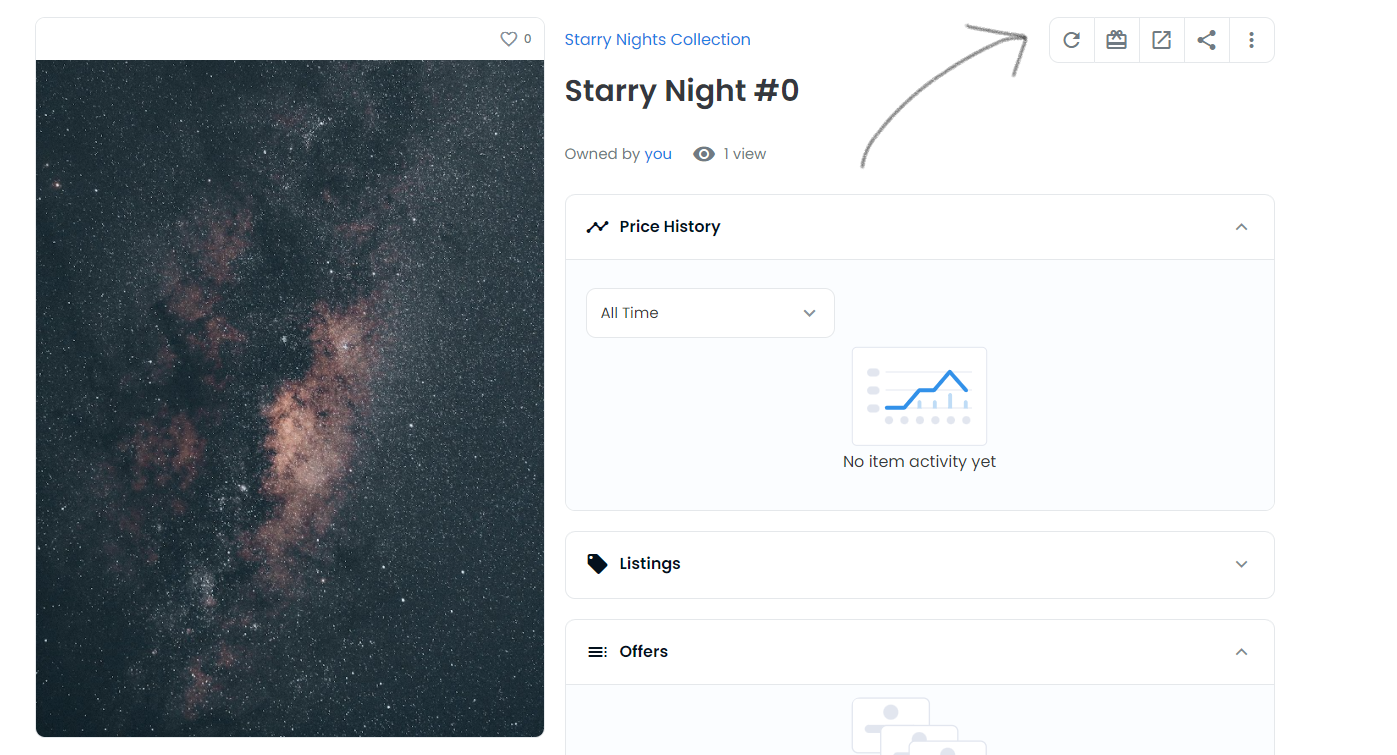
And assuming there aren’t issues at this point, we should be able to see our NFT listed on OpenSea, following the next structure:
https://rinkeby.opensea.io/assets/[nft contract address]/[token id]
The example I made for this tutorial can be found in here:
And more in another profile where you can find a collection made with Generative Adversarial Networks and some different types of properties on its metadata:
Import it to your Metamask wallet
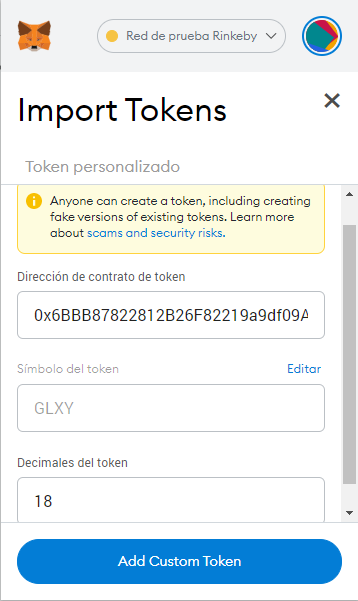
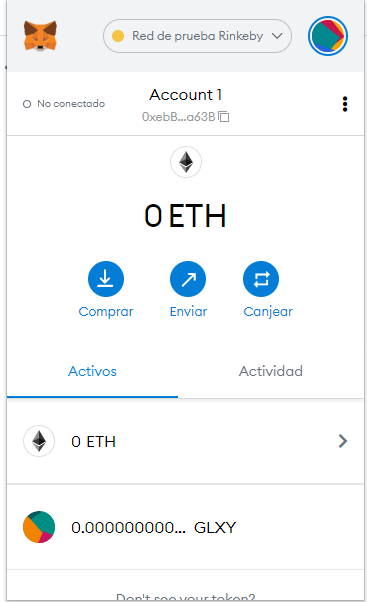
As well, you should be able to import your NFTs into your Metamask wallet. Just open the Metamask Chrome extension of the address you passed for the minting earlier, and select ‘Import Tokens’ down in the menu. You will be asked for the contract address and after you copy it there, it will set the token symbol you passed earlier automatically. Also, you need to select the decimals.
*I recommend to not use 18 decimals as I did if you don’t want to see lot of zeros …
Next steps
Many possibilities at this point to further develop your NFTs:
Conclusion
We have followed a simple process during which we have used an OpenZeppelin preset written with Solidity and deployed through Truffle to create an NFT with the ERC721 standard and using tools like Pinata to ensure the permanence of our metadata in a decentralized storage service like IPFS, as well as listing it in OpenSea following the metadata standards, to finally import the tokens into our Metamask wallet.
If you got interested about it or want to know more about NFTs and digital art, feel free to listen to the podcast by our colleagues David Creer and Julien Donnet — “Your Immutable Future” — Let’s talk NFT’s
How to create and deploy an NFT collection
In this tutorial we will create and deploy an NFT collection. First we will create a collection of images and upload them to IPFS (Inter Planetary File System). Then we will create a Solidity smart contract and link it to the images. Finally we will test the NFT’s on Open Sea. If you are not sure what an NFT is you can read more about them here (Non Fungible Token).
Images and JSON files for NFT collection
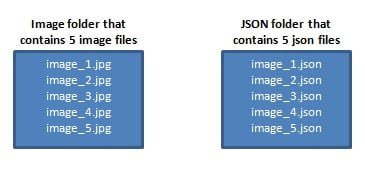
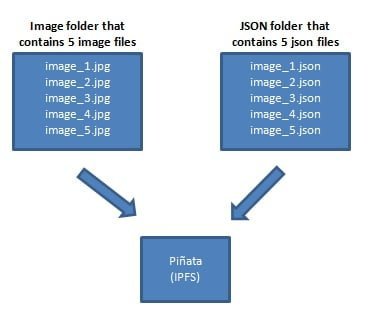
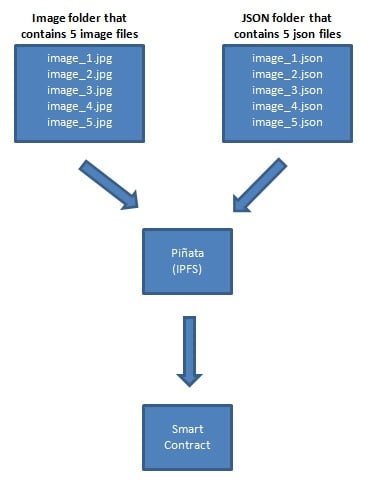
To make and deploy an NFT collection we need to make sure our project structure is setup correctly for scale. If you want to create 5 NFT’s or 5,000 NFT’s the structure of the data and folders will be the same. You will need to create an image folder and a JSON folder. Each folder will contain files needed for this project. Take the time to organize your files and save them in a location on your computer for easy access.
Create a image folder for NFT’s
Create a JSON folder for NFT’s
Then create another folder called “JSON”. This folder will contain the corresponding JSON files for each picture. The JSON files are used to give your NFT’s traits. To create the JSON files use your favorite text editor. I used PyCharm to create these files and saved each file in the JSON folder. The JSON structure that I used for each file is below. Make sure each JSON file corresponds to an image name (as an example – image_1.jpg). Add, remove and change attributes to correspond to your images and project. Note that we will update the
sample JSON file
Upload images and JSON files to Pinata
Next create an account on Pinata. They provide a service to upload files to IPFS and you can sign up for a free account. With their free account you can experiment and quickly get your NFT project up and running. Remember IPFS is a public network so only post information that you want to share with the world.
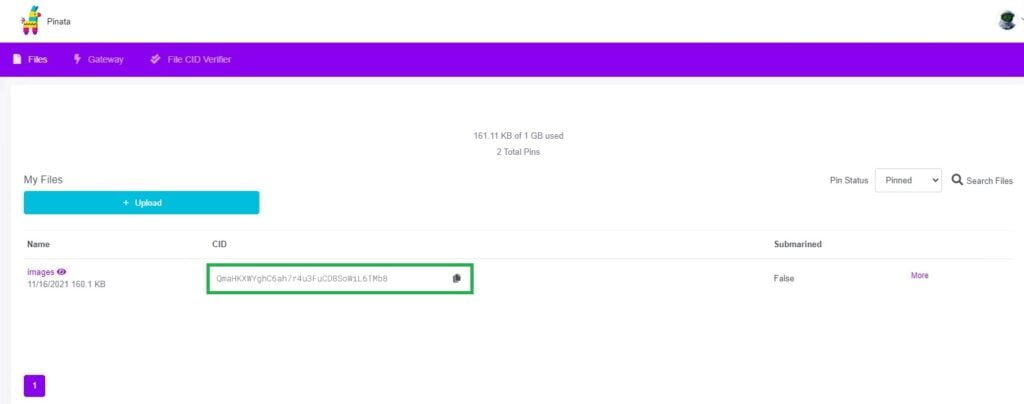
After your account is created on Pinata perform the following steps:
3. Copy this CID and paste it into each of your JSON files (see example below)
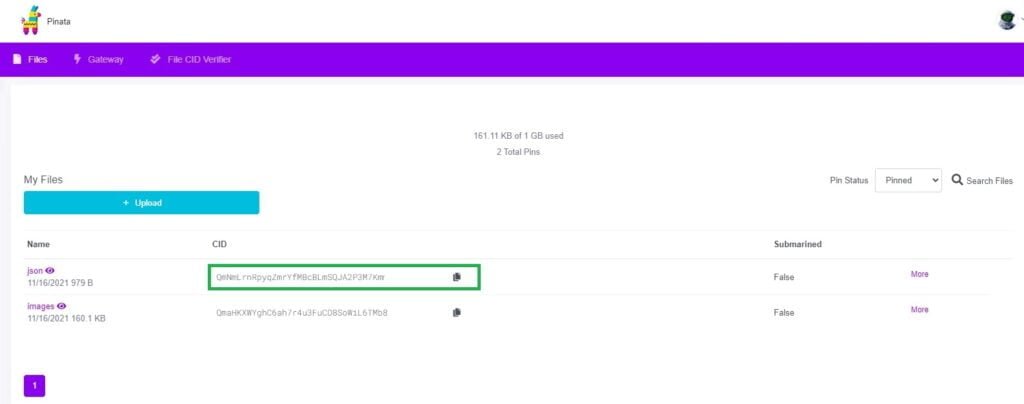
4. After all JSON files have been updated with the CID in the URL upload the JSON folder to Pinata. After you upload the JSON files in Pinata a new CID will be generated for the JSON folder. The JSON folder CID will be used in your Solidity smart contract.
Create and deploy a Solidity ERC721 smart contract for your NFT collection
Now lets create an ERC721 Solidity smart contract for our NFT collection. This smart contract will allow you to mint an NFT and will keep track of all tokens and owners. It is important to note that this contract uses the IPFS location of the JSON folder.
The ERC721 smart contract below imports Open Zeppelin’s ERC721 and Strings contracts. Two functions were added to the contract below (Mint and TokenURI). This is a sample contract and can be extended to meet your projects goals.
Read the comments in the code to understand how the smart contract works.
In the future add a minting fee to your contract. For the purposes of this demonstration we are leaving it out. This makes the contract and process easier to understand and test.
Deploy the contract on the Goerli network and test your NFT’s on Open Sea
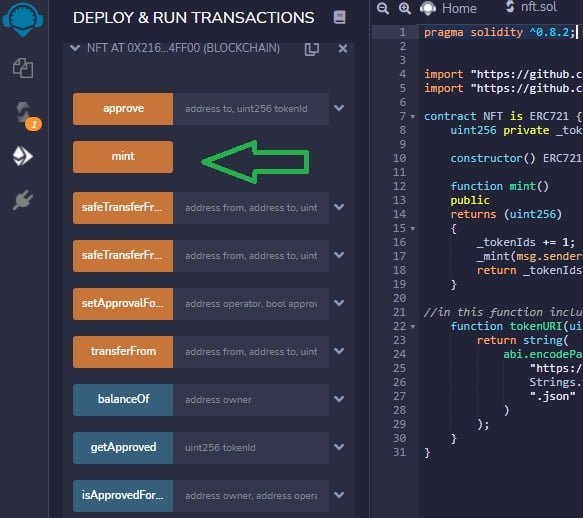
Use Remix to upload your contract to the Goreli next work. After you upload the smart contract mint an NFT directly in Remix.
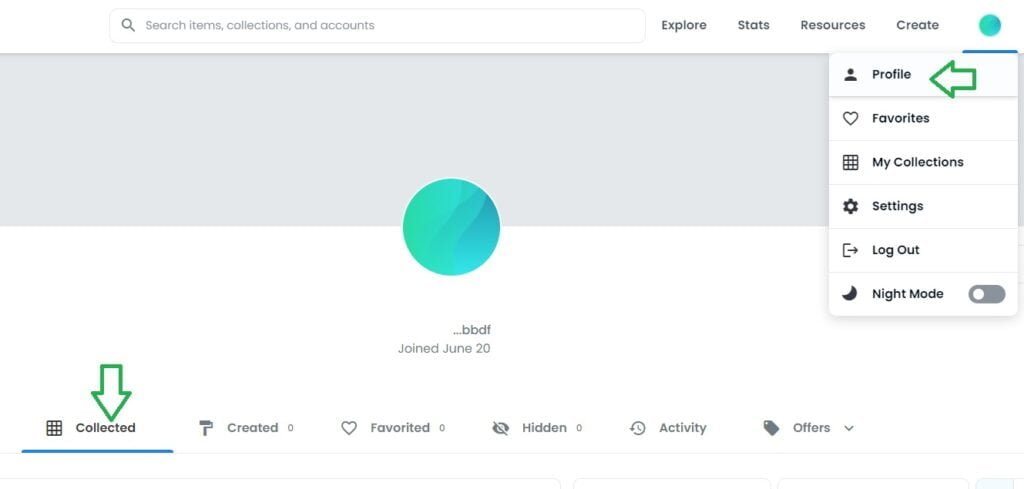
After you create and deploy an NFT collection test out your NFT’s on Open Sea. Finally go to the Open Sea test environment at https://testnets.opensea.io/ and connect your wallet that contains your newly minted NFT’s. You will be able to see the collection of NFT’s that you own in your wallet on the Open Sea platform. Select Profile then Collected.
Resources
Blockchain Networks
Below is a list of EVM compatible Mainnet and Testnet blockchain networks. Each link contains network configuration, links to multiple faucets for test ETH and tokens, bridge details, and technical resources for each blockchain. Basically everything you need to test and deploy smart contracts or decentralized applications on each chain. For a list of popular Ethereum forums and chat applications click here.
 | Ethereum test network configuration and test ETH faucet information |
 | Optimistic Ethereum Mainnet and Testnet configuration, bridge details, etc. |
 | Polygon network Mainnet and Testnet configuration, faucets for test MATIC tokens, bridge details, etc. |
 | Binance Smart Chain Mainnet and Testnet configuration, faucets for test BNB tokens, bridge details, etc. |
 | Fanton networt Mainnet and Testnet configuration, faucets for test FTM tokens, bridge details, etc. |
 | Kucoin Chain Mainnet and Testnet configuration, faucets for test KCS tokens, bridge details, etc. |
Web3 Software Libraries
You can use the following libraries to interact with an EVM compatible blockchain.
Nodes
Fix a transaction
How to fix a pending transaction stuck on Ethereum or EVM compatible chain
How to generate your own 10,000 NFT Collection: A Step-by-Step Guide
Marquee NFT projects like Cryptopunks and Bored Ape Yacht Club have generated hundreds of millions of dollars in revenue, and have made several of their owners millionaires.
What the aforementioned projects (and most other successful NFT projects today) have been in common is that they are PFP projects. This means that they usually are a collection of 10,000+ avatars where each avatar is unique and has a set of traits.
What is an NFTВ collection?
These properties are displayed on OpenSea, the main platform where NFTs are traded. On any given NFT’s page, its properties will be listed, as well as the percentage of NFTs in the collection that share that property. Usually, anything under 1% is considered rare. For example, take a look at the trio of apes at the top of the page. On the right you’ll see one with a rare «Solid Gold» fur trait. Of 10,000 apes, only 46 have this property, making these 46 particularly valuable.
How NFTВ collections are made?
NFT profile collections are made by stacking layers of traits on top of each other. Take a look at the NFT below. Each layer (base, shirt, hat, accessory) is a png of the same size of every other trait. By layering these traits over one another, we end up with an NFT profile.
These trait images need to be designed so that they fit perfectly with other traits when stacked. Each layer typically has multiple traits. The generation process works by selecting a random trait from each layer and stacking them into one single NFT profile for your collection.
Typically, traits have some rarity associated with them.
For example, a BAYC NFT with a gold background only exist in 10/10000 of their NFTs. This rarity is what drives up the value of that specific NFT. It is encouraged for every collection to include rarity in their collection.
The amount of traits in layers correlate directly to how many NFTs you can generate. If you have 3 layers, each layer with 3 traits. the math to calculate this would be 3 * 3 * 3.
The formula is (number of traits)^layers. If you have uneven amount of traits in some layers, you will need to split the math to do e.g. 3 * 4 * 3 * 2.
For my collection, we have 4 layers, each layer has 4 traits. therefore I can only generate 256 NFTs at most.
I have the collection prepared already, and today we will be using this tool I made specifically for generating NFTs.
Pre-requisites to creating an NFT collection
If you made your NFTВ art work, export all your traits into different folders. Once I have something that looks like this, I will be ready to generate my collection.
It is important to note you need to export all your traits with the same size.
make sure the trait is aligned relative to the final composite
How to generate your NFTВ collection
The tool I will be using to create my NFT collection will be the generator app from Ambition. The process is super simple, and is broken down into 4 steps.
Once IВ have configured those, we can start generating our collection. Let’s get started with step 1.
Step 1: Project Settings
Filling in the project description with name is important for the metadata generated alongside this collection.
Step 2: Create the right layers.
As mentioned prior, my artist created 4 traits for 4 layers for this collection. All IВ am going to do is name the four layers that my traits were categorized in. I’ll need to confirm that my layers are in the right order before moving on to the next step. e.g. if my background layer ends up on top of the other layers my collection will come out with only the background.
Step 3: Add in my traits
Now that I have created the four layers, IВ can drag and drop my traits from their folder into these layers.
Step 4: Configure your rarity
In order to create scarcity in my NFTВ collection, IВ will update the rarity settings for some traits. In this example I will make the «yellow» background super rare.
And that is it!
Once I have confirmed my NFTВ looks correct by looking at the preview on the right hand side, all I have to do is hit generate and wait for my collection to finish generating. Projects with a larger collection size will take longer to create.
Next steps.
So are we now ready to launch the next big NFT project? Not quite. You will need to upload these images to IPFS, allow your users to mint them into NFTs, and create community and buzz around your project.
ambition’s no-code tools
Launching an NFT collection can be smooth and easy. Try out our no-code products today.
We have the right tools and plans you need.
Источники информации:
- http://medium.com/scrappy-squirrels/tutorial-create-generative-nft-art-with-rarities-8ee6ce843133
- http://medium.com/gft-engineering/creating-your-own-nft-from-scratch-and-listing-it-on-opensea-8ac296cf1019
- http://cryptomarketpool.com/how-to-create-and-deploy-an-nft-collection/
- http://ambition.so/post/generate-nft-collection

