How to delete grub
How to delete grub
Как удалить загрузчик Grub
Если вы устанавливали Linux, а потом по каким-либо причинам решили его удалить и вернуть Windows или создали загрузочную флешку Linux, но теперь она вам больше не нужна, нужно удалить загрузчик Grub. В этой инструкции мы рассмотрим, как удалить загрузчик Grub из MBR или из UEFI, также поговорим о том, как удалить Grub с флешки.
Как удалить загрузчик Grub и восстановить Windows
Если на вашем компьютере установлено две операционные системы, Windows и Linux, и вы хотите стереть Linux и его загрузчик, восстановив загрузчик Widows, и у вас используется таблица MBR, то это сделать очень просто.
В сети часто советуют способ: взять установочный диск Windows, загрузиться с него в режиме восстановления и выполнить команды:
Это действительно ответ на вопрос «как удалить Grub и восстановить загрузчик Windows?», и он работает. Но есть способ намного проще. Вам даже не придётся перезагружать компьютер. Утилита Bootice позволяет восстановить загрузчик Windows и удалить Grub с жёсткого диска в несколько кликов.
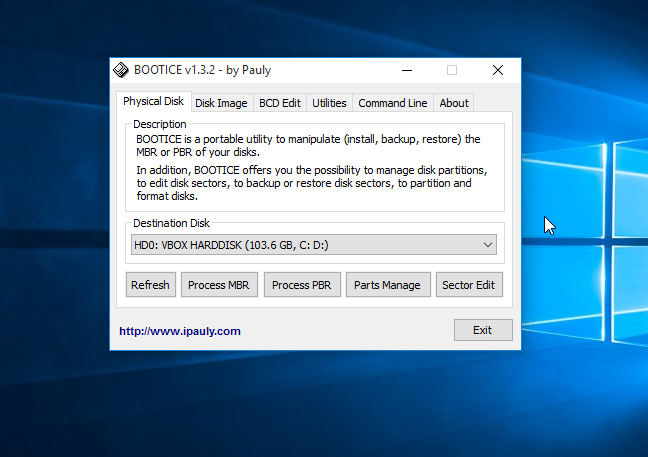
Скачать утилиту можно с softpedia, потому что на официальном сайте всё по-китайски. Только выберите правильную разрядность для своей системы. Запустите утилиту, выделите диск, на котором у вас установлен загрузчик Grub, затем нажмите кнопку Proccess MBR:
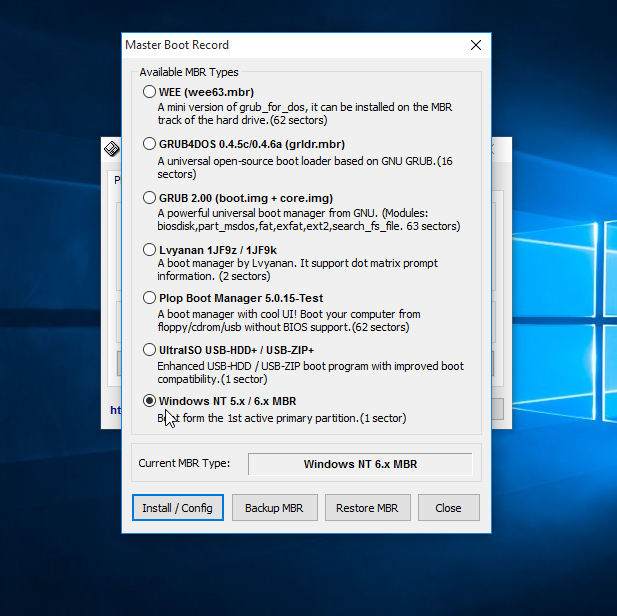
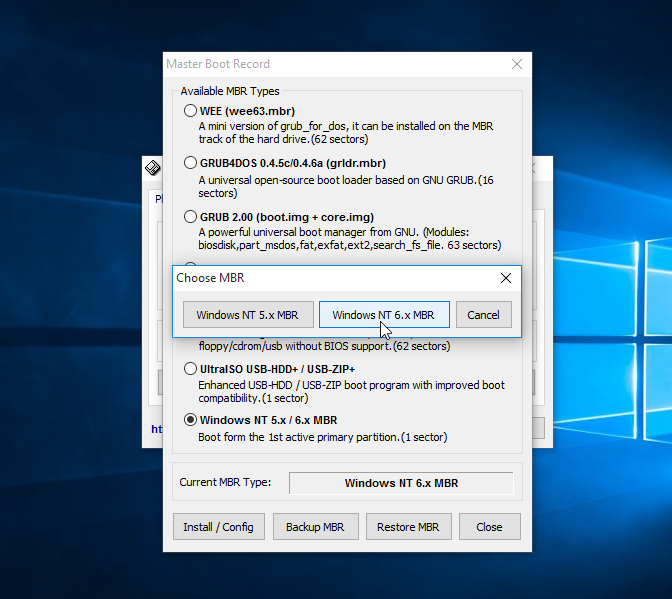
Затем Windows NT 5.x / 6.x MBR:
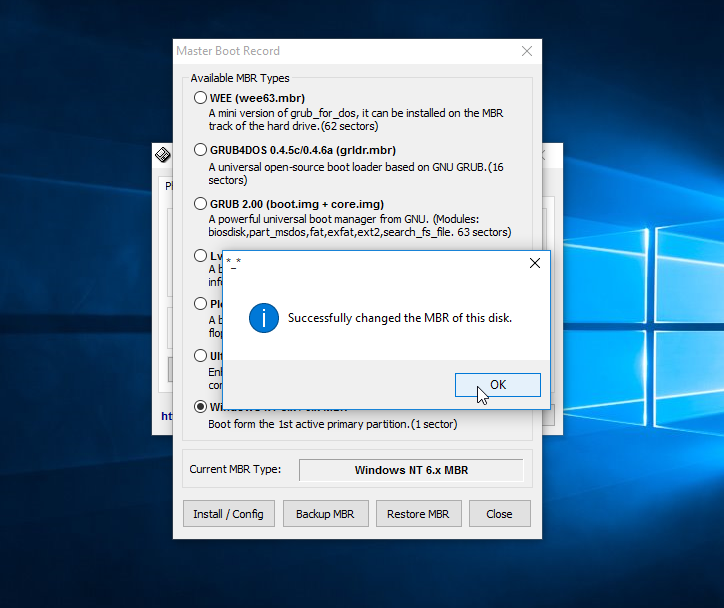
И нажмите кнопку Config / Install:
И готово: вы смогли успешно полностью удалить загрузчик Grub. Можете перезагружаться и проверять.
Как удалить загрузчик Grub в UEFI
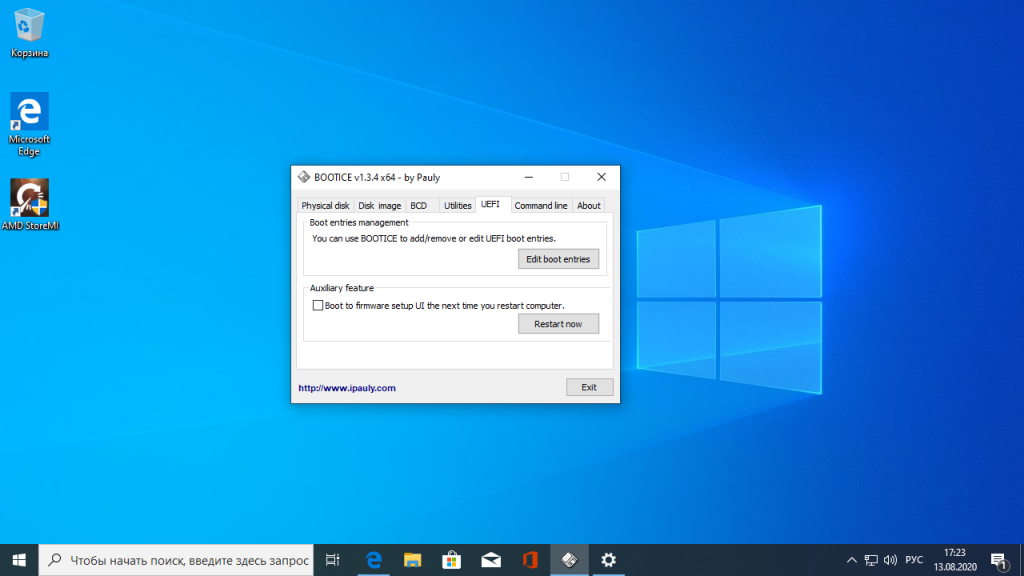
Эта проблема тоже решается с помощью утилиты Bootice. Только на это раз вам нужна именно 64-битная версия программы.
Одно из преимуществ UEFI на MBR в том, что здесь можно устанавливать сразу несколько загрузчиков на специальный раздел. Для удаления загрузчика Grub и восстановления функциональности Windows достаточно переместить Grub чуть ниже в очереди загрузки UEFI.
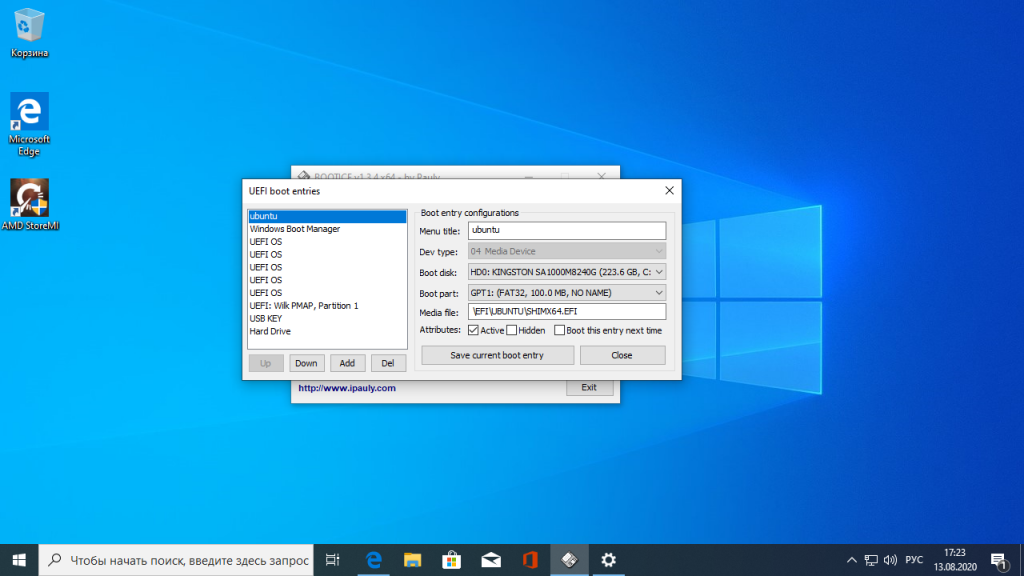
Откройте программу, перейдите на вкладку UEFI и нажмите Edit Boot Enteries. Откроется такое окно:
Здесь у вас есть два варианта действий. Либо опустить Grub ниже загрузчика Widnows кнопкой Down, либо полностью удалить запись о загрузчике кнопкой Del. Но в обоих случаях файлы загрузчика останутся на диске. Полностью удалить загрузчик Grub со всеми его файлами нужно из командной строки. Это немного сложный процесс, но всё же мы его разберём.
Кликните в левом нижнем углу экрана правой кнопкой мыши, в открывшемся контекстном меню выберите Командная строка от имени администратора.
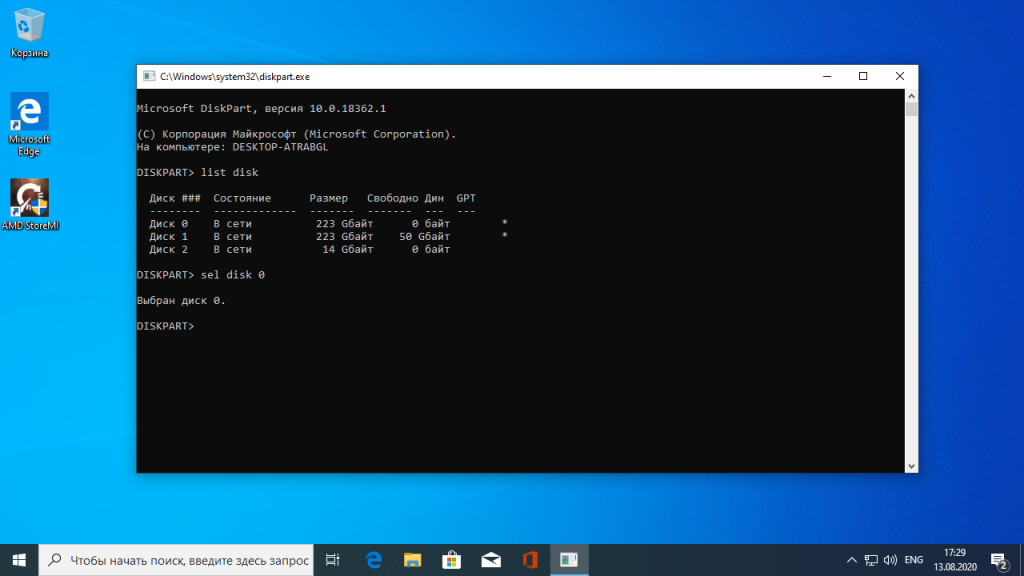
Далее нам понадобится утилита diskpart, все действия мы выполним с помощью неё. Запустите её командой:
Затем смотрим доступные диски:
И выбираем наш единственный диск, на котором сейчас установлена Windows, а раньше была установлена Ubuntu:
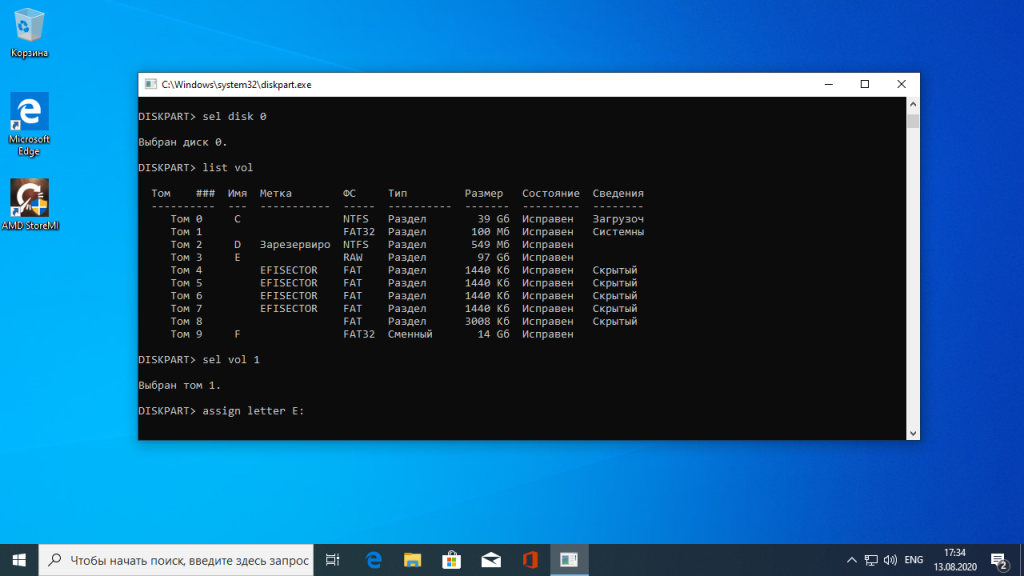
После того, как был выбран диск, мы можем посмотреть список разделов на нём:
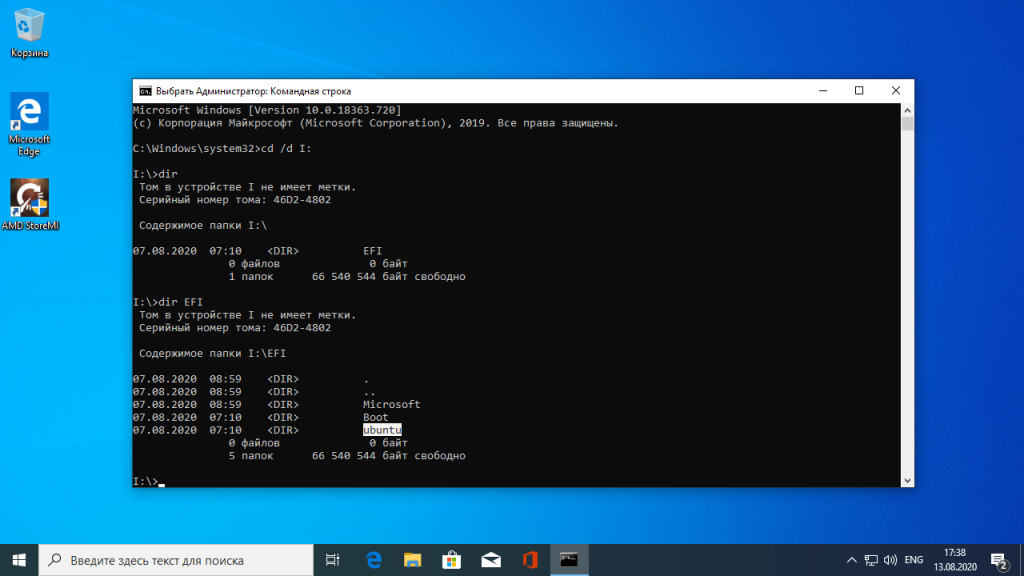
Среди этих разделов есть и раздел с файлами EFI, для обычной системы он скрыт, но не для этой утилиты. В нашем случае это Volume 2. Как правило, это небольшой раздел с файловой системой FAT32 и отмеченный как системный.
Мы выбрали этот раздел текущим с помощью команды:
Затем назначим ему букву, чтобы можно было с ним работать:
Утилиту можно закрывать. Дальше продолжаем выполнять действия в консоли. Сделать всё с помощью проводника вы не сможете, потому что нужны права администратора. Переходим на диск E:
Переходим в папку EFI:
Удаляем папку с файлами загрузчика Ubuntu:
Готово: удаление загрузчика Grub завершено, и теперь его файлов больше нет в системе.
Как удалить Grub с флешки
На флешках, как правило, используется таблица разделов MBR. Чтобы удалить загрузчик Grub с флешки недостаточно просто её отформатировать. Загрузчик записывается в таблицу MBR, а поэтому нам придётся её пересоздать. Очень не рекомендую использовать этот способ для удаления загрузчика Grub с жёсткого диска, потому что вы потеряете все данные.
Работать будем в системе Linux. Сначала посмотрите, какое имя устройства у вашей флешки, например, с помощью программы Gparted или в терминале командой:
Затем удалим полностью существующую таблицу разделов:
dd if=/dev/zero of=/dev/sdc count=512
Теперь, с помощью той же Gparted создаём новую таблицу разделов:
Создаём раздел на флешке и форматируем в файловую систему FAT32:
Теперь вы знаете, как удалить MBR с флешки, только не сотрите его с жёсткого диска, потому что потом будет сложно восстанавливать.
Выводы
Оцените статью:
Об авторе
Основатель и администратор сайта losst.ru, увлекаюсь открытым программным обеспечением и операционной системой Linux. В качестве основной ОС сейчас использую Ubuntu. Кроме Linux, интересуюсь всем, что связано с информационными технологиями и современной наукой.
60 комментариев
А что за красота на обложке и как её добиться?
Это Burg с темой DasrkShine
А можешь рассказать про создание каркаса для мультизагрузочной флешки на низком уровне, средствами системы, без использования дополнительных прог, особенно виндовых?
Возможно в следующих статьях напишу об этом.
Отличная статья. Большое спасибо за помощь. На 10 винде все починил!))))
Согласен и присоединяюсь).
cd \d D: и rmdir \S ubuntu
Слеши в другую сторону, не?
Также после assign letter=D: было бы неплохо написать про remove letter, ибо маячит диск в проводнике.
При удалении всех ОС установленных у меня на диске я удаляю все разделы и efi в том числе,разве Grub не должен удалится при этом?
Если он был установлен в UEFI, то да, должен.
Здравствуйте! У меня внешний диск терабайтник. Один раздел, dev/sdb1 200 ГБ ntfs, отдан под резервные копии Windows 7 и Windows 10. Второй раздел dev/sdb2, 250 ГБ ntfs отдан под программы Portable и разные вещицы, которые хотелось бы сохранить. На остальном пространстве внешнего диска были установлены Linux Mint cinnamon 32-bit и MX-15 32-bit. Все разделы для них были логические, в формате ext4. Загрузчик GRUB 2 ставился в dev/sdb при установке первой системы Linux Mint cinnamon. Во второй системе загрузчик не ставила, cinnamon её подхватил через «sudo update-grub». В Linux Mint cinnamon был так-же установлен Burg, хотелось и с внешнего диска загружаться красивенько. На основном диске терабайтнике, я имею Linux Mint mate 17.3 64-bit, Kubuntu 14.04 64-bit и Windows 10. Мне нравится ставить в Virtualbox и в VMware разные Linux, чтобы изучать их. Но в системах не очень много места. Поэтому я удалила разделы Linux с внешнего диска и создала раздел dev/sdb3 520 ГБ в формате ext4. Там у меня архивчик Линукса и папки «VMware» и «VirtualBox VMs». При установке систем, я указываю VMware и Virtualbox помещать все файлы систем в те папки. Довольно часто, отключая ноутбук или перезагружаясь в другую систему, я забываю отсоединить внешний диск и чертыхаюсь, когда упираюсь в чёрный экран GRUB. Он мне говорит, что ему нечего загружать, нет разделов. Приходится отключаться кнопкой, вытаскивать внешний диск и опять загружаться. У меня в Биосе, для моего удобства, выставлен приоритет загрузки сначала с USB-HDD, затем с CD-ROM и уже потом с HDD. Возможно ли удалить GRUB 2 с dev/sdb не повредив важные данные, которые не хотелось бы потерять или не рисковать?
об этом и говорится в статье,уделите внимание к инструкции с консолью
Спасибо братуха. На конец то избавился от этого ДЕРЕМА.
How to remove grub completely
I have two HD, one with windows 8 installed and on the other with Ubuntu 17.04 that I installed using a bootable USB drive. This worked in the beginning as I was able to boot into windows and Ubuntu fine initially but my system was left unused for sometime and then I faced a grub screen with a prompt. So I somehow booted into windows and formatted the HD with Ubuntu 17.04 into NTFS hoping I will get rid of the grub screen but now I can’t even boot into the windows. Now, i am faced with a grub screen when I power on my computer and unable to get past that screen. I have found some posts that talk about removing grub but that has not worked for me.
2 Answers 2
In UEFI systems which you probably have GRUB is stored in the EFI System Partition and NVram. You can «remove» Grub in the sense that your UEFI won’t know its there by mounting your ESP and deleting EFI/ubuntu/grubx64.efi
Your motherboard may also keep this entry around even after you delete the file (but it won’t try to boot it) in which case you have to go into your UEFI menu and delete it from there as well.
This obviously doesn’t touch the installation of grub on ubuntu so you can reinstall it if you wanted later.
I went into the BIOS and just changed the boot order. Not sure if that helps anyone but I just moved Ubuntu below my Windows one and got a normal windows startup. I installed the WebODM/LiveODM Lubuntu 20.04 image onto a USB flash drive and then used the flash drive to install it on the external USB hard drive for drone mapping. I think you could reasonably assume it’s not to much different than other versions of Ubuntu. To enter BIOS the process is different on every computer so you’ll probably have to figure that one out if your not familiar. But I’d think most people using Ubuntu are probably familiar with the BIOS.
On a sidenote if WebODM/LiveODM users find this post because your frustrated it won’t work because of grub or grub2, and follow the same process described, but run into error code 134, running «sudo apt update» then «sudo apt upgrade». Don’t know why it worked but it did. I know enough to be dangerous, not a professional.
How do I uninstall GRUB?
A hard drive that I use only for data storage still has GRUB from past Ubuntu installations.
How can I remove GRUB from it without harming the rest of the drive’s data?
Background
I occasionally move the data drive between computers with various boot order configurations, so I would like it to be non-bootable in order to avoid having to accommodate it in each computer’s BIOS settings.
When I power on a computer while only the data drive is attached, the following appears:
I can confirm from old backups of /etc/fstab that this was the UUID of a root partition that I recently reformatted and which no longer exists. Here’s the the data drive’s partition table and raw master boot record.
Please note that I’m not interested in workarounds that don’t answer my primary question. I can think of several ways to work around this issue, but it bothers me on principle that I don’t know how to directly resolve it. Every installation procedure should have a counterpart uninstallation procedure.
6 Answers 6
You can render the device not bootable simply by making the first few bytes of the disk 0x00.
Typically (and this is true for both grub, grub2 and ntldr iirc) the very first byte of your drive is going to be an x86 jmp instruction. This occurs before even the disklabel, because when passing execution to the device to bootstrap it, it simply sets the CPU to suck in the device information as code. If it has invalid code it triggers an interrupt and the BIOS handles the exception and goes to the next bootable device.
For instance, the beginning of my disk starts with:
The first part is eb 63 which is Jump to offset 0x63 from the current IP (so to 0x65).
Execution continues from here.
The end of the sector looks like this:
First, copy the MBR to a file for a backup.
Next, make a copy of that file:
Next, we have to create a loopback device (so that the contents don’t get truncated.) And apply the changes on our fake sector 0 as a test:
hexdump the file and make sure that the entire partition table is intact:
You should see something like:
Now, 0x1be is where you see 80 on the hexdumped output, this can also be 00 and still be valid. (It’s the «bootable» flag in the partition table, you can leave it alone, because it’s completely ignored by most modern BIOSes. ) The byte at 0x1bf though will almost never be 0x00 (it’s most commonly 0x01 but it can take other values) you can compare this against your backup.mbr to make sure that nothing past 0x1be is changed.
Once you’re satisfied that you applied the change correctly then you can directly copy the file over the first part of the disk. The reason why you want to do the file rather than /dev/zero again is for safety against typos. If you accidentally omit count=1 you’re gonna have a bad time, copying a file on the other hand will never run past the EOF, ever. So it’s safer.
Next hexdump your disk to make sure that the changes took as expected.
Compare up to 0x200 against backup.mbr.test to make sure it’s what you want.
Finally, if anything screws up for whatever reason you can simply copy the backup of the MBR back onto the drive via:
Hope this helps.
WARNING: EXTREMELY DANGEROUS
You can use dd command from Linux itself (it removes partition table):
Just remove MBR, without the partition table (see comment below):
Source
My experience with
is, that it successfully un-installed grub2 from /dev/sda (where my Windows 7 is installed), so the first part of the question «How do I remove grub from /dev/sda?» has been answered.
However, the 2nd part of the question, which is «How do I restore the MBR of /dev/sda?» has not been answered since the install-mbr command failed to restore the MBR. As a result, Windows does not boot any more and the Windows boot manager reports an error about a damaged MBR and asks the user to repair from a windows repair CD.
After reading the Wikipedia article on the subject I’d like to propose a few additional solutions:
Change boot order in BIOS 🙂
The best and the safest one: use fdisk to remove «bootable» flag from any partitions on that drive. Most MBRs look for a «bootable» partition to chain-load from, so I would expect GRUB to just do nothing if there are no such partitions. Haven’t tested though.
If the above does not help, try installing a free clone of standard MBR code:
Install mbr package and use install-mbr command like this:
From reading the Wikipedia article, I have an impression that the only thing which identifies the MBR is its signature which is at the very end of the sector (bytes 510 and 511). The first 446 bytes of MBR supposed to contain machine instructions. The BIOS is supposed to transfer control to the bootloader regardless of the actual contents of the first 446 bytes, provided that MBR signature is present:
On IBM PC-compatible computers, the bootstrapping firmware contained within the ROM BIOS loads and executes the master boot record.[14]. Thus, the beginning of the MBR is expected to contain real mode machine language instructions.[14] The BIOS reads the MBR from the storage device into physical memory, and then directs the microprocessor to the start of the boot code.
Due to the restricted size of the MBR’s code section, it typically contains only a small program that copies additional code (such as a boot loader) from the storage device into memory. Control is then passed to this code, which is responsible for loading the actual operating system.
The bootstrap sequence in the BIOS will load the first valid MBR that it finds into the computer’s physical memory at address 0x7C00. The last instruction executed in the BIOS code will be a «jump» to that address, to direct execution to the beginning of the MBR copy. The primary validation for most BIOSes is the 0xAA55 signature on the end, although a BIOS implementor may choose to include other checks, such verifying that the MBR contains a valid partition table without entries referring to sectors beyond the reported capacity of the disk.
UPDATE: Also, this article suggests that to make the disk to look «un-bootable» for BIOS you should actually edit the MBR signature at the and of the sector (using any disk editor). I’m not sure if it’s going to affect OS seeing the partition table on the disk though. but at least you can always modify those bytes back.
Remove GRUB bootloader from Windows 10
My Razer 2016 laptop had Windows 10, Kali and Ubuntu installed but after a Windows update Linux partitions became inaccessible. I removed both Kali and Ubuntu partitions including SWAP but GRUB was till there. I needed to remove GRUB safely without breaking anything else and the following method on how to remove GRUB bootloader from Windows 10 worked for me. It also works on Windows 7. I’ve used it so far 2/3 times since last year on my laptop running Windows 10 multiple times, never failed. I have Secure boot disabled and I am using Legacy boot on BIOS.
Remove GRUB bootloader from Windows
Follow steps below to remove GRUB from Windows 10.
Step 1(optional): Use diskpart to clean disk
Format your Linux partition using Windows disk management tool. Then you can increase the disk size on your primary partition (i.e. C:) to claim that space. If you’re doing this step, it’s safe to do a restart after you’ve done that.
Step 2: Run Administrator Command Prompt
On Windows 10, Windows 8.1 and Windows 7 search for command and simply right-click Command Prompt shortcut from the search results and select Run as administrator. Don’t use Powershell as PS doesn’t work for few commands.
Step 3: Fix MBR bootsector from Windows 10
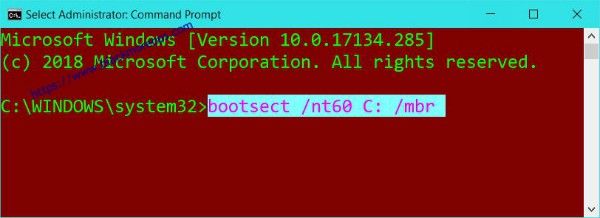
Simply type in the following command to remove GRUB bootloader from bootsector on MBR and revert back to Windows bootloader. In Command Prompt (Administrator)
If your drive is C:\ this command will be
Thats it. GRUB should be gone from MBR, restart and confirm.
39 comments
Did not work, friend. I’m never using Ubuntu on anything again.
is reading a manual really that hard before installing? I did the same thing but I admit my lack of care while installing
So simple only one command line.and problem solved.many many thanks
It does not work! If you hold down the ESC button while booting you get the option menu and if you go to bnoot menu it shows Ubuntu (or whatevedr linux version you installed) although you cannot bnoot into it the fact that it is there shows thatr grub is still installed
I have the same problem. When I go into bios, there are 2 boot options; windows and ubuntu but when I go into ubuntu, it comes up with a grub error that i can’t fix because i already removed ubuntu from its partition
It’s worked thanks
Thank you it worked!, Tried every possible way to repair grub/grub rescue and didn’t work. This worked.
Great, it worked for me.
Awesome, worked a treat 😁
It worked for me as well. Thanks.
Thanks a lot! This was the only solution I found that worked for me.
Simplest and perfect solution works on windows 10. Thanks
boom! it worked, but be sure to use an “admin” command prompt. type “cmd” in cortana, then hit ctrl-shift-enter to pull it up
Thanks, bro. You saved my day. 100% work.
Grub is still installd
what is the ‘nt60’?
Thanks a ton, that worked perfectly (I was at the “grub rescue” prompt and was getting nervous!)
not worked on my Acer e15
Just commenting to say that this worked perfectly for me! Ubuntu’s partition was deleted and then I used this command and it worked just as expected.
Great….after lot of searches and almost tired of other methods this simple trick done the work…thank you very much
This is only for systems still on MBR. The world has moved forward you know, people are more likely be on GPT with UEFI. Can you explain how to do it on GPT disks?
Thanks for the solution. It works for me.
It worked. I am happy.
Thank you very much, IT WORKS
bro i can’t do it because access is denied
run as administrator you braindead idiot.
It didn’t worked for me☹️
Hi, yesterday i just deleted the partition using the disk part without knowing anything, i restored the space left into my C: drive and turned off my computer. Today I tried to turn on my computer and i got this GRUB problem. I tried to resolve it with bootsect /nt60 C: /mbr (running as admin) but it doesn’t work, any advice you could give me?
Thank you very much, you really helped me out!
Hi, I really hoped this would work for me, but unfortunately, when I try this, I am given this error message:
Updated NTFS filesystem bootcode. The update may be unreliable since the volume could not be locked during the update:
Access is denied.
I am doing this on my C: volume. I tested this by running the command on my E: volume, and it worked successfully for that. I think it might be because I am currently using my C: volume.
I am running Command Prompt as administrator. I have also tried to use the command /force. Access unfortunately is still denied. Any advice?
I ran command prompt from my X volume, and then ran the bootsec on the C volume, and it ran successfully. Unfortunately, my PC still boots to the GNU Grub first. 🙁 I have done a hard factory reset on my PC, and this Grub boot still exists!
You are worth inverse your weight in saved keystrokes my well typed friend.
I’m not sure Grub hurts anything Andrew. I didn’t read all the comments above so I apologize if I’m rehashing or missing the point but I left Grub on computers long after Grub had any use. It actually provides another layer of recovery possibilities.
I ran the command provided at the top from the E: prompt (where C ends up after booting from a Windows 10 install thumb drive). I ran it against an ancient original install and it warned about the same access problem my previous attempts encountered but then just did the job anyway. I rebooted, saw windows take over and soiled myself.
I’m going to clean up now. Idk though Andrew.. I’m assuming you’ve moved on to better things by now but if you’re still trying, maybe use the latest win 10 install media and run the command from the partition you intend to boot too. Good luck. If not that, burn the drive and use this as your opportunity to move up to ssd. T
hen, never pollute your windows computers with Linux dual boot arrangements again. That’s very abusive to Windows. It has a superiority complex which needs constant attention and throwing it in with the open source crowd makes it fell itchy all over like it’s got lice. That’s where this all really started from. Lack of respect for your Window’s machine’s feelings.
Remove GRUB and keep a Linux system
I searched the Internet for instructions on how to remove GRUB, but the only thing I could find was using a Windows DVD to «repair» the system. I previously had a Windows/Linux doal-boot and removed Windows (GParted + Boot-Repair), but GRUB is still installed with only one entry: the Linux one.
How can I uninstall GRUB and directly boot on a Debian-based OS?
6 Answers 6
While you can uninstall GRUB, that would mean you have to set up another bootloader and is probably not worth it. There is no reason to use another one since you just want the GRUB screen to be hidden. I believe that all of the other bootloaders work in similar ways, so you shouldn’t worry about installing something else.
A text-editor window will open, showing something like:
Also set GRUB_HIDDEN_TIMEOUT to 1 to avoid potential problems. GRUB will flash by, but it won’t sit there for 10 seconds.
If you want, you can do this graphically.
Run these commands in a terminal window:
Once that’s done, search for and open GRUB Customizer.
(NOTE: GRUB Customizer does not seem to support EFI/GPT based systems.)
Reboot and see no bootloader.
All the other answers start good, advising you that GRUB is usually there whether you see it or not, you probably shouldn’t start taking random potshots at it, and how to restore your system to the ‘hidden GRUB’ you (presumably) previously enjoyed.
So, for reference, I can say from everyday experience that Debian now ships with a UEFI stub compiled into its kernel, enabling the kernel to be directly booted without any middleman by your firmware, assuming it is a competent EFI-compliant firmware. This is not esoteric knowledge, though neither is it a default. Anyway, unsurprisingly, it looks like this ability is inherited and perfectly usable by Ubuntu, e.g.: How to boot load the kernel using EFI stub (efistub) loader?
But again, though this technically matches your question, you might not have been asking what you thought you were asking! You’re best to combine this with the other (correct!) parts of the other answers, and decide whether (hidden) GRUB or EFI suits you. The usual disclaimers apply: Don’t mess with EFI if you’re not technically confident yet. Treat any thread like that link as an example only: customise exactly to the needs of your system. Enjoy!
