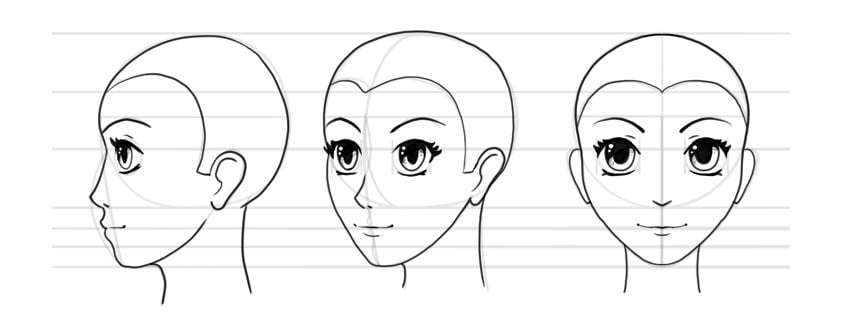
How to draw anime face
How to draw anime face
How to Draw Anime Heads and Faces
The anime style was created to make animated characters both expressive and easy to animate. This means that many elements of the face have been extremely simplified—and this means they are easy to draw, too. However, if you want to draw anime characters from imagination, you must know certain rules.
In this tutorial, I will show you how to draw an anime head in various views, step by step. I’ll also show you how to draw manga eyes, nose, lips, and ears, explaining their «anatomy» and styles. You’ll learn how to draw deformed faces as well, and how to create a distinction between males and females. After this tutorial, you’ll be able to draw your own anime heads from scratch!
This is the second tutorial in our series, How to Draw Anime. You may also want to take a look at the first one, to learn how to draw anime bodies:

1. Anime Head Anatomy
Although manga drawings are flat, they illustrate something that is definitely 3D. Because of this, it’s very useful to understand the 3D structure of an anime head instead of memorizing a few 2D templates for various views. It also makes it easier to keep the proportions correct in every perspective.
The most distinctive part of the head is an elongated sphere that represents the cranium. It looks like a circle in the front view and an oval in the side view.

The basic proportions of an anime head are very simple: the whole head should have a middle line.

. which marks the point for attaching the lower part of the face.

This middle line also marks the area of the eyes. They can go right through it or be placed under it, depending on the style you’re going for.


The area under the line can be cut in half too—this middle line marks the location of the nose.


The lower half can be divided into thirds. The mouth is usually placed on the first of these lines.


The ear is usually located between the big middle line and the nose line.

The hairline is usually located on the line marking the halfway point of the upper half of the face.


The neck should be thin, attached to the original sphere at the bottom.

Once you have your proportions set like that, you can easily draw the details!

2. How to Draw an Anime Head in Profile, Front, and 3/4 Views
But this was a very general overview of how an anime head is constructed. Let’s draw a manga head step by step in all the popular views to better understand the process. Just keep in mind that manga is not one style, so the way I’m showing you is not the only correct one. Feel free to experiment!
Step 1
As I mentioned before, the original sphere is not really a sphere—it’s elongated, and it looks slightly different in various views. If you have problems with it, you can always start with a sphere and add some space in the back if needed.

Step 2
Draw a line towards the bottom, defining the length of the face. Mark the middle of the head once you’re done.

Step 3
Outline the lower part of the face. Notice how it changes depending on the view.

Step 4
Add the eyes in your chosen area—on the middle line or under it. A classic proportion tells us to leave a one-eye-wide space between the eyes, but this rule is often broken for a stylized effect.

Step 5
Draw the nose on the halfway line of the lower half. Create a subtle indentation between the eyes (or not—some styles don’t need it!).

Step 6
Divide the part under the nose into thirds.

Step 7
Draw the mouth in this area.

Step 8
Draw the eyebrows over the eyes. Their location should depend on the expression you’re going for.

Step 9
Draw the ears between the middle line and the nose line.

Step 10
Draw the hairline at the halfway point of the upper half.

Step 11
Add the neck. It should merge gently with the jawline.

Step 12
With all the guide lines in place, you can safely finish your manga face.

3. How to Draw Anime Eyes
Now you know how to draw proportions of a manga face, but you still need to learn about the details to draw it convincingly. Let’s see how to draw eyes in manga style step by step.
Step 1
Anime eyes come in many shapes and sizes. Start your drawing with a general outline of the eye.

Step 2
Draw the curve of the upper eyelid, along with the eyelashes in the outer corner.

Step 3
Add some thickness to the eyelashes, if you need it.

Step 4
In manga style, the eyes usually don’t really have an outline. Instead, it’s suggested by the shape of the eyelids. Turn the eyelashes in the outer corner down, accentuating the side of the eye.

Step 5
Draw the lower eyelashes. They’re usually much subtler. Notice how they accentuate the shape of the eye.

Step 6
Add the iris. It should be big, circular, or vertically oval.

Step 7
Add the pupil. It should mimic the shape of the iris and be placed exactly in the middle.

Step 8
Cross the eye with a shadow. Its direction should be identical in both eyes (the symmetry is broken here).

Step 9
Draw the shine dots. They shouldn’t be symmetrical either.

Step 10
Darken the eyes: fill the eyelashes, the pupil, and the shadow, leaving the iris and shine dots untouched.

Step 11
Add the eyebrow. There are many shapes to choose from!

Step 12
To make an eye look bigger, add the crease of the eyelid over it.

Step 13
Anime eyes can be stylized in various ways to make the character unique. It’s especially important in a classic, black-and-white manga, where you can’t distinguish the eyes with a color.

Step 14
To draw the anime eyes closed, just imagine the upper eyelid going down and rotating.

If you want to learn more about how to draw anime eyes, especially how to rotate them, you can learn a lot from this tutorial dissecting Disney style. After all, anime has borrowed a lot from Disney!


4. How to Draw Anime Lips
Eyes are certainly the most developed feature in a manga face. The other features are heavily stylized and as simple as possible. Let me show you how to achieve this effect.
Anatomy of Anime Lips
To simplify anything, first you need to know the original form. Take a look at this tutorial to learn how the real lips are constructed and how to draw them.


Manga lips still work like the realistic ones—they’re just reduced to as few lines as possible. Even the line between the lips may not be continuous to keep the effect very subtle. However, the invisible lower lip still casts a shadow, and in the side view both lips reveal their shape.

Styles of Anime Lips
But again, anime doesn’t have one style, and many variants are present. You can experiment with many styles of the lips, as long as you keep them consistent with the other elements of the face.

5. How to Draw an Anime Nose
An anime nose is even more simplified than the lips. Sometimes, it’s simply not present at all! Let’s take a look at how it’s achieved.
Anatomy of an Anime Nose
In this tutorial, you can learn how a real nose works and how to draw it:


If you place a classic anime nose over a realistic one, you’ll notice that it borrows just the crucial elements: the curve of the nose and its bottom part.

Styles of Anime Noses
This basic recipe can, of course, be modified across various styles.

6. How to Draw Anime Ears
Rotation of Anime Ears
Anime ears are very simple to draw, with one exception: if you see them from behind, their base becomes visible. It’s like a conch, and you must imagine it this way—you can’t simply draw the ears the same way in every view, or they’ll look flat!
You can learn more about the structure of the ears and how to draw them here:


Styles of Anime Ears
Ears are complicated, and they can be simplified in many ways:

7. How to Draw Anime Faces in Various Styles
Manga Deformation
Manga borrows from reality, but sometimes it goes pretty far away from it. To create a style that will look good and not monstrous, always keep these basic proportions: half of the head as a line marking the eyes, the nose halfway down the lower half, and the mouth around one-third of the distance under the nose. The rest you can freely experiment with! Just remember to keep the features consistent: the more deformed the style, the less realistic the facial features should be to make it all look intentional.

Male and Female Anime Faces
Although manga style faces are pretty feminine to begin with, there are certain ways to make the face look more masculine:

Anime Expressions
In anime, the facial expressions are as simple as the facial features. They resemble simple emoticons to a large extent, and you can use them as inspiration. Less is more here—if your character doesn’t have detailed lips on their neutral face, don’t show the teeth and tongue in any expressions. Keep these features exaggerated, but minimal in details.

Good Job!
Now you know how to draw anime heads and faces, and how to draw those characteristic eyes, noses, lips, and ears. If you want to continue learning about drawing in simple styles like this, you may like our series on cartoon drawing.
How to Draw Anime Heads & Faces in Different Styles
This tutorial looks at how to draw different types/styles of anime and manga heads and faces going from the more common styles to the more stylized (also known as “Chibi”).
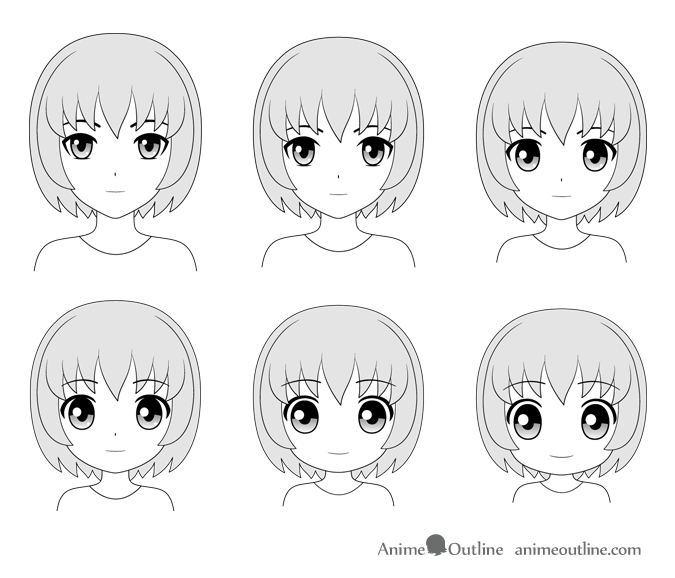
Below are some basic examples of the same character drawn in different styles along with an explanations for what makes them different from one another.
Standard Anime Heads & Faces
The above styles are similar to those commonly used in anime and manga. Usually these have body proportions that are are fairly close to those of real people.
Style is not the only thing that effects the shape and size of anime heads. The characters age is also important. Kids tend to have rounder faces and heads bigger in comparison to the rest of the body.
For more on drawing the faces of characters of different ages you can see:
Stylized Anime Heads & Faces
The more stylized example of anime characters tend to have bigger eyes and rounder chins. More stylized characters also tend to have heads that are bigger in relation to the rest of the body than in real people.
Chibi Anime Heads & Faces
Chibi characters are very stylized. They tend to have very wide faces, rounded chins and huge eyes while the nose is often not drawn at all. These types of characters also usually have heads that are giant compared to the rest of the body.
Comparison of Different Styles of Anime Heads
In the above example you can see the difference between the various styles of anime heads.
As already mentioned the more stylized faces are generally drawn wider and have more rounded chins.
Comparison of Different Styles of Anime Facial Features
The above illustration shows how anime facial features tend to change based on style.
When drawing the facial features for the first three examples you can use the guidelines provided below.
For very stylized characters like the last three examples these guidelines may not always apply. When drawing “Chibi” characters you can draw the mouth and nose lower down than the below example. As these types of characters can be very stylized it’s hard to have a clear guideline for drawing them.
For some suggestions on chibi proportions you can see:
You can also check:
Placing Anime Facial Features for More Realistic Styles
Drawing Anime Facial Features to Match the Style
For more serious styles of anime eyes you can draw them closer in shape to real eyes (although still much larger).
For “Chibi” faces draw the eyes larger and “taller”. You can also avoid drawing the bottom eyelashes.
For more examples of drawing anime eyes see:
For less stylized anime and manga characters you can draw the eyebrows covered by the hair (if the hair goes down that far). For more stylized characters draw the eyelashes right over top the hair.
For more examples of drawing anime hair see:
In the very stylized chibi faces you can avoid drawing the nose all together.
You can draw the mouth pretty much the same across most styles (single line). Though in some very realistic anime styles or if the character is wearing lipstick the mouths are drawn slightly different.
For more examples of drawing anime mouths see:
Conclusion
This tutorial covered some of the basics of drawing different styles of anime faces but obviously there are a lot more styles and variations out there. You can experiment combining different aspects from different styles and see what you can come up with.
How to Draw an Anime Girl’s Head and Face
This tutorial explains how to draw a an anime or manga girl’s head and face from the front and side views.
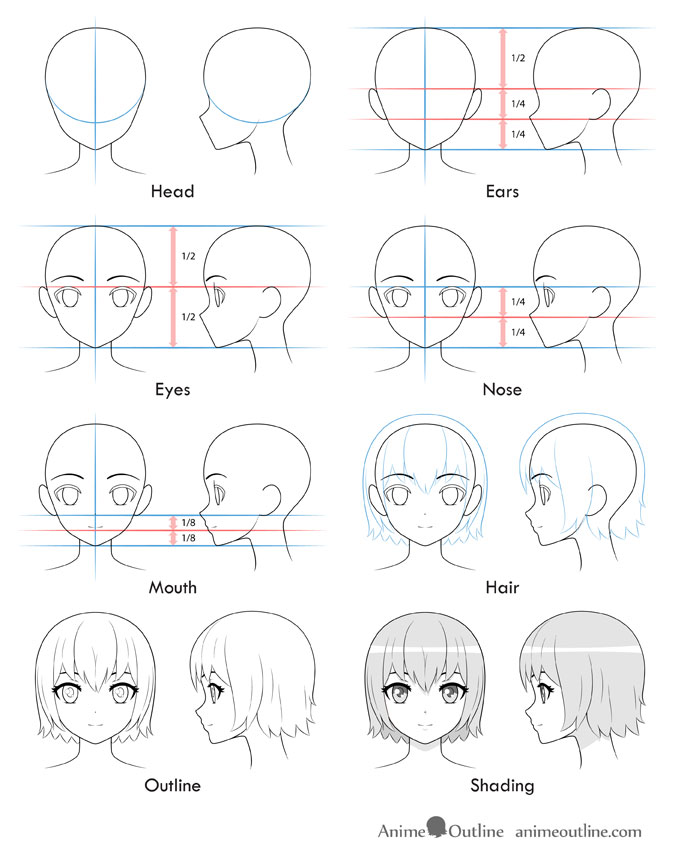
Before you begin drawing it’s a good idea to outline the defining features of the anime style.
Most female anime characters tend to have big eyes, a small mouth, nose and chin and a fairly round face. The lips are usually either very lightly defined or not drawn at all. The hair tends to be drawn in clumps instead of individual strands and often as a somewhat spiky look.
If drawing using pencil and paper be sure to make very light lines for the initial steps of the tutorial as you will need to erase some parts later.
If you would also like to try drawing a more realistic looking anime character check:
Step 1 – Drawing The Head
Star you drawing with the overall outline of the head. For an explanation of the drawing order as well as some general drawing tips see:
You can draw a vertical line down the middle of the head for the front view to help you insure that both sides are even.
Make a circle or a light oval for the front view and a longer oval for the side view to help you get the shape of the top of the head.
For the front view you can basically project two sets of lines down from the oval/circle that curve to meet at the chin.
For the side view there will be a sort of indent for the nose/eyes area. Draw the nose about halfway between the bottom of the chin (covered in more detail in Steps 3) and the middle of the head. You can draw a straight line going from the tip of the nose down to the chin (details of the mouth will be added in Step 5). Again for the side view you can draw a line going upwards from the chin and then curving again towards what will later be the position of the ears to form the lower jaw.
For both views draw the chin small and almost pointy but with a tiny curve at the bottom.
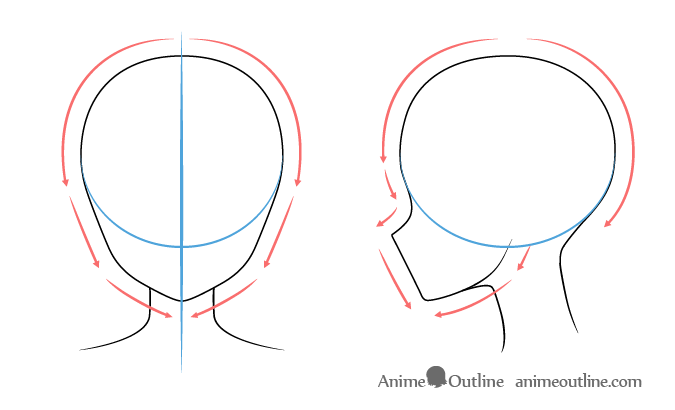
In the above example you can see the basic curves and shape of an anime or manga style head.
Step 2 – Drawing the Ears
To place the ears first draw a horizontal line directly though the middle of the head and then draw another line between that and the chin. Draw the ears between these two lines.
For the side view placement of the ears they will be positioned slightly more towards the back of the head than the front.
As the ears will be covered by the hair in later step we won’t go into drawing their inner details. But if you would like to learn more about drawing anime style ears see:
Step 3 – Drawing the Eyes
To place the eyes on the head you can use the same vertical line used to place the top part of the ears. Draw the eyes directly below this line. The height of anime eyes can vary based on style and character type so there is no one sure way to place the bottom portion.
If drawing both views at once be sure that the positioning of the bottom portions of the eyes in both views is relatively even. A common mistake beginner artists tend to make when drawing the same face from different views is misaligned or differently sized facial features.
Also note that for this stage of the drawing process you can do a simplified shape of the eyes and leave the details for a later (covered in Step 7).
For more on drawing female anime see:
For drawing different types of eyebrows see:
Step 4 – Drawing the Nose
As already mentioned you will want to position the nose between the horizontal halfway point of the face and the bottom of the chin.
In the front view you can pretty much draw the nose as just a dot in the side view an anime nose is usually small and pointy.
For more examples of anime noses in different views you can see:
Step 5 – Drawing the Mouth
To mouth is a little bit trickier to place as you will first want to get the position of the bottom lip in order to do it. Also keep in mind that when it comes to anime and manga the bottom lips itself is often not drawn in the front view of the characters.
The bottom lip will be positioned between the nose and the bottom of the chin. Draw the mouth itself slightly above that.
You can pretty much draw the mouth as one or two lines (really just one line with a break in the middle for the front view). If you want a happier/friendlier looking character you can draw it with a bit of a curve.
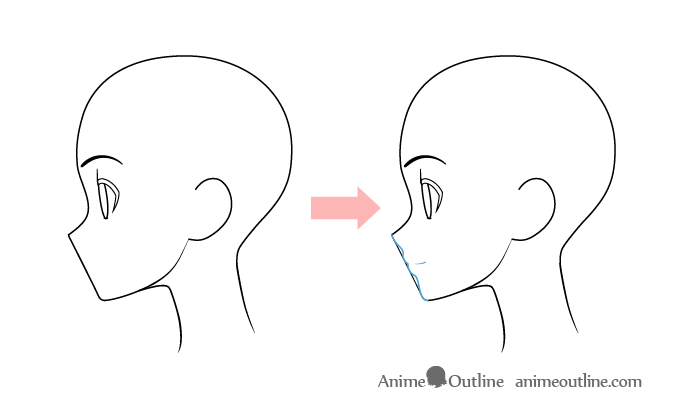
In the above illustration you can see how the initial straight line from the tip of the nose down to the chin can then be used help you draw the lips.
For more on drawing anime mouths and lips see:
Step 6 – Drawing The Hair
Keep in mind that the hair will overlap some of the other features of the character’s face. But it is still good practice to draw those out especially since they may be visible if you choose to draw a different hair style. You can erase the parts that are covered up by the hair once you are done.
For this stage you can simply draw out the major parts of the hair clumps without any of the smaller inner details of the hair. Try and vary the clumps slightly in size shape and direction to give the hair a more natural look.
For more information on drawing anime and manga hair check:
Step 7 – Drawing the Smaller Details of the Face & Finishing the Line Drawing
At this stage you can erase the parts of the face that are covered by the hair and add the smaller details o the eyes such as the eyelashes, pupils, and highlights. You can also shade in the eyelashes and add some more details to the hair.
When drawing the eyes you can lightly outline the highlights (reflections of light) with a very light lines so that if you shade the eyes you don’t accidentally shade them in also.
Once you are done you should have a finished line drawing of an anime girl’s head and face.
This is technically a finished drawing and you can leave it as is but if you want to go a little bit further you can move on to the next step for the shading.
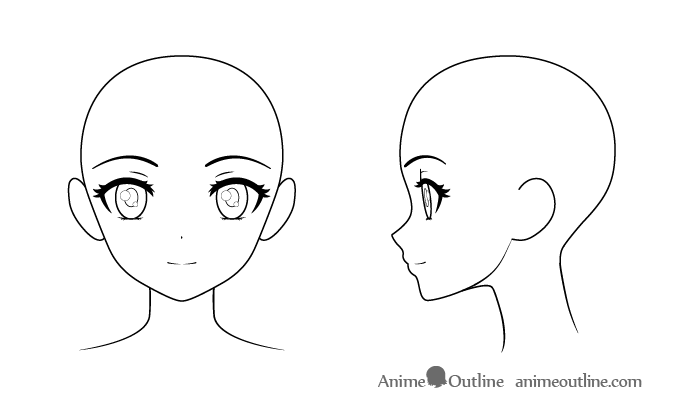
You can see the finished line drawing of the facial features without the hair in the way in the illustration above.
Step 8 – Applying Shading
You can add some very basic shading to your drawing to make it stand out a lot more.
Anime uses what is known as “Cel” style shading (basically shading with no gradients) which generally makes shading fair fast and easy.
The way the shading is applied will be determined by two things. The areas that are naturally darker and the areas that have shadows cast on them.
Darker Areas
Generally you will want to darken the hair and the irises of the eyes (leave the highlights white). Shade the pupils and the upper area of the iris even darker.
For more detailed examples of shading hair see:
Leave a white area in the hair for the highlight. For more on drawing these see:
In Shadow Areas
The way shadows are cast is determined by the light source. For the sake of this tutorial we will go with very “generalized” lighting conditions where the shadows are usually cast downwards.
In this case the shadows (top to bottom) will be:
For a tutorial on shading anime faces in different lighting conditions see:
If you would like to color your character see:
Conclusion
This tutorial provides general guidelines for drawing an anime or manga style female face. For instructions on drawing anime style female bodies check out:
For drawing an older or younger female character’s head and face see:
For drawing male anime heads and faces see:
For drawing different types of anime characters see:
How to Draw an Anime Girl’s Face, a Step-by-Step Guide
So far, I have published a few dozen drawing tutorials on gvaat.com, and finally, we have arrived at how to draw a face of an Anime girl. A task that requires focus and knowledge of multiple disciplines: stylization, anatomy, perspective, and line work.
I am excited to share with you what I have learned about this subject in the past three years.
Drawing a pretty stylized face is difficult mainly because very small changes create large visual results. This means we must set our expectations wisely, and get ready for small adjustments and corrections as we try to perfect a drawing of an anime girl face.
So for those of you looking for a simple, two-sentence answer on how to draw an anime girl’s face, here it is below, for the rest of you – those of you who want to dive deep into Anime and Manga drawing, I wrote the rest of the tutorial.
To draw an Anime girl face, start with a strong construction method of the head, then simplify the features and keep only those identifiable lines necessary to deliver the Anime and Manga aesthetic, exaggerate the shape of the eyes, and simplify the nose, as well as shape the head to fit the type of Anime style you are interested in drawing.


That sounds great Gvaat, but also how do I do all that? Follow me in this tutorial, and I will do my best to make the process clear and have your drawing look like it was done by a true Mangaka in no time. Okay, maybe not that well without years of practice of drawing Manga. However, I do believe you will get better at drawing Anime girl faces after you finish this tutorial.
A quick note, before going further, I will use the term Anime to mean both Anime and Manga for simplicity. Although Anime usually refers to animated, and Manga usually refers to drawn (printed) art, the general style and approach to drawing is the same.
Table of contents:
1. Construction of Anime girl head
We need a solid method of construction of the human head before we can understand how to draw an Anime/Magna head or face.
Trust me when I tell you that all, yes all great Manga artists know how to draw a realistic human head. What’s more, they know how to draw it really, really well. Do not skip learning anatomy and construction of the face and try not to dive right into drawing in the Anime style, before understanding the basics of construction.
Luckily, there is an incredibly powerful method for the construction of the face that we can learn and practice developed by Andrew Loomis. I published a detailed tutorial on the Loomis method and you can find it at this link.
Basically, the method evolves drawing a sphere to represent the top portion of the head, then drawing in the jaw and other features based on predetermined landmarks and proportions. It is a great starting point for drawing the face. Check out the tutorial above.
Later on this page, I will walk you step-by-step through how I use the method to draw an Anime girl face.
2. Drawing Anime girl face – Proportions –
Now that we have the construction of the head covered, let’s talk about the proportions in Anime and Manga art.
Proportions of a girl’s face in Anime and Manga are grounded in reality, with some exaggerated features.
The most notable are the eyes. The eyes usually appear larger. Eyebrows appear smaller than their average counterparts in real life. (For a super detailed look at how to draw Anime eyes, check this tutorial). So do the noses, and mouths. (I have a tutorial on drawing lips and mouths in Anime style as well, you can find it here.)
Studying proportions in Anime and Manga:
The best way to study proportions is to look at Anime drawings you really like, then measure out the distances between the eye brows and the tip of the nose, the tip of the nose and the chin. As well as measure out the distance between the eyebrows and the hairline, and the hairline and the very top of the head.
You can also measure our the length verses the width of the head as well. Note that to do this properly you will need to find the head drawing that is at eye level. Various angles of a drawing of the head can foreshorten the drawing and make it hard to measure.
Once you have these measurements, you can compare them to the Loomis method, note the variation and adjust your Loomis head construction accordingly. (In the Loomis method of construction the length from the top of the head to the hairline, from the hairline to the eyebrows and from the eyes brows to the nose, and from the nose to the chin are all about the same.)
Compare this with your favorite Anime style, and see what adjustments should be made when you construct the next drawing.

3. Placement of features
One of the easiest ways to draw an anime girl’s face is to use the Loomis method of construction and adjust from there.
When placing features, keep in mind that although the eyes are exaggerated in Anime art, making eyes too big will make them look uncanny and often can make the face scary looking.
Pick a few of your favorite anime shows, or look at Manga, and compare the male and female characters. You will notice that the female characters are composed of lines that are less angular. Keep that in mind when drawing features. Female chins and noses are drawn with carefully rounded lines, while male counterparts are drawn with harsher more prominent angles. This is of course not always the case, but keep this in mind so that you can manipulate your drawing to whatever you see fit.
With time, through keen observation and practice, you should gain the ability to control your drawings to represent whatever character you want.
Start with the Loomis measurements for the placement of the facial features in your drawing by following this guide.

Then look at some screenshots of your favorite Anime, or look at your favorite Manga drawings, and identify how the Loomis proportions have been changed. In some Anime styles the face is much wider. In almost all Anime the size of the eyes is exaggerated. In other expressions of the face in Anime, the distance between the eyebrows and the tip of the nose, is greater than that between the tip of the nose and the end of the chin.
Gvaat, wait! Do I really have to get into these details? Do I really need to measure things out, or study the Loomis head construction?
No, not really. It is probably possible to do all of this intuitively over time. However, if you want to expedite your learning curve somewhere between ten and a hundred times, (😉 I’m serious), then yes, it is absolutely necessary.
A bad drawing of an Anime face often can be separated from a good one by identifying minute details, it is the same between a good drawing and a great one.
We have to get into the details, and we also have to be mindful of the entire drawing at once. This is the essence of portrait drawing, and it definitely applies to drawing Anime girls, just like it applies to drawing any human head, stylized or not.
4. Step-by-step instruction, how to draw an Anime girl’s face

Next up, we will draw this Anime girl’s face below, step-by-step, together. Feel free to grab a sheet of paper and pencil and follow along.
Step 1: draw a circle
First, let’s start with a circle on our page, the circle will represent the main upper portion of the head (or the head, minus the jaw).

Step 2: make markers for the facial features
Next, let’s find the center of that circle and draw lines to represent the eyebrow line and the center where the length of the nose will fit.

If you are wondering what we are doing at this point in the process, I am here to tell you that we are, for now, simply following the Loomis construction of the human head. I recently published an entire tutorial devoted to this type of construction, feel free to refer to it if you need additional instruction. You can find it at this link.
We will mark down the nose and the eyebrow line. From there we will push down to the end of the nose, and take another leap (of the same length) to the chin. You will have to play with these distances to get the style you like most. In the image below, I am keeping the distance between the hairline and the eyebrows, the eyebrows and the tip fo the nose and the nose and the chin the same.

Step 3: Draw the first draft of facial features
Let’s also cut in from both sides of the circle, and create the area for where ears will go (largely to follow the length of the nose).
Okay, this next stage is super important, so keep your focus and energy to get through it. We will now begin to use the markers from Step 2, to carefully place features onto the face, in a very draft-like way.
If you are using a pencil, press lightly and focus more on the overall shape and placement of the feature rather than the details. Eyes can be styled to look like ovals, for now, the nose can be adjusted to just a simple extension of the face. The lips can be simplified as well. We are not looking to draw the final beautiful image – we are simply looking to help our minds in the next stage. That is to say, we are placing down a brief sketch for the eyes, the nose, the lips, and ears, to use as an underdrawing in the next stage of the drawing.

It is completely okay, if, at the end of this stage, your drawing looks like a sketchy mess (just look at mine right above), as long as you can easily identify where you can draw over it.
Keep adjusting your lines and your sketch, to fit the style and expression you are going for. Stop when you are happy with your progress. You should feel like what you have is a good summation of what is to come in the next step. More importantly, you should feel like you have a good base to draw over confidently.
In the next step, we will draw over this sketch. If you are using a pencil, grab a eraser (preferably one that erases well without destroying the paper surface), and lightly erase the sketch you made for the facial features, until it appears very lightly on the surface of the paper, just enough to guide you on drawing over it.
If you are drawing digitally, set the sketch layer to 10-30% transparency, base this on your comfort. And start a new layer for the line art drawing that will go on top in the next step.
Step 4: Draw final lineart over your sketch
In this final stage of our drawing, we will attempt to draw over our sketchy messy lines to complete our drawing of Anime girl’s face. Three things to focus on as you do this:
With the above three ideas in mind, let’s begin to draw over our sketch.
You should feel confident when drawing your lines. Anime and Manga art relies heavily on beautiful line art, and lines that don’t carry some confidence don’t appear beautiful to the eye.
If you are struggling with confident lines, try the follow techniques:
Once you try the above, come back to our drawing of the Anime girl’s face, and try to focus on producing confident, clean lines, akin to the ones you see in your favorite Anime and Manga art.
5. How to draw Anime Girl hair for your anime girl drawing
Drawing hair is difficult. Here are some tips on drawing hair for your Anime girl face drawing:
Finally, I wrote an entire tutorial on how to draw Anime girl hair, you can view it by clicking here.

6. On frustration with drawing an Anime face of a girl
As I mentioned in the beginning of this tutorial, we should be ready for minute changes and adjustments. Sometimes, this can turn into hours of tinkering to try to develop a drawing of a face you like best, these hours of tinkering can end up feeling very frustrating. Then the whole practice of drawing can end up frustrating, and then… well you don’t want to do it anymore or you want to do it less often.
How do we battle that frustration? Well, first, if you really want to get better, you won’t let that discourage you. However, there are some things we can do to help.
First, go into the drawing expecting some level of tinkering. As I mentioned at the outset, drawing a beautiful face is not just a difficult task, it is a task where very small changes produce extremely visible results. Therefore, moving or redrawing the left eye 1 – 2 millimeters to the left (as an example), can be the difference between a drawing you are proud of, and a drawing that feels off in some way.
That is okay, the minute details are just what it takes, get comfortable with it. Over time, you will learn systems that will help you with placement of features, you will get better at approximating where the eyes should be placed to get the result you want subconsciously (yes, to the nearest millimeter), so just stick with it.
Second, go for quantity over quality, keep drawing faces and set a “tinkering alarm clock”. As an example in drawing a face over a course of an hour, give yourself 10 minutes to make adjustments, regardless of the result after the 10 minute mark, move on. In this way, after drawing a 100 faces you will improve in your skills much more, than drawing just 10 faces that take 10 times as long to draw.
Third, look at reference, or look at artwork you love for inspiration, but also for direction and guidance. How did someone else solve this problem before you? Can you learn from that? If yes, what can you learn from it? What makes you like certain drawings but not others in Anime or whichever style you aspire to learn? Spend some time thinking about this before dismissing your current drawing as just another “bad try”.
A wise mentor told me once that every artist has a few thousand poor drawings, but once they draw through them, these “bad” drawings are gone forever, and what remains is of much higher value, and is something that can only exist given the existence of those “bad” drawings that came before. So in this sense, every “bad” drawing you create, can potentially give life to beautiful drawings in the future. I hope you see where I am going with this: on a long enough timeline, there are no bad drawings. Only drawings that help you create better ones in the future.
Conclusion – How to Draw the Face of an Anime Girl
Gvaat, you wrote a lot about how Anime and Manga drawing is similar to realistic drawing of anatomy, okay thanks, but how is it different? Okay, yes, Anime art is grounded in reality, this is why it is so easy to recognize even to someone who has never seen Anime or Manga art before. It is different in two significant ways
At this point, I hope that two ideas are becoming clear, first, yes it is difficult to draw a pretty face. It could be a stylized face of a character from Manga or Anime, it is still not easy to draw really well. A lot depends on small changes in the drawing, as well as on a solid foundation in perspective, understanding of anatomy, and line quality.
Second, it is entirely possible to learn all of the skills necessary to draw the beautifully rendered face of an Anime girl. Skills like understanding the use of perspective and thorough knowledge of anatomy can be gained with diligent study and practice. If you know what Gvaat’s Workshop is about, you know I believe anyone can do it. What will help? Daily practice of drawing goes a long way. Studying perspective and anatomy will help as well.
Practice a lot, and be consistent. Try to string together as many days as you can of consistent practice. Try to correct mistakes but go for quantity and not quality at first. Then slowly try to increase the quality of your drawings. You will be surprised to see how much progress you will be making and how fast you can actually get to drawing Anime girls, or whatever else you desire.
How to Draw Anime Kissing Lips & Face Tutorial
This tutorial explains how to draw anime kissing lips and face from two different views with the head at different angles.
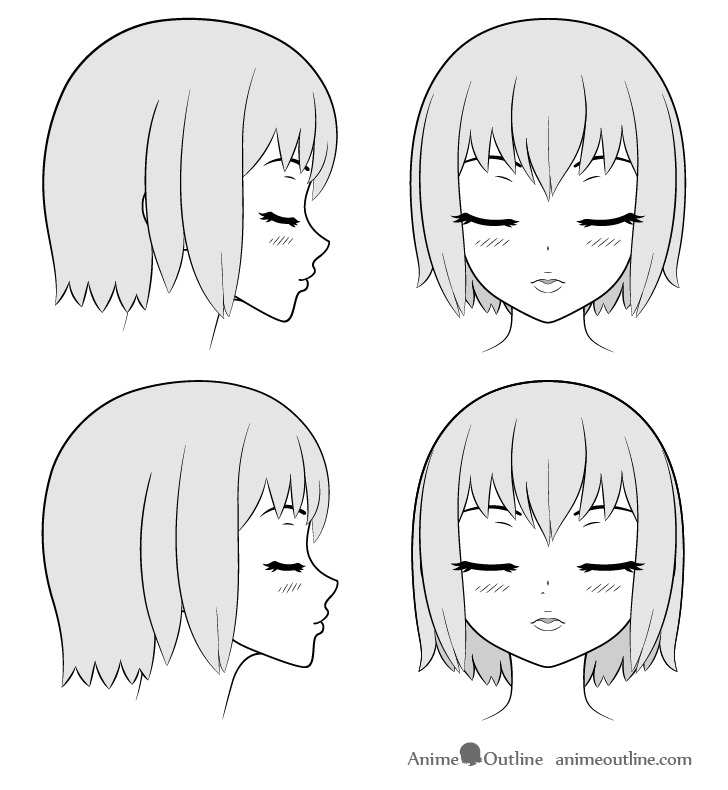
The main focus of this tutorial is on showing a “kissing” look on a female anime face but it can also help you if you are looking for an easy way to draw the head at different angles.
Drawing Kissing Anime Lips
Anime characters are usually drawn without showing the lips. However in certain expressions as well as well as close up scenes of the face lips can be fully or partially shown.
For kissing anime lips draw the mouth slightly open with the top portion similar to a flattened “M” shape and the bottom portion similar to a flatted “U” shape. Give a hint of the top lip with one tiny curve and the bottom lip with two large curves that join in the middle.
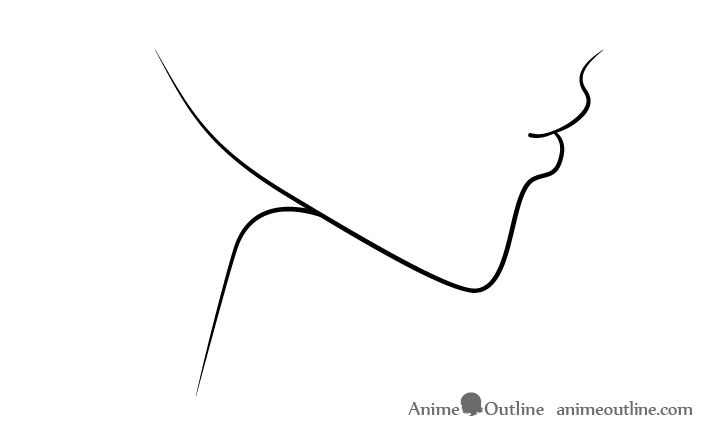
For the side view you can draw anime lips very similar to real lips but leave them as a silhouette without showing inner details.
For more style variations of anime lips see:
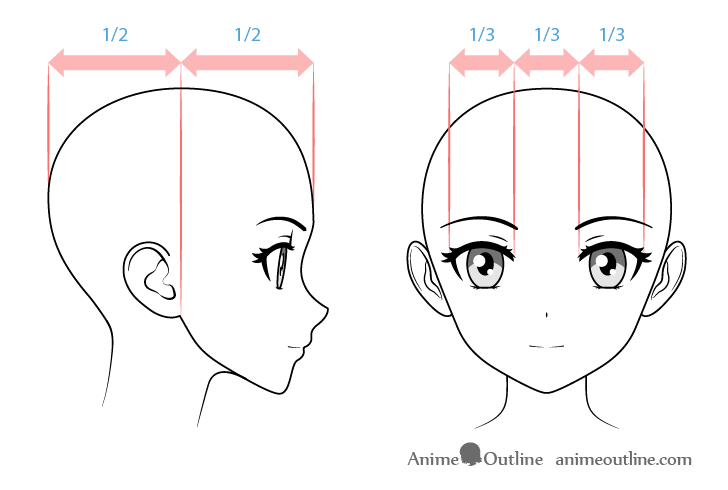
Proportions of Anime Face Used for This Tutorial
Above and below you can see the proportions of the face used for this tutorial.
You may already be aware of these if you’ve seen some of the other tutorials here on AnimeOutline.
If you have not seen the other tutorials on drawing anime style faces and need more explanation then check out:
Kissing Face vs Normal Face Comparison
Finally you can see how the facial features shift when making a “kissy face” as compared to a normal expression.
The main changes are:
For more details on drawing closed anime and manga style eyes see:
You may also notice some blush added to the cheeks. You can draw the blush with just a few stripes.
For more anime blush style variations see:
Anime Girl Face – Front View
For reference you can see how this character would look with their normal expression with the head and face fully drawn.
For examples of drawing various anime hairstyles you can see:
Anime Girl Face – Side View
You can also see the side view drawing example above.
Drawing a Kissing Anime Face – Front View
To draw the “kissing face” in the front view position and draw the facial features as described earlier (closed eyes, lightly open mouth and blush).
Drawing a Kissing Anime Face – Side View
Above you can also see an example of the same face drawn with a “kissing expressions” from the side view.
This example can work when drawing a character that is kissing someone slightly below them. For example if she was kissing her smaller sister/brother on the forehead. But often the head tends to be tilted upwards when giving a kiss on the cheek or lips so the above example will not always work.
Drawing a Kissing Anime Face With Lifted Head – Side View
In the side view an upward tilted head is still fairly easy to draw. You can basically rotate the previous drawing of the face.
The only tricky part is drawing the hair. Draw the top part of the hair rotated along with the head and the shorter clumps slightly more angled in accordance with the tilt. Keep the longer parts of the hair hanging downwards same as the previous example.
Basically the longer the hair the more likely it is to simply hang down. Very short hair will pretty much rotate with the head and medium hair will tend to bend downwards but not fully hang like long hair.
For more on drawing hair in various states see:
Drawing a Kissing Anime Face With a Lifted Head – Front View
Finally the most challenging example of this tutorial.
Drawing a head that’s lifted up in the front view can be quite tough because all of the facial features and proportions will shift. However you can use the technique below to make drawing an angled head significantly easier.
Projecting Lines From One View to Another
A good trick to use to if you are struggling with drawing a head that is raised (ore lowered) in the front view is to draw that same head from the side view. Next project a set of lines from each of the major facial features. These lines will give you the placement of the facial features of that same head angle in the front view!
Please note that you do not need to do this every time you draw but it can be very good practice until you get the hang of how to draw the face at different angles without the extra help.
You may also notice that there is a hint of one of the nostrils on the left side of the face. This is optional but can help show that the head is tilted upwards.
Conclusion
Drawing kissing anime lips is fairly simple but drawing the entire face (especially from different angles) can get a lot more complicated. Hopefully the tips and suggestions provided in this tutorial have helped you gain a better understanding of how you can draw these.


