How to draw arms
How to draw arms
How to Draw Arms on a Body for Beginners
This video is a tutorial video for people who want to improve how to draw arms.
If you look at this video, you will be able to grasp the tips.
Here is a brief summary of the content and illustrations explained in the YouTube video.
When I draw an arm, I can only draw a straight arm.
I think many people have such troubles.
In this article, I will explain how to draw a more realistic arm without straightening the arm.
If you want to check the contents of this article on YouTube,
please watch this video.
The basic structure of arms
First, think of the arm parts in circles instead of drawing the arm suddenly.
The more muscular the arm, the more rounded the circles are.
It’s common for beginners to start drawing in detail without thinking about the whole thing.
As a result, the illustration may be out of balance.
To prevent this from happening, let’s start with a rough sketch at the drafting stage.
The best practice when you draw arm and body parts is to think about the structure of the muscles.
At first, I tried to memorize the name of the muscle structure, but I lost motivation.
Perhaps most people find it awkward to think about and remember the structure of muscles, so I recommend that you first take a rough shape like me and then draw the details.
I drew both straight and bent arms.
The point at this time is
are slightly popped out.
Also, pay attention to the balance of the hands.
If you want to know more about how to draw hands, I made the article before, so please refer to that as well.
How to Draw Hands and Hand Poses for Beginners
It is written for those who want to know the basic way of drawing hands. I will explain how to draw hands in order so that anyone can draw easily!
On the left side, I draw how to draw a girl’s arm.
Girl’s arms, unlike boys’ arms, look better if they don’t overemphasize their muscles.
That doesn’t mean that you draw the arm straight.
Draw small circles on the bends of the shoulder and elbow.
Draw an arm to connect to those circles.
I drew slightly curved arrows in red, can you see that they are not straight?
Actually, as a bad example, I also drew a straight arm.
If you can’t draw arms well, you may be drawing an illustration like this straightened arm.
In this way, you can make a difference in the illustration just by thinking about the joints in circles.
Male and female arms
In the following illustration, I will explain the connection between the arms and body of men and women.
The illustration of a man is a pose with his hands raised, and the woman is a pose with her arms folded above her head.
First of all, I will explain the pose of the male arm.
Draw a straight line between the wrists to draw the arms evenly.
This will reduce the chances of drawing a misaligned arm.
I drew the outline of the arm and body parts.
Try to make the elbows and beyond thinner than the upper arms.
Next, I will explain the poses of female arms.
For women, tilting hips to the left or right make for a beautiful pose.
Also, unlike men, avoid drawing too much muscle.
When drawing line art, the male muscles are drawn in more detail.
By adding shadows to the muscles, it looks more three-dimensional.
Also, since the arms are raised, it is one of the tricks to draw the ribs slightly.
If you give the side of the body a little bulge, it will become a more natural muscular male body.
On the other hand, for women, do not draw too much shadow on the muscles.
I struggled with the position where her chests were drawn, but I was able to draw the female body relatively easily because women draw fewer lines than men.
If you draw the collarbone and shoulder lines so that they connect well, you can draw a more natural body of a woman with her arms raised.
How to draw various arms
From here, I drew various arm poses.
First of all, I drew a rough outline of the arm and part of the body.
You can use the lasso tool to adjust the size.
Therefore, if the illustration is unbalanced or the illustration itself is drawn too large, it will be adjusted without erasing everything.
Perhaps most digital tools have a lasso tool feature, so give it a try!
At the draft stage, it is NOT necessary to draw in detail, so I think it will be important how quickly you can draw a well-balanced illustration.
Especially when you draw poses, try to balance by looking at the pictures and illustrations of the poses you are referring to.
Now, from here, I will explain the points of the line arts from right to left.
The point of the first illustration is to draw the hand large.
Then, the length of the lower elbow and the upper arm is drawn with a ratio of 3: 1.
If you give a little perspective like this, the reality of the illustration will increase.
The point of the second illustration is to draw the muscles of the back.
Doing so will help balance the back and chest muscles.
Also, if you draw the shadow of the muscles on the side, it will look more three-dimensional.
The point of the third illustration is to draw the elbow so that it looks larger than the shoulder.
Also, if you draw the bulging position of the arm on the left and right so that it is slightly offset, it will look more natural.
As for the hand, it looks more natural if you lift the index finger a little and gradually increase the length from the little finger to the middle finger.
The point of the fourth illustration is the bulge above and below the arm.
Also, one of the points is to draw the connection between the shoulder and the upper arm like a U shape.
Please draw the positions of the fingers in a circular motion and don’t forget to draw the folds on the inside of the thumb.
For those who want to learn more about moving poses like Japanese anime,
Your Custom Text Here
How to Draw Arms
Welcome to this drawing tutorial! Make sure to grab the free worksheets below and take time to practice. Drawing is a skill that requires hands-on practice so make sure you spend more time making art than consuming tutorials.
Simple Forms
The arm can be simplified down to three spheres for the joints (shoulder, elbow, and wrist) and two cylinders for the arm bones themselves. In these examples, I have added in the hand, if you are only focused on drawing the arm I recommend just placing a box for the hand so that you start to visualize the relationship between the arm and hand.
If you are just getting into drawing, cylinders can be quite tricky, I have a tutorial on the basic forms that you can check out here (Opens in a new window). This method of drawing depends heavily on these basic forms which can be frustrating at first but it makes everything easier in the long haul.
Practice from references by copying the pose of the arm but simplifying down the shapes to our basic forms. Do this until you are comfortable with the overall proportions of the arm.
Complex Forms
Drawing in the arm muscles is fairly simple once you have developed an understanding of the cylinders (especially when drawing skinny arms). The biggest challenge during this step is drawing in the shoulder, pay close attention to how the shoulder muscle wraps around the top sphere.
For the forearm, draw the cylinder slightly thicker towards the elbow and more tapered close to the wrist. You can see that on the example drawings that there is only a slight difference here, you can exaggerate these differences if you are drawing someone muscular.
Now draw some arms in your sketchbook from reference and then some from imagination, switching back and forth will help you memorize these forms and allow you to draw accurately from imagination.
If you want more worksheets for drawing anatomy I have a printable workbook on the basics of drawing the figure and also the hand that you can check out below
How to Draw Arms
In this super simple instruction, the team of Easydrawingart.com will show you how to draw arms. This instruction is super important if you want to learn how to portray a human.
Step 1
To begin with, depict the base of the arm with the help of two simple lines – one for the upper part and the second for the lower. Depict the joints with small circles.
Step 2
So, let’s now begin to add volume to the arms. First, depict the deltoid as a simple oval. If you want to make a more pumped arm, just make this oval larger.
Step 3
Now let’s portray the upper arm, which consists of triceps and biceps. This part should be depicted as a simple cylinder.
Step 4
Now let’s depict the elbow joint. Depict this detail as a simple circle. This circle should be noticeably smaller than the circle of the deltoid muscle.
Step 5
So, now it remains only to depict the forearm. This part of the art looks like a cylindrical figure gradually tapering closer to the bottom.
Step 6
The basic contours of the arm are completed, and now it’s time to give it a more regular and voluminous appearance. To do this, smoothly trace everything as the artists of Easydrawingart.com did.
Step 7
Now take an eraser and wipe off the auxiliary lines from the arm. Next, with a darker pencil or ink, trace the arm drawing to make it look more clear.
Step 8
Let’s now paint the arm. For this, you can use both more standard colors and unusual ones, as if you were drawing Hulk or an orc.
So, above the team of Easydrawingart.com showed you how to draw an arm with from the front. Below we show you how to draw an arm from the side.
Step 1
So, as in the previous example, we start from the base, that is, from the “skeleton” of the arm. Draw the arm with two simple lines and three small circles for the joints.
Step 2
So, let’s start adding volume to the arm. We will do this exactly as in the first example. Start with the deltoid by depicting it as a simple ball or oval.
Step 3
Now add volume to the upper part of the arm using a cylindrical shape. If you are portraying a more muscular person, make this detail more plump.
Step 4
Now let’s portray the elbow joint. Here it is also presented as a simple ball. It, as in the first example, should be noticeably smaller than the ball of the shoulder.
Step 5
So, in the fifth stage, we will depict the forearm. It also looks like a cylindrical figure tapering smoothly to the area of the wrist.
Step 6
Using smooth lines, trace the geometric shapes from the previous stages, drawing the deltoids, biceps, triceps and other muscle groups.
Step 7
So, now put the pencil aside and grab the eraser, clearing all the guidelines and tracing the drawing so that it looks clear and voluminous.
How to Draw Anime & Manga Arms Tutorial
This tutorial explains how to draw anime and manga style arms with a breakdown of the proportions and examples of drawing arms in different positions.
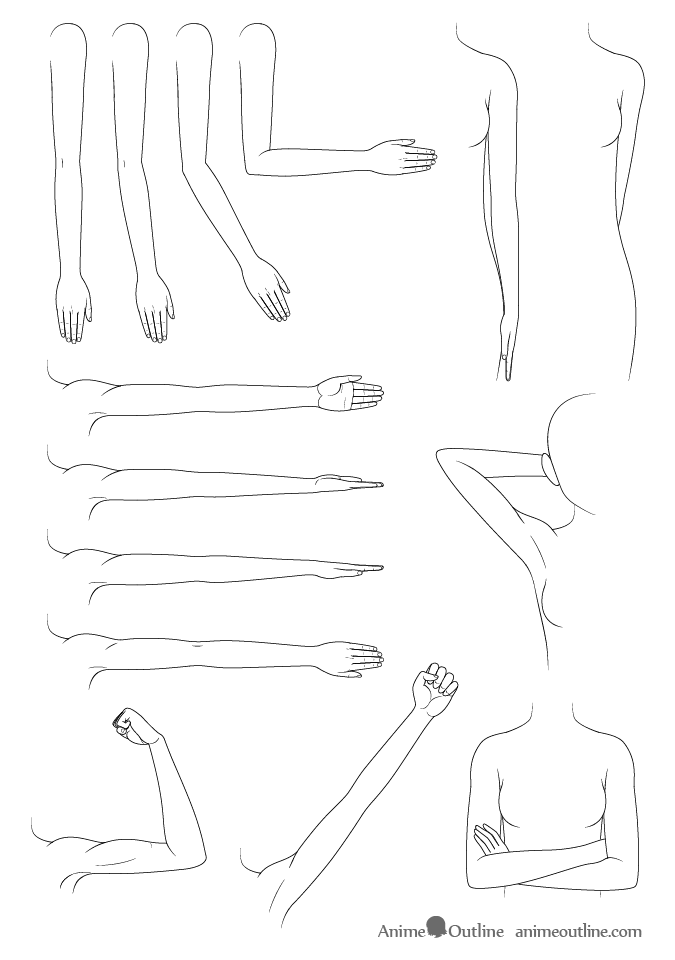
For this tutorial we will focus on the more common, more realistic style of anime arms. The examples are those of the arms of a young female character but you can draw the arms of young male characters in pretty much the same way (simply change the body).
Please note that this tutorial does not go into much detail on drawing hands. For that you can see:
You may also want to see the tutorial on drawing the neck and collar bones:
Anime Arm Proportions & Step by Step Drawing
Before you draw arms it’s a good idea to first analyze their basic proportions.
Though these can vary slightly from person to person (and style to style) generally you can use the above example.
The the distance from below the shoulder down to the elbow and from the elbow down to the wrist is generally the same (fingers and palm are usually the same length for the hand).
When drawing just about anything (arms included) start with a light sketch and go over it with darker lines after you are sure you have the correct proportions.
Though it can get a little tricky it’s also important to try and maintain these proportions when drawing arms in different positions.
How to Draw Anime Arms With Different Bends
When the arms bend the main change that takes place is the elbow sticking out more and more the sharper the bend. When the arm is help straight the elbow area actually tends to be slight indented.
When the arm is bent far enough there will tend to be a sort of “fold” on the side opposite the elbow.
How to Draw Anime Arms in Different Twists
When looking at the arm from the same view but with different twists of the wrist it will appear narrower or wider in different places.
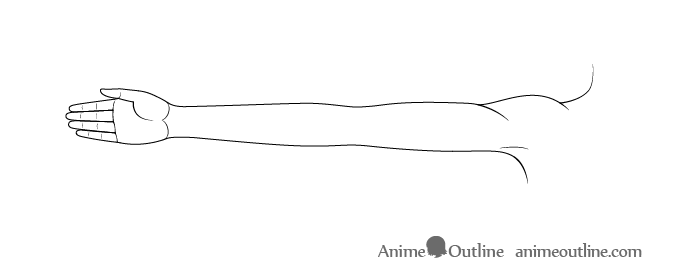
Using an outstretched arm with the palm facing directly towards the viewer as a basis you can see the slight variations below as the arm twists.
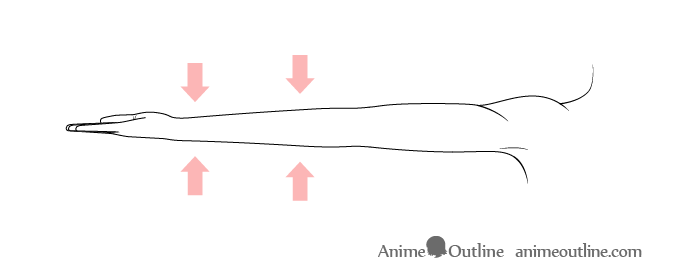
When drawing the arm with the palm up draw the entire portions of the arm past the elbow narrower.
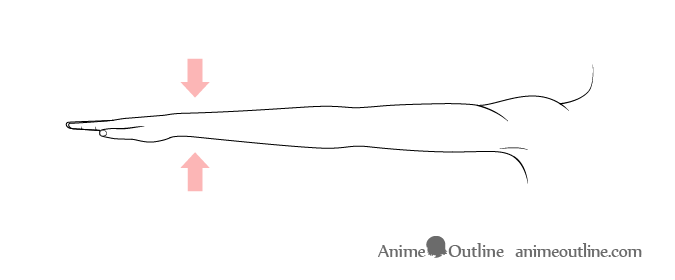
When drawing the arm with the palm facing down draw the wrist “thinner” as the viewer will be looking at it from the side.
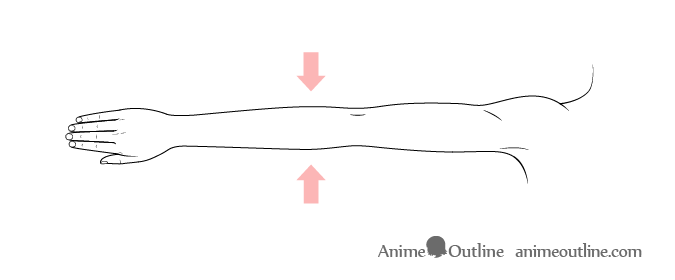
Drawing the arm with the palm facing away form the viewer the “below elbow” area should be narrower but draw the wrist will the same as the base example.
How to Draw Anime Arms in Different Positions
When drawing anime arms in different positions such as the examples below again be sure to maintain the proportions mentioned earlier.
Drawing Flexed Anime Arms
As this particular set of flexed arms is not very muscular draw the biceps popping up very slightly. You can even leave the drawing at just that. If you want to ad a little more detail you can also give a hint of the bottom portion of the biceps with just a few lines.
Drawing Raised Anime Arms
For raised arms you can pretty much draw them the same as the outstretched arms in the earlier examples. The main difference will be more stretched out shoulder muscles.
Drawing Anime Arms to Sides of the Body
When drawing the arms held to sides of the body sort of like the character is standing at attention the arms will not be perfectly straight. Draw them bent slightly away from the body past the elbows.
Drawing Anime Arms Where Parts of the Arm Are Hidden
When drawing anime arms where parts of one or both arms are hidden you can use the technique below to help you out.
Drawing Crossed Anime Arms
To draw crossed anime arms like in the example above it’s a good idea to think of the drawing as “see through”.
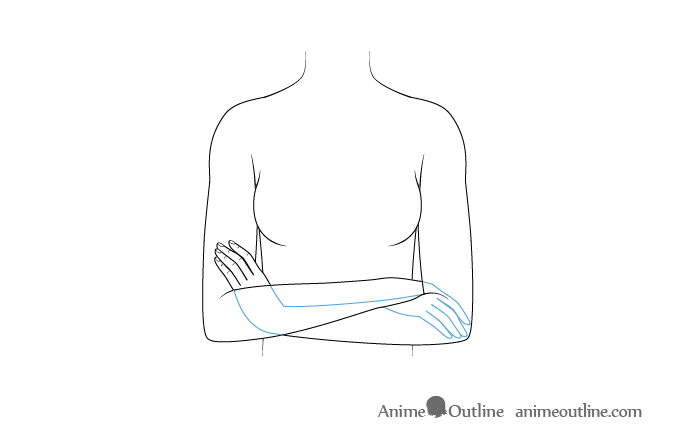
Being able to look at the arms as “see through” allows you to know if the visible parts of the arms are correctly placed. For example the fingers on the left arm.
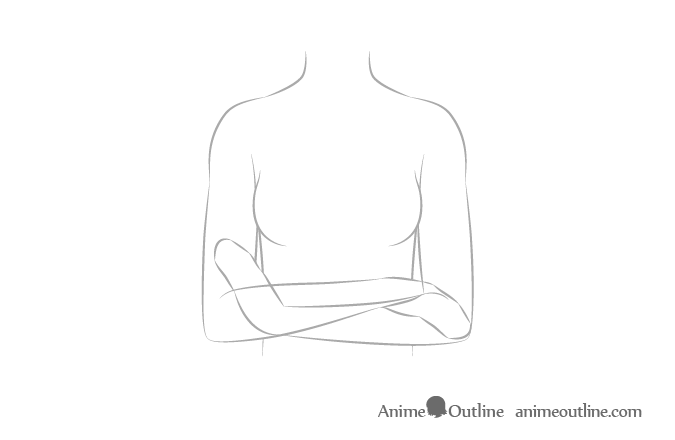
You don’t need to draw every hidden detail like the individual fingers in the previous example. Instead do sketch like the above example to help you estimate their general size and position.
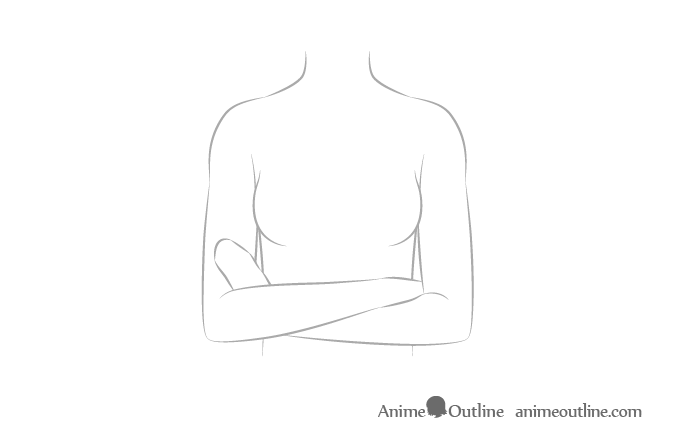
After confirm that it all looks right simply erase the parts that are supposed to be hidden, add the smaller details and go over your sketch with darker more solid lines.
Drawing Anime Arms Behind Head
To draw the arms behind the head you can again use the previous example. Since this is a simpler pose to draw you can even just estimate where the hidden parts of the arms will be positioned without doing a see through drawing (though you still can if you are not sure).
Simply make sure that there is enough room left for the hands that are hidden behind the head.
Drawing Anime Arms Behind Back
To draw the arms held behind the back you can yet again sketch out or estimate the position of the parts that are hidden.
In this case simply make sure that the arms are angled in a way that they have enough room to meet behind the back.
Also keep in mind that the arms will usually be slightly bent when they are in this position.
Conclusion
Arms can be a very challenging area of the body to draw due to their ability to do so many combinations of twists and bends. To avoid mistakes when drawing always try and keep proportions in mind and compare the size of one part of the arm to another.
For more general drawing tips see:
For more on drawing anime bodies check out:
How to Draw an Arm
Artist Dani Puente explains how to draw an anatomically correct arm, including its proportions, muscle names, & how bones & muscles move when raised or rotated.
Introduction
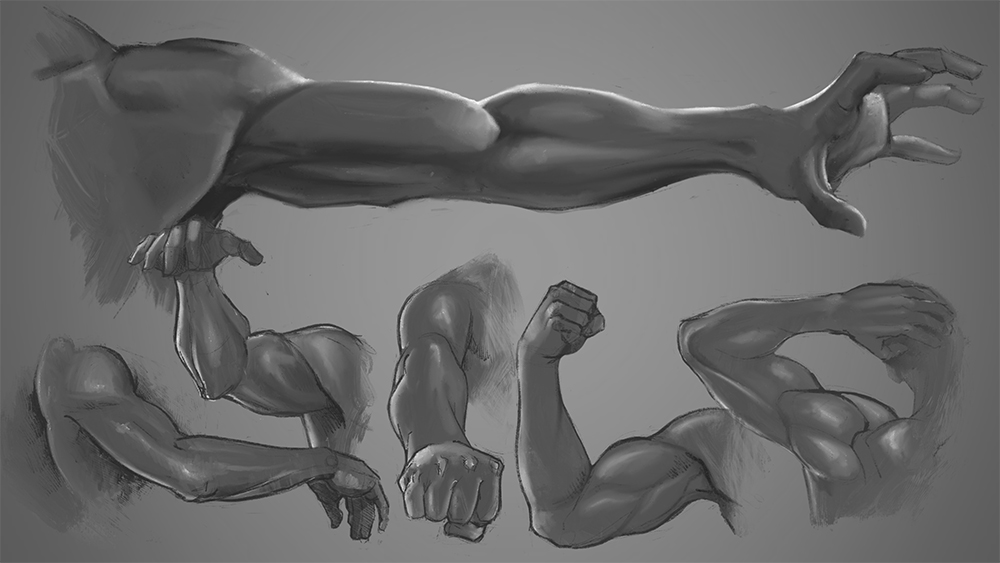
Hi all! My name is Dani Puente, and today I will give you some guidelines to learn and improve drawing human arms easily and quickly.
It is essential that, as illustrators or people who love illustration, we know some anatomy since this is one of the key pieces to grow as artists and to improve the quality of our illustrations. An incorrect, disproportionate posture or errors in the extremities can ruin our final work. However, and since anatomy is not simple, in this tutorial, I will give you the keys to draw arms in a real, anatomical, and credible way.
I hope that my advice will help you learn a little more about the human body and motivate you to continue learning.
Proportions
To start drawing the limbs of a human body, proportions are the first thing that we must know well. In this case, I will focus on those of the arm.
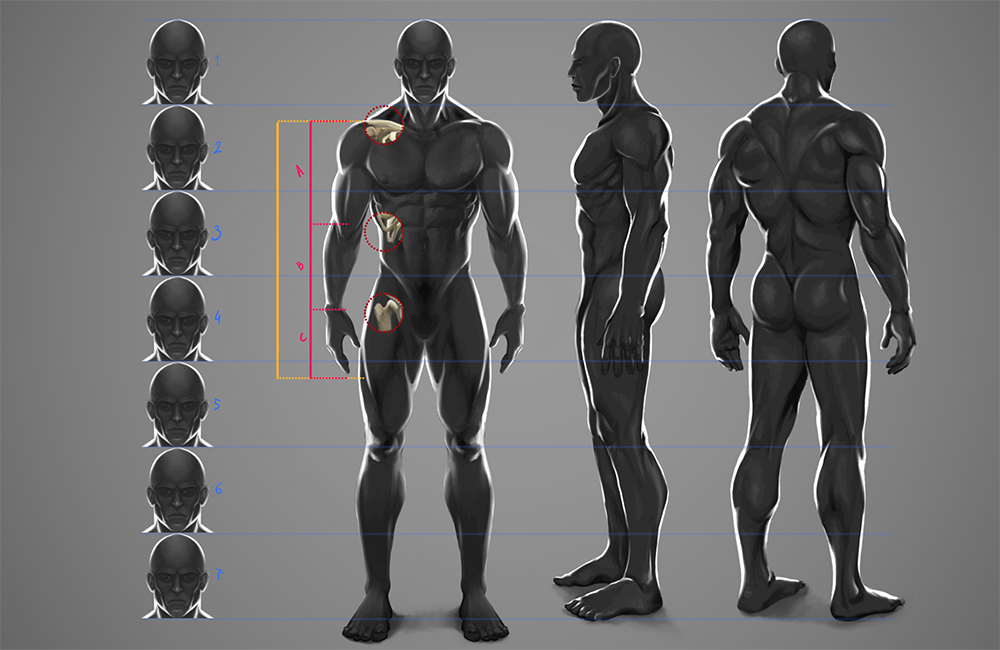
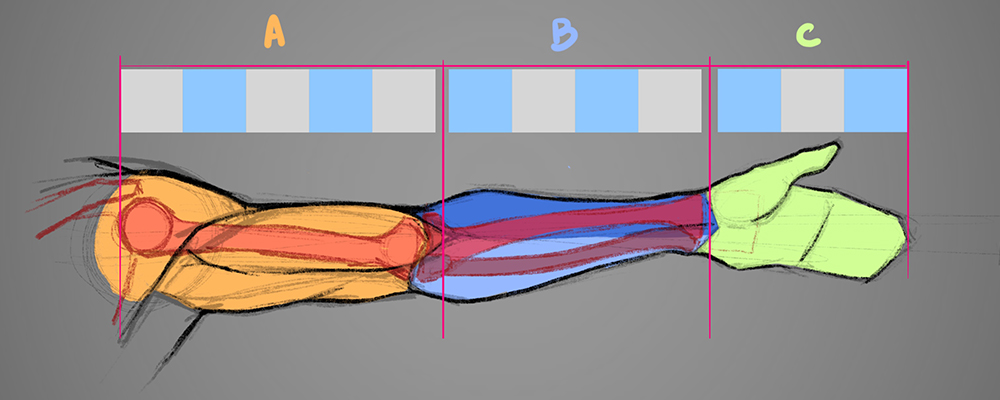
As you can see in the following image, the arm can be divided into three parts. I will take the dimensions of the rest of the body as a reference.
The first part goes from the shoulder to the elbow (A). This part begins at the collarbone and ends at the level of the last rib. The second part is the forearm, which extends from the elbow to the wrist (B) specifically, at the height of the femur’s head. And the third is the hand (C), which goes from the wrist to the fingertips and ends approximately at the center of the thigh. I will show you all of this in more detail throughout this tutorial.
Study the following drawing carefully:
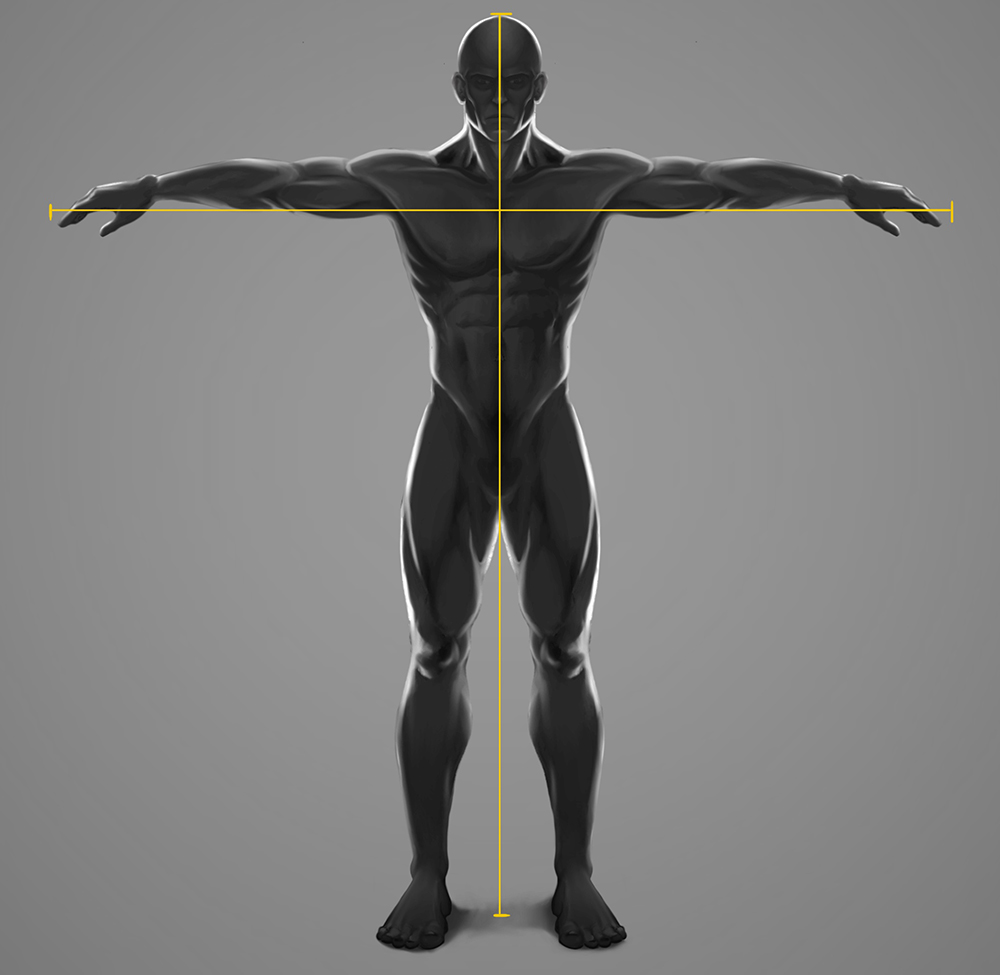
Another important point is never to forget that the length of the arms outstretched is equal to the individual’s height from the shoulders down.
Now let us focus on the proportions of the arm. As I said, the arm is divided into three parts: the arm, the forearm, and the hand. However, I am going to focus on the arm and the forearm.
The top part of the arm, which is the longest (A), is the humerus, a strong and long bone that starts at the shoulder and connects to the elbow, connecting at the joint in the forearm (B).
The bones that make up the forearm (B) are the ulna and the radius (red). These bones connect at a joint and are responsible for turning the wrist.
If you divide the length into 12 portions, you can see that A is the longest part, with five units, the forearm (B) has four units, and the hand (C) has three units.
Construction
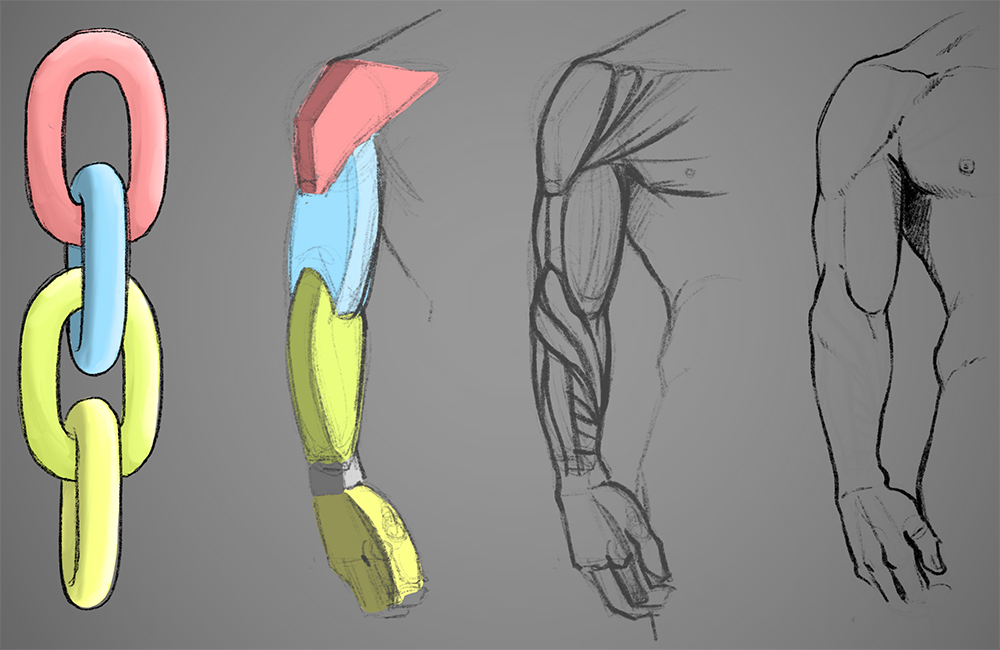
Once you understand the proportions of your arm, you can then familiarize yourself with its shape and understand its musculature. The insertion of the muscles is like a chain.
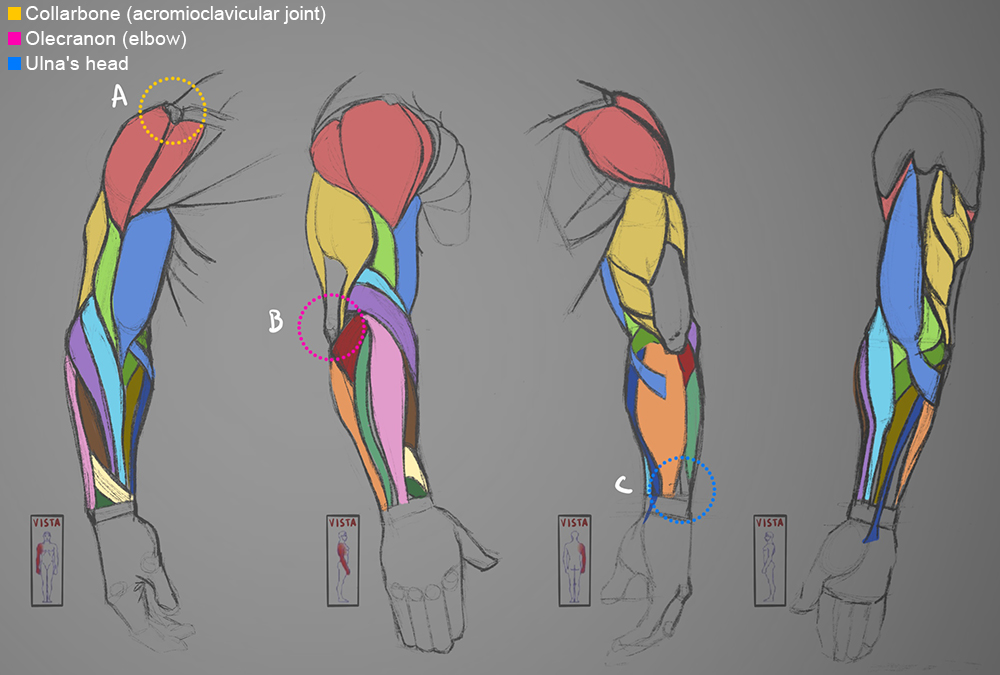
A useful guide for constructing an arm is to include the line formed by the subcutaneous points or bones that can be perceived through the skin, such as the collarbone, elbow, and head of the ulna at the wrist.
Take a look at the following image:
Muscle Anatomy
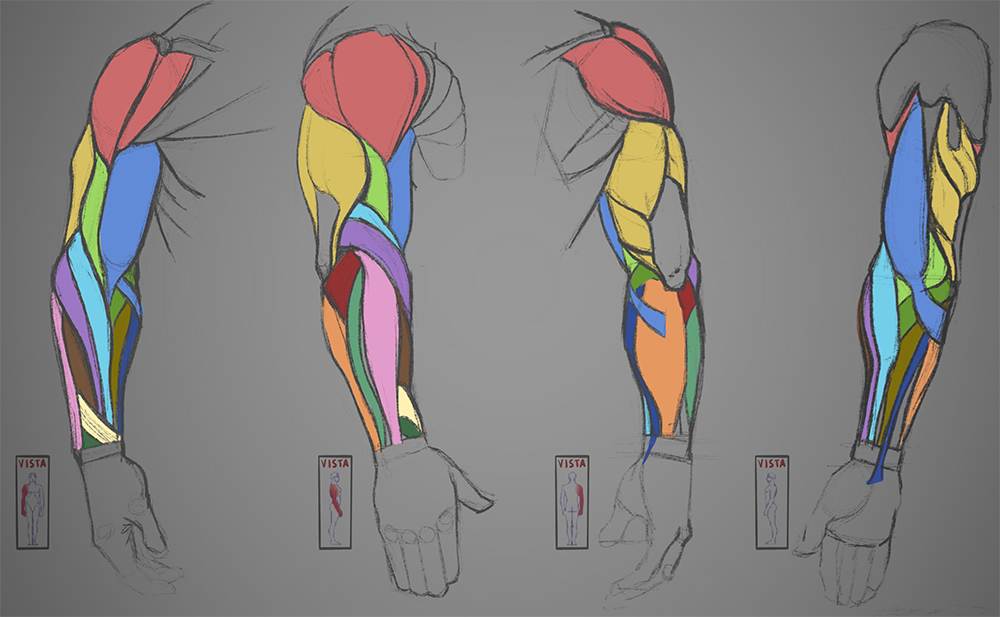
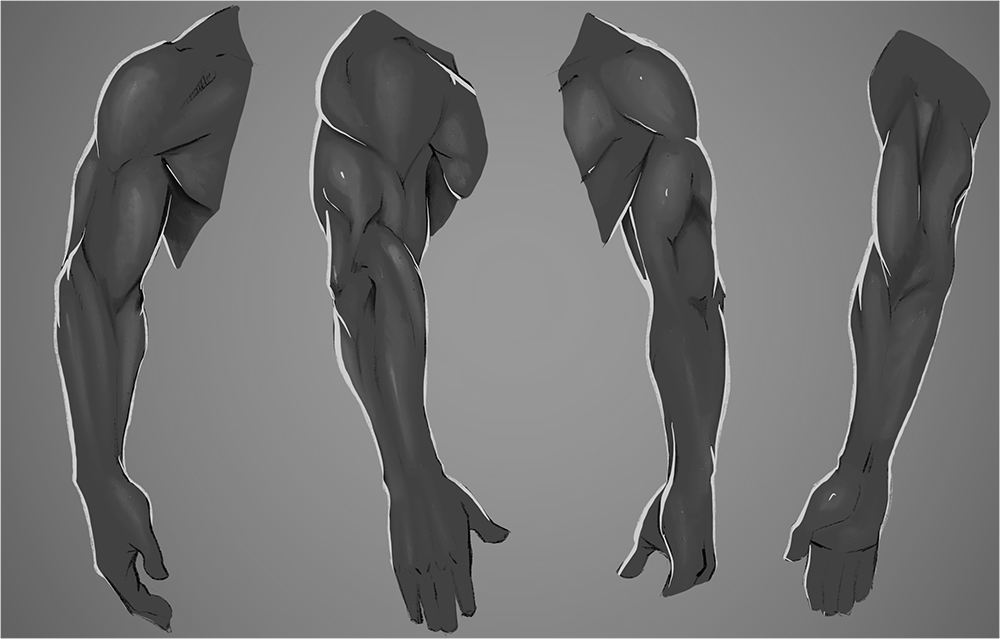
To learn and be able to realistically draw the arms of your character, it is better to know how to locate the most important muscles of the limb you are studying. Whatever your style, knowing them will be useful in achieving the right shape, which will enrich your illustrations.
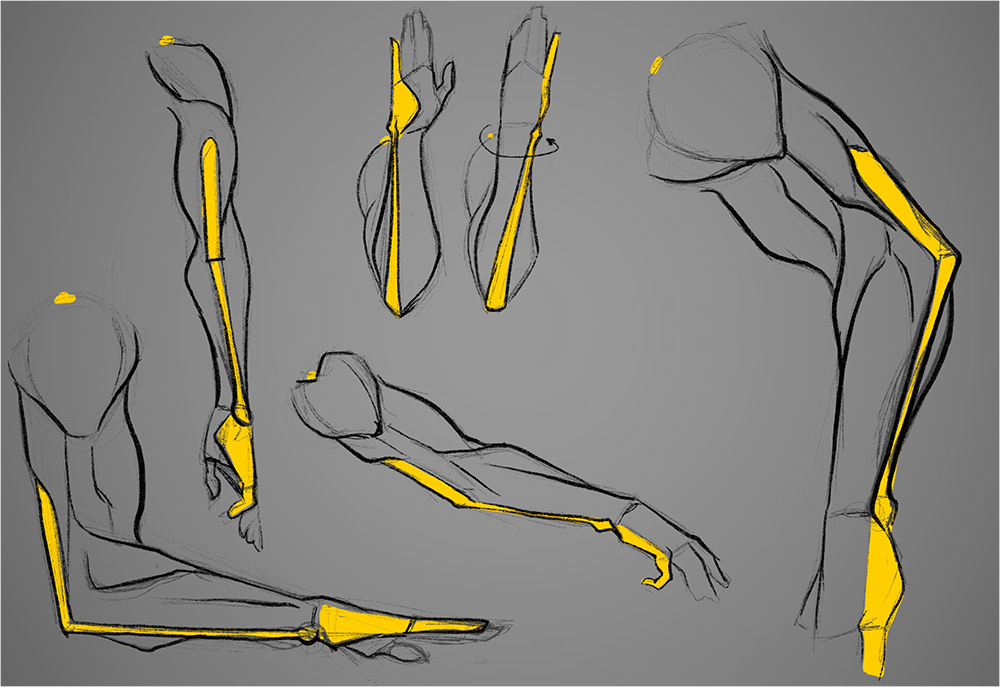
Here you can see in more detail the aforementioned subcutaneous points in areas A, B, and C.


Movement and Rotations
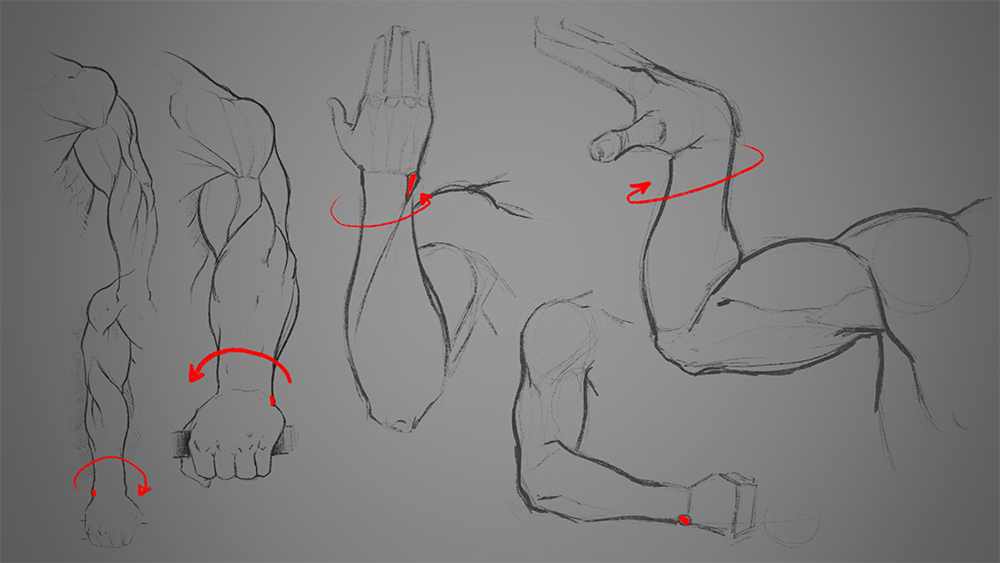
On many occasions, the arm can be difficult to draw due to all its movement options: vertical, horizontal, diagonal turns, rotations, etc. This is because the head of the humerus is rounded and allows almost 360º mobility. Therefore, it is one of the greatest difficulties when drawing arms. Let me show you some rotation movements to help you solve these problems in your illustrations. Look closely at how the radius bone spins on the ulna during the rotation movement.
Note: Use the head of the ulna (red) as a reference. It must always be on the side of the little finger.
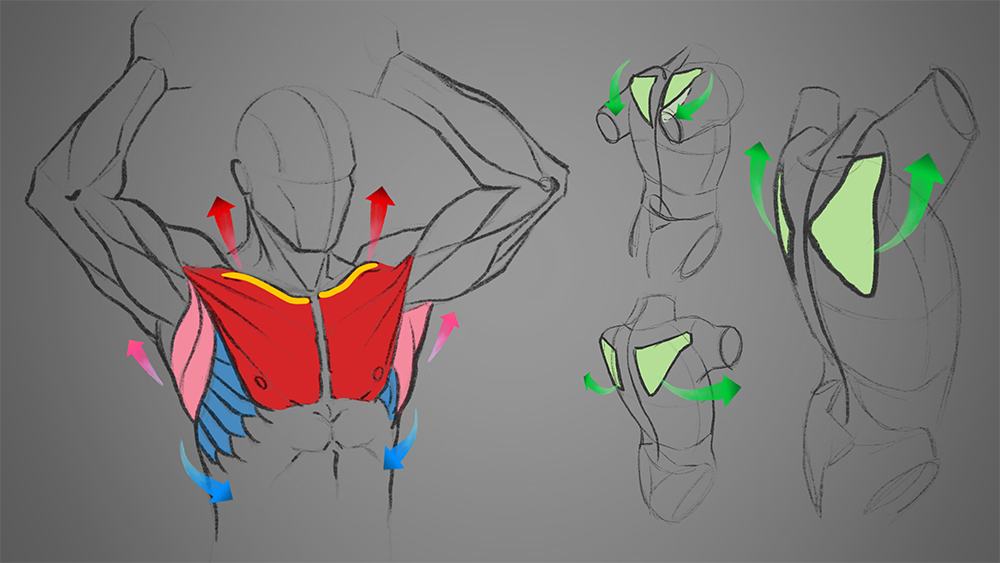
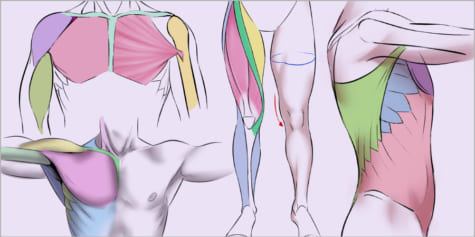
If you want to add realism to your illustrations, the arms’ movement is aligned with a whole set of muscles and bones. For example, when drawing a pose in which the arms are raised, do not forget that, in the frontal plane, the pectoral (red), the latissimus dorsi (pink), and the collarbones (yellow) are raised; and the serratus (blue) is visible in the rib cage. In the posterior plane (back), remember to include the movement of the scapula (green), as it also contributes to the movements of the arm. You can see it in the following images:
In short, to simplify the process of drawing an arm, we only must follow three clear guidelines: the proportions, the main muscles, and the reference points.
I hope that my advice, along with my video, will help you, and soon you can easily solve arms in your illustrations.
Thank you for reading this tutorial. I encourage you to share on Instagram (@Danipuente_conceptart) the notes and illustrations you have made following this tutorial. Maybe a creature with 4 or 6 arms? Go for it! I would love to see it!
It has been a pleasure to draw for all of you!
– Daniel Puente
Similar articles
Bring Energy and Life to Your Poses!
Learn to Draw Croquis Sketches
Sculpting Forms, Using Value, and Brush Introductions
Draw Expressive Hand Poses from Imagination!
Push Your Poses to the Extreme! Drawing Cartoon Hands
How to Draw Expressive Faces
Essential Tips for Drawing Drapery and Folds
How to think: Drawing Noses
How to draw and color anime hair
Muscles of the Human Body
Top Articles in Category
Essential Tips for Drawing Drapery and Folds
How to draw and color anime hair
Guide to Creating Color Schemes
Bring Energy and Life to Your Poses!
Easy Tips for Drawing Eyes
Anime-Style Skin Coloring Tutorial
How to Draw Hair
How to Draw Anime Eyes
How to Create Pixel Art
Color Theory for Digital Artists
Muscles of the Human Body
Natural-style Painting Workflow for Character Illustrations
Extracting Scanned Line Art for Digital Coloring
Drawing mouths and lips
How to Design Fantastical Dragons with a Touch of Realism
Grayscale to Color: Digital Character Painting
How to Draw Expressive Faces
Easy tips to paint light and shadow
How to Design Characters with Bold Fashion and Strong Silhou…
How to draw a frilly dress with a full skirt and puffy sleev…
How to Draw an Arm
How to Make Appealing Original Characters
Tips for digital outlining for Anime Art!
Designing characters with 7 basic shapes
How to Draw a Nose
Recommended Articles
Ultimate Guide to Blending Modes
Becoming a Concept Artist for a Hollywood Film
Things You Need to Know to Become a Game Illustrator
Extracting Scanned Line Art for Digital Coloring
Featured Pro Portfolio: Miroslav Petrov
Five Tips for Getting Noticed Online
Sculpting Forms, Using Value, and Brush Introductions
Keyboard Shortcut Guide for Artists
Top Drawing Apps and Software in 2022 (Free & Paid)
Learn to Draw Croquis Sketches
Easy Tips for Drawing Eyes
Exclusive Interview: Lois Van Baarle (Loish)
3 Reasons to Use Digital Art Software
Featured Pro Portfolio: Phil Saunders
Must-Know Tips to Improve Your Tablet Drawing Experience
ArtStation Marketplace Success Story: Le Vuong
How to Make Appealing Original Characters
Bring Energy and Life to Your Poses!
Simply Well Drawn: Part 1
Finding and Correcting Drawing Mistakes
Learn the basics of digital art, from the tools you need to the steps of creating digital artwork.
Read art tutorials and interviews with concepts artists for films, games, and animation.
Learn techniques for creating expressive and fun character art with these tutorials.
Whether you’re creating manga, comics, or webtoons, here you’ll find the best techniques to create your story!


