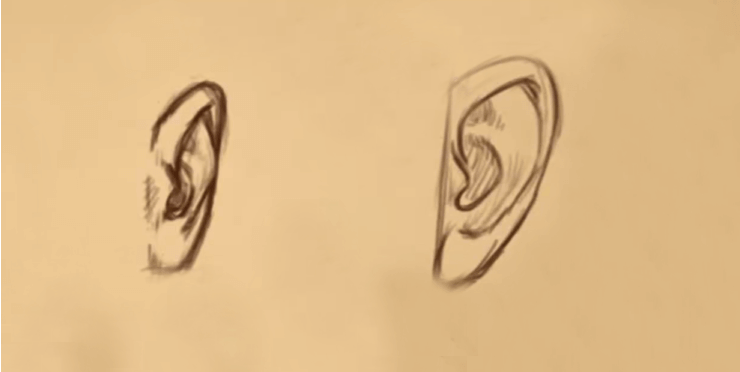
How to draw ears
How to draw ears
How to Draw Ears
Why Learn How to Draw Ears
Drawing ears can be a little tricky, if you are like me – you’ve never put much thought into ears – until you started to draw faces! You may not understand the ears, but you will definitely know if they are off – so this post will help you get those pesky ears just right.
In this article, you’ll learn:
Learning to see the nose as a 3D object will help you draw it more easily
How to Draw an Ear: Side View
In this lesson about how to draw an ear we’ll first focus on the basic shapes you will need to understand and master throughout this post.
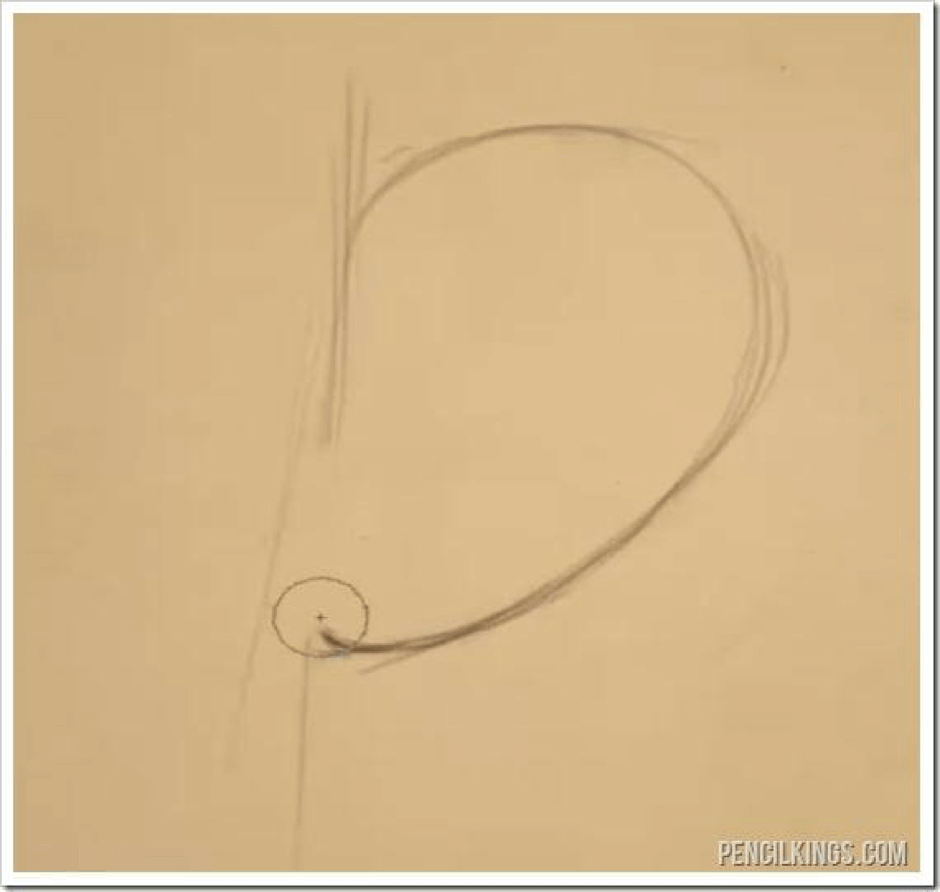
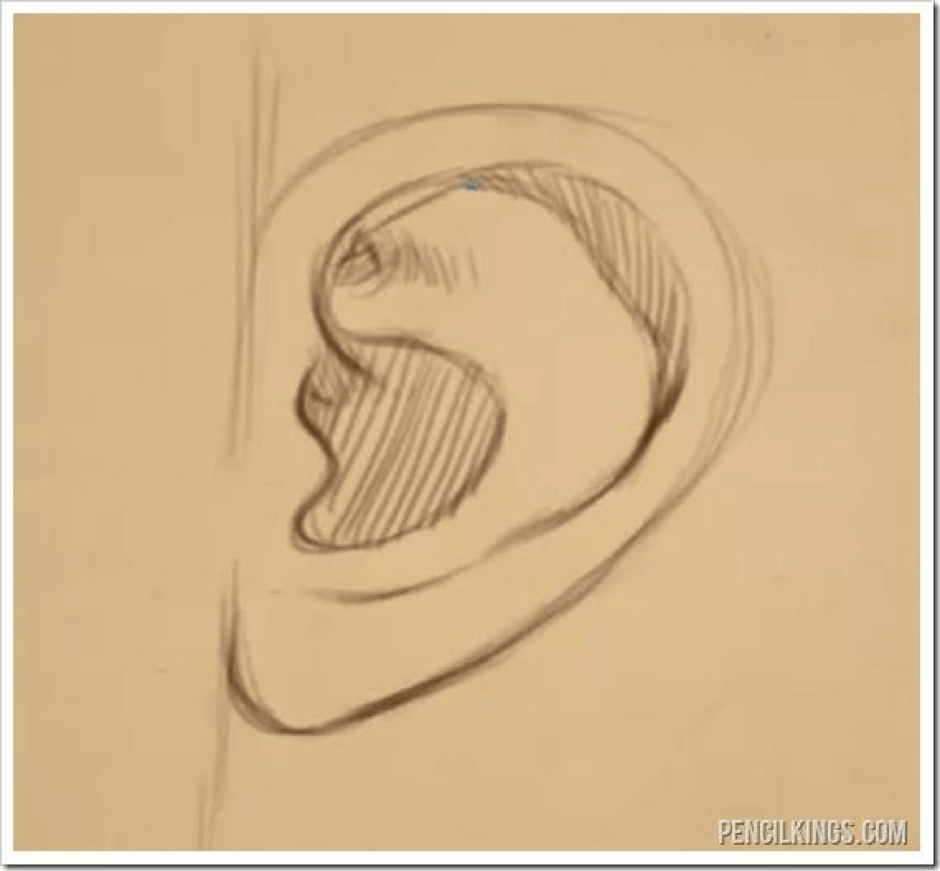
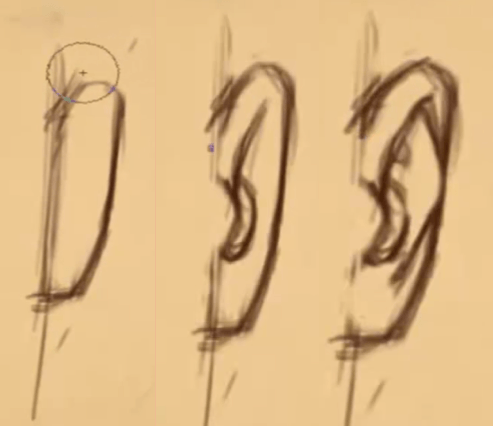
Step One: Start your Ear Drawing with a Curve
Draw a vertical line to show where the top and bottom of the ear attaches to the rest of the face. The curve of the ear goes up first and is much wider on the top than on the lower portion.
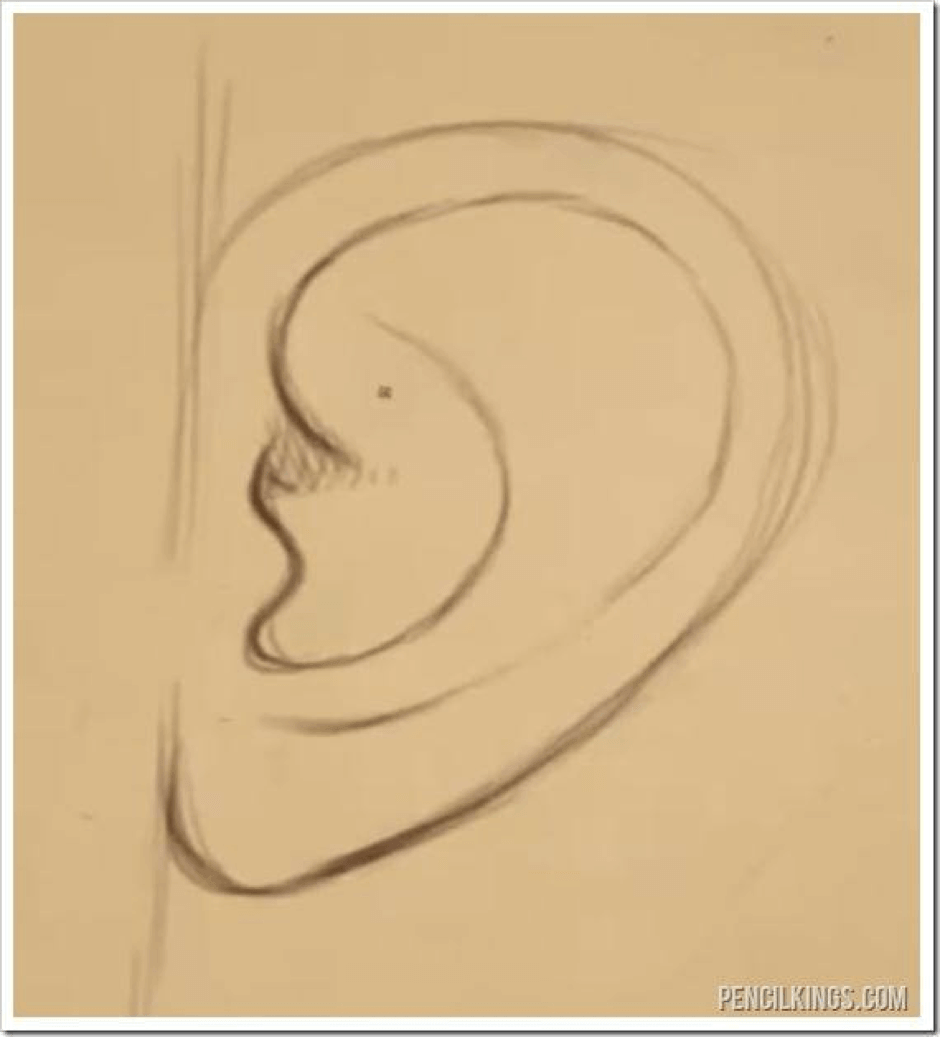
Step Two: Drawing the Inner Ear
There are a lot of little shapes inside of the ear. The one we see here is the ear flap that covers the hole in our ear, the continued shape as the flap transitions up and around folding in on itself.
The curved line above also wraps around, but this time it is much larger. Notice the way the top curved line interacts with the lower and inner line. It comes from the inside of the ear, passes by the flap as it draws upward. This is a feature that is mostly overlooked. Use this in your own work and you’ll be impressing viewers everywhere (even if they aren’t sure why it looks so good)!
As this line continues downward it will become lighter. This is because it becomes less defined as it wraps around the inner ear lobe.
Detailing the Inside of the Ear Drawing
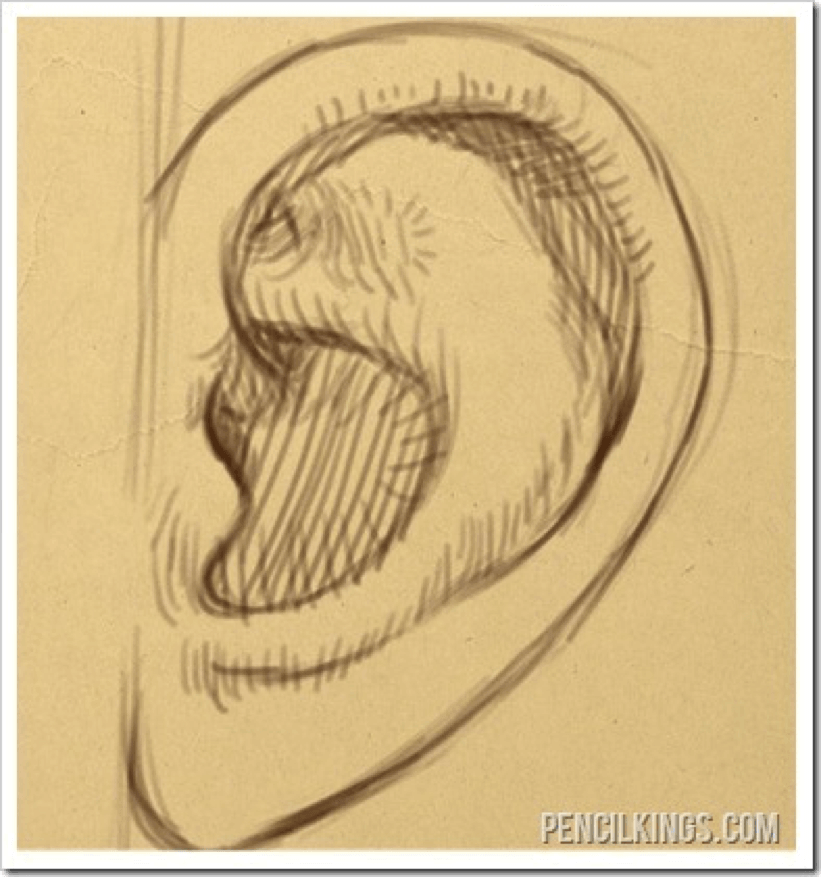
When learning how to draw an ear from the side, note that there is a rounded Y-Shape on the top inside part of the ear.
You don’t need to use lines to define this area because there are no sharp transitions or overlapping pieces of skin. Just use light shading to define it instead.
Using the same technique, you want to shade in both the top outer area along the inside of the ear and the pit of the ear that surrounds the ear hole.
After you have added these areas with the shading you are finished defining the major forms of the ear.
Finishing the Ear Shading
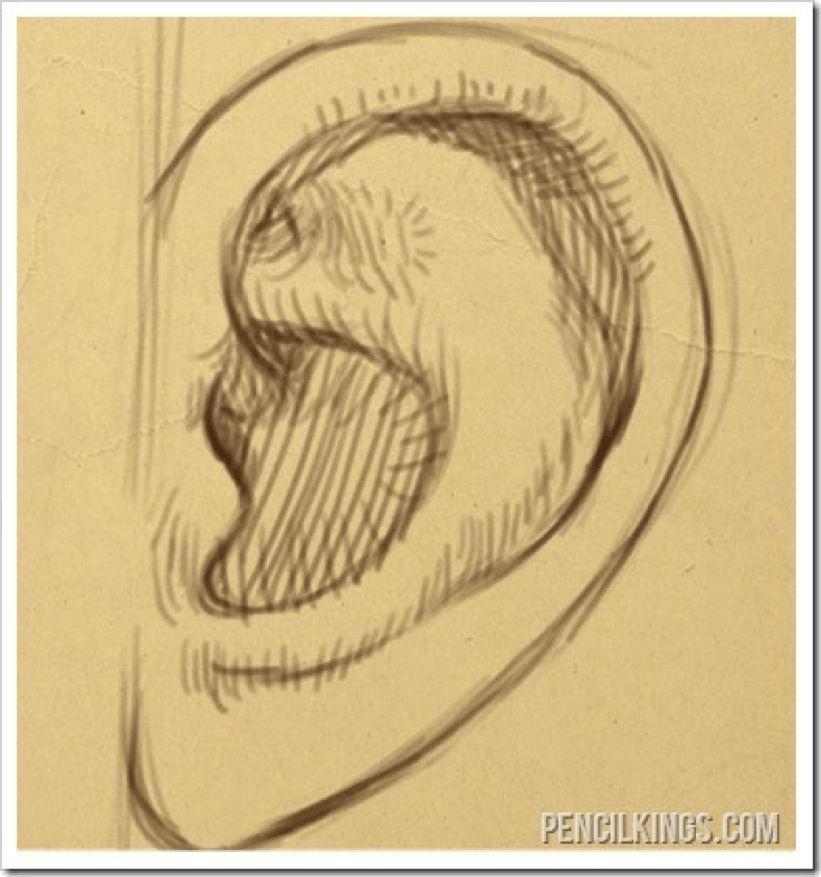
The last thing to finish off this drawing of an ear is to add some additional shading and contour lines to help give some more depth and volume to the drawing.
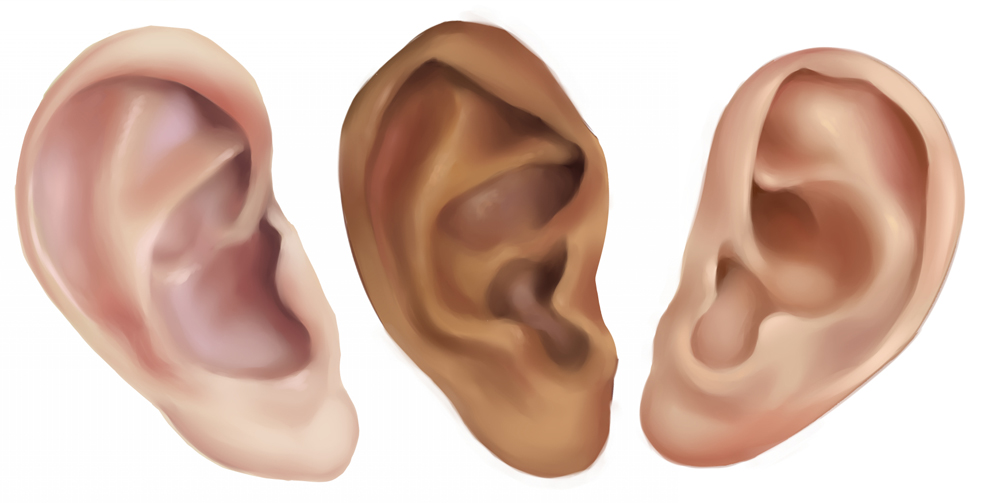
It may be a good idea here to look at some reference photos if you are not familiar with how these different parts overlap and cast shadows on each other.
With this basic understanding of this simplified ear, you should practice drawing it several times to make sure that you have really grasped what needs to be drawn to complete an ear like this.
TIP: Remember that it’s not enough to just ‘know’ how to do this. You also need to apply this knowledge to your work so that you can gain and eventually master the skill.
ASSIGNMENT
Once you have some references collected, it is time to put your pen to paper (or stylus to tablet) and practice drawing ears. This time you will draw twenty different ears from the side view. Make a special note of the differences between each reference because no two ears are the same. They are as unique as your fingerprints!
How to Draw an Ear: Front View
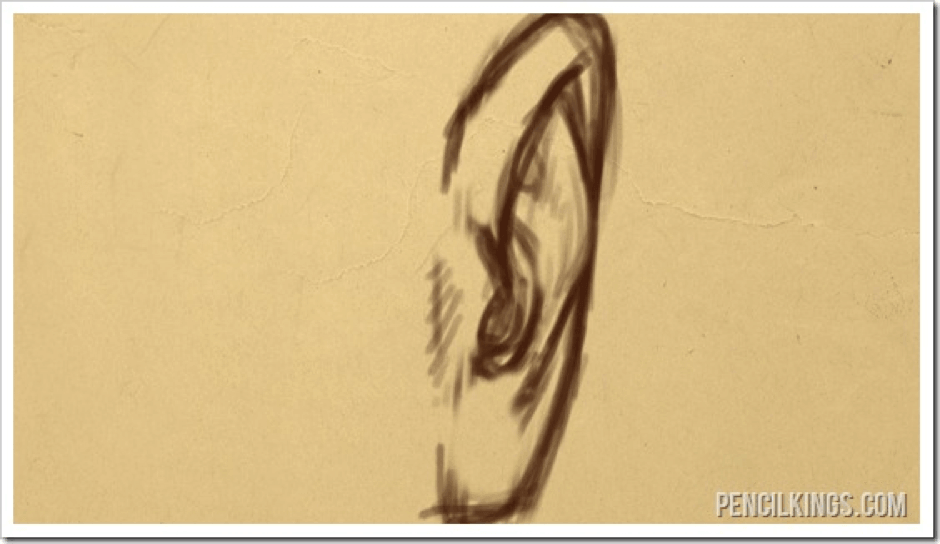
When you learned how to draw an ear just now, it was purely from a side view, and that is the easiest way to both draw and understand the ear. But the problem with this is that it is just a flat representation, and it’s easy to forget that the ear has thickness, or mass.
TIP: When learning to draw ears or any other subject, it is imperative that you understand not only what makes up the subject – such as anatomy – you must understand the 3D form of the object as well to capture it correctly.
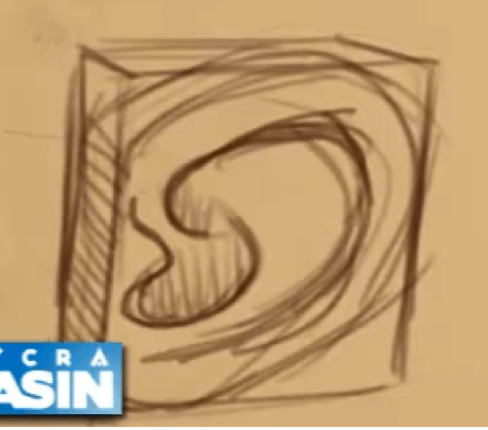
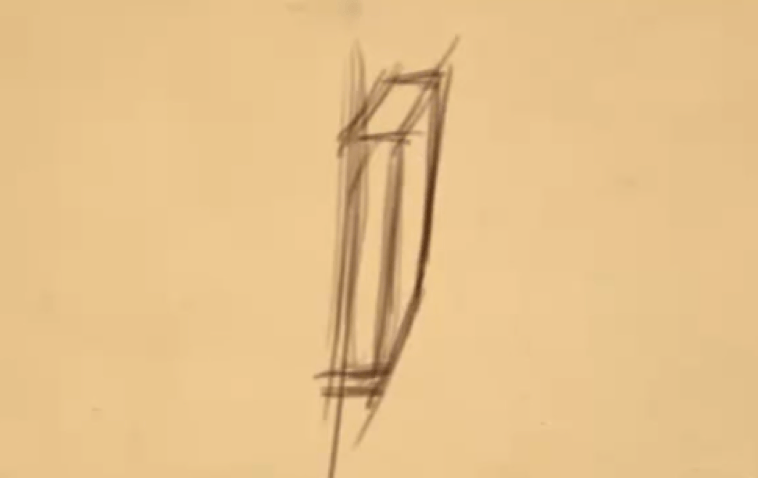
In learning, how to draw ears from the front view, first you should understand the ear from the side view with some thickness to it, as if it fills up a box like in this image. If you turn the box in the previous step ninety degrees to the side you will now have a front facing ear, and the box that it is contained within is not very thick.
Your drawing of the ear is going to need to fit within this narrow box to have a convincing effect when you draw the ear from the front view.
Begin Drawing the Details of the Ear
Drawing the ear from the front is actually not much different from drawing it from the side. Instead, it is compressed into a smaller space. You can also basically follow the same steps as before, by drawing in the curve of the outside of the ear. Move onto the curve inside of the ear starting with the flap then as it travels down and around, and then again, the upper curve that goes up and around the ear.
Adding The Y-Shape of the Ear
When you begin to draw this detail of the ear you need to remember that it pokes out a little bit past the outside of the ear on most people’s ears before it curves down to the lower part of the ear.
This may seem a little complicated and confusing at first, but don’t overthink this too much. Use your references to pinpoint the exact shape.
ASSIGNMENT
Once you collect your references of front facing ears, study the 3D shape, and the slight differences between front and side facing ears. Do at least twenty studies before moving on.
How to Draw an Ear: The Rear View
It’s pretty rare to see a person’s ear from the back – so you won’t often need to draw the ear from these angles, but it’s important to understand them.
Knowing how to draw the ear from the back will help strengthen your understanding of it as a three-dimensional shape by exploring it from all angles.
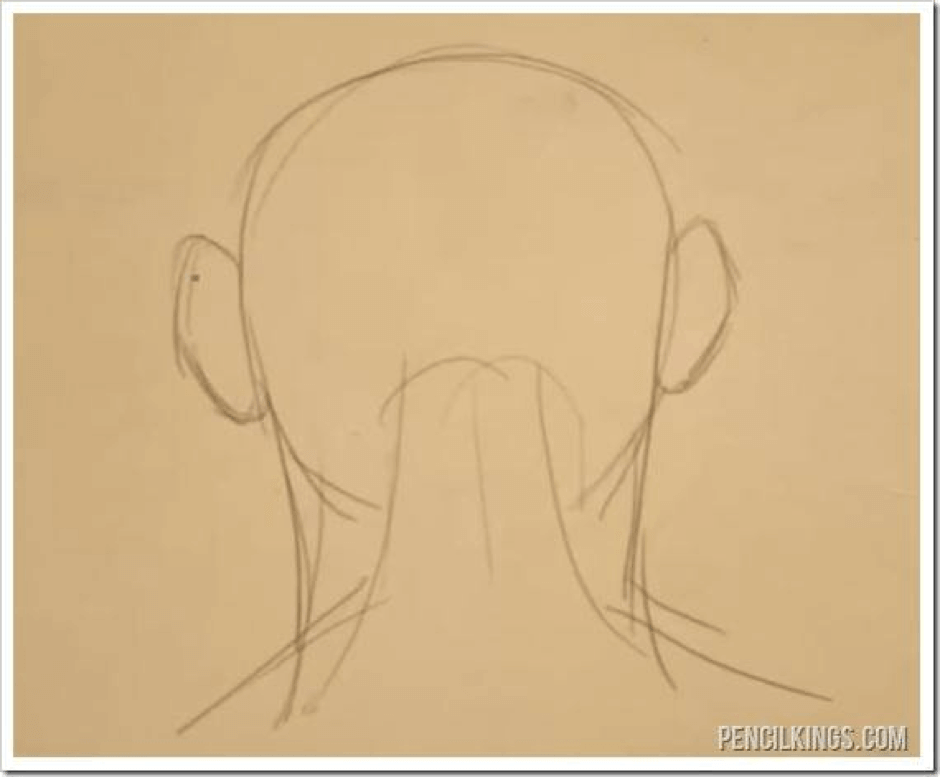
Start with the back-view silhouette including the ears. This image may look a little strange at first, but don’t get thrown by it.
If you focus just on the outline, you’ll realize that it’s exactly the same silhouette as you would have if you were drawing the face and neck from the front view.
This particular drawing has also included the muscles that stretch up from the back and attach to the lower base of the skull.
How to Draw an Ear from the Back
You can think of the ear as sort of a plate or dish; it protrudes outward and upward. This design, for all intents and purposes, is like a baseball mitt, it wraps around and directs sound waves – just as a ball into a mitt – into the ear and we are then able to hear it. (Just like the ball it creates a sound as soon as it is cradled.)
Because the silhouette is the same from the back view, the main difference is what you will be drawing inside that silhouette. Namely, two pieces can be found. The deep dish of the inner ear, and the lobe of the outer ear.
While you are thinking about the ear, make sure to take your fingers and feel the shape of your own ear to help with your understanding of the forms before you dive into drawing. You can even study your ear, family, or friends ear to understand this further.
The first thing to draw here is the line that defines the outer rim of the ear. You can think of this outer rim as kind of rolling up and over the skin that attaches the ear to the head.
Second, add in the deep dish of the inner ear. It is in a short cylindrical shape that is wider towards the outside and slimmer at the base where the ear attaches to the head.
As you can see, the ear from the back is actually a very simple structure.
ASSIGNMENT
It is still pretty easy to draw this – which is great, but yes… We are still going to study them. Find references and draw twenty ears from behind.
How to Draw an Ear from the Back Three Quarter View
If you can remember how you learned to draw the ear from the side view, you’re now going to be turning the ear slightly to combine the side view with the back view to give you the three-quarter view.
I think it’s worth saying again that even though it’s unlikely that you will need to draw the ear from this view very often, it’s still an important exercise to help you better understand the ear, that will actually improve your ability to draw an ear from any angle.
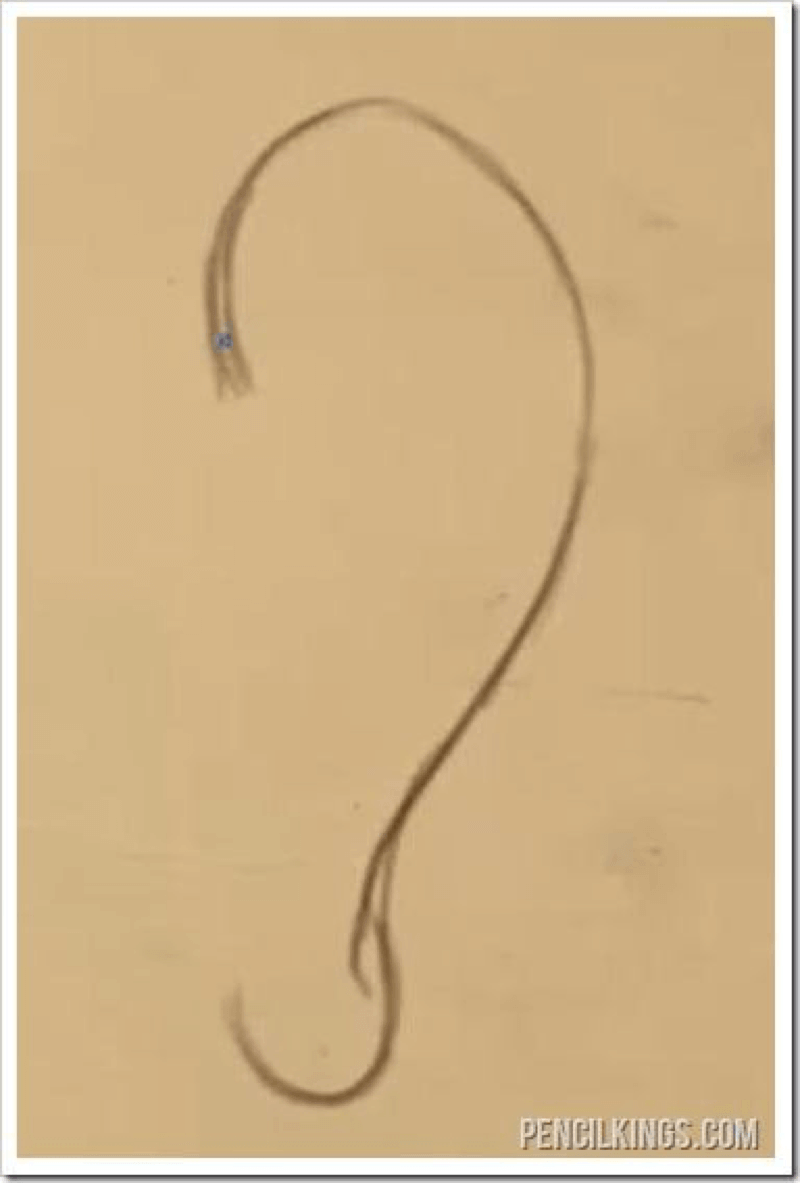
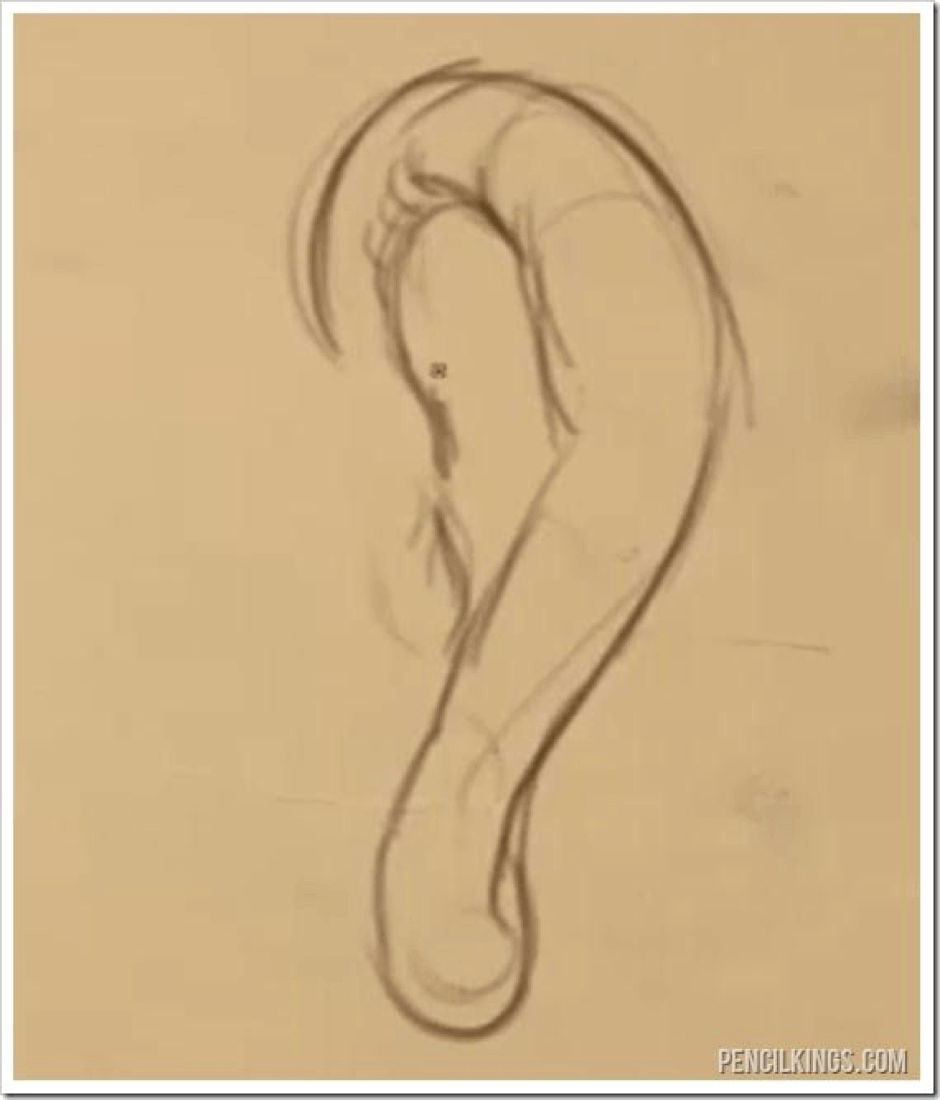
To simplify the major shape of drawing the ear from this view you can think of it like a question mark.
The hook part of the question mark forms the top of the ear, and as it curves down towards the bottom the ear lobe creates the dot on the bottom of the question mark.
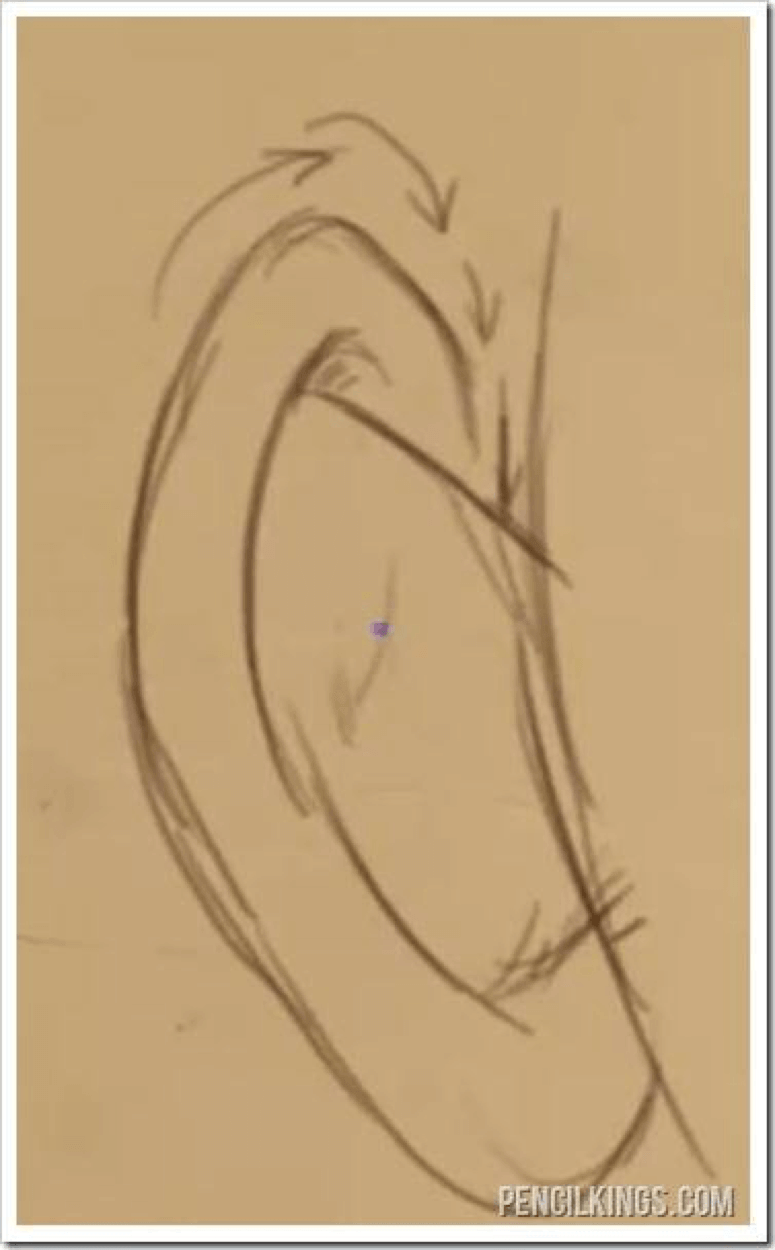
Start by first drawing the outer rim of the ear. If you are following the video, you can see that the instructor is starting to draw the outer rim at the very bottom of the ear.
Then, he continues to draw that line stretching upward and around towards the front of the ear, before ending as it turns inward towards the middle of the ear.
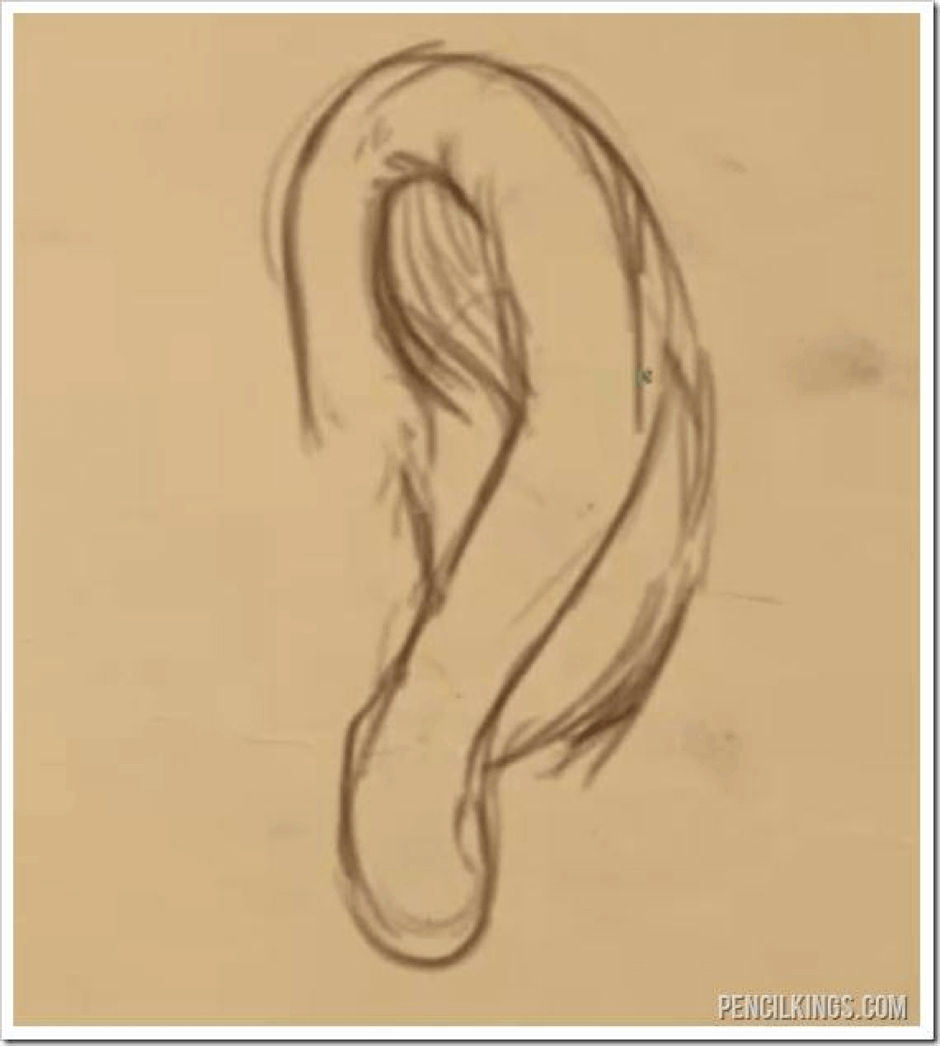
Leave a little bit of separation between the rim of the ear and the ear flap in the middle-front. When learning how to draw an ear from the back, remember the flap is the little piece that sticks out and partially covers the hole of the ear where sound can enter.
Finish off your drawing of the ear from the back three-quarter view by adding a bit of shading into the inner part of the ear that is under the outer rim. The other part to add is the curved piece of skin that attaches the ear to the head as seen from the back view.
ASSIGNMENT
Collect your last batch of images of ears, this time they can be anything but if you can find more of the back third – use them! Finish off with twenty more drawings and you’ll be a pro.
How to Draw Ears
If you want to learn how to draw an ear, you must first understand its construction. Although human ears look quite complicated, they can be drawn quite easily once you deconstruct them. In this tutorial I will show you such an anatomical deconstruction, and I will also explain how to use it to draw ears in three views: front, side, and in perspective.
1. Ear Anatomy
If you look at the general form of the ear, it looks quite complicated. Where would you even start? Let’s simplify it!

Let’s start with a little dome attached to the side of the skull.

If you make an opening in the front of this dome, the sounds will be caught by it and sent directly to the hole in the skull. So this structure already works like an ear, but let’s just add some improvements.

If you thicken the walls of this dome, its edges will look softer, like this:

Create a radar shape around the dome.

Curl the edge of the «radar» inwards

Add one last part on the bottom.

Compare our deconstructed ear to the real ear form. It should look clearer now!

If it’s still confusing, take a look at an ear during rotation. Try to locate the dome and the radar. You can also take a look in the mirror and try to see all these forms in your own ears.

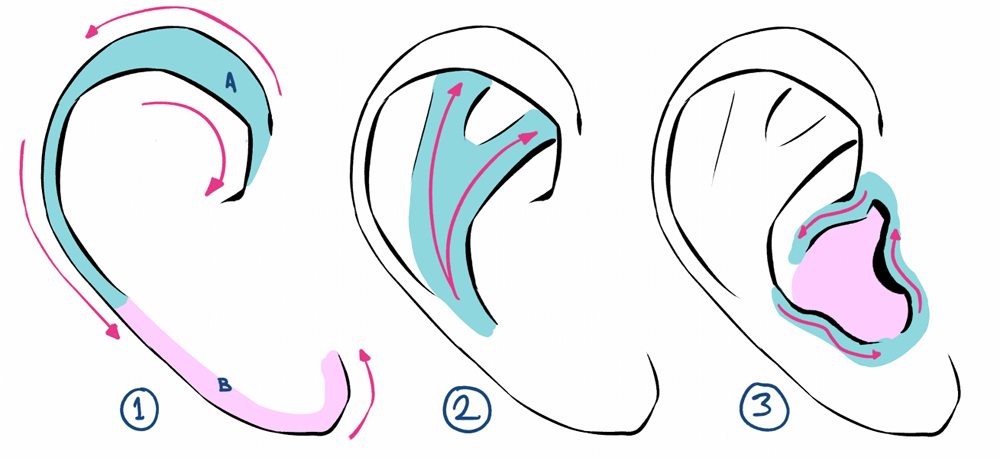
To make it even easier, let’s simplify the big form into separate ones:
2. Ear Position
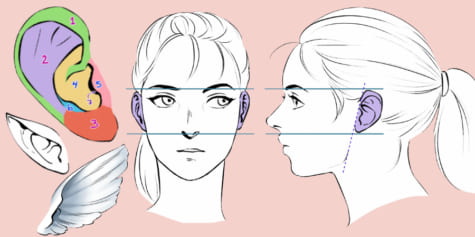
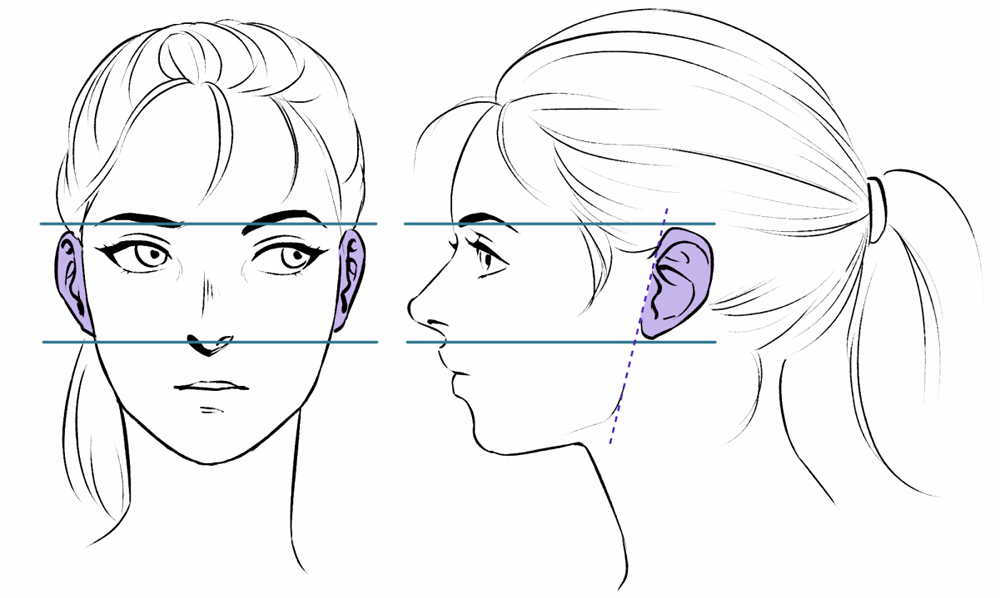
But knowing the shape of the ear is just half of the task. Where exactly on the head is it? It’s quite easy to remember: it’s located exactly behind the jaws, in the space defined by the eyebrows and the bottom of the nose.

You also need to remember that the ear is slightly rotated in two ways:
3. Ear Shapes
To draw an ear, you only need to know the parts building it and some very general proportions. For example, the «upper oval» is always much bigger than the lobe, but the actual size relation is not strictly defined. You can experiment a lot with these proportions to create a unique ear for your character!


4. How to Draw an Ear in the Side View
Step 1
Prepare the head in the side view. You don’t need to draw any details—just make sure you’ve marked the crucial proportions in some way.

Step 2
Draw an oval in the upper part. Leave some space for the lobe.

Step 3
Add the lobe. It can overlap with the oval, but it doesn’t have to—this will affect the final shape of the ear, but not its realism.

Step 4
Sketch the helix.

Step 5
Define the thickness of the helix by drawing small ovals on its ends. You can also add the auricular tubercle if you want.

Step 6
Outline the helix and the lobe.

Step 7
Add the antitragus.

Step 8
Sketch the «y» shape of the antihelix.

Step 9
Define the width of the antihelix by attaching an oval to its end.

Step 10
Outline the antihelix.

Step 11

Step 12
Outline the opening of the ear carefully.

Step 13
With all the guide lines defined, you can add the final lines.

. and shade the whole ear, if needed.

5. How to Draw an Ear in the Front View
Step 1
First, sketch the head with the basic proportions marked.

Step 2
Draw a big oval taking most of the space for the ear. Remember that it’s not actually flat—it’s an oval rotated slightly towards us.

Step 3
Add the smaller oval for the lobe.

Step 4
Add the rhythm of the helix right on the edge.

Step 5
Add the width-defining ovals.

Step 6
Outline the helix and the lobe.

Step 7
Add an oval on top of the lobe—the antitragus.

Step 8
Add the «y» shape of the antihelix. Notice how its lower part bulges out, outlining the shape of the dome.

Step 9
Add an oval on the end of the antihelix to define its width.

Step 10
Outline the antihelix.

Step 11
Add an oval for the tragus.

Step 12
Outline the opening to the ear.

Step 13
The guide lines are finished, so now you can draw the final lines and shade the ear.


6. How to Draw an Ear in Perspective
You know what an ear looks like in the front, and what it looks like on the side. Drawing in perspective is simply creating a state between these two!
Step 1
Sketch the head to have a base for the ear.

Step 2
Draw the big oval.

Step 3
Draw the smaller oval for the lobe.

Step 4
Add the curve of the helix.

Step 5
Add the small ovals defining the width of the helix.

Step 6
Outline the helix and the lobe.

Step 7
Add the oval for the antitragus.

Step 8
Add the «y» shape of the antihelix.

Step 9
Add the small oval on its end to define its width.

Step 10
Outline the antihelix.

Step 11
Add the oval of the tragus.

Step 12
Outline the opening of the ear.

Step 13
Finally, draw the final lines and shade the ear.


Good Job!
Now you know how to draw an ear, both from scratch and step by step! If you want, you can now paint it digitally!


If you want to keep learning how to draw other facial features, check out our other tutorials:


Or maybe you simply want to keep drawing? One of these may interest you:
Guide to Drawing Ears
Learn ear drawing tips and tricks to make your character illustrations more realistic! Eridey explains in detail how to draw ears from different angles and how to apply the basics to fantasy characters like fairies.
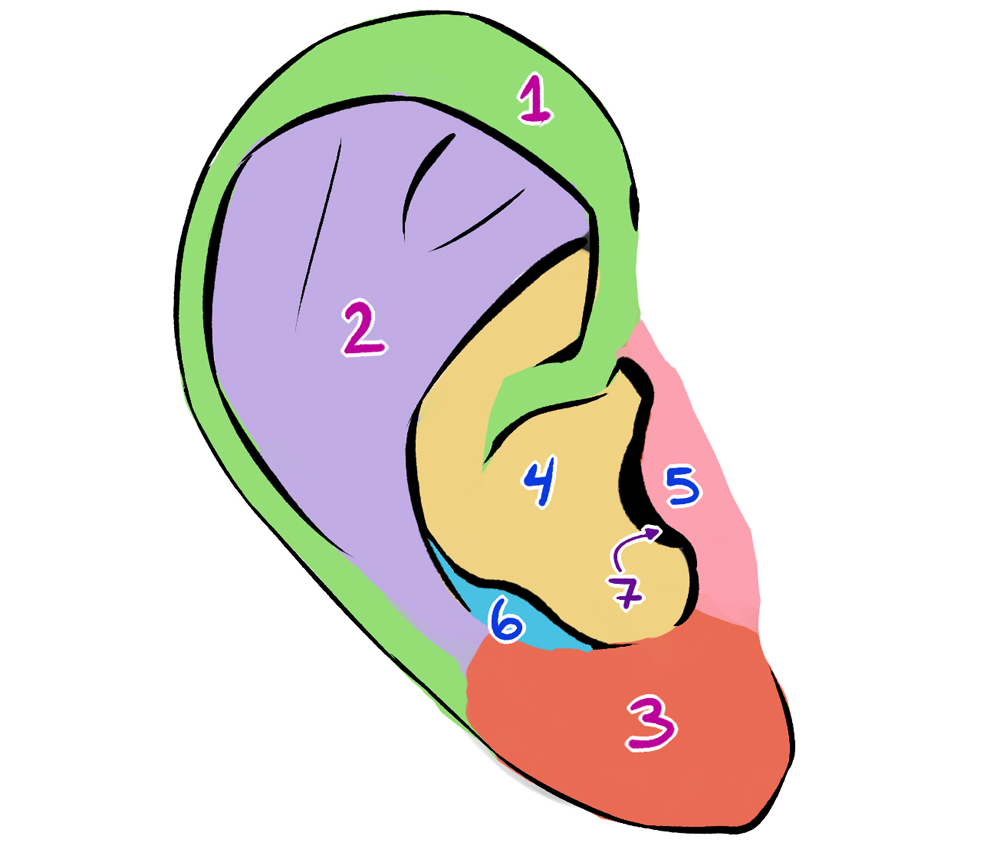
Ears are unique and, even if they come by pairs, there aren’t two cut from the same mold. Let’s see a bit of their common basic structure before we start with their diversities:
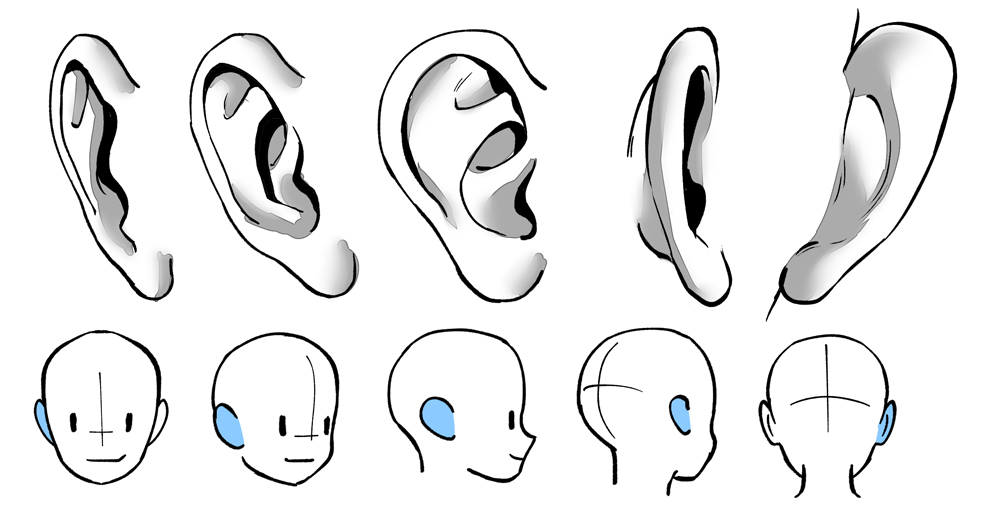
In general terms, all ears follow the same basic structure. A magic formula! Practice a couple of times to learn it by heart. You can use the sketch above to go through the following steps.
In the following examples, we will observe that some features are more pronounced or more subtle than others, but it is easy to identify each part of the ear, so if you draw from your imagination, bear in mind that your purpose is to create comprehensible shapes:
Shape, placement and angles:
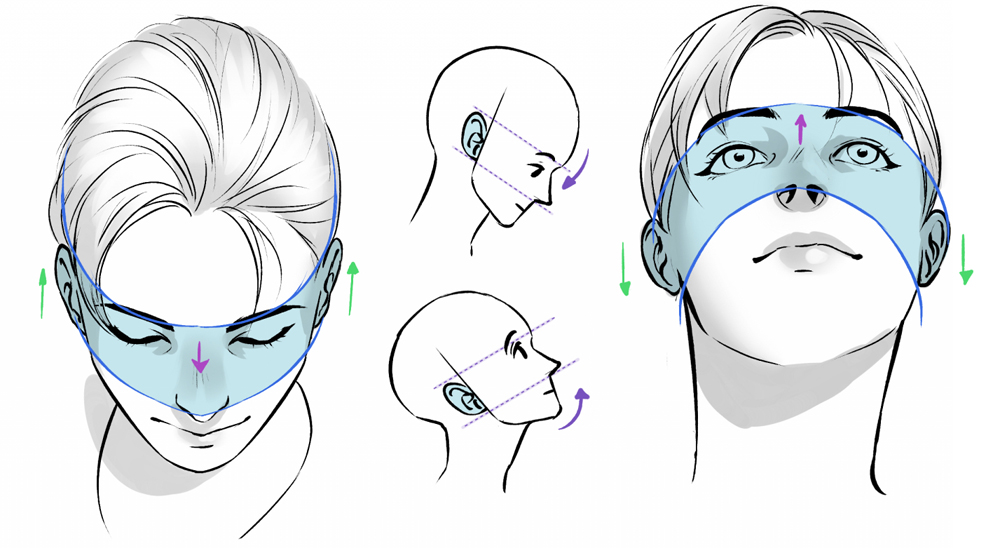
It is great that anatomy is so perfect that it allows us to use various reference points to determine the position and size of other elements. In the case of ears, the eyebrows and the tip of the nose act as guidelines to draw them at a suitable height and size. You can also follow the jaw line as a guideline for the correct angle.
If our character is looking looks up or down, we can still use the same guides. Just remember that in a three-dimensional approach, the head is a sphere and the location of the ears remains the same.
What does change is the perspective from which you are looking at the image. Therefore, let us not forget how ears are viewed from other angles.
Stylizing:
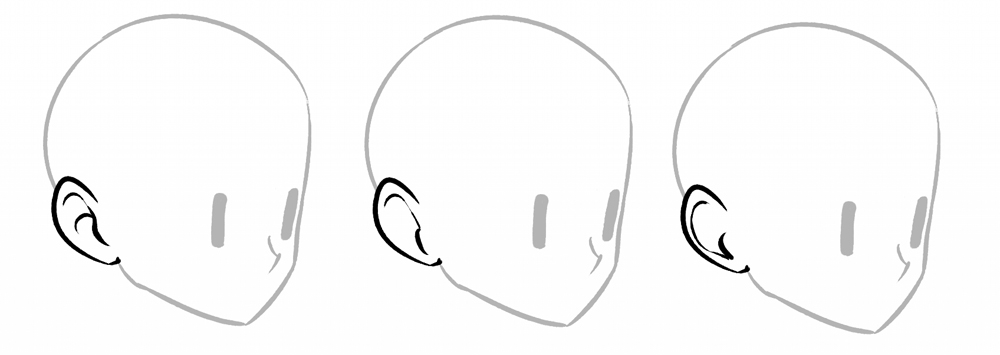
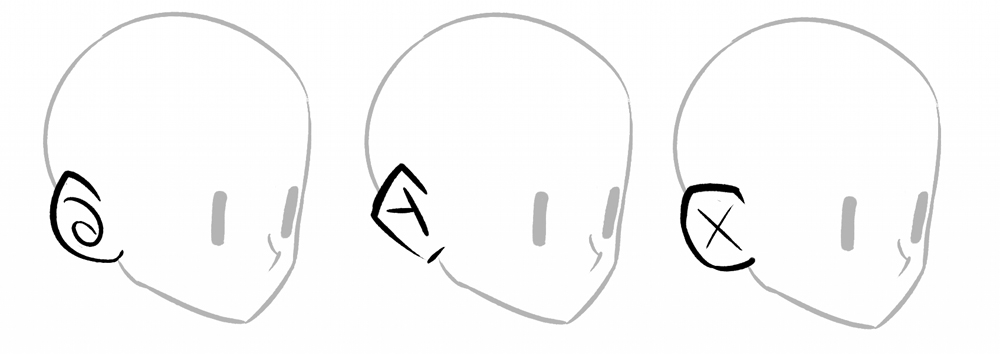
We’ve come this far, and we have realized that drawing ears isn’t that impossible. However, for those whose job or hobby tends more toward animation or comics, saving time in the details is crucial. Try getting rid of the lines that aren’t necessary:
My advice is to soak in the styles that you like the best and look closely at how your favourite artists draw ears. Some of them even change the pattern of the ear, like an X or a 6!
Fantasy ears:
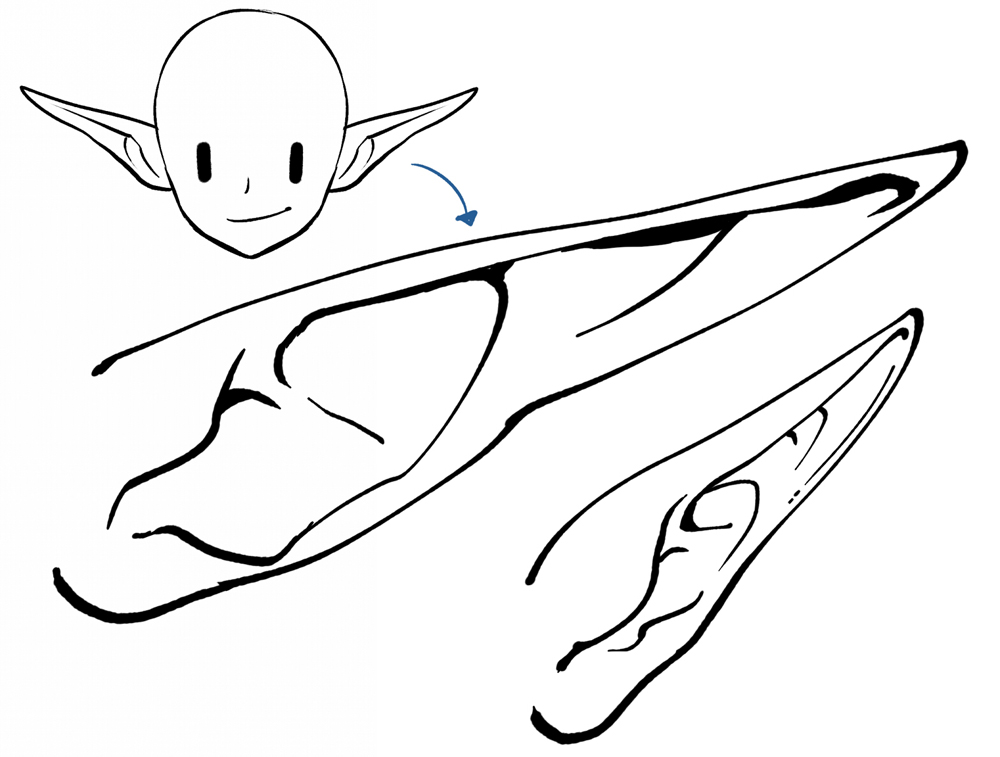
Is our character… human? Or from another planet?! The classic, and most obvious, way to tell humans apart from magical creatures is to look at their ears. This topic is fun, we are free to experiment with exaggerated and unique proportions.
Elves and faeries:
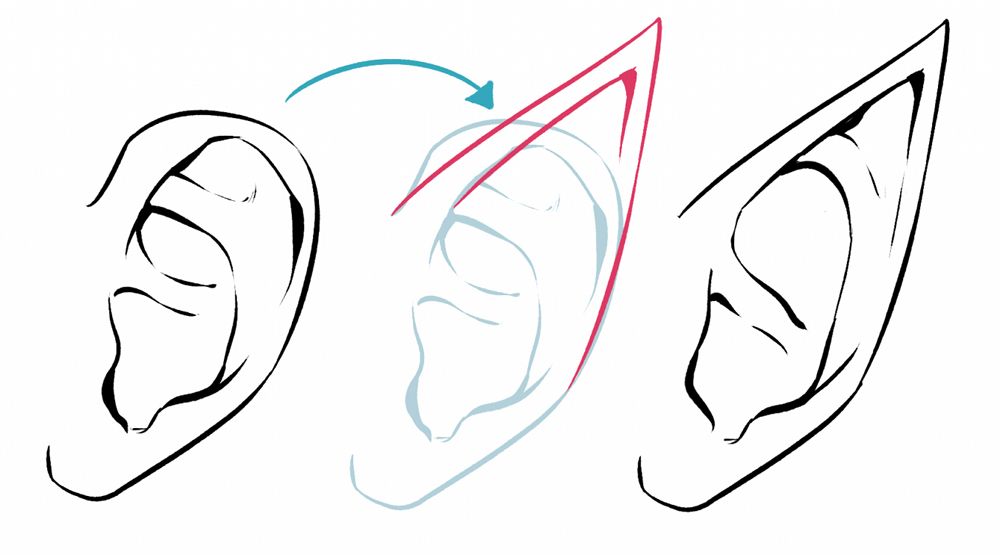
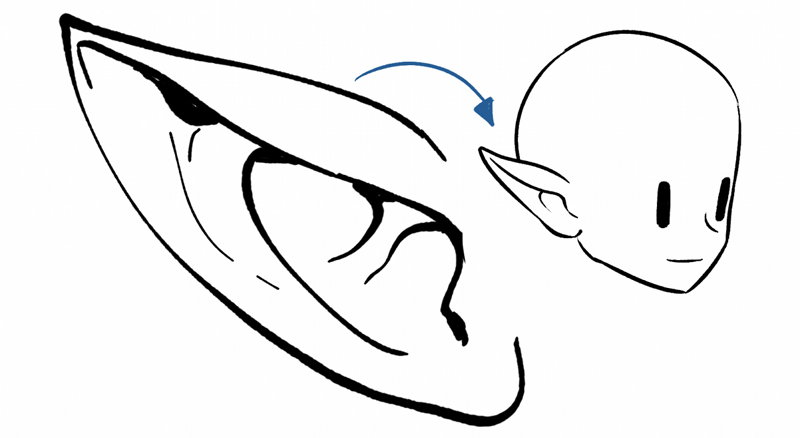
Pointy, long ears have become a symbol of magic, wisdom, and immortality, since they are the characteristics that these kinds of beings generally possess. We already know what a human ear looks like, so let us apply the same pattern to other silhouettes. In this case, something like a teardrop.
We can simplify this ear in the same as before:
If we place the ears where they should go and keep a regular size (at least at the base), they will look quite credible, no matter how exaggerated they are.
Aquatic beings:
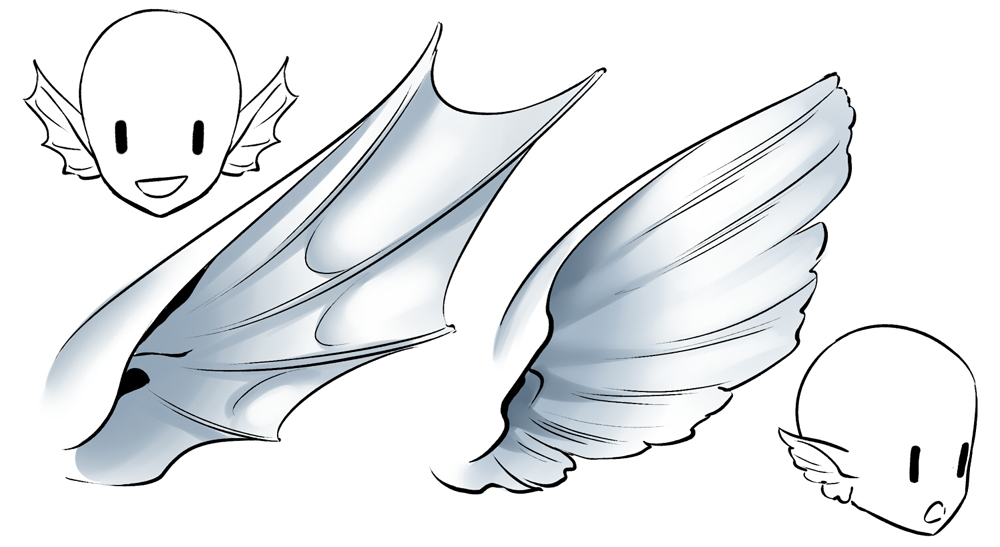
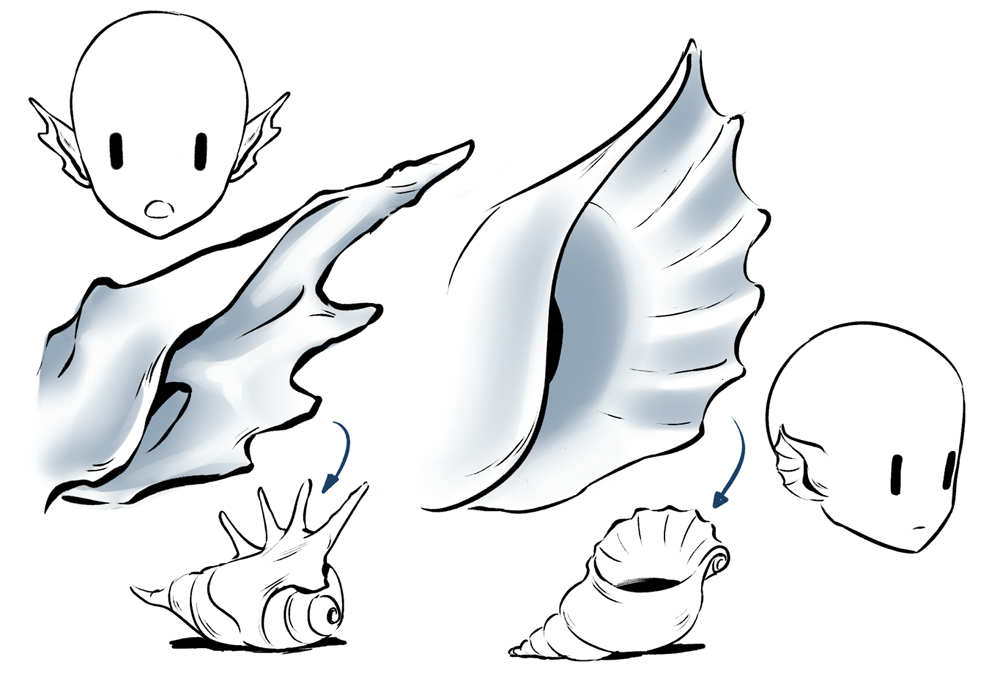
When designing a character, I love to introduce into them different elements of the world that surrounds them. In the case of sea creatures, there is a lot we can get inspiration from ꟷfish fins, seashells, aquatic plants, etc. So, imagine what your ears would be like if they were based on these elements? The results can be very interesting!
I followed the same concept of elf ears (long with pointed tips), but added elements of a fish fin…
… or inspired by seashells! All of these work perfectly underwater!
Animals:
Since each species has unique ears, maybe a little more research and practice is necessary to accomplish this task. How do we get started?
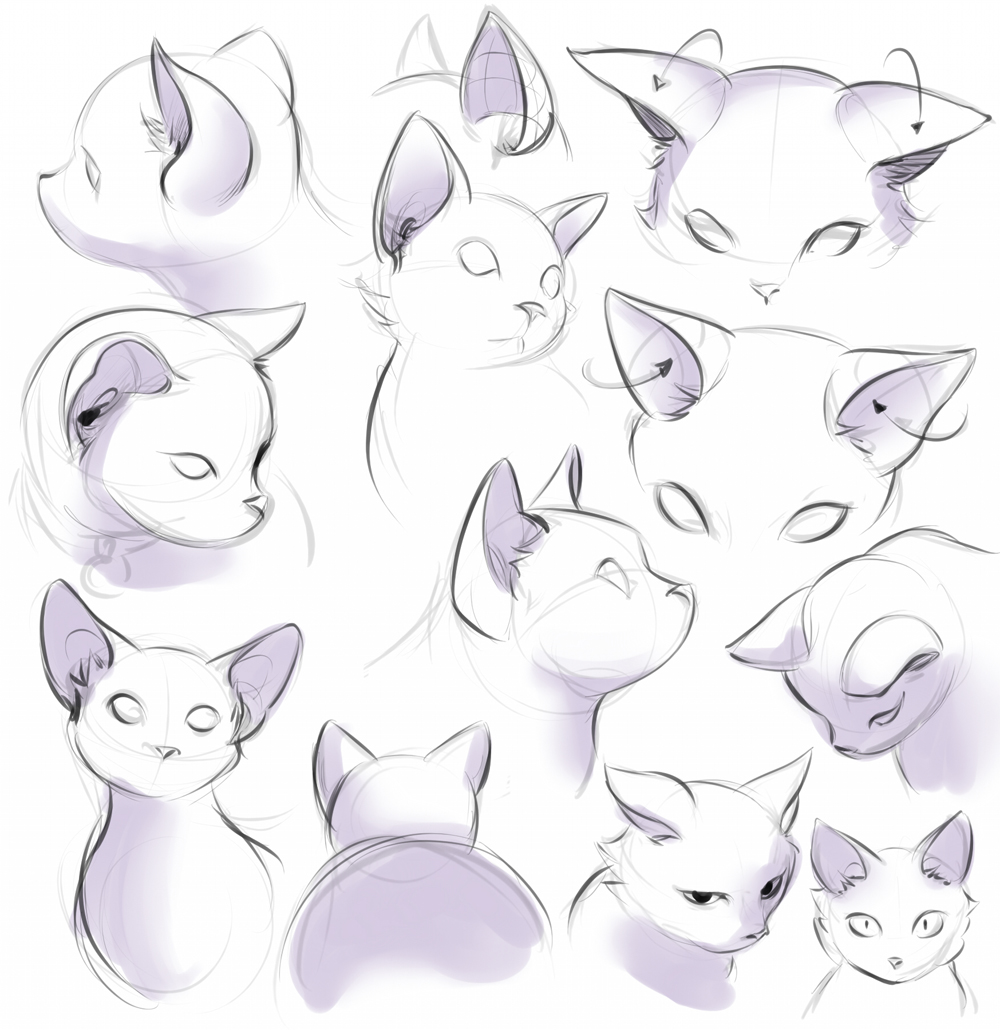
Cats:
We know that they have a reputation for being curious and stealthy creatures (more or less). The ears of Siamese cats are very pointy and prominent; they enhance their personality while always being alert.
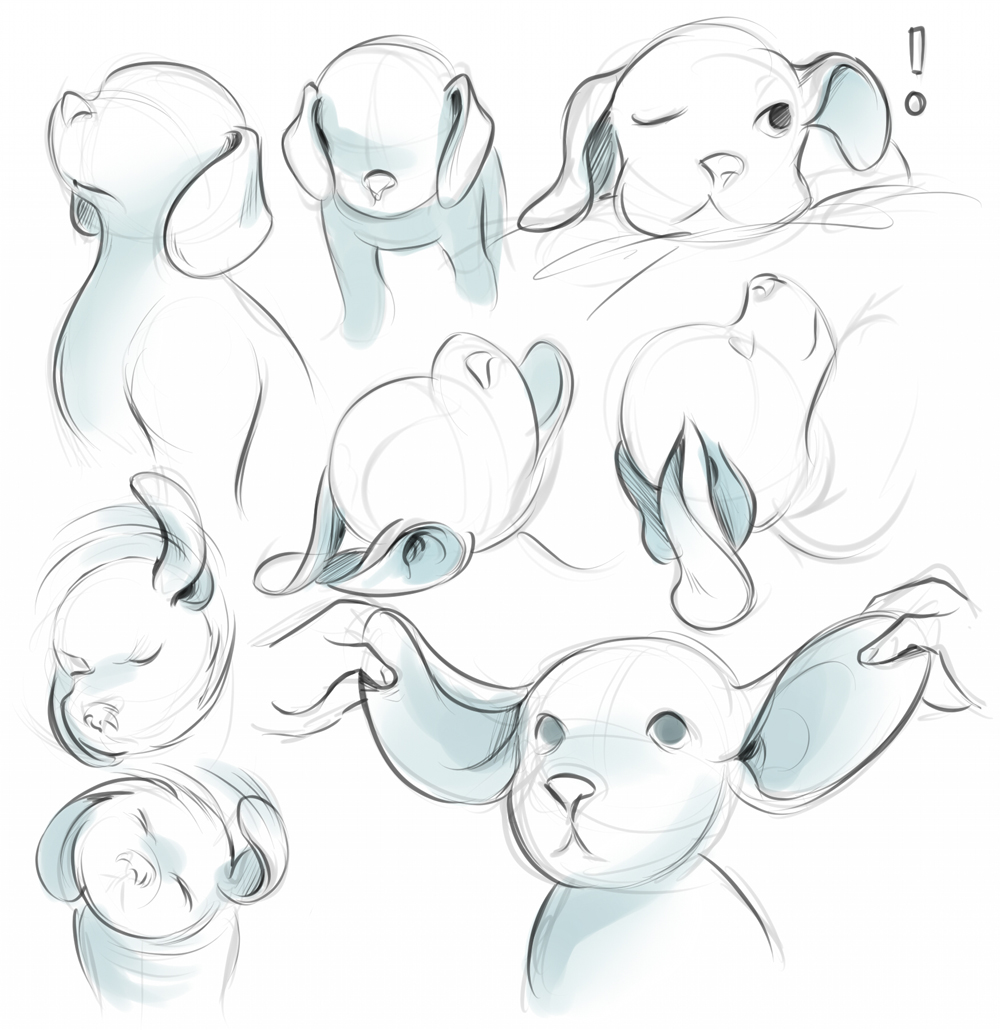
Dogs:
I really wanted to draw a beagle because of its really amusing ears. It was a real challenge, because they are playful doggies and their ears fly everywhere, following their movements.
Rabbits:
Rabbits have long ears, but I was surprised that, compared to other types of rabbits, white rabbits’ ears do not bend or fall, they are almost always rigid or slightly arched.
You can’t imagine how much you can learn once you start drawing, it is not enough just to see, so there are no excuses to practice!
I hope that you could find some helpful tips in this guide. Please, check my social networks if you want to see some more examples of my work:
Thank you very much for reading!
Similar articles
Bring Energy and Life to Your Poses!
How to Draw Hair
Learn from Anatomy to Improve Your Poses
Guide to Creating Color Schemes
Paint Manga Eyes in 6 Steps
How to draw and color anime hair
How to Draw Anime Eyes
Simple Anime-style Coloring Techniques
Tips for digital outlining for Anime Art!
How to think: Drawing Noses
Top Articles in Category
Top Drawing Apps and Software in 2022 (Free & Paid)
Tips for Beginners: Getting Started in Digital Art
Learn from Anatomy to Improve Your Poses
Keyboard Shortcut Guide for Artists
Ultimate Guide to Blending Modes
Simple Anime-style Coloring Techniques
Liven Up Your Line Art With Smooth, Attractive Lines
Top 13 Drawing Tablets of 2022!
Tips for Digital Coloring and Shading
Pen Settings for Anime Art in Any Style
How to draw super detailed anime aesthetic art
Must-Know Tips to Improve Your Tablet Drawing Experience
Drawing the Sky in Various Weathers and Times
How to Draw Dogs
Digital Coloring Book for Beginners – Digital Coloring…
Guide to Drawing Ears
Tips For Dry Brush Painting
How to Draw a Rose
Lighting your Painting
Painting Texture: How to Render Metallic Surfaces for Illust…
A Beginner’s Guide to Perspective
My Digital Coloring Process Plus Tips on Useful Features
How to illustrate a children’s book: Creating, Printin…
Five Tips for Getting Noticed Online
Finding and Correcting Drawing Mistakes
Recommended Articles
Sculpting Forms, Using Value, and Brush Introductions
Five Tips for Getting Noticed Online
Becoming a Concept Artist for a Hollywood Film
Featured Pro Portfolio: Phil Saunders
Learn to Draw Croquis Sketches
ArtStation Marketplace Success Story: Le Vuong
Easy Tips for Drawing Eyes
3 Reasons to Use Digital Art Software
Finding and Correcting Drawing Mistakes
Easy Steps to Creating Chibi Characters
Simply Well Drawn: Part 1
Featured Pro Portfolio: Miroslav Petrov
Extracting Scanned Line Art for Digital Coloring
Must-Know Tips to Improve Your Tablet Drawing Experience
Exclusive Interview: Lois Van Baarle (Loish)
How to Make Video Tutorials
How to Make Appealing Original Characters
Bring Energy and Life to Your Poses!
Top Drawing Apps and Software in 2022 (Free & Paid)
Ultimate Guide to Blending Modes
Learn the basics of digital art, from the tools you need to the steps of creating digital artwork.
Read art tutorials and interviews with concepts artists for films, games, and animation.
Learn techniques for creating expressive and fun character art with these tutorials.
Whether you’re creating manga, comics, or webtoons, here you’ll find the best techniques to create your story!
How to Draw Ears – Anatomy and Structure
In this video tutorial I dig deep into the ears and explore ear anatomy and structure to show how to draw an ear. Learn how to simplify the complex forms of the ear.
For more video tutorials visit www.proko.com and subscribe to the newsletter
In this tutorial I will go over the parts of the ear and suggest an easy way to remember all these complex shapes. At the end, I will show a step by step of an ear drawing.
Basic Forms
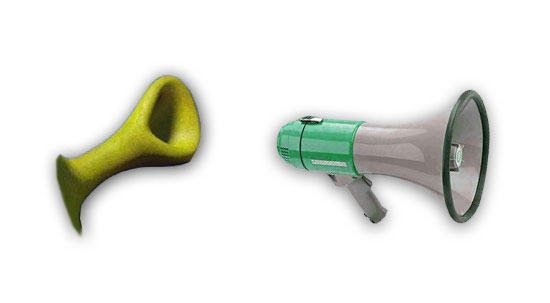
The simplified volume of the ear is very much like a megaphone. This is easier to see from the back, where the concha is like the tubular part and the helix is the lip part of the megaphone. Maybe this explains Shrek’s freakish deformity… I bet the creators of Shrek were thinking of this during the concept designs.
Just Remember “why?”
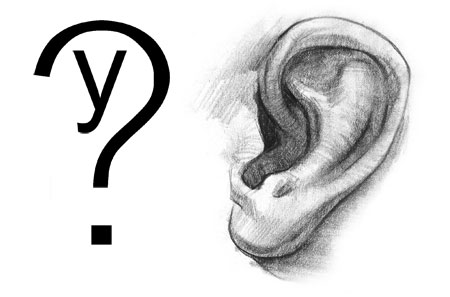
At first glance the shapes in the ear seem random and confusing. There is though, some structure to this madness. A really easy way to remember these crazy shapes is “why?” or “y?”. The outside of the ear is shaped like a question mark with the dot of the question mark being the earlobe. The squiggly part on the inside resembles the letter “y”.
Placement of the Ears
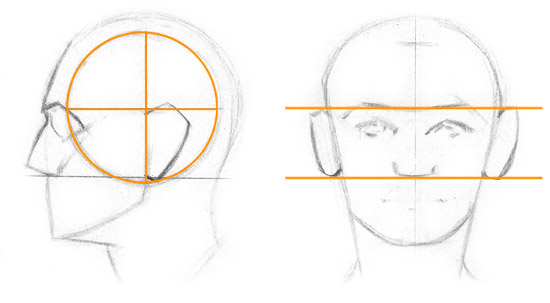
The ears lie in the middle third of the face. The top of the ear aligns with the brow ridge and the bottom aligns with the base of the nose. Horizontally it’s directly behind the jaw. From profile it sits conveniently on the bottom back quadrant of the loomis ball that I mentioned in the previous post.
In Perspective
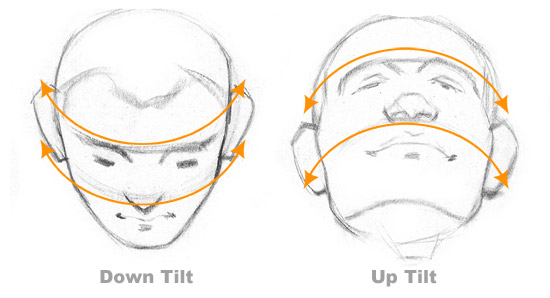
During an up-tilt or down-tilt the placement of the ears is very important since doing it incorrectly can break the illusion of a tilt. On a down-tilt, the ears should be placed higher on the head, while on an up-tilt they should be placed lower on the head.
Anatomical Information
Shading the Complex Forms of the Ear
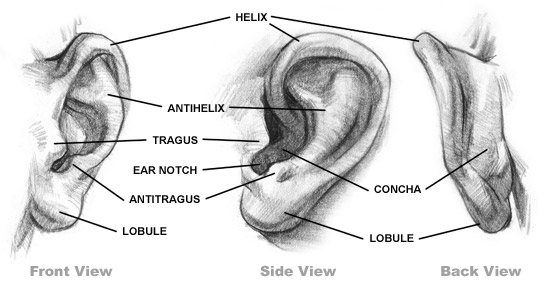
Concha
The concha is the bowl-shaped part that attaches the back of the ear to the head. You can also see it from the front, directly above the antitragus. Shrek has a diseased concha…
Helix
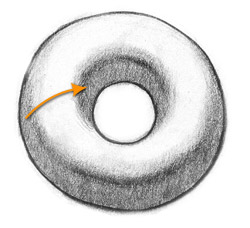
The Helix is a semi-cylindrical form and should be shaded as such. The helix curves over the top of the ear and around into the inside almost completing a circle. This is the hook part of the question mark. When shading a cylindrical volume that forms a loop, think of a donut. Take a look at what the shadow does on a donut.
The shadow jumps to the other side where the bottom planes transition to side planes (assuming it’s lit from above). The shadow on the helix does that same thing.
The end of the helix that curves into the inside of the ear will usually be darker then the part on the outside, since it’s on the inside. Imagine the inside of the ear as a dark cave. Obviously this isn’t true of the light source comes from the side and points directly at the ear.
Antihelix
The antihelix is the Y shape inside the ear. At the top, the helix usually casts a shadow onto the two legs of the antihelix. I’ll often use this cast shadow to exaggerate the cylindrical volumes of the antihelix. The upper leg is larger and softer than the lower leg. At the lower end, the antihelix connects to the antitragus at about the same level that the helix connects to the earlobe.
Tragus and Antitragus
The tragus and anti-tragus are like little beads that point at each other. They are separated by a ‘U’ shaped notch in between them.
Lobule
The earlobe is the only part of the ear that isn’t cartilaginous. It’s roughly 1/3 the height of the entire ear, sometimes smaller. The earlobe usually hangs from the ear, but sometimes connects to the jaw.
How to Draw Ears, a Detailed Step-by-Step Guide
A proper drawing of the ear is often neglected by artists. The ear takes little part in facial expression and is often blocked out of view by hair. However, drawing the ear properly provides for completeness to your drawing as well as demonstrates a higher level of artistic knowledge and skill.
In this tutorial we will go over a two-step approach to learning to draw ears well, and then we will go through my drawing of an ear, step-by-step.
For those of you looking for a short answer on how to draw the ear, here is my summary:
To draw an ear, first, break down the form of an ear into basic anatomical features, then create a proportionate structure, then starting with the outline of the helix, begin to place features, and draw in the anti-helix, the tragus, and anti-tragus sections.
Two step approach for drawing the ear
We will use a two-step approach to breaking down the ear in an effort to make it easier to draw. I, for one, always had problems drawing ears. Once I applied this two-step approach to learning to draw the ear, my drawings improved significantly.
You can see my results in the ear drawings I made for this tutorial. Here is what I did, and what I recommend you do to start drawing ears well:
Step one to learning to drawing the ear:
First, let’s become familiar with the main features and landmarks of the ear. There are six in total to keep in mind, four of which are the main cartilage sections and have opposing names (example: helix and anti-helix) and therefore are easy to remember.
We will go over each one together below.
Step two to learning to draw the ear:
Once you are familiar with the landmarks generally (and you will be, by the end of this tutorial), it is time to look at reference and identify these landmarks on as many different ears as possible.
Ears vary greatly by person. There are small ears and large, more curved and less curved, and each landmark will have different shapes from one person to another.
However, in general all of the landmarks we will discuss will be present and are easily identifiable.
In one way, ears are like chairs. There are many kinds of chairs, but all have the four legs and a place to rest on. Same with ears, each specific feature of an ear can change in shape and design, but each feature will still be there, waiting to be identified properly and indicated in your drawing.
It is good to see the variation in reference. This process will help identify what resembles an ear generally, which in turn will help us draw the ear properly.
After seeing variation in features, pay attention to the shape of each feature. We need to learn the actual physical masses of each landmark.
Things like: what curves in, and what curves out, which section folds into which other section, what is located closer to the head, and what part is further out.
All of this is important. The best way to learn is to observe in real life from different angles. Or take pictures from different angles and learn from that.
Don’t learn to draw the ear from just one example of an ear. There is enough variation that when you see another example it may be difficult to figure out what-is-what at first. I suggest looking at least three different references to learn.
That’s it. Now it’s time to draw. Draw many ears, draw at different angles, and notice how the shapes change when the angle changes. The changes in shape will, I have no doubt, surprise you, as they surprised me.
As always, let’s go over both of these steps together!
Ear anatomy for drawing
Although ears vary widely, like other areas of the body, they have certain definite areas. We need to remember only six anatomical features of the ear to draw it well.
The Lobe, or Lobule
The lobe is an appended fatty tissue at the bottom of the ear. It changes greatly from person to person, from an area that is larger and looks like a flap, to one that is reseeding into the mass of the ear and connecting to the head in a swift curve.
This is one feature of the ear, and probably one you already knew about, five more to go.
It is important to note that four of the main cartilages of the ear that we will study for drawing the ear are raised off the surface of the ear. They in essence, appear on the surface as elevated bumps or flaps.
Let’s look at them now:
Helix
The helix is the prominent outer rim of the ear. Note the shape and also note that at the top it is further away from the head. The helix moves closer to the head as it descends into the ear lobe.
Anti-helix
The anti-helix is a visible part of the inner ear (still external ear, since we are only looking at the visible masses for drawing) that largely follows the helix in its curvature.
You can think of the anti-helix as a form of a curved mountain ridge.
As its ridge moves towards the top, it flattens, then splits into two. This top part of the anti-helix tucks in under the helix.
The bottom section moves downward and eventually morphs into the anti-tragus.
Tragus
The tragus is the flap-like piece of cartilage that protects the ear canal from the front of the ear.
Anti-tragus
The anti-tragus, true to its name, sits across or opposing the tragus at the bottom of the ear.
Concha
The concha is the ‘bottom of the bowl’ of the ear. Surrounded by the anti-helix, the tragus, and the anti-tragus.
The concha is the area that the helix divides as it moves down into the bowl of the ear.
The helix divides the concha it into two parts (cymba and cavum). The names of these two sections are not important for drawing. However, it is essential to remember that those areas are there and that the helix does not just stop at the outer rim, but does indeed descend down into the concha.
Proportions of the ear for drawing
The ear can be divided into three equal sections from top to bottom. This will provide for continuity of proportions in drawing the ear, regardless of angle (when accounting for perspective and foreshortening).
I don’t focus on proportions in my tutorials often, because I believe that as you keep drawing, your sense of proportion will improve, and will eventually become second nature to your drawing process. When things are off, you will know it instantly.
You can see on the diagram above, if we draw a line at the top of the helix, then another where anti-helix wedges into the front of the ear, and then another line right through the anti-tragus, and finally a line at the end of the lobe, we can divide the ear into something resembling three equal parts.
Another way to think about these proportion guides is to mark the top and bottom of the concha with two lines, as well as mark the top and bottom of the ear with two more lines, thus yielding the same result.
Physical features of the ear
Now that we covered anatomy and proportion, let’s take a moment to observe the ear from different angles and make notes on physical features.
Drawing the Ear, Step-by-Step
Let’s now go over drawing the ear, with the knowledge that we gained so far.
I definitely felt like it got much easier as soon as I reviewed the anatomical features involved, and began to identify the landmarks in different examples, as well as studied the shapes of those anatomical features.

Here is a process video of the step-by-step ear drawings that you will find below.
How to Draw an Ear – Step-by-Step 1
I started this drawing by blocking in the helix outline. At this early stage, I began to gauge proportions and angles.
With the helix blocked in, I marked down where I thought the tragus and anti-tragus envelop the section leading up to the ear canal.
The location of the tragus and the helix, basically dictate the rest of the ear drawing in this example.
In this step, I identified the remaining features, the width of the helix and the location of the anti helix.
To provide a little bit of depth to this ear drawing, I began to shade in areas that are receding and are hidden from the light.
In this step, I began to identify the darker darks in the concha area, as well as the terminator at the ear lobe. (For more on shading, light and shadows, visit my tutorial at this link.)

At this step, I focused on shading-in the anti-helix as it ascends to the top of the ear. Since the light is coming from the top in this example, I know that some of it will be in the shadow, covered by the helix arching over it.
This is true since the helix at the apex (top of the ear) stands out further from the head, creating a cast shadow that lands on the top part of the anti-helix.
More shading in this step to indicate the areas of light verses shadow.
Final drawing. In this step, I tried to tidy-up the outline, focusing on a readable silhouette.
How to Draw an Ear – Step-by-Step 2
Let’s look at one more step-by-step example of an ear drawing. In this initial step, I outlined all prominent features: the helix, the anti-helix, tragus, and the anti-tragus.
Next, I focused on the shape of the ear, and further defined the outline, as well as began to shade-in the areas in the shadow.
Cast shadows created by the helix are defined as they fall on the anti-helix at the top. Some areas of the anti-helix remain lit due to its shape. (It is shaped liked a mountain ridge).
In this step, I further separated the light side from the shadow side, in an effort to show some depth in the drawing.
I added more separation between light and dark, and further separating the dark areas between the darks and the darkest darks.
In this final render, I refocus on defining the shape of the lobe which shifts planes from the anti-tragus, as well as further detailing the shadow sections of the drawing.
Let’s summarize what we covered together: we first discussed the two-step approach to drawing ears: (1) learning the anatomical features involved and (2) observing and learning the shapes by drawing. We then took a hands-on approach to this method, by going over the anatomy and going over the drawing process together.
I hope you found my drawing guide on how to draw ears helpful. If so, It is now time to put your new knowledge to use, and draw some ears on your own!
