How to make a podcast
How to make a podcast
How to Make a Mind-Blowing Podcast (Complete Guide)
A number of people who enjoy listening podcasts has been growing day by day. People listen to the podcasts while going to work, while running, waiting in a queue or cleaning the house. Listening to a radio show or a podcast requires less attention than watching a video or reading a book. According to Edison Research, 52% of podcasts are listened to at home, 18 percent in the car. The same statistics report tells that 42 million Americans listen to podcasts weekly. It’s five times more than go to the movies. One more interesting fact to mention is that an average listener subscribes to 6 podcasts.
In case you have a deep wish and a good knowledge base to share, podcast creating may bring you the pretty good outcome and income. The other reasons for making a podcast can be a self-promotion or audience expanding if you already have a website or a blog.
Quick Start Guide
How much does it cost to make a podcast?
The 1 st thing to keep in mind here is that your very first podcast will require some monetary investments from you since you’ll have to get professional equipment and software. What you will need:
These are the main things you will need to record a podcast. There is only one left to mention. In case you plan to records interviews, don’t forget to buy a Skype calls recording program.
How to plan your podcast?
There are three main types of a podcast: solo, interview, and multi-host.
When you are finished with tech preparations, it’s high time to think about a theme of your podcasts. First of all make up your mind whether you want to make show podcasts where each one will be dedicated to a particular topic or episodes telling about a huge topic. You should listen to other podcasts of a kind and check what information is missing or outdated to make your recording come forward.
Please note that you are supposed to record podcasts on a regular basis. You should create an editorial calendar for at least one month with your topic ideas. You’ll get time to read the information concerning your topic and listen to the podcasts of other people. Whenever you feel that you don’t have fresh ideas, check this list of 100 most trending podcast topics.
Don’t forget to check forums and question sites to understand what people are looking for and curious to know.
It’s highly recommended writing a script of your entire podcast to clearly see how it will look like. Besides, it’s easier to read a ready text than to remember things while recording. If necessary, read it out loud in front of a mirror or ask your friends to be your very first listeners.
Try not to exceed a 60-minute time limit. Everything that is longer will be too much for an average listener. Try to focus on main things only.
How to start recording a podcast?
As soon as your podcast script is ready, it’s high time to set your software and equipment. Let’s take Audacity as an example. It’s really great for podcasting beginners. It’s free, easy to deal with, available for all operating systems and moreover there are tons of how-to guides online. To set Audacity for work, you should:
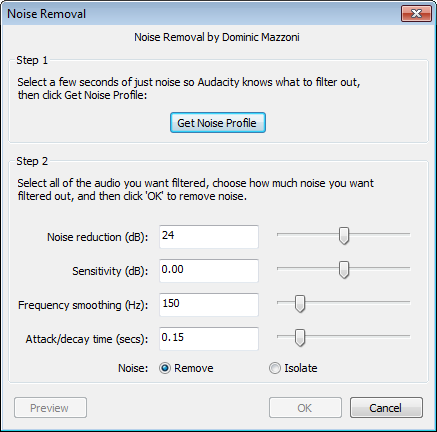
If everything is OK, you can start with the podcast. Don’t forget to record at least 5 seconds of silence before you get to your podcast. It will help you to cut out all the background noises like an open window, a scratching cat or anything of a kind. When you get a right sound atmosphere, start talking. You’ll cut the beginning of a podcast later.
How to edit a recorded podcast?
As soon as you pressed the Stop button and finished the recording process, it’s high time to edit your audio:
Don’t forget to make or find a good cover photo for your podcast. Podcast images also have certain requirements:
You may use these photo apps and Pixlr or other photo editors to shoot and enhance your image.
How to publish a podcast?
When everything is ready, you should do one of the most important things – upload the podcast online. There are several main sites for doing it:
SEE ALSO: Convert Audios for Podcasts Free
How to get revenue from a podcast?
To make a podcast is not enough. A successful podcast should bring you a good income. Of course, you must not think that you’ll become a millionaire right after publishing your 1 st podcast. But the more professional you become, the more subscribers you have and the more money you can make on a podcast.
Here are 11 best ways to grow your podcast audience:
Now let’s check how you can monetize your podcast and get income:
These were the most important things to keep in mind when creating a podcast. Start following our guide right now and create your very 1 st podcast. We’d be glad to know about your success or podcast creating ideas. Please share them in comments below.
How to Start Your Own Podcast
For many of us, podcasts are a favorite way to get our news or stay entertained while we’re working out, commuting or getting stuff done around the house. Chances are you probably have a favorite (or seven) that you keep up with on a regular basis.
While every armchair broadcaster with a voice-recording app is eager to get in the game, creating a professional-sounding podcast isn’t as simple as that. This guide will tell you how to create, record and publish your own basic podcast—and get people to listen.
Before you start, be ready to commit
Before you rush into things, it’s important to keep in mind that podcasts take a lot of effort to get going. It’s easy to assume they are easy to produce because most are audio only, but don’t be fooled. They can take a lot of time to put together, especially when you’re first starting out.
Also, podcasts do best when they’re released consistently. If you’re interested in developing any kind of listener base, you have to be ready to release episodes on a regular basis. Podcasting can be fun work, but it’s still work, and should be treated as such.
How to Start a Podcast, With Abu Zafar
Ever dreamed of making a podcast of your own? Of being the next Teri Gross or Joe Rogan? This week…
Don’t expect to get rich from podcasting. It’s possible to generate income from podcasting, but that usually requires advertisements and sponsorships and patrons—all of which you can get only after you’ve built up a listenership big enough to make it worthwhile to advertisers.
If you’re not interested in starting a podcast for the fun of it, or just to have your voice heard, you might not get much out of it unless you already have an eager audience.
The gear you’ll need to get started podcasting
You can’t start a podcast without equipment, and good equipment will go a long way. Here’s what you’ll need:
Analog microphones use XLR connectors, which means you need another device to get your audio onto your computer, but you can get higher audio quality and can use them with other sound equipment (if you had a PA system or wanted to play live music, for example).
You might be thinking that all this equipment is pretty pricey, and you’re not wrong. However, keep in mind that decent audio equipment will last forever if you take care of it. It may be expensive at the outset, but after the initial purchase, you’re set.
Narrow your topic and find your niche
For example, if you wanted to make a podcast about music, ask yourself if there’s an audience out there for what you want to talk about. Maybe you narrow your idea down from music in general to bluegrass specifically. Now your coverage is specific: the music, people, and culture of bluegrass.
Once you have your topic narrowed down, it helps to add a spin to it. Maybe you talk about bluegrass music and culture while sipping moonshine with your co-hosts. It’s kind of true that everything has been done before, but it hasn’t all been done the way you would do it. Find an angle that’s interesting and engaging—the more your passion shines through your podcast, the more people are likely to keep listening.
How to Start a Podcast: Complete Step-by-Step Guide [2022]
Launching a podcast can feel overwhelming if you’re doing it by yourself, but you don’t have to do it alone.
Since 2009, Buzzsprout has helped over 300,000 podcasters launch their podcast, and we’ve used everything we’ve learned to create this guide.
We broke this guide into 10 easy steps that give you everything you need to confidently create, launch, and grow a great podcast!
JUMP TO A SECTION:
Step #1: Develop a podcast concept
Choosing the right podcast concept for your new podcast is a big part of attracting the right listeners and staying committed to your show.
Follow these tips to narrow your niche and clarify your message.
Define your goals
Why do you want to start a podcast? It’s important to know your why, even if it’s to have fun with friends.
Some good reasons for starting a podcast are:
Podcasting has a lot of benefits for brands and businesses, but it’s important to be realistic about your goals.
While some podcasters shoot to fame, most have a small target audience that they build over time.
Pick a podcast theme or topic
You should feel excited to regularly discuss and research your podcast topic. The more you enjoy your topic, the less likely you’ll experience podfade.
Once you have some ideas, do some market research to survey the competition in your genre.
Search your show’s topic in Apple Podcasts. Listen to a few episodes and ask yourself what you could do differently.
There’s always a unique angle or perspective to offer.
PRO TIP
To test out your own podcast concept, try to come up with ten episode ideas. If ideas don’t come easily, you might want to change topics.
Make it specific
When you zero in on a niche, you attract a more specific and engaged audience. Podcasts that appeal to a broad audience can end up reaching fewer people.
People are also more likely to recommend a niche podcast to a friend than a generic one.
To make your podcast niche, focus on a sub-category or sub-demographic.
Drill down on what makes your podcast different. What unique perspective can you bring to your podcast’s topic?
EXAMPLES OF FINDING A NICHE
Name your podcast
Your podcast name is a core part of your brand. It makes a strong first impression on listeners and sets the tone for your podcast.
Here’s Apple’s advice on how to name your podcast:
Podcast names should have the following characteristics:
Once you have a title in mind, run it through a podcast name checker to make sure the social accounts and domains are available. You also don’t want to use someone else’s podcast name.
Don’t create podcast artwork, yet. It’s likely that you’ll tweak your podcast concept before you release your episodes, and you don’t want to have to redo your artwork.
Step #2: Choose your podcast format
Your format should complement your podcast and feel sustainable.
Ask yourself what gives you energy. Do you love connecting with podcast guests, or do you feel your best going solo?
If you choose to have cohosts, try to keep your group small. Podcasting with more than two or three people makes scheduling a challenge.
Keep in mind that some shows require more production than others. For instance, fiction podcasts usually require more editing than interview podcasts.
These are some common podcast formats:
Optimal podcast episode length
Make your episodes as long as they need to be and no longer.
Some podcasts are less than five minutes long, and others have episodes the length of a short audiobook. Here are the most common episode durations:
Podcast publishing schedule
Podcasting can be a full-time job or something you do on the side. You might decide to publish daily or every two years like Serial.
We recommend publishing once a week to develop a connection with listeners and create the habit of producing consistent content. These are the most common publishing frequencies:
Step #3: Setup podcast recording equipment
You don’t have to buy expensive equipment to have good audio. Lots of popular podcasts have a basic setup.
Let’s review what to look for in a podcast microphone. Then, we’ll make our top podcast equipment recommendations.
Best podcast microphones
A good podcast mic enhances your audio quality and makes editing easier. Less background noise in your recording means less editing on the backend.
Here are a couple of things to consider before getting your first podcast mic.
Dynamic or condenser
Dynamic microphones work best for podcasting. They pick up lower frequencies and have less sensitivity. This means you’ll have less background noise to edit out later.
Condenser mics have more sensitivity and pick up a wider range of frequencies. Sensitivity is good for recording music but isn’t ideal for spoken word.
XLR or USB
Podcast mics have two types of connections: XLR or USB.
XLR mics give you maximum flexibility. There are a lot of XLR mics to choose from, and they usually have a long life. But, XLR mics require an interface or mixer to hook up. This can get expensive for beginners.
USB microphones are less expensive and plug directly into your computer. You can also run it through an interface if you record with multiple people.
USB mics are affordable, practical, and sound great. This mic is the best option for the majority of podcasters.
TOP MIC RECOMMENDATIONS:
Example podcast setups
1. One-person setup ($70)
2. Two-person setup ($400)
3. Three-to-four-person setup ($960—$1,080)
RECOMMENDED ACCESSORIES:
RELATED YOUTUBE VIDEOS
Step #4: Choose your podcast software
Once you’ve recorded your podcast, it’s time to make edits. This is where you can structure your episode and optimize audio.
Fortunately, podcast editing software is often affordable or even free.
Remote recording software
If you frequently do remote interviews, you’ll need software specifically for long-distance recordings.
Riverside allows you to record local audio and video, even if you don’t have a great internet connection.
Users can take listener call-ins, livestream to social media, and edit videos within a browser. Files continuously upload to the cloud during recording, so you never lose your work.
SquadCast makes it easy to set up a remote podcast interview and capture high-quality, lossless audio.
Squadcast’s sound quality is much better because it records local WAV files to each person’s computer. The initial setup is more complicated than Zooom, but this tutorial can help.
3. Zoom
Zoom is a go-to remote recording tool with average audio quality. And most people already know how to use it.
The app’s default features compress audio, but you can improve the audio by using the best settings for Zoom recordings.
Don’t use Skype to record your podcast. Skype calls are typically much more compressed and lower quality than the other options.
Editing software
1. GarageBand | Free
GarageBand comes pre-installed on most Apple computers. If you don’t have it, you can easily download it for free. We think GarageBand is a more intuitive interface than Audacity.
GarageBand is not available on Windows computers or Android phones. This tutorial can help you learn how to navigate the workspace.
2. Audacity | Free
Audacity is a free, open-source audio editor with pro-level features. This DAW is more than enough for most podcasters to produce great episodes.
Audacity has a steeper learning curve than GarageBand, but we have many Audacity tutorials to help you navigate the platform.
Descript is an all-in-one editing tool that lets you record, transcribe, mix, and edit your audio files like you would a text document.
Descript can automatically remove filler words and dub over a phrase with text-to-speech voice cloning.
This Descript tutorial breaks down how to use the video and screen recording feature and the in-browser editing suite.
Hindenburg is a pro-level audio editing software designed specifically for podcasters and journalists.
The workspace features simple tools made for spoken word and automated options to streamline your workflow. This Hindenburg walkthrough gives you an idea of the workspace.
Alternatives:
Other podcast software
These tools aren’t required but can improve your workflow and help optimize your content.
Otter.ai is an automated transcription service. The tool is highly accurate and has a quick turn-around time.
Buzzsprout has an Otter.ai integration, so you can easily upload your Otter transcripts into your dashboard when they’re ready.
This service is a great option if you speak English. If you speak another language or have a heavy accent, it won’t render accurate results.
Magic Mastering automatically levels out and optimizes your audio file, like an Instagram filter for your podcast.
This tool helps simplify your workflow and guarantees your podcast meets industry best practices.
Audio Hijack lets you record audio from any website or application and save it as an audio file.
Audio Hijack is an excellent option if you livestream with Twitch, StreamYard, or Facebook Live.
RELATED YOUTUBE VIDEOS
Step #5: Record your first episode
Recording your episode requires a little preparation on the front end. Follow these three steps to set yourself up for success.
1. Write a podcast outline
Rambling is one of the most common mistakes new podcasters make, and the best way to fight this tendency is by writing a podcast script or outline.
Even taking a few minutes to jot down a list of bullet points will dramatically improve the flow of your episode.
If you’re working with a cohost, share the outline with them so you can work on it together.
2. Pick a good place to record
If possible, record in a quiet room with lots of furniture, curtains, rugs, or carpet.
Noise bounces off of hard, flat surfaces, so eliminate these where you can. You can also sound treat your space with foam panels on the walls.
3. Set up your recording equipment and software
Connect your mic to your computer or audio recording device.
If you have a USB mic, plug the cable into your computer’s USB port. If you have multiple hosts, run each mic through an audio interface and plug the interface into the computer.
If you have an XLR mic, connect its cable to a USB interface or an external audio recording device like the Podtrak P4.
Once plugged in, go to your audio editing software settings and select your audio input.
Microphone technique
Position your mouth 2″ to 4″ away from the microphone for the cleanest sound, but the optimal distance may vary based on your microphone.
If you notice too many plosives or harsh sibilance in your recordings, the simplest solution is to move off-axis from the microphone.
Set your mic up to the side, angled slightly toward your mouth. This adjustment prevents bursts of air from hitting the capsule and results in more natural audio.
Record test track
Try recording yourself talking at a consistent volume at several different positions. Then, listen to the recording to see which position gave you the best audio quality.
Don’t worry about mistakes, stammers, or silence. You can make your edits in the next step.
Step #6: Edit your audio
Podcast editing is primarily for cleaning up the audio and making basic changes to the structure. Try to keep the process simple. If you focus too much on production, you’ll get overwhelmed.
Follow these four tips to streamline your editing workflow.
1. Create an engaging intro and outro
Your podcast intro lets you tell your listeners what you’re about, the value you bring, and convince them to stick around.
You can get royalty-free music for no cost or purchase your show’s intro music through one of these resources:
2. Edit for content, then distractions
Edit for content on your first pass and work on noise issues or other distractions on your second go-around.
If you focus on noise issues too early, you might polish sections you remove later on. Focus on getting the content right first, then double back to fix audio issues.
3. Fade between tracks to remove unwanted noise
When you cut sections of audio, you can sometimes get little pops or clicks in the finished product.
Use the fade tool at the beginning and end of clips if you run into those issues.
4. Create a punch-list
If you don’t want to listen to an entire episode multiple times, create a list of audio distractions to check during your second pass.
This list can save time and ensure you don’t miss anything.
RELATED YOUTUBE VIDEOS
Export audio file
If you use another podcast hosting service like Anchor, you’ll need to export your file in its recommended format.
Don’t worry about ID3 tags. Buzzsprout will add the correct ID3 tags to your audio files automatically.
Step #7: Create podcast artwork
Your podcast cover art is the first thing potential listeners see on Apple Podcasts or social media.
Good artwork implies quality content, and 62% of new listeners are more likely to listen to a podcast if they like its cover art.
Your podcast artwork should follow these technical specifications based on Apple’s Podcast Artwork Requirements:
5 Tips to make your podcast artwork stand out
Follow these five tips to make artwork that stands out in podcast directories and attracts new listeners.
Tools to design your podcast artwork
Buzzsprout’s Canva integration
Buzzsprout’s Canva integration allows you to create your own podcast cover within your Buzzsprout account.
Choose from 250,000+ templates, edit the template to match your podcast brand, and click Send to Buzzsprout.
Using this tool automatically guarantees that your cover art meets spec requirements for every podcast app.
Adobe Create Cloud Express
Adobe Creative Cloud Express (previously Adobe Spark) is a free service similar to Canva.
Fiverr
Fiverr is a more affordable way to outsource your artwork. Prices vary based on the experience of the designer.
Make sure you pick a designer with examples of good artwork in their portfolio.
99Designs
99Designs lets you run a contest where designers compete to create the best design. Designers submit their ideas based on your guidelines, and you pick your favorite!
Step #8: Set up podcast in Buzzsprout
To get started, sign up for a free 90-day trial of Buzzsprout.
If you decide to upgrade to a paid plan, you can upload up to three hours of new content every month.
Fill out your podcast information
Go to Podcast Setting inside Buzzsprout to fill in your podcast title, artwork, and description. This information helps you appear in search engine queries.
Your podcast description is where you tell listeners what they can expect from your content. It’s also a good place to use keywords to draw people’s attention.
If you have a business podcast, use related words and phrases so readers know your content is relevant to them.
Upload podcast artwork
Upload your podcast artwork into the designated field. You can upload artwork you already created or click the Canva button to create your cover art within the dashboard.
Pick a podcast category
This is where you pick which category your podcast appears in Apple Podcasts (formerly iTunes).
Pick the category that best fits your podcast. You can always change this later.
You can also pick a subcategory to narrow your niche. It’s better to be at the top of a subcategory than further down a general category.
Upload your first episode
Drag and drop your file into the dashboard and then schedule when you want it to go live.
Individual episodes have their own metadata and can even have their own episode artwork.
Write podcast show notes
Your Episode Description is where you can write your show notes.
These notes show up with your episode in podcast apps and next to your episode on your podcast website. Quality show notes can help with your SEO and overall accessibility.
Try to include these things in your show notes:
Most major apps support formatting within your episode notes, but not all do. Keep that in mind when you format your episode description text.
Bonus features in Buzzsprout
Now that you have the basics done, you can check out these extras to optimize your podcast.
Buzzsprout customizable website
Every podcast should have a website where your podcast lives. All Buzzsprout podcasters can create a free customizable website where you can keep your transcripts and episodes and have more information on your podcast and hosts.
You can set up this website within Buzzsprout and put it on your own domain. This site is primarily for podcast listening, transcripts, and show notes.
Transcripts
Transcripts help with your accessibility. Some people just prefer to read rather than listen to your content.
Within Buzzsprout, you can transcribe your episode using the Otter.ai integration or transcribe it yourself.
Upload your transcript, and we’ll distribute it to every directory that supports transcripts.
Magic Mastering
It’s challenging to fine-tune your audio. Magic Mastering levels out your audio, removes background noises, and makes voices sound more full.
Once you have an account, you can try out this feature for free on one episode!
Visual Soundbites
Visual Soundbites are video clips of your audio animated with an image and waveform.
These soundbites are a great way to promote on social media and stand out in someone’s feed. Posts with a visual component get an average of seven times the engagement.
RELATED YOUTUBE VIDEOS
Step #9: Get listed in Apple Podcasts, Google Podcasts, and Spotify
Podcast directories, like Apple Podcasts, are a centralized place for podcast listeners to find new shows.
Getting listed in the top podcast directories is a critical part of your podcast marketing strategy. Most of your new listeners will find your podcast through these directories.
Here are the steps for getting listed in the top three major podcast directories.
Submit podcast to Apple Podcasts
Apple Podcasts is the number one podcast directory in the world and accounts for 37.4% of all podcast downloads.
It can take up to 24 hours for a podcast to be approved, as Apple does a human review of every new podcast. You’ll receive an email once your show is approved.
Submit podcast to Spotify
Spotify launched its directory in 2018 and is now the second-largest podcast directory, with 26.8% of all podcast downloads.
Once you submit your podcast to Spotify, it should be listed almost immediately.
Submit podcast to Google Podcasts
Google Podcasts makes your podcast visible in Google web searches and on Android phones. This directory accounts for 2.4% of all podcast downloads and works differently from its competitors.
Rather than submitting your podcast to a directory, you just make sure Google can crawl your podcast website.
You can manually submit your podcast RSS feed to Google to help speed up the process.
All Buzzsprout websites are compatible with Google Podcasts. Most podcasters see their episodes show up in Google results in a couple of weeks.
If you use another hosting platform, check out this article on how to get a podcast into Google Podcasts.
Other podcast directories
Once you get listed in Apple Podcasts, Spotify, and Google Podcasts, your podcast is in front of 95%+ of all podcast listeners.
Submit to these smaller directories to further broaden your reach:
Step #10: Launch and grow your show
When it’s time to launch your podcast, you have two options. Choose whichever one feels best to you.
Strategy #1: The grand opening
A grand opening is when you build hype for your show before its launch. This is the approach used by most podcasters with an existing following.
Pick a launch date a few weeks away and reach out to people who might be interested.
You can pay for ads, submit to Apple Podcasts’ New and Noteworthy, or reach out to publications.
Strategy #2: The soft open
A soft open is more discreet. With this method, you publish episodes as if people are listening but wait on the promotion.
This strategy lets you get comfortable, iron out kinks, and overcome imposter syndrome.
When you see your podcast succeed in a lower-pressure environment, it’s easier to promote it more confidently.
Imposter syndrome
A lot of podcasters feel like a fraud when they first start. Maybe you dislike your voice or don’t feel qualified enough to speak on your topic.
It’s easy to sideline yourself, but you have a valuable perspective to offer. Know that this is a normal phase of podcasting that gets easier.
6 Marketing tips to grow your listenership
It takes time to get the word out about your podcast. Follow these five steps to building a successful podcast marketing strategy.
1. Share your podcast with friends and family
Share your podcast with loved ones and ask for feedback. You can get their honest opinions and have them leave your first reviews on Apple Podcasts.
2. Create a Buzzsprout Ad
You can grow your listenership by running a podcast promo with Buzzsprout Ads. Podcast promos are more effective than traditional ads since they target the right audience for your show.
When listeners click on your ad, they’ll be taken to your podcast page, where they can subscribe to your show and get notified of new episodes.
3. Post episodes on social media
Sharing podcast content on social media helps you build a connection with your listeners.
You can create Visual Soundbites for Facebook and Instagram, boost tweets on Twitter, and post content on LinkedIn. You could pick up ten new listeners over your first few episodes if you do this right.
4. Join groups and forums
Providing value on forums like Reddit, Quora, or Facebook groups helps direct people to your podcast.
Respond to relevant, recent questions you can confidently answer. Include a link to one of your episodes to direct traffic to your podcast.
Aim to post one or two answers like this for each new episode.
5. Cross-promote with other creators
Cross-promotion lets you partner with other podcasters and promote each other’s shows.
This marketing method lets you get your podcast in front of a new audience.
You can reach out to fellow creators on Podchaser or find hosts’ contact information on their websites or social media.
6. Overcast Ads
The Overcast podcast app runs ads exclusively for podcasting. In our experience, we get 100 new subscribers each ad cycle. This is an excellent way to get your first 100 subscribers if you have the money.
Additional resources
If you run into any issues during your launch or have questions once you’re podcasting, consult these Buzzsprout resources.
Celebrate your launch!
If you’ve made it this far and are ready to publish your episode, we encourage you to submit it soon and celebrate your accomplishment.
Launching your first podcast is an achievement, so congratulations from the entire Buzzsprout team! We can’t wait to see how far your podcast takes you.
Alban Brooke
Alban Brooke is the Head of Marketing at Buzzsprout and the co-host of Buzzcast. Have any questions about this guide? Reach out on Twitter.
How does a beginner start a podcast?
To start a podcast, follow these ten steps:
Do podcasts make money?
Can anyone start a podcast?
Yes, anyone can start a podcast, regardless of their experience level. All you need is a genuine interest in your topic and something valuable to offer listeners!
How To Start A Podcast: A Complete Step-By-Step Tutorial
Disclosure: Links to other sites may be affiliate links that generate us a small commission at no extra cost to you.
If you’re looking for a guide that walks you through how to start a podcast, you’re absolutely in the right place…
Starting a podcast isn’t difficult, but there are a number of steps you’ll need to go through in order to get it launched.
In this podcasting tutorial, we’ll walk you through every step of the process:
Bonus: Free 10-Day “How To Start A Podcast” Email Course
Just click the link and enter your email to get the first lesson:
Just a few of the things you’ll learn:
Get started today!
Podcasting is a much less crowded and competitive space than blogging, making now the perfect time to get started.
As of August 2022, there are just over 2 million podcasts, but over 600 million blogs!
In case you’re wondering, I’ve helped thousands of people start a podcast in the last several years and have started a few shows in different industries myself.
Looking to start a podcast quickly? Sign up with Buzzsprout, upload your audio files, and submit to Apple & Spotify.
Let’s get started:
Planning
This is the initial (often overlooked) stage to make a podcast. You’ll want to spend a good amount of time here before you move on.
Feel free to get out a notebook or a whiteboard so you can start planning your podcast like a pro.
Choose A Topic
You want your podcast to be focused on a particular topic or niche.
Try to narrow it down to something you can speak about for many episodes (100+) but that isn’t so broad that you won’t appeal to your potential audience.
For example, instead of having an “outdoor” podcast, talk about hiking – or even more specific, like hiking 14ers.
You can always expand your topic later as you get more popular.
Important: see the section about choosing a name to make sure you don’t limit yourself.
Pick A Co-host (optional)
Do you have a friend, business partner, or coworker that you want to co-host with?
It can be much easier to start podcasting if you have a co-host.
You will naturally have a more engaging conversation if you both share your points of view on a topic. It can also be helpful to have someone to keep things on track.
Plus, you can split additional tasks of editing, promoting, and more.
There can be downsides though.
You’ll want to make sure both of you are committed to it for the long term. And it helps to set a schedule from the beginning so you know when you will be recording every week.
There aren’t rules here though. If your co-host drops off, you could still continue the podcast without them. Or you could start solo and add a co-host later.
The important thing is to just get started.. so let’s choose a name:
Choose A Name
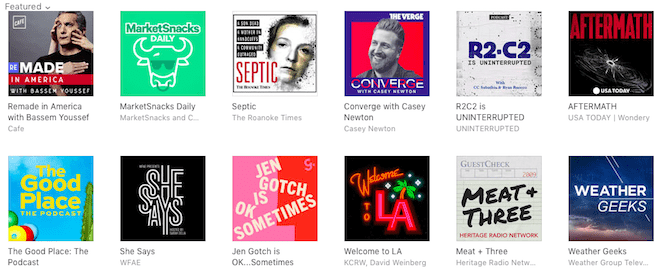
If you look at the top Apple Podcasts charts, you’ll see a variety of different names.
Some are descriptive of what the show is about, while others don’t mean much.
I’m actually going to seemingly contradict what I said earlier: You want to choose a name that is broader than your topic.
Using the hiking example earlier, if we choose “The 14er Cast” as our name, what happens when we want to talk about backpacking & ultralight camping too?
Instead, choose a name that will let you expand if you decide to later. Maybe “Mountain Adventures (Above & Below 14K ft)” would work as it gives a hint to hiking 14ers but gives you the option to talk about all kinds of stuff if you want.
I just came up with that as I was writing this, I’m sure you could do better!
Action Step: Purchase a domain name (opens in a new tab) for your podcast.
Another option is to get a free domain name with a Bluehost web hosting plan. You can search right here on this page – try it out!
I also have some more tips on choosing a domain name here if you want.
Show Format
Length
You’ll find a number of “experts” claim that certain lengths are perfect for podcasts. The problem is that’s just BS.
You don’t need a 28-minute podcast because that’s the average driving time. Or under an hour because people can’t pay attention longer than that.
There are 5 minutes podcasts and there are 6-hour podcasts. Find whatever works for you and run with it!
What I would try to avoid is making it longer than it needs to be because you went off-topic for 15 minutes.
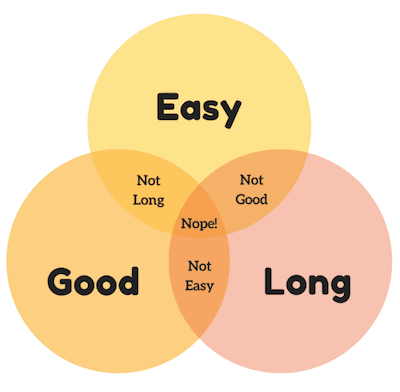
Here’s a great image from Pop Up Podcasting that shows “easy, good, or long – pick two”:
Style
Interview shows are popular, but that doesn’t mean you have to do one.
You can do solo (or co-hosted) shows half the time and interview shows the other half.
One big benefit of doing interviews is that they help a ton with getting new listeners – especially if you make it easy for your guest to share with pre-written templates and graphics.
Episode Format
So what does a specific episode sound like? I wrote this post about podcast intros, but it has a bunch of examples of different episode formats for popular podcasts.
Here’s one example:
Get creative with this part.
Different segments make it easier to share small clips on social media too.
But remember that for every episode you put out, you will have both repeat listeners and new listeners so you should try to speak to both of them.
Preparation
Now that you’ve written down your topic, format(s), and secured a domain name, we’ll need to get a few things prepared ahead of launch…
Create Cover Art
Your cover art is the first impression most people will see as they browse through Apple Podcasts or their favorite podcast app.
It’s might also be the image someone sees when you share your show on social media.
Buzzsprout has written an excellent article about designing cover art, so I would definitely start there.
If you have a little bit of a budget, I highly recommend 99 Designs to get yours created.
You’ll get hundreds of different designers to produce a draft – then you can choose the ones you like to have them further refined.
Get A Professional Intro (Optional)
Music Radio Creative is the best place to get professional-quality voiceovers and intros.
Having a third-party introduce you just takes your perceived value up a notch, which is a great way to stand out when first starting a podcast.
Choose Intro Music
I’m a big fan of PremiumBeat for podcast music.
It’s easy to search, you get a full license, and they have a bunch of different styles.
Take a look at this post on royalty-free music for more options.
Most people don’t need an unlimited subscription-style music service – just a song or two.
Get A Microphone
Audio quality is important but it doesn’t have to cost a ton to get a good quality microphone for podcasting. One of the most popular podcasting microphones is the Audio-Technica ATR2100x-USB (brand new version for 2020).
It’s both a USB microphone and has an XLR connection which lets you upgrade your recording equipment without needing a new mic.
I recommend taking a look at our podcast starter kit post for more options here, especially if you plan on having a co-host or two.
Podcast Guests
If you are doing an interview show, now is the time to get a list together of who you want on your podcast.
Then start reaching out to them.
It can help to use a service like Acuity Scheduling so people can book right on your calendar when it’s convenient for you.
This saves the headache of going back and forth working out a meeting time – and means you can focus on getting more guests!
Plus you can ask them for certain info like their Skype username or an intro you can read when they schedule with you.
To record your interviews when you’re not in-person (or if your co-host doesn’t record in the same room with you) I use and recommend Iris.
Recording & Editing
Alitu (The Easy Way)
If you haven’t used editing software before, even simple actions in GarageBand or Audacity can be quite intimidating.
It’s understandable: audio production is completely full of jargon!
It’s a ‘podcast making’ tool that automates a lot of the confusing technical parts, and practically builds your episode for you. It’s all based right inside your browser, so no software to download, and it works on any computer connected to the internet.
It is built to be super simple to use and does pretty much everything:
All you need to do is upload your recordings, and use the fool-proof podcast-specific editor to take out any big mistakes. Alitu does the rest!
Even better, Alitu includes a library of music and jingles which you can use as your theme tune, or as transitions between segments.
Whether you’re a complete beginner, or an experienced podcaster looking to drastically cut down on your production time, you should definitely give Alitu a try. It comes with a 7-day free trial, so sign up here and try it out!
GarageBand (Free Option)
I’m going to show you how to use GarageBand for recording and editing.
Other audio editing software is similar but most have more advanced features that you don’t need when getting started. Popular options are Adobe Audition & Audacity (both work with Mac & PC).
You can also check out our full post on podcast editing software.
Create A Template
Before you get started, it will be much easier if you create a template that you can reuse every time you record a podcast episode.
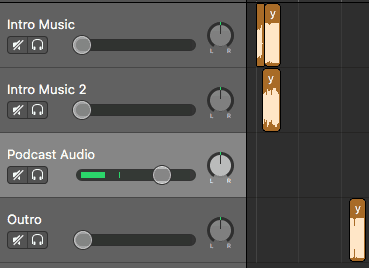
What this means is that you will have your intro & outro music already placed, space for ad spots, as well as your tracks for your voice or an interviewee.
Keep in mind this will look different depending on your episode format – create a podcast template that works for you. Here’s one I use:
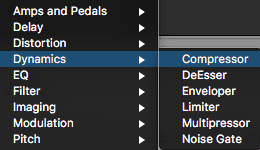
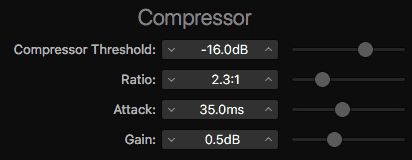
This will also keep any effects you have applied to the tracks, including compression, EQ, or anything else. I’ll show you the settings I use in the editing section below.
Record Your First Episode (Or 3)
If you’re just recording a solo episode or want to record an intro to an interview you did, simply select the track you want to record to (see the light gray Podcast Audio track selected above) and click the red Record button up top:
Multiple Hosts
This will give you the option to enable multiple tracks to record at once and you’ll see the Record Enable button on each track:
You’ll click that button on each track you want to record, then click the big record button up top. Easy enough!
Remote Interview
Many people use Skype for recording remote interviews and the easiest way to actually record the audio (or video) is with Ecamm Call Recorder For Skype (Mac only) or Pamela (for Windows).
If you want better audio quality than Skype or Zoom allow, or a way to have individual audio files for more than 2 people, services like Iris are excellent. They are designed for remote recording and podcast interviews.
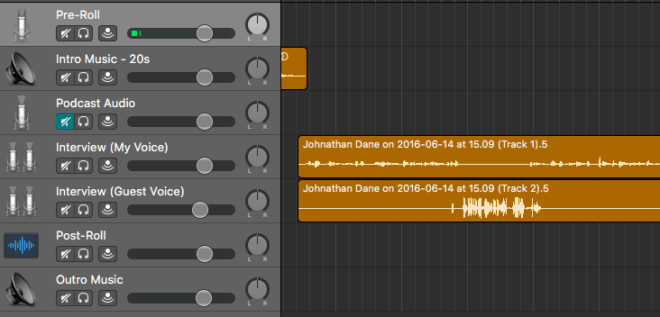
When you are done recording, you’ll have two separate tracks that you will place on top of each other like this:
This also shows another template that you may want to use. The Podcast Audio track is only used for solo shows, and the Interview tracks are only used for interview shows.
Edit Your Episode
There are a couple of things you can easily set up once (and save in your template) that will make your podcast (and your voice) sound much better.
Keep in mind that everyone’s voice is different so there aren’t perfectly universal settings, but these may give you a good starting point:
I’m not going to get into what all that means, but if you just do one, the low-end roll-off (on the left) will be a good start.
Or you can just download my Podcast Vocal EQ settings here (.pst file on Dropbox).
The last step I’d recommend is going to Auphonic to apply some normalization for loudness (LUFS), leveling, and filtering. It will also automatically add ID3 tags should you need them.
Launch!
Get A Podcast Host
I use and highly recommend Buzzsprout podcast hosting after trying many different companies over the years.
Feel free to check out our complete podcast hosting guide if you want to see other options, but another great choice for larger brands is Transistor.
You can also look at this list of the best podcast platforms.
Once you’ve signed up, you’ll need to fill out some required information about your podcast (name, description, categories, etc.).
Upload Your First Episode
If you use Buzzsprout, this process is super simple.
If not, it’s possible you need to mess with things like embedding ID3 tags into your MP3. Sounds confusing and unnecessary – let’s not do that.
You’ll just need to click the “Upload” button:
and they’ll apply some magic processing to your mp3 file.
Then you’ll need to fill out the episode title, description, summary, publish date, and episode #.
If you want to use Seasons, put a “1” there, otherwise leave it blank. If you use a lot of bad words, click the explicit checkbox.
It can be helpful to create a template for your episode description (in a separate text document) to reuse for every episode – I use something like this:
Click save and repeat this step for your initial release of episodes.
It’s recommended to launch a podcast with more than 1 episode so that people don’t have to wait to hear more.
3 to 5 episodes is a good number to start with.
Submit To Apple Podcasts (iTunes)
I have a separate guide on how to submit your podcast to iTunes but within Buzzsprout just click Apple Podcasts under the Directories tab and follow the steps they’ve put together.
After that, grab your podcast RSS feed and submit it to other podcast directories too.
As you upload new episodes, your host will automatically update your RSS feed and any podcast directory you’re listed on will also update with your new episode.
Spread The Word
Use Buzzsprout’s social sharing feature to generate teaser videos and start sharing!
Buzzsprout’s built-in video soundbite creator.
There are other companies that will help you generate different styles of audiograms, but having it built into your host makes it really easy to create (and it won’t cost you extra).
Wavve and Headliner are two excellent choices if you want to create more custom podcast videos to share.
Check out this article on podcast promotion to for a bunch of other marketing tactics. One of the most impactful ones is building your own website (see next step below).
Recommended Steps (After Starting A Podcast)
Your job isn’t done once you start a podcast. Here are my recommendations to help make your show more appealing and easier to grow:
Create A Website
WordPress (Easy To Medium Difficulty)
Podcast hosting companies usually give you a website, but if you want to be taken seriously get yourself a separate WordPress host.
For beginners, Bluehost is easily the best option (plus you’ll get a free domain name for the first year).
If you need a bit more guidance, start with this how to start a WordPress blog post for the initial steps.
I have a list of excellent WordPress plugins that a podcaster would need too.
And if you need more help, I have a course called Podcast Website LaunchPad that walks you through everything.
Podcastpage (Easiest Method)
Podcastpage is a website builder and hosting all-in-one made specifically for podcasts. Kind of like Wix but designed for the needs podcasters.
No coding is necessary. You just choose one of their themes, customize to your liking, and optionally integrate email marketing or Google Analytics.
You can add pages or blog posts, customize your audio player, and make it easy for your visitors to subscribe!
Get Transcriptions
Transcriptions are an excellent way for search engines (like Google) to “read” your podcast episodes. They also give your audience another way to look something up quickly.
You don’t have to start out with them, but it’s another one of those things that will set you apart.
Create Show Notes
Show notes can be transcriptions like above, a simple summary of what you talked about, or a full blog post tailored more toward reading than listening.
Some people do a combination.
On this site, we start with written content first and then create podcast episodes after.
Embed Your Episode
Grab your episode embed code and place it on your show notes page so people can listen from your website.
How to Make a Podcast
What to know before starting a podcast
In This Article
Jump to a Section
You owe it to yourself to make your podcast as good as you possibly can, and a huge part of that is making sure you have all of the hardware, software, and supporting services required to elevate you above the competition. With that in mind, here’s how to make a podcast.
What You Need to Start a Podcast
Before you can start your podcast, there are four bases that you need to cover:
Finding Your Podcasting Topic or Niche
This is the first step in starting a podcast, and it’s a pretty important one. If you already have a built-in audience from somewhere else, then you may be able to just roll tape, talk about whatever, and have your audience eat it up. For everyone else, do yourself a favor and put some thought into the big picture and the overall theme of your podcast.
If you’re starting from scratch, then think about your favorite interests and hobbies. Is there anything you could talk about with some level of both authority and enthusiasm?
After you have some ideas, do some research on the competition. See what’s out there in the same topic or niche, and think about how you could attack the same thing from a different angle, put a different spin on it, or just bring something new or better to the table.
If you need some inspiration, you’ll find all kinds of ideas in the best history podcasts, the best mystery podcasts, the funniest podcasts, and the best podcasts overall. It’s good to listen to tons of episodes to see what’s working for other people.
Recording Equipment for Making a Podcast
You can technically record a podcast on your phone and upload it from free Starbucks Wi-Fi, but the result probably won’t be that great. If you want to make a professional-sounding podcast that people actually want to listen to, you need to put together some essential podcasting equipment.
Here’s the basic equipment you need to make a podcast:
While it’s possible to record a podcast using a phone or a tablet, it isn’t really recommended. You need a good computer that’s capable of running audio recording software if you want to put together a professional podcast.
A decent microphone is the next most important piece of equipment. You don’t have to break the bank, but you should seriously consider buying a condenser microphone if you don’t already have one. There are a lot of decent USB condenser microphones out there that are also affordable, or you can go for a more expensive microphone that has an analog output, phantom power, and the whole nine yards.
Headphones you can cut some corners on, as any set will do. Over-the-ear headphones are better since it’s less likely your microphone will pick them up, but you don’t need to shell out for expensive studio monitor headphones unless you’re super serious.
With that basic equipment assembled, you can start recording your first podcast. However, the sound quality of your podcast can improve if you add additional equipment like:
There’s really no limit as to how far you can go with your recording equipment. Upgrades to your mic and mic accessories, audio input and mixer equipment, and your recording environment can all help create a more professional sound.
A microphone shock mount is a good place to start, as that’s a great way to keep your mic from picking up noise from vibrations like moving your chair or tapping on your desk, and a pop filter helps minimize red-lining from specific sounds when you’re talking.
If you upgrade from a USB mic to an analog mic, then an audio interface and a high-quality sound card can improve your overall sound quality. A physical mixer board is an expensive upgrade, but it gives you more control over your levels and can really help if you plan on having call-ins.
If you can’t afford a full-on home recording studio, then some acoustic foam can go a long way toward preventing unwanted noise.
Recording Software for Starting a Podcast
You have a lot of options when it comes to choosing recording software for your podcast. There are choices at every price level, including some fantastic free ones if you’re feeling the pinch after buying all of your recording equipment. In fact, our favorite is Audacity, which is free and available for Windows, macOS, and Linux.
Before you download and use Audacity, be sure to review its privacy policy to ensure you’re comfortable with its terms.
Whatever software you select to record your podcast, make sure it has editing capabilities that allow you to fix any sound issues that crop up. You may also want to be able to cut and splice your audio, add sound effects, and other advanced options. The ability to save in a variety of other formats is also key.
How to Get Podcast Hosting
There are a lot of options out there for podcast hosting. You can technically use any web host and just upload your podcasts, but that isn’t always ideal. If you become popular, you may run into bandwidth and throughput issues, especially if you have cheap shared hosting.
Dedicated podcast hosting is designed specifically for podcasts, so you won’t experience any issues if you become popular and have a lot of concurrent listeners or downloads. A lot of these hosts also provide extra features that are geared toward increasing your audience, disseminating your podcast to various platforms, and even monetizing your podcast.
Making a Podcast: How to Record and Release Your First Podcast
Now that you’ve put together all of the equipment you need to get started, it’s time to record and release your podcast into the world. This is the basic process you follow:
Record your podcast using the audio recording software of your choice.
Listen to your podcast, and use your audio software to fix any issues.
Upload your podcast to your podcast host.
Use tools provided by your podcast host to promote your podcast, or promote it yourself by sharing the link on social media.
One strategy you may want to consider is to get your podcast on Spotify. It’s not an easy process, but you get tons of exposure that might help your podcast catch on and become viral.









:max_bytes(150000):strip_icc()/jdlaukkonenportrait-d7f63bc9dedd44c18c9936ba6f0eebd0.jpg)
:max_bytes(150000):strip_icc()/GettyImages-1170060583-1c6f80a42cdc48d0921180a20315dd0d.jpg)