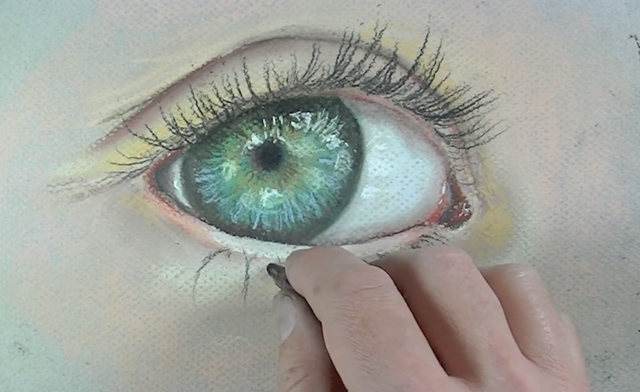
How to paint a realistic eye
How to paint a realistic eye
How to Paint Realistic Eyes: The Ultimate Guide
They say that eyes are windows to the soul.
From our hidden thoughts to our deepest emotions, eyes can tell us an awful lot about someone. If we wish to paint a truly expressive portrait, it’s vital to learn how to paint realistic eyes.
Let’s jump right in!
STEP 1: Sketch An Outline
1. Begin your rough outline on a midtone background
Using a relatively large brush, begin to sketch the outline of your eye. If you aren’t 100% familiar with eyes, I HIGHLY recommend you use a reference photo.. it’s the best way to learn!
You can use any brush you want, but make sure you don’t go into too many details. You are just building a basic ‘roadmap’ for your painting.
Tip: When sketching, going into too much detail will slow you down and make your life more difficult. Avoid the temptation by selecting slightly larger brushes.
2. Develop your sketch, and don’t be afraid to erase and re-draw lines
It’s actually fairly difficult to sketch on a tablet. Don’t get frustrated! The beauty of digital painting is that you can delete and re-draw your lines as many times as you need to.
Remember: This is not meant to be polished linework! It is simply a roadmap for your painting. I’ll show you how to paint realistic eyes in time, for now keep it sketchy and loose.
STEP 2: Rendering The Eye
The ‘Brush and Cut’ Method
Before we begin rendering in detail, it is important you understand one of the most common techniques in digital painting. I like it call it the Brush and Cut method.
The basic principle is this:
Lets have a look at an example:
1. Merge the sketch and background, then create a new layer
The first step is to merge your sketch with your background. I personally like to use Ctrl/Command+Alt+Shift+E to merge everything to a new layer on top. This way you still have your sketch as a separate layer, in case you need to go back to it in the future.
Then, create a new layer by pressing Ctrl/Command+Shift+N.
2. Add shading to the eyeball with a soft, round brush
On the new layer, begin to add some shading around the outside of the eyeball. Do this by painting just outside of the lines of the eye.
3. ‘Cut’ away the values outside of the eyeball with a hard-edged eraser
Erase everything that spills outside of the outlines of the eye.
As you can see, the Brush and Cut method allows us to very easily create areas of values that have a soft, gradient edge on one side, and a hard-cut edge on the other.
This has allowed us to paint the basic shading around the outside of the eye, giving it a 3D look.
Note how rough everything is still looking at this stage. That’s totally ok, don’t get frustrated!
Remember: The beauty of this method is that each new element you create is on a new layer. You can keep playing around with it, brushing and cutting the shape without fear of wrecking anything you’ve already painted.
And if everything is looking too light or dark, you can play around with the layer’s Opacity in the ‘Layers’ panel.
4. Use variations of this method to continue rendering
You don’t have to Brush and Cut with a soft brush and hard eraser. You could just as well brush in areas of values with a harder brush, then fade out the edges with a softer brush.
5. Use the Marquee Tool to Paint a Perfectly Circular Iris
You don’t have to paint everything by hand. Often you will get better results by using the other tools at your disposal, such as the Elliptical Marquee Tool (keyboard shortcut: M).
I first erased the iris from my sketch. I then made a selection with the Elliptical Marquee Tool on a new layer, and filled it with light gray. As it was on a new layer I could use the Free Transform Tool (Ctrl/Command+T) to reposition it.
6. Tip: Blending With the Smudge Tool
One very useful tool for blending is the Smudge tool. I prepared a tool preset for you which contains my favourite Smudge settings. You can find it in the downloadable brush files.
You can use the Smudge tool to blend lines in your painting, and smoothen out hard edges.
7. Keep Rendering the eye!
Keep painting values bit by bit. Make sure to start with the big areas of high and low values, before zooming in and painting in the little details with a smaller brush.
Here is a tip you might find useful if you find yourself getting caught up in the details too soon.
TIP: To see my full rendering process, and learn about many more tips and techniques (such as using Liquify to fix proportions or Adjustment Layers to boost contrast) make sure to watch the full video.
How to Paint Realistic Eyes with Acrylic (Step-by-Step Guide)
A step-by-step easy tutorial on painting a realistic eye using acrylic paint for beginners
In this post, you’ll learn how to draw every part of the eye, incorporate basic techniques to block in your eye shape, add a base color, create shadows and highlights, and creating fine details for a stunning, realistic looking eye using acrylic paint.
Disclaimer: some links used in this post are affiliate links, which means I’ll earn a small commission if you purchase using my links at no extra cost to you. I only recommend products I think will be helpful to you and bring you one step closer to creating beautiful acrylic masterpieces!
Pin it for later! ⤵
Supplies You’ll Need for Painting a Realistic Eye
Paint Supplies:
Paint Brushes:
How to Paint a Realistic Eye with Acrylics Step By Step Tutorial
Step 1: Draw in the Basic Shapes of the Eye Shape
Whenever you start any painting, an important part is using a reference photo and drawing out the basic shapes first as a way to plan out your composition and give you a little guidance as you paint. So, let’s begin drawing in the eye socket.
The first step is to draw in the upper portion of the eyeball. Space out about 5-6 inches from the top of your canvas and using a brown or dark red colored pencil, create a downward curved line. I usually leave 3-4 inches of clearance on both the right and left side of the line.
Next, we’ll create the tear duct, which looks like a “c” shape coming out on the left portion of the curve.
Once you’ve established your tear duct, connect the tear duct to the right portion of the eye line, by creating a curved horizontal line. You’ve just completed your first part of drawing an eye (pat yourself on the back, baby!)
Now it’s time to add in the eye fold, which is simply a curved line about 2-3 inches above the top of the eye. Simply follow the curve of the eye until you reach the other end of the eye.
In addition, add a tiny waterline on the lower lid (about 1″). Begin on one side of the eye and follow the bottom line curve and taper the line width to the tear duct.
It’s time to add the iris. The rule of thumb here is that the iris is about 1/2 part the eye width, with 1/4 part space on either side. Draw in two curved lines from the top eye line to the bottom eye line – this will form the edges of the iris.
At the center of the iris, add a smaller circle representing the pupil. You can vary the size of the pupil as you see fit.
To help plan out where the eye highlights are, add a sideways triangle with the point centered at the pupil.
Let’s add in where the lash line will go. Place your pencil about 0.5″ below the top line and follow the curve of the line to the end of the eye line.
Now, we’ll add a small curved line a few inches to the right of the tear duct. This will create the eye shape boundary (and adds that hint of realism).
Right next to the eye boundary add another curved line in the opposite direction, forming the tear duct.
Finally, draw a few fine curved lines under the bottom of the eye. This will be used later when we are painting the more detailed parts of the skin around the eye.
Step 2: Paint in the Skin Around the Eye
Mix unbleached titanium white with a tiny bit of yellow and load it onto your flat brush. Proceed to paint the surrounding skin around the eye, using slightly curved horizontal strokes.
Step 3: Paint the Iris Color
In this step, we’ll be filling in the iris, which is usually a bright color. Choosing the desired color you like, load it onto your rinsed, wet flat wash brush. Proceed to block in the iris color.
Using a rinsed flat wash and the skin color (unbleached titanium white + a bit of yellow), paint in the waterline of the eye.
Step 4: Paint the Skin Shadows
Mix together unbleached titanium white, red, blue and titanium white to create a darker skin tone. Using your flat wash brush (un-rinsed), proceed to add curved horizontal strokes along the eye fold area, following the shape of the eye.
Tap your brush into water (but not in paint) and proceed to blend the shadows into the skin color.
Repeat this process for under the eye in several places like near the tear duct and at the eye corners.
Step 4: Paint the Skin Highlights
Mix unbleached titanium white with a bit of white and make sure to load your flat wash brush with a bit of paint (not too much). Proceed to lightly dry brush the color starting from above the tear duct to a bit halfway over the eye flap.
With the same color, switch over to your round brush and add several strokes along the upper portion of the eye as well as under the eye near the tear ducts.
Proceed to add more strokes at the rightmost eye corner as well as the waterline, bringing everything to a point.
Using your flat wash brush dipped in a bit of water, blend out the skin highlights following the same horizontal curved strokes.
Step 5: Add Eye Ball Shadows
With your rinsed round brush, mix small amounts of blue and red with a bit of white to create a darker shade of color. Then, add the color to the tear ducts and to the rightmost bottom edges of the eye as a dark layer.
With the same brush, lightly add some fine lines around parts of the eye fold and waterline.
Step 6: Paint in the White of the Eye
With a rinsed round brush dipped in white, add in the whites of the eye. Doing this softens the eye ball shadows to help give it more depth.
Step 7: Paint in the Darker Parts of the Iris
With a rinsed round brush dipped in green, proceed to add a darker color to the perimeter of the iris.
Take your brush and dip it in water (do not reload with paint). With your brush, go to the edge of the green stroke you just painted and using the brush tip, spread out the color bringing it toward the center of the eye. Repeat this for the other side of the pupil.
Step 8: Add Eye Color Highlights
With your rinsed flat wash brush, mix together yellow with a hint of green to create light tones. Starting at the center of the eye, place your brush broad side down and create straight lines going out to the iris edge. You don’t have to do too many of these but just enough to go full around the entire pupil.
With your un-rinsed flat wash brush, grab more yellow, and repeat the same strokes as above to add more yellow highlights. You don’t have to go all around the eye or do too many strokes.
With your un-rinsed flat wash brush, grab white, and repeat the same strokes on the right portion of the eye.
Step 9: Add Eye Color Flecks
With your shader brush (or flat wash), load it with green and using just the tip, lightly paint thin lines emanating from the center of the iris to the iris edge. Vary the line heights for an added organic look.
Step 10: Add Eye Highlights
With a flat wash brush, load with white and add a large white highlight to the upper left portion of the eye as well as the lower right portions.
Step 11: Paint in the Pupil
With a small brush (detail round is my preference) dipped in water and loaded with black, paint in the pupil at the eye center.
Step 12: Paint in the Top and Bottom Lashes
With the same brush and paint, proceed to paint the upper lashes. Begin by holding your brush at the edge of the eye where it meets the eye fold, and create a slightly curved line moving up. Release the brush pressure as you do so to help thin out the line. Create one full line of lashes, increasing and varying the overall lengths as it goes to the rightmost eye corner.
Proceed to add more layers of eye lashes, especially concentrating them towards the middle and rightmost areas of the lash line. Be patient and just have fun layer the lashes. For added realism, vary the length of each lash as well as slightly varying the directions.
Add the lashes to the lower eyelid lash line. Starting toward the middle of the eye at the water line, create short curved strokes that point down, making sure to relieve pressure as you do so. Repeat this process as you add more lashes to the rightmost edge of the eye, making sure to increase the lash length as well.
Also, be sure to vary the orientations of the lashes to help create more realism.
Step 13: Add more highlights at pupil and iris
With your rinsed detail brush loaded with white paint, lengthen the eye highlight to overlap the pupil as well as adding a few more white highlights to the rightmost portion of the eye.
Step 14: Thicken lash line & layer on more lashes
With your rinsed detail brush loaded with black, thicken the lash line to create a more “heavier” looking mascara. You can also add more lashes at this point too.
Step 15: Paint in upper iris shadow
With your flat wash brush, load it with a mix of green and blue to create a darker green. Proceed to add a dark shadow on the upper portion of the iris (this helps imitate the shadow created from the upper eye fold.
Step 16: Paint darker eye flecks
With a round or shader brush, use the same dark green color to add a few tiny lines going around the iris. Vary the lengths and starting points as you do this to create a more organic eye color specks.
Repeat this with your detail brush and black paint for added contrast around the pupil. A little goes a long way.
Step 16: Paint dark outline around iris
With your detailed brush and a little bit of black, make a tiny outline around the entire circumference of the iris using very little pressure.
Step 17: Step back and admire your work, Queen
Once you’ve applied your finishing touches, you’ve got yourself a realistic eye painting that you can stare at (and with) adoringly for hours on end. Beauty is in the EYE of the beholder *wink wink*.
JOIN THE VIRTUAL INSTRUCTOR
Get ALL of our courses, ebooks, live lessons, critiques, lesson plans and more today.
Taking Advantage of Oils
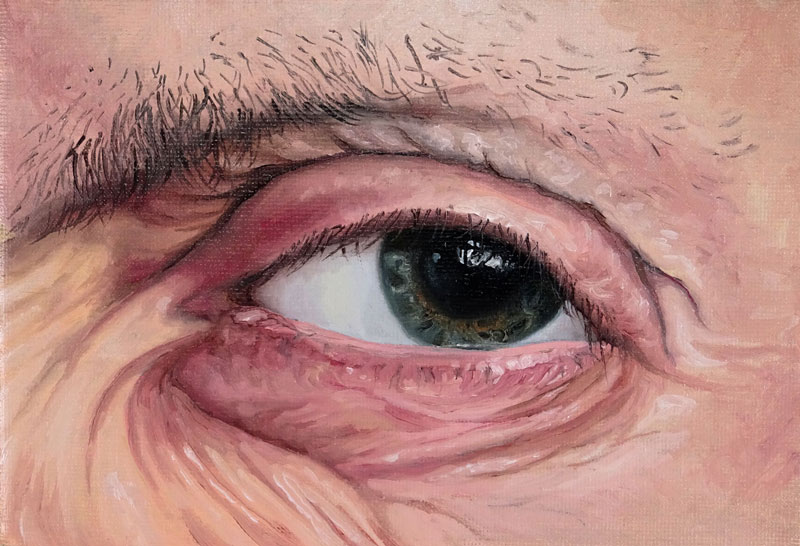
In this lesson, we’ll take a look at how to paint a realistic eye using water mixable oil paints. Although we are using water mixable oil paints in this demonstration, the techniques applied here can be used with any opaque painting media.
We will take full advantage of the characteristics of oils, which dry dramatically slower than water-based media such as acrylics. This allows us to work the paint applications, adjusting the values and colors while the paint remains wet on the surface. This gives us full control over the details that we develop and the relationships of the colors and values.
The Benefits of Water Mixable Oil Paints
Water mixable oil paints are real oils. But unlike traditional oil paints, water mixable oil paints can be thinned with water instead of traditional paint thinners that produce fumes. Water mixable oil paints can be used in combination with traditional oils and mediums. They are an excellent choice for those wanting to take advantage of the benefits of traditional oils but may be turned off by the fumes produced by paint thinners.
Materials and Surfaces
In this lesson, most of the colors used are Artisan paints by Winsor and Newton. The only exception is the flesh tone which is made by Reeves. Here’s a list of the colors that are used in this demonstration:
Water mixable oil paints can be used on any surface that accepts paint applications. For this lesson, a small stretched canvas is used but other acceptable surfaces include paper, wood (masonite), linen, or burlap.
Initial applications are made by thinning the paint with water. But as we begin to refine the details, we’ll switch over to using medium with the paint. The medium used in this demonstration is 50% linseed oil and 50% paint thinner.
Medium allows us to adjust the viscosity of the paint, making it easy to spread over the surface. This gives us more control over our brushstrokes and the option to use translucent glazes, if desired.
Step By Step
We’ll create a small painting measuring just 7″ x 5”. This canvas has been primed using a combination of Raw Umber and Titanium White with acrylics.
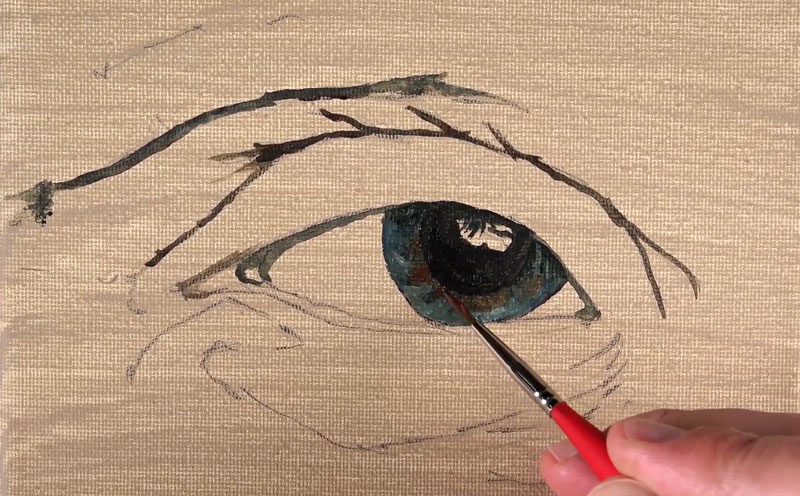
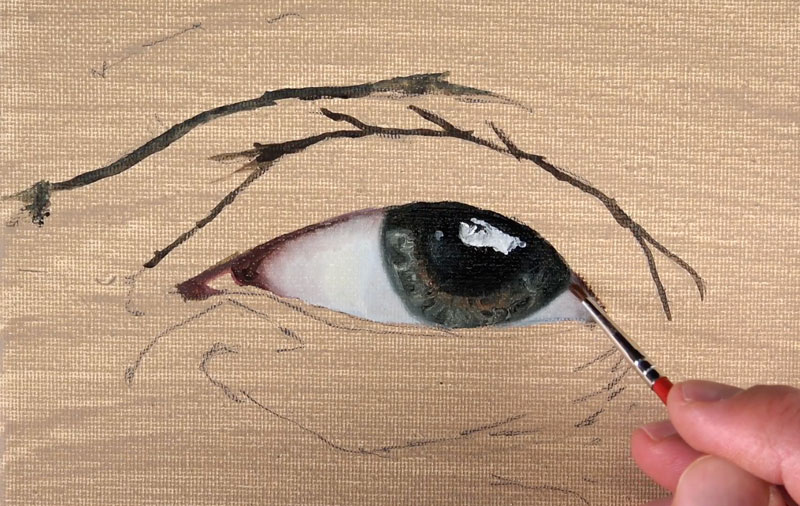
We’ll start with the darkest area of the pupil and use a mixture of Burnt Umber and Prussian blue. This will create a more natural black and help us to establish some of the darker tones early in the painting.
Adjusting the values is where the magic happens. We’ll gradually start adding a bit of white to lighten up some of the tones and also continue to add a bit of the Burnt Sienna in areas. We can begin gradually getting lighter, increasing the contrast and also bringing out some of the patterns of the iris.
We can continue pushing the contrast even further by adding additional areas of darker value, again with a mixture of Prussian Blue, Burnt Umber, and a touch of Olive Green. As we go, we’ll consider the brushstrokes that we make. In some areas, we’ll pull the strokes outward from the pupil towards the outer edges of the iris. In other cases, the lines that we see in the iris may actually flow horizontally.
It’s important not to rush this process. Be patient and allow the contrast between values to develop. Ultimately this will create the illusion of the details that we see. We’ll continue to push the contrast, again adding darker areas as well as lighter ones.
With a smaller brush, we can add some of the small details within the iris. We’ll continue going back and forth with our Burnt Sienna, which is found mainly around the outer edge of the pupil.
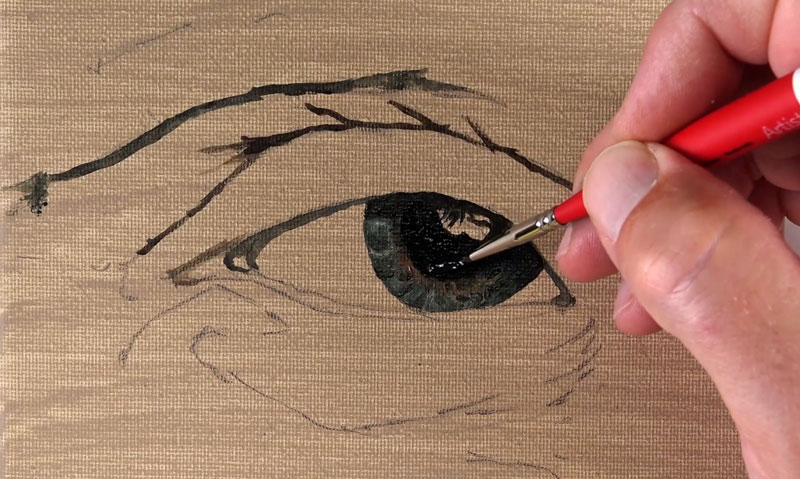
Going back to our pupil, we can add another layer of our mixture of Prussian Blue and Burnt Umber, this time adding a heavy application.
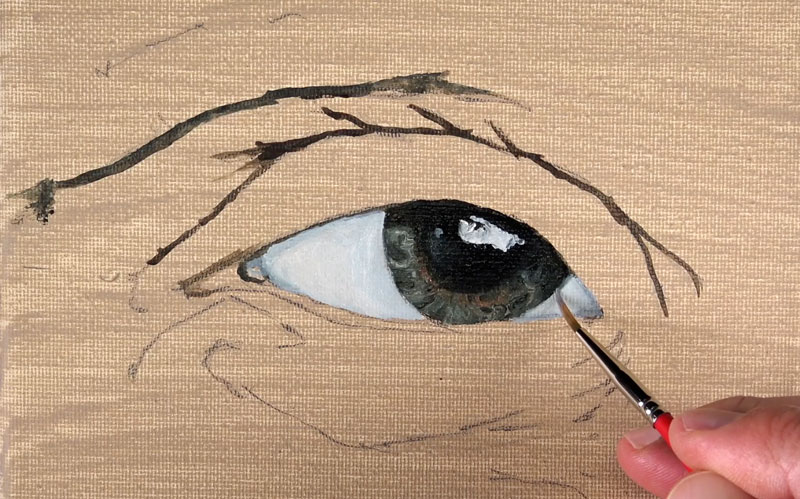
Next we can begin addressing the white parts of the eye. The white parts of the eye are usually not white. In most cases, there is quite a bit of variation within these sections. First, we’ll cover the area with an application of Titanium White. Some of the darker tones that we added initially will naturally mix with this application.
To make the white parts of the eye appear more natural, we’ll add a bit of Flesh and a touch of Cadmium Yellow to the Titanium White.
We will also add a strong highlight over the pupil. We’ll refine this shape in a moment, but for now we’ll just get it in place.
Using a combination of Alizarin Crimson and Burnt Umber, we’ll address the tear duct in the left corner. This darker tone is also pulled underneath the upper eyelid to create a slight indication of shadow. We should expect some blending and mixing to occur with the white applications. To smooth these transitions, we’ll use a soft, dry sable brush to blend the wet paint.
We can then refine the highlights on the pupil by adding a bit of our mixture of Burnt Umber and Prussian Blue. The brushstrokes applied with this mixture reflect the shadows produced by the eyelashes. We can also add a slight highlight to the left side of the pupil. This highlight should be very subtle and blended in with the darker tones of the pupil.
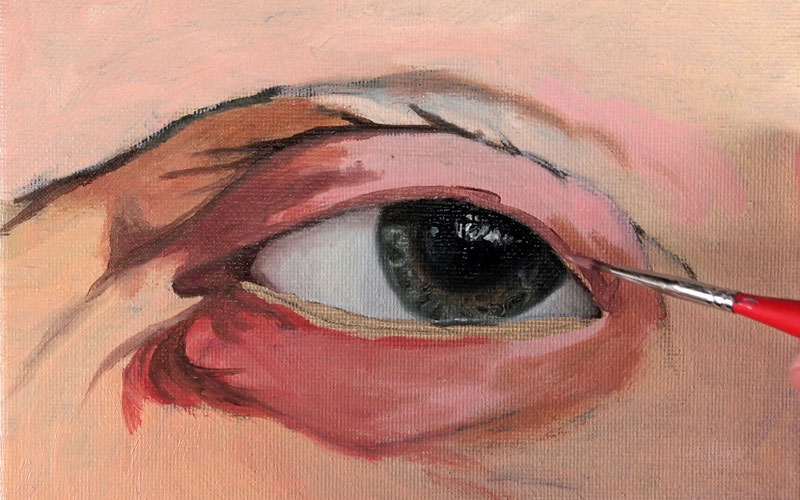
Next, we can begin quickly filling in the larger shapes of skintone around the eye. The value and hue of the skintone changes in different sections around the eye, but the same combination of colors is used. The mix of colors used here include Flesh, Burnt Umber, Cadmium Red, Alizarin Crimson, Cadmium Yellow, and Titanium White. We can adjust the value and the hue by changing the concentration of the specific colors used. For darker tones, more Burnt Umber is used. For lighter ones, more Titanium White is applied.
We will be sure to use a darker value underneath the upper eyelid. This will create the impression that the eyelid is three-dimensional with a slight shadow underneath.
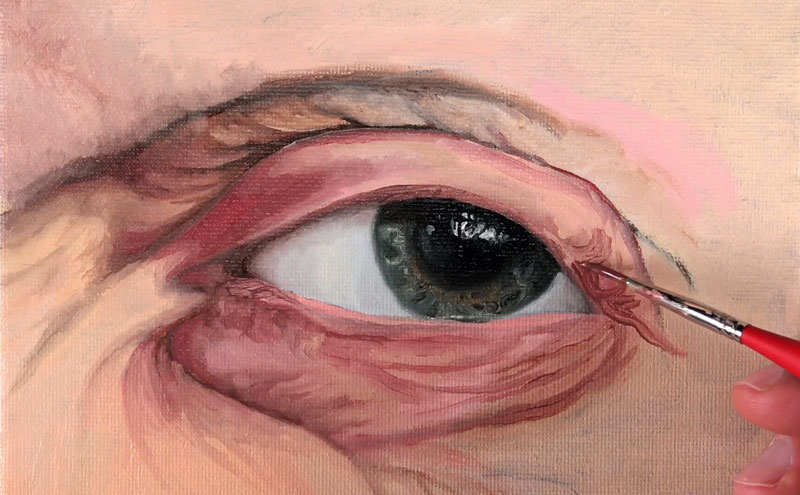
We’ll continue to adjust the values and the hues to develop the details and wrinkles found in the skin around the eye. The forms around the eye protrude and recede. To create this illusion, we’ll pull brushstrokes in the direction of each form. This means that the brushstrokes should flow over the cross contours of each form. In the areas that have wrinkles, the direction that the brushstrokes should flow are fairly obvious.
By adjusting the value relationships, we can gradually develop the illusion of each of the wrinkles and the details. We will add darker values using a combination of Burnt Umber and our mixed skintone. We can then go back and add lighter values in between, using a mixture of our skintone and Titanium White with a touch of Cadmium Yellow.
It is important to be patient throughout this process. But as we continue to develop the value relationships, our wrinkles and the form of the face around the eye begins to take shape.
As we develop the values and colors, we can go back with the clean soft sable brush and blend transitions of color and value. In many cases, softening the transitions will lead to a more realistic image.
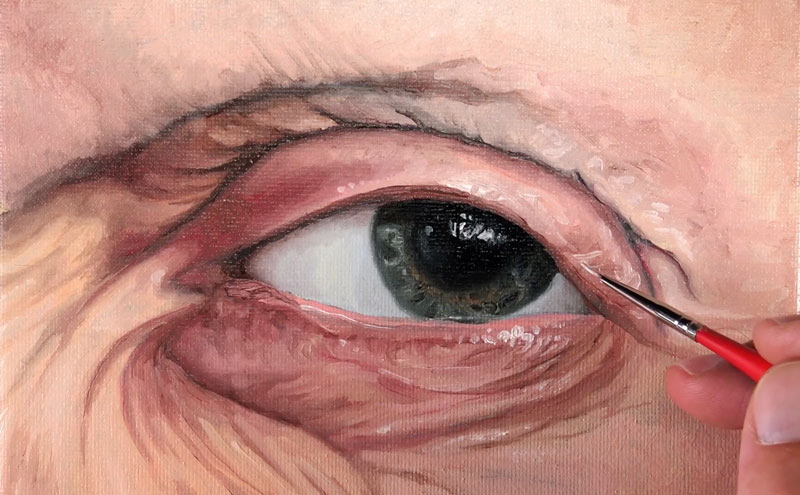
After blending, we can continue to add dark and light values. Some strong highlights are added on the bottom portion of the eye just underneath the bottom eyelid. We will also add a strong highlight in the center of the upper eyelid, where it protrudes the most. If these applications are too strong when added, simply blend them using the soft sable brush.
Subtle changes in value are added in various locations around the eye using the smaller brush. This gives a subtle indication of imperfections, which are found on any face. Including subtle imperfections increases the illusion of realism in the painting.
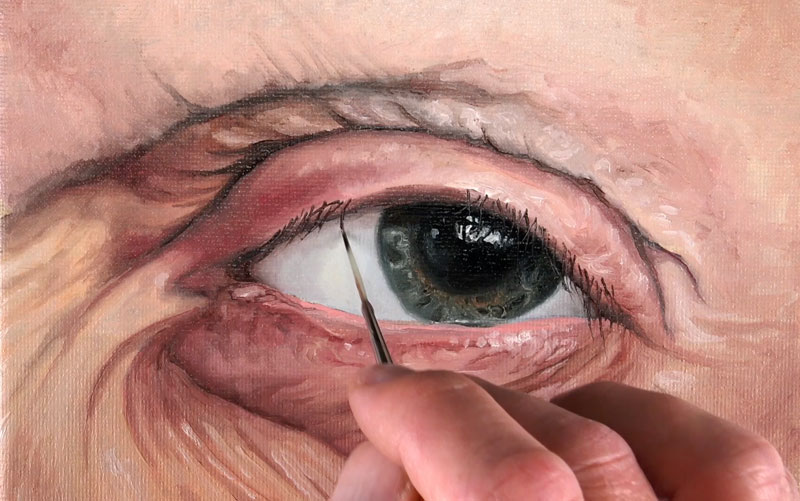
Once the skin has been developed, we can begin adding the eyelashes. Since we need to be precise with our brushstrokes, we will use a rigger brush (script liner) to apply the color. This brush holds an ample amount of pigment but allows us great control in producing defined lines.
A dark mixture of Prussian Blue and Burnt Umber is used to produce a more natural black. Quite a bit of medium is used with this mixture to increase the viscosity and aid in the flow of the paint over the canvas.
Our brushstrokes should be deliberate. We can pull them out just as they grow from the upper lid. Be sure to include some variety in your stroke, allowing some of the strokes to turn slightly. Each eyelash will vary in length and direction.
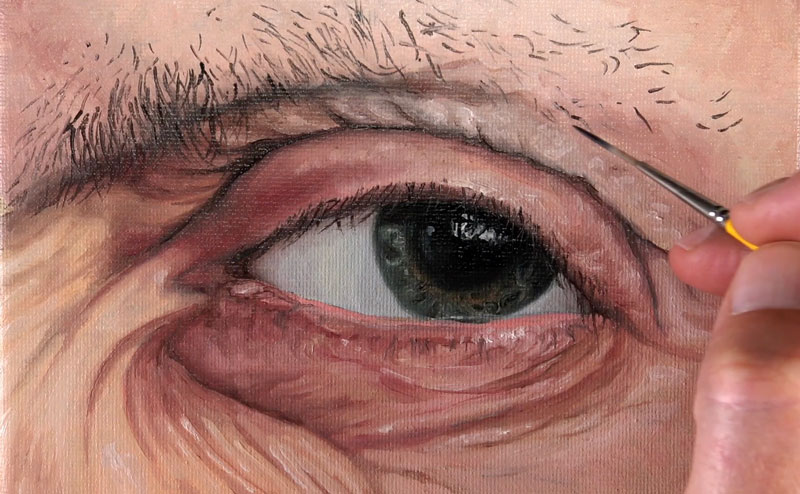
Many times, we can add the eyebrow with just a few simple strokes. In this particular subject however, the eyebrow is quite sparse. Because of this, we will address the eyebrow in the same manner that we addressed the eyelashes. We will simply pull out strokes as the hair grows from the browline. We’ll use the same mixture of Prussian Blue and Burnt Umber for the hairs of the eyebrow.
As the eyebrow extends out on the right side, the hairs become more sparse. For this reason, shorter strokes are used. It is encouraged to include a bit of variety in the length of stroke and the intensity of the color used.
After making a few adjustments to the bottom eyelid, darkening the value slightly, our painting of an eye is now complete.
How To Paint A Realistic Eye
How To Paint A Realistic Eye
11:35 15.24 MB 1.5M
How To Paint A Realistic Eye In Acrylic By JM Lisondra
01:36:10 126.56 MB 2.6M
How To Paint An Eye With Acrylics START PAINTING With This Tutorial
12:01 15.81 MB 67.8K
OIL PAINTING DEMONSTRATION 1 How To Paint An Eye
14:11 18.67 MB 2.1M
How To Paint A Realistic Eye
24:42 32.51 MB 21.3K
HOW TO PAINT A REALISTIC EYE ACRYLIC PAINTING BY CHRIS KEMPTER
15:53 20.90 MB 9.5K
How To Paint A Realistic Eye
16:20 21.50 MB 13.7K
How I Paint A REALISTIC Eye OIL PAINTING TUTORIAL
10:53 14.32 MB 74.2K
ART LESSON How To Paint A Realistic Eyeball
09:37 12.66 MB 30.1K
How To Paint A Realistic Eye In Acrylics Time Lapse
03:45 4.94 MB 33.5K
IPAD PAINTING TUTORIAL Paint A REALISTIC Eye With Me
38:44 50.98 MB 37.3K
Realistic Eye Painting For Beginners How To Paint In Acrylics
11:41 15.38 MB 71.4K
How To Paint A Realistic EYE Process Video
01:42:13 134.52 MB 7K
Do S And Don Ts Of Realistic Eye Painting Art
07:35 9.98 MB 738.1K
How To Paint Realistic Eyes With Spray Cans
24:15 31.91 MB 24K
REALISTIC EYES Painting
07:55 10.42 MB 37K
How To Paint A Realistic Eye With Watercolor
14:54 19.61 MB 142.5K
Painting A Realistic Eye Episode 194
05:53 7.74 MB 1.5M
How To Paint Realistic Eye In Watercolor Realtime Beginner Tutorials
17:33 23.10 MB 13.1K
IPAD PAINTING TUTORIAL You Can Paint A REALISTIC EYE
48:29 63.81 MB 21K
How To Paint A Realistic Colorful Eye Using Acrylic Paints
50:42 66.72 MB 10.7K
How To Draw A Realistic Eye Painting In Dry Brush Speed Drawing Malen Zeichnen
04:36 6.05 MB 10M
Beginner Learn To Paint Realistic Eye In Acrylic TheArtSherpa
01:10:54 93.31 MB 236.8K
How To Paint A Realistic Eye With Oil Color
08:04 10.62 MB 180.1K
Painting A Realistic Eye In Acrylics Study Sunday Episode 3
How To Paint A Realistic Eye In Watercolor
35:03 46.13 MB 83.5K
I Painted A Magnified Eye Oil Painting Time Lapse
06:13 8.18 MB 497.6K
How To Paint An Eye Using Acrylics Painting For Beginners
02:31 3.31 MB 263K
How To Paint REALISTIC EYES Acrylic Painting
04:13 5.55 MB 4.6K
How To Draw Eyes In Digital Painting Semi Realistic Eyes Tutorial
06:59 9.19 MB 34.5K
How To Paint A Realistic Eye Painting A Detailed Eye Using Acrylics
05:06 6.71 MB 6.9K
MUST TRY Method Painting Realistic Eyes In Acrylic
16:03 21.12 MB 2.7K
HOW TO PAINT REALISTIC EYES TUTORIAL Heath Ledger Joker
06:36 8.69 MB 20.2K
Realistic Eye Painting With Acrylics On Paper Shorts
25 561.52 KB 8.6K
How To Paint Realistic Eyes Nose And Lips With Oil Paint The Basics Of Oil Painting 2
10:33 13.88 MB 9.5K
How To Paint A Realistic Eye In Acrylic Eye Painting Tutorial For Beginners By Debojyoti Boruah
09:20 12.28 MB 4.2K
PAINTING ULTRA REALISTIC EYES ON MINIATURES THE ULTIMATE GUIDE 2020
17:45 23.36 MB 20K
How To Paint A Realistic Eye Using Acrylics Part 3 BornAdroit
21:46 28.65 MB 508
REALISTIC EYES OIL PAINTING PORTRAIT ART DEMO Annotated Tutorial
20:34 27.07 MB 92.5K
152 FLUIDART EYE STEP BY STEP Painting Tutorial Art Acrylicpouring Painting
15:13 20.03 MB 1.3M
How To Draw A Realistic Eyes In Procreate Procreate Art Howtodraw Painting
31 696.29 KB 4.7K
Digital Painting How To Paint Realistic Eye Using Krita And Huion Pen Tablet
20:54 27.51 MB 17.8K
How To Paint A Realistic Eye Coloring Tutorial
04:53 6.43 MB 8.1M
How To Paint Realistic Eyes
06:37 8.71 MB 22.8K
How To Draw Realistic Eye Step By Step Easy To Follow
01:28:12 116.08 MB 0.9M
How To Paint Realistic Eyes That Will Make Your Art Look Alive MSM 11
05:43 7.52 MB 68.5K
How To Paint A Realistic Eye With Oil Or Acrylic
08:15 10.86 MB 403
Sculpting Painting A Realistic Human Eyeball With ZBrush
17:21 22.83 MB 35.2K
REALISTIC EYE TEARS ACRYLIC PAINTING How To Paint Eye Drops
13:04 17.20 MB 15.7K
Для вашего поискового запроса How To Paint A Realistic Eye мы нашли 50 песен, соответствующие вашему запросу. Теперь мы рекомендуем загрузить первый результат How To Paint A Realistic Eye который загружен HowToBasic размером 1.34 MB, длительностью 1 мин и 1 сек и битрейтом 192 Kbps.
Слушают сейчас
How To Paint A Realistic Eye
How To Pronounce Chopunnish American English
Веза Велла Дагна
Rick And Morty Type Beat
Little Swing Rocky Yueling
Space Song Speed Up
Тамара Тамара На Табасаранском
Ярослав Смаль Белое Вино
Пусть Шторм Бушует А Пламя Горит
Ring Dinge Ding Из Тик Тока
Davit Hakobyan Pape Xurban
Osmanthus Wine Zhongli
На На На На Нанана Поет Девушка
Selka Olish Videolar
Сакит Самедов Новинка Свадьбе Зажигает
Look At All The Lonly People Tik Tok
Пока Пора Завтра Будет Лучше Чем Вчера Speed Up
Красивый Мужчина Мужчина Красивый Тик Ток
Тут Помощник Нужен Homo Sapiens Кф Формула Любви
Помогает Водка Заглушает Никотин
Вадим Захаров 26 Песен Первый Концерт Вадима В Гнезде Глухаря
Sardor Mamadaliyev Do Stga Nasihat Music Version
Сайхан Гериханов Хьо Са Дуьне Ма Ду
Tiktok Compilation Boom Boom Challenge 2021 Part 22
Дора Дура Растения Против Зомби Mashup
Красивая Турецкая Песня Деря Уркмез Рафет Эл Роман Унутурум Элбет
Трек C One X Shoh Инстакоролева C One X Shoh Instakoroleva 2021
История Про Казахского Друга Досика Евгений Чебатков
A Wall Loverboy Lyrics Yo Bro Who Got You Smiling Like That
Владус Х Лёня 5 Миллионов Песня Клип Майнкрафт 2022
Evolution Of Squid Game Squidgame Evolution Shorts
Гр Ассорти Зачем Это Лето
Morgenshtern Show Bass Boosted
Safari Джек Воробей Компас На Клад Tiktok Remix Tiktok Mix
Aram Shaida Digi Digi Maso
Completed Скованные Одной Цепью Countryhumans Pmv Map
Nightmorss Secret Андеграунд Slow Tik Tok Music Slow
Lady Gaga Government Hooker Speed Up Best Part Loop Fyp Trending Speed Ladygaga
King Crimson 21St Century Schizoid Man Marquee 1971 Sbd
Copyright ©Mp3crown.cc 2019
Все права защищены
На нашем музыкальном сайте вы можете бесплатно прослушать и скачать любимые, новые и популярные mp3 песни в хорошем качестве. Быстрый поиск любой композиции!
Почта для жалоб и предложений: [email protected]
How to Paint a Realistic Eye with Pastels
JOIN THE VIRTUAL INSTRUCTOR
Get ALL of our courses, ebooks, live lessons, critiques, lesson plans and more today.
This lesson is a step by step approach to painting (or drawing) an eye with pastels. If you’re interesting in exploring the basics of drawing an eye with pencil, please have a look at the following lesson.
This is unfortunate because many miss out on the satisfaction that can come from a medium that might be «the perfect fit» for them. I say all of this, because this was true for me.
I shunned color media for a long time because it was uncomfortable for me. It wasn’t until I found pastels and worked with them for a while that I changed my tune.
The Materials Used In the Painting
(Some of the following links are affiliate links which means we earn a small commission if you purchase at no additional cost to you.)
For this demonstration, I used Rembrandt Pastels. These are premium pastels, but mid-level pastels can be used as well. Rembrandt pastels are vibrant in color, less dusty, and cover exceptionally well.
The set that I am using includes 30 half stick pastels and 15 full stick pastels.
The pastels come encased in a sturdy box that features foam grooves to hold the pastels. Having used mid-level pastels for quite a while, the quality of the Rembrandt pastels is noticeably different.
The surface that I am working on is Mi-Tientes pastel paper by Canson. The tone of the paper is a cool gray. This color is chosen since it will contrast nicely with the oranges that are present in the skin tones. This paper features a coarse side with a «heavy tooth», which is considered to be the «front» of the paper. The «back» of the paper is less coarse, but not by much. Either side of the paper can be used. (I am using the «front»)
The Secrets to Drawing
The Secrets to Drawing is a comprehensive learning experience designed to guide absolute beginners and intermediate artists through the core foundations of drawing.
Here are the steps to painting an eye that were taken in this demonstration. Of course, there are more steps, but these are the major highlights.
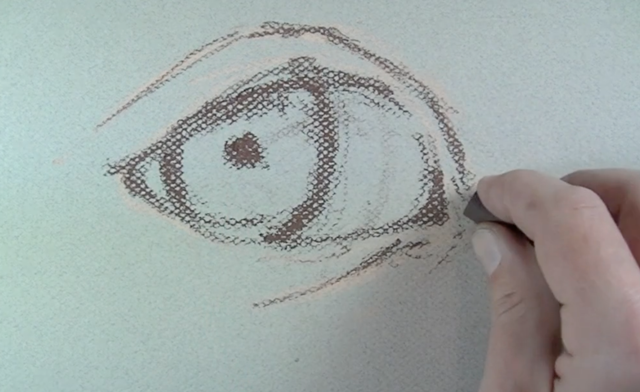
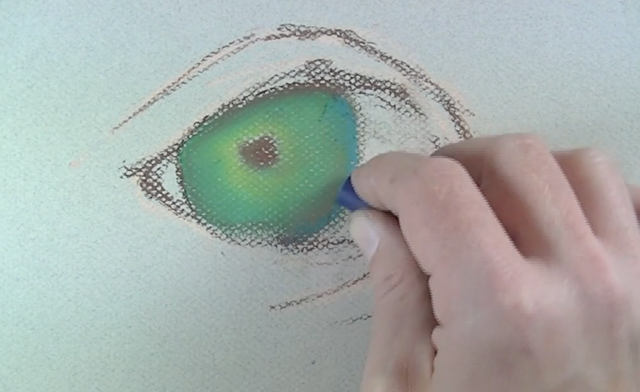
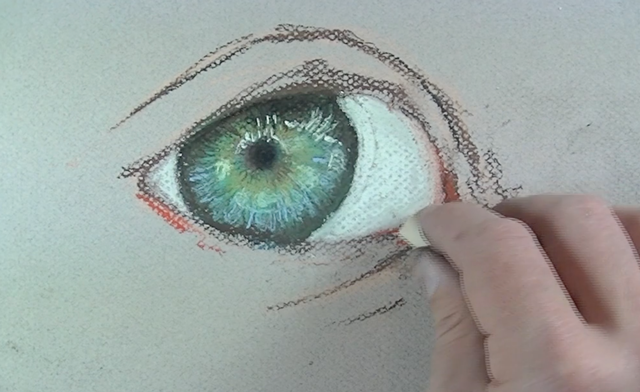
The first step is to lightly draw the contours of the shape of the eye. A skin tone color is used first, followed by a dark brown.
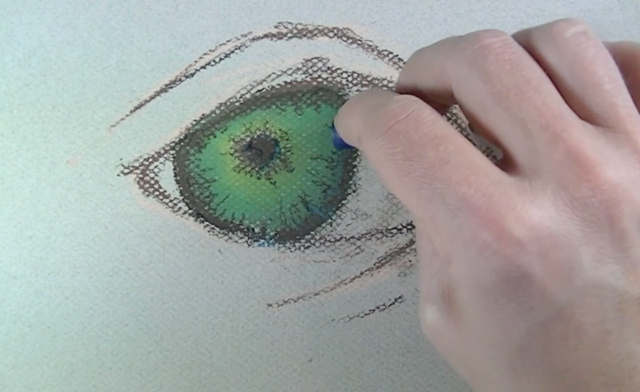
Next, the colors that are observed in the iris part of the eye are layered in. Blues, greens, and even yellow are all added and then blended in with a finger.
The next step is to layer some of the darker tones and values of the iris over the colors. A dark brown and blue are used for this. Layering is an important part of painting with pastels. By layering the colors, depth is created making colors become more realistic and believable.
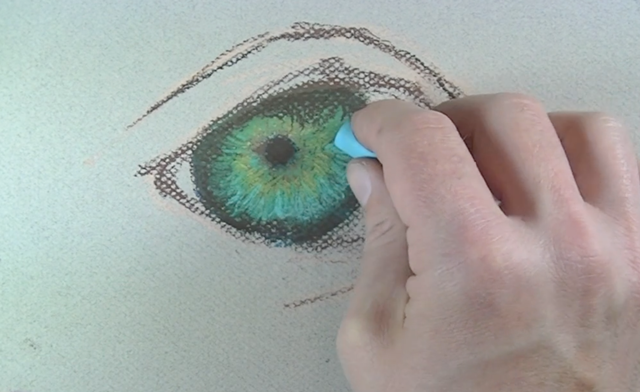
Additional colors are laid on top of the darker layer. This time, less smudging takes place. Instead, the color is layered directly on top without any mixing. Yellow-green and light blue is used for this.
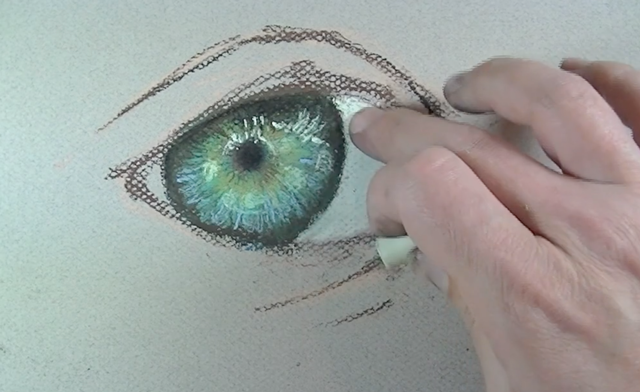
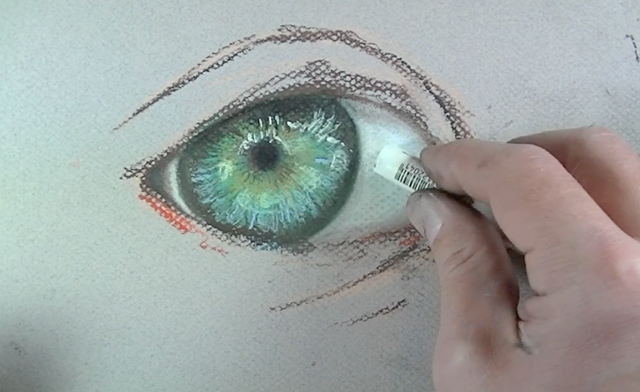
Highlighted areas are added on the iris using a light cream. This color is also used in the «white» parts of the eyes as well.
Next, marks are made with red-orange, red, and cream to begin to establish the edges of the eye.
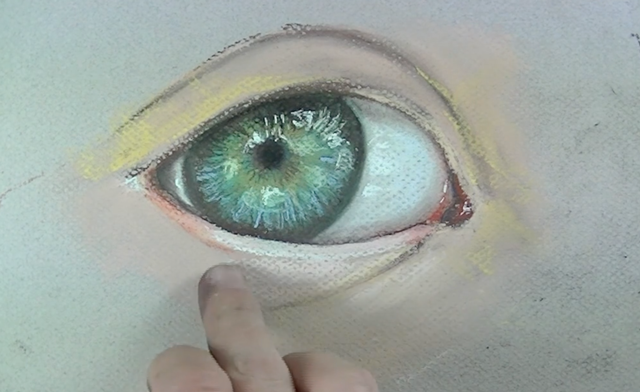
White is layered over the slightly darker «white parts» of the eye to create a highlight and make the eye appear «wet». White is also used over the iris as well for the same effect.
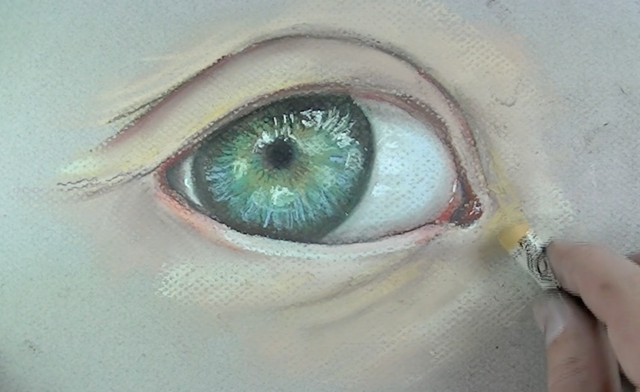
Skin tone colors are added around the eye and gently worked into the surface as they are applied.
Observed colors of the skin tones continue to be added and blended into the surface.
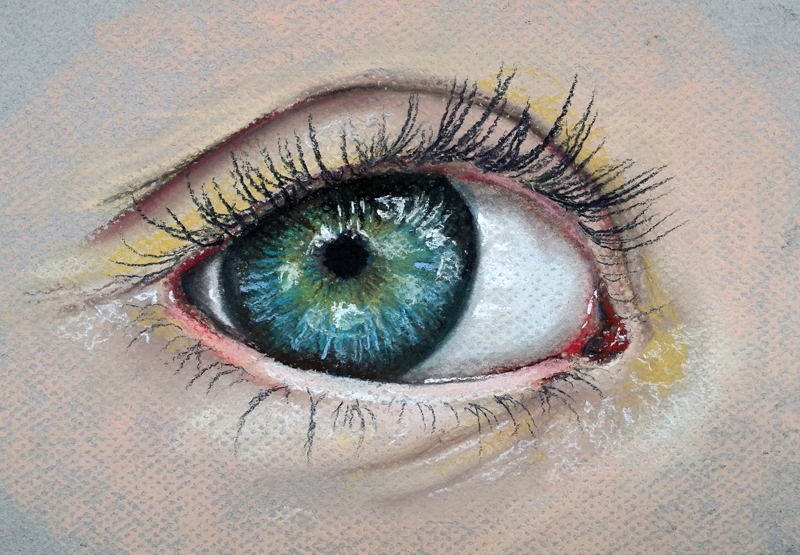
Lastly, the eyelashes are added using a sharp black pastel pencil.
Here’s a look at the completed image.
Working with pastels give you the best of both worlds. The finished result is definitely a painting, but the process is arguably very much like drawing.


