How to publish npm package
How to publish npm package
Как публиковать пакеты в npm
В статье мы рассмотрим 2 способа публикации пакетов в npm, первый и самый простой с помощью команды npm publish и второй не менее простой с использованием np
Создаем свой первый пакет
Чтобы опубликовать свой первый пакет на npm, вам необходимо выполнить следующие шаги:
Во-первых, вам нужно иметь учетную запись npm. Если у вас ee еще нет, создать можно здесь.
Во-вторых, вам нужно войти в свою учетную запись npm через командную строку. (Перед выполнением этого шага необходимо установить Node и npm в вашей системе).
Для входа вы используете npm login.
Вам будет предложено ввести имя пользователя, пароль и адрес электронной почты.
В-третьих, вам нужно создать пакет. Для этого создайте папку где-нибудь на своем компьютере и перейдите к ней.
Далее вам нужно инициализировать проект с помощью команды npm init.
Эта команда проведет вас через несколько вопросов и в конце создаст файл package.json. Этот файл package.json содержит все необходимое для публикации вашего проекта. (Не бойтесь пропускать вопросы, которые не имеют смысла).
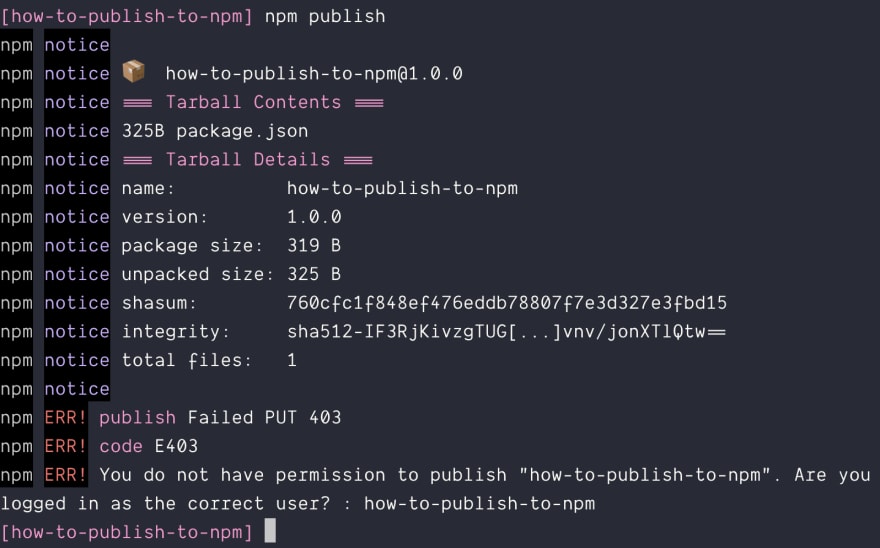
Если пакет уже существует в npm (поскольку ваш пакет имеет то же имя, что и другой пакет в npm), вы не сможете его опубликовать и получите ошибку.
Вам нужно будет изменить имя вашего пакета.
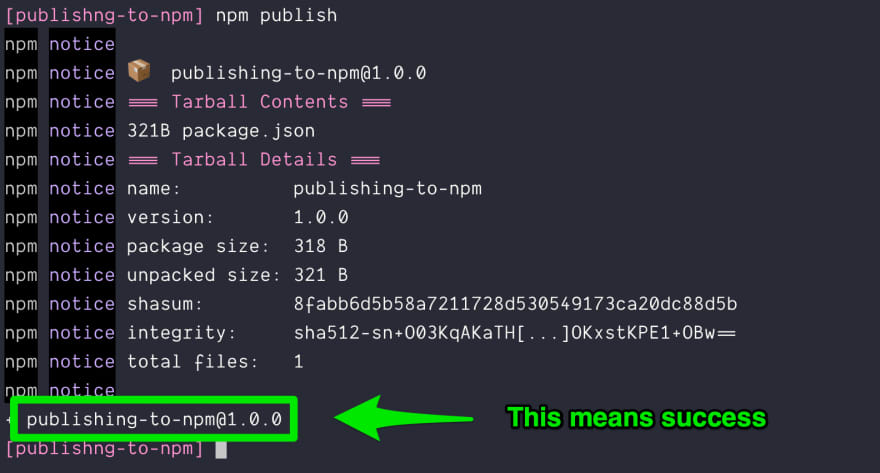
Чтобы изменить имя вашего пакета, нужно измените свойство name в файле package.json. Здесь я изменил его на publishing-to-npm.
(Вы можете проверить наличие конфликтов имен, выполнив поиск по npm или с помощью команды npm search).
Это также хорошая идея, чтобы обновить имя папки, а также для согласованности. Вот эквивалент командной строки.
Попробуйте снова команду publish.
Что делать, если каждое имя, которое вы придумали, уже занято
Чтобы бороться с этой проблемой, npm позволяет вам публиковать в scope. Это означает, что вы можете опубликовать пакет под своим именем пользователя (или организацией npm), чтобы избежать проблем с именами.
Чтобы опубликовать в scope, вы можете:
Если ваш репозиторий имеет scope, вам нужно немного изменить команду публикации:
Это все, что вам нужно сделать, чтобы опубликовать пакет в npm.
Теперь давайте перейдем к тому, как индустрия публикует пакеты.
Способ, которым отрасль публикует (и обновляет) пакеты.
Рассмотрим популярный фреймворк, такой как React. Если вы покопаетесь в React, вы заметите несколько вещей:
Во-первых, у React есть хранилище Github.
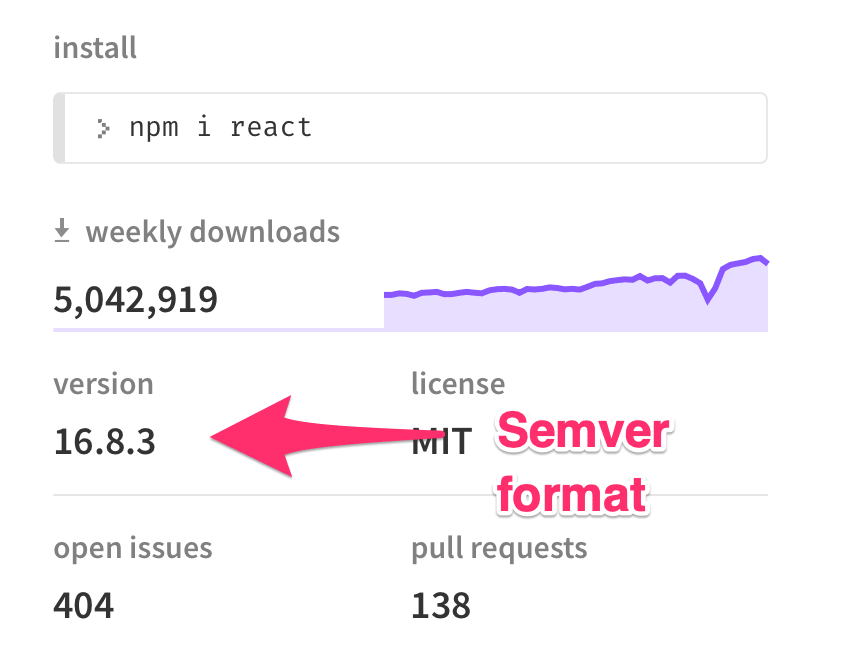
Во-вторых, React опубликован на npm.
В-третьих, React следует семантическому версионированию (для краткости Semver).
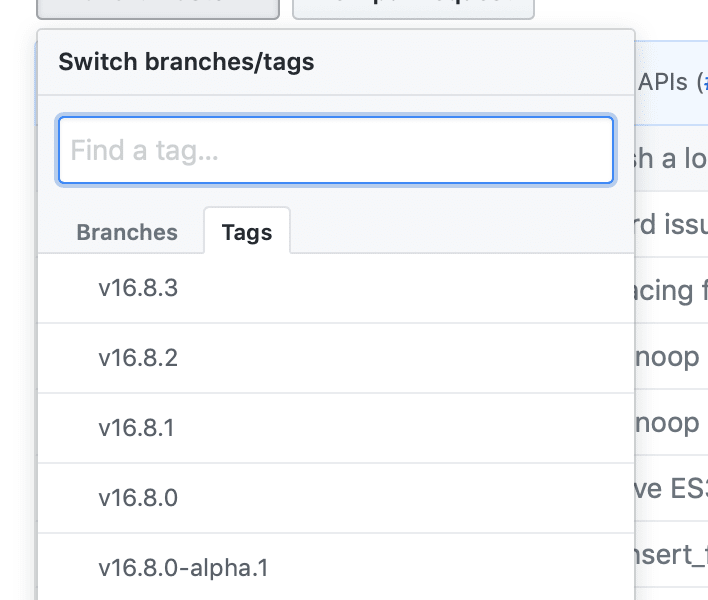
В-четвертых, с каждым обновлением React имеет связь с git тегом. Этот git тег также следует за Semver.
В-пятых, есть примечания к выпуску для каждого обновления React.
Это означает, что публикация пакета включает в себя много шагов. По крайней мере, вам нужно:
Обычно мы забываем один из этих пунктов, когда отправляем публикацию в npm. C помощью инструмента под названием np, можно избежать подобных проблем.
np (созданный Sindre Sorhus) облегчает нам публикацию пакетов, не пропуская ни одного из шагов, которые я подробно описал выше.
Установка
Чтобы установить np, вы можете запустить следующую команду:
Это работает. Но я предпочитаю устанавливать np глобально на моем компьютере, чтобы я мог запустить команду np где угодно.
Перед использованием
Перед использованием np вам необходимо убедиться:
Если ваш проект не имеет Git репозитория, вы получите эту ошибку:
Если ваш проект не имеет внешнего репозитория, вы получите эту ошибку.
Если ваш рабочий каталог грязный, вы получите эту ошибку:
Используем npm
Чтобы использовать np, вы запускаете команду np.
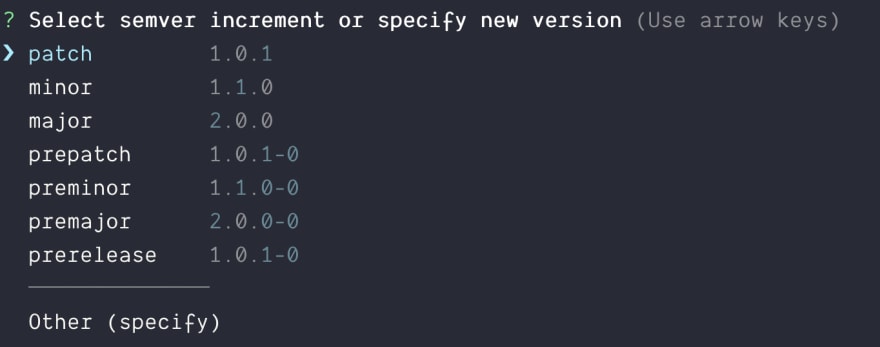
np предложит вам ввести номер Semver.
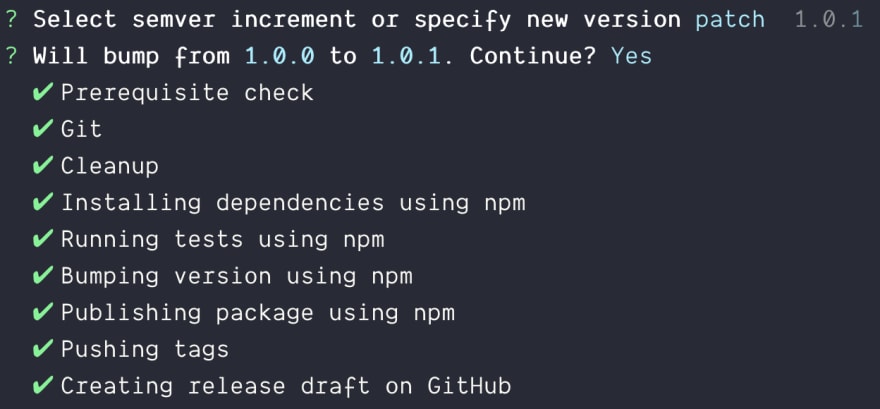
Выберите номер, и np попросит вас подтвердить свой выбор.
np делает остальную часть публикаций за вас.
Ошибка при запуске тестов
np выполняет команду npm test как часть своих проверок.
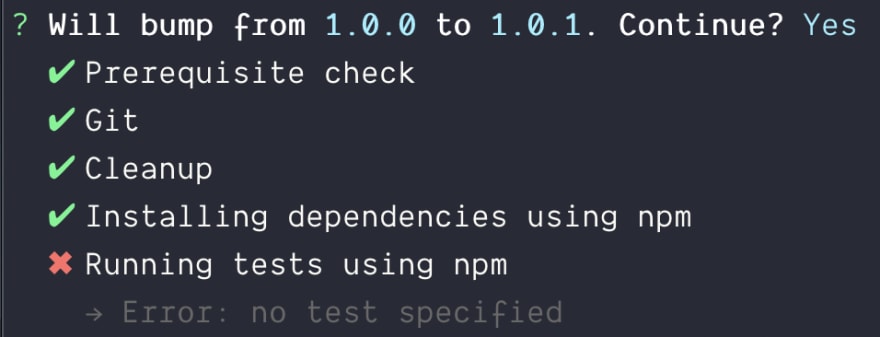
Если вы следовали этому руководству до этого момента, вы получите ошибку, которая выглядит так:
Это происходит потому, что наша команда npm test приводит к ошибке. Вы можете попробовать это сами:
Чтобы исправить эту ошибку, нам нужно изменить test скрипт в файле package.json.
Прямо сейчас это выглядит так:
Измените на это:
Это изменение работает, потому что exit 1 создает ошибку.
С этим изменением np должен завершить процесс публикации. (Не забудьте зафиксировать изменения перед запуском np).
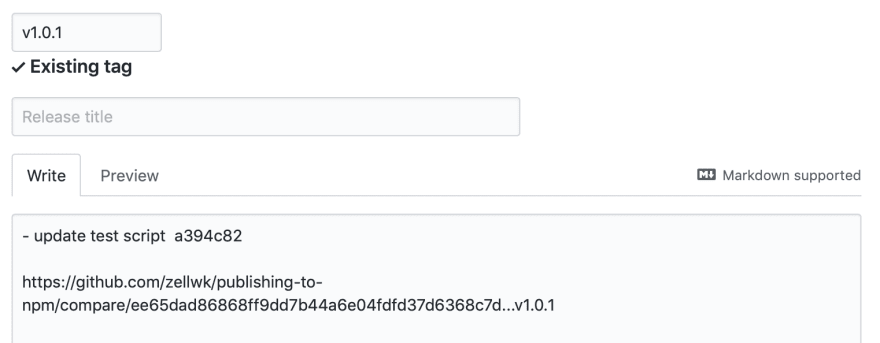
В конце процесса np запускает окно браузера, в котором вы можете написать свои замечания к выпуску.
Короче говоря, np делает публикацию пакетов намного проще!
How to create and publish an npm module
Introduction
In this tutorial, you will create your own npm package and publish it to the npm repository.
By doing this, you will understand:
To be precise, you will build a package that will return a list of GitHub repositories of the specified username sorted by the number of stars for each repository.
Prerequisites
You will need the following to complete this tutorial:
This tutorial was verified with Node v13.14.0, npm v6.14.4 and axios v0.20.0
Step 1 — Initial Setup
Create a new folder with the name github-repos-search and initialize a package.json file
Exit fullscreen mode
Initialize the current project as a git repository by running the following command from github-repos-search folder:
Exit fullscreen mode
Exit fullscreen mode
Install the axios package that you will use to make a call to the GitHub API.
Exit fullscreen mode
Your package.json will look like this now:
Exit fullscreen mode
Step 2 — Writing the code
Create a new file with the name index.js and add the following contents inside it:
Exit fullscreen mode
Let’s understand the code first.
Exit fullscreen mode
Exit fullscreen mode
Exit fullscreen mode
Then that result is sorted by descending order of stars so the first element in the list will be with the highest stars
Exit fullscreen mode
Exit fullscreen mode
Step 3 — Executing the code
Now, run the index.js file by executing the following command from the command line:
Exit fullscreen mode
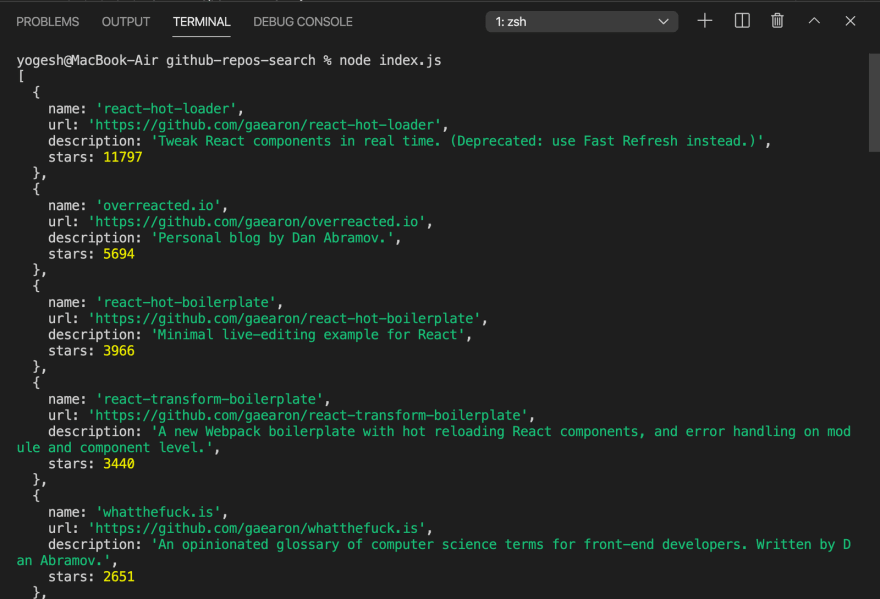
You will see the following output with the first 30 repositories:
In the file, you have not provided the username so by default my repositories are displayed.
Let’s change that to the following code:
Exit fullscreen mode
Run the file again by executing node index.js command and you will see the following output:
You can choose to pass the page and per_page properties to change the response to get the first 50 repositories.
Exit fullscreen mode
Now, you know that the functionality is working. Let’s export this module so you can call this getRepos method from any other file.
So remove the below code from the file
Exit fullscreen mode
and add the below line instead
Exit fullscreen mode
Here, you are exporting the getRepos function as a property of the object so later if you want to export any other function you can easily add it to the object.
So the above line is the same as
Exit fullscreen mode
Step 4 — Testing the created npm package using require statement
Now, you are done with creating the npm package but before publishing it to the npm repository, you need to make sure it works when you use it using require or import statement.
There is an easy way to check that. Execute the following command from the command line from inside the github-repos-search folder:
Exit fullscreen mode
Executing npm link command creates a symbolic link for your current package inside the global npm node_modules folder (The same folder where our global npm dependencies get installed)
So now you can use your created npm package inside any project.
Now, create a new folder on your desktop with any name for example test-repos-library-node and initialize a package.json file so you can confirm that the package is installed correctly:
Exit fullscreen mode
If you remember, the name property in our package’s package.json file was github-repos-search so you need to require the package using the same name.
Now, execute the following command from inside the test-repos-library-node folder to use the package you created:
Exit fullscreen mode
Create a new file with the name index.js and add the following code inside it:
Exit fullscreen mode
Here, you have imported the package directly from the node_modules folder( This was only possible because you linked it using npm link)
Now, run the file by executing it from the command line:
Exit fullscreen mode
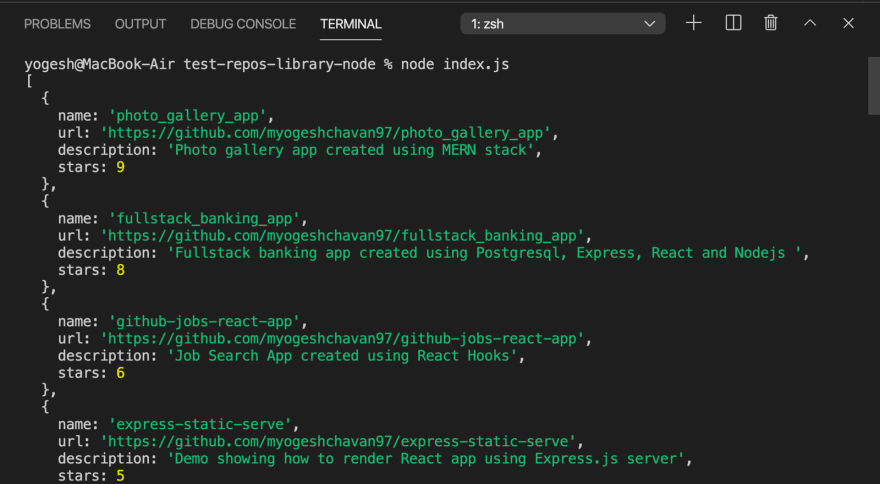
You will see the correct output displayed:
This proves that when you publish the npm package on the npm repository, anyone can use it by installing it and using the require statement.
Step 5 — Testing the created npm package using the import statement
You have verified that the package works by using the require statement. Let’s verify it by using the ES6 import statement.
Create a new React project by executing the following command from your desktop folder:
Exit fullscreen mode
Now, execute the following command from inside the test-repos-library-react folder to use the package you created:
Exit fullscreen mode
Now, open src/App.s file and replace it with the following content:
Exit fullscreen mode
Start the React app by executing the following command from the terminal:
Exit fullscreen mode
If you check the browser console, you will see the output as expected:
This proves that when you publish the npm package on npm repository, anyone can use it by installing it and using import statement.
Step 6 — Publish to the npm repository
Now, you have verified that the package is working fine.
It’s time to publish it to the npm repository.
Switch back to the github-repos-search project folder where you have created the npm package.
Let’s add some metadata in the package.json file to display some more information about the package
Here is the final package.json file:
Exit fullscreen mode
Create a new GitHub repository HERE and push github-repos-search repository to GitHub.
Navigate to https://www.npmjs.com/ and create a new account If you don’t already have an account.
Open terminal and from inside the github-repos-search folder execute the following command:
Exit fullscreen mode
and enter your npm credentials to login.
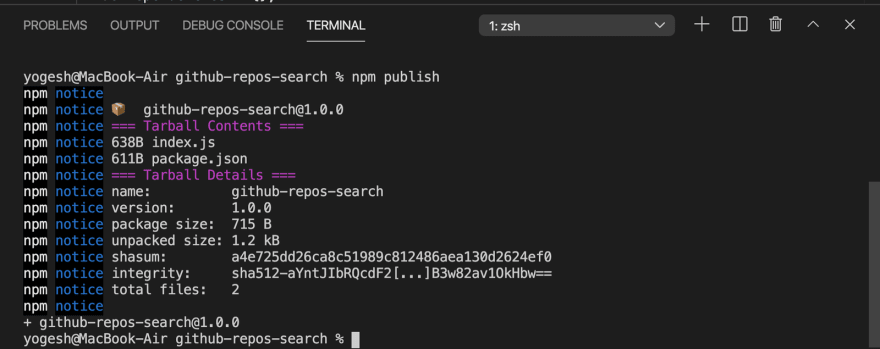
Now, to publish it to the npm repository run the following command:
Exit fullscreen mode
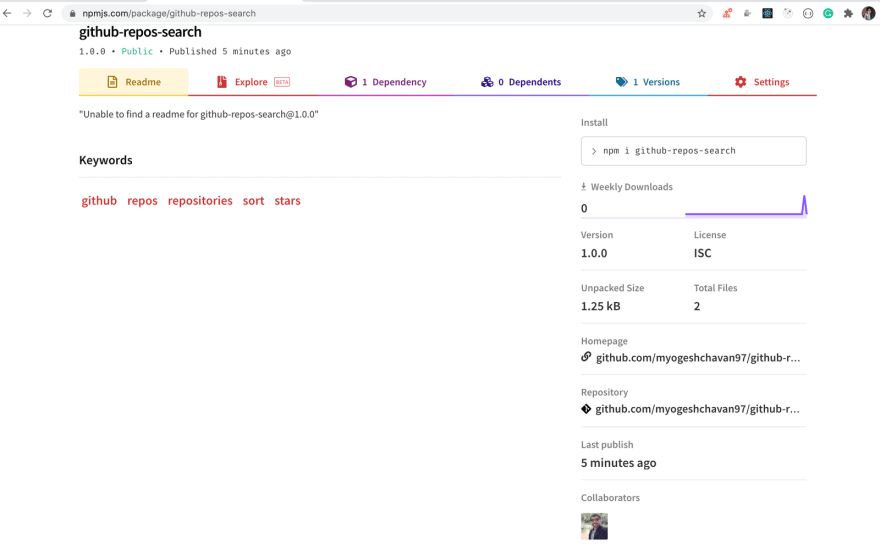
If you navigate to https://www.npmjs.com/package/github-repos-search in browser, you will see your published package:
Now, let’s add a readme.md file for displaying some information regarding the package.
Create a new file with name readme.md inside the github-repos-search folder with the contents from here
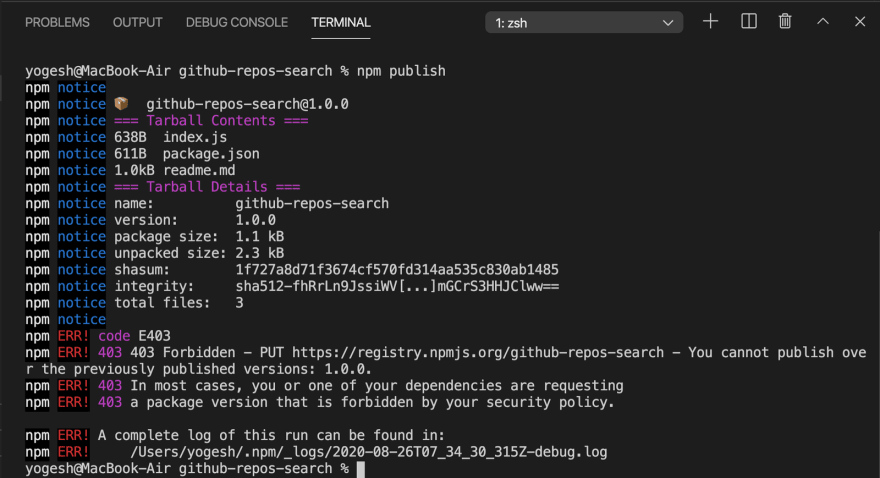
Let’s try to publish it again using the npm publish command.
You will get an above error. This is because you are publishing the module with the same version again.
If you check our package.json file, you will see that, the version mentioned in the file is 1.0.0 You need to increment it every time publishing a new change. So what should you increment to? For that, you need to understand the semantic versioning concept.
Step 7 — Semantic versioning in npm
The version value is a combination of 3 digits separated by dot operator. Let’s say the version is a.b.c
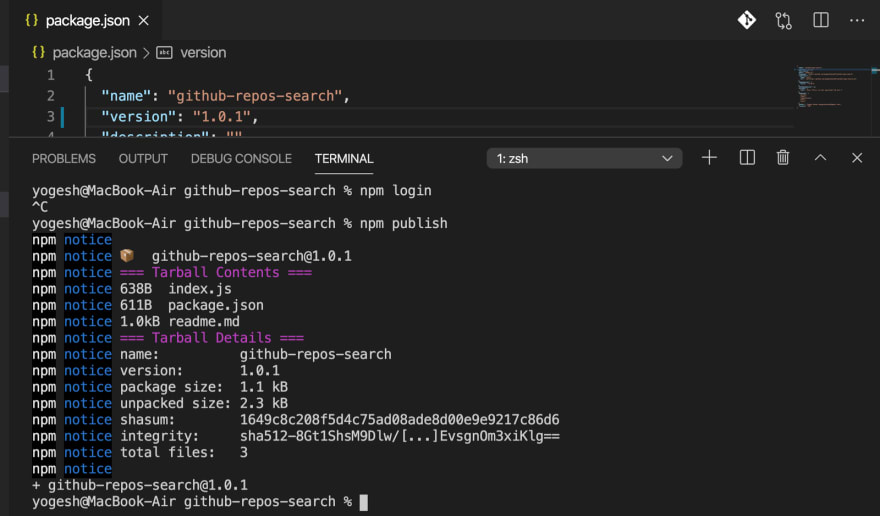
In our case, you just added a readme.md file which is not an API change so you can increment the patch version which is the last digit by 1.
So change the version inside package.json file from 1.0.0 to 1.0.1 and run the npm publish command again.
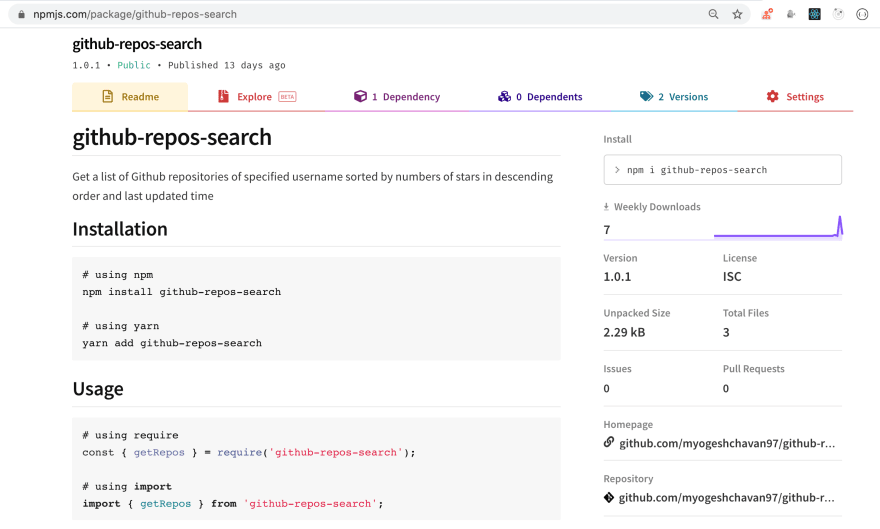
If you check the npm package now, you will see the updated npm package live here
To learn in detail about semantic versioning check out my previous article
Conclusion
In this tutorial, you created a npm package and published it to the npm repository.
For the complete source code of this tutorial, check out the github-repos-search repository on GitHub. You can also see the published npm module here
Don’t forget to subscribe to get my weekly newsletter with amazing tips, tricks and articles directly in your inbox here.
coolaj86 / how-to-publish-to-npm.md
Getting Started with NPM (as a developer)
As easy as 1, 2, 3!
Updated:
If you haven’t already set your NPM author info, do that now:
Side notes:
Then create a package.json and publish it:
Tip: Use your @ :
npmjs.org is pretty crowded these days, but every user (and organization) has a scope.
I recommend using it.
Your username: npm whoami
Your scope: @ +
Your next package: @ /
Tip: Check Dependencies:
Beta and Release versions
Typically if you publish something, it should be v1.0.0 (you won’t run out of numbers, after all), but it should be at least 0.1.0.
If you don’t want something to install by default
If you published a bugfix as v1.0.7 and need to set v1.1.3 back to latest
To remove a tag
Licensing (SPDX Identifiers)
If you don’t know which license to choose, then pick MPL-2.0
(open source, but gives you legal protection against bad actors)
Live Stream: Publishing @root/uuid to npm
Install Node + npm
If you haven’t already installed node + npm, or you’d like the latest version:
macOS, Linux:
Windows 10/11:
Check out my online course
If this helped you, and if you or someone you know is just getting into development, check out my upcoming online course:
Publishing Node.js packages
In this article
You can publish Node.js packages to a registry as part of your continuous integration (CI) workflow.
This guide shows you how to create a workflow that publishes Node.js packages to the GitHub Packages and npm registries after continuous integration (CI) tests pass.
We recommend that you have a basic understanding of workflow configuration options and how to create a workflow file. For more information, see «Learn GitHub Actions.»
For more information about creating a CI workflow for your Node.js project, see «Using Node.js with GitHub Actions.»
You may also find it helpful to have a basic understanding of the following:
About package configuration
The name and version fields in the package.json file create a unique identifier that registries use to link your package to a registry. You can add a summary for the package listing page by including a description field in the package.json file. For more information, see «Creating a package.json file» and «Creating Node.js modules» in the npm documentation.
You can specify the Node.js version installed on the runner using the setup-node action.
If you add steps in your workflow to configure the publishConfig fields in your package.json file, you don’t need to specify the registry-url using the setup-node action, but you will be limited to publishing the package to one registry. For more information, see «publishConfig» in the npm documentation.
Publishing packages to the npm registry
This example stores the NPM_TOKEN secret in the NODE_AUTH_TOKEN environment variable. When the setup-node action creates an .npmrc file, it references the token from the NODE_AUTH_TOKEN environment variable.
In the example above, the setup-node action creates an .npmrc file on the runner with the following contents:
Please note that you need to set the registry-url to https://registry.npmjs.org/ in setup-node to properly configure your credentials.
Publishing packages to GitHub Packages
Each time you create a new release, you can trigger a workflow to publish your package. The workflow in the example below runs anytime the release event with type created occurs. The workflow publishes the package to GitHub Packages if CI tests pass.
Configuring the destination repository
If you don’t provide the repository key in your package.json file, then GitHub Packages publishes a package in the GitHub repository you specify in the name field of the package.json file. For example, a package named @my-org/test is published to the my-org/test GitHub repository.
However, if you do provide the repository key, then the repository in that key is used as the destination npm registry for GitHub Packages. For example, publishing the below package.json results in a package named my-amazing-package published to the octocat/my-other-repo GitHub repository.
Authenticating to the destination repository
If you want to publish your package to a different repository, you must use a personal access token (PAT) that has permission to write to packages in the destination repository. For more information, see «Creating a personal access token» and «Encrypted secrets.»
This example stores the GITHUB_TOKEN secret in the NODE_AUTH_TOKEN environment variable. When the setup-node action creates an .npmrc file, it references the token from the NODE_AUTH_TOKEN environment variable.
The setup-node action creates an .npmrc file on the runner. When you use the scope input to the setup-node action, the .npmrc file includes the scope prefix. By default, the setup-node action sets the scope in the .npmrc file to the account that contains that workflow file.
Publishing packages using yarn
If you use the Yarn package manager, you can install and publish packages using Yarn.
npm-publish
Table of contents
Publishes a package to the registry so that it can be installed by name.
By default npm will publish to the public registry. This can be overridden by specifying a different default registry or using a scope in the name (see package.json ).
: A folder containing a package.json file
: A url or file path to a gzipped tar archive containing a single folder with a package.json file inside.
[—tag ] : Registers the published package with the given tag, such that npm install @ will install this version. By default, npm publish updates and npm install installs the latest tag. See npm-dist-tag for details about tags.
[—otp ] : If you have two-factor authentication enabled in auth-and-writes mode then you can provide a code from your authenticator with this. If you don’t include this and you’re running from a TTY then you’ll be prompted.
[—workspaces] : Enables workspace context while publishing. All workspace packages will be published.
[—workspace] : Enables workspaces context and limits results to only those specified by this config item. Only the packages in the workspaces given will be published.
The publish will fail if the package name and version combination already exists in the specified registry.
Files included in package
Symbolic links are never included in npm packages.
See developers for full details on what’s included in the published package, as well as details on how the package is built.
If you ask npm to install a package and don’t tell it a specific version, then it will install the specified tag.
Also the tag that is added to the package@version specified by the npm tag command, if no explicit tag is given.
When used by the npm diff command, this is the tag used to fetch the tarball that will be compared with the local files by default.
If not set, and a registry response fails with a challenge for a one-time password, npm will prompt on the command line for one.
Enable running a command in the context of the configured workspaces of the current project while filtering by running only the workspaces defined by this configuration option.
Valid values for the workspace config are either:
When set for the npm init command, this may be set to the folder of a workspace which does not yet exist, to create the folder and set it up as a brand new workspace within the project.
This value is not exported to the environment for child processes.
Enable running a command in the context of all the configured workspaces.
This value is not exported to the environment for child processes.


