How to use cheat engine
How to use cheat engine
The Cheat Engine (Complete Guide) for Beginners
Cheat Engine is one of the leading tools for the Windows OS used by gamers to edit different game values as per their requirements to overcome different game restrictions (or just for fun). It scans the memory and uses its debugger function to perform its operation (i.e., cheating in games).

Being one of the best tools in its niche, it does not have one of the best user interfaces for a newbie and requires a certain level of expertise to operate it. So, we have compiled a beginner’s guide to make things easier for a newbie and teach them how to use cheat engine properly.
But before proceeding, keep in mind that not every game value can be edited by Cheat Engine, especially, most of the server-side or online games (which process the user data on their side, not at the user machine) values for these kinds of games cannot be edited using the Cheat Engine.
Warning: Proceed at your own risk as some games or platforms (like Steam) may ban your account for trying unethical techniques to manipulate the game modules and using Cheat Engine. The methods discussed here, are for educational purposes only.
1. Download and Install Cheat Engine
Although you may find many online resources to download Cheat Engine, it is always best to download the latest version of Cheat Engine (currently version 7.2) from the official Cheat Engine website.
Once you have downloaded the Cheat Engine, double-click on it to launch it and follow the prompts to complete the process. Make sure to decline any browser toolbar like Mcafee toolbar or any other type of adware.

Also, it will be a good idea to install it on the system drive at its suggested default location. Once installed, launch the Cheat Engine (click Yes, if UAC prompt is received). If asked to, skip any dialogue box that asks for the community server, etc.
2. User Interface Know-How
On the top of the Cheat Engine window, you have the following five menus:
Under the menus, you have a shortcut toolbar, which has the following three icons:
3. Basic Workflow of Cheat Engine
Firstly, the user clicks the Process Explorer (to open the running processes on the system) and there are three tabs shown to the user, namely:
You may use any of the tabs of the Process Explorer to find out the game’s process. Finding out the related process is a bit trickier as you can see in the image below:
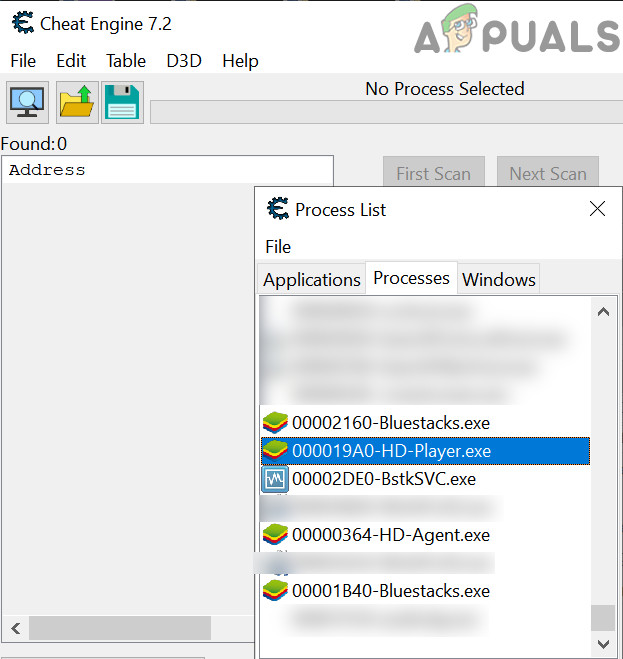
As you can see in the picture above, BlueStacks has plenty of processes, and to find the related one you may have to use hit and trial method (or check the community forums for the process found by other gamers). Once a process is selected, click Open and the following type of window may be shown:
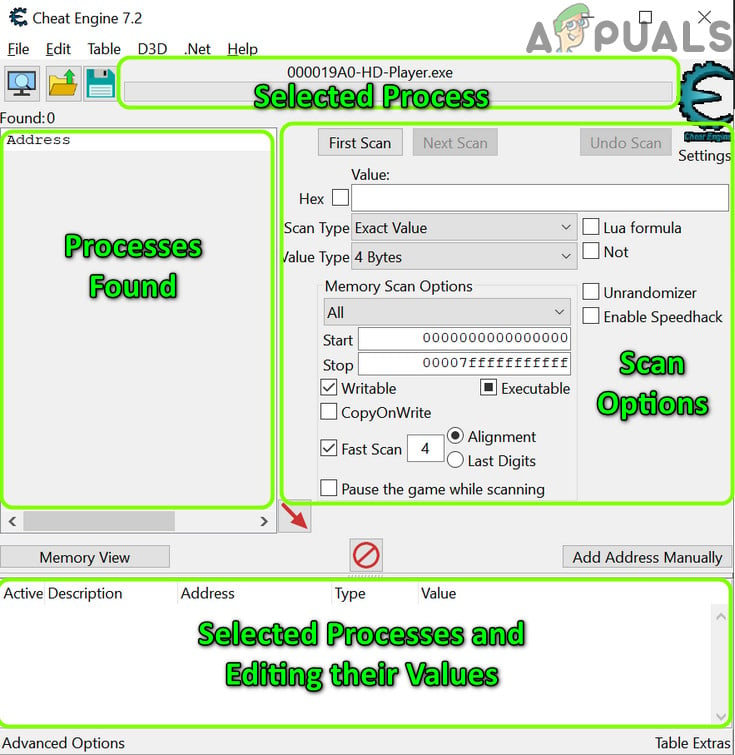
As you can see, we can roughly divide this window into 4 parts:
4. Use Cheat Engine on BlueStacks [Step by Step]
Enough of the basic discussion, let us dive into the ocean of game modification. As a use case, we will discuss the process for the BlueStacks Android emulator and the same process can be used to edit the values in the other games (Windows or emulator based).

5. Use the HD-Player Process to Edit the Game Values
You can use the process tab of the Cheat Engine to find the game value of the game in BlueStacks and then edit accordingly.
You may follow the same procedure to edit the values of the other game parameters (like Points, etc.). The same technique can be used to edit the game parameters of other games.
6. Use the Physical Memory Process to Edit the Game Values
If the above method did not do the trick, then try the method below which uses the Physical Memory process to find the game values (but this method may take a long time to scan and slow down your PC):
Keep in mind that in the physical memory process, the first scan may take a longer time to complete but subsequent scans may take a lesser time to complete. If the Cheat Engine application or system crashes during the scan process, then you may try the following steps:
For more advanced options to edit the game values, you may have to root the Android version of BlueStacks and install the CE Server on BlueStacks (but that discussion is not in the scope of this article) or you may try Cheat Engine with another Android emulator.
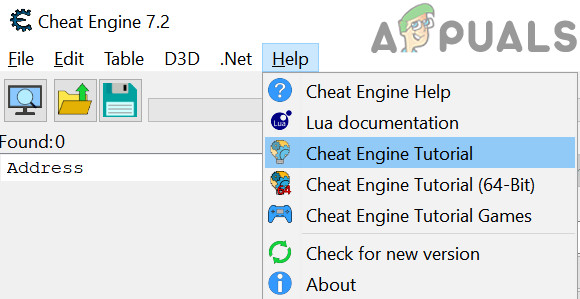
Now, as you have some basic idea of how the Cheat Engine works, it will be a good time to go through the internal Cheat Engine Tutorial in the Help menu.
Инструкция по использованию программы Cheat Engine
Данная программа пользуется популярностью в среде геймеров. Это неудивительно. Подстроить необходимые особенности конкретно под себя, прописать нужное количество монет и прочих ресурсов, в зависимости от игры. Всё это стало возможно благодаря Cheat Engine.
Однако, не смотря на все дивиденды, которые можно получить с помощью этой программы, многие пользователи не прибегают к ее помощи. Им попросту не хватает терпения разобраться во всех тонкостях управления ею. Хотя на самом деле это достаточно просто.
Изменяем значения в игре
Взлом с помощью Cheat Engine шаг за шагом:
Как пользоваться программой MHDD


Как работает программа Cheat Engine
Cheat Engine представляет собой высокопроизводительный HEX-редактор, работающий в стандартном режиме и Speed Hack. Пользоваться программой сможет даже новичок, по-крайней мере, изменить количество денег или увеличить здоровье главного героя в 10 или 100 раз – базовые операции не представляют собой ничего сложного.
Как пользоваться таблицами
Таблица в Cheat Engine – это, по сути, файл с сохраненными параметрами для изменения. Для использования следует:
Принцип работы
При рассмотрении вопроса о том, как использовать программу Cheat Engine, сначала рассмотрим принцип ее функционирования. В его основу заложен анализ ячеек оперативной памяти, которые и отвечают за сохранение пользовательских данных (в нашем случае героя или персонажа, которого использует геймер).
Вычислив нужную ячейку, в ней можно изменить значение по своему усмотрению, добавив себе все необходимое.
Использование SpeedHack
Некоторые игры наполнены атмосферой, и это действительно приятно — просто поглощать прекрасно созданный мир, которым окружен пользователь в течение нескольких часов подряд. Во многих других есть наполнитель или просто ненужные вещи, которые крадут время, потраченное на другие дела. Для таких случаев у Cheat Engine есть функция ускоренной перемотки вперед.
Несколько примеров использования:
Rocksmith 2014. Эта игра имеет очень длинную последовательность запуска, которая не скрывает загрузку или что-то в этом роде, она просто длинная ради зрелищности. После запуска устанавливаете ее на 50-кратную скорость, и последовательность заканчивается, экономя примерно 25 секунд при каждом запуске.
Undertale. Ограничена 30fps. При этом большая часть игры просто идет в излишне медленном темпе. Лучше играть на скорости 2x, тогда визуальные эффекты составляют 60 кадров в секунду, что ускоряет многие монотонные действия (медленная ходьба), при битвах и диалогах можно вернуть скорость.
Можно установить конкретные клавиши для определенных скоростей, чтобы обеспечить возможность регулировки.
По умолчанию используют такие горячие клавиши:
Достаточно найти название исполняемого файла и вставить его название с расширением exe в настройки (как показано на скриншоте).


Делай три
Теперь в таблице выберете эти два значения, нажмите на них правой кнопкой мыши и проследуйте по пути “Изменить ” – “Значение”.
И устанавливайте нужное вам. Например, 10000. Теперь возвращайтесь в игру, и вуаля – теперь количество золота у вас равно десяти тысячам. Таким же образом вы можете изменять любые другие значения в любых играх. Удачи в экспериментах!
Заморозка значений
Иногда простого изменения значения недостаточно, тогда может понадобиться функция заморозки. После переноса параметра в нижнюю часть, слева от него есть квадратик, при нажатии на него появится крестик или галочка, теперь оно заморожено.
В этом случае цифры не будут изменяться независимо от действий игрока. Например, нужно взломать игру на деньги. Установив золото на 10000 можно его тратить сколько угодно, это цифра будет неизменна. Это же касается маны, жизней и других параметров.
Делай два
Поэтому возвращаемся к игре и отправим поселенцев заработать немного денег, что бы изменить их количество.
Переключаемся опять к cheat engine, вводим в строку поиска новое значение (4) и запускаем повторное сканирование кнопкой “Отсев” (5), что бы программа искала изменение значений только среди результатов первого сканирования.
Как видите, результатов осталось всего два. Выберете их мышкой, щелкните правой клавишей и нажмите “Добавить выбранные адреса в таблицу”.
Как использовать в онлайн-играх
Cheat Engine может изменять значения, только если игра запускается на стороне игрока. Если игровые расчеты происходят на сервере, то взломать её не получится.
Некоторые онлайн игр, которые не используют многопользовательский режим запускаются во флэш контейнере. Взлом браузерной оффлайн игры аналогичен обычной, но в качестве источника данных надо выбрать флэш процесс:
Ищем необходимое изначальное значение и изменяем его, к примеру, построив здание:
Большинство простых показателей будут представлены числом в 4 байта:
Если конкретное число не найдено, ищем все возможные комбинации.
Затем изменяем параметр и отсеиваем, указав, что оно уменьшилось или увеличилось.


Делай раз
Запустим какую-нибудь миссию в игре и увидим, что золота у нас не так что бы уж очень много – 200.
Запомним это значение и откроем через alt+tab окно с нашей программой. Здесь вам нужно будет выбрать игровой процесс (1), в строку поиска ввести искомое значение (2) и нажать кнопку “Поиск” (3).
В этот момент Cheat Engine просканирует память игры на предмет наличия этого значения. Скорее всего, в результате вы получите огромное количество результатов и понять какой именно отвечает за наше золото будет непросто.
Сheat Engine на Андроид
Ранее программа была доступна только пользователям компьютеров. Но теперь она доступна и для телефонов Android. Благодаря этому пользователи могут получить множество преимуществ, которые открываются в большинстве игр:
Очистка компьютер от мусора с помощью Clean Master
Инсталляция и настройка
В принципе, в установке программы ничего сложного нет. Необходимо всего лишь следовать указаниям «Мастера» (Setup Wizard). Правда, в зависимости от версии приложения, может быть предложено установить несколько дополнительных компонентов типа браузера Opera, ускорителя Speed My PC и еще бог знает чего. Если вам все это не нужно, лучше сразу поснимать галочки с соответствующих полей.
Что касается настроек, то здесь нужно отдать должное разработчикам. Все уже настроено, так что пользователю не придется, так сказать, изобретать велосипед. По окончании инсталляции программа сразу же будет готова к работе. Да и перезагрузка не потребуется. Единственное, что может вызвать проблемы в решении вопроса о том, как настроить программу Cheat Engine, это англоязычный интерфейс. Это относится только к тем случаям, когда приложение скачано с официального источника.
В любом случае можно дополнительно загрузить русификатор или просто скачать русскую версию программы.
Вывод
«Читы» действительно можно загружать, и они нормально работают. Главное – делать все в соответствии с предписанным алгоритмом и не нарушать его, так как может ничего не получится. С программой можно разобраться даже самостоятельно. Сложного в ней ничего нет. По ссылкам ниже можно загрузить Cheat Engine, а также её таблицу для игры «Blur»:
Cheat Engine Tutorial Guide (x32)
So let’s go through the Cheat Engine Tutorial (x32).
So open Cheat Engine, then in the main menu select help then select Cheat Engine Tutorial.
Then attach to the Cheat Engine Tutorial process, it should be ‘Tutorial-i386.exe’.
If unsure how to attach to the process see: How to attach to a process
Contents
Step 1 [ edit ]
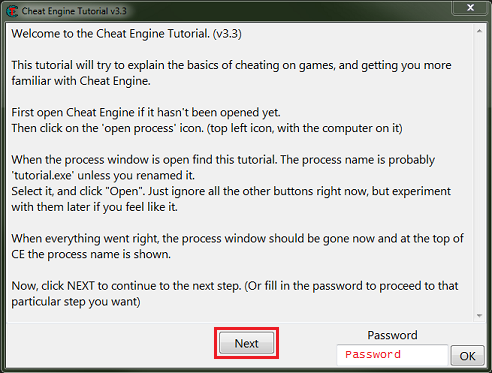
When the tutorial launches you should see some thing like this, you can just click the next button after reading the help text.
Save the password in later steps in case of crashes (from injections) and for restarting at a later time.
Step 2 [ edit ]
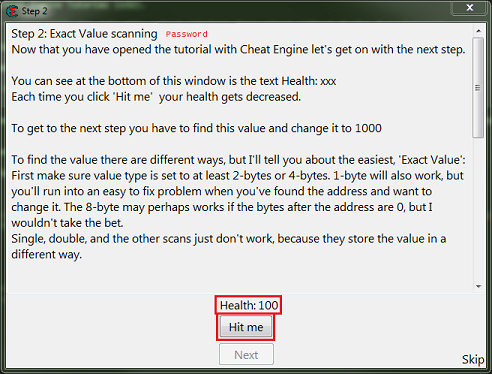
So for step 2 you will see some thing like this.
What we need to find is the health, and here it’s an integer.
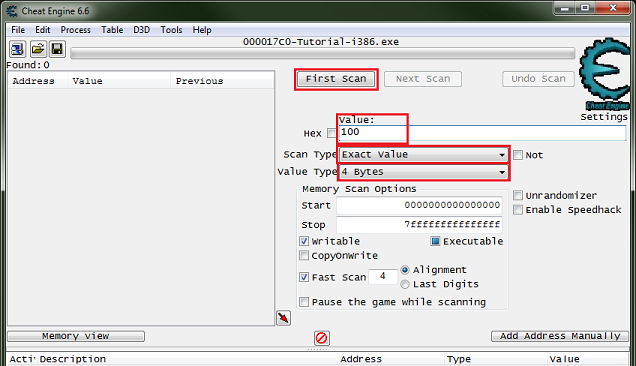
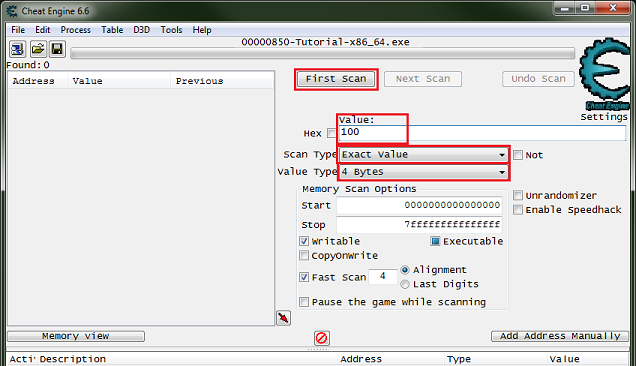
So setup the memory scanner to find an integer and for exact value scan then set the value to the current health value, most integers will be stored in a 4 byte variable, so let’s start there.
Note: Integers can be stored in a 1 byte variable (byte), 2 byte variable (int16/short), 4 byte variable (int32/int), or 8 byte variable (int64/long).
When ready click the first scan button.
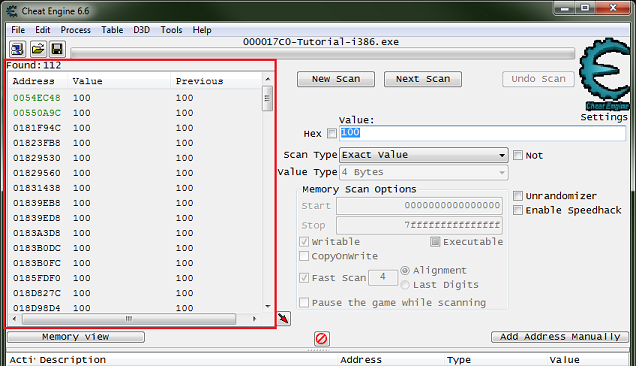
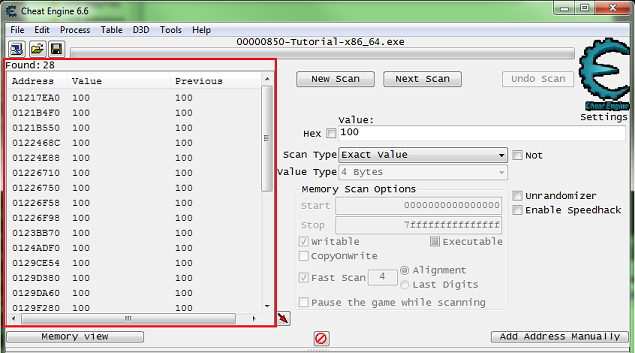
You should see a list of addresses, in the found address list, like this.
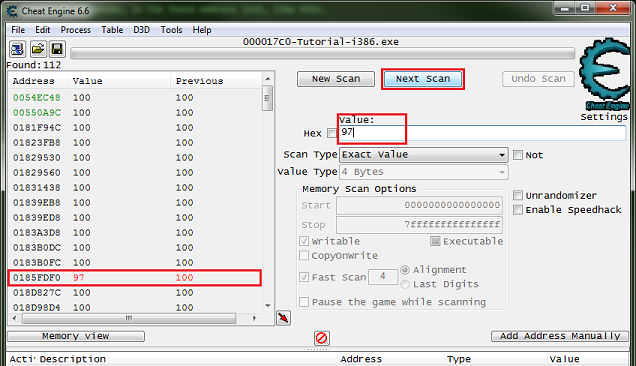
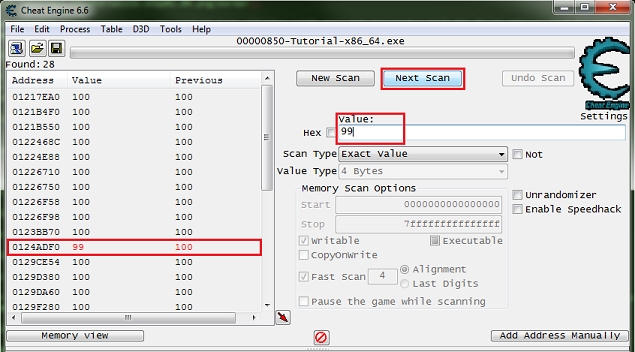
Now Click the hit me button, then reenter the current value and click the next scan button.
Note the red value in the list, this shows that the value has changed.
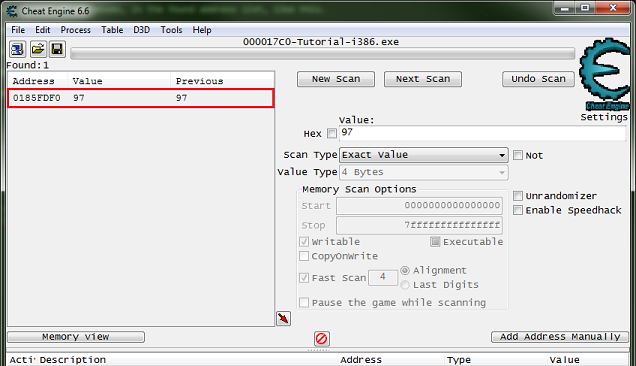
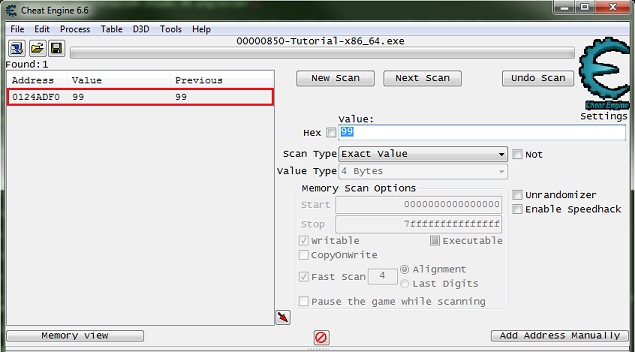
After clicking next scan you may need to keep clicking hit me and rescanning tell the found address list is small enough to work with.
Just double click the address in the found list to add it to the cheat table. Then change the value and freeze the address, double click the value in the address list to edit it, freeze it by clicking the enabler/freeze box.
Now the next button should be enabled, click it to go to the next step. Click the hit me button again if the next button is not enabled already.
Step 3 [ edit ]
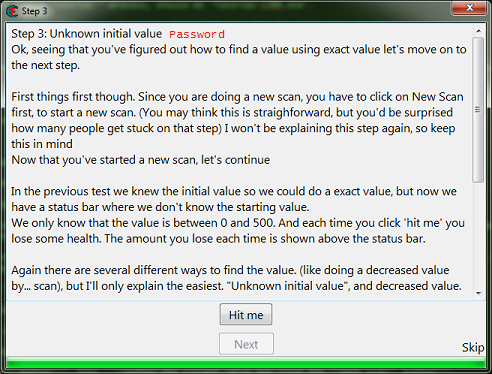
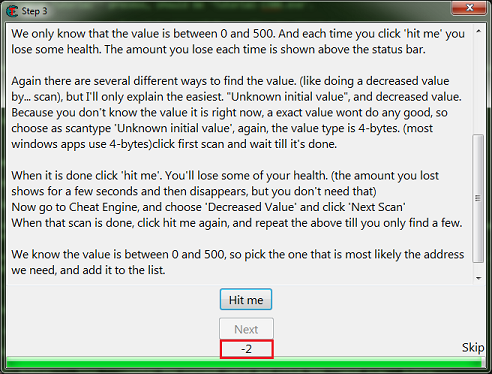
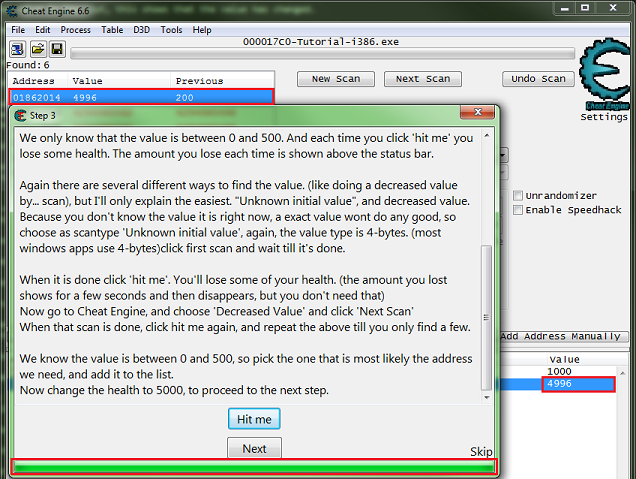
When you start step 3 you should see the form looking like this.
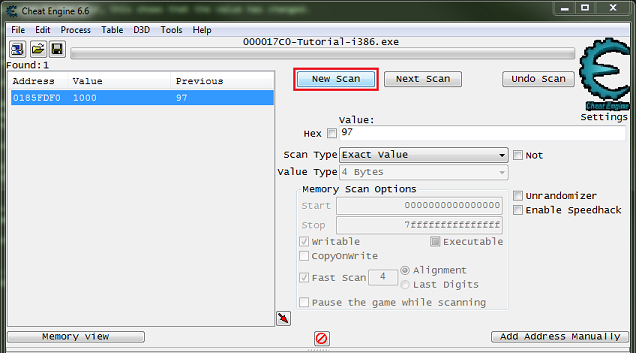
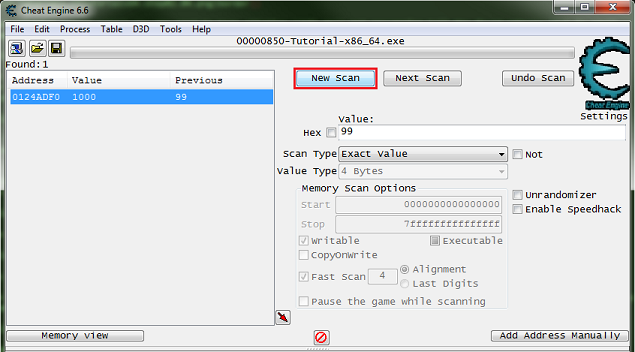
Like the help text said make sure to click the new scan button before starting new scans.
This clears the found results to start scanning for a new value.
Here is where I suggest going ahead and clicking the hit me button, just to see how the value is decreased to help in determining what value type to scan for.
Note that the value was decreased by an integer, that is a non fractional number.
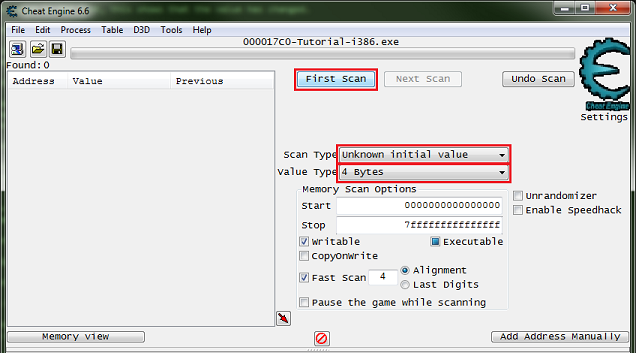
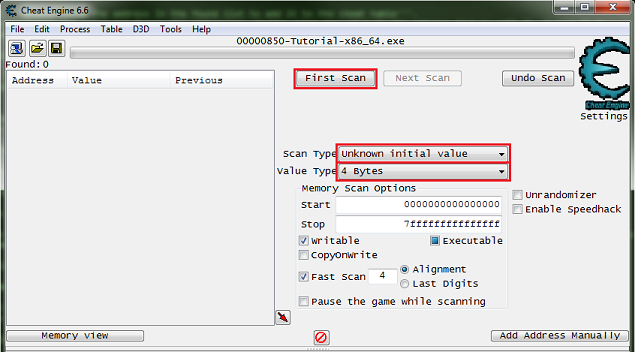
So I would setup the scanner for 4 bytes and unknown initial value. Then click the first scan button.
Now click the hit me button.
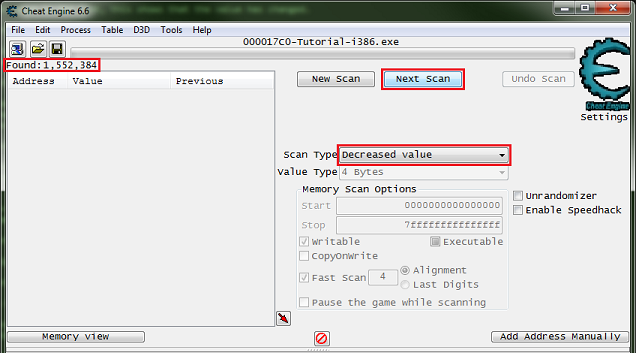
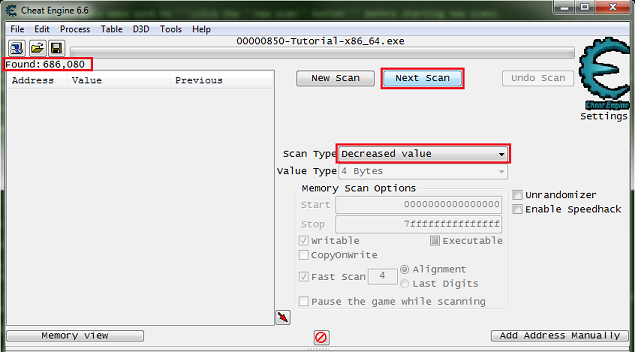
Then set the scan type to decreased value and click the nest scan button.
Note the number of found addresses, this is kinda small for most games these days, the found results can easily be in the millions for most games.
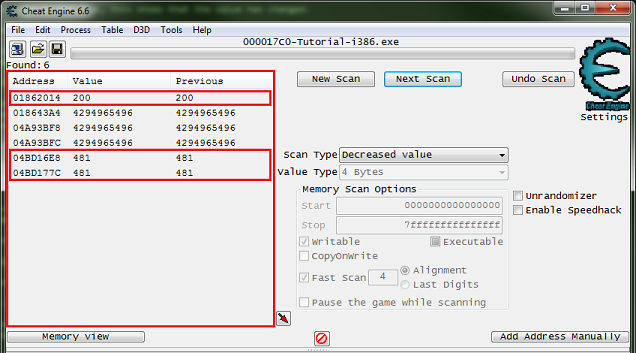
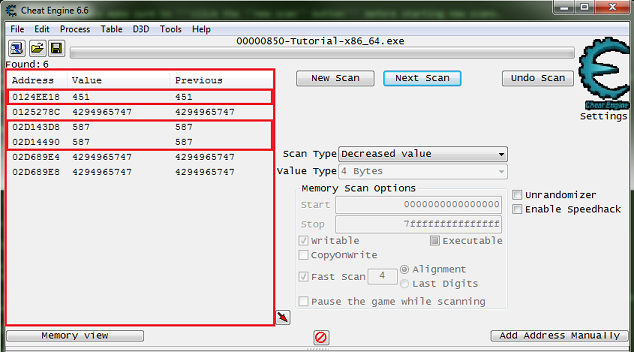
Now just keep decreasing the value with the hit me button, and scanning for a decreased value, until the found results is small enough to work with.
Now we just pick an address and change the value to see if it has the desired effect, this is just how it works.
Here is where I suggest that you always note the values (or just Ctrl+C) before changing them to set them back if they are not the right value, to keep from changing a bunch of unknown addresses and corrupting your save files when doing this in games.
The next button should become enabled as soon as you set the value to 5000. After changing the value and clicking the hit me button the progress bar should fill, but this is not needed.
Now the next button should be enabled, click it to go to the next step. Click the hit me button again if the next button is not enabled already.
Step 4 [ edit ]
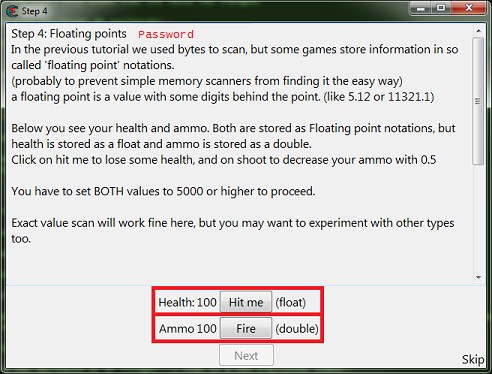
When you start step 4 you should see the form looking like this.
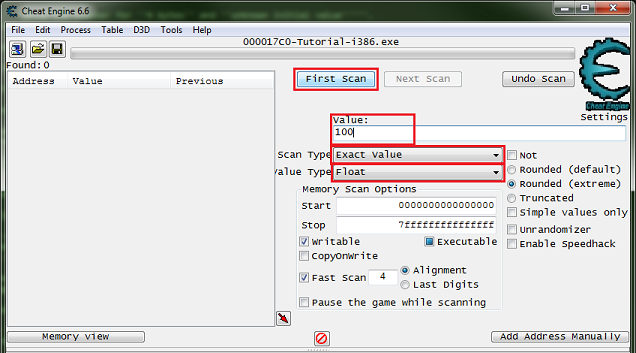
So click the new scan button. Then setup the scanner for a float, exact value, enter the current health value.
When setup click the first scan button.
So just scan like before to find the health address, then add it to the address list.
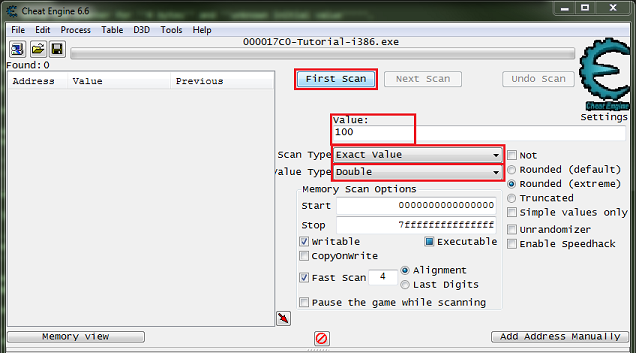
Now click the new scan button again. Then setup the scanner for a double, exact value, enter the current ammo value.
When setup click the first scan button.
So just scan like before to find the ammo address, then add it to the address list.
Now change the values to 5000, then the next button should become enabled. Then click the next button to progress to the next step.
Step 5 [ edit ]
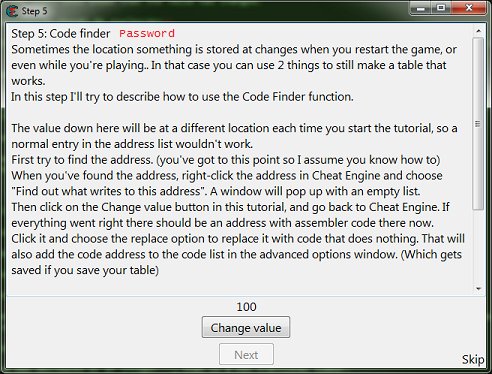
When you start step 5 you should see the form looking like this.
So first find the value then add it to the address list.
Go ahead and save the table and the password at this point, just in case the debugger isn’t setup right.
If you need help setting up the debugger see: Debugger options
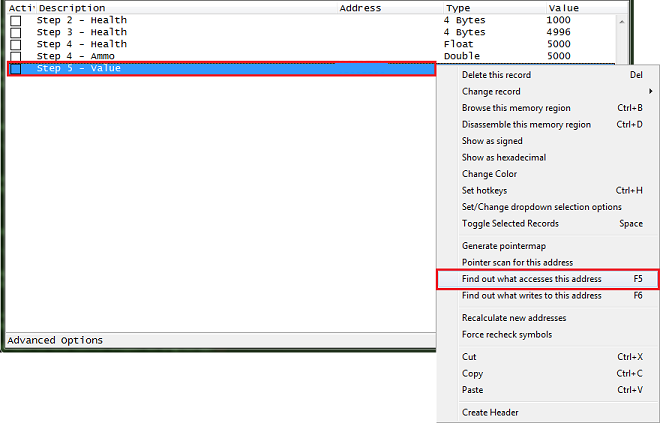
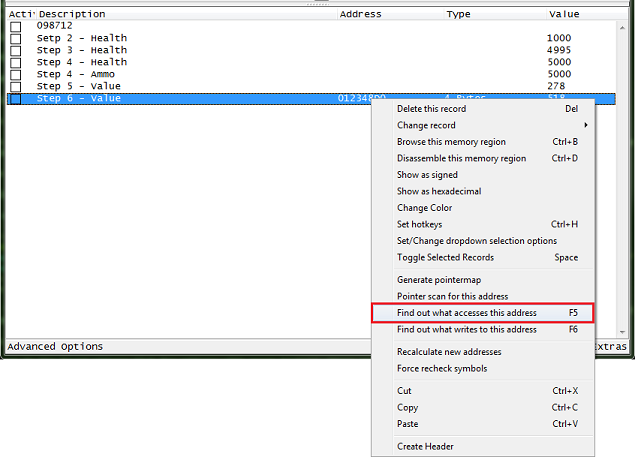
After you have the address in the address list right click it then select find out what accesses this address.
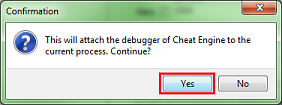
Cheat Engine will prompt you about attaching the debugger, just click the yes button.
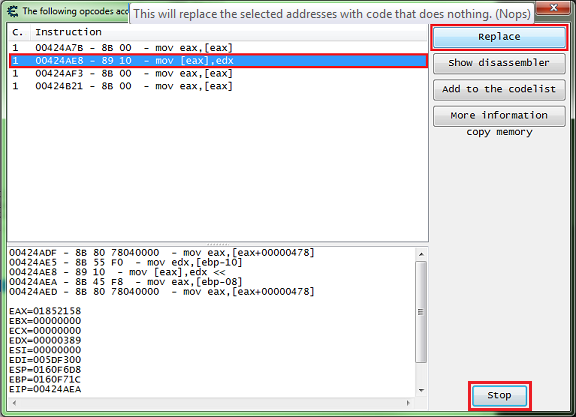
Then a debugger form will open, now click the change value button, and you should get code that shows up in the debugger form.
What we want is a write instruction. So we will be looking for some thing like one of the following:
Select the code line of the write instruction, you can click the show disassembler button to see the code in memory, then click the replace button.
Don’t forget to click the stop button.
The replace button will replace that line of code with NOPs.
Cheat Engine will prompt you for a name for the entry it will add in the advanced options list.
Enter a name and click the OK button.
Now click the change value button back on the tutorial.
The next button should become enabled, then click the next button to advance to the next step.
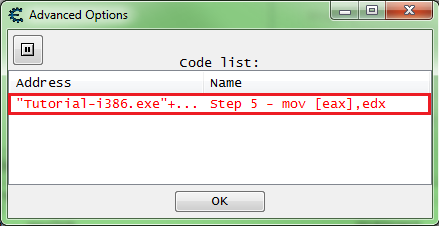
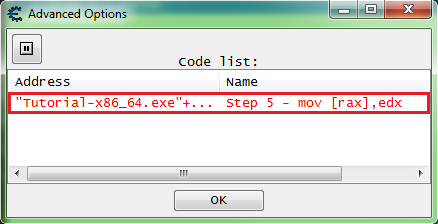
When entries in the advanced options list are replaced, they will show up with red text.
The advanced options list can be viewed by clicking the advanced options button in the status bar on the bottom left corner of the Cheat Engine main form.
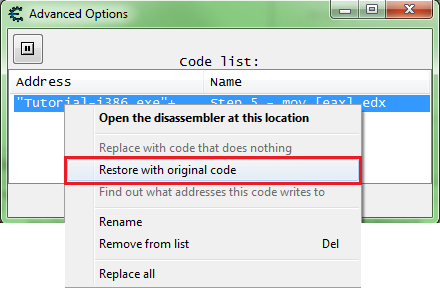
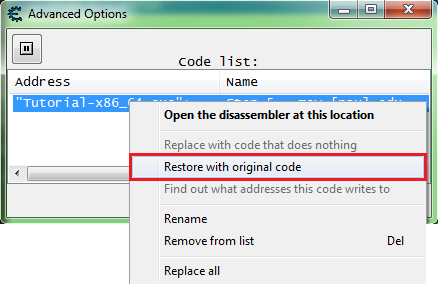
To restore the original code for an entry in the list, right click the entry and select restore with original code.
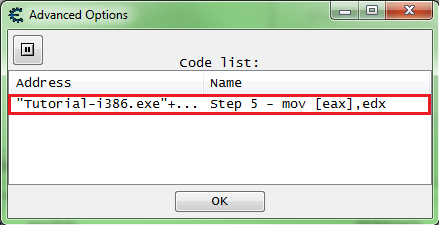
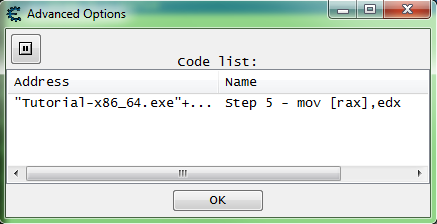
Note that the text is black after restoring.
Step 6 [ edit ]
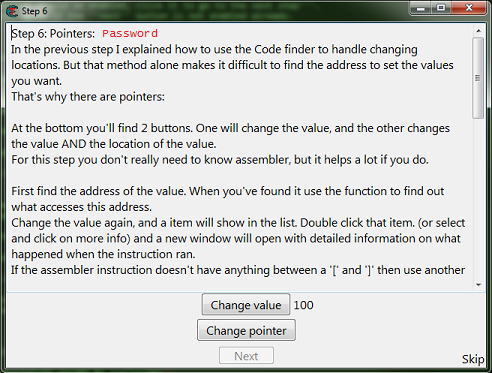
When you start step 6 you should see the form looking like this.
So first find the value then add it to the address list.
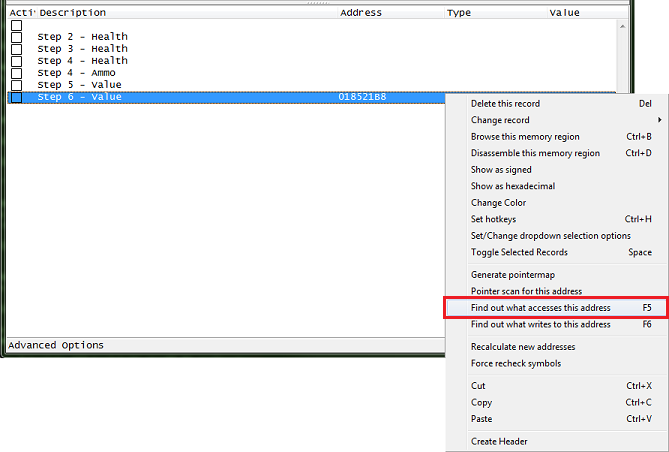
After you have the address in the address list right click it then select find out what accesses this address.
Then click the change value button, to have the process access the address.
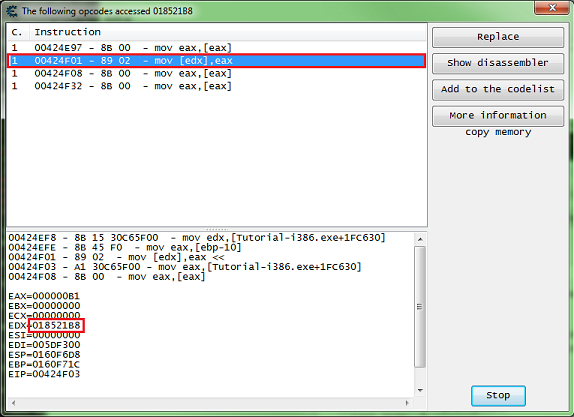
When choosing the code to find the base address for the pointer, try to select an instruction that doesn’t write to the same register as the base address.
Here we’re interested in the value between the square brackets (‘[‘ and ‘]’), so here we want the value of EDX.
The offset here is 0, if the instruction had some thing like this:
mov [edx+ 12C ],eax
Then the offset would be ’12C’ (0x12C), note that this is in hex.
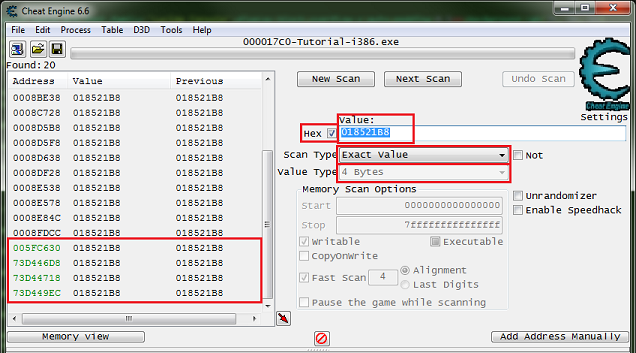
Now set the scanner for 4 bytes, exact value, check the hex check box, then take the value found and put that as the value to scan for.
When ready click the first scan button.
Look in the found address list for address with green text, these are static addresses.
Add one to the cheat table, double click the address of the memory record that was added to the address list, copy the address then check the pointer check box, and paste the address in the pointers base address.
If you are unsure how to do this look here: How to add addresses to the address list
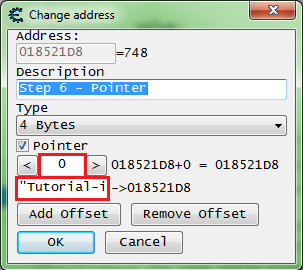
So my pointer will look like this.
It should be setup some thing like this, remember to set the offset to the offset you found.
Click the OK button when the pointer is setup.
Now freeze the value at 5000 and click the change pointer button, the next button should become enabled.
If the next button doesn’t become enabled then select another address from the found list, look for a green one that had it’s value changed, and set it up like the last one and see if it points to the right value, if so change the value freeze and click the change pointer button.
Click the next button to advance to the next step.
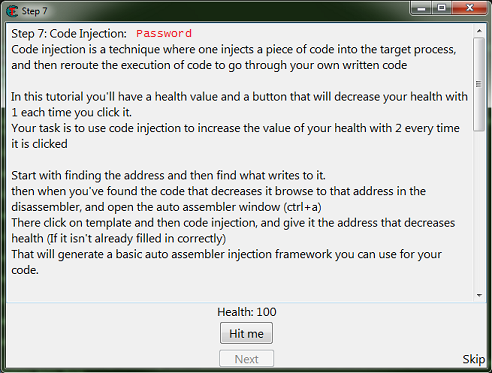
Step 7 [ edit ]
When you start step 7 you should see the form looking like this.
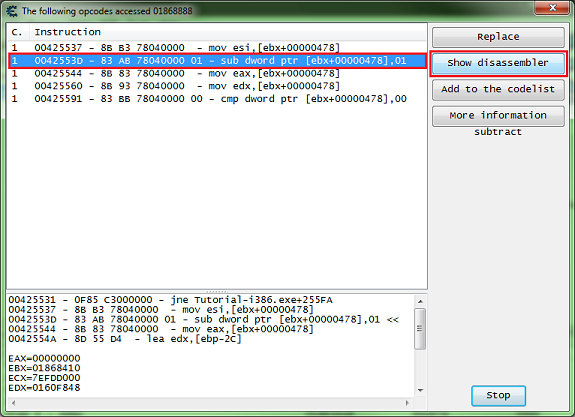
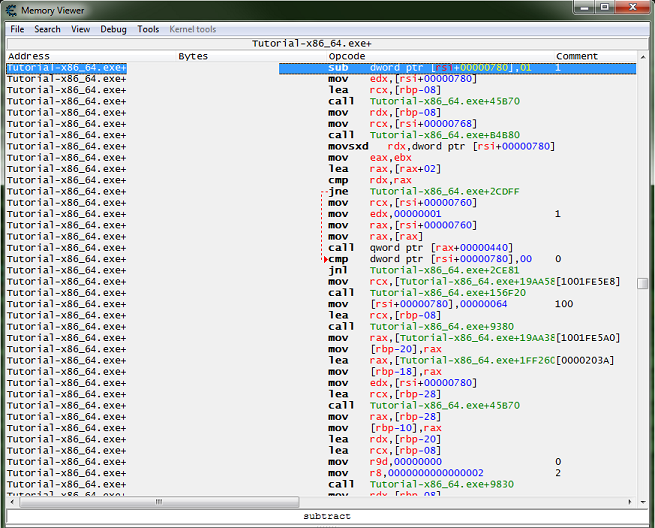
Here we’ll follow the the same procedures as step 5, but instead of clicking replace click the show disassembler button.
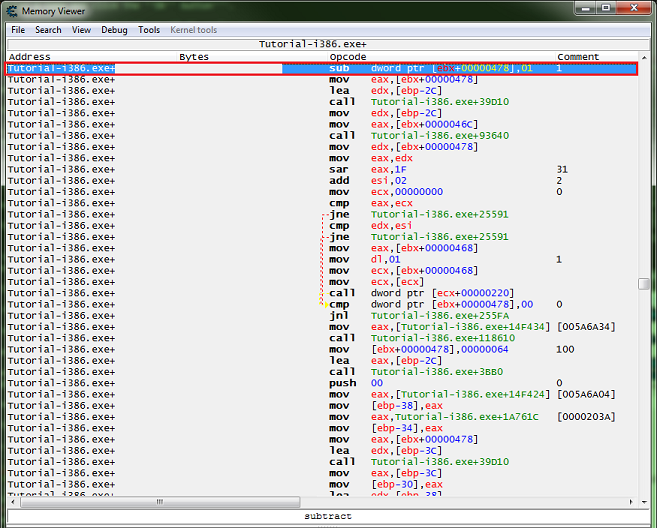
This will open the disassembler view form at the instruction’s address.
With the instruction selected press Crtl+A, to open an auto assembler form.
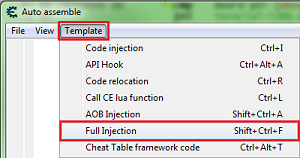
In the auto assembler form menu select template then select full injection.
This will generate some script to start you out.
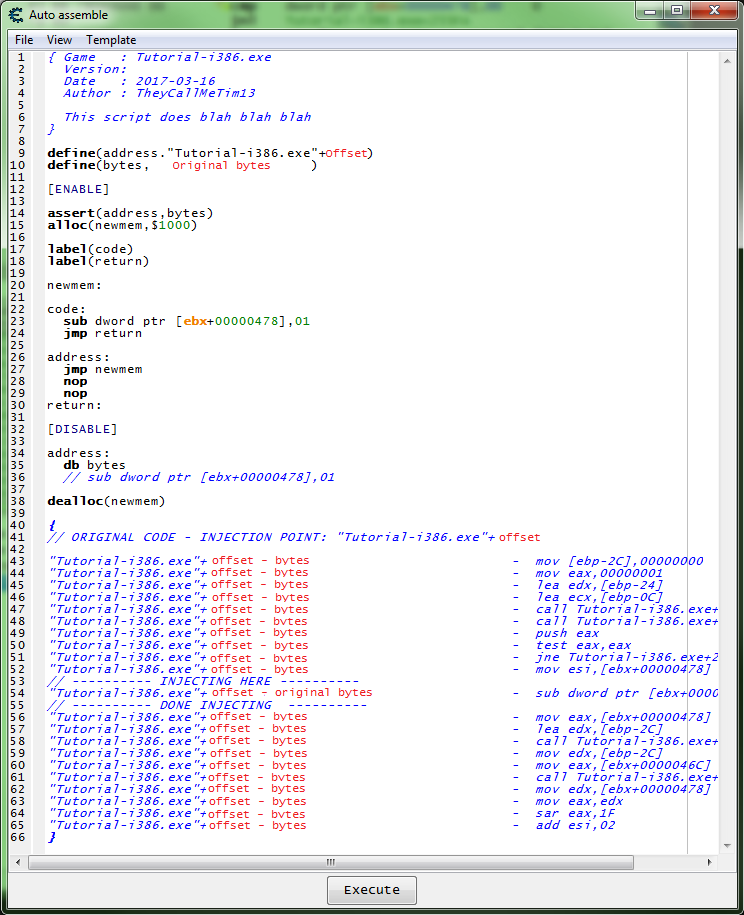
Now we need to add some code that will increase the value by 2, then remove the original code that decreases the value.
For increasing the value we can use INC or ADD.
So let’s try some thing like this.
Now add the script to the cheat table.
If you are unsure how to do that look here: How to add script to table
Then enable the script and click the hit me button.
This should enable the next button, so click the next button to go to the next step.
Step 8 [ edit ]
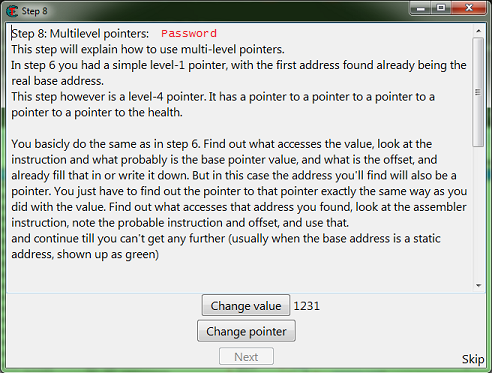
When you start step 8 you should see the form looking like this.
So here we will follow the same steps as step 6, except we’ll see what accesses the base address we find, and we’ll keep repeating this until a static base is found.
So here is my first debugger output.
I did find a static base on the first scan of the base address but I remember this being a false base. So here what we want is a base address in the form of ‘process.exe+offset’, you can try one of the others that look like ‘module.dll+offset’ but I want to say that here they will prove to be false pointers. And yes most newer games will have many false values and pointers.
And the debugger output from the address holding: 01829F68
And the debugger output from the address holding: 018332A0
And the debugger output from the address holding: 018BA4F8
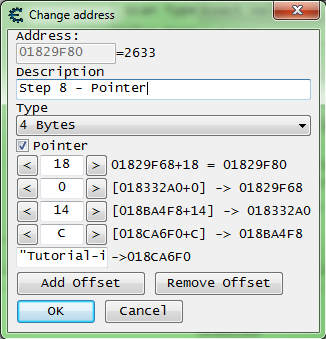
Now we scan for that base ‘018CA6F0’ and you should find a static address, but in real games you would keep going until a static base is found.
With that static address as the base my pointer will look like this.
After you have found the pointer, freeze it at 5000, then click the change pointer button. If you found the right base the next button should become enabled after about 2 seconds. So click the next button to go to the next step.
Step 9 [ edit ]
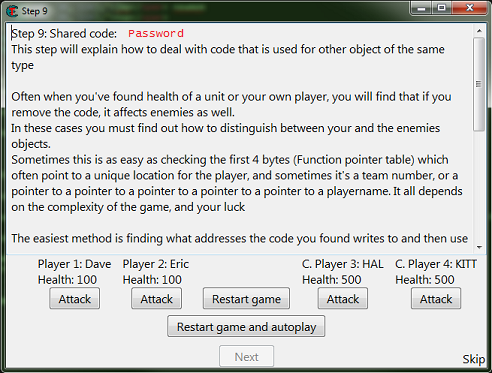
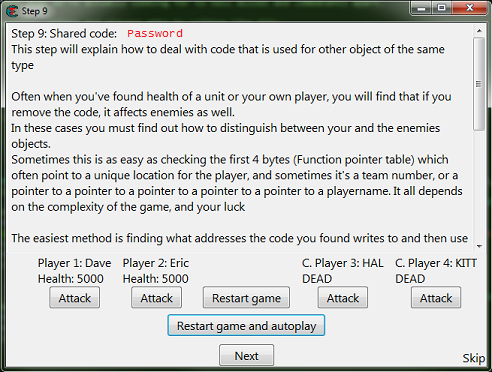
When you start step 9 you should see the form looking like this.
So here like the help text says there is far more then one solution.
First we need to find one of the addresses and add it to the table.
If you are having trouble finding an address, remember to try different value types, and don’t forget to start new scans.
Then like in step 7 we want to see what accesses the address, to find the function that writes to the actor’s health.
Go ahead and save the password if you want to try different ways, this is the last step in the tutorial.
So here it’s good to understand what we’re actually looking for to tell allies and combatants apart.
When the game or engine is written, actors and players mite be written like this.
The team it self could be a structure, say if it’s declared as an object class like the ‘Coords’ variable, which we would want to look for a pointer to the actor’s team structure.
So one way we could do this is to find the team id or team structure in the player structure.
Find the team id in the player structure [ edit ]
After you have found the function that decreases health.
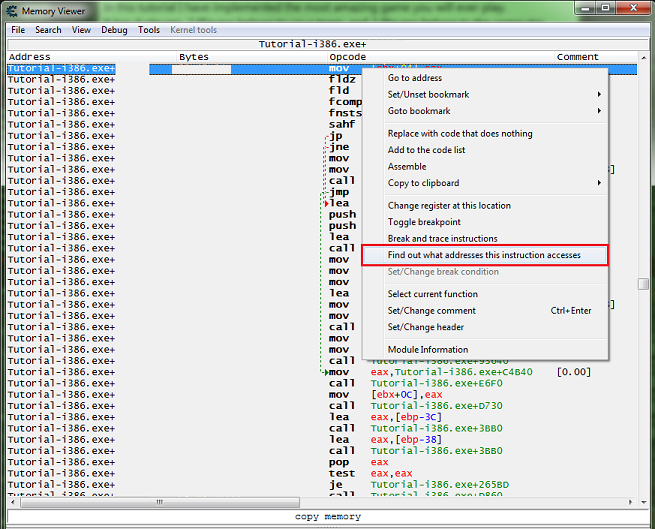
Right click the instruction in the disassembler view form, and select find out what addresses this instruction accesses.
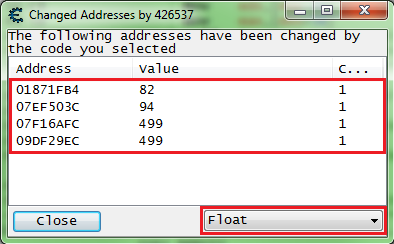
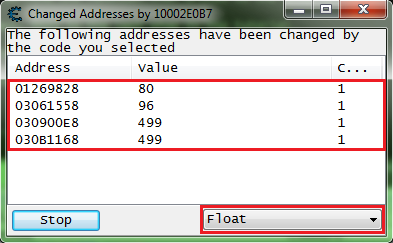
Then click the attack button for all 4 values.
You should have all 4 addresses in the debugger list.
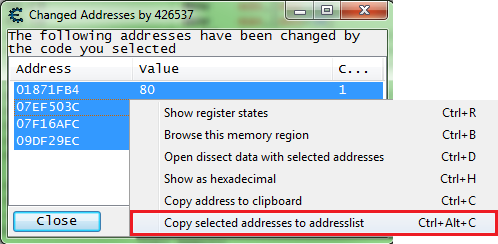
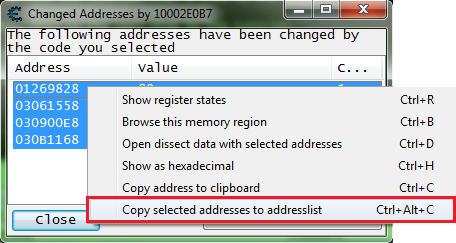
So go ahead and add them to the address list.
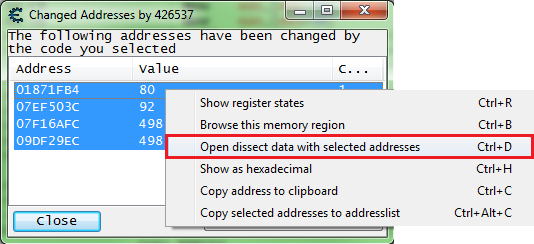
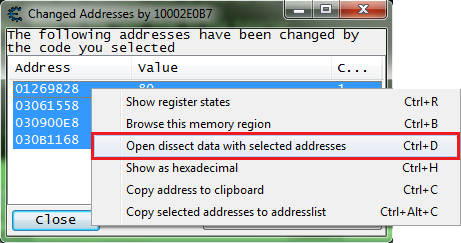
Then let’s open the dissect data structure form.
You’ll get some pop ups, after going thought them you should see a form like this. Note that I had to expand the width of the form to be able to move the columns.
So here we can see that the team variable is at offset 0x10 of the structure.
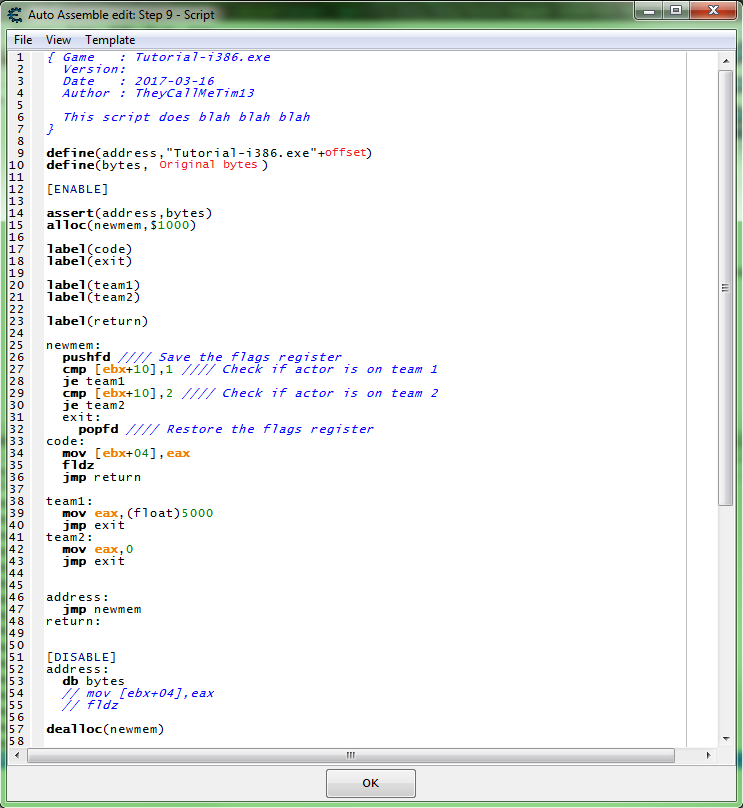
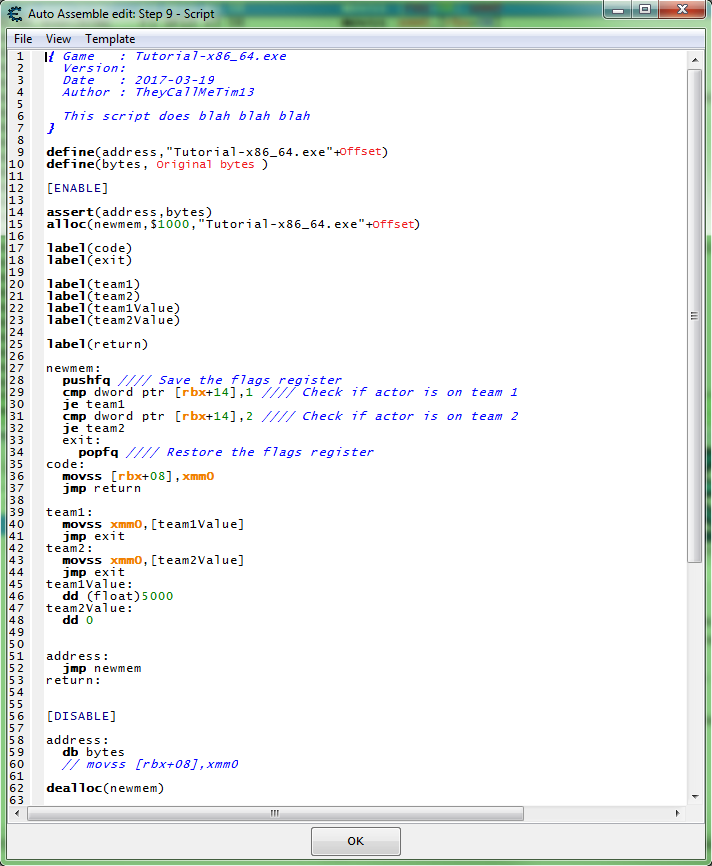
Now we need to add some injection code to a script, then add some code that checks the team variable of the structure, to determine which actors are allies and which are combatants.
So we want some this like this.
So with this script enabled, when the game writes to an actors health here is what will happen after the jump to the hook code:
With this script enabled, click the restart game and autoplay button, then you should see the form change and look like this.
So click the next button to complete the tutorial.
Then you should see a form telling you that you have completed the tutorial.
Find a difference in the registers [ edit ]
After you have found the function that decreases health.
Right click the instruction in the disassembler view form, and select find out what addresses this instruction accesses.
Then click the attack button for all 4 values.
You should have all 4 addresses in the debugger list.
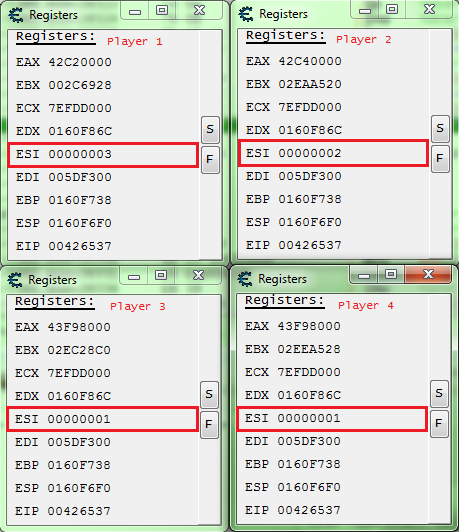
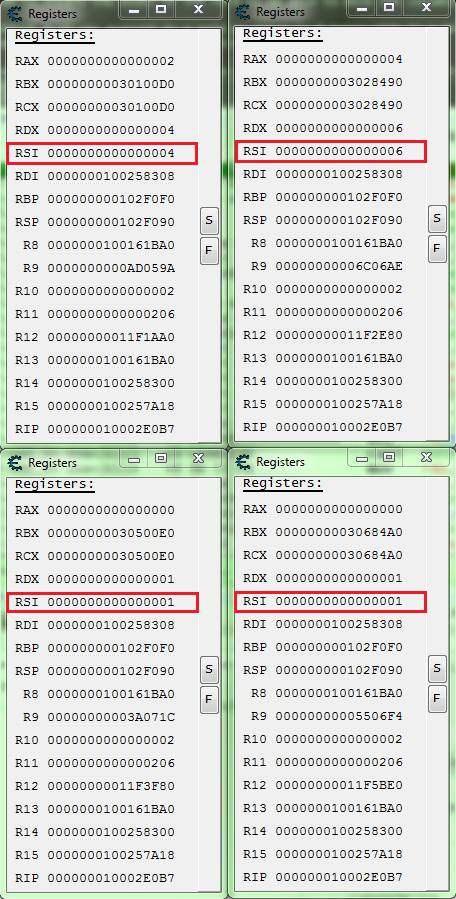
Now let’s look at the registers to see if we can find a difference in the allies and combatants.
Select each address individually and press Ctrl+R.
Arrange the forms to make it easier to compare.
So here we can see that ESI is 1 for the combatants.
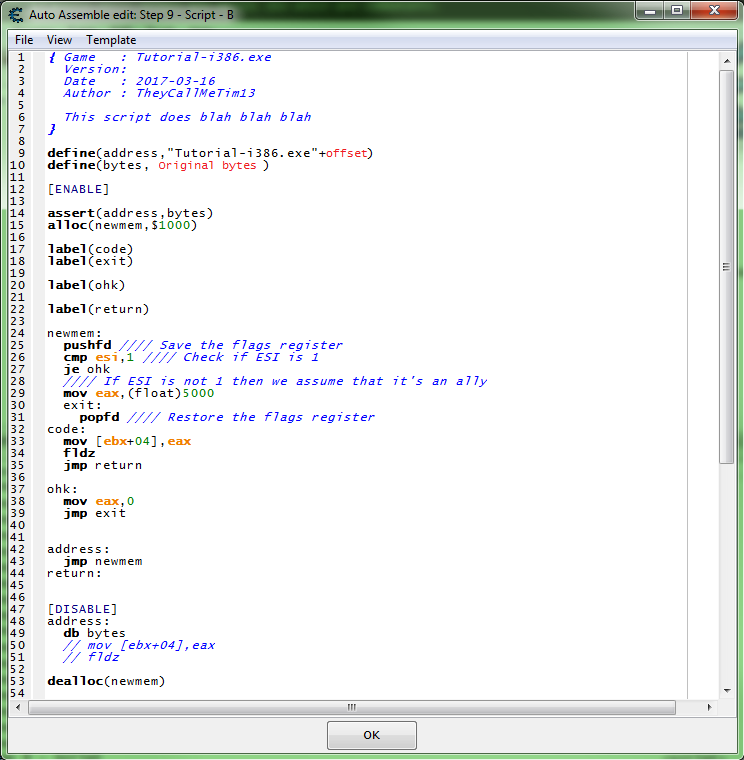
So a script like this should work.
So with this script enabled, when the game writes to an actors health here is what will happen after the jump to the hook code:
With this script enabled, click the restart game and autoplay button, then you should see the form change and look like this.
So click the next button to complete the tutorial.
Then you should see a form telling you that you have completed the tutorial.
Cheat Engine Tutorial Guide (x64)
So let’s go through the Cheat Engine Tutorial (x64).
So open Cheat Engine, then in the main menu select help then select Cheat Engine Tutorial.
Then attach to the Cheat Engine Tutorial process, it should be ‘Tutorial-x86_64.exe’.
If unsure how to attach to the process see: How to attach to a process
Contents
Step 1: Welcome [ edit ]
When the tutorial launches you should see some thing like this, you can just click the next button after reading the help text.
Save the password in later steps in case of crashes (from injections) and for restarting at a later time.
Step 2: Exact Value scanning [ edit ]
So for step 2 you will see some thing like this.
What we need to find is the health, and here it’s an integer.
So setup the memory scanner to find an integer and for exact value scan then set the value to the current health value, most integers will be stored in a 4 byte variable, so let’s start there.
Note: Integers can be stored in a 1 byte variable (byte), 2 byte variable (int16/short), 4 byte variable (int32/int), or 8 byte variable (int64/long).
When ready click the first scan button.
You Should see a list of addresses, in the found address list, like this.
Now Click the hit me button, then reenter the current value and click the next scan button.
Note the red value in the list, this shows that the value has changed.
After clicking next scan you may need to keep clicking hit me and rescanning tell the found address list is small enough to work with.
Just double click the address in the found list to add it to the cheat table. Then change the value and freeze the address, double click the value in the address list to edit it, freeze it by clicking the enabler/freeze box.
Now the next button should be enabled, click it to go to the next step. Click the hit me button again if the next button is not enabled already.
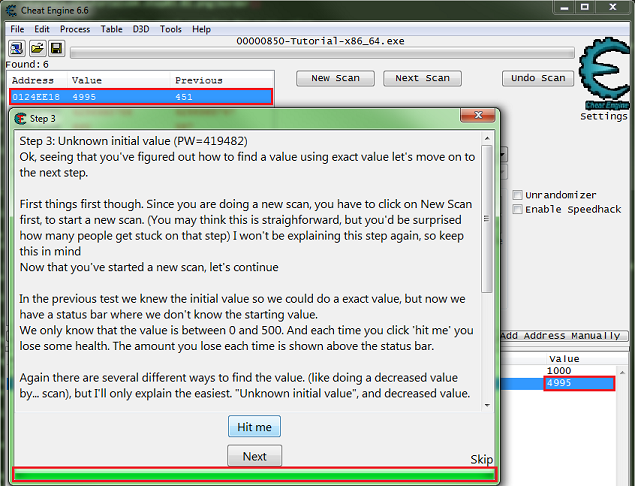
Step 3: Unknown initial value [ edit ]
When you start step 3 you should see the form looking like this.
Like the help text said make sure to click the new scan button before starting new scans.
This clears the found results to start scanning for a new value.
Here is where I suggest going ahead and clicking the hit me button, just to see how the value is decreased to help in determining what value type to scan for.
Note that the value was decreased by an integer, that is a non fractional number.
So I would setup the scanner for 4 bytes and unknown initial value. Then click the first scan button.
Now click the hit me button.
Then set the scan type to decreased value and click the nest scan button.
Note the number of found addresses, this is kinda small for most games these days, the found results can easily be in the millions for most games.
Now just keep decreasing the value with the hit me button, and scanning for a decreased value, until the found results is small enough to work with.
Now we just pick an address and change the value to see if it has the desired effect, this is just how it works.
Here is where I suggest that you always note the values (or just Ctrl+C) before changing them to set them back if they are not the right value, to keep from changing a bunch of unknown addresses and corrupting your save files when doing this in games.
The next button should become enabled as soon as you set the value to 5000. After changing the value and clicking the hit me button the progress bar should fill, but this is not needed.
Now the next button should be enabled, click it to go to the next step. Click the hit me button again if the next button is not enabled already.
Step 4: Floating points [ edit ]
When you start step 4 you should see the form looking like this.
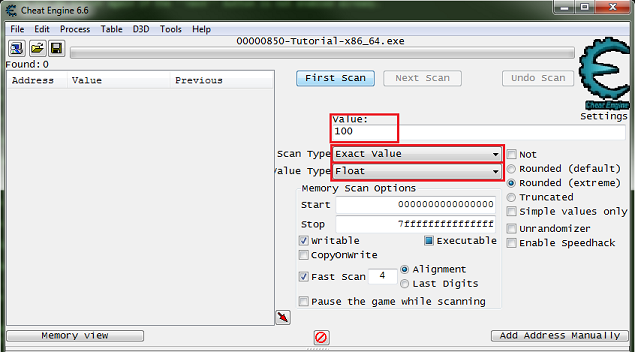
So click the new scan button. Then setup the scanner for a float, exact value, enter the current health value.
When setup click the first scan button.
So just scan like before to find the health address, then add it to the address list.
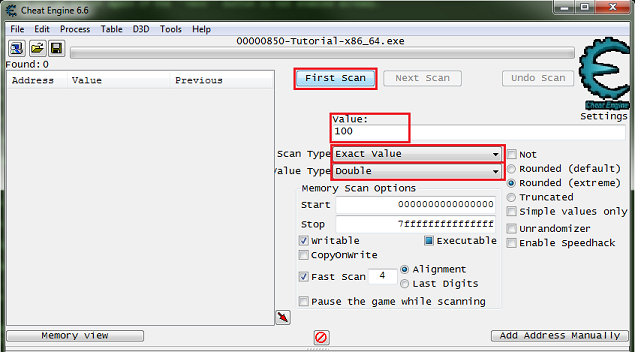
Now click the new scan button again. Then setup the scanner for a double, exact value, enter the current ammo value.
When setup click the first scan button.
So just scan like before to find the ammo address, then add it to the address list.
Now change the values to 5000, then the next button should become enabled. Then click the next button to progress to the next step.
Step 5: Code finder [ edit ]
When you start step 5 you should see the form looking like this.
So first find the value then add it to the address list.
Go ahead and save the table and the password at this point, just in case the debugger isn’t setup right.
If you need help setting up the debugger see: Debugger options
After you have the address in the address list right click it then select find out what accesses this address.
Cheat Engine will prompt you about attaching the debugger, just click the yes button.
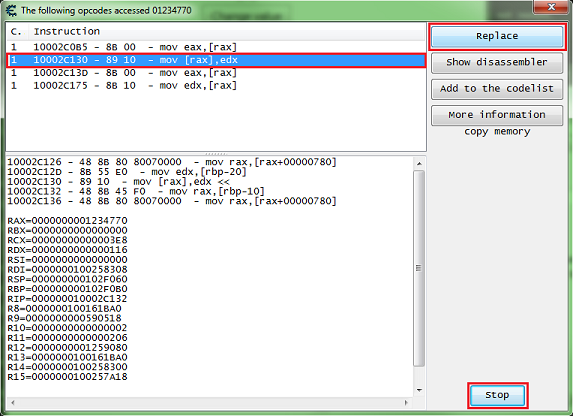
Then a debugger form will open, now click the change value button, and you should get code that shows up in the debugger form.
What we want is a write instruction. So we will be looking for some thing like one of the following:
Select the code line of the write instruction, you can click the show disassembler button to see the code in memory, then click the replace button.
Don’t forget to click the stop button.
The replace button will replace that line of code with NOPs.
Cheat Engine will prompt you for a name for the entry it will add in the advanced options list.
Enter a name and click the OK button.
Now click the change value button back on the tutorial.
The next button should become enabled, then click the next button to advance to the next step.
When entries in the advanced options list are replaced, they will show up with red text.
The advanced options list can be viewed by clicking the advanced options button in the status bar on the bottom left corner of the Cheat Engine main form.
To restore the original code for an entry in the list, right click the entry and select restore with original code.
Note that the text is black after restoring.
Step 6: Pointers [ edit ]
When you start step 6 you should see the form looking like this.
So first find the value then add it to the address list.
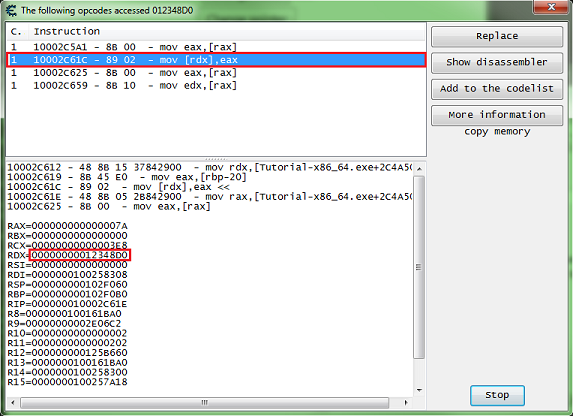
After you have the address in the address list right click it then select find out what accesses this address.
Then click the change value button, to have the process access the address.
When choosing the code to find the base address for the pointer, try to select an instruction that doesn’t write to the same register as the base address.
Here we’re interested in the value between the square brackets (‘[‘ and ‘]’), so here we want the value of RDX.
The offset here is 0, if the instruction had some thing like this:
mov [rdx+ 12C ],eax
Then the offset would be ’12C’ (0x12C), note that this is in hex.
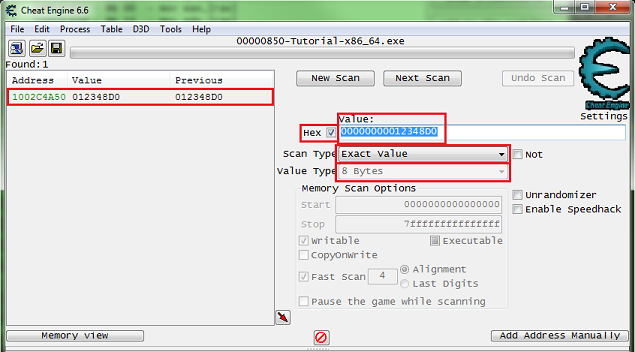
Now set the scanner for 8 bytes, exact value, check the hex check box, then take the value found and put that as the value to scan for.
When ready click the first scan button.
Look in the found address list for address with green text, these are static addresses.
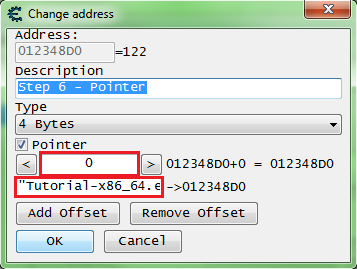
Add one to the cheat table, double click the address of the memory record that was added to the address list, copy the address then check the pointer check box, and paste the address in the pointers base address.
If you are unsure how to do this look here: How to add addresses to the address list
So my pointer will look like this.
It should be setup some thing like this, remember to set the offset to the offset you found.
Click the OK button when the pointer is setup.
Now freeze the value at 5000 and click the change pointer button, the next button should become enabled.
If the next button doesn’t become enabled then select another address from the found list, look for a green one that had it’s value changed, and set it up like the last one and see if it points to the right value, if so change the value freeze and click the change pointer button.
Click the next button to advance to the next step.
Step 7: Code Injection [ edit ]
When you start step 7 you should see the form looking like this.
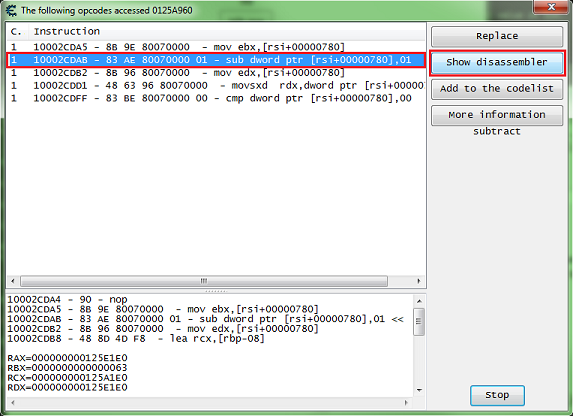
Here we’ll follow the the same procedures as step 5, but instead of clicking replace click the show disassembler button.
This will open the disassembler view form at the instruction’s address.
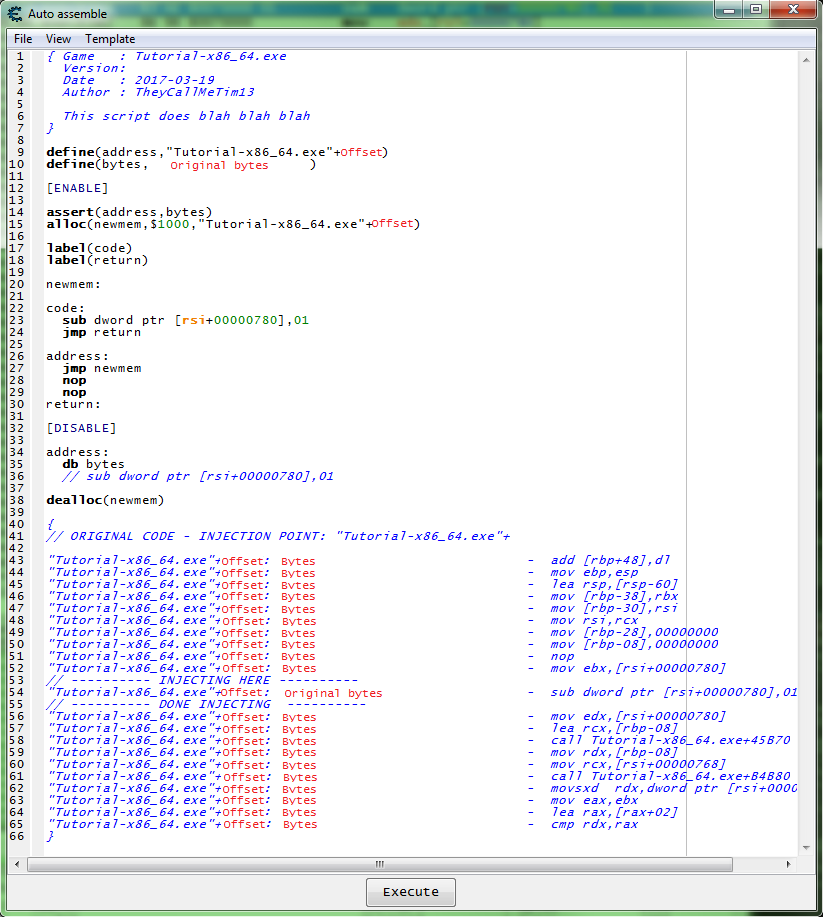
With the instruction selected press Crtl+A, to open an auto assembler form.
In the auto assembler form menu select template then select full injection.
This will generate some script to start you out.
Now we need to add some code that will increase the value by 2, then remove the original code that decreases the value.
For increasing the value we can use INC or ADD.
So let’s try some thing like this.
Now add the script to the cheat table.
If you are unsure how to do that look here: How to add script to table
Then enable the script and click the hit me button.
This should enable the next button, so click the next button to go to the next step.
Step 8: Multilevel pointers [ edit ]
When you start step 8 you should see the form looking like this.
Manual Iteration [ edit ]
So here we will follow the same steps as step 6, except we’ll see what accesses the base address we find, and we’ll keep repeating this until a static base is found.
So here is my first debugger output.
I did find a static base on the first scan of the base address but I remember this being a false base. So here what we want is a base address in the form of ‘process.exe+offset’, you can try one of the others that look like ‘module.dll+offset’ but I want to say that here they will prove to be false pointers. And yes most newer games will have many false values and pointers.
And the debugger output from the address holding: 0000000001287960
And the debugger output from the address holding: 0000000002D6D540
And the debugger output from the address holding: 0000000002D6CE40
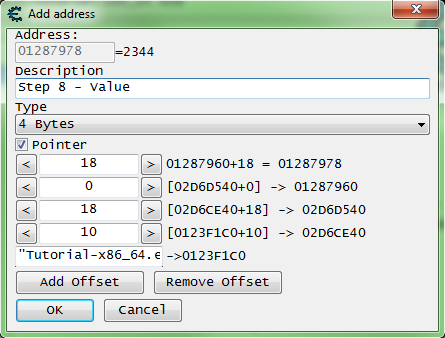
Now we scan for that base ‘000000000123F1C0’ and you should find a static address, but in real games you would keep going until a static base is found.
With that static address as the base my pointer will look like this.
Pointer Scan [ edit ]
The pointer scan can be used to solve this quickly by first finding the address of the desired value, saving a generated pointer map, restarting the game, searching for the address again, saving another pointer map, and then comparing the two. More information can be found in Help_File:Pointer_scan.
Finally [ edit ]
After you have found the pointer, freeze it at 5000, then click the change pointer button. If you found the right base the next button should become enabled after about 2 seconds. So click the next button to go to the next step.
Step 9: Shared code [ edit ]
When you start step 9 you should see the form looking like this.
So here like the help text says there is far more than one solution.
First we need to find one of the addresses and add it to the table.
If you are having trouble finding an address, remember to try different value types, and don’t forget to start new scans.
Then like in step 7 we want to see what accesses the address, to find the function that writes to the actor’s health.
Go ahead and save the password if you want to try different ways, this is the last step in the tutorial.
So here it’s good to understand what we’re actually looking for to tell allies and combatants apart.
When the game or engine is written, actors and players might be written like this.
The team it self could be a structure, say if it’s declared as an object class like the ‘Coords’ variable, which we would want to look for a pointer to the actor’s team structure.
So one way we could do this is to find the team id or team structure in the player structure.
Find the team id in the player structure [ edit ]
After you have found the function that decreases health.
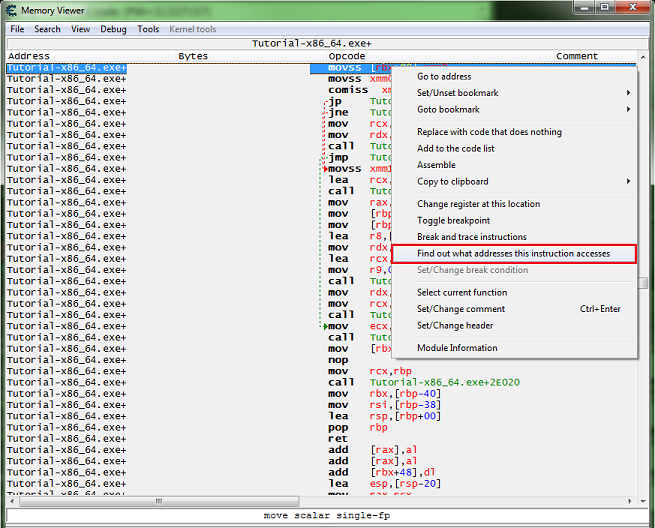
Right click the instruction in the disassembler view form, and select find out what addresses this instruction accesses.
Then click the attack button for all 4 values.
You should have all 4 addresses in the debugger list.
So go ahead and add them to the address list.
Then let’s open the dissect data structure form.
You’ll get some pop ups, after going thought them you should see a form like this. Note that I had to expand the width of the form to be able to move the columns.
Now on mine offset 0x10 was guessed as a pointer which is 8 bytes wide in a 64 bit process. I saw that the pointers at 0x10 had values that really didn’t look like pointers.
So I had to switch it to 4 byte, and add a new element set it’s offset to 0x14 with 4 byte value type. This is often the way it works.
So here we can see that the team variable is at offset 0x14 of the structure.
Now we need to add some injection code to a script, then add some code that checks the team variable of the structure, to determine which actors are allies and which are combatants.
So we want some this like this.
So with this script enabled, when the game writes to an actors health here is what will happen after the jump to the hook code:
With this script enabled, click the restart game and autoplay button, then you should see the form change and look like this.
So click the next button to complete the tutorial.
Then you should see a form telling you that you have completed the tutorial.
Find a difference in the registers [ edit ]
After you have found the function that decreases health.
Right click the instruction in the disassembler view form, and select find out what addresses this instruction accesses.
Then click the attack button for all 4 values.
You should have all 4 addresses in the debugger list.
Now let’s look at the registers to see if we can find a difference in the allies and combatants.
Select each address individually and press Ctrl+R.
Arrange the forms to make it easier to compare.
So here we can see that RSI is 1 for the combatants.
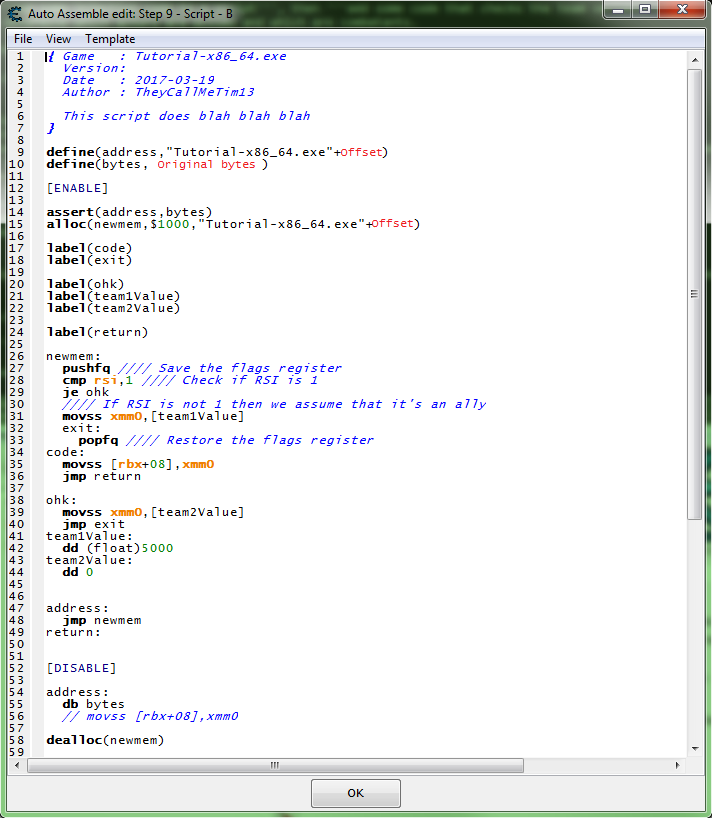
So a script like this should work.
So with this script enabled, when the game writes to an actors health here is what will happen after the jump to the hook code:
With this script enabled, click the restart game and autoplay button, then you should see the form change and look like this.
So click the next button to complete the tutorial.
Then you should see a form telling you that you have completed the tutorial.
Lua Basics
Lua interaction is done a few ways in Cheat Engine.
Contents
Lua Engine [ edit ]
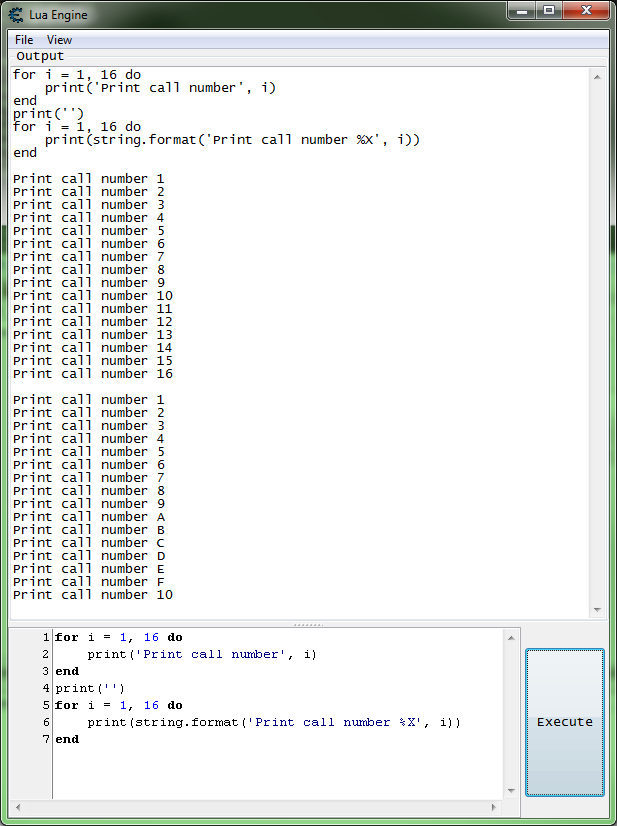
The Lua Engine form contains a text box for lua’s standard output (print calls use the standard output) as well as an interactive script box that you can directly execute lua script. You can open or save scripts from here.
Cheat table lua script [ edit ]
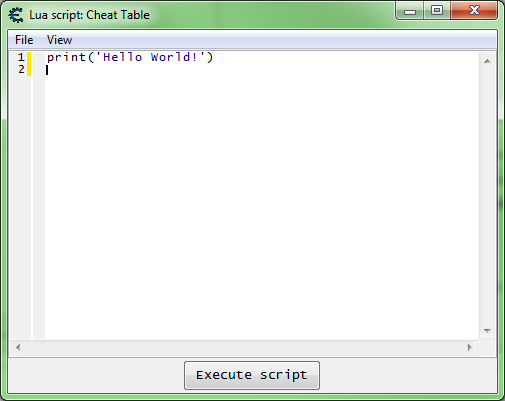
From the Cheat Engine main form press Ctrl+Alt+L, to open the cheat table lua script form.
This script is associated with the cheat table. By default when opening a cheat table file Cheat Engine will prompt you that the table has a table lua script and asking you if you want to execute it.
Note: You can change what Cheat Engine does with the cheat table Lua script in the Cheat Engine general settings.
From the cheat table lua script form menu you can select file then select new window to open new script windows.
Script windows [ edit ]
You can debug the scripts written here by setting a breakpoint by clicking next to the line numbers.
You can have as many script windows open as you want, simply click File then New Window. If you save these scripts as lua files in the same directory as your cheat table or any directory included in the
string. You can run them from other scripts using lua’s require, which will only run a script the first time it’s required (or if package.loaded.filename is set to nil), and dofile, which will run a script every time you call it. Note that you do not use the extension with require, «.lua» is assumed, but you do need it with dofile.
require ( ‘Script1’ ) dofile ( ‘Script1.lua’ ) require ( ‘Script1’ )

