How to draw anatomy
How to draw anatomy
Human Anatomy Fundamentals: How to Draw Hands
Of all parts of the body, the hand is by many considered to be the hardest to draw. We all have stories of how, early on, we would keep our characters’ hands behind their backs or in their pockets, avoiding as much as possible the task of tackling hands. Yet paradoxically, they are our most readily available reference, being in our field of vision every moment of our lives. With just one extra accessory, a small mirror, we can reference hands from all angles. The only real challenge, then, is the complexity of this remarkably articulated organ: it’s almost like drawing a small figure onto a larger one, one doesn’t know where to start.
In this tutorial we will deconstruct the hand’s own anatomy and indeed demystify it, so that when you look at a hand for reference, you can make sense of it as a group of simple forms, easy to put together.
I use the following abbreviations for the fingers:
Basics of the Hand
Here’s a quick look at the bone structure of the hand (left). In blue, the eight carpal bones, in purple, the five metacarpal bones, and in pink, the 14 phalanges.
As many of these bones cannot move at all, we can simplify the basic structure of the hand: the diagram on the right is all you really need to remember.

Note that the actual base of the fingers, the joint that corresponds to the knuckles, is much lower than the apparent base formed by flaps of skin. This will be important to draw bending fingers as we will see later.
Based on the above, a simple way of sketching the hand is to start with the basic form of the palm, a flat shape (very much like a steak, but roundish, squarish, or trapezoidal) with rounded angles, then attach the fingers :

If you have a hard time drawing fingers, it’s very helpful to think of them, and draw them, as stacks of three cylinders. Cylinders are easy to draw under any angle, taking away much of the headache of drawing fingers in perspective. Observe how the bases of the cylinders are exactly the folds you need to draw when the finger bends.

This is important: The joints of the fingers are not aligned on straight lines, but fall onto concentric arches:

In addition, fingers are not straight, but bend slightly towards the space between MF and RF. Showing this even subtly gives life to a drawing:

Let us not forget the fingernails. There is no need to always draw them, indeed they are a degree of detail that only looks right when the hands are seen sufficiently close up, but we are not usually taught how they should look, and because of this, I for one couldn’t make them look right for a long time. Here are some notes on the fingernail:
Proportions
Now, taking the (apparent) length of FF as our base unit, we can roughly put down the following proportions:
I said «roughly» because these do vary with people, sometimes a lot, but remember that deviating from the norm on paper can look wrong. If in doubt, these measurements will always look right.
Details
The basic shape is only one challenging aspect of the hand; the other may be the detailing of folds and lines. Who hasn’t been frustrated by drawing a hand and not being able to get all these lines to look right? Let’s look at fold lines and some measurement details:
Note also, in the diagram above, how the fingernails are not drawn fully but indicated in a subtle way appropriate to the overall level of detailing (which is rather higher than necessary, for purposes of showing all the lines). The smaller the hand you’re drawing, the less detail you want in it, unless you want it to look old.
I didn’t mention the lines of the hand above, so let’s take a look at them closely here:
Now, what do we see when the hand is extended and seen sideways?
Note also that when seen from the outside, the palms shows another, new contour line. It starts at the wrist and, as the hand turns more, joins up with the LF line, until it covers up the Th base:

Range of Motion
Detailed articulation implies movement, and the hands move constantly. Not just for functional uses (holding a mug, typing) but also expressively, accompanying our words or reacting to our emotions. It’s therefore no surprise that drawing hands well requires understanding how the fingers move.
The Thumb and Fingers
Let’s start with the thumb, which works alone. Its real base, and centre of movement, is very low on the hand, where it meets the wrist.
The other four fingers have little sideways movement and mainly bend forward, parallel to each other. They can do this with a certain degree of autonomy, but never without some effect on the nearest fingers; try for instance to bend your MF alone, and see what happens to the rest. The Th alone is completely independent.
When the hand closes into a fist and the fingers all curl together, the whole of the hand maintains a cupped shape, as if it was placed against a large ball. It’s just that the ball (here in red) gets smaller and the curvature stronger:

When the hand is fully extended (on the right), the fingers are either straight or bend slightly backwards, depending on flexibility. Some people’s fingers can bend back 90º if pressure is applied against them.
The fully closed fist is worth a detailed look:
The Hand as a Whole
When the hand is relaxed, the fingers curl slightly – more so when the hand is pointing up and gravity forces them bent. In both cases, the FF remains straightest and the rest fall away gradually, with the LF being the most bent. From the side, The gradation in the fingers makes the outer 2 or 3 peek out between FF and Th.
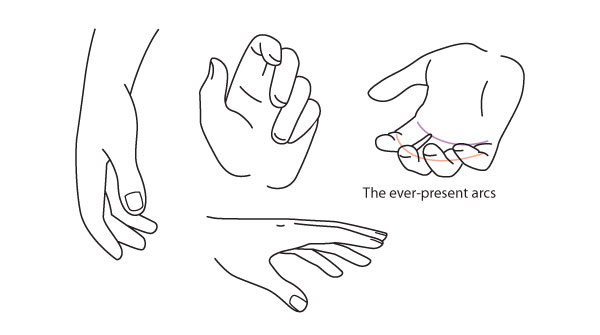
LF frequently “runs away” and stands isolated from the other fingers – another way of making hands look more natural. On the other hand, the FF and MF, or MF and RF, will often pair up, “sticking” together while the other 2 remain loose. This makes the hand look more lively. RF-LF pairings also occur, when the fingers are loosely bent.

Since the fingers are not the same length, they always present a gradation. When grasping something, like the cup below, the MF (1) wraps the most visibly around the object while the LF (2) barely shows.
When holding a pen or the like, MF, RF and LF curl back towards the palm if the object is held only between Th and FF (pick up a pencil lightly and observe this). If more pressure is applied, MF participates and straightens up as it presses against the object. Full pressure results in all the fingers pointing away as shown here.

As we have seen, the hand and wrist are remarkably articulated, each finger almost having a life of its own, which is why hands tend to stump the beginning illustrator. Yet when the hand starts to make sense, we tend to fall into the opposite trap, which is to draw hands too rationally – fingers carefully taking their places, parallel lines, careful alignments. The result is stiff and simply too tame for a part of the body that can speak as expressively as the eyes. It can work for certain types of characters (such as those whose personality shows stiffness or insensitivity) but more often than not, you’ll want to draw lively, expressive hands. For this you can go one of two ways: add attitude (i.e. add drama to the gesture, resulting in a dynamic hand position that would probably never be used in real life) or add natural-ness (observe the hands of people who aren’t thinking about them to see the casualness I’m referring to). I can’t possibly show every hand position there is, but I give below examples of constrained vs. natural/dynamic hand:

*Note in this particular case – trained fighters will always hold their fingers parallel while punching (as in the forced position), otherwise they may break their knuckles.
Diversity
Hands vary individually just as much as facial features. Males’s hands differ from female’s, young from old, and so on. Below are some existing classifications, but they don’t cover the whole range of characters a hand can have. Character is a good word because it’s most useful to draw hands as if they were characters with their own personality: delicate, soft, dry, callous, uncouth and so on. (See Practice Time)
Hand Shapes
This is really about the proportion of fingers to hand:

Finger Shapes

Even fingernails are not all the same! Well, Mother Nature gives us flat or round nail bases, really, and the different ways of styling the nail are man-made.
How To Practice Drawing Anatomy: The Essential Guide
If you want to grow as an artist when your subject of choice is the human form, then you need to learn how to practice drawing anatomy.
There’s no getting around this. Unless you have a solid understanding of how the human body is put together and how the muscles and bones move, you won’t be able to draw realistic human figures.
Drawing the human form is not without its challenges, and one of the chief amongst them is being able to draw figures that appear life-like. Without a solid understanding of anatomy, your figures will come out looking stiff and lifeless.
If you look back at some of the old masters, you can see that they had a good understanding of anatomy. Leonard da Vinci, one of the greatest and most influential artists in history, was renowned for his study of anatomy.
The old masters studied anatomy because they understood the importance of knowing how the body worked so that they could reproduce the body in their artwork.
If you hope to be able to create drawings, paintings, or sculptures that look life-like, then you need to learn how to practice drawing anatomy.
Drawing the Proportions of the Human Form
The human form is complex. When drawing it, you have to draw a head, neck, torso, arms, legs, and hands. That’s a lot of different areas you have to focus on, and you have to make sure that they are all drawn proportionately.
When you are drawing a portrait or a figure, if the proportions are not correct, the drawing will not look right. How do you get better at drawing the human figure proportionately? You practice. A lot.
Drawing the Head and Neck
When drawing the human figure, getting everything in proportion is essential, but it’s even more important when you are dealing with the head and neck. The human face is the most recognizable thing in the world to all of us, and a mistake made when drawing the face, head, or neck will be easily recognizable.
So, how do you avoid making mistakes when drawing the head and neck?
Drawing The Human Body with Shapes
Please enable JavaScript
First, always start out your drawing with a light sketch made with loose strokes. Any drawing you ever create should start out with a solid foundation, and the first step in creating that foundation is with a light and loose sketch.
Don’t focus on details with this sketch that will come later. Instead, just get the basic shape of your figure down, along with the posture you want your figure in.
It helps to break down the different parts of a person into simpler forms when you are drawing the figure. When drawing the neck, it’s basically a cylinder, and the head is shaped like an oval.
These are oversimplified explanations, but these are the basic shapes. They are going to differ from person to person, so look at your reference and adjust your sketch accordingly.
What will the shadows look like?
First, the eyes of your model will be in a shadow. Light will be blocked by the forehead and brow, casting a shadow on the eyes.
There will also be a shadow under the nose since the nose will block light. The upper lip will be slightly darkened when the light source is directly above, as well.
The last significant shadow will be on the neck, which is under the head, and will be in a shadow as a result.
What about highlights?
The next component for drawing the head and neck is adding hair.
Many artists struggle when drawing hair, so if this is something you have trouble with, don’t let that bother you. Just keep practicing, and you will get better at it.
Drawing the Torso
When drawing the torso, it helps to think of the basic shapes involved. The human torso is roughly rectangularly shaped, with the top being wider than the bottom for most people.
So, start by sketching in this basic shape. Having a solid knowledge of anatomy is essential here.
Understanding how bones and muscles move can mean the difference between drawing something that looks flat and drawing something that looks like a three-dimensional human body.
When drawing in the major muscle groups, you mustn’t outline them. Unless you are drawing a comic book, you should never outline your figures.
Just sketch in the shape, look at your light source, and allow light and shadow to indicate the placement of muscle and fat.
Drawing the Arm
Drawing The Legs
Drawing and Sketching the Hands and Feet
Drawings hands and feet is a challenge for many artists, even artists that have been training and practicing for years. Hands, in particular, are challenging to draw. There’s the hand, four fingers with three joints each, and then a thumb with two joints.
That’s a lot of moving parts. Don’t forget veins either. They are present in most hands and have to be drawn in as well.
As with every other part of the human body, when drawing hands and feet start out by drawing their basic forms, then move forward with more details from there.
The best way to think of fingers and toes is to picture tubes that have joints.
These joints move to change the shape of the fingers and toes. But each segment of these tubes remains the shape size regardless of how the joint bends.
So, when drawing hands or feet. Focus on the position of each segment of finger or toe concerning the angle that you are viewing your subject at.
Just draw each segment and focus on each section at a time, then make sure they line up with one another. While this approach to drawing fingers and toes simplifies things, it’s still going to take you a good deal of practice before you can master drawing them well.
Learning to Draw the Human Skeleton
If you want to learn how to practice drawing anatomy, you need to learn how to draw the human skeleton. Why?
Because the skeleton is the framework that the rest of the human body is built on. You need to understand how the joints connect, and how they move so you can realistically depict human figures in your artwork.
When drawing the skeleton, you don’t need to focus on creating detailed shadows and highlights. Unless, of course, you are planning to draw a skeleton as a finished piece of art.
Instead, focus on getting the basic shapes down. Does this mean you can ignore shadows and highlights? You could, but anytime you can practice accounting for a light source when drawing, you should take it.
When drawing a skeleton, you could try drawing it in ink. If you are drawing just to study anatomy, and not to create finished artwork, drawing with a pen can be a lot of fun. Ink lets you get shapes down quickly, and facilitates quick sketching.
No matter what medium you choose to draw your skeleton in, make sure that you pay attention to the size and shape of the bones, and how they all connect to each other.
How to Draw the Ecorche
Have you ever wondered how to draw the Ecorche? Have you ever wondered what an Ecorche even is? Ecorche is a term used to describe an anatomical depiction of a body, minus the skin.
Before you allow yourself to feel disgusted, keep in mind that artists have drawn the Ecorche for centuries.
Why is Drawing the Ecorche so Important?
Because it helps you to get familiar with anatomy. The best thing you can do as a figure artist is to draw the Ecorche in as many different positions as possible.
You don’t just want to draw it standing there, you want to draw it in motion. This will help you to see how the muscles move, which is essential when you are trying to depict a realistic looking person.
Drawing the Facial Expressions
Facial expressions are a challenge even for seasoned artists. Why is that? Because facial expressions are so intricate.
Facial expression depicts emotions, so getting them right is essential if you are trying to create a certain mood in a drawing.
For example, if you are drawing a somber scene, the last thing you want is to draw a face on your figure that appears joyful.
How do you get better at drawing facial expressions? By practicing. Before you start drawing facial expressions, make sure that you can draw facial features in proper proportion to each other.
There’s no sense in trying to run here before you can walk. Practice drawing different faces over and over again. Then do anatomical studies, and do a lot of them.
Then, look at photos of people making different faces. Or, better yet, look at a live model making different faces. Then you will have a decent foundation to build on, giving you the insight you need to create realistic expressions.
You should also spend time people watching. Just watching how people act in daily life can help provide you with understanding how different facial expressions convey different emotions.
Anatomy Drawing Tips: Draw From A Real Physical Model Or Body
Have you ever seen an artist mannequin? Of course, you have. If you are an artist, you have undoubtedly seen an artist mannequin.
They are fantastic tools for giving an artist a visual reference to see how limbs look at different angles, and also how light interacts with those limbs at different angles.
But is an artist mannequin a substitute for a live model, or even a photograph? No. Not at all. A mannequin is pieces of wood that have joints in them so you can pose them in different positions.
A live model, or a photo, is a real human figure that you can look at for reference. There really is no comparison.
Why would you use an artist mannequin?
If you lack access to a model or a photo for reference, then an artist mannequin can be used as a stand-in. It won’t be as good as a model or photo, but it beats having nothing.
Another possible use would be for shadow reference for a figure you have a photo of. Let’s say that you have a picture of a model in a pose that is perfect for the drawing you are doing. But, the light source isn’t quite right? What do you do? You get out your trust artist mannequin and use it to visual where the shadows should be. This saves you the effort of having to mentally picture where shadows should be, giving you a visual reference that can help you to create a more realistic drawing.
‘Drawing Figures On The Hoof’
The human body is constantly in motion. Even as we sit in an idle position, our chest moves with each breath, or eyes blink, our stomach moves in and out, etc.
The point here is that since the human body is always in motion, even when it appears to be at a state of rest, you need to learn how to draw figures that convey a sense of movement. How do you do that?
You do it by drawing figures on the hoof. What does that mean? It merely means that you are drawing quickly and instinctively.
You aren’t worried about getting everything perfect, you are just trying to get your ideas down on paper as quickly as possible.
When drawing like this, don’t draw with your wrist. I’ll repeat that, don’t draw with your wrist. Draw with your entire arm. Make big strokes, and don’t worry about the details!
Drawing figures on the hoof will allow you to draw a figure quickly. That means you can draw another one more quickly, then another. When you master the skill of drawing of the hoof, you’ll be able to draw dozens of figures an hour.
Why is that important? Because it lets you get in much-needed practice. How do you get better at drawing the human form? By drawing it as much as possible.
When drawing of the hoof, you can be doing this as practice, or as a precursor to a finished drawing. If you are doing this as a precursor to a final drawing, make sure that you keep your sketch quick and light.
When you draw in this manner, your final artwork will often have more life and convey a greater sense of motion.
So, how should the process of drawing on the hoof be used to create a finished drawing?
First, either choose a photo for reference or find your model. Next, start a light sketch of your figure using quick strokes. No details are necessary at this point. Sketch your figure quickly, paying attention to the pose and posture.
Then, after you have this quick sketch done, go ahead and finish the drawing; however, you usually would.
The Efficiency of Line: Drawing Figures With A Few Simple Lines
Are incredibly intricate drawings of the human form that have tight details and correctly rendered shadows and highlights amazing to look at?
Absolutely. Is this the only way to draw a human figure? Absolutely not. However, you choose to develop your own style, don’t discount the possibility of drawing simpler figures using fewer lines.
Many artists have mastered the ability to not only draw with minimal lines but to do so while still capturing the essence of their subject.
When you draw in this manner, you have to use great care. With a more sophisticated line drawing, a few mistakes may be overlooked. With a simpler line drawing, any mistakes you make will be magnified. You can draw figures using fewer lines and a simpler approach as a sketch, or as a finished piece.
Drawing The Human Form Is Very Challenging And Rewarding
For many artists, the ultimate achievement is being able to draw a human form realistically. Many of use first discovered our love for art by looking at paintings by the old masters.
We wondered how did they do that? How did they create something so amazing and so life-like? It was this sense of wonder that drove many of us into exploring our own artistic talents.
The human form is complex, but it can be mastered if you are willing to work to do it. There’s no quick solution here, you either put in the time, or you fail. Try to break down the human form into simpler shapes to build the foundation of your artwork.
Use light, gestural drawings to help establish the composition and convey a sense of movement. Always pay attention to the light source and how it casts shadows and creates highlights.
You also need to develop a style of your own. You could draw in a highly rendered manner, with a simple line approach, or some mix of the two. Above all else, have fun, don’t get discouraged, and keep working so that you can master drawing the human form.
It takes time to master the human form, so be patient with yourself as you progress along your artistic journey.
Create Art With My Favourite Drawing Resources
General Drawing Courses. I like Udemy if you want to develop your knowledge of drawing techniques. Udemy is an excellent choice due to its wide range of creative courses and excellent refund policy. They often have monthly discounts for new customers, which you can check here. Use my link.
Sketching and Collage. Take a look at this sketching resource I have created. Use this link.
Proko. Is one of my favorite teachers who surpasses in the teaching of Anatomy and Figure drawing. Prokos course breaks down the drawing of the human body into easy-to-follow components aiding the beginner to make rapid progress. For this, I really like Proko.
Art Easels. One of my favorite ways to draw is by using a drawing easel, which develops the skill of drawing on a vertical surface. The H frame easel is an excellent vertical way to add variety to the style and type of marks you create when using a drawing board.
To see all of my most up-to-date recommendations, check out this resource I made for you.
Ian Walsh is the creator and author of improvedrawing.com and an Art teacher based in Merseyside in the United Kingdom. He holds a BA in Fine Art and a PGCE in teaching Art and Design. He has been teaching Art for over 24 Years in different parts of the UK. When not teaching Ian spending his time developing this website and creating content for the improvedrawing channel.
Recent Posts
How to Draw with a Pencil on Canvas. As an artist, learning how to draw with a pencil on canvas may take some time, but it’s time well spent. Many artists make the mistake of thinking that canvas is.
How to Draw Bangs We instantly recognize bangs in a hairstyle that defines how the front portion of hair covers the forehead. There are many different bangs styles based on the shape of a.
Top 5 Dos and Don’ts of Drawing Anatomy
Drawing Anatomy for Beginners, Learning the Ins and Outs
When it comes to learning how to draw people successfully, knowing human anatomy is key. Jeff Mellem, artist and author of How to Draw People, shares the top dos and don’ts of drawing anatomy for beginner artists so you can start drawing more realistic figures in no time.
Figure Drawings excerpted from “How to Draw People” by Jeff Mellem
Learning to Draw? Check Out Our Live Video Series, Drawing Together!
Learn to draw people, body parts, and much more in our live weekly video series.
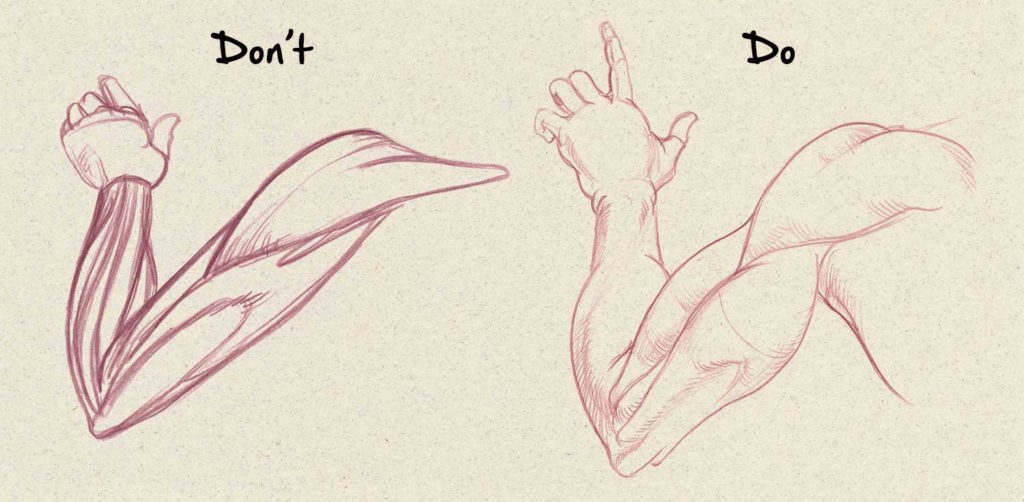
1. DON’T think like an anatomy book
Drawing anatomy for beginners can feel overwhelming at first because there are so many muscles on the body. When you’re looking at a model and you see a lot on bumps, you might be tempted to pull out an anatomy book to decipher what’s going on under the skin.
An anatomy book is great at telling you what you’re looking at but it’s not very helpful at telling you the three-dimensional shape of the muscles.
DO think in simple volumes
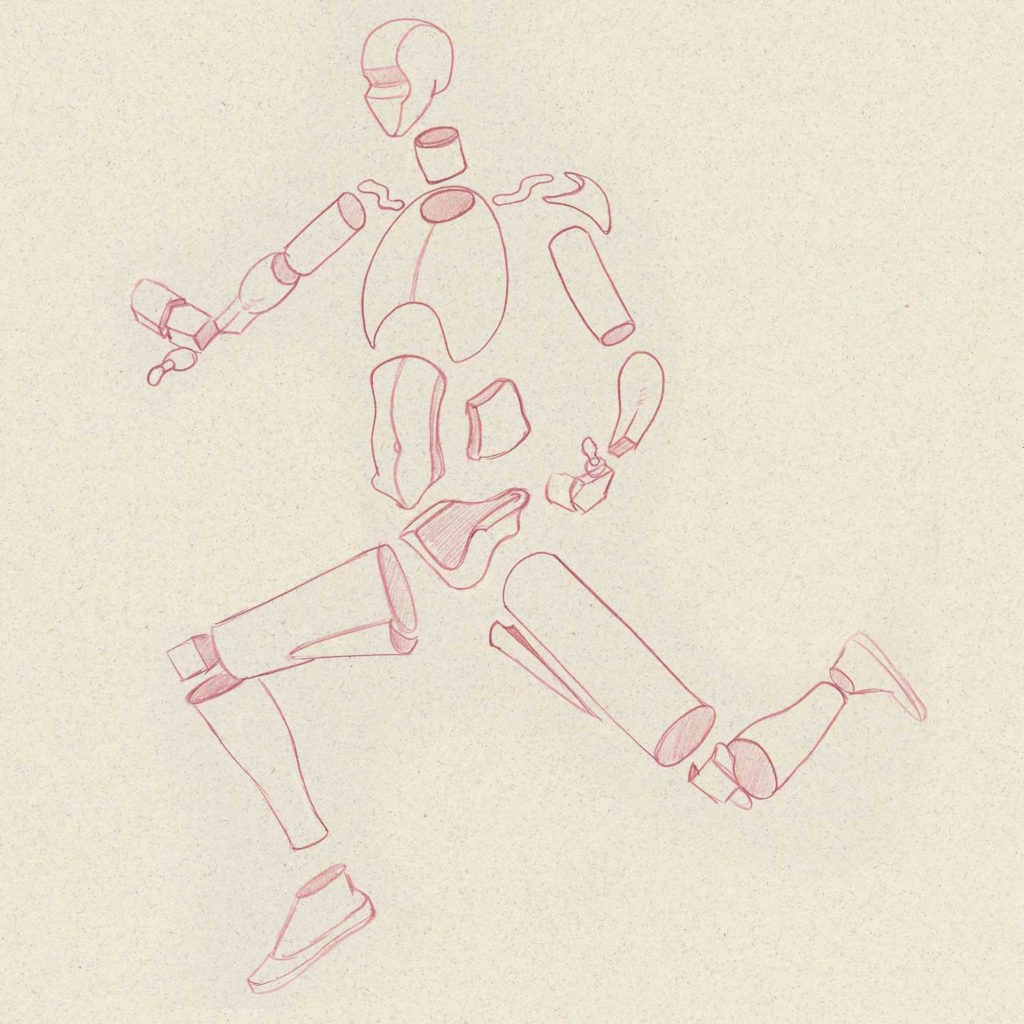
When you first approach figure drawing, you need to start out with establishing the basic volumes of the figure using spheres, boxes, and cylinders. By simply beginning with these basic shapes and then building up the complexity as you go along, you will be able to make your drawing maintain its sense of dimension.
If you copy contours before you build in the structure, I guarantee you’ll end up with a flat-looking drawing.
The drawing on the left overemphasizes the model’s muscles and it looks more like an anatomy book than a figure. An artist needs to think about the 3D shape of the muscles to give the figure an illusion of volume.
The Takeaway:
Use an anatomy book to understand what’s below the surface but think about each muscle in 3D. Don’t draw the muscles as a series of lines. Draw them as sculpted spheres, boxes and cylinders.
With that being said, you don’t always have to actually draw spheres and boxes on the page. If you look at an artist like Harry Carmean, you can see that while he sometimes is only drawing counters of the body, he is clearly thinking about the 3D qualities of what he’s drawing.
2. DON’T make muscles the focus
When artists first start paying closer attention to adding anatomy to their drawings, they often have a tendency to overemphasize the anatomy. The figures often end up looking like they have no skin. The muscles are there to add more realism to the figure, but they shouldn’t be the
This piece by Richard McKinley, Minnesota Morning, 9 x 12, has three focal points as marked.
Focal point art definition
The focal point of a painting is the area in the composition (. )
DO use muscles to reinforce the action
The focus of a drawing should convey an action, an emotion or the subject’s personality. You don’t want a viewer to stop and look at the parts of your drawing; you want the viewer to see the whole figure and be interested in what that figure is doing and who he or she is.
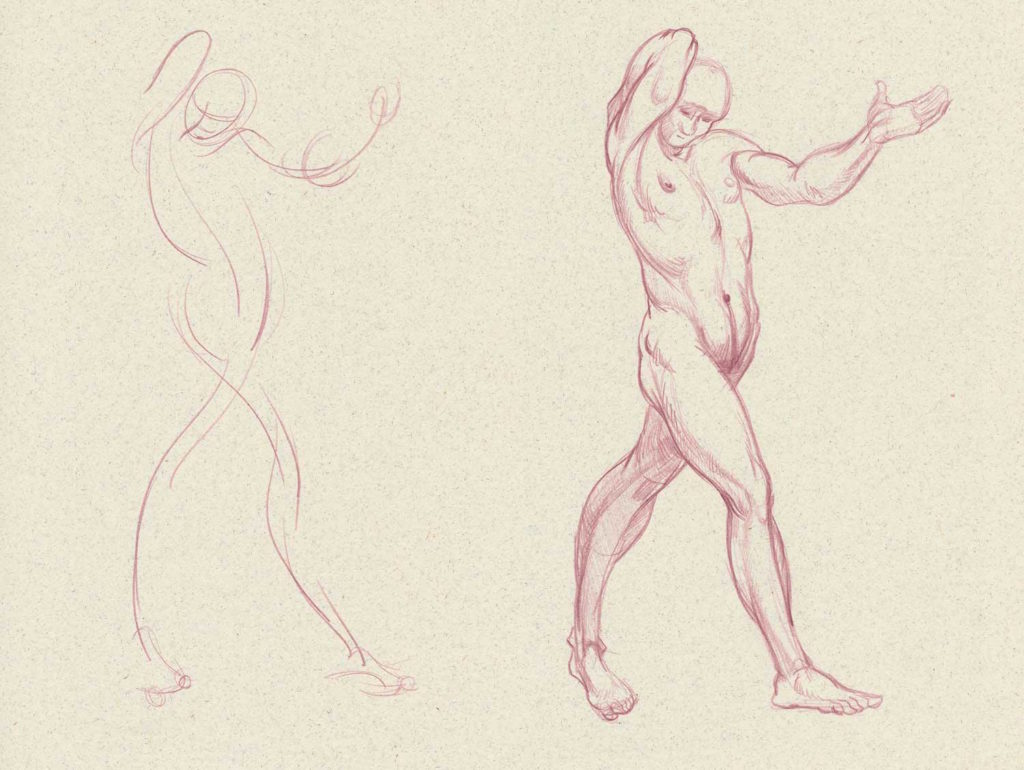
In order to maintain focus on the action it’s always a great practice to start all your drawings with a gesture drawing. A gesture drawing serves as a blueprint for the action. Everything that comes after is to help clarify and enhance that action.
The muscles should be drawn to amplify the movement of the figure and shouldn’t draw attention to themselves. A good example of this is comic book characters that have exaggerated anatomy to convey their strength.
A successful comic book page isn’t about the character’s muscles but about how that character’s power is being expressed in the story. The volumes of the muscles are designed to lead the eye through the body toward a point of action. The reader isn’t stopping to look at the character’s well-developed musculature.
Notice how the muscles in the figure on the right reflect the gesture drawing on the left. The muscles are used to reinforce the figure’s action, they aren’t the focus of the drawing.
The Takeaway:
Anatomy is there to add realism but it’s less important then conveying the action and attitude of the whole figure.
3. DON’T draw every figure with the same shapes
When artists start using basic shapes to develop figures they often start to fall into a pattern of using the same shapes to build every figure.
DO observe and adapt to your figure’s unique build
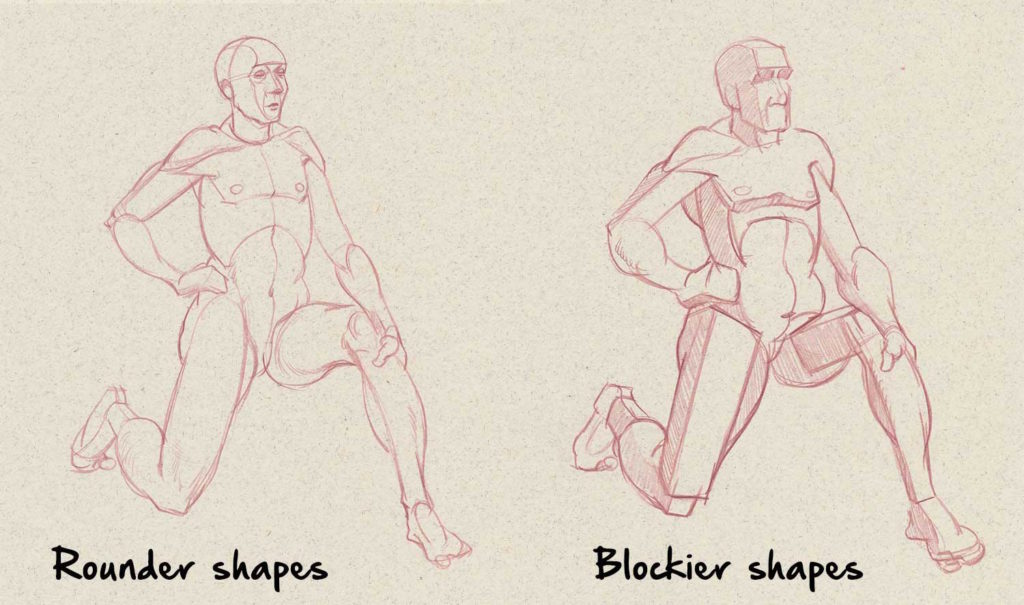
When you’re building your figure you have to look and adapt your shapes to the specific subject you’re drawing. You’re not going to use the same shapes for a bodybuilder that you would a sumo wrestler or a long distance runner.
You have to look at your subject and figure out what simple shapes are the best tools to develop your figure. For example, some people have very squarish heads which needs to be constructed from box shapes while others have a more roundish appearance that should be built from spheres.
These two figures are in the same pose but are built from different shapes. The figure on the right is built from more block shapes and it gives the figure a sturdier feeling.
The Takeaway:
Don’t approach every figure with a formula. Instead, observe and adapt your shapes to fit your subject.
4. DON’T copy what you see
If you only copy what you see you will never create what you imagine. I never saw the point of replicating a photo in a drawing beyond being an exercise to build observational skills. Why duplicate what already exists when you can interpret and adapt as you see fit?
DO recreate what you see on the page
Observational skills are important but not just for copying what you see. Use your observational skills to analyze your subject’s unique shapes so you can reinterpret it on the page. That means you aren’t copying counters of the body. Instead you’re recreating a figure on the page from the ground up.
You start by capturing its movement in a gesture, rebuild the figure three-dimensionally using basic spheres, boxes and cylinders, and then sculpt those simple shapes into anatomical forms. This is a very different process than just replicating what you see.
You’re combining what you see with your 3D knowledge of anatomy to recreate the figure on the page. This will not only help you to develop drawing that have a sense of mass but also will allow you to adapt and modify the figure to create something new.
This is just a fun drawing to help illustrate that you need to understand the 3D shapes of a figure and then you can reassemble them on the page. This is a different way of thinking than just copying the contours you see.
The Takeaway:
The job of an artist isn’t to replicate what he or she sees. It is to interpret what he or she understands. When drawing a figure, you bring in your knowledge of anatomy and volume to draw a figure rather than just copying contours and values.
5. DO pay attention to proportions and anatomy
To draw a realistic figure, you need to pay attention to accurately capture the figure’s proportions and anatomy. This comes from both studying anatomy and having good observational skills.
DON’T be overly rigid.
Anatomy and proportion are important. But alone, they don’t make for an interesting drawing. A figure drawing that feels like it has personality or appears dynamic is going to be more interesting than one that is technically correct.
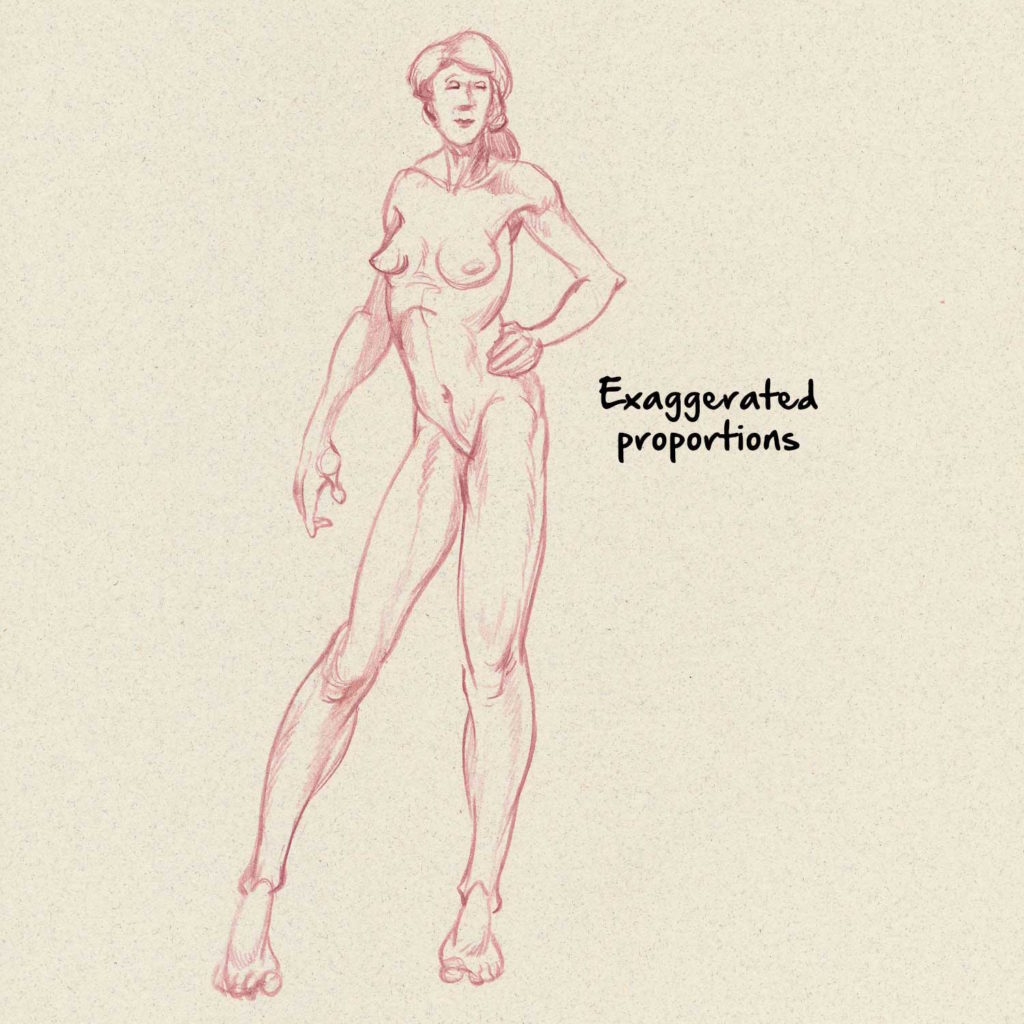
Let the anatomy and proportion take a supporting role to the underlying gesture drawing. Every step of your drawing should be to create a unified figure that has energy and attitude even if that means altering the figure’s proportions or anatomy to better emphasize that action.
This figure has exaggerated proportions – similar to those used in fashion drawing. It doesn’t matter that it’s not correctly proportioned if the decision to exaggerate is purposeful. You can find many examples of artists who distort and exaggerate proportions for stylistic reasons.
The Takeaway:
Drawing great anatomy helps artists create realistic-looking figures that appear to have actual mass and volume. However, the anatomy needs to add to the sense of movement of the figure and not distract from it. You must have the skill to be able to draw the muscles in 3D in order to modify and adapt the shapes and emphasize the movement and personality of your subjects.
Human Anatomy Fundamentals: Basic Body Proportions
In this human body drawing tutorial, you’ll learn basic human body outline drawing techniques. If you’ve practiced capturing energy in the previous tutorial, you’ll have acquired a good feel for loose sketching of people. We’re going to start giving structure to that feeling-based groundwork by studying the body with a more scientific eye.
Let me say that it will take many sessions to cover the wonders of the human body. Not only is it among the most sophisticated animal structures in nature, it is also one of those with the most variations: few other species come in so many shapes and colors. Nobody, therefore, should feel frustrated for having trouble drawing people; it is an ambitious undertaking.
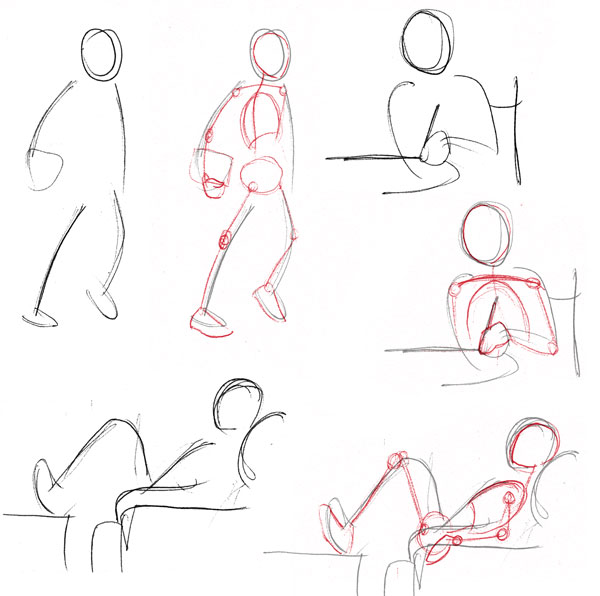

We’re going to build up this skill from the ground up, in the same order as the drawing process, starting with a simplified body drawing skeleton (the basic figure or stick figure), moving on to the volumes of muscle structure, and then finally the details of each part of the body and face.
The first fundamental skills to acquire are human proportions drawing techniques. And we’re going to be practicing with this basic figure for a while to become familiar not only with the conventional «ideal proportions», but also with the way they vary with gender, age, and even ethnic background.
If you’re drawing digitally, perhaps you want your work to look as if it’s created with pencil and paper. If this is the case, may we recommend one of the many Photoshop brush sets available on GraphicRiver, including this Classic Art Brush Pack.
What You Will Learn in This Human Body Drawing Tutorial
How to Draw a Body: The Basic Figure
Create Your Chart From Heads
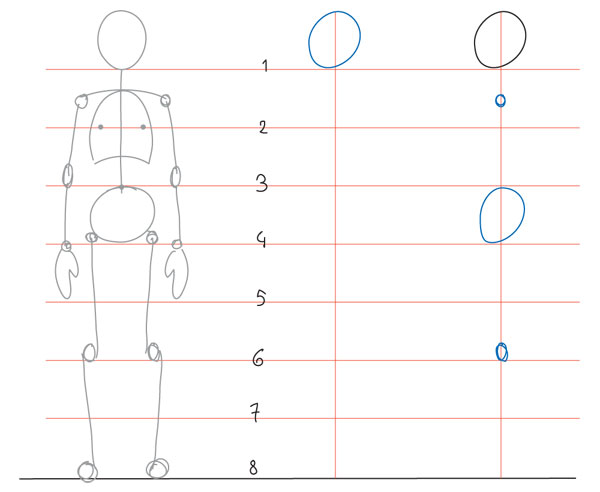
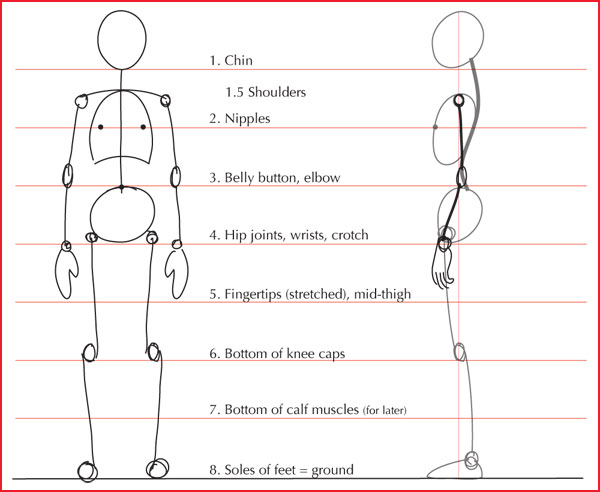
Let’s begin with human drawing basics. A well-proportioned figure, regardless of variations due to gender and such, is defined by the alignment of the joints, which is invariable (that is, we perceive something odd if it does vary). This is our groundwork for proportions. Draw your own chart with me as we go—it really helps with learning the material.
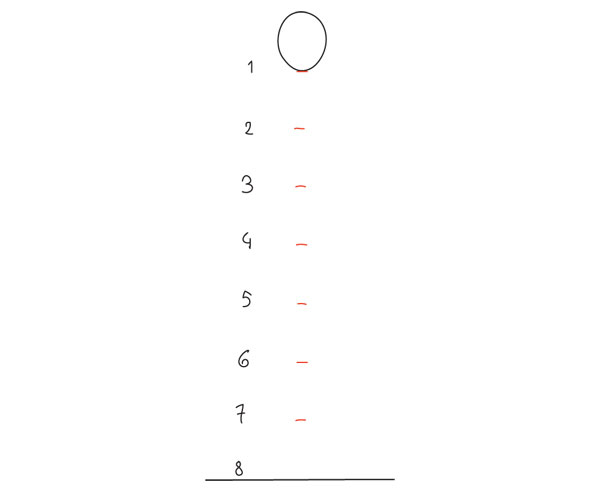
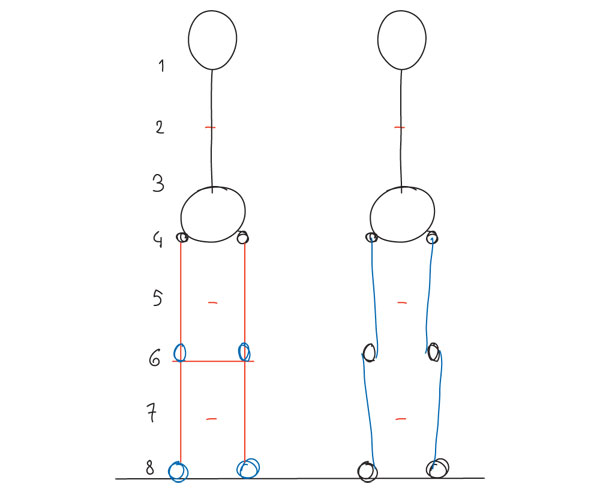
To learn how to draw a body, we start with the head. Start by drawing an oval or egg shape (pointy end down) for a head, and mark down eight measurements, the last one being the ground.
The measurement (ideal male height = eight heads) was set down during the Renaissance as an idealization of the human form. It’s rather obvious that very few people are actually eight heads tall (even Northern Europeans, who served as the basis for this model, are closer to seven heads), but this is still the best model to start with, as it makes it easier to grasp the alignments.

The Pelvis
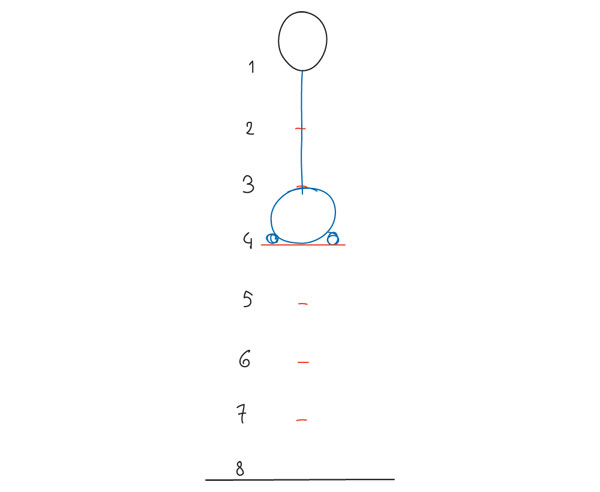
Add the pelvic bone next, simplified as a flattened circle between marks 3 and 4, with the hip joints sitting on 4. Its width is roughly 1.5 to 2 head-widths. You can now draw the spine connecting the head to this most important part of the body, its center of gravity and stability.

The Legs and Knees
Let’s assume this figure is standing with the feet vertically aligned with the hip joints. The knee joints sit on mark 6, as that line corresponds to the bottom of the kneecaps.
When the leg is stretched out, the knee joint is placed on a straight line with the hip and ankle (left). But this straight line is virtual: to complete the leg, connect the hip joint to the inside of the kneecap, and then again, the outside of the knee to the inside of the ankle (right). This is a very simplified but accurate representation of the actual bone structure, and it helps in drawing the natural look of the human leg, which tapers in from the hip, then staggers out at the knee, and tapers in again. It also helps with placing the muscles at a later stage.

The Ribcage, Nipples, and Belly Button
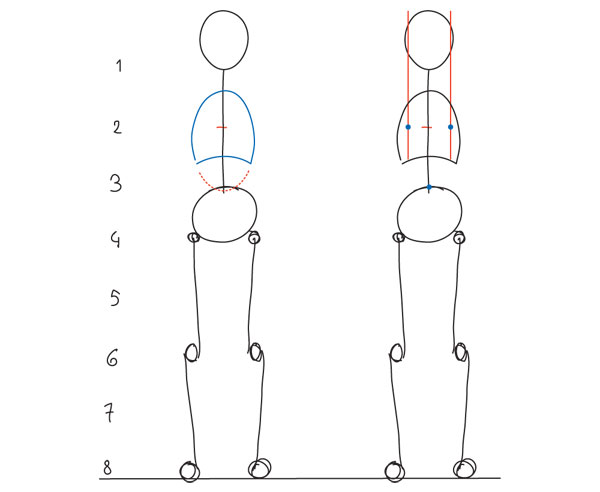
The ribcage-lungs group is the third important volume of the body, after the head and the pelvis. Simplified, it is an oval that starts halfway between 1 and 2, down to mark 3; but it is best to chop off the lower part of it as shown here to imitate the actual rib cage, as the empty part between the two volumes is important: it is soft and subject to change (flat belly, soft belly, wasp waist) and it is also where the most torsion and movement happens in the spine. It’s good to be aware of that and not to attach the torso and pelvis together like two blocks, as that would «block» your drawing’s range of motion. The width of the oval is roughly the same as the pelvis for now.
Two more details here: the nipples fall on mark 2, just inside the sides of the head, and the belly button on mark 3.

The Shoulders
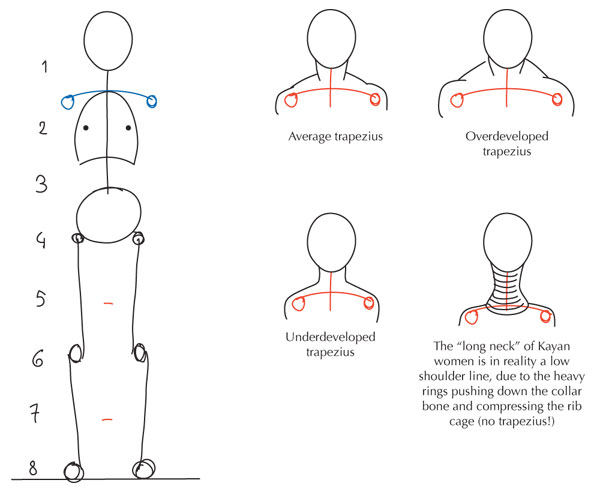
The shoulder line is about halfway between marks 1 and 2, with the shoulder width 2 to 3 head-widths, but its apparent position can vary a great deal. To begin with, it’s slightly curved down, but in tension the shoulders tense up and the curve can itself turn up and look higher. Furthermore, the trapezius muscle, which from the front appears to connect the shoulder with the neck, is highly individual; if it’s very muscular or carries much fat, it can make the shoulder line look so high there’s no neck; inversely, an underdeveloped trapezius, often seen in very young women, gives the impression of a long neck.
This brief digression into non-skeletal details is to ensure there’s no confusion between the actual position of the shoulder line and its apparent placement in a fleshed-out body, some examples of which are shown below.

The Arm, Wrists, and Hands
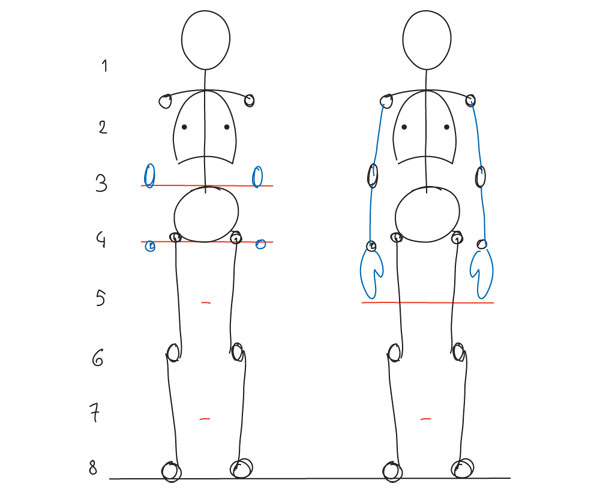
Finally, the arms. The wrists are on mark 4, slightly below the hip joints, which sit on it (you can test it out for yourself by standing up and pressing your wrists against your hips). The fingers end roughly at mid-thigh, which is mark 5. The elbows are a slightly complicated joint that we’ll examine in detail later, but for now it’s helpful to mark them as elongated ovals sitting on level 3.

We’re done. almost. Before summing this up, let’s extend those marks into lines and see how this works in profile.
How to Draw a Body: The Basic Profile
The next step in learning how to draw a body is the profile. Start by drawing the head again, the same egg shape but with the end pointing diagonally down, and drop a vertical line from the crown to the ground.
In an erect posture, you can place the pelvic bone (a narrower version of the head’s egg), the shoulder, and the knee roughly on this vertical line. They are on the same level as before: all the joints are, but the others are not on the same plane as these.

The Spine in Profile
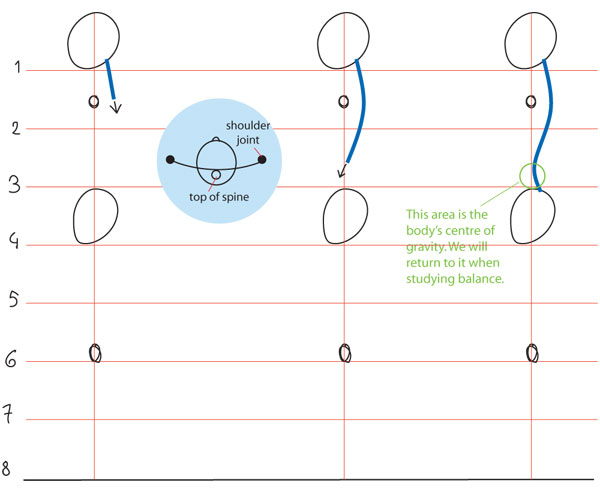
From the side, the spine is revealed as being shaped like a flattened «S». From the base of the skull, it moves down and back till it reaches its furthest point at the level of the shoulders (between the shoulder blades). Note the shoulder joints are ahead of the spine! This is because, again, the shoulder «line» is in reality an arc: the medallion shows a top view of it.
The spine then comes back forward, and peaks again (inward) a little above the pelvis (the small of the back, which varies in depth and can make for an arched back). Finally it changes direction again briefly and ends in the coccyx or tailbone.

The Ribcage and Legs in Profile
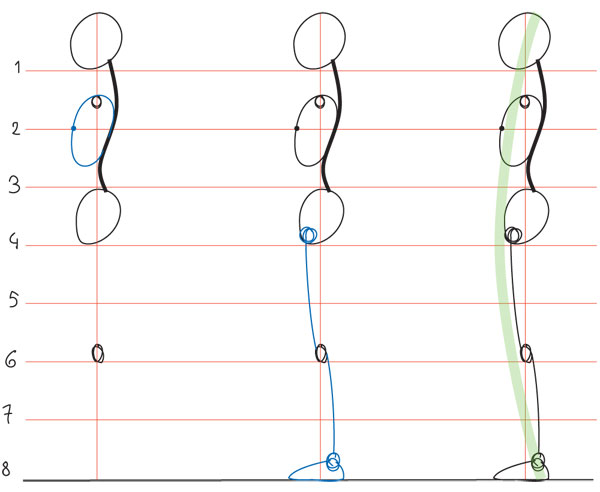
The ribcage is closely attached to the spine, and, in a reasonably fit body standing erect, the chest is naturally pushed forward.
The hip joint is ahead of our vertical axis, and this is counterbalanced by the ankle being a bit behind it. So our hip-knee-ankle line is slanted backward, and staggered again: from the hip joint to the front of the knee joint, and from the back of the knee joint to the ankle.
The overall effect of this posture is a visual arc from head to chest to feet (in green), and when it’s flattened or reversed, we perceive an uncertainty or slouch in the posture.

The Arms in Profile
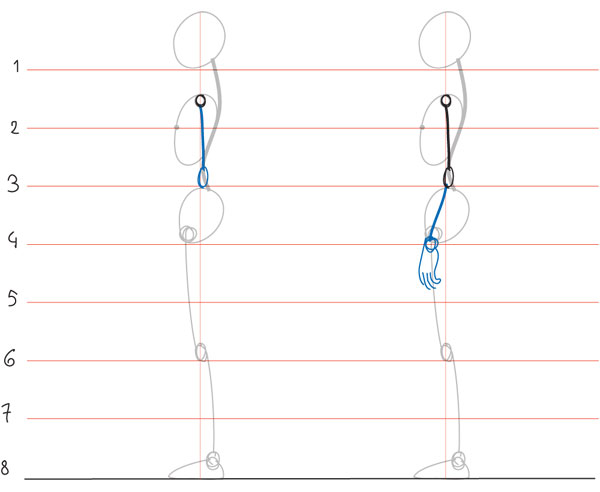
Finally, the arms. The upper arm falls fairly straight from the shoulder, so the elbow can be aligned with the latter (or fall slightly backward). But the arm is never fully stretched when at rest, so the forearm is not vertical: the arm is slightly bent, and the wrist falls forward, right over the hip bone. (Also, when the hand is relaxed, the fingers curl a little, as shown here).

How to Draw a Body: Summary
This completes the basic, undifferentiated human proportions drawing tutorial. Here’s a diagram to sum up all the human body outline drawing techniques we reviewed:
Human Body Proportions Drawing Reminders
The following human proportions drawings are a few useful visual reminders based on the body. They come in handy when the body is not standing upright.
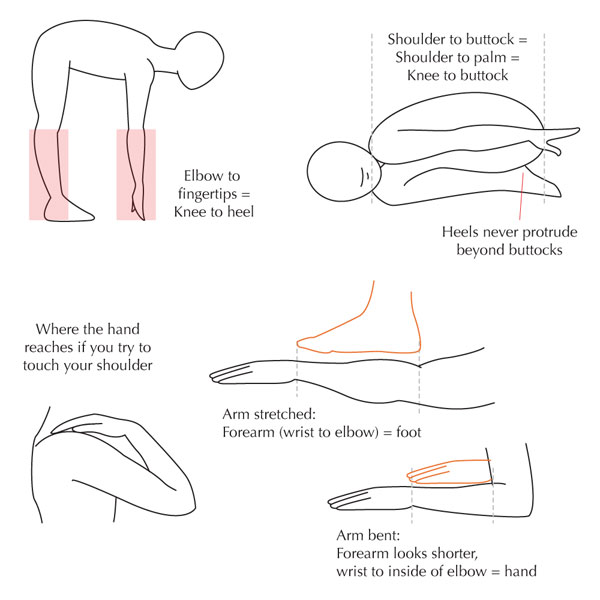
Body Drawing Practice Exercises
We’ve covered a lot of material in this body anatomy drawing tutorial. Now is a good time to pause the studying and familiarize yourself with this basic figure and the principles of drawing human body proportions. Then, we’ll move on to the differences between male and female structures (and others). For instance, you can integrate this new knowledge into your daily human drawing sketching practice by overlaying a quick energy sketch with this correctly proportioned basic figure.
Human Proportions Drawing Tips
I consistently start with the head, but it doesn’t really matter what part of the body you start drawing, if you’re comfortable and get a good result. If you’re unsure or are having a hard time, then I suggest trying with the head first.
Get used to drawing this basic figure with a light hand, since the finished body will be built up over it. Traditionally, the final lines are inked and the guidelines then erased (hence the importance of a light hand), but even when I’m sketching with a ballpoint pen with the intent of inking on a different sheet by transparency, keeping a light hand ensures I can see what I’m doing.

Discover More Awesome Human Drawing Tutorials
I hope you’ve enjoyed this tutorial about how to draw the human body step by step. If you want to learn even more, we’ve got this great learning guide: Human Anatomy Fundamentals. There you’ll find detailed human drawing tutorials and resources like these:




Editorial Note: This post has been updated with contributions from Maria Villanueva. Maria is a staff writer with Envato Tuts+.
Human Anatomy Fundamentals: Learning to See and Draw Energy
This is the first of a number of articles teaching everything you need to draw the human body at its most lively. But before embarking on a study of anatomy, we’re going to work on an essential preparation: learning to see, and to capture the energy of a body in motion or at rest.
A Preliminary to More Technical Studies
The technical study of the body, while necessary to the artist, can result in stiff figures that look put together. This is typical of anatomy study that is not supported by real life study: the student ends up literally putting the body together from what they learned, rather than recreating it from what they observed. Yet what brings a human figure to life cannot be taught or put down in a chart. It is the energy in that figure – happy, rushed, sorrowful, still, childish, uncertain, comfy, exhausted – you can only «learn» it from life. I put «learn» in quotation marks because you must not expect to learn it with the mind (the way you might learn that the average distance between two eyes is equal to an eye). You learn to internalize it, to feel it in your body. If you can feel it in your body, it will make its way into your drawing and you don’t have to think of how to do it. This is the key to expressive, lively drawing and it goes for non-human or even non-living subjects, too.
In the image below, the two characters essentially hold the same posture. The subtle difference is due to their different mindset, and expressing this in drawing – when the facial expressions are not even visible – came naturally from being able to feel each mindset and how it would influence the posture.

In the below image, there are things you just won’t find references for! In these cases your ability to internalize is a key asset.

Please don’t feel this is hard! It’s only tricky because we are always taught to learn with our minds, and this is an obstacle to drawing freely and well. The task this month is about relaxing and letting something instinctive take over.
What we’re going to do is observe living people and capture their energy on paper.
Phase One: Quick, Permanent Sketches From Real Life
You will need to have is a cheap sketchbook (not too small or only your hand will work: give yourself a chance to engage your whole arm) and a bold, permanent drawing instrument such as a ballpoint, marker or a chunky crayon.
Then, all you need to do is look at people and very quickly, in a few seconds, sketch the impression their posture makes on you, the emotions they give you. I filled the following page while in a coffee shop, watching people outside hurry through the rain.

As you can see, there is no art to this, no attempt to get proportions right or fill in details beyond that first burst. Sometimes limbs are shown, sometimes not, depending on what has struck me in their posture. Yet as basic as these scribbles are, they still convey something: you can tell these show different people in different states. They have something in common, the look of people in a hurry to get somewhere, but not identical. They have different energies. This is what I mean by capturing energy, and this is your practice for the time being!
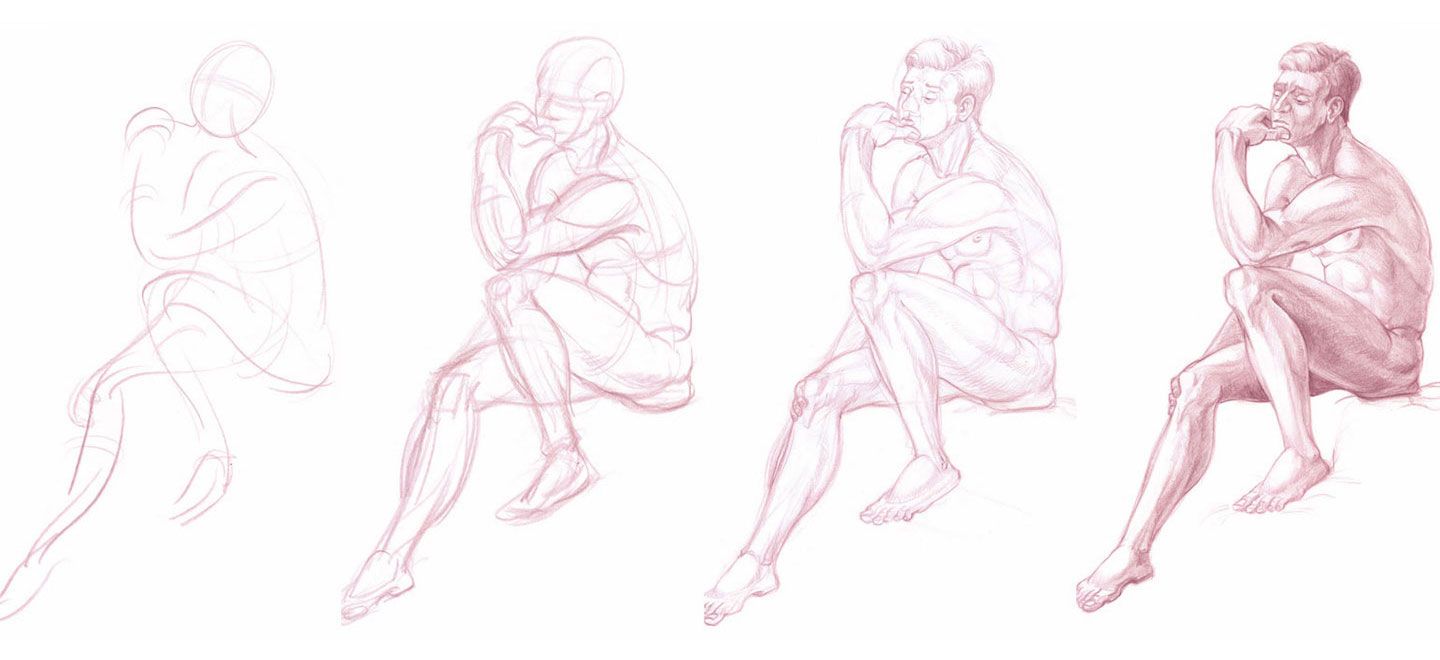
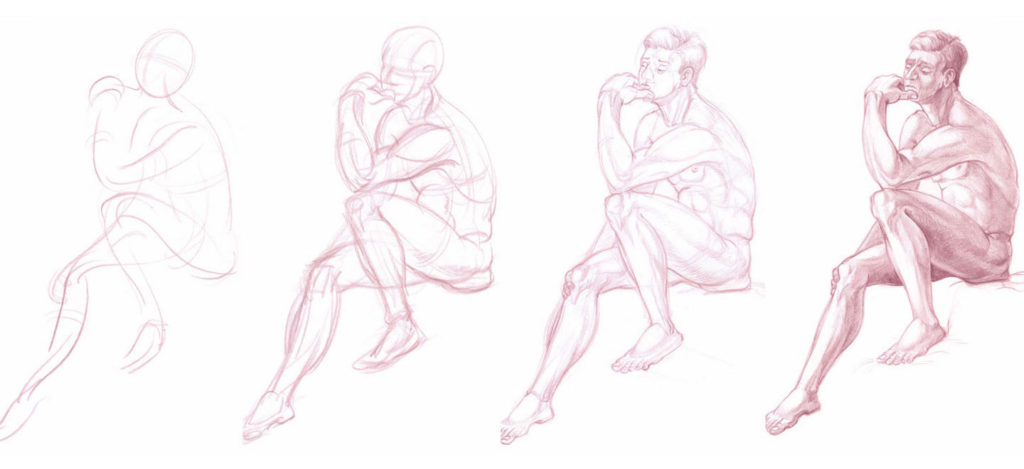
The reason we’re doing this before learning anatomy is that this skill serves as a base to draw lively bodies; while if the habit of technical drawing sets in first, it can be very hard to change and breathe life into that. People can get stuck in the «wooden manikin» syndrome and we don’t want that. In the drawings below, you can just see the energy sketch under the final lines, and how it allowed the proper anatomy built over it to retain the dynamism of the quick loose sketch.

Another desirable result of this practice: we learn a lot from observation, but even more from actively observing (e.g. sketching). While sketching my crowd above, I was noticing how someone bends to compensate for a heavy load, how rare it is to find someone walking upright in this tired society, how many people held a phone to their ear, etc. Merely observing is good and never a waste of time, but sketching these observations is even better: it’s like clicking «save» so they get stored in your system. The more you observe and sketch, the more you know in your body, instinctively, how to draw things. This will come in handy for phase two (and your drawing career, of course).
A Few Tips:
Phase Two: Quick, Permanent Sketch Without Reference
When you become comfortable doing quick captures (and I can never repeat enough, the more you’ve practiced, the better), you can move on to the next phase, which is the same exercise, but without looking at any reference.
This is where «feeling it in your body» kicks in. It’s not about visualizing your subject in your mind’s eye – not that this is excluded, but that comes as a consequence. In the following sketches, which took three minutes altogether, I wasn’t trying to capture their image, but the impression they gave me, even though they only existed in my head. Some are not so evocative, but among those who are, you can probably spot the fat man at a table, the forehead slap, the determined small person with his sword, the toddler and the coy girl.

Now fill your two pages a day with imaginary people doing imaginary things, but instead of observing them with your eyes, take a moment to sense what you’re about to draw. Some things may be harder to sense than others, and that’s normal: in some ways an artist is very much like an actor! If you’ve ever caught yourself mirroring the facial expression you were drawing (as I do all the time) then you know exactly what I mean. Just like an actor, an artist may specialize in niche «roles» or broaden his or her range to a variety of characters. and things, as shown in phase three.
Phase Three (Optional): Consider Non Human Figures and Objects
Both phases one and two can perfectly be applied to animals, nature and inanimate objects! Everything has an energy, everything has a character. Even lack of character is a character. Even though we’re only going to learn human anatomy for the time being, feel free to practice with anything else that catches your fancy.

Points to Consider
A Note on Accuracy
Notice how an expressive sketch can (and indeed often must take) liberties with its subject:

This is important. This is because I am drawing the feeling I get from the man playing, rather than reproducing what I see mechanically, which would only capture shapes. Your sketch of the same subject would look different but still clearly be the same subject. This is why tracing is not a good learning tool and why some highly realistic art, while impressive, feels dull and non-dynamic: Tracing life can never actually convey life itself. When we’re trapping life as lines on a flat surface, we need to compensate for it by putting something extra feeling of our own in the drawing. That’s why it’s almost more important to learn to feel and capture energy, than to learn anatomy with medical accuracy. A lively drawing is always more attractive than a lifeless trace (of course, it still needs to look right – it just doesn’t have to be a perfect copy).
We could put this in terms of drawing subjectively vs. objectively. An architect or engineer drawing plans, a medical illustrator, a naturalist need to draw objectively. An artist is usually only concerned with drawing subjectively (which is why this is our first lesson), especially if there is a question of developing style.
A Note About Style
Many young and aspiring artists are concerned about developing their style. Style is nothing but reality rendered through the filter of what is uniquely you. It’s not something you decide to develop. It is this kind of practice – drawing and drawing and drawing a lot, without thinking about it, that allows your hand to start drawing from the place in you that is unique. Your own unique style appears gradually over years of drawing as long as you’re not forcing yourself to copy someone else’s style. I say years, but the scale is not so much one of time as it is one of practice, so draw and trust that it will happen. In the same way, you can’t decide to make your body grow; it does that on its own as long as you give it proper food. The same happens with personal style. Don’t try to force it: just allow it to flower.
Share Your Sketches With Us
For this month, try out at least two of the three phases. Share with us what you’ve captured from people on the street, TV and more. By sharing each others impressions we can learn and perhaps recognize new poses.
Источники информации:
- http://improvedrawing.com/how-to-practice-drawing-anatomy-the-essential-guide/
- http://www.artistsnetwork.com/art-techniques/beginner-artist/drawing-anatomy-for-beginners/
- http://design.tutsplus.com/articles/human-anatomy-fundamentals-basic-body-proportions—vector-18254
- http://design.tutsplus.com/articles/human-anatomy-fundamentals-learning-to-see-and-draw-energy—vector-17027


