How to draw gore
How to draw gore
Рисование хоррора
Особенно актуальной тема хоррора становится к концу осени, когда многие люди хотят отметить Хеллоуин просмотром кино, атмосферной игрой или книгой данного жанра. Школа CG LAB сегодня расскажет о том, как рисовать жуткие иллюстрации, и что нужно знать для того, чтобы подчеркнуть эту атмосферу.
Приготовьтесь погрузиться в атмосферу ужасов! Бу!
Анатомия реальных животных и людей — это ваши помощники
Как правило, когда есть желание нарисовать несуществующий объект в виде какого-либо монстра, вам всё равно придётся опираться на реальность. Если не знать, как грамотно построить человеческую/животную анатомию, вам будет попросту трудно совмещать эти виды таким образом, чтобы рисунок выглядел гармонично. В хорроре антропоморфные чудища выглядят цельными, а не так, как будто к человеку случайно сбоку прилепили часть, скажем, крысы. Чтобы уметь грамотно совмещать объекты и получать из них нечто новое — нужно хорошо знать, как каждый из них выглядит по отдельности.
Работы Кита Томпсона, канадского художника-фрилансера.
Игры и фильмы — пополнение визуальной библиотеки
Страх может казаться довольно простой эмоцией, но чтобы создать нечто по-настоящему жуткое, одного желания недостаточно. Для начала неплохо бы иметь базу, которая поможет вам определиться, какие вещи могут считаться страшными, а какие нет. Обратитесь к классике ужасов, вроде фильмов «Оно», «Кошмар на улице Вязов», «Семь дней» или «Пила». Попытайтесь анализировать саму психологию страха: какие моменты кажутся вам наиболее пугающими, и что именно вызывает тревогу. Обычно это цвет и свет кадра, тоновой ключ, жуткий вид главного антагониста, переживания и эмоции тех, кто попал к нему в руки, динамика происходящего и музыка. Последнее нельзя передать в рисунке, но остальное вполне можно «взять на карандаш» и подумать над вопросом страшных составляющих как следует.
В прикреплённых ниже скриншотах вы отыщете не только самостоятельные по композиции и передаче эмоций кадры, но и советы, что можно посмотреть на Хеллоуин 🙂
кадры из фильмов: «Бабадук», «Техасская резня бензопилой», «Тишина», «Нечто», «Полтергейст», «Проклятие Аннабель», «Синистер», «Реинкарнация», «Заклятие-2», «Тихое место», «28 дней спустя», «Изгоняющий дьявола»
Изучайте работы других художников
Художники, выбравшие жанр хоррор, достаточно хорошо знают базу, и даже отдельно взятая картинка может являться огромным источником вдохновения и понимания, как устроена жуткая иллюстрация. Присмотритесь к рендеру отдельных объектов, композиции, общей атмосфере и передаче эмоций художником.
Аудитория
Это важный критерий, от которого будет зависеть очень многое в работе. Для детской иллюстрации, когда надо создать, например, очевидного злодея с коварными и беспощадными планами, будут использоваться более «мягкие» методы, чем если бы вы создавали такого же персонажа для взрослого зрителя. Например, в первом случае вряд ли будет уместно использовать много крови или отрубленные конечности в дизайне костюма, но со взрослыми можно не ограничивать свою фантазию касательно устрашающих элементов дизайна.
Приведённый ниже пример —это визуализация детских кошмаров (кажется, не только детских…) от датчанина Джона Кенни Мортенсена, сценариста и режиссёра передач для юных зрителей на телевидении. Некоторые из рисунков можно отнести к уместным примерам страшилок для детей, а вот другие заставят содрогнуться и зрителя старшего возраста.
Не перегружайте работу деталями
На самом деле данное правило касается практически каждой иллюстрации, не обязательно хоррора, если вы не преследуете цель создать нечто, которое можно разглядывать часами, и на это направлена общая задумка. Простота — это не всегда плохо: есть масса примеров, где это плюс. К примеру, страшное северное создание из книги Симмонса «Террор» описано, как нечто среднее между акулой и медведем, с длинной шеей. Представили? Это должно выглядеть по-настоящему устрашающе! И пусть в сериале не удалось передать всю жуть, но некоторые художники изобразили свой вариант чудовища весьма удачно, опираясь на это простое описание.
Тон, свет и цвет
И вот мы добрались до пункта, вызывающего настоящую боль у многих рисующих, ведь от передачи перечисленных элементов будет зависеть очень многое, а в хорроре без подобающей атмосферы никак нельзя. Вы могли заметить, что многие жуткие иллюстрации нарисованы в тёмных тонах, и всё происходящее буквально кричит о том, что люди до сих пор не разучились бояться того, что обитает в темноте. Но это не повод отказаться экспериментировать с подачей, менять вариации цветов и их сочетания. Ниже несколько примеров:
Прекрасные хоррор-иллюстрации отFlavio Greco Paglia.
Окружение и его влияние
Вполне естественно, что изображенный персонаж, помещённый в определённую среду, будет смотреться куда интереснее и естественнее, чем если толком не делать ему фон. Окружение может не только задавать нужную атмосферу, но и внести дополнительные элементы в вашу историю: валяющиеся на заднем фоне человеческие кости, жуткие и кривые деревья, луна или тусклое солнце — всё это хорошо сказывается на общей подаче. Да и в портфолио такая работа часто смотрится интереснее и богаче, чем отдельный концепт.
Важная оговорка: нужно помнить о конечном результате работы и идее. Какая задача стоит сейчас: передать общий дизайн существа, или развить с его участием целую историю, где так важны дополняющие элементы? Этот вопрос надо решить до того, как вы приступите к работе.
Психологические приёмы для работы с хоррором
Это актуально не только для рисования, но и для индустрии кино, мультипликации, книг и игр. Задача, которая всегда стояла перед ужастиками всех мастей, сводилась к одному — заставить зрителя пережить яркие эмоции, которые он не испытает в повседневной жизни. Когда мы наблюдаем волнующую воображение вещь, наш мозг отвлекается от проблем, перезагружается, отдыхает от рутины, и именно поэтому такой жанр, как кошмары, всегда будет находить своего зрителя. Мы перечислим общие моменты, которые используют при создании фильмов, но и к рисованию подобные вещи более чем применимы.
Приём первый. Мы всё ещё боимся темноты
Этот пункт упоминался ранее, но это весьма рабочая штука — там, в темноте, может скрываться нечто неописуемое, страшное и опасное, подобная тревога навсегда останется частью человеческой натуры. Именно поэтому большинство страшных вещей происходят в ужастиках ночью, и художник тоже может взять это на вооружение. Рисуйте ночь — и вы, скорее всего, добавите к своей иллюстрации той самой естественной тревоги, которую сможет считать зритель.
Приём второй. Динамика заставляет почувствовать напряжение
Для некоторых ощущение надвигающейся опасности куда неприятнее самого момента столкновения, так как здесь идут в ход самые страшные догадки на тему «А что же будет дальше?». Тревожные работы, на которых пока не происходит ничего страшного, но зато зрителю даётся достаточно намёков, занимают особое место в хорроре. Такие вещи всегда будут выглядеть интересно, потому что вы буквально играете с фантазией зрителя и даёте ему самому додумать дальнейшее развитие сюжета.
Например, объединяют два пункта выше работы Драгана Бибина. Вот кто действительно умеет играть с темнотой!
Приём третий. Обыденность + сюрприз
Стивен Кинг говорил, что самый лучший способ напугать читателя — это добавить в обычную жизнь нечто, с чем никто не предполагает встретиться. Неожиданный персонаж в привычном месте (вроде клоуна, который может появиться на прогулке в парке) — это одна из хитростей, которую вы можете использовать в своих работах.
Помимо озвученных выше приёмов существуют отобранные психиатрами страхи, присущие большинству. Эти данные создатели кино получают у специалистов, чтобы их картина выглядела как можно более устрашающей. Вы тоже можете воспользоваться списком и создать собственный сюжет на основе одного из пунктов.
— Безумие или искажение реальности.
Какой человек не боится сойти с ума? Увидеть в отражении зеркала нечто пугающее и зловещее? Идти по привычной улице и понять, что она какая-то не такая? Безумие — одна из самых волнительных и тревожных тем, хорошо прижившаяся в жанре ужасов.
— Иррациональные страхи.
Тот самый приоткрытый шкаф, где темнота кажется намного гуще (и в ней точно кто-то есть!), или заброшенное здание, в котором может происходить всё, что угодно. Многие опасались в детстве подкроватных монстров. 🙂 Люди боятся необъяснимого, а уж наше воображение и культура не поскупится на краски в объяснении, взять ту же мифологию и легенды. Сюда же можно отнести разнообразные мистические мотивы вроде призраков, НЛО, вампиров и им подобных существ.
Иллюстрации Insist, прекрасные представители жанра как по атмосфере, так и по динамике.
— Принудительные деформации тела.
Местами это может вызывать даже отвращение, идущее рука об руку с любопытством. В конце концов, мы все хотим остаться в том состоянии, которое есть сейчас, а мысль о том, что кто-то (или что-то) может специально извратить наше существо не может не вызывать мурашки по телу.
— Боязнь потери контроля над ситуацией.
Именно поэтому в жанре ужасов так хорошо прижилась медицинская тема — условие, которое нельзя контролировать, всегда выбивает из колеи и заставляет нас бояться. К этому же сценарию можно отнести психиатрические клиники, бесчеловечные эксперименты и любую ситуацию, где жизнь жертвы оказывается в руках незнакомого человека.
— Тема детей, которую вы могли многократно наблюдать в хоррор-картинах. Это и маленькие призраки, и чей-то ребёнок, рисующий или видящий странные вещи, девичий шепот и прочие приёмы, связанные с запугиванием через детей.
— Страх конца всего, начиная с быта и заканчивая полным апокалипсисом. Когда привычный уклад мира рушится за короткий срок, тот, кто не смог приспособиться к новым условиям, недолго ходит по земле. Добавим сюда немного (или много) зомби или полнейшее одиночество — атмосфера готова. Что тут ещё сказать, для многих людей кажется трагедией потеря работы, а здесь целый апокалипсис…
Художник Sandeep Karunakaran
Чтобы напугать искушенного зрителя, вам придётся как следует постараться! Ведь работа должна вызывать ровно те эмоции, которые вы хотите передать, а это в свою очередь потребует много сил и развитый навык рисования. Если не знаете, с чего начать, начните, например, с изучения анатомии человека в нашей школе. Она пригодится везде, где есть антропоморфные существа.
Желаем вам счастливого Хеллоуина! Проведите его за просмотром хорошего и, непременно, пугающего фильма 🙂
Статью подготовила Наталия Иванова специально для Школы CG LAB.
Редактор Лина Сидорова.
Художник иллюстрации с обложки Мрачный Инженер.
Build Your Drawing Foundation When You Learn How to Draw a Skull
Stock Photos from pattang/Shutterstock
This post may contain affiliate links. If you make a purchase, My Modern Met may earn an affiliate commission. Please read our disclosure for more info.
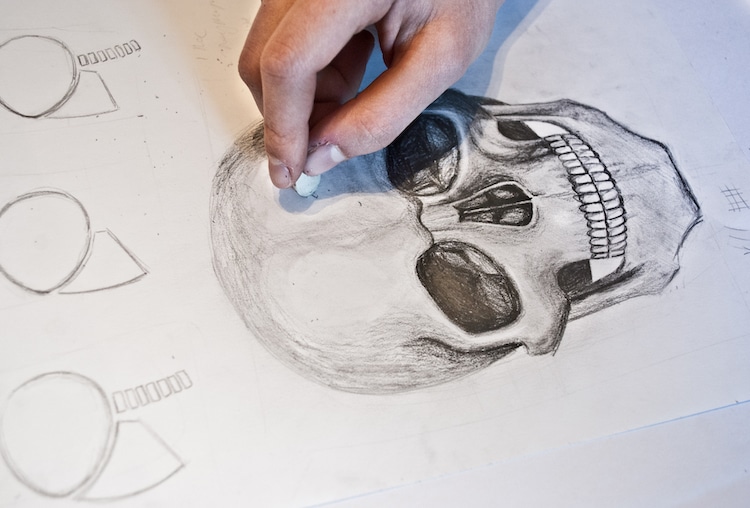
There’s a simple secret to mastering how to draw anything in a realistic way—learn about its internal structure before you ever put pencil to paper. In doing this, you’ll be better informed about why something looks the way it does, and you’ll have a clearer idea of how your subject moves.
This is perhaps best illustrated in the human head. By learning how to draw a skull, it makes the task of sketching the nose, lips, and eyes less confusing. When you get to the base of the human head, you can see the nooks and crannies that make us who we are, and you’ll start to connect the dots over why our noses pitch forward and our eyes sit further back.
It’s a necessary and helpful exercise to learn how to draw a skull—even if you’ve rendered a portrait before. In this tutorial, we’ll look at proportions of the head as well as an easy step-by-step process to sketching the bones.
Grab your favorite drawing supplies to get started. We recommend a sketchpad, multiple graphite pencils (in varying grades), and an eraser. To learn more about the best pencils for sketching, check out our guide to the drawing utensils that professionals and enthusiasts love, as well as the types of paper that are ideal for dry media.
Why should you learn to draw a skull?
One of the biggest advantages to drawing a skull is that you’re getting to the bare bones of what’s underneath our skin. By studying how the nose looks when it’s not covered by the epidermis and how the teeth appear without lips, it’s easier to get an understanding of their proportions as well as how all of these things interact.
Facial Proportions You Should Know
Before we begin drawing, here are some of the basic proportions of the human face. They will vary, of course, depending on the person, but they are helpful to know for when you want to check if your drawing is balanced.
These are the basics of a face seen from a straight-on view.
When you look at the face, it is generally wider at the top and tapers at the bottom of the chin. (Like an upside-down egg!) These are a few things to keep in mind, with the width of an eye as being a standard for measurement (keep in mind that the eye is smaller than the eye socket).
Here’s how to draw a skull step-by-step.
Once you’re ready to begin drawing, find a source photo for a skull. Another alternative is to buy a replica skull and sketch from that to improve your direct observation skills. (It will also work great in still lifes!)
Step 1: Start with the basics.
Photo & art: Sara Barnes / My Modern Met
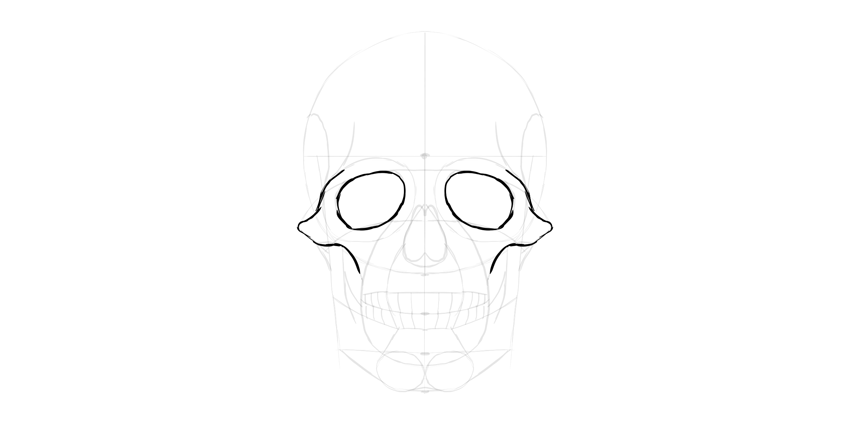
Begin by sketching the most fundamental shapes you see. The upper part of the skull—which has things like the frontal bone and nasal bone—will be represented by a large circle. The lower jawbone (mandible) will be a smaller circle that overlaps with it. Where the two intersect is where your jaw joint moves.
At this point, also pencil in where the eye sockets will be as well as the nasal cavity.
Step 2: Refine the fundamental shapes with contour lines.
Photo & art: Sara Barnes / My Modern Met
The basic shapes are a good starting point for your sketching, but to make your skull drawing appear realistic, you need to refine your composition with contour lines. Observe the nuances of the skull while following the guidelines that you set. Notice what’s contained above and below the horizontal and vertical lines of the face. The nasal cavity, for instance, will intersect with the vertical line you drew.
This is the most important stage of your entire drawing. It’s worth it to take extra time to really look at the features of the skull. Ask yourself questions along the way. How big is the nose compared to the eye sockets? How many teeth are there? What is the curve of the mouth, and where do the teeth fit into that?
Remember, it’s a challenge to draw a skull. But if you take the time to observe and to double-check your proportions, you’ll eventually have an accurate sketch.
How to Draw a Skull
Recently, I showed you how to draw a skull in profile. This time, I’ll show you how to draw a skull in a more interesting view, perfect for tattoos and scary illustrations. This front view is also very simple, so you don’t need to be a skilled artist to follow this tutorial!
A hint before you start this skull drawing tutorial: it’s easier to keep the proportions right when you’re drawing small.
If you prefer a skull drawing step-by-step video tutorial, follow along with us over on our Envato Tuts+ YouTube channel:
What You’ll Learn in This Skull Drawing Tutorial
1. How to Draw the Base for a Human Skull Drawing
Step 1
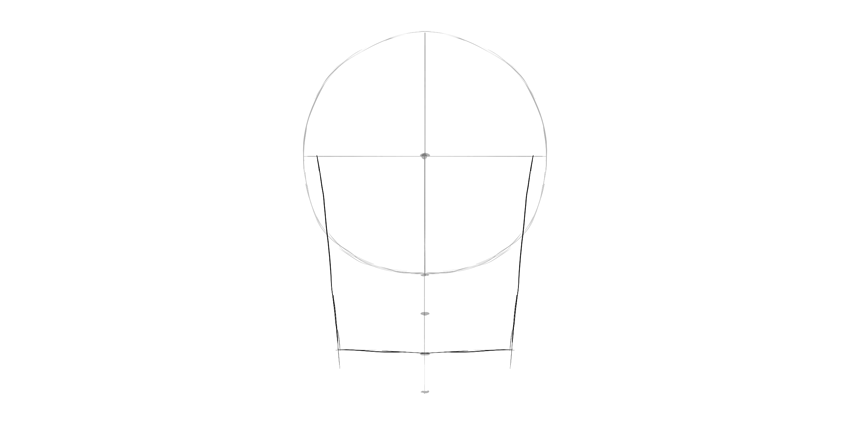
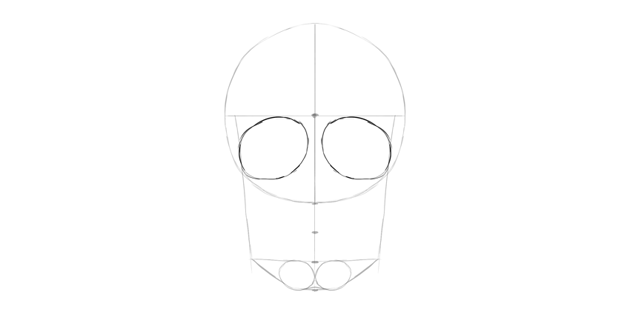
Let’s begin this skull drawing step-by-step tutorial by drawing a circle. It doesn’t need to be perfect, and feel free to draw it with many lines. Find its center, too.

Step 2
Draw a line under the circle, using the length of its radius.

Step 3
Divide this line into three sections.

Step 4
Draw a square «bucket» under the circle.

Step 5
Draw two ovals in the bottom third of this line. This will be the chin.

Step 6
Connect the ovals with the rest of the lines.

Step 7
Draw two huge leaning ovals in the lower half of the circle.
Step 8
These ovals are not eye sockets yet—their shape is too simple for this. Let’s fix it. Draw a curve crossing both ovals, leaving some space for the eyebrow area.

Step 9
Connect this curve with the sides of the skull.

Step 10
Draw another curve on the bottom, leaving a similar amount of space below.

Step 11
You can outline the eye sockets now by giving them some space on the sides.

Step 12
Draw a curve from the corner of the eye socket towards the other socket, going through the chin. This will be the mouth area.

2. How to Draw Human Skull Details
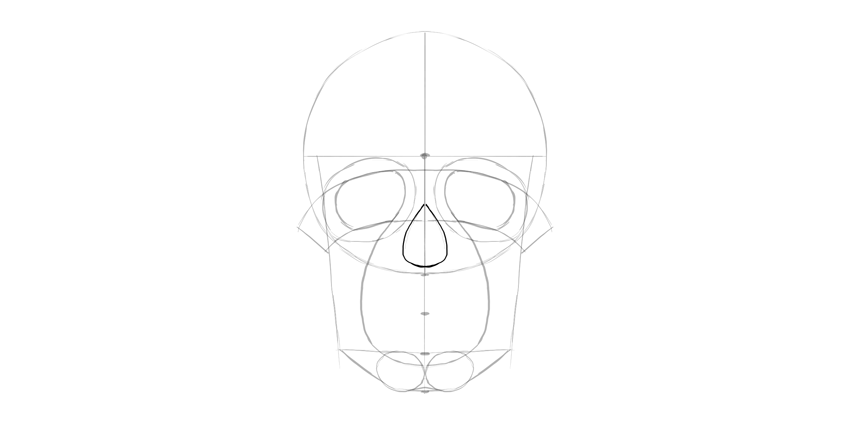
Step 1
The sketch of a skull is coming along. Next up, draw a teardrop shape between the eye sockets, at the bottom of the circle. This will be the nose.

Step 2
Make the nose more detailed.

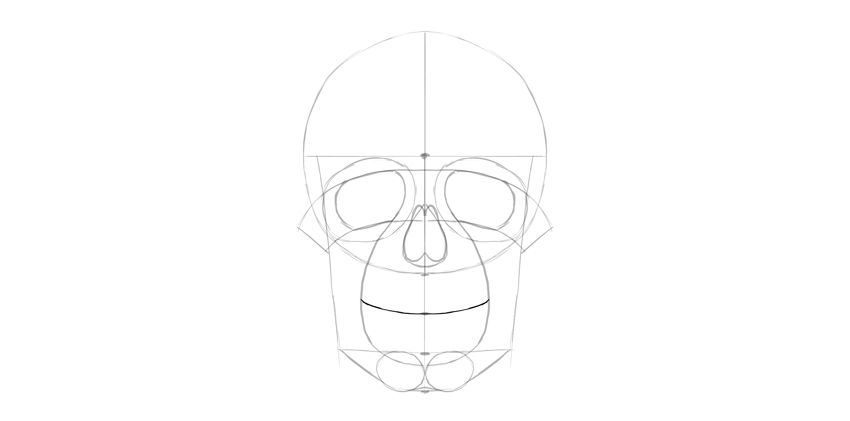
Step 3
Draw a curve across the mouth, through the mark between the first two thirds.

Step 4
We need to add more details to the mouth. First, define the front of the upper jaw with two curves.

Step 5
Draw the border of the lower teeth.

Step 6
Connect the teeth area to the chin.

Step 7
Draw the border of the upper teeth now.

Step 8
Finish the borders of the teeth area with these curves.

Step 9
We need to add the details to the lower jaw, too.


Step 10
Add the final curves to the skull.

Step 11
Divide the teeth area into separate teeth. Now it looks more like a sketch of a skull.

3. How to Finish and Shade a Skull
Step 1
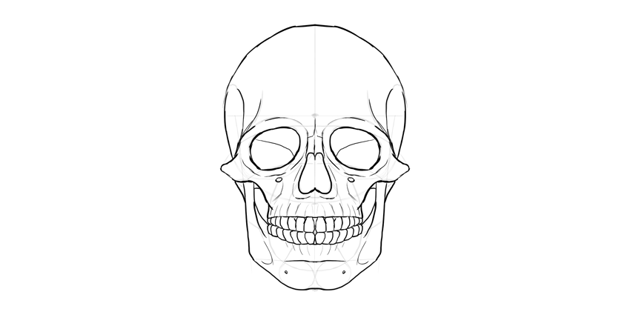
Let’s finish drawing a human skull. If you’re drawing traditionally, you can put a new sheet of paper over it, or simply draw with a darker medium now.
Outline the eye sockets.

Step 2
Outline the nose. Don’t forget about the nasal bridge on top.

Step 3
Add more detail to the edges of the eye sockets.

Step 4
Outline the teeth. They’re slightly tapered towards the bone.

Step 5
Add some details under and over the teeth.

Step 6
Outline the lower jaw.

Step 7
Outline the upper part of the skull.

Step 8
Add more fancy details, if you want to be even more accurate.
Step 9
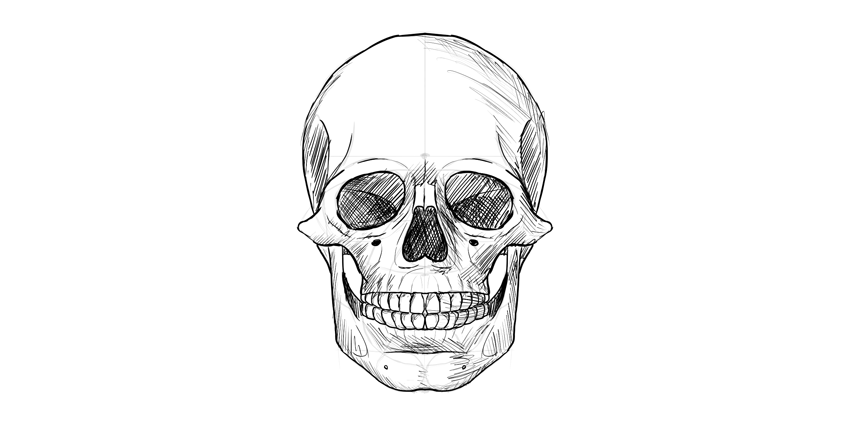
You can shade the drawing if you want. Start by darkening the darkest parts.


. then cross-hatch the shadow areas.

Finally, thicken some of the lines to make the effect more interesting. And that’s it—your drawing is done!
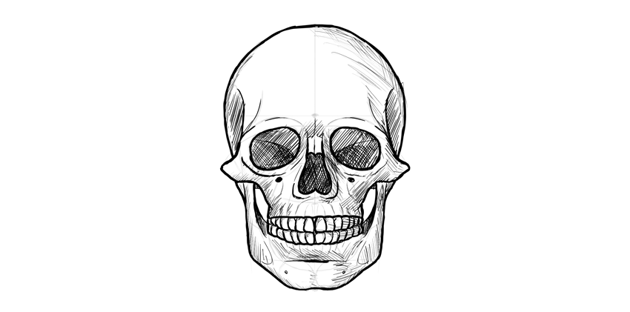
Good Job! You Finished Drawing a Human Skull!
Do you want to try some other simple drawing tutorials? We’ve got you covered:
How to Draw Grass, Ground, and Rocks
When you draw a creature, an animal or a fantastic being, the background is not that important. However, the creature still needs something to put their feet on—some kind of ground. It’s not the most important element of the picture, of course, but if you gloss over it, it may make the whole illustration look incomplete. And if you pay more attention to it, your picture will certainly benefit from it!
There are many types of ground you can use for your drawing. In this tutorial we’ll take a close look at simple dirt, a grass field, a dry land (a semi-arid desert), and rocky ground.
What You Will Need
You can read more about these tools in the introduction to How to Draw Trees.
1. Draw Dirt Ground
Your drawings don’t always need complicated ground. Sometimes you just want to be done with it as soon as possible without actually neglecting this part of the illustration. Some simple dirt can be great for this purpose.
You can find some inspiration using photos like these:
Step 1
No matter whether you start with the ground or add it at the end, your picture needs some kind of perspective. Show it with subtle lines—it doesn’t really need to be a perfectly correct perspective; we’ll just use these lines to define the area we need to cover. Use a hard pencil for this.

Step 2
Dirt ground is very plain and boring, so we need to add a few details to make it more interesting. Rocks, weeds, or old bones will work very well.

Step 3
Draw a few irregular patches—we’ll use them to make the coloration less uniform.

Step 4
Fill the area between the patches with tight lines. Don’t press too hard! Draw small «pebbles» on the border to make it more irregular.

Step 5
Fill the patches with lines as well, but this time don’t be so careful—the more white you leave between the strokes, the brighter the area will look.

Step 6
Take a softer pencil and draw short, thick, horizontal lines all over the ground. This will make it look less flat. The higher you go (the farther according to the perspective), the shorter these lines should be.

Step 7
Let’s shade the additional elements to establish the contrast of the whole picture. First use a hard pencil.

. then the softer one.

. and the softest one for details.

Step 8
Take a soft pencil and draw tiny pebbles all over the area. The closer to the horizon, the smaller and less dense they should be.

Step 9
Take the softest pencil and draw a few very dark ovals in the front only. They will look like shadows of bigger pebbles.

Step 10
You can see the whole composition now, so if you think it lacks something, add it now.

Step 11
Optionally, you can add a few smaller rocks here and there by erasing small oval areas.

. and shading them.

2. Draw a Grass Field
A grass field is perfect if you want to hide the feet of your creature. It’s not always because you can’t draw them—sometimes they’re simply more detailed than the rest of the sketch, so they break the composition this way. A grass field may seem to be very time-consuming to draw, but I’ll show you quite a quick method. You don’t really need to draw every blade!
Need some inspiration? Try these photos:
Step 1
Again, start by defining the perspective in a sketchy way.

Step 2
Define the area covered by grass. It will look best if it’s irregular in shape.

Step 3
Make it 3D by drawing a copy of the outline below and connecting them with vertical lines.

Step 4
Grass can have various lengths (is it a lawn or a meadow?), so to make it clear, add some scale-defining details.

Step 5
Again, shade the details to establish final contrast.


Step 6
Shade the side of the grass field with a hard pencil.

Step 7
Make the border less regular by drawing some blades around.

Step 8
Take a softer pencil and shade the side by drawing «shadows between the blades». To put it more simply, just draw a lot of thick, chaotic lines crossing each other, leaving some space for the previous layer of shading.

Step 9
Go back to a soft pencil and shade the top of the field slightly. Make the other edge less regular by adding tops of blades.

Step 10
Take the softest pencil and add some details to the darkened part of the side.

Step 11
Take a soft pencil and draw the tops of the blades all over the top of the field. Draw short lines in various directions to create this effect.

Step 12
Shade the top slightly by drawing groups of longer lines here and there.

Step 13
Take the softest pencil and press harder on the side to create some really dark shades. You can also accentuate random blades on the top.

Step 14
When you’re done, you can add a few eye-catching details to make the composition more interesting.

3. Draw Dry Land (Semi-Arid Desert)
Let’s be honest—plain dirt ground is boring, and a grass field is not much better. What if we want to make the ground a very important part of the illustration? You can achieve it by drawing a small garden that desert plant formations naturally create. It doesn’t even need to be a desert, just some area where the dry parts are intertwined with green parts. This type of ground takes more effort, but it’s worth it!
Use these photos for inspiration:
Step 1
As always, start with sketchy perspective lines.

Step 2
Add a few «clouds»—patches of tiny grass will grow from them.

Step 3
Add smaller clouds in between to increase the irregularity.

Step 4
Add a few bigger clouds—these will be small bushes.

Step 5
Add a few clusters of some grass-like plants.

Step 6
Longer blades of some resistant little flowers will look good here as well.

Step 7
Finally, some rocks—they make every area more interesting!

Step 8
Use a hard pencil to establish the darker value of the plants and make it different from the sand and rocks.

Step 9
Shade the rocks using all the pencils to establish the final contrast.


Step 10
Now we need to work on every plant formation one by one—first, the small bushes. Use a soft pencil to fill them with little curls that will simulate tiny leaves.

Step 11
Press harder to shade them by making them more similar to clouds.

Step 12
Draw the sturdy flowers by crossing one curvy line with short lines. They will look very interesting from a distance!

Step 13
Take the softest pencil and darken some parts of the bushes. Don’t overuse this effect—always use this pencil for accents only.

Step 14
Use a soft pencil to fill the grass areas with tiny lines and dots. Be very patient here—the texture you create must be uniform across the picture. Go around the blades that cross them.

Step 15
Take the softest brush and darken the sides of the grass area, making it more 3D. Darken the top part as well.

Step 16
If the blades got lost in the process, use the softest pencil to accentuate the parts of them that have the grass as a background.

Step 17
Draw the little unidentified clusters in the background. Start with a soft pencil.

. push harder to give them a 3D shape.

. then take the softest pencil to accentuate the darkest parts.

Step 18
Let’s finish the picture by making the sand in between more detailed. First use a hard pencil to add a subtle texture to it.

. then take a softer brush to add a few pebbles here and there.

4. Draw Rocky Ground
Still too simple? You want something more serious for your mighty dragon to stand on? Say no more! Place rock debris under its feet—this background will make your vision complete. The biggest problem about rocks is that they’re irregular by nature, so it’s hard to use any rules to draw them, but I will show you a workaround.
Check these photos if you need inspiration:
Step 1
Again, start with simple perspective lines.

Step 2
To achieve an irregular effect, we need to start with something irregular—like these shapes. Draw them with a hard pencil.

Step 3
Draw lines connecting them with the ground. These lines don’t need to be vertical!

Step 4
You can use the same method to draw a big, complex rock.


. and to make other rocks more complex:


Step 5
Add smaller rocks in between using the same method.


You can also add bunches of simple rocks without a definite shape.

Step 6
Darken the space between the rocks, going around their outlines carefully. Don’t forget about creating a «ragged» edge for the ground.

Step 7
Use a softer pencil to darken the ground even more.

Step 8
Let’s shade the rocks now. First, use a hard pencil to darken the shadowed parts. Use irregular, «hatching» strokes for this to create a texture.

Step 9
Use the same pencil to add a texture to the illuminated tops. Just don’t make them too dark in the process.

Step 10
Take a softer brush and darken the shadowed parts. Again, use the hatching method. By leaving space between the strokes, you create sharp blending.

Step 11
Use the softest pencil to darken the ground even more.

Step 12
Use the same pencil to darken the crevices in the rocks and between them. Make sure your pencil is very sharp before you try this!

You Rock!
In this tutorial you have learned how to create various types of ground, and your characters will not float in the air anymore (unless you want them to)! If you want to try other tutorials where you can use the same set of tools, feel free to check out some of these:
i’ll get to it
!! you like how i draw gore? omygosh thank youuuuu!! ^o^ as for advice uhhh,, I’m not too good at tutorials (yall have seen me) but here are just some things I use when drawing gore:
Things to keep in mind when drawing blood:
It’s liquid, but it’s thicker than water, so it’s not exactly the same. It’s a little more blobby, you can include clots sometimes, that’s always nice. Whenever I draw blood I tend to make it messy and wobbly, it’s never really that clean or smooth. Also when drawing blood drip, make the trail a little lighter, make it fade off from where the blood’s comin’ off of.
Also, I use a lot of bright colours, lush reds, reddish-pinks. Also sometimes orange-yellow for lighting or just for little details. Add lighting and sparkles to make it seem all gooey and shiny and slimy…
Also show depth to the cut, it’s going inside the body after all it’s rather dark there, plus it can show just how deep the cut is.
When drawing organs, they ain’t all pink and red, sometimes they’re a bit orangish, sometimes there’s some violet or blue. Mix it up and also include veins, just as a little detail. And again, make it shiny, it just looks nice.
Use contrast between dark and lighter shades, like,, blend in some bits but in some bits make ‘em clash against each-other, it just looks nice and makes it stand out, you can even make it look like it’s pulsating or something, haha.

I often use a lot of references, (a friend showed me an account on instagram that just posts pictures and information about surgeries, injuries and stuff like that, it’s really good for reference) to check on the structure of organs, or details or stuff like that.
Anyways, that’s all I can really give ya on this,, I don’t know anything really, not the best teacher.
