How to draw hands
How to draw hands
How to Draw Hands: A Step-By-Step Tutorial
Here’s the simple truth about drawing: how you think about your subject is how you will draw it. If you see the hand as an impossible mess of muscle, bone, tendon, and flesh, that’s exactly how you’ll draw hands on your paper.
I’m going to teach you a step-by-step strategy that will help you simplify the forms of the hand. You’ll begin by drawing the largest forms of the hand and work toward the smallest details.
This is the hand we’ll be working with. Study it and refer back to it throughout the following six steps.
Last Updated October 2021
Learn to Draw the Figure in Dramatic 3-Dimensions | By Brent Eviston
Step 1: Simplify the palm & wrist
When starting a drawing we want to approach our subject as simply as possible. Ask yourself: What are the biggest forms of the hand?
The biggest forms of the hand are the palm and wrist. We include the wrist because the bones and tendons of the hand extend well into the forearm.
Ignoring all detail, I’ll first draw the sides of the palm section of the hand (lines A & B in the following image). These lines flow directly out of the lines for the wrist (lines C & D).
Next, I’ll draw the curving line where the hand connects to the wrist (E). Finally, I’ll draw the line of the palm where the fingers attach. In this pose, the line can be divided into two sections. The first is where the index and ring fingers connect (F), and the second contains the ring and pinky fingers (G).
This step should be drawn very lightly. It’s meant to help us construct the rest of the hand, but should not be visible at the end of the drawing.
Step 2: Simplify the thumb & fingers
Next, I’ll draw the basic shapes of the thumb and fingers. Pay particular attention to where the fingers attach to the palm. Before drawing the shapes of the fingers, you may want to mark where they connect to the palm. For example, look at line A to B. In this pose, the connection between the index and middle fingers is in the middle.
You can also see that each finger has its own unique character. For example, the straight segments of the index finger bend at an angle while the pinky has a subtle s-curve (E).
In this pose, the thumb appears to emerge out of a large ovoid (line F) and tends to be thicker than any of the fingers.
Pay particular attention to the length of each finger in relationship to the palm. I like to visualize an imaginary line that connects the fingertips to one another (G). This helps me draw the shapes of the fingers at the right sizes in relationship to the palm and to one another.
Once again, this step should be drawn lightly.
Step 3: Simplify the volumes
Next, we’ll turn these flat, basic shapes into three-dimensional volumes. These volumes can change depending on the pose so we don’t want to default to a one-size-fits-all system.
The volume for the palm is usually a box (A). This box contains the metacarpals, the bones that extend from the wrist to the first set of knuckles.
Each finger is divided into three segments. Each segment will generally be cylindrical, although they can sometimes appear boxier. You can see that the cylinder at the base of the index finger (B) is larger than the second segment of the finger (C). The final segment of the finger tapers and rounds into an ovoid at the fingertip (D).
Pay close attention to the ellipses of these cylinders. They tell the viewer if the cylinders tilt toward us or away from us and how much.
The thumb only has 2 segments (E & F) that emerge out of an ovoid (G). Depending on the pose, sometimes this ovoid can appear more like a triangular wedge.
I have simplified the wrist into a box.
Like Steps 1 and 2, this step should be drawn lightly.
Step 4: Simplify light & shadow
The goal of this step is to understand and draw the basic light and shadow patterns of the hand.
First, we need to understand where the light is coming from. We can see that the shadows tend to be on the left sides of the forms of the hand so we know the light is coming from the right.
We’ll focus on three kinds of shadows: the core shadow, reflected light, and the cast shadow.
The core shadow is the dark band we see running along the length of the fingers (A). A core shadow occurs when curved forms turn away from the light and go into shadow. It’s soft-edged on both sides.
We see the reflected light to the left of the core shadow (B). The reflected light is light reflected back onto the subject from nearby surfaces. The reflected light is lighter than the core shadow, but not as bright as the parts of the hand hit with direct light.
The thumb and fingers have similar light and shadow patterns.
Finally, we have the cast shadow. A cast shadow occurs when direct light from the light source is completely blocked. In this case, the index finger is blocking light from hitting the part of the palm directly to its left. The cast shadow is the darkest shadow.
We can also see a shadow cast by the ring finger onto the box of the palm and a shadow cast by the thumb onto the wrist.
Step 5: Add detail & complexity
A successful drawing creates the illusion of three-dimensional form. This is accomplished by successful shading and details that accentuate the volume of the subject. Take a look at the core shadow starting at the tip of the index finger. Follow it as it runs down the finger toward the palm. This core shadow (A) appears more jagged than the core shadow drawn in step four. This finished core shadow includes the folds and textures of the surface of the finger. Despite more detail, the core shadow and reflected light are still distinct.
Next, look at the contours of the hand. The outer contour constantly dives inside the form creating overlaps. An overlap occurs when one line dives in front of another. This tells the viewer that one part of the form is in front of another. When an outer contour dives inside the form it becomes an inner contour. Inner contours can travel over the surface of the form.
For example, look at overlap B. It tells us that this segment of the finger is in front of the middle segment. Overlap C tells us the middle segment is in front of the base of the figure. When overlap C dives inside the form, you can see it rise and fall as it moves over the topography of the finger.
Overlaps also provide an opportunity for ellipses. Where one segment of the thumb overlaps the other (D) the line travels up and over the thumb creating an ellipse. This ellipse was first established in step three.
This drawing contains dozens of overlap and ellipses. How many can you see?
You can choose to include as many details as you like. Just keep the volumes, proportions, and shadow patterns from the previous steps.
How to Draw Hands and Feet
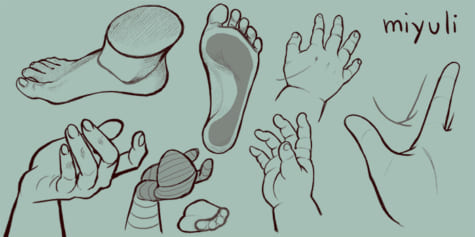
Break down complex parts like hands and feet into simple forms to easily and accurately capture a variety of poses! Illustrator Miyuli explains tips for drawing hands and feet right down to important details like finger positioning, knuckles, and fingernails.
Basic Proportions (Hand)
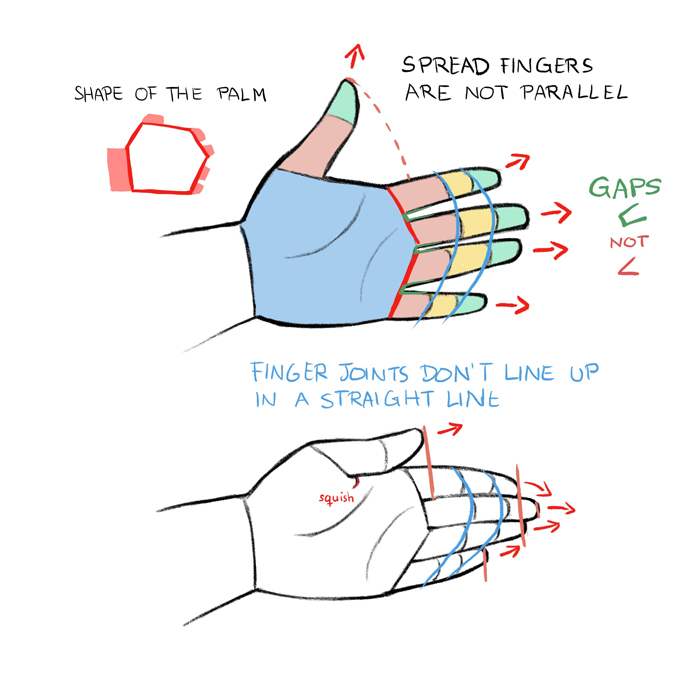
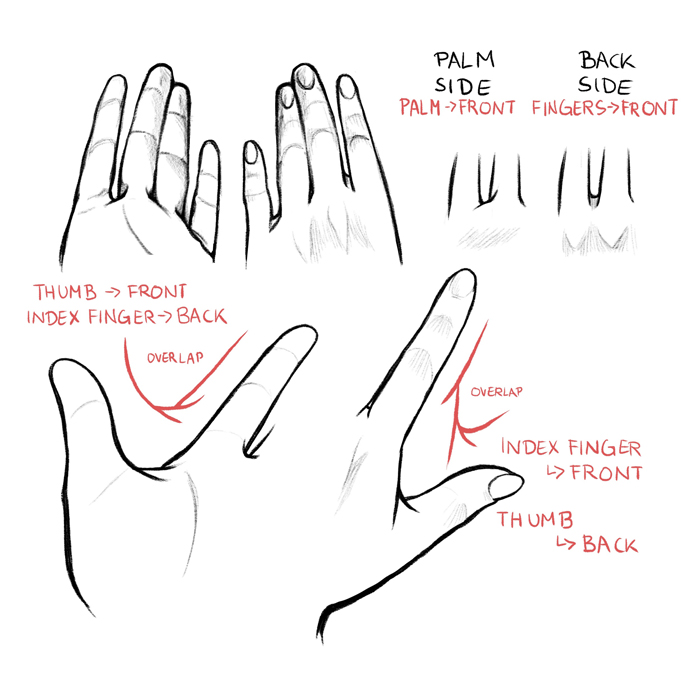
The basic shapes of a hand are not perfectly square or parallel so it is easy to get them wrong. When spread, the fingers all point in different directions.
Because the fingers’ points of origin and lengths are different, the joints do not line up in a straight line.
Note that the thumb moves in a different direction than the rest of the fingers.
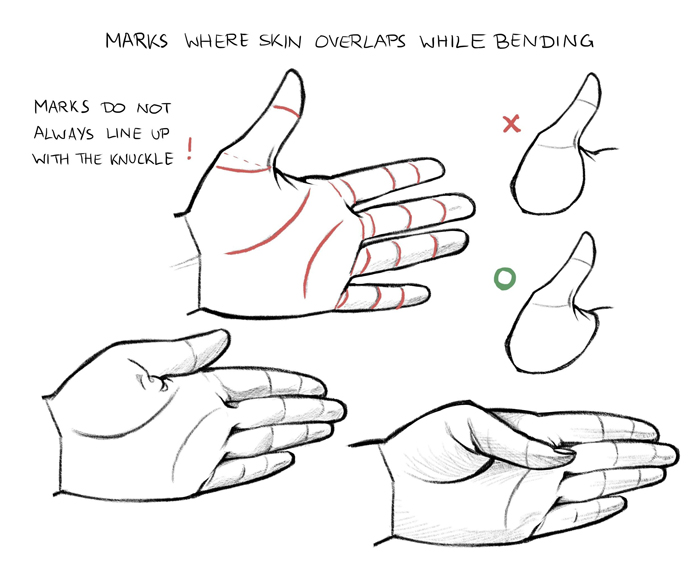
To make bending possible, the skin is relatively loose and thin at the joints.
The bending marks on the palm side do not necessarily line up with the joints.
These lines might not be visible in simple drawing styles, but knowing where they are and where the skin overlaps can help when drawing the fingers bent.
The skin can be treated a little like drapery. Add more folds if you want to add more details.
These folds are more visible on older people so don’t use them too much on young hands.
Children’s Hands
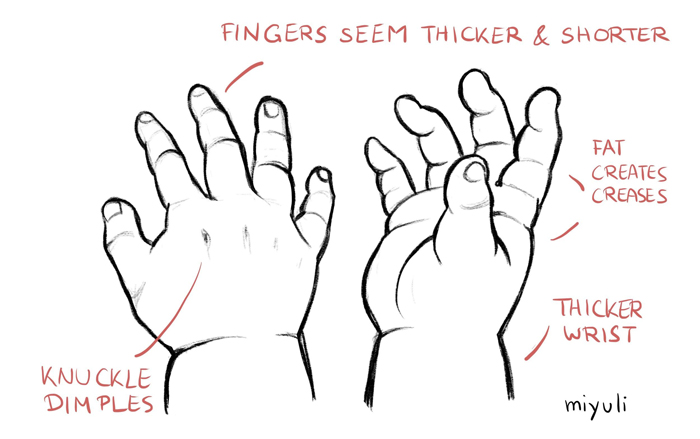
Children’s hands are proportionally a little different, which leads to the fingers seeming thicker and shorter and the wrist wider.
All the baby fat creates creases around knuckles and joints.
The knuckles on the back of the hand show dimples that disappear with age, while the knuckle bones become more prominent.
Straight Lines vs Curves
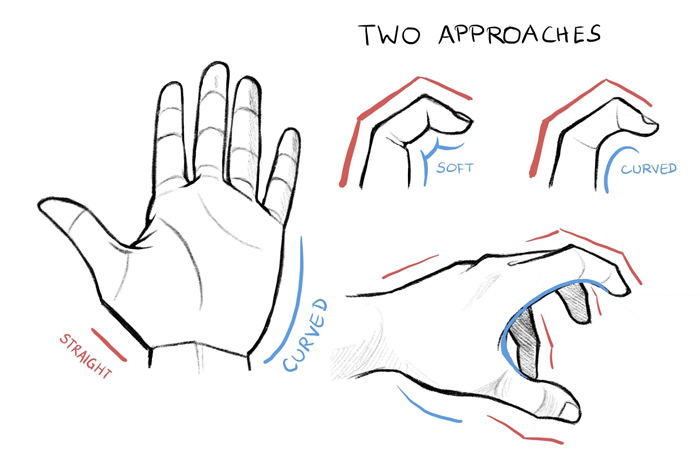
The outside of the hand is usually straighter and harder so that hands can be used for combat and self-defense, while the inside of the hand is soft in order to hold tools and touch things.
Summarising the shapes of the hand with bold straight and curved lines can make hand movements more dynamic and expressive.
The more you see the palm side of the hand the softer the shapes become.
Sometimes it can vary depending on the angle and hand shape.
Nails
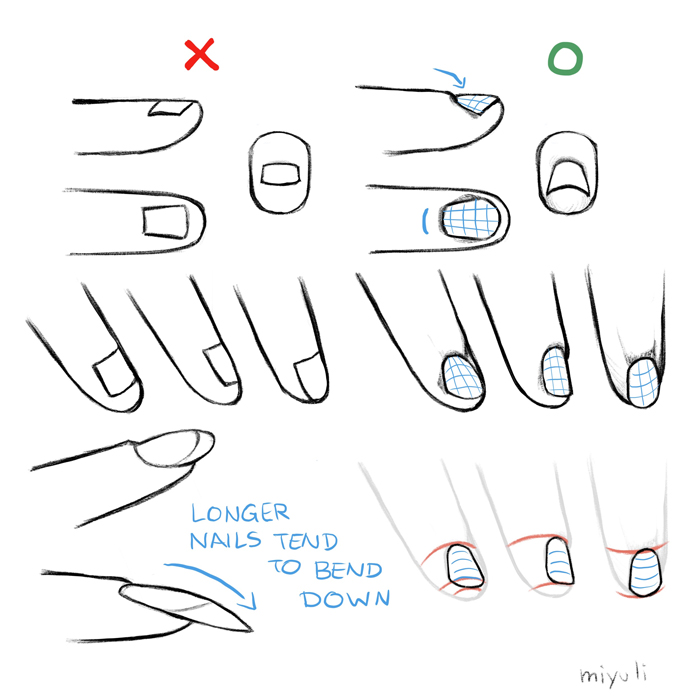
The nails are not flat. They wrap around the finger‘s shape.
Be careful of the way they fit into the skin. It might slightly differ from person to person.
Longer nails don’t grow in a straight line but curve down a little the longer they get.
Step by Step
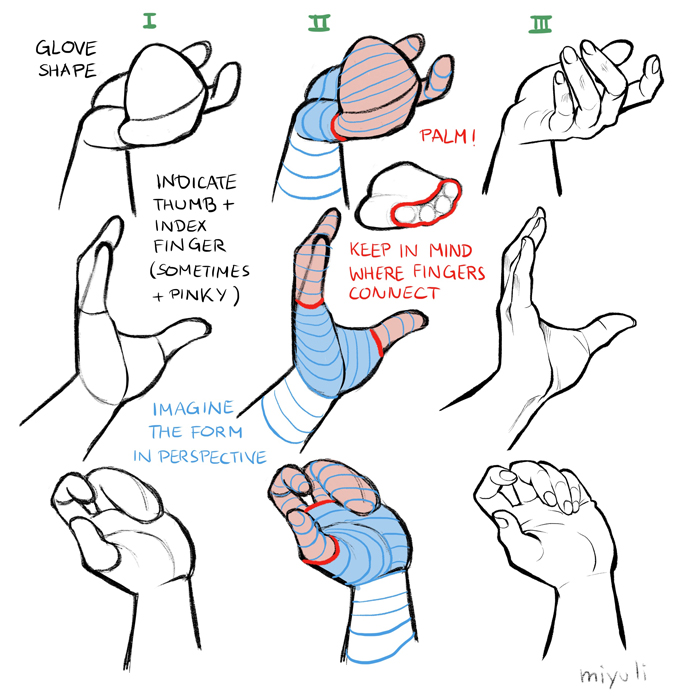
When sketching hands it is easier to start with a very simple glove form you can imagine well in perspective.
You can easily get lost in the details of all the different hand components but save that for later.
Regardless of what style you are going for, it is better to start simple.
That way you can create a stronger silhouette and expression of the hand without getting distracted.
From that point on you can apply perspective and anatomical knowledge and look for reference.
The best reference is looking at your own hands using a mirror or a camera.
Basic Proportions (Foot)
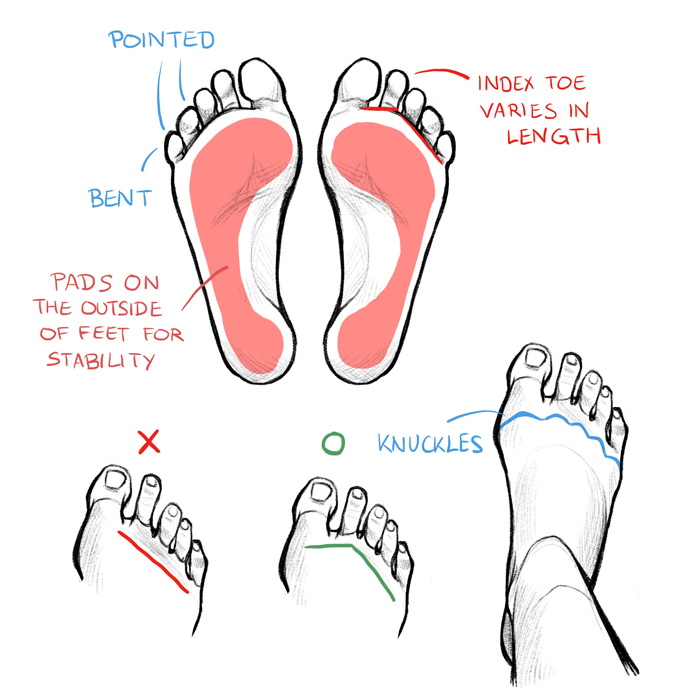
The soft pads under the feet (and toes) are located on the outside of the sole for better stability when walking.
That side is lower than the inner part of the foot and leaves footprints when walking barefoot.
The toes are not arranged in a straight line. The index toe is located a little higher.
The ring and little toe tend to have a more pointed shape and are bent a little more than the rest.
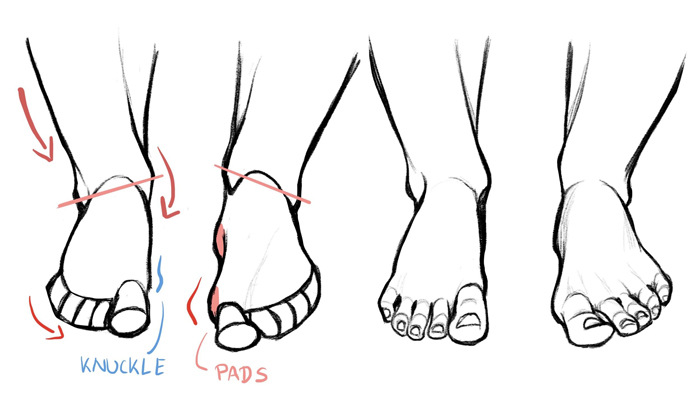
The inner ankle is higher than the outer ankle.
You can imagine it as the big toe pushing it up so it ends up higher on the big toe side.
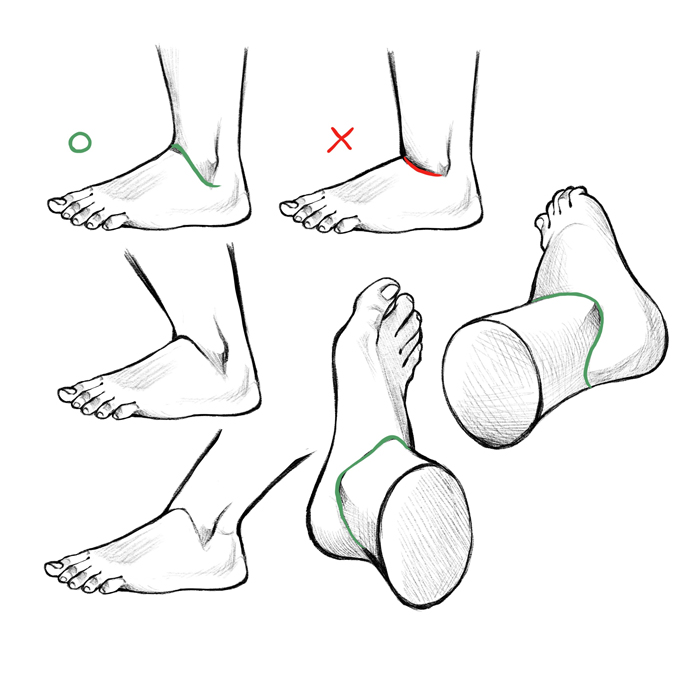
The lower legs connect with the feet coming down as a curve, not a straight line.
Toes
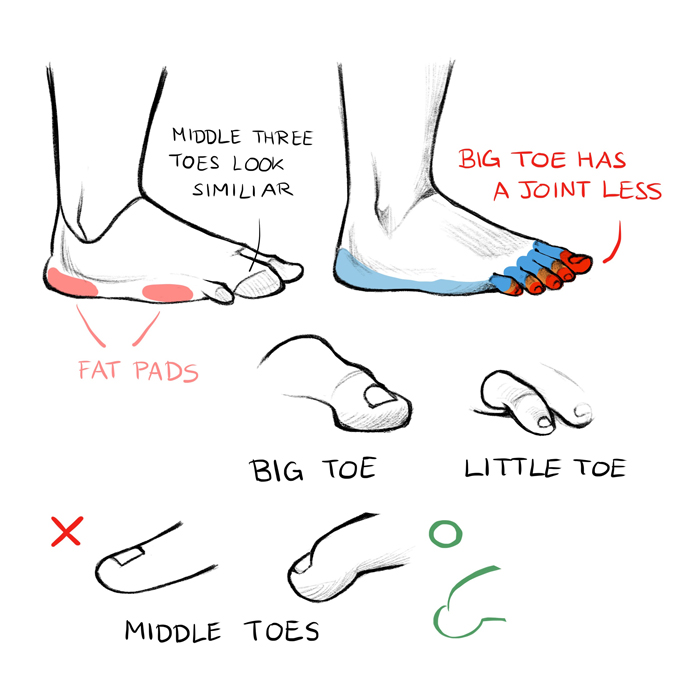
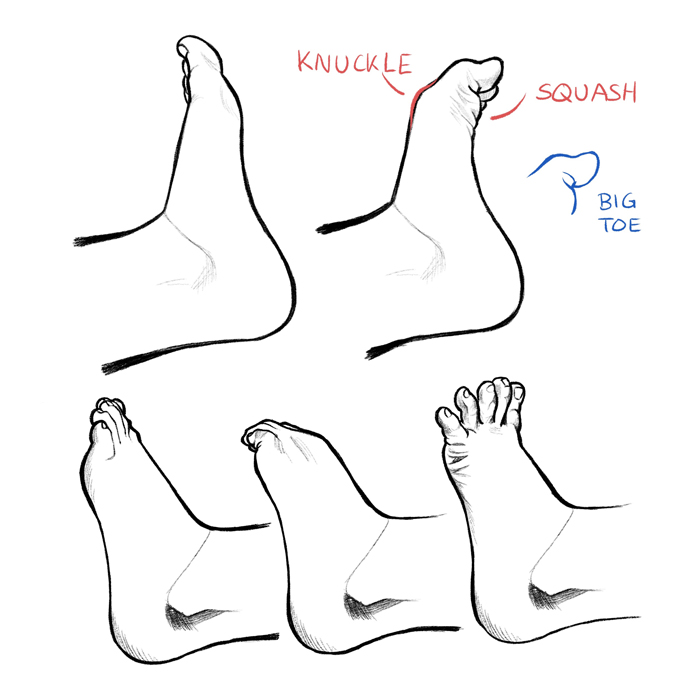
The big toe has one joint less so it does not curl up as much as the other toes.
The fat pads shaping the sole of the feet and the underside of the toes can also be prominently seen from a side view.
Bending
The lower leg and foot are not just piled on each other like cylinders but rather interlock with one another in a shape that goes down underneath the ankles in order to make movement easier.
The toes don’t bend as much as the fingers since they are much shorter.
They don’t touch the heel side of the foot because we typically don’t need them to grab things and they are usually planted on the ground most of the time.
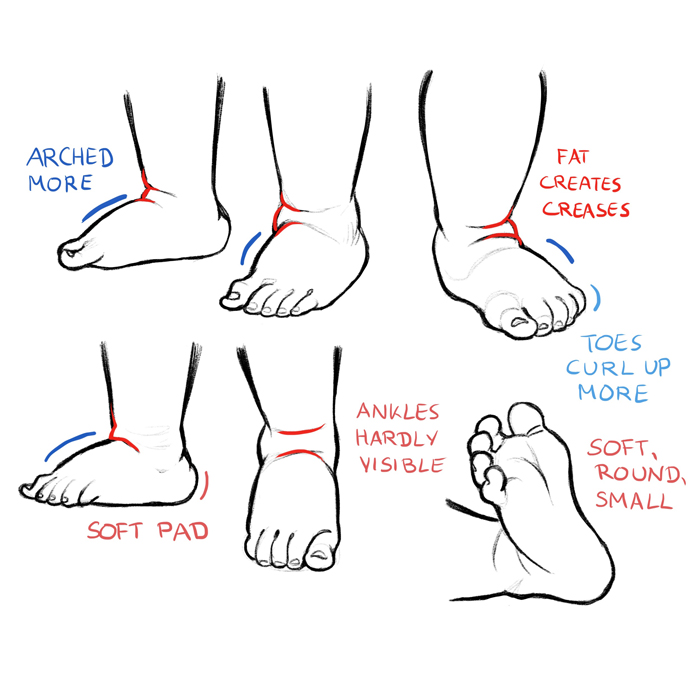
Children’s Feet
Children’s feet are smaller and softer with more curves.
Especially baby feet have not been walked on much yet so the fat pads on the sole are softer and seem bigger.
Because of the fat covering them the ankles are hardly visible and create prominent creases.
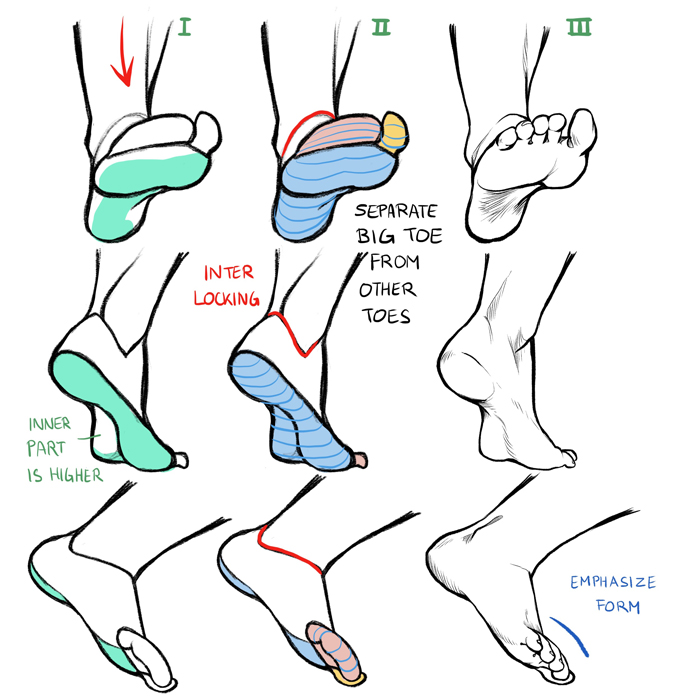
Step by Step
Just like drawing hands, it is better to break down the feet into simpler forms.
The movement of the feet is more limited than the hands’ since they are mostly used for standing and walking.
The big toe can be looked at separately from the other toes to find the most dynamic pose. Drawing the sole might be a little difficult from certain angles.
The inner part is higher and barely touches the ground.
Keeping in mind how the lower leg and foot interlock helps to make the two body parts work in perspective.
Toes or fingers that line up can often be summarized in an arc that makes the gesture clearer and stronger.
Be sure to emphasize the gesture wherever possible.
I hope this tutorial was helpful.
Miyuli is a freelance illustrator and comic artist.
Similar articles
Easy Steps to Creating Chibi Characters
Simply Well Drawn: Part 1
Bring Energy and Life to Your Poses!
Push Your Poses to the Extreme! Drawing Cartoon Hands
How to Draw Expressive Faces
How to Draw Powerful Sword Fighting for Comic panels & Illus…
How to Draw an Arm
Learn to Draw Croquis Sketches
The Difference Between Digital Manga and Hand-Drawn Manga
Simply Well Drawn: Part 4
Top Articles in Category
Easy Steps to Creating Chibi Characters
Tips for Creating Vertical Scrolling Webtoons
How to Layout Your Comic! Panels, Gutters, and Page Flow
How to Draw Hands and Feet
Creating a Hand-Crafted Style Webtoon
How to draw a comic strip with an iPad
The Difference Between Digital Manga and Hand-Drawn Manga
Simplifying Characters for Webtoons
Inking Superhero Comics in Clip Studio Paint
Simply Well Drawn: Part 1
How to Draw Powerful Sword Fighting for Comic panels & …
How To Draw Mountains
How to draw Gems, Crystals, and Gold
How to Draw Comic Covers
How To Draw Animal Heads & Snouts
How to Draw Bottles & Glasses
How To Draw A Tree
How To Draw Bird Wings
Creating a Dynamic Landscape Composition with Silhouette
How To Draw Glasses & Goggles
Recommended Articles
Learn to Draw Croquis Sketches
Five Tips for Getting Noticed Online
ArtStation Marketplace Success Story: Le Vuong
How to Make Appealing Original Characters
Simply Well Drawn: Part 1
Easy Steps to Creating Chibi Characters
Must-Know Tips to Improve Your Tablet Drawing Experience
How to Make Video Tutorials
Becoming a Concept Artist for a Hollywood Film
Featured Pro Portfolio: Phil Saunders
3 Reasons to Use Digital Art Software
Bring Energy and Life to Your Poses!
Featured Pro Portfolio: Miroslav Petrov
Ultimate Guide to Blending Modes
Finding and Correcting Drawing Mistakes
Easy Tips for Drawing Eyes
Exclusive Interview: Lois Van Baarle (Loish)
Top Drawing Apps and Software in 2022 (Free & Paid)
Sculpting Forms, Using Value, and Brush Introductions
Keyboard Shortcut Guide for Artists
Learn the basics of digital art, from the tools you need to the steps of creating digital artwork.
Read art tutorials and interviews with concepts artists for films, games, and animation.
Learn techniques for creating expressive and fun character art with these tutorials.
Whether you’re creating manga, comics, or webtoons, here you’ll find the best techniques to create your story!
Learn How to Draw Human Hands With This “Handy” Step by Step Guide
Image: Drawing of a hand from bioraven / Shutterstock.com
This post may contain affiliate links. If you make a purchase, My Modern Met may earn an affiliate commission. Please read our disclosure for more info.
Drawing human anatomy is tricky. One of the most challenging parts of the body are the hands—especially when you’re sketching them in a realistic manner. As with all things in art, practice builds skills and confidence—which is just one reason why you should learn how to draw hands. They are undoubtedly a challenge, but when you can make them look so life-like that they’re popping off the page, it’s sure to boost your creative confidence.
One reason that the hands are difficult to draw is that they can easily look askew. (That’s why so many artists “hide” them by stuffing them into pockets!) There’s a fine line between too little and too much realism. By implying too many folds in the skin, you can dramatically (and unintentionally) age your subject. Or a misshapen finger can make the hand look like a claw. So when the initial sketching phase begins, it’s important that you make sure the proportions of the palm and fingers are correct.
Bone Structure of a Human Hand
Medical illustration of hand bones from Sebastian Kaulitzki / Shutterstock
One of the biggest issues we can face in hand drawing is that we don’t fully understand what’s underneath our skin. The hands are made of 27 bones; some are very tiny at the tip of your fingers while there are long bones that comprise the base of the digits. In addition to bone structure, there are four main parts of articulation: interphalangeal articulations (the hinge joints between the bones on your fingers); metacarpophalangeal joints (where your fingers meet the palm); intercarpal articulations (the point at which the palm and wrist meet); and the wrist.
You needn’t memorize all of the bones in the hand. Instead, you’ll want to familiarize yourself with the general structure. That way, when you’re trying to imagine how someone’s hand might look holding their cell phone or pointing their finger, you’ll imagine how their bones and joints would move.
How to draw hands
So without further ado, lets get started!
Anatomy of the human hand:
So first, lets learn how the human hand is built. Here is the sketch for the previous drawing.
You can see that that hand is composed of the following parts: part A, part B and the fingers. The overall length of the hand, top to bottom, should be enough to reach from your chin to you hairline. This should give you a good idea on how big the hands should be, which is a major sticking point for many people (including me).
The biggest part of the hand, is the one I marked as part A. Sadly, I can’t find a simple «trick», or method of drawing it. I have to actually think while doing so [=. It can help however, to imagine it as sort of a trapezoid. Its inner side (the side closer to B) is longer. After drawing it a couple of times you will kind of get it, and be able to draw it from top, bottom and sideways.
Next is part B. This part connects to the inner side of A (when looking at the hand from top, like both drawings). It also connects to the thumb. Part B is a triangle. Its length (from wrist to beginning of thumb) is about half the length of part A (from wrist to middle finger). After looking at my hands, and many other people’s hands, I noticed that its angle is about 40 degrees, but can vary depending on the movement of the thumb.
— The Length of the middle finger is about the same as the length of part A.
— The fingers, from longest to shortest: middle, index, ring, thumb and little (together).
— Each finger (except the thumb) is divided into 3 knuckles, with the 3rd (farthest from A) «bended» a tiny bit to the back. For the thumb, the same is true to the second knuckle. Also, the fingers are a bit thicker where the knuckles are.
— The fanning is critical for drawing a correct, realistic looking hand.
— The nails are on top of the 3rd knuckle, and take up about half of it’s length.
After we talked about each part individually, lets see how they all connect.
—-
Check out my new website and subscribe for a FREE eBook! (=
LironYan.com
—-
The first hand we are going to draw, will be from the opposite side of the 2 previous drawings, and with the fingers slightly bended (this angle is actually pretty similar to the one from my older How to draw a hand lesson.
Here you can see the wrist, and part A connecting to it. As I’ve said before, part A is a round trapezoid. I tried to be as simple as I can, and later on we will add more details to this and all of the other shapes.
Here I added part B. Not a whole lot to add, but notice the
40 degrees angle we’ve talked about.
Here I added the first knuckle of each finger, including the thumb. Usually we will start by drawing where the fingers are going to END (so we can gauge their length), but for this example I prefer to do it that way. The most important thing here, is to make sure we get a fan if we were to connect the knuckles.
Here I added another knuckle to each finger. Since the ring and little fingers are very bended, this knuckle is lower then the first one. The index and the middle fingers are only slightly bended. This is a common thing that happens in hands, having the shorter fingers bend more the the longer ones.
Here we added the third knuckle. This time, the index finger’s 3rd knuckle is actually blocking our view of the 2nd one. Look at your own hand and see it happening for yourself.
This is the cool part, where we actually make solid fingers, based on the lines we drew up till now. It is important to note again, that the fingers are thicker where the knuckles are (meaning where they bend), and their 3rd knuckle is slightly bended back. I find that this part is actually quite challenging. Another important thing is to take into consideration the foreshortening that occurs with the fingers that are pointing towards us. This affects how the nails look as well. This is also tricky, so take your time building it up, and erase and redraw if necessary.
Here I shaded the hand. Check out my lesson on Sketching and Shading Techniques for more on that. I will just point out that the light source is coming from the left, so the shadows are on the right. This really helps to indicate the nails.
And we are done with this hand
—-
Check out my new website and subscribe for a FREE eBook! (=
LironYan.com
—-
We are now going to draw a hand in a very natural and relaxed position. This is the way a hand typically looks like, when a person is standing in place.
Here are our A and B parts. Since this is a more relaxed pose, part B is less prominent. Try and look at different hands, and see how this occurs in different angles. Later on, we may see angles in which the thumb, and also Part B, are not visible at all.
Here I added the knuckles, and indicated the fanning that occurs. You can kind of already imagine the fingers.
Here I solidified the fingers, and slightly indicated the thumb’s nail. Notice how, again, the shorter fingers are bending MORE then the longer ones.
Two More Examples
Here is an example of turning the sketch into solid objects (mainly the fingers). Its important to remember that these are all cylindrical objects, that have mass, and as such you have to draw them properly.
Here is a colorful example, that will help you understand the sketch better.
That’s it for the examples. I hope this drawing lesson gave you some simple tools that will help you learn how to draw human hands. There are a lot of things to learn, and there are literally infinite angles and poses. This is great, since you are being challenged constantly.
On my next post, I will draw a few more interesting angles of hands, including ones holding objects, just to get your creative juices flowing.
And after that, we are going to mix it up and draw something completely different and surprising. [=
How to Draw Hands: Easy Simple Tutorial
Here is a simple easy step by step tutorial for beginner artists on how to draw hands.
Learning how to draw hands was something I always tried to avoid when it came to drawing human anatomy.
I always had a lot of trouble making them look natural and effortless – So here is a simple overview of hand drawing tips I’ve learned over time.
I’m not an expert at drawing hands. I know I don’t draw hands perfectly but I hope that a few of these tips in this blog post can help anyone else struggling with drawing hands, as a beginner artist.
Also, as this tutorial is geared more towards beginner artists, it will only cover how to draw the basic structure and shape of a hand, not how to make them realistic through shading.
1. Use Reference
When first learning how to draw hands, it is imperative to use reference.
The best reference to use are real-life hands, whether you use your own hands or someone else’s. You can also use photo references.
Hand-drawn examples of hands can also be helpful to give you a rough idea of the overall hand shape, as well as the angle of joints.
* * I have included reference drawings throughout this blog post so that you can practice drawing hands in different poses.
Make sure to use the correct hand (whether left or right) for reference. Using the wrong hand can cause incorrect angles or anatomy.
As a general tip, if the hand is facing down, the thumb will point towards the body. If the hand is facing up, the thumb will point away from the body.
The reason using reference is so important for beginner artists is so that you can start off drawing correct angles, proportions, and shapes.
If you practice and keep drawing wrong anatomy from the beginning, it can be difficult to break the habit later on. It can also affect the way you draw everything else.
This is why it is so important to practice drawing what you see, and not what you think you see.
2. Sketch Guidelines
Below is how I would sketch my guidelines for hands. I have also included some tips to help with proportions.
I first start off by drawing the palm in the shape of a quadrilateral. The top of the quad is wider than the bottom and there is a slight incline upwards towards the side of the thumb.
After drawing the guidelines for the palm, I draw the skeleton structure (lines) and the joints (circles).
The size of the hand (length) is approximately the height of the person’s face. It can be slightly smaller or larger according to your reference or preference.
Also, the middle finger is about the same length of the height of the palm.
The pinky finger length should come to about the top knuckle of the ring finger.
The ring finger is slightly longer than the index finger.
3. Draw the Hand Outline
Using the guidelines you’ve initially sketched out, begin to draw the outline of the hand.
The key to drawing a good hand outline is knowing where to use curves and where to use angled turns.
If you look closely at these hand drawings and examples, wherever there is a joint, there will usually be a turn in the line rather than a gradual curve.
Also, the skin on the top of a hand is more taut than the underside of a hand. Keep this in mind when drawing hand outlines – There will be more curves when working with the underside of the hand than the top of a hand.
The process of drawing the initial outline of a hand isn’t always perfect so I always end up adjusting the hand shape accordingly. Sometimes I’ll see that the thumb is not right or a finger needs to be longer.
Feel free to change your hand to your own drawing preferences or according to the reference.
Depending on the character you are drawing, you can adjust the hands to be small, large, slender, or wide.
4. Add Fine Details
Add as many fine details as you’d like to your hand drawing, such as fingernails, wrinkles, shadows, etc.
Below is a simple overview on how to draw fingernails.
Another detail I will add when drawing the back of a hand are the knuckles and bone ridges.
The bone ridge radiating below the middle finger is the longest and most obvious one.
As for drawing the palm of a hand, I will often add major wrinkles and lines.
5. Practice
In order to become better at anything in life, it’s important to keep practicing!
The reasons hands are so difficult to draw is because there are so many small bones and joints located in the hand. It is very easy to mess up on an angle or bone structure, causing the hand drawing to look awkward.
The best way to get better is to continue practicing and honing your eye to be able to see when your hand drawing looks wrong – And correct these mistakes.
Below are some drawings of hands to try practicing yourself.
I’ve also included different hand poses to help with visualizing hands in different scenarios.
I know drawing hands can be difficult, but take it one step at a time. I hope these examples help.
Here is a simple hand drawing pose to try out. I will often simplify the guidelines as shown in the drawing above for a faster drawing process.
Here is a collection of various hand poses to try drawing.
Here is an example of how to draw hands in a relaxed state or with fists clenched.
Try practicing drawing hands as if they are holding something.
Here are some examples of how to draw hands being held.
6. Study How Other Artists Draw Hands
Just as important as practicing how to draw, it is also important to learn from other artists who draw human anatomy well.
Art isn’t all about drawing reality.
A great artist will be able to incorporate expression into their art, which wouldn’t be visible in a drawing replicated from a photograph.
They may exaggerate certain angles, features, or values to bring out a certain feeling or intention in their work.
So study the works of other artists and their drawings.
See what aspects of art you enjoy in other’s, and see how you can bring those elements into your own drawings.
Thank you for stopping by this blog post and I hope you could find something helpful here for drawing hands.
Drawing hands can be a complicated process, but the more you practice, the more easier it will become.
I hope you have a wonderful day and above all, have fun drawing! Until next time!

