How to draw hand
How to draw hand
Your Custom Text Here
How to Draw Hands
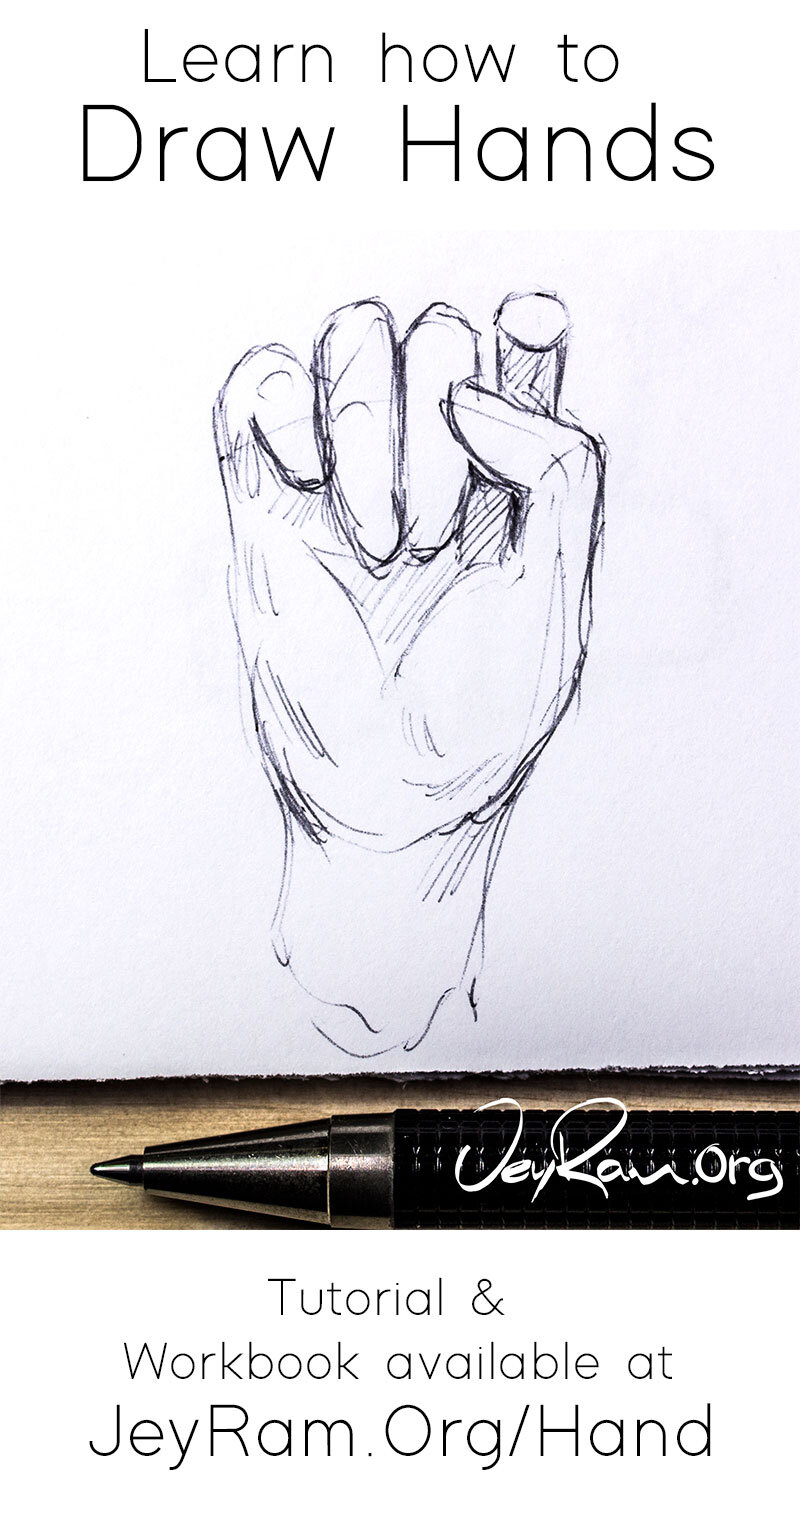
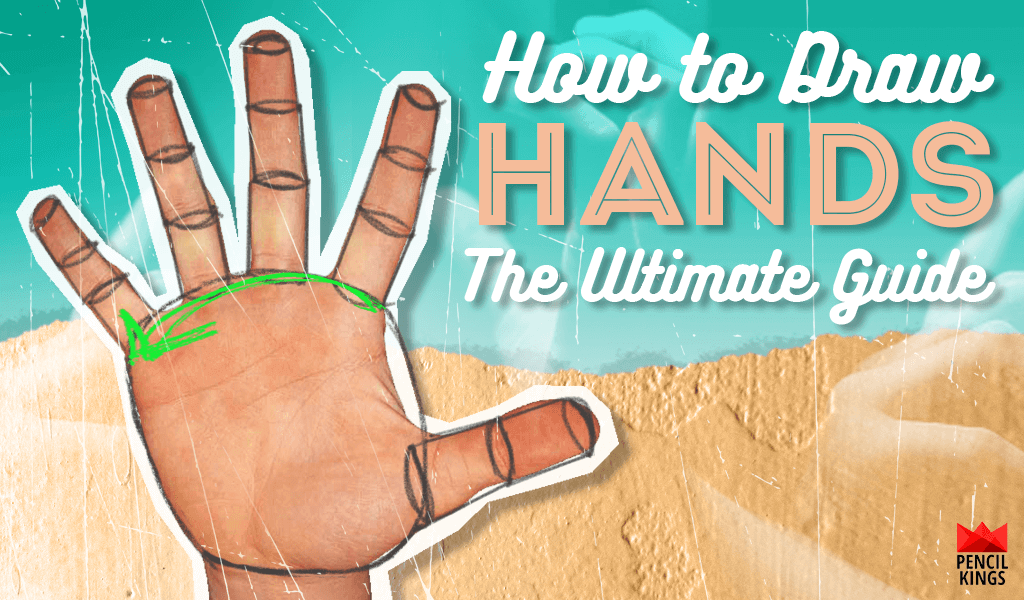
The reason that drawing hands is so challenging is because there are so many forms that have to be drawn in perspective. Every finger is made up of multiple cylinders and the box of the central form also needs to be drawn in perspective.
The only effective way of learning how to draw hands is to take it in 4 stages that will allow you the room to focus on one element at a time. This method of practice is perfect for people that want the ability to draw from imagination. Below I have created a free worksheet that can help you practice.
4 Stages
I recommend practicing each of these stages until you are comfortable before moving forward. When you are starting out, try to practice more simple hand gestures before trying the more complex ones, we want to avoid unnecessary frustration as we practice.
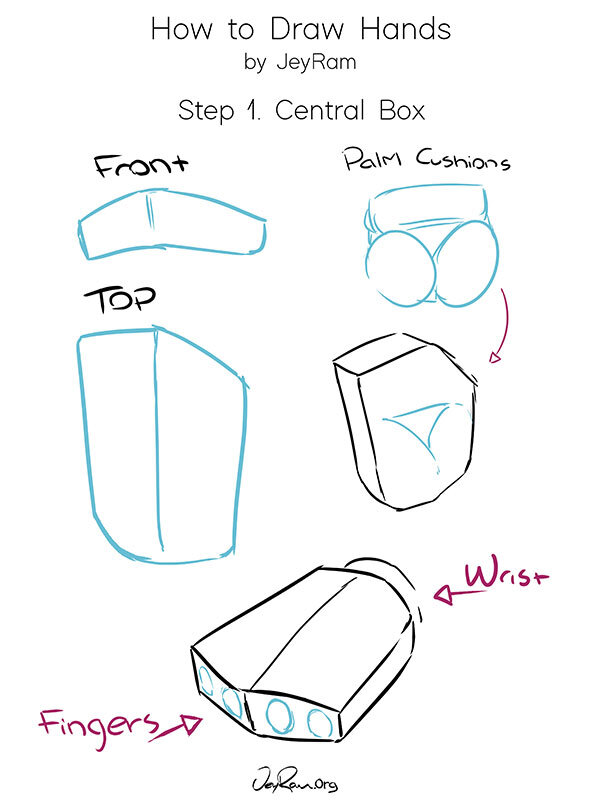
Stage 1. Central Box
Draw a bent box for the central part of the hand, draw in the cushions of the palm if they are visible at this angle. Pay attention to how the hand is fairly thin, the depth of the hand is much smaller than the overall surface area.
If you want help with drawing boxes that have dimension, you can check out my Basic Forms tutorial here (Opens in a new tab)
Stage 2. Thumb
Now start adding in the thumb which connects to the box through a triangular box, followed by a cylinder and a tapered cylinder. Pay attention to how the thumb connects to the cushion of the palm (look at your own hand to develop an understanding of this).
Stage 3. Mitten
At this stage, we try to simplify the fingers by grouping the ones that are closer together. I would recommend practicing individual fingers at this point because of some of the gestures will require individual fingers. Getting comfortable with this stage will help us during quick block-ins once we start to apply this to illustrations and figure drawing sessions.
Stage 4. Full Hand
Drawing the full hand will feel a lot easier once we have gotten comfortable with the mitten because we can use the simplified form as a guideline for the individual fingers.
If you want further help with learning to draw hands, which I know can be very frustrating at times, check out the Workbook below. I design these workbooks as a way to give us a clear way to practice drawing that isn’t overwhelming. Drawing is a skill that requires hands-on practice, unfortunately watching video tutorials isn’t enough which is why I create printable workbooks.
Thank you for letting me be part of your drawing journey, I have tons more tutorials on the site you can check out 😀
Learn how to draw hands with this 21 page workbook that will walk you through the 4 stages of understanding how to draw hands from imagination.
Learning to draw can be frustrating and intimidating but with these worksheets, you will have a clear path forward and exercises to help you take things one step at a time!
This workbook is also part of the Figure Drawing Bundle that you can grab here if you are interested in getting the whole collection!
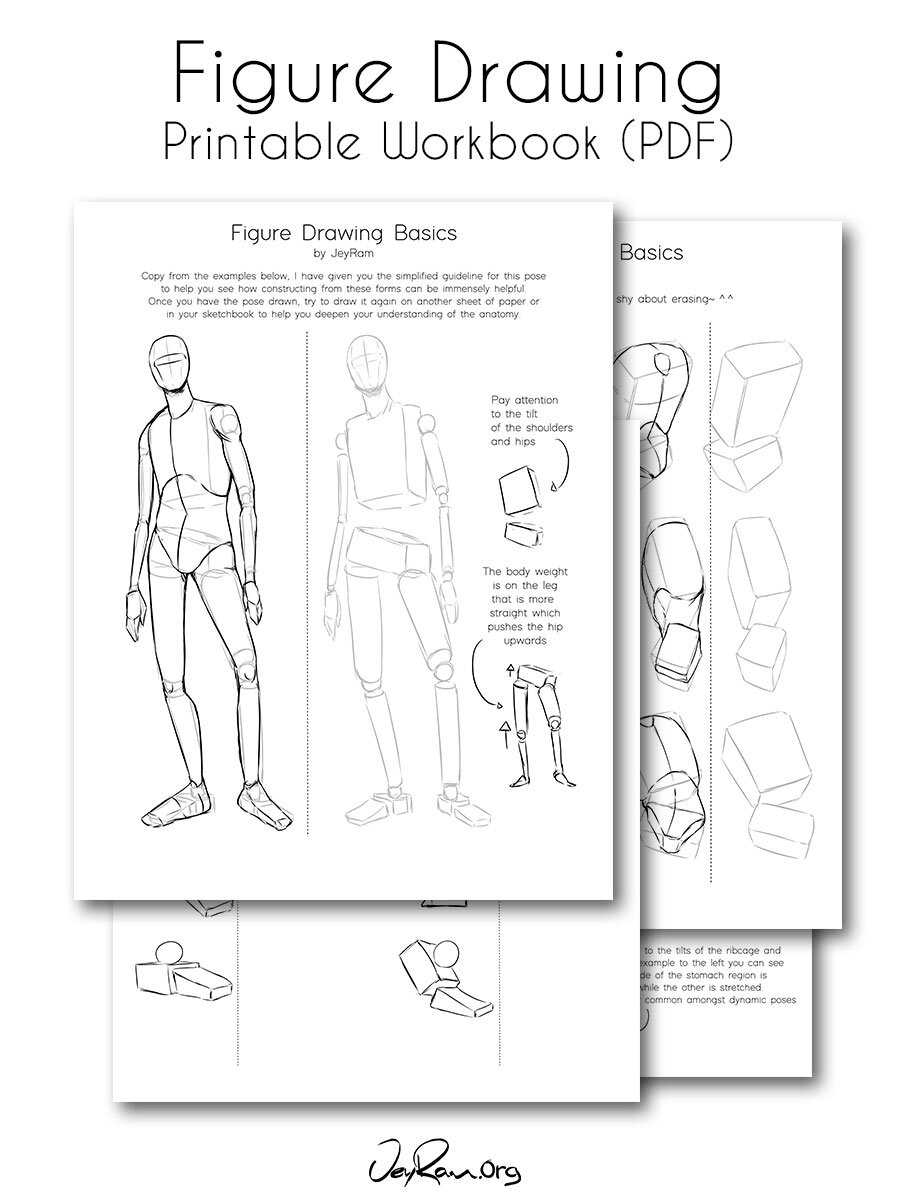
Learn the basic skills of drawing the human figure. in this 28 page workbook, we go over the simplified form of each element of the human body and then build more complex forms on top of that.
This method is great for drawing the human body from imagination and also from reference. I personally wish someone had taught me this method of drawing the figure which is why I designed these worksheets around this method of practice.
This workbook is also part of the Figure Drawing Bundle that you can grab here if you are interested in getting the whole collection!
Patreon Membership
If you are interested in supporting the work that I am creating on a regular basis I have a Patreon that you can check out below! Patreon is a platform where you can provide creatives with monthly support to give them the stability to create on a regular basis, it’s like buying a friend a coffee on a regular basis.
The main point of becoming a member isn’t about receiving exclusive items (although that is part of it), it’s about a shift in how we think of creative work. Patronage used to be something that was only available to royalty and the ultra-wealthy, but with the internet that has all changed.
By becoming a patron of an artist, you are voting for the art that you think should exist and be created in the world.
Obviously this isn’t mandatory in any way but if you are interested you can check it out below!
How to Draw Hands, a Step-by-Step Guide
As you no doubt have already figured out, drawing hands is not an easy task. The forms change dramatically depending on the gesture, and like with all good drawing we have to keep a lot of things in mind at once: anatomy, proportions, expression, etc.
Since drawing hands is complicated, we are going to do what we did successfully in other tutorials, we are going to break it down into simple, easy to understand sections. At the end of this article, I have compiled a checklist you can download to check against your drawings of hands.
If I had to summarize drawing hands in one paragraph, I would say: know some anatomy, then start with the shape and angle of the palm, then block-in the shape and silhouette of the entire hand, while minding proportions, before drawing the details or individual fingers. We will go through this process step-by-step below.
Drawing hands encompasses having control over six areas, they are:
It is easy to group 1 through 3 under anatomy in general, but there is more to learn under some of these topics than just anatomy. Therefore, we will consider each one of them in turn as we learn to draw hands.
In preparation for this tutorial, I drew hundreds of hand studies over a period of 10 days, in my 10-day hand drawing challenge. Learning to draw is a discipline requiring both the acquisition of deep knowledge and its application while you draw. It works best when you learn something and apply it to drawing the same day, and then again over the next few days to solidify your understanding. if you are interested in drawing hands well, I highly encourage you to take this challenge. Details on my 10-day hand drawing challenge can be found here.
If you need more help on learning to draw hands and anything in general, head over to the Academy. There, I teach how to draw hands by building a visual library. The methods are more complex and are provided at Step 16 in my course Learn to Draw in 18 Steps.
Without further ado, let’s get started with an overview of the basic shape of the hand.
1. Consider Shape When Drawing Hands
This is a good section to start discussing the drawing process:
Draw the contour shape of the hand first, before getting into the details of what goes inside of the shape. Look at good reference (I have some great references for hand drawing at this pinterest board) and try to carefully observe what goes into the shape outline of the hand, what features are visible? Study the shape of the palm (or the back of the hand) and build the shape from there.
Keep the following in mind when observing the shapes you are drawing:
1. There are two main masses to deal with when drawing the hand: that of the palm and the one of the thumb attached to it. These masses shift, the palm folds, but the changes are minimal compared to the movement of the fingers.

2. The middle finger is the longest and is at the apex of an arch created by the fingers when they are extended.

3. When fingers are extended, their shape has a backward curve to it. Incorporate this backward curve when drawing hands with fingers flaring out, or the drawing will not look natural.


4. The palm has an arch to it pointing inward to the knuckles. Notice that the palm of the hand has a hollow in the middle, forming a sort of a spoon-like shape, especially when the thumb is brought close to the hand.

5. When clenched into a fist, the thumb does not stretch beyond the second finger.
6. There is a change in the shape of the form from the forearm to the hand. The hand steps down from the way it attaches to the arm. Hold your hand out in front of you as in the diagram below, and observe this shift in planes. Make sure to indicate this in your hand drawings.
Keep the above pointers in mind regarding the shapes when drawing hands. Now let’s add some more information to your visual library by looking at important landmarks.
2. Important Landmarks for Drawing Hands
Highlighting anatomical landmarks and sometimes exaggerating them in your hand drawings will help create expressive and believable drawings.
When you are looking at a painting of an old master or a modern-day artist you really like, where anatomical landmarks seem to have been subdued and, on the surface, it may appear as though there are a bunch of straight lines creating very straight fingers barely indicating the knuckles or most masses of the palm. When you see this, know that this is only what seems to appear on the surface. Because if you are looking at a great and believable drawing of hands there is no doubt that anatomical landmarks are properly indicated, just very subtly and in a way that could be impossible to detect to an untrained eye. Yet, trained or untrained, we all see the resulting beautiful drawing.
This is why I highly recommend that if you are interested in drawing hands well that you take my 10-day hand drawing challenge. I vividly remember very subtle changes in lines and angles that indicated proper anatomical placement of features in many master drawings that I have reviewed; and that I personally could not even spot until about day 5 of the drawing challenge.
With that in mind, let’s look at the most prominent landmarks to look for in your reference, and to indicate your hand drawings.
1. Distance between the knuckles and the tip of the fingers is longer than the distance between the webbing between the fingers and the tip of the fingers on the palm side.
This means that the knuckles are set back a bit from the webbing between the fingers. Fingers appear longer due to this when looking at the back of the hand, comparative to the palm side. When drawing the back of the hand, do not place the knuckles right up against the bottom of the fingers.
Knuckles actually sit right above the horizontal fold of the palm. Hold your hand with your thumb pointing to you and your little finger pointing away from you, bend the palm and observe the location of the knuckles.

2. The second knuckle is larger and higher than the rest. It creates an arch pointed upward when the fist is formed:


3. The palm is made up of three sections:
Thenar eminence of the thumb is the highest of these. A detailed discussion of these is below under the anatomy section.


4. There are two bones in the lower arm connecting to the wrist, the radius and the ulna. Each as they connect leaves a landmark in the form of a bump below the wrist area. These landmarks are the styloid process of the ulna and the styloid process of the radius
The styloid process of the ulna is the more visible and thus more prominent of the two of these landmarks in hand drawings. It is visible on the little finger side right below the wrist. Carefully look for it in your references and indicate it accordingly in your drawings.
5. Styloid process of the radius. The styloid process of the radius is on the thumb side down below the carpal bones of the wrist. It is less obvious than that of the ulna but can be seen in many angles. Indicate it accordingly in your drawings.


3. Consider Proportions When Drawing Hands
A small caveat: I am not big on memorizing proportions in a way that can be expressed as a formula. This is because as you practice drawing from reference, over time you will develop a better eye for proportion. Further, there are many variations in proportion in life, and you may want to express that in your drawings. With that said, here are some formula-type proportion statements to memorize when drawing the hand. I think that at least at the beginning they can be very helpful, but I am confident that with time you will refer to these less often.
1. The first joint of each finger is equal to the last two joints of that finger in length.
2. The length of the middle finger from its tip to right before the knuckle is equal to the length of the hand.
3. The first finger (index finger) almost reaches the fingernail of the middle finger.
4. The third finger is just slightly longer than the index finger.
5. The little finger barely reaches the top knuckle of the third finger.
6. To find the last joint in each finger, take the length from the middle joint to the top of that finger and divide it in half.
7. The hand, wrist to the tip of the middle finger is about the height of the face.
4. Basic Hand Anatomy to Draw Hands Well
Without further ado let’s discuss the basic anatomy of the hand. Anatomy can be an intimidating topic, therefore we will take a practical approach and keep things as simple as possible with focus on learning just enough to create anatomically correct hand drawings.
Bones of the hand:
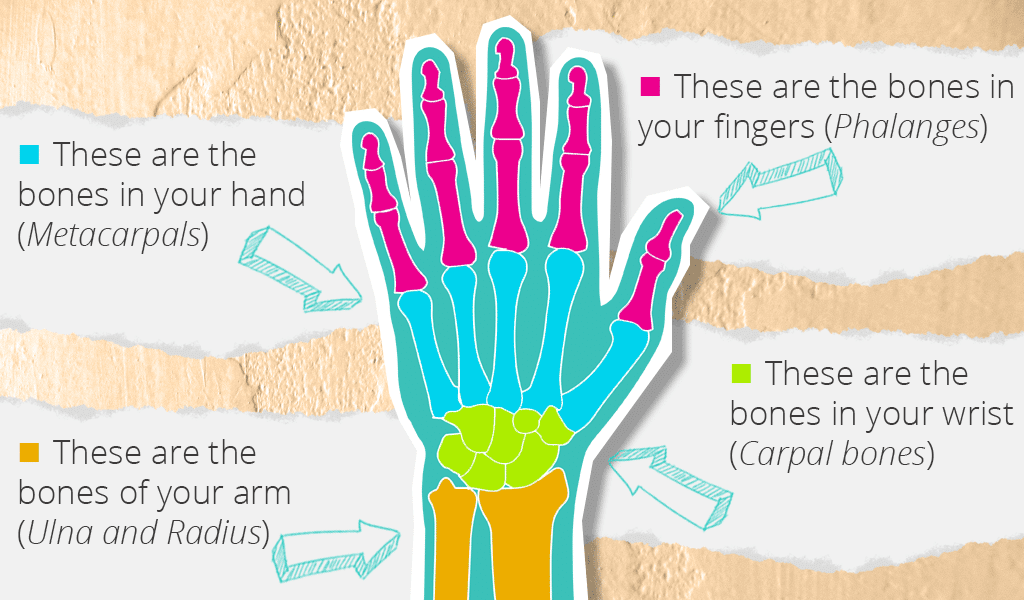
There are two bones in the forearm that are connected to the bones in the hand by the bones in the wrist. These are the radius and the ulna. So we the following sections of bones to think about: the two in the forearm (the radius and the ulna), the 8 in the wrist (all 8 of which we will collectively call the carpals), and the bones of the hand of which there are precisely 19, 4 for each finger and 3 for the thumb.
The first section of these 19 bones is housed in the hand itself. They are collectively called the metacarpals, there are 5 of them, one for each finger and the thumb.
The following sections are all housed in the fingers and the thumb are collectively called the phalanges. Each finger has three of them and the thumb has just two.
So to summarize, we have the metacarpals that are the bones inside the hand, they are connected to the carpals (the wrist bones) on one side, and to the phalanges (the finger bones) on the other side. The carpals are connected to the forearm bones the radius and the ulna.
If we move from the elbow to the tip of the fingers, we get Ulna/radius —.> carpals /wrist bones —-> metacarpals/hand bones ——-> phalanges/finger bones.
Before we move on to the muscles we need to think about when drawing the hand, let’s come up with a quick way to memorize the names of these bones and their sequence from elbow to the finger:
To memorize this, just remember: “Your Cape Must Fly” or “UR Cape Must Phly” or “Ulna/Radius, Carpal, Metacarpals, Phalanges”. This phrase gives us all the bones we need in the proper sequence from elbow to the tip of the fingers.
Another consideration with the bones of the hand is that there is one bone in the carpal group (the bones of the wrist), that we do need to know, the pisiform bone. This bone is housed on the palm side, down from the little finger on the corner of the palm. In some angles, it stands out in drawing, especially when the hand is extended back. See the below diagram for its placement.
Muscles of the hand, back view:
In the back of the hand we only need to concern ourselves with three items:
Muscles of the hand, palm view:
In the palm, there are many tendons and muscles, but we only need to concern ourselves with what is visible and that is mainly three masses of flesh and skin:
5. Expression and Stylization
Hands play a primary role in non-verbal communication and therefore can carry a lot of expression in drawing. There are a lot of variations and styles of drawing hands, and it seems as if each art period through the ages has had its own stylistic changes in drawing of hands. Each artist also draws hands differently. Looking at many different styles of drawings of hands can help identify what you find interesting.
Beyond stylization, however, there are narrative and thematic expression an artist should consider. Will you draw delicate hands with long fingers, or muscular ones with short thick fingers? What gesture will you draw and what are you trying to communicate? …and so on. Below are examples of variations I tried in preparation for this tutorial.
6. Creating Hand Drawings, Step-By-Step
At this point, we looked at hand anatomy, specific landmarks, and proportions. Let’s continue now to draw the hand step-by-step.
I think the easiest way to draw the hand is first to observe your reference and note the outline or the shape you are about to draw. Really try to take it in and understand the spirit of that shape and have a plan as to what you plan to put on the canvas.
Then armed with the knowledge that we have covered in this tutorial so far, identify the landmarks you are looking for. Depending on the reference you look at, some of the information may not be present in the image or in real life depending on lighting conditions, however having the knowledge of anatomy you should still know where the landmarks are. I created a checklist for reference when drawing hands that you can download by subscribing to my newsletter below.
Once you check for the landmarks and identified their placement, now we can begin to actually draw the hans.
Start by identifying the shape and the angle of the palm, and then attach the fingers to it. So let’s do that now:
In this drawing of the palm of the hand, I tried to identify the angle that we are looking at and the overall shape of the palm, and now I can start drawing the fingers. It is a good idea to indicate landmarks at this point, is the pisiform bone visible, which knuckles are visible and should they be made more prominent in your drawing depending on style or expression?

You can see that I’m placing dots at the point where the fingers would end. As I do that I step back from the drawing and try to imagine the fingers drawn in with the dots as the placeholder for their length.
Then I compare that to the reference and to what I want to draw and decide whether the fingers were indicated to be long enough and proportional enough. If not, no need to redraw, I can adjust by just erasing these dots and placing them somewhere else more appropriate. If I feel like the proportions are correct I can start drawing and fingers.


Here is a video time-lapse of this hand drawing:
BONUS: How to Draw Hands Using Bridgman Construction
Let’s now go through a six-line construction method for drawing the hand found in Bridgman’s anatomy books.
This method of hand construction begins by drawing the inactive and the active sides of the hand. Depending on position, if the thumb side is the action side, the little finger side is the inaction side and the opposite is true. In this method of drawing the hand, the inaction side is drawn as a single line straight with the arm.
There are six lines total for construction in this type of drawing and three of these lines are always unchanged:
There are 3 construction lines remaining. Two are attributed to the action side depending on the gesture, and only one to the inaction side. This is of course not the final drawing, but lines used to construct a believable gesture in hand drawing. See below diagram, notice how construction changes depending on the action side of the hand.

Although this is a very simple method to construct the hand, the proportions in this method still have to be resolved, and it seems like Bridgeman only used it for the construction of the palm. Although at its simplest form I think you can use it to construct the back view as well as I did in the above example.
Final Remarks on Drawing Hands
This is the end of this hands drawing tutorial. I hope you learned something and that it will show in your drawings!
I must tell you that there is one topic I purposely omitted from this hand drawing tutorial: function. Studying the functions of the muscles of the hand and the hand itself is an advanced topic that would move this tutorial well into A3 category. I plan to visit this topic in the future in a separate tutorial. For now, watch your drawings of hands closely when developing a specific gesture and examine how the muscles move and what positions the fingers take when interacting with objects.
Finally, I compiled a checklist based on this tutorial that can be used to analyze your hand drawings. It is available to my newsletter subscribers. You can subscribe for free here and also get my artist trainer pdf workbook for free, as well as other downloads.
How to Draw Hands The Easy Way – Step by Step Guide
A lot of people tell me that the thing they feel more complicated to draw is the hands!
I’ve always had a kind of love-hate relationship with hands.
Because I always loved to watch hands on cartoons or illustrations and how much emotion they can convey!
So I wanted to do that as well.
The problem was the part of figuring out the position and how to draw the hands.
UPDATE: If you’re interested in watching this in video format, I’ve added a section to my Figure Drawing course teaching you how to draw Hands step by step! Grab it here with a discount: Introduction to Figure Drawing.
Here you’ll learn how to draw hands step by step, using simple shapes.
We’ll go over how to draw the fingers and thumb, as well as different kinds of hands and even going over all the details that you can add!
Getting Hand Reference Photos and Poses
I always like to start with references.
It’s very important to get the right hand reference photos and poses for you to use.
This will help you draw better and more believable hands much faster!
Besides photo references that you can get (and that I will talk about right after), one amazing reference that you can get is an Articulated Hand Mannequin (click to check it out on Amazon).
I highly recommend this if you’re struggling with drawing hands!
I’ve even talked about it in my Recommended Tools article about mannequins.
Having a mannequin that you can pose around and change the lighting on is priceless!
Every pose that you can imagine, you can pose it.
Other than that, let’s talk about a few other photo references for drawing hands.
I love Pinterest.
As an artist, the amount of quality photos that you can get there to use as inspiration and reference is nearly infinite.
Thousands and thousands of photos are posted there each day. Sure, some may not have amazing quality, but most of the times you can find whatever you’re looking for.
Also, even if they don’t have super high “studio” quality, that can be a good thing.
Having a random photo that someone took with their phone can help you create a more realistic drawing.
To get photo references for hands on Pinterest you can try searching “hand photography” and see what comes up.
But if you want to save the trouble of searching throughout thousands of images, I’ve created a specific Pinterest board with the best hand references I could find!
Magazines
Another way to find good photos to use as a reference is by looking through magazines.
This is especially good if you already have a few magazines that you bought and are just lying around. And well, if not, you can always just go buy a few magazines that you like and search through there!
My best recommendation in terms of Magazines is to get Fashion Magazines or Jewelry related magazines since those tend to have lots of hands.
Take Your Own Photos
Here’s another great option for getting good hand pose references, take your own photos!
Doesn’t really matter if you have a high-quality camera or not, grab your phone and take pictures of the poses you want.
This is something that I’ve done when looking around for hand references when writing this post.
Since I couldn’t find the specific poses that I wanted I just took a photo of them! I’ve also included all those photos as a downloadable resource at the end of this article. So stick around for that and feel free to use them anywhere!
I talk all about Art References and Resources for Artists on a lengthy article with several examples and websites, so if you’d like to read more, check out my Article!
Drawing Hands Step By Step
Alright, time for practice!
First of all, we’re starting with the basics of basics.
A simple open hand, so you can nail down the main shapes you’ll use for almost any position!
There are two ways you can go about it, the first way is: take a photo, open it on your drawing software of choice or print it. Draw on top of it.
Tracing your photos is always a good way to learn the shapes. A lot of times, when learning to draw something new, this is how I go.
The second way is following the next steps! I’ve done part of the job for you.
So just follow the steps below and let’s master drawing hands!
Start With The Palm
This is where I start. For the palm of the hand, we make almost a square shape, a bit rounded and going thinner on the bottom.
Pay attention to the arched line we draw here, it’s very important!
If you look at your hands, you’ll notice that the line where your fingers touch the palm of the hand is usually curved.
This is important to figure out our next shape and its position.
The Finger Arc
Alright, so half our hand is done.
Now for where our fingers will be: above the shape, we repeat the same curved line that we did before.
So, in short, you’ll always have the same curve!
Unless you really want to exaggerate your hands and try out different styles, of course.
With this new line, you just need to close the shape and there you go! We have a complete hand.
Now we just need to draw the shapes for each finger.
Drawing the Finger Joints
If you find it easier, especially in the beginning, this might be the best way to figure out each finger: Circles.
Draw a circle for each joint, including the thumb.
When you’re finished, you just need to connect each circle, with a line around it:
How to Draw Fingers (The Thumb Is Pretty Different)
The fingers have lots of details and different ways to draw them, depending on their position or how they’re flexing.
And the thumb is a whole different shape and style!
So let’s see how to draw them in more detail.
One of the best ways is to draw the finger flexing and extending.
There are many stages for the flexing of a finger, let’s go for the 3 main ones:
Stretched Fingers
We already went through this one in the steps above, but let’s go through it again very quickly.
Draw a horizontal line. Now let’s add the joint circles. When all the shapes are done, we just need to connect them, with a single line.
As you can see, we are viewing our finger from the side this time, so it looks a bit different. The top part of the finger is very straight, but the bottom is more rounded.
Half Flexed
Let’s start again, with a line. Almost like a cane, but laying down.
Afterward, we do our circles: one at the start of our line, one in the first corner and the last in the second corner of our line.
Again, we just need to connect everything up!
As you can see, the outside part of the finger has very straight lines, while the inside has lots of curves.
This is the way your fingers will always behave, so remember these shapes!
Flexed
Alright, last position. The finger here will be completely flexed. We can draw a square shape or a square spiral.
Now, as always, add the circles and join everything together.
Thumb and the Circle in the Palm
The thumb is a bit different to draw.
As you noticed before, we start with a circle in the palm, from there, if it helps you, you can draw a curved line, going outside the hand.
If not, you can jump to the next part: Draw a rectangle and then a circle.
Drawing The Knuckles Of The Hand
Drawing a closed hand is completely different than the open hand!
One of the biggest differences here is that we see a whole lot more of the knuckles, so that will be fun!
They point out of the hand, almost like peaks of mountains or waves in the sea. And depending on how hard the hand is closing, the angrier and sharper they’ll look!
Knuckles From The Side
Here, the knuckles won’t be as noticeable, but it’s a very common position to draw.
Start with a squared shape.
On the bottom of this shape, draw a circle and then a rectangle. This is our thumb.
Since it’s flexed, we can’t see the whole thumb, so we leave the circle part behind us.
We already drew a flexed finger, so we already know how to do it: draw a square spiral and add the circles if you prefer.
I usually sit them out when drawing a fist, since it will be too cluttered, so the spiral should be enough.
Knuckles From The Front
I feel that this one is the easiest to do!
Start with a rectangle shape, but this one is quite irregular, going up, almost like a chart or a mountain.
Now our thumb will appear in front of the rest of our fingers. So draw a rectangle and circle in front of the main shape.
And behind it, a circle for the rest of the thumb.
Now, all we need is to add the knuckles and fingers. So, again, let’s go with circles!
The middle finger will have its knuckle at its highest point and for the pinky, the lowest.
Now we just need to clean everything up and add the details.
Differences Between Masculine And Feminine Hands
There are many types of hands and each person is different.
But generally speaking, when drawing hands, especially when going for a more cartoony style, we tend to draw hands differently.
Feminine hands tend to have elongated fingers, but more delicate and slim.
When drawing masculine hands, we usually go for broader hands and very thick fingers.
The same goes for the nails.
With feminine hands, we draw more stylized nails and even longer than normal.
If the character we’re doing asks for it, we even add nail polish of different colors!
For masculine hands, we usually go for very simple nails, sometimes very squared and big.
Adding Details To The Hands
There are lots of small details that you can add to your character’s hands.
If you want to give more expression to your hands, you can do that by adding details.
The poses of the hands will already help you with conveying an emotion, but the details will add so much more to that!
We’ve already done some nails and an extra line here and there, but let’s go over each detail that you can do!
Drawing Hair in the Hands
We always have some hair on our fingers and the back of our hands.
This is usually more noticeable in men.
So if you’re drawing a male character that happens to be very hairy, don’t forget to add some of it on their hands.
Go simple or exaggerate with all the hand hair!
It’s your character and you know them better than anyone.
Experiment a lot and see what works best. And, as always, have fun!
Drawing Hand Wrinkles
This is all about taste.
For me, I usually leave these ones out, but you might prefer to have a more realistic feel or very stylized.
When you look at your hands, the knuckles have some wrinkles.
You can add them to your drawings!
They fit very well if you’re drawing either men or older people, where these are more noticeable.
Try different weights on your lines, to give them more or less strength.
Let’s say your character is someone who works very hard, especially with their hands.
Then, these wrinkles can be very noticeable, to convey this idea better!
Drawing Fingernails
We already drew some, but again, there’s a lot of styles that you try and experiment with.
People have different fingernail types, so explore that in your drawings.
If you’re drawing a woman, that is very careful with her looks, then her nails will also look the part!
Elongated nails with pointed ends and even with a different color.
If your character tends to chew on their nails, then, maybe they’ll look very short, going below their usual level and even a bit irregular. Some examples of different fingernail types!
The nails can also be very pointy or round and even squared.
You can them in different sizes and styles and you can even mix and match these styles in one character!
Drawing The Palm Lines
Finally, the palm lines.
When we drew our first hands, we drew them from the back.
If you want to draw a hand facing towards you, the shapes will be exactly the same.
The only difference here is that we’ll have some extra lines decorating the hand.
We have dozens of tiny lines all over our palms, but let’s focus on the main ones: the thumb line and two horizontal lines above it.
These are the ones you’ll want to focus and they’ll usually look the same every time.
But you can experiment with different kinds of curves and, again, on how much pressure you apply to these lines.
If you’re drawing older characters, for example, these lines might stand out more!
How To Draw Old Hands
Think about your character and their age.
As you draw their hands, they’ll look different depending on how aged the character is.
If you’re young, you’ll notice that your hands are very simple.
Almost no marks and definitely no wrinkles on the backs of the hands.
If you’re drawing someone old, then their hands will look different.
Look up on Pinterest or ask to take hand photos of someone older in your family.
Put their hands next to yours and you’ll clearly see the differences.
Generally speaking, the skin becomes looser, which means that you’ll see more wrinkles on the hands.
Another detail you can add is freckles and different colored spots on the hands.
This is very common to see on older people, so take advantage of that in your drawings!
Another matter that is worth mentioning, is that as you age, your hands tend to become thinner, so pay attention to that as well, when drawing old hands.
Apart from this, another little detail you can add is some scars.
Both in young and older characters.
We use our hands a lot and it’s more than common to get some scars in them.
I sure can count some on my hands, but it might also be because I’m just too clumsy. Oops!
Look for different hand references, take pictures of people you know, of any age.
Compare them and observe the differences. Now, you just need to practice your drawings!
How To Draw Baby Hands
When drawing old hands, we focus on thinner hands and lots of wrinkles, baby hands are almost the opposite!
Here round shapes rule.
Babies tend to be very chubby, so take advantage of this, by exaggerating how round their hands and overall features will be!
Other than that, the hands will usually be smaller, especially the fingers.
Imagine baby carrots on a circle, draw them.
Those are your main shapes, now you just need to clean up everything and add some details.
For this part, there isn’t much to do.
Very small fingernails and little dots for the knuckles, like little dimples on the back of the hand!
Take photos (if you can, babies like to move a lot sometimes, so good luck!) and even study some cartoons.
If you want to go for a cartoony style, this is always a good place to go.
Cartoon movies from Disney, Pixar, Dreamworks, and many others are a good place to get inspiration and to learn.
Watch how they develop their styles over the years and how they create unique characters, not only with their wardrobe or faces but hands as well!
Search, observe, experiment and practice.
These are your only rules for learning how to draw.
And, of course, have fun!
Hand Drawing Tools Online
If you want some exercises to perfect your hand drawings there are some really awesome online tools for that.
I mentioned a lot of times, here and on my Figure Drawing course, some websites where you can practice gesture drawing.
And these are not only good for posing in general and drawing the whole human body but also hands or other particular parts of the body!
Let’s see some examples that I particularly like and use a lot. You can practice many different hands and feet on the Line Of Action website, for free!
Line of action
This is a super clean and very helpful website with a cool drawing tool, Line of Action!
With this tool, you simply choose a few settings like male, female and others, and then you can select how much time you’d like to practice each pose and you hit the start button “Get Drawing”!
The tool lets you choose between Hands, Feet or both hands and feet, so if you want to practice feet as well, that’s a bonus.
If you’re still beginning to learn how to draw hands I would recommend setting it up to 60 seconds or 2 minutes. Later on, you can try the 30 seconds version as well.
In my opinion, it’s very good to have a shorter time so that you can focus on the main shapes and not overthink the small details. Another great website to practice: Sketchdaily
Sketchdaily References
Another very similar (and helpful!) drawing tool, Sketchdaily References.
Also has a bunch of different photo references so if you’ve used the previous website a lot, change to this one for a while so you don’t get as many repeats.
To use it simply click the “Body Parts” link up top, select “Hands” in the parts dropdown, the Gender you’d like.
You can also choose the View, the Time (I recommend the 1 to 2 minutes for beginners) and click Start!
Once you get used to the time, try to change it to 30 seconds and see what you can get out of it.
It might be hard and the time might feel like it’s too short.
But the more you practice, the more you will improve and create better drawings in a shorter amount of time.
Quickposes
Quickposes is another website that you can use to get a bunch of different poses.
It has all the standard options like the ones before and you can choose how many images you’d like to draw in one session.
One interesting feature of this website is that you can choose to display the images upside down.
Which makes for an interesting challenge if you’re up for it.
Alright, that should be enough for now, you’ve got a lot of tools to use! Give them a try and see which one you like the most.
Hand Reference Photos Download
As a bonus, here are a bunch of photos on a white background that I’ve taken to use as reference!
There are both male and female hands (mine and from my boyfriend) and a lot of different poses from several sides. Click the image to get your hand reference pack on Gumroad!
This includes over 100 photos and 2 videos of hands!
You might even recognize some of these since I’ve used them in this article and to practice.
You can use these hand photos in your drawings and art as you wish.
Lots of pictures for you to use, so remember to practice a lot!
A Quick Recap On How To Draw Hands
Start with simple shapes and you’ll see that your drawings will improve immensely!
Drawing doesn’t need to be hard.
We just like to overcomplicate things sometimes.
Before reading this article, you might have felt that drawing hands was a nightmare.
Now, hopefully, you feel that it’s much easier and you feel more motivated to draw hands on your characters!
No more hiding your character’s hands behind their back, we are better artists now and we’re not afraid of hands anymore.
Drawing hands IS fun!
Sit down, get some images for reference and relax while practicing some good hand drawings.
Back to the Blog
Related Posts:
Hello! I’m Patricia.
An Artist, Online Teacher, and big Nerd!
I want to help YOU create amazing and fun artwork as easily as possible. With no stress and no hard to follow rules.
So let’s do this, together!
Follow me on Instagram for more Artwork and Tips. @artbydoncorgi
Cartoon Fundamentals: How to Draw Cartoon Hands
To get some inspiration, have a look at the hundreds of character designs on Envato Elements. Or for a shortcut, try a character creation kit!
What You Need to Know
Several times I have been asked by some people in the comments of my tutorials how do I draw characters in many poses and different expressions. The case is that, with practice, you begin to develop your own drawing style and without that other people know it, you begin to use some shortcuts in your art. These shortcuts are poses or expressions you usually draw more often, as well as a type of hair or clothing in which you feel more comfortable in drawing. This is much more common than you think and professional artists do this all the time!

The fact is that doing this with hands is very difficult! On the head, for example, the only flexible portion is the jaw. We could change our facial expressions but our eyes, nose and mouth always remain in the same place (at least in real life!). This doesn’t occur with the hand. For any direction in which you move, things change completely. In fact, it’s likely that in a dialogue scene you change very few of your character’s facial expressions and moves their hands excessively at various different angles.
1. The Hand in its Most Simplified Form
The hand consists of several different bones, particularly the fingers, which means that they have different sizes and could bend in different directions. For this reason it’s important that you learn how to make a hand in the simplest possible way and learn to see it as a small puzzle divided into a few main parts. So let’s start dividing it into blocks:
Step 1
Starting from the back of the hands, let’s draw the following simple semi circle:

Step 2
Now, draw a triangle in a way that it fits on the side of it, like this:


Step 3
Above the triangle we design something like the tip of a knife.

Step 4
It’s time for fingers. We will replicate our first shape at the top, but in reverse. Thus we conclude our «hand puzzle»:

Step 5
Excellent! Now just fill in the remaining details with soft contours:


Notice above that format of fingers isn’t uniform, due to difference in sizes.
2. As The Palm of Your Hand
The palm of the hand has a few more details we should know. Let’s check them out:
Step 1
Once again, all the above procedure repeated using our basic template:

Step 2

Step 3
Finally, we can add the outlines and conclude with the final details.


Profile View
When the hand is in profile view, we could see the rise of the thumb muscle.

The more childish your drawing style, the more your lines and forms are smoother and simpler. These are just some shortcuts that helped me to understand that hands can also be drawn starting from simplified shapes. The important thing is always to seek a style that print personality and dynamism to the final result of your drawings.
3. More Shapes and 3D Hand
Well, you can not draw a flat hand for the rest of your life, right? To make a hand with convincing depth, just use the techniques presented above and change the viewing angle of the camera! Try to play with this technique until you feel comfortable with the process.

To form the fingers we should think of them as if they were stacked cylinders. This technique is used to help us design our fingers in several different angles, as it facilitates us to see the hand in perspective.


Let’s learn how to make a fist. This is a slightly different process, but you’ll see that, in the end, it all comes down to simplification based on geometric figures.

Step 1
First, we start simplifying the bend of the little finger, making a format similar the letter «y».

Step 2
We wrapped the finger with the format below. Take note to highlight the curve that goes from little finger to the wrist.

Step 3
We continue drawing the fingers into perspective. We’ll do only three fingers this time. I’ll explain more about that later.

Step 4
Lastly, we draw the thumb finger and its rising curve below.

Step 5
Good! In a few steps we conclude our simplified drawing of the fist viewed from inside. Notice how its overall shape can be sketched through «boxes» with different sizes.


Obviously, trying to simplify all of the shapes that hands can have through various different techniques, makes the job a bit tiring. So try to keep in mind that the real secret is to simplify what is seen in real life.


4. The Fab Four


Note that by using this technique, all your knowledge in designing a hand with five fingers should be converted to four fingers. You need to adapt the concepts for a satisfying and interesting result.
Another detail is related to the fingertips. In cartoon style, the more round and flexible are your fingertips, more dynamic and interesting they are. When creating your characters, try to develop the hands as if they were also a character!


Another good reason to draw the hands of four fingers is that you can make them larger and, therefore, more expressive! Several famous characters benefit from the use of this technique, like the Simpsons, Bugs Bunny, the Flintstones and Mickey Mouse.
The Secret of the Little Finger
One of the biggest secrets when designing this type of hand is in making the good use of the little finger! If you place it unevenly, you’ll prevent a monotonous look to your hands.
5. Talk to the Hand
The hands also have their own personality, oddly enough! Besides serving as a complement to the facial and body expressions, they can also express feelings on their own!


However, many times you will come across in a situation where your hands should play a subtle role in the composition. In this case, it should serve as a secondary agent to the main action. Characters in action scenes are more prone to exaggeration than the characters in the quiet ones.
6. Knowledge Test
I prepared a small test to see whether you are truly a good observer. Analyse the drawings below and try to identify the best feeling that approaches them. Can you guess all.


Raise Your Hand!
Now you know all the secrets in the art of drawing cartoon hands, congratulations!

Although the hands are a really fun part of the body to draw, designing them in any style isn’t an easy job and only with practice you can ensure a more organic result. Even if your focus is the cartoon style, buy a good anatomy book will also help you to understand how muscles and bones work in the hands, although to known all of them is an unnecessary task. You just need to understand how the hand works while in motion. Remember that character’s expression are much more important than what’s under its skin.
How to Draw Hands Without the Hassle
Learning how to draw hands is one of the most important things you can do if you want to be a good figurative artist. But why are they so difficult to get right?
And what if there was a simple way to draw hands that didn’t involve years of study and piles of textbooks?
Relax. After reading this article, you’ll have a much better understanding of how the hand is constructed and how to draw it.
You don’t have to get baffled by science or learn lots of complicated terms that are as difficult to pronounce as they are to remember.
This article will show you how to:
So, are you ready to learn how to draw hands without the hassle?
All you need is a pencil and some paper to get started.
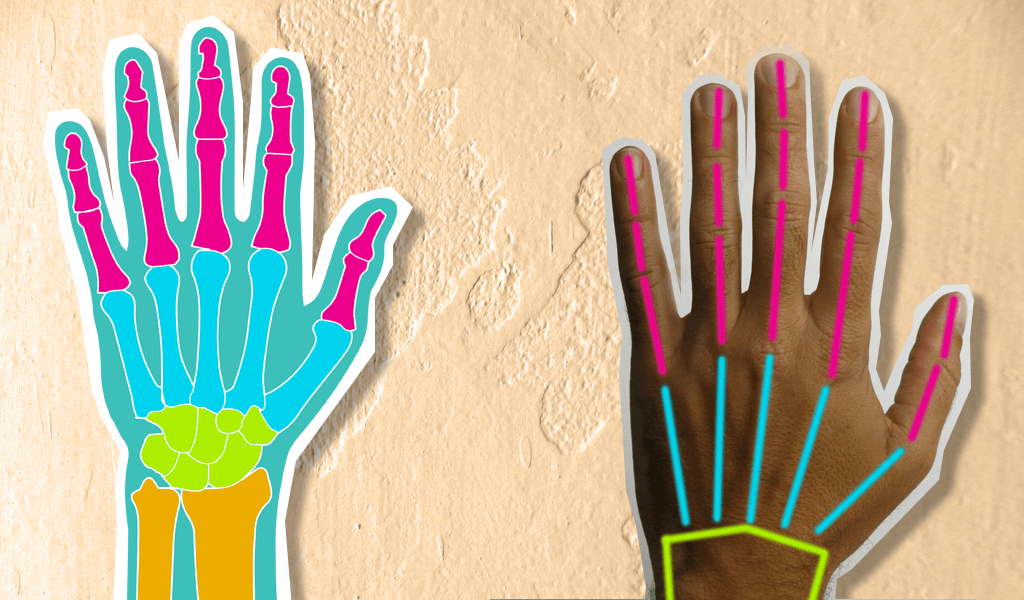
Illustration 1: There are four groups of bones which make up your hand
How to Draw Hands: Basic Anatomy
Here’s a diagram of the bone structure in the hand. As you can see, the hand is basically made up of four different groups of bones:
Illustration 2: See how the bones in the illustration match up to the bones in a real hand?
How to Draw Hands: Getting Started With Simple Shapes
Now, let’s take a look at how this diagram relates to a real hand. The colored lines on the image of the real hand are color-coded with the bones of the hand in the diagram.
Now you know how the hand is constructed, let’s get started with some basic shapes and proportions which will help you draw it more easily.
For this first exercise, you’ll be drawing the palm side of the hand.
1. Drawing the Palm of the Hand
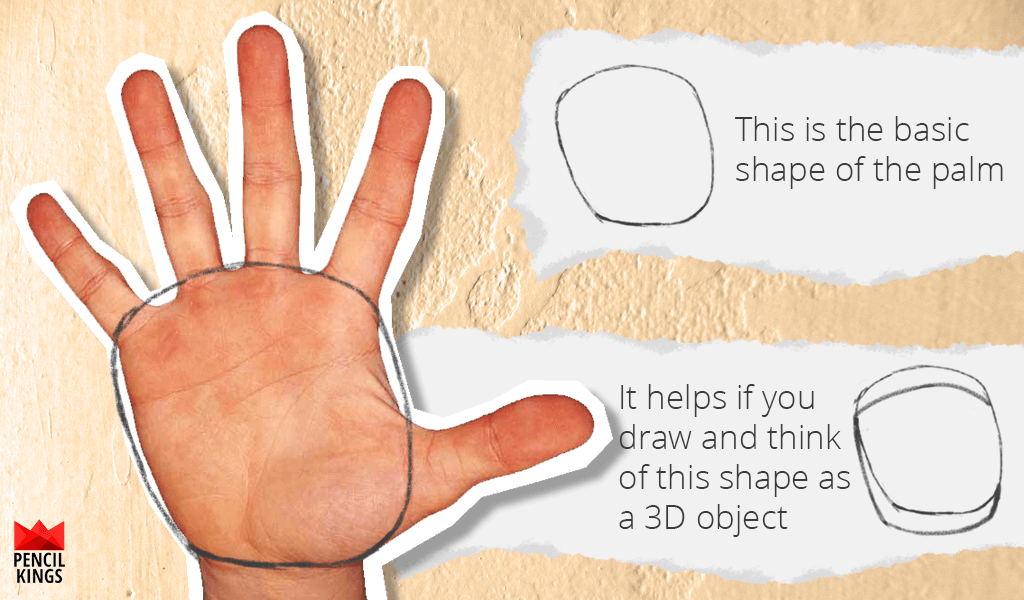
The simplest way to draw the palm of the hand is to draw a shape like this, which is basically a rectangle with rounded edges:
Illustration 3: Draw a basic ‘steak’ shape for the palm
If it helps, imagine this as being similar to the shape of a steak (or a nut cutlet if you’re vegetarian!) Also, because this ‘steak’ shape isn’t completely flat, you’ll need to draw it with some depth like in the illustration.
Drawing and thinking of this shape as a 3D object will help you when you come to add the fingers and will stop your drawing from looking too flat.
Using the illustration as your reference, practice drawing this shape as many times as you like until you fully understand it.
Once you feel totally confident with drawing this shape, you’ll be ready to move onto the next part of learning how to draw hands.
2. Drawing the Fingers and Thumbs
Once you’ve drawn your basic shape for the palm, it’s time to move on to the fingers. Let’s look at the basic proportions of the hand first, because this will help you draw the fingers at the correct size:
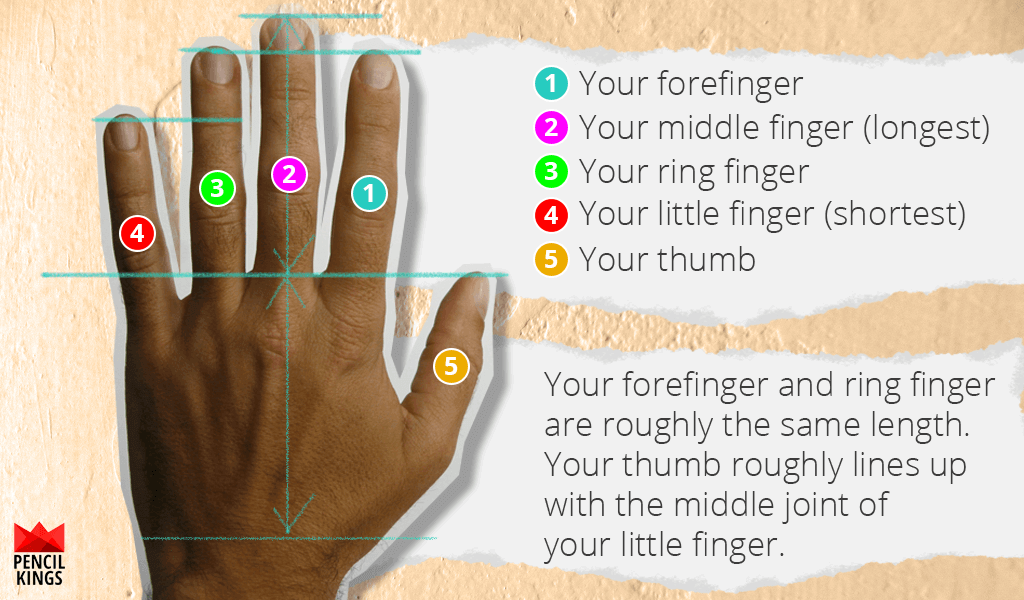
The basic proportions of the hand are as follows:
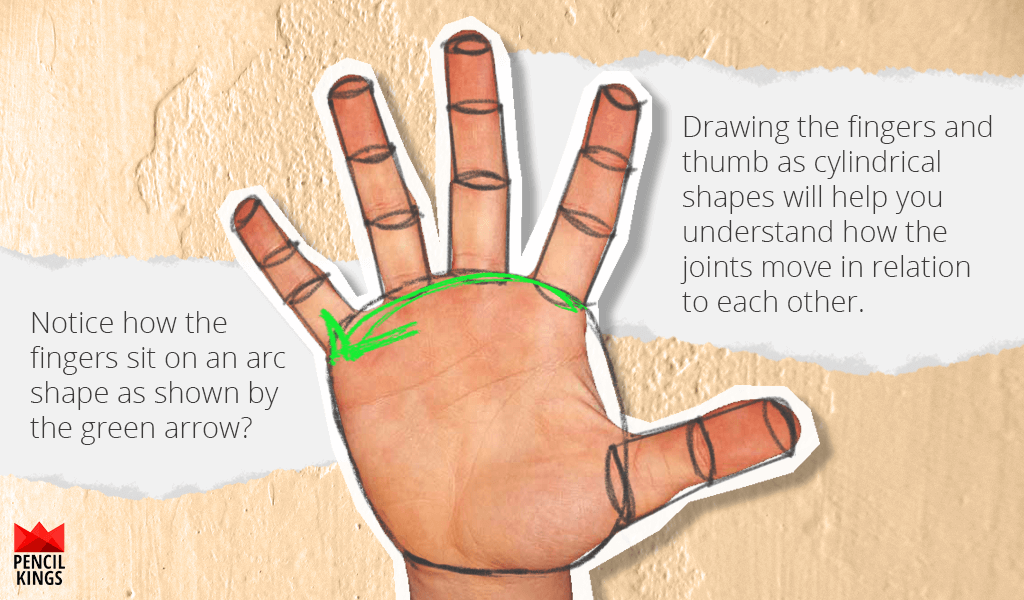
The easiest way to draw the fingers is to see them as a series of cylindrical shapes, like this:
Illustration 5: The fingers can be drawn as cylinder shapes
Drawing them this way will help you establish where the joints in the fingers are, and teach you to see the fingers as 3D shapes instead of flat, 2D shapes.
Now look at your own hand. Notice how your fingers aren’t completely straight, but bend slightly towards the middle finger? This is a subtle detail, but it’ll make a huge difference to how realistic your drawings of hands look.
Illustration 6: Notice how your fingers aren’t totally straight
The other important thing to remember here is how the fingers are attached to the palm. Rather than being attached in a straight line, the fingers actually sit on a curved line or arc that goes downwards at the little finger.
You also need to notice how the thumb usually sits at a slight angle when compared to the other fingers. It’ll look a little unnatural if you draw it looking face-on like the other fingers.
Using the image above as your reference, practice drawing the hand using these simple shapes. Keep doing it until you start to become more familiar with the structure of the hand and its proportions.
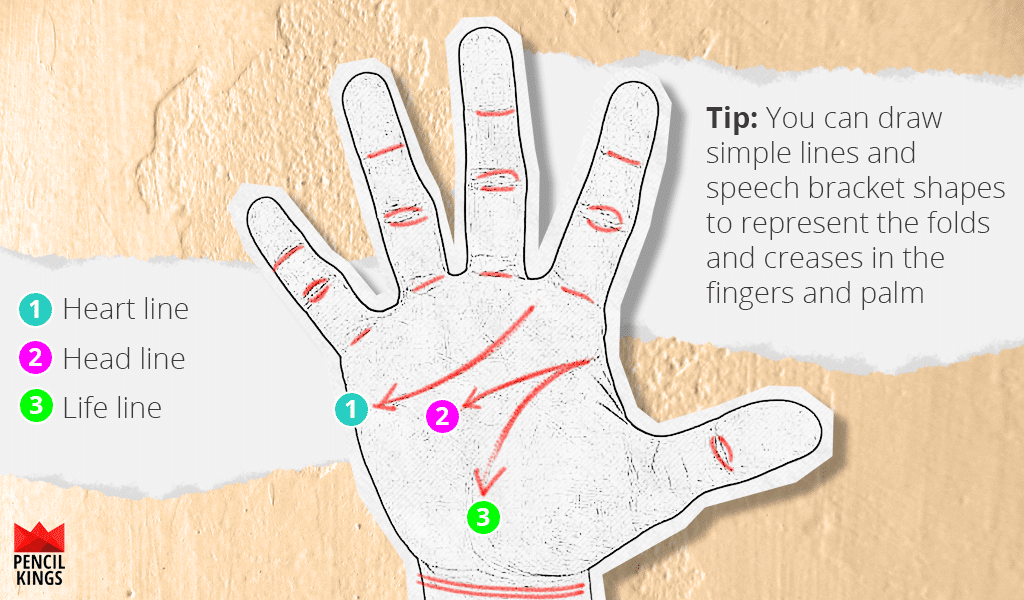
How to Draw Crease Lines on the Palm
To make your hand drawings look more realistic, you’ll want to add some crease lines to the palm and fingers.
There are three main lines you need to draw on the palm. These are:
Take a look at your own hand and see how these lines curve across the surface of the palm. The head line (3) and the life line (3) both start from the same point at the base of the forefinger.
The heart line starts right between the forefinger and middle finger, and then curves down towards the outer edge of the hand. It stops roughly level with the base of your thumb.
If you look at your wrists, you’ll also see some creases. These two lines are known as your ‘bracelets’ and they curve around the cylindrical shape of your wrist.
You can add these if you like, but it’s not essential – especially if you’re just starting out learning how to draw hands.
Remember how each of your fingers is made up of three bones? Well, it probably won’t surprise you to learn the crease lines on your fingers are at the point where each of these bones meet.
Take a look at your own fingers. Notice how the crease lines in the fingers also follow an arc shape like the rest of the hand?
Go ahead and sketch these lines in, like in the illustration above. This is another small detail that will make a big difference to how realistic your drawings look.
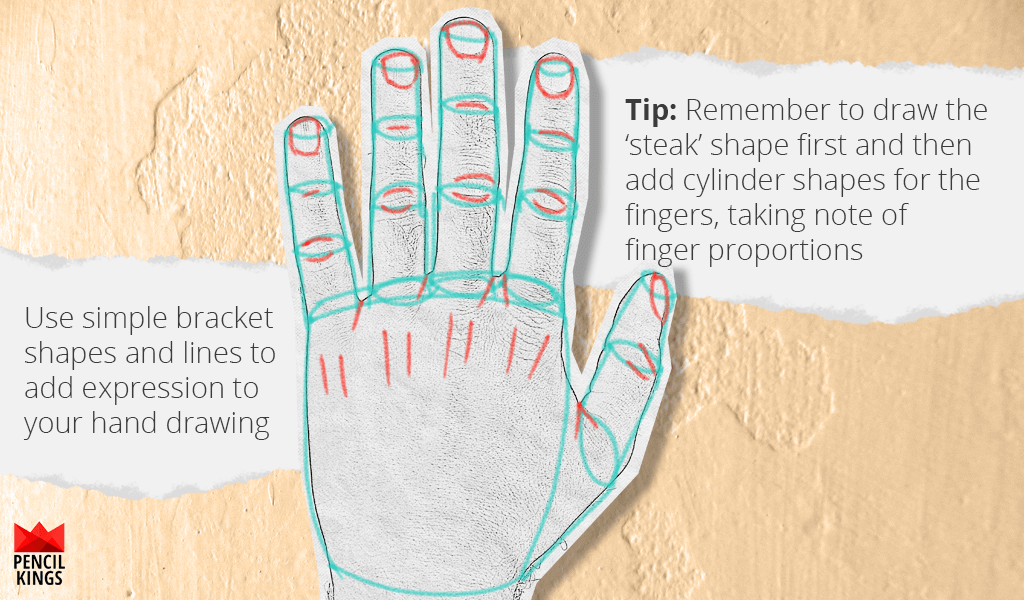
Illustration 8: Draw simple lines to indicate the creases in the hand
Drawing Hands From the Other Side
Once you’ve got the hang of drawing hands from the palm side, why not try drawing them from the other side, otherwise known as the back of your hand?
The major differences between the palm and the back of your hand:
Start off by drawing the same basic ‘steak’ shape for the main part of the hand. Then, taking note of the proportions of the fingers and thumb and the joints between the bones (as in Illustration 4), sketch in those basic cylinder shapes to represent the fingers.
1. Adding the Fingernails
The fingernails are often overlooked when learning how to draw hands, but they’re actually a pretty important feature – especially if you’re drawing or painting hands close up.
Not only that, but the fingernails can also be used as a useful reference point with regards to the proportions of the hand. For example, the top of the index and ring fingers roughly lines up with the bottom of the fingernail on your middle finger.Pro Tip: Take a good look at your own hand and fingernails. Are they long, short, painted or in need of a little manicuring?
The look of the hands and fingernails says a lot about a person, so this is something you’ll want to bear in mind when creating original characters, for example. So how do you get started? Here are the main points to remember:
2. Drawing the Knuckles
The knuckles sit at the base of each finger, and also sit on an arc shape. When the hand is relaxed, the knuckles usually aren’t too prominent.
A simple way to draw these is to add two straight lines or curved lines like speech brackets at the base of each finger.
3. Drawing the Crease Lines on the Fingers
Just like with drawing the palm side of the hand, the crease lines appear where the joints of the bones in each finger meet.
To draw the main creases in the middle of each finger, just draw two curved lines like speech brackets turned on their side. Notice how these also sit on an arc, rather than a straight line?
If you look at your own hand, you’ll also notice some smaller lines at the base of the first bone on each finger. You can sketch these in using some simple curved lines, just like in the illustration.
At the base of each finger, there are some small diagonal crease lines where each finger meets the next.
Now, follow this exact same process for drawing the crease lines on the thumb.
Illustration 9: Use simple measurements to help you draw hands
How to Draw Hands: How the Hand and Fingers Move
Now you’ve learned how to draw the basic shape of the hand from both sides, let’s take a look at how the fingers move and how you can draw them more accurately.
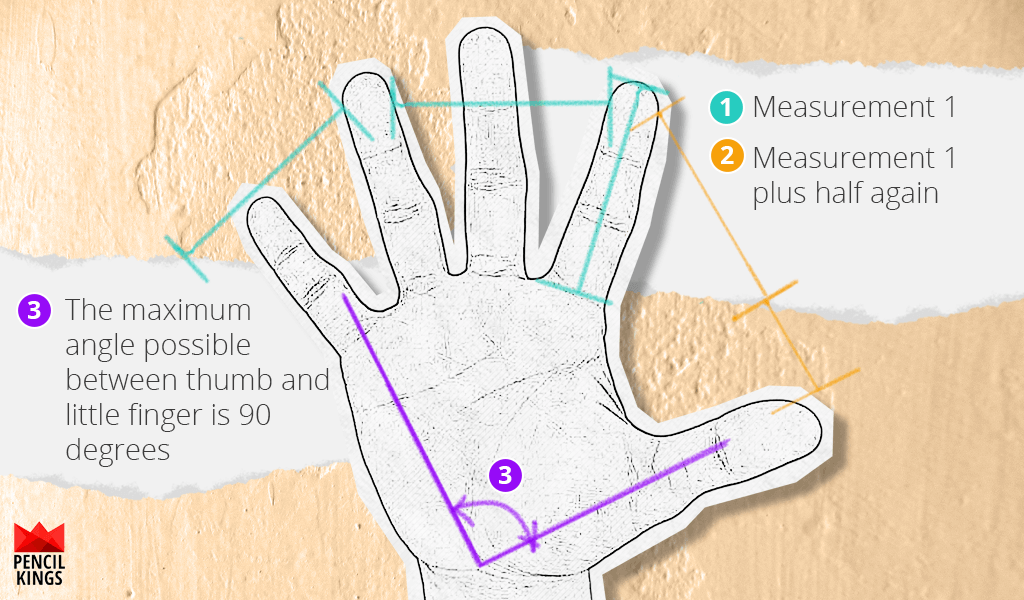
First, let’s take a look at how your fingers move without bending them.
Look at the top of your hand and fan your fingers out as far as you can, like in the illustration above. Notice how you can only fan them so far?
It’s the small details like this that will make a big difference to how realistic your drawings and paintings look.
For this next exercise, we’ll use the length of the forefinger as our main reference measurement (measurement 1) like in the illustration.
The main points to remember are:
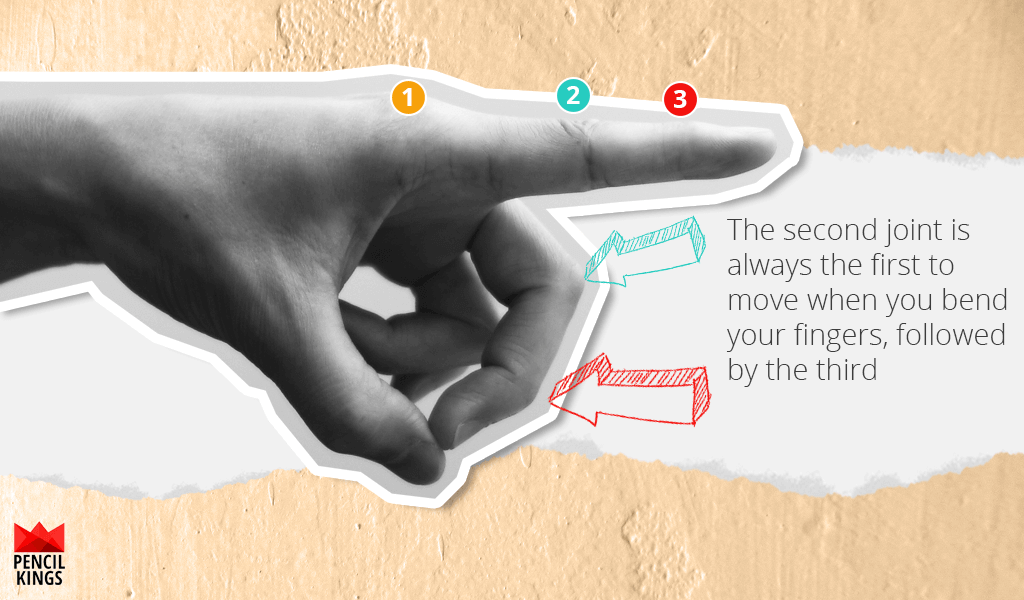
Illustration 10: Notice how your fingers move when you bend them
How to Draw the Fingers Bending
Now, let’s look at how the fingers move when you bend them.
First, try bending your forefinger from a straight position into a curled position like in the illustration.
Notice how:
It’s important to remember these small details when drawing hands, because they’ll help give your drawings a more realistic feel.
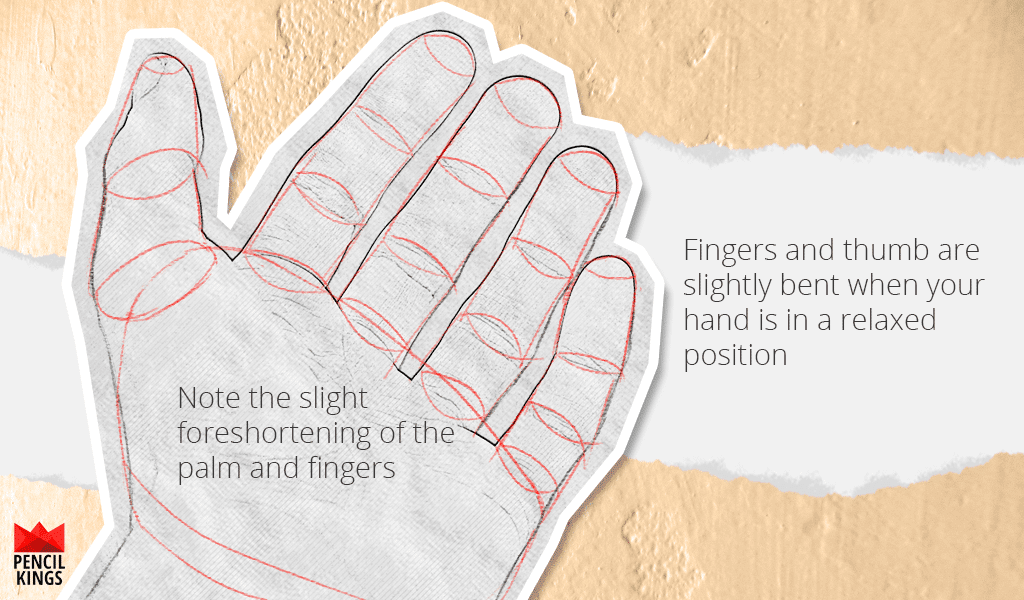
How to Draw the Hand in a Relaxed Position
Because we use our hands all the time, they’re rarely in one position for very long.
Whether it’s holding a pencil, lifting food and drink to your mouth or even brandishing a sword, there are all kinds of different poses for hands.
Follow along and draw the useful poses in our illustrations. These are a great place to start, because they’ll help you understand how the hand moves.
And, once you feel more confident with your hand drawings, you can experiment with other poses if you like.
First, let’s take a look at the hand in the relaxed position…
Relax your hand and take a look at what’s happening.
Notice how:
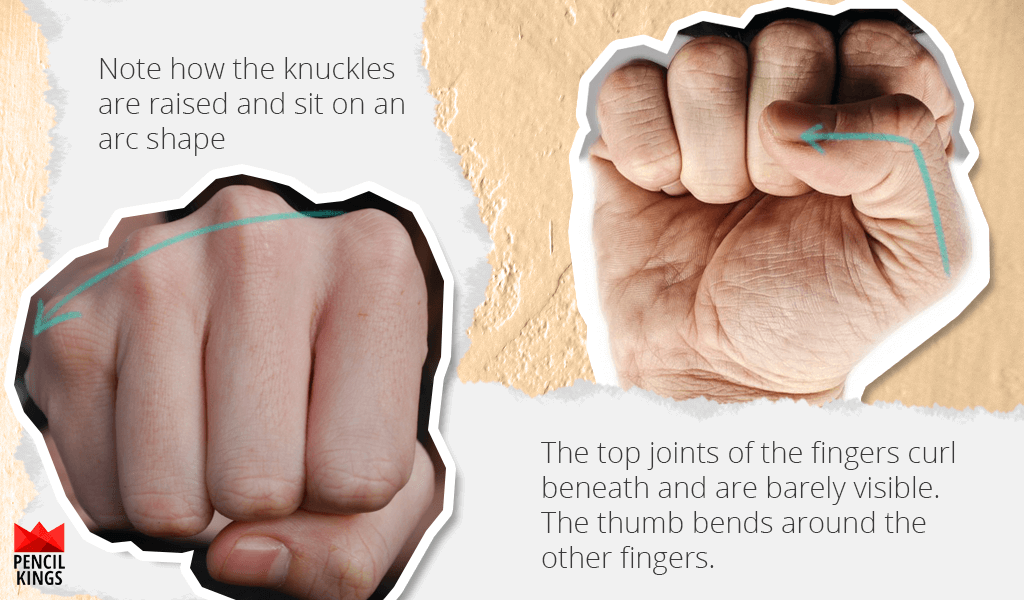
Illustration 12: Here are the main differences to look out for when drawing a fist
How to Draw a Clenched Fist
Now, let’s see how a clenched fist looks…
First, clench your fist and take a look at it from the front.
The main things you’ll notice are:
Practice drawing your fist from this angle, and take a look at the image above for guidance.
Now, let’s view that same clenched fist from the other side (from below).
The main things to remember here are that:
How to Draw a Hand Holding a Pencil
Our fingers can adjust to hold many different things, and it’s useful to have an idea of how some of the main poses look.
First, let’s see what happens when we hold a pencil…
Pick up a pencil or pen and hold it in your fingers like you were writing or drawing. Notice how your fingers bend and position themselves to ensure a comfortable grip?
The main things to remember here are:
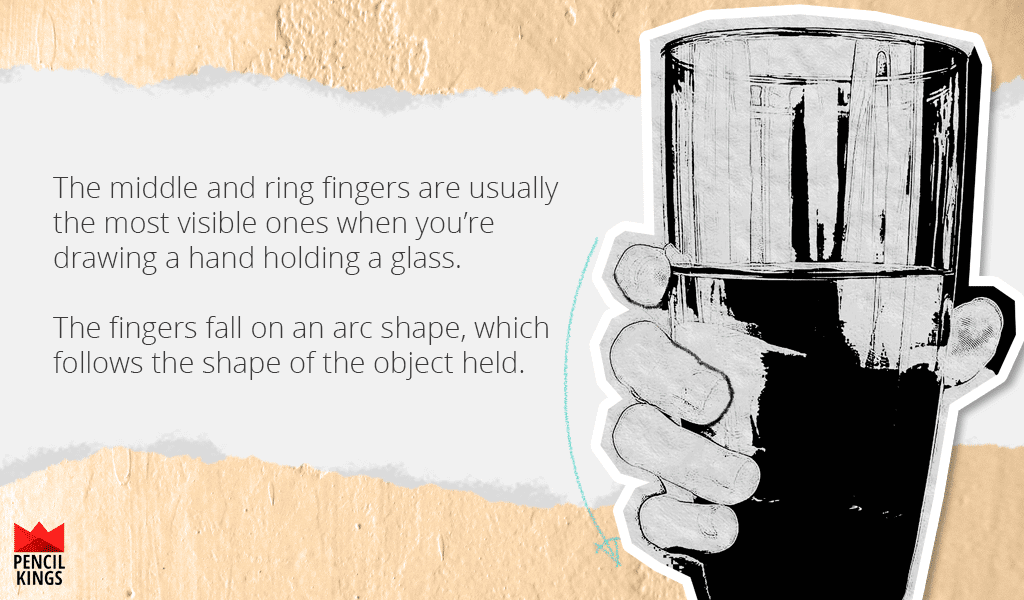
Illustration 14: Your fingers curl around the shape of the object you’re holding
How to Draw a Hand Holding a Glass
Now pick up a glass and look at your hand. Notice how your fingers have automatically bent and formed themselves into the best position for doing this?
You can see how:
Of course, there are lots of other hand poses for you to practice. These are just some examples to help get you started and become more familiar with the proportions of the hands and how the fingers move in different situations.
If you’re serious about drawing hands, spend 15 minutes a day drawing them in different poses such as the ones in this article.
You’ll be surprised at how quickly everything starts to make sense, and how your drawings gradually start to look more realistic.
If you enjoyed this blog post about how to draw hands, why not leave us a comment below?

