How to draw hair digital
How to draw hair digital
How to Draw Hair Step by Step
Hair is very difficult to draw, because what we see is different than what we know. You can’t simply draw all the hairs in the form of lines, because that’s not what we see when we look at hair. What we see must be simplified to lines and shades, and there are many ways to do it.
In this tutorial, I will show you one of these ways—a simple method that’s great for quick rendering and sketches. I will present this method on four examples: long straight hair, short hair, wavy hair, and afro-textured hair.
Before You Start
To follow this tutorial, you’ll need some kind of head base. You can use mine, or create your own in some other style.


Let’s take a look at real hair to prepare for this tutorial:
1. How to Draw Long, Straight Hair
Step 1
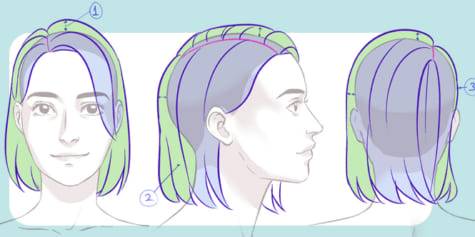
Start by adding some volume around the head. Hair shouldn’t lie flat on the scalp!


Step 2
Draw the parting in your chosen place.

Step 3
Draw the outline of the hair around the face.

Step 4
Draw the direction of the hair gently flowing down over the shoulders. Keep in mind that you’re not drawing the single hairs here, just their flow.

Step 5
As I’ve mentioned before, hair doesn’t lie flat on the scalp. Show it by elevating the front.

Step 6
Hair is grouped in strands, and that’s what we see. Create skewed edges of such strands.

Step 7
Each strand can be divided into smaller strands.

Step 8
The strands we’ll be partially visible on top of the head as well.

Step 9
Draw some strands on the side, too, to add some texture. Don’t draw them as simple straight lines, but rather as narrow «Y» shapes (normal and upside down).

Step 10
Make the hair elevated along the parting.

Step 11
Outline the whole hair, following the rhythm of strands. Don’t press too hard—hair is soft and shouldn’t have a hard outline.

Step 12
Draw long lines along the strands. This will give the hair some detail and add depth to the whole haircut. Don’t press too hard, and don’t make the lines too tight.

Step 13
Shade the hair now, thinking in terms of strands, not single hairs.

Step 14
Add some stray hairs here and there to make it look more realistic.

2. How to Draw Short Hair
Step 1
Again, draw some volume around the head. In this case it will also be the outline of the whole haircut.

Step 2
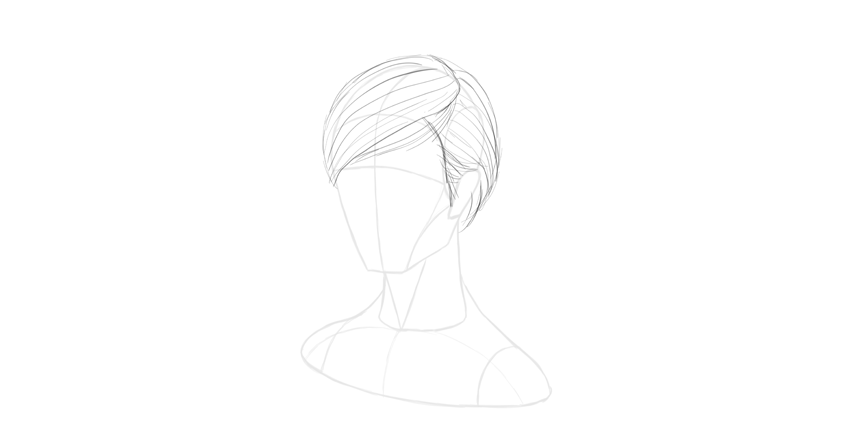
Draw the parting and the fringe going straight from it.

Step 3
Make the general outline complete by drawing the hairline next to the ear.

Step 4
Draw the direction of the hair, creating the 3D form of the haircut.

Step 5
Some stray strands may appear in the fringe. Draw their edge.

. and then their shape going towards the parting.

Step 6
Define the strands on the sides of the head.

Step 7
Draw some shadows between strands in the middle as well.

Step 8
Gently outline the hair without drawing lines that are too thick. All the lines should be tapered.

Step 9
Gently shade the strands.

Step 10
You can add some stray hair to make it more natural.

3. How to Draw Wavy Hair
Step 1
Draw the volume of the hair around the head. Wavy hair is often quite full and elevated.

Step 2
Draw the parting.
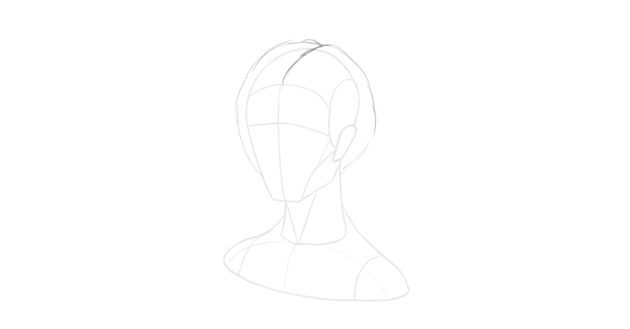
Step 3
Draw the outline of the strokes surrounding the face.

Step 4
Make the hair seem elevated by filling the area between it and the scalp.

Step 5
Add gentle waves above the first strand-lines without touching them.

Step 6
Create more waves following the same rhythm. These waves shouldn’t touch each other.

Step 7
Close the shape of each strand by mirroring its wave and adding a pointed tip.

Step 8
Draw some more thin tips on the bottom of the haircut. Their curl should complement the other waves.

Step 9
Draw the shape of the strands on top of the head.

Step 10
Draw the direction of the strands all over the head. Do it lightly.

Step 11
Each strand should be divided into more strands at the tips.


Step 12
Make the strands on top of the head more detailed.

Step 13
Outline the whole hair without making the waves too obviously separate.

Step 14
Shade the strands and the spaces between the waves.

Step 15
Give a strong outline to the hair, keeping it soft.

Step 16
Add some stray hair here and there.

4. How to Draw Afro-Textured Hair
Step 1
Draw the outline of the volume of the hair. This time it will have a lot of volume.

Step 2
Afro-textured hair has a lot of curly strands and texture. Sketch «clouds» of strands all around the head.


Step 3
Sketch the curly outline of the whole haircut.

Step 4
The hair around the face will have the same shape.

Step 5
Gently sketch the general direction of the hair. Perspective is important here!

Step 6
Imagine each direction line is a branch of a tree. Add the «leaves».

Step 7
Add strands of hair in the form of little springs all around the head. This will create a nice, non-uniform outline.

Step 8
Draw bigger curls within the outline, following the direction you’ve established before.

Step 9
Shade the hair in a very general way—just to show it doesn’t have a flat surface.

Step 10
Shade the whole haircut now, drawing curls all around. This will create the texture nicely.

Step 11
Shade the haircut in a more definite way, drawing shadows between groups of curls.

Step 12
To make the haircut less round, you can add thicker curls here and there (draw a spring, and then draw over it once more).

Good Job!
Now you know how to draw four different hairstyles. If you want to learn more about creating hair in different techniques, try these tutorials as well:
How to draw realistic hair: The ultimate tutorial
Are you struggling when it comes to drawing hair? Drawing hair can be an intimidating task for those who are just learning how to draw. With the overwhelming amount of detail and commitment required, many people lose their patience and resort to a series of sloppy scribbles.
To some of us, drawing hair can be a nightmare. But a change in your approach can help you leave those fears behind. In this tutorial, I will introduce 4 simple steps for drawing realistic looking hair.
UPDATE: I’ve broken the steps down further (7 steps) in video format. It’s a really detailed video tutorial that covers 6 different hairstyles:
It contains additional tips, techniques and close ups so you see exactly what I’m doing.Tools I used for this tutorial:
Tutorial Breakdown:
The steps below can be used for drawing all sorts of hairstyles from short to long and straight to curly hair. So without any further ado, let’s jump right into the lesson! Here are 4 things you need to keep in mind when it comes to drawing realistic hair:
Volume, Flow, Value and Texture
1. Volume
It helps to make loose outlines of the skull before you start drawing hair. If you draw hair without the 3 dimensional shape of the human head in mind, it will lack volume and you risk chopping off a part of the skull. Hair hugs the head, but it isn’t plastered to it. For most people with long hair, you can expect at least 2 centimeters of “hair height” on top of their actual height and at least 2 centimeters on the sides as well.
Having difficulty drawing heads? Click here to learn how to draw one from the front and here to draw one from side.
2. Flow
In order to draw hair with flow, you need to be aware of the structure underneath. For long hairstyles in their resting state, the hair flows down, hugs the head and wraps around the shoulders. Somewhat like a liquid. You want to begin by sketching the basic structure of the hair and keep your strokes loose and simple.
3. Value (Shadows, Midtones, Highlights)
A head of hair contains many shades, so before you start scribbling away, take some time to determine where the light source is coming from and how it will affect the tonal value of the hair.
If you are working off a reference image where the lighting is too soft, posterize the image or turn up the contrast using a free image editing program such as gimp in order to exaggerate the 3 different shades – Making them much easier to identify.
Posterized reference image:

Once you have the lighting down, start drawing boundary lines between groups of hair that appear to be overlapping. Decide where you want the light to fall and then outline those areas using the shadow lining technique. Shade your way around the highlights. If you often find yourself getting lost in the details, this step will help you keep track of the overall lighting so you can be more confident when drawing the individual hairs.
4. Texture
An average human head contains around 150,000 strands of hair. Just the thought of this can be very discouraging. First
Tip: You can produce long, continuous and smooth lines using an overhand grip on your pencil while harnessing the power of your elbow and shoulder instead of your fingers and wrist.
Work on one part of the hair at a time, while following the general direction in which the strands flow. In dark areas, don’t be afraid to press hard (I used a 6B to 8B for these areas). To bring out highlights, flatten your kneaded eraser and swipe it in the desired direction. The eraser will become too dirty after the first swipe, so fold it in and flatten after each stroke.
You can add more or less detail depending on the level of realism you are trying to achieve.
Let’s take a closer look at drawing a small lock of hair:
When creating your first layer of pencil strokes, mix it up with 
Add a second layer of strokes. In this stage, I usually opt for a 0.5mm HB–4B for touch-ups and a very dull 6B to fill some white space without making it look too busy.
Keep doing this until you achieve desired results. If you want to create a shiny look or replicate harsh lighting, try to keep the highlights fairly clean. You can use an eraser if need be.
For hair ends, work outwards so your hair tapers nicely without looking too blunt and dull.
Useful Techniques
Drawing hair isn’t just a bunch of lines in boring repetitive patterns. Use the 4 techniques below to make your drawings more interesting to the eye.
If you’re having difficulties drawing long hair because your pencil strokes are too short or choppy, try holding your pencil further away from the tip. This will give you more range of motion, producing longer, smoother strokes.
Are you ready to draw some hair? Let’s implement the steps and techniques above in the 2 mini tutorials below! Pencils I will be using: 4B, 6B, 8B
How to Draw Curly Hair
Drawing curly hair is really fun and absolutely great for building confidence when it comes to adding texture.
1. Practice drawing curls using a cylindrical shape. This will help you achieve realistic curls with plenty of volume.
2. Sometimes it helps to make associations. So think of a curl as a ribbon. They have many ringlets which stretch further apart near the bottom. Use curvy lines and avoid any straight lines in order to achieve a more realistic feel and flow. (4B)
3. Pay attention to the highlighted areas of the hair and keep it consistent. For this example, the highlight is in the center. As you can see, the hairs closest to the front have more prominent highlights than the back. (6B)
4. Use swift strokes to add texture. Break free from patterns and boring lines by overlapping or adding stray hairs. Be creative and look to reference images or even the mirror for inspiration. (4B, 8B)
How to Draw Short Hair
Drawing short hair is really no different than drawing long hair, except that you will find yourself covering less ground in the same amount of time because the strands are much shorter.
1. Construct the shape of the head and position the ear in the correct place. (4B) Click here to learn how to draw a head/face from the side and where to draw the ear.
2. Draw a loose outline of the hair using strokes that flow in the actual direction the hair is pointing. (4B)
3. Shade the dark areas, keeping in mind this step is for helping you see the big picture. (6B)
4. Add texture by working on one area of the hair at a time. Outlining groups of hair and then adding texture is also a good technique. For thin hair, use ‘v’ shapes to taper most hair ends. Keep in mind that thick hair usually does not taper at the ends. Instead, most hairs will stand on their own. (4B, 6B, 8B)
This is my longest tutorial to date! I hope it covers everything. If you want to see more tutorials like this one, please let me know. Also, don’t forget to share the love using the share buttons below 🙂 Does the thought of drawing hair make you cringe? Let me know in the comments!
Other Hair Tutorials:
Darlene created RFA In 2013 with the goal of sharing simple yet detailed drawing tutorials with other artists on the world wide web. She is a self taught pencil portrait artist and Youtuber.
Color Anime Hair in 4 Easy Steps
Featured Tutorial
Categories
Recent Tutorials
Mar 6, 2022
Before start coloring, you need to finish the clean line art like this one.
If you already have your character with the clean line art, then you’re good to go!
First, create a new layer and use «Fill» tool to add the plain color to the hair.
Define the light direction and use «Soft Airbrush» to color the lighter part of the hair.
Create a new layer in «Multiply» mode and use «Soft Airbrush» and «Watery» brush to paint the shadow.
Create a new layer and use the brush «highlight curve 3» to highlight the hair.
You may download the Hair Highlights Mega Pack brushes from the CSP assets store [ HERE ]
That’s all of my anime hair tutorial. I hope this mini tutorial helps you with your hair painting process! If you want more of our drawing guides, I also have a Clip Studio Paint for Beginners course which I’ll walk you through the basic of Clip Studio Paint and help you start your digital art journey!
Ingredients
Directions
First, create a new layer and use «Fill» tool to add the plain color to the hair.
Define the light direction and use «Soft Airbrush» to color the lighter part of the hair.
Create a new layer in «Multiply» mode and use «Soft Airbrush» and «Watery» brush to paint the shadow.
Create a new layer and use the brush «highlight curve 3» to highlight the hair.
Finally, if you like art tips and content like this, feel free to subscribe to my weekly newsletter: MiMi Art Tips!
I share my anime art tips and experiences in my digital art career in a weekly email. You’ll get the insight and behind the scene of the art career! Really recommend if you’re a beginner anime style artist. Click here to subscribe!
Thank you so much for reading this post! I really appreciate your visiting and using your valuable time reading my content!
Want to Learn the Basic of CLIP STUDIO Paint?
Register to MiMi Family Drawing Membership and get this CLIP STUDIO PAINT basic course for FREE!
Tips for digital outlining for Anime Art!
Artist Eridey explains how to create compelling lineart for anime-style character drawings! Learn more about how to draw dynamic lines, techniques for drawing eyes and hair, and useful digital art software features.
What brush should I use?
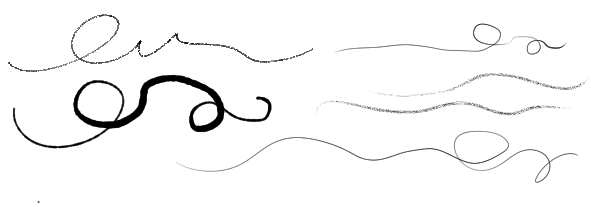
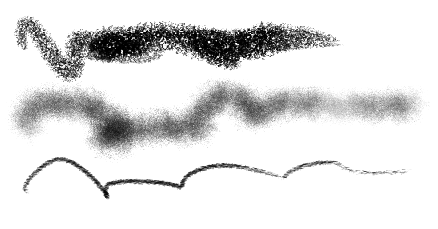
Obviously, there are millions of digital brushes, and each one has a different function, so there is no correct answer to this question. I could say “It depends on what you want to do” but that’s not good enough, right? The good thing is that they all share more or less the same configuration panel. Let’s take a look at a couple of basic Clip Studio Paint brushes: the Darker Pencil and the G-Pen.
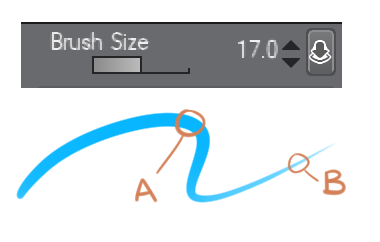
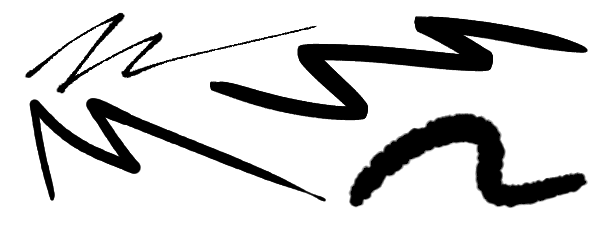
* Brush Size: The thickness of the line varies depending on the size of the brush and the pressure we exert on the pen of our graphics tablet. (A) Maximum size, (B) thickness with the minimum pressure.
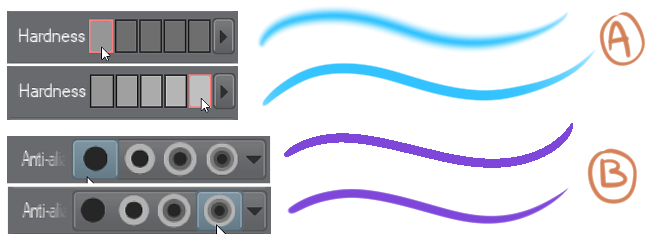
* Hardness / Anti-aliasing: This softens the edges. You can see how it affects the strokes in both cases. (A) Hardness / (B) Anti-aliasing.
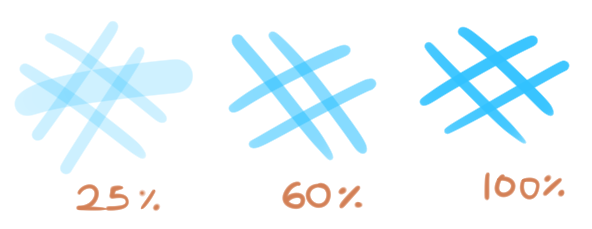
* Density / Opacity: With less density or opacity the lines become more transparent. Here I increased the density progressively until we get to 100%.
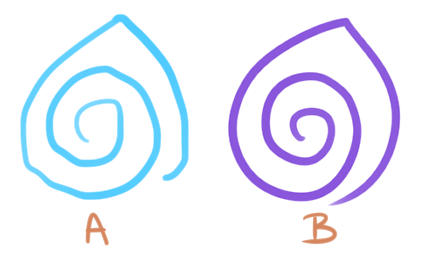
* Stabilization: This bar is a life-saver! It makes small adjustments in the line to avoid shakiness, so it is great for when you want to make long and uninterrupted lines – you only have to increase or decrease the value as much as you need. (A) 0 stability, (B) 10 stability.
What idea or feeling do I want to create?
Maybe I want my drawing to look aggressive, to show speed, power and strength …
Perhaps calmer, more delicate, clean and fluid …
Or even a little undefined, confused, or dirty with a bit of texture!
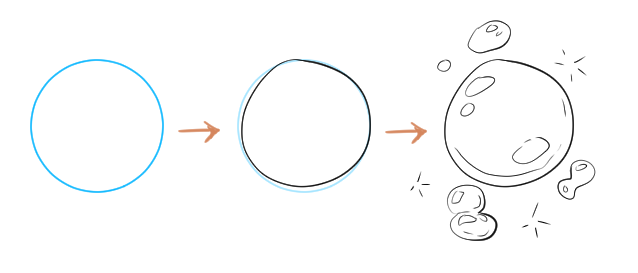
Lines are capable of representing any type or volume of materials, so you only have to vary their thickness, direction and attitude. For example, if you want this circle to look like a soap bubble, then thin and imperfect lines (which have the attitude of a bubble) are what you are looking for. You know that it is a fragile, trembling, transparent figure and that at any moment it could … Poof! Burst!
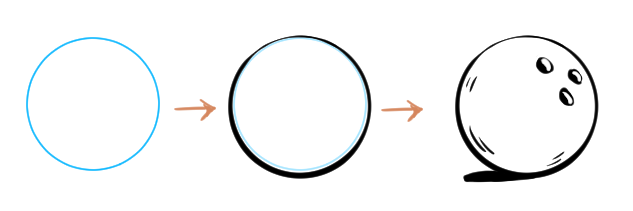
And if you do the opposite, it may look like a bowling ball. Notice how the thickness of the line at the bottom is accentuated to simulate some shade, and give it some more weight.
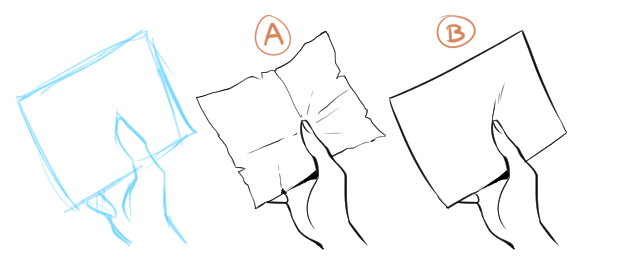
Lines can give a worn look (A) or a new look (B) so it is important to keep in mind what you want to represent and make them act in such a way.
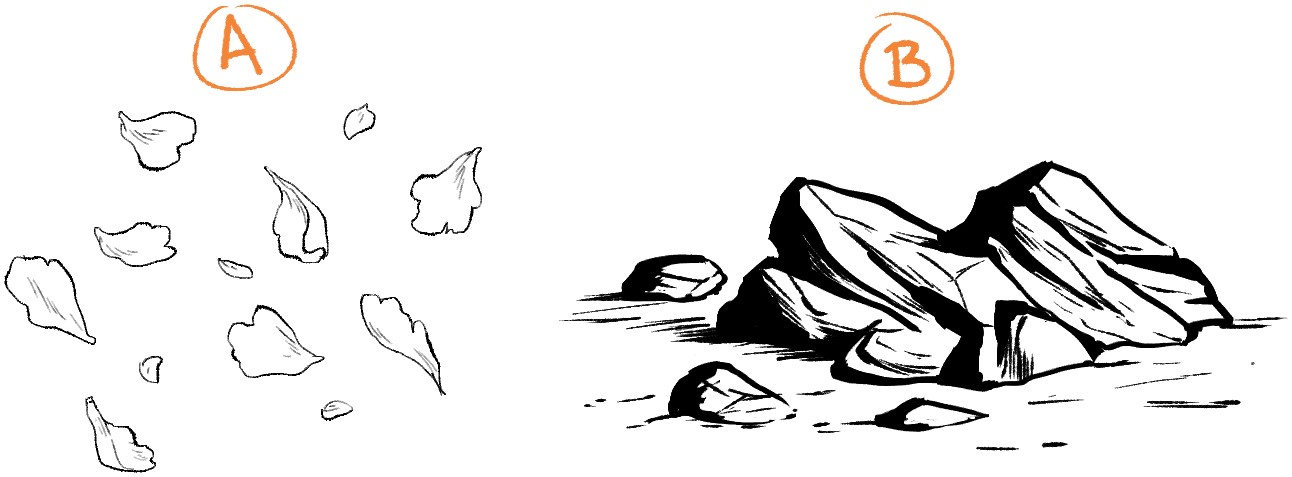
The petals are delicate and light (A), the rocks are rough and heavy (B). There are countless other objects you can do this with…
Represent light or shadow:
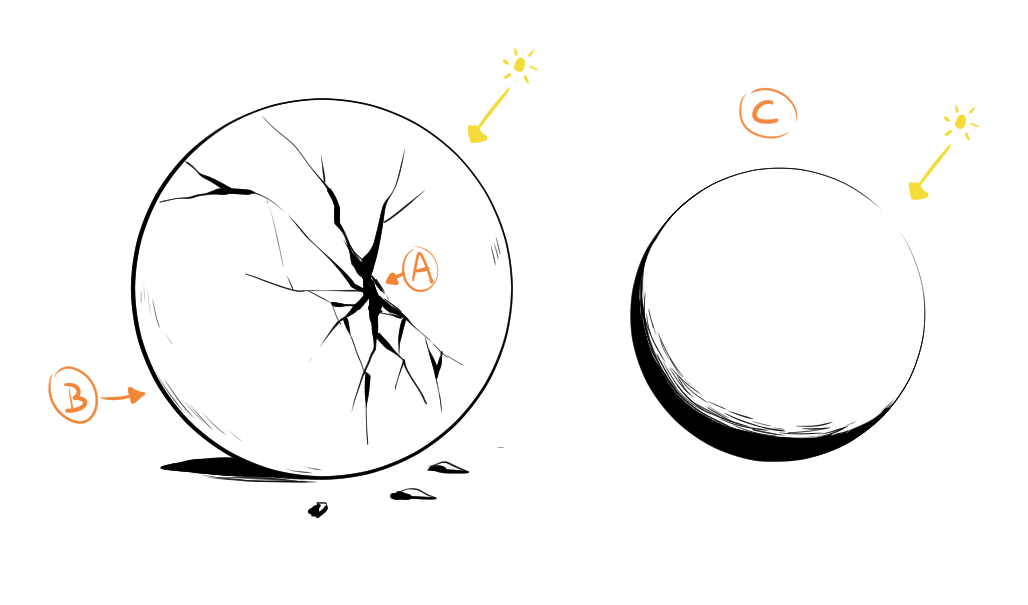
Strong strokes in certain areas of your figure will create the feeling that light does not reach this point (A).
Also by varying the thickness of the lines on one side of the figure, you might suggest shading (B).
For light, we use fine lines or open spaces. Keep in mind, the thinner the line, the more intense the light feels (C).
Perspective and emphasis:
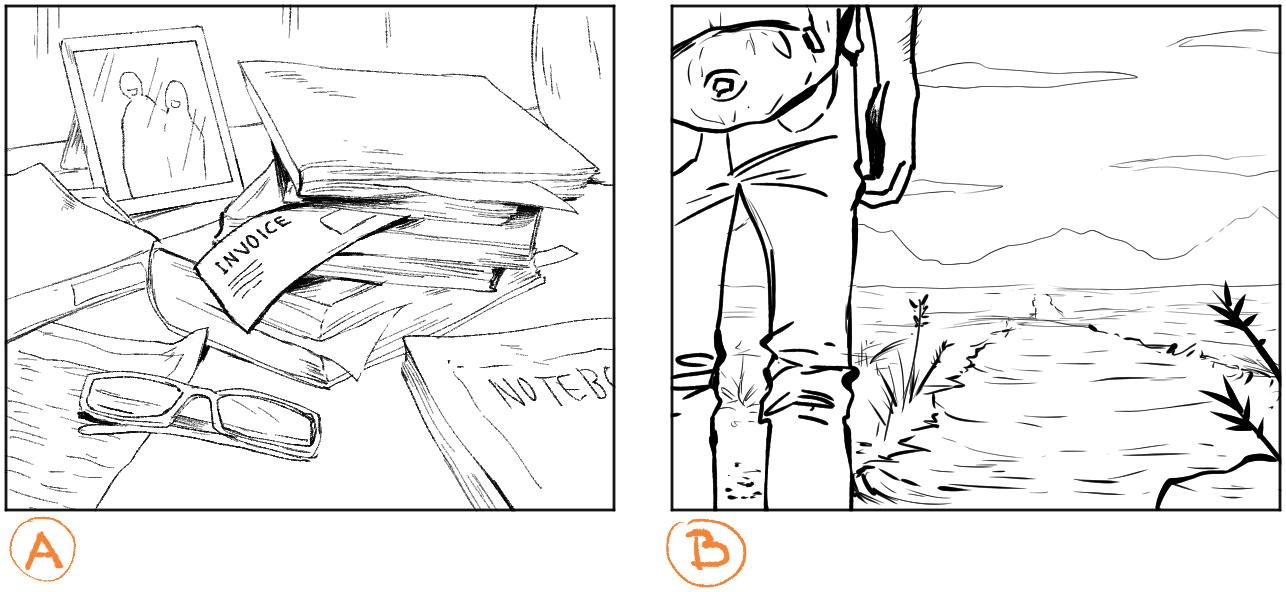
We can use the composition to help highlight an object. If the lines are slightly more defined or thicker, you can guide the eye directly where we want it to go (A); or if you want to create perspective, similarly, a heavier and more defined contour will give a sense of closeness (B).
Conversely, diffused and thin lines for the objects that accompany the composition indicate to the viewer that they are not your protagonists (A); or represent things far away (B).
Let’s put it into practice!
I will go step by step explaining the process of this drawing and the CSP tools that I used to solve certain problems.
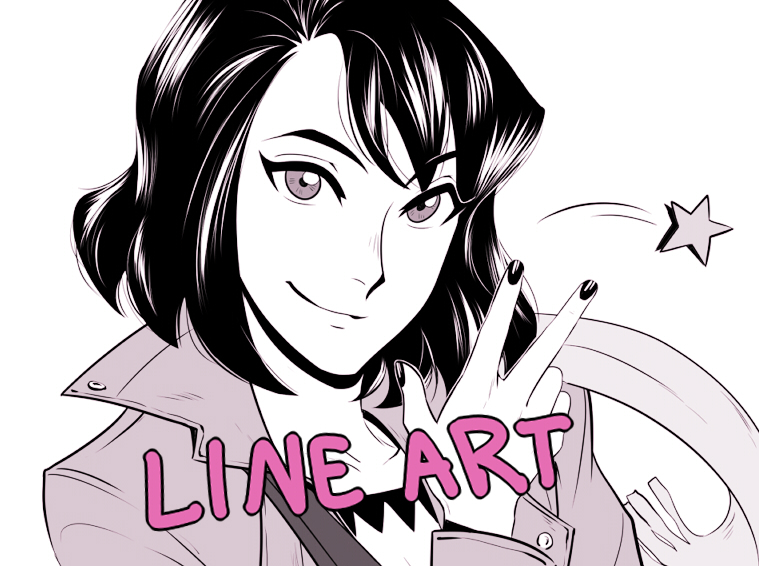
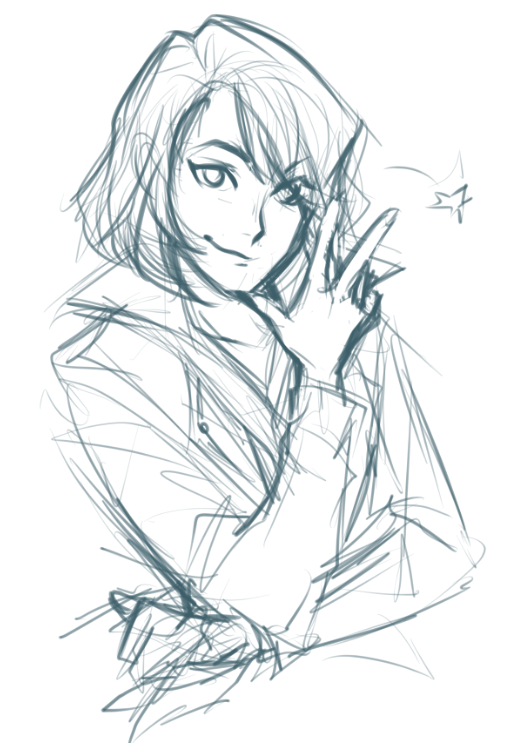
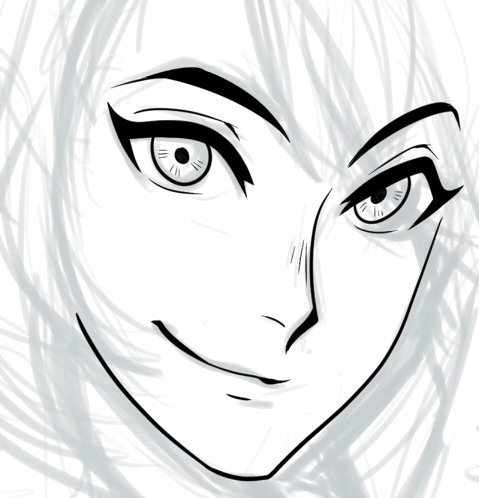
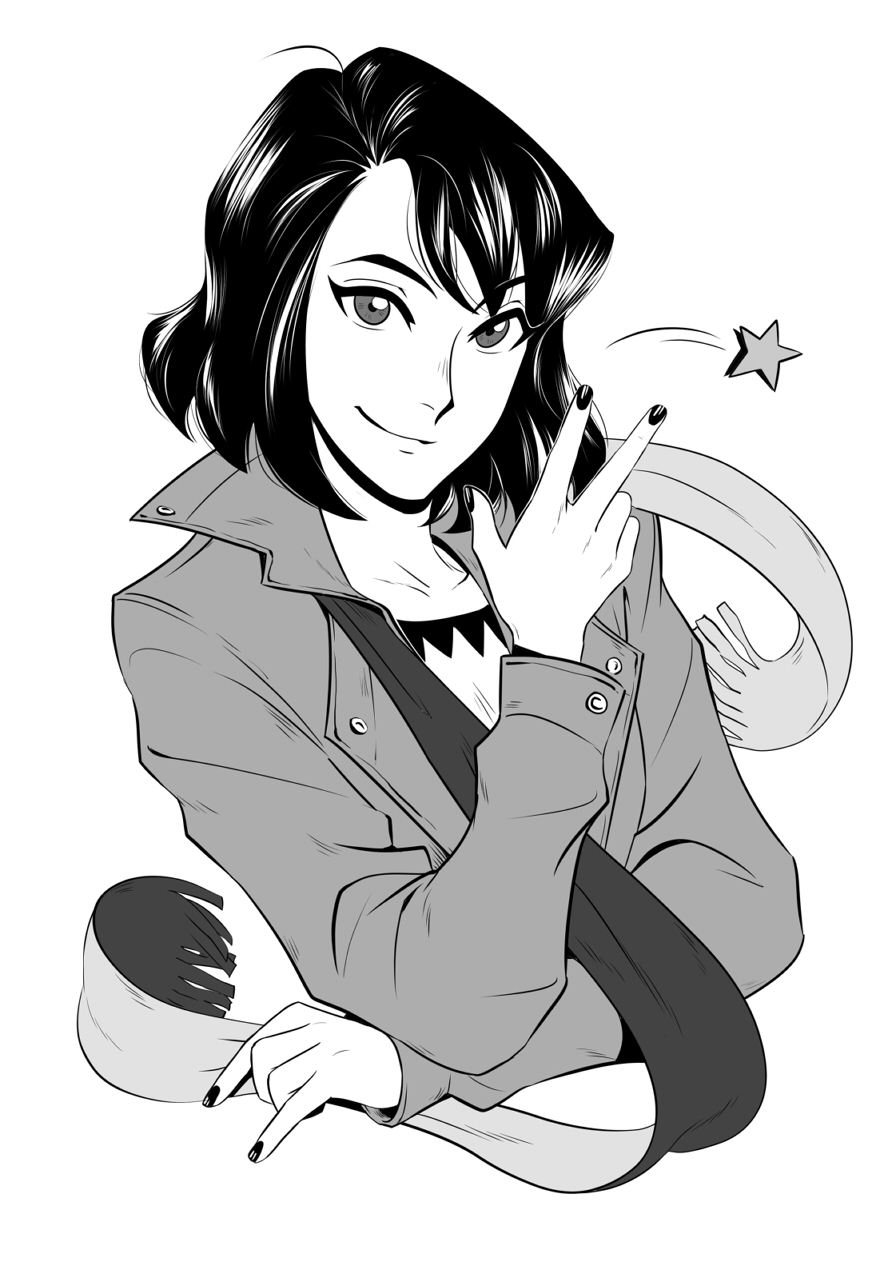
In my mind, this drawing is full of energy, and maybe a little rebellious, because she looks like a bit of a bad girl, right? So let’s give the lines the same attitude.
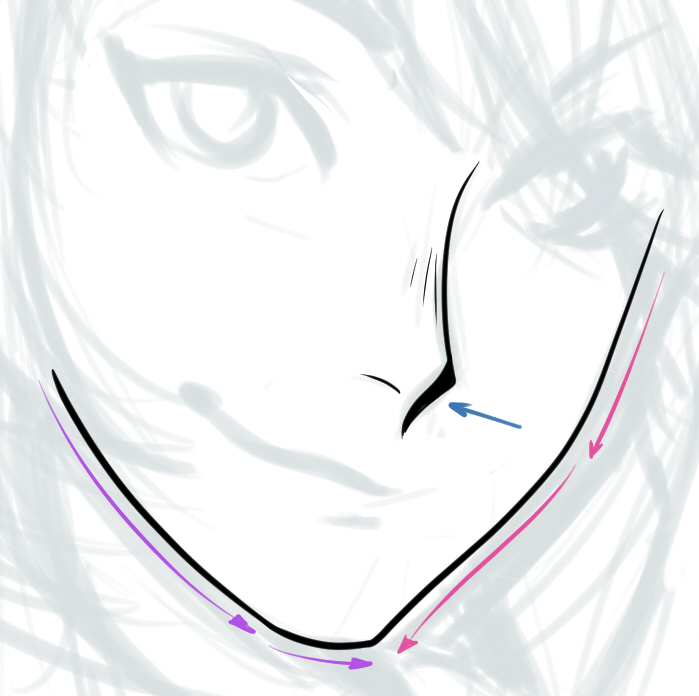
I start off by lowering the opacity of the sketch and create a new layer. I usually start with the features of the face, but this sketch isn’t very clear so I have to find a line that works. If I find it difficult to start with the jawline, then I start with the nose. Normally when I figure out how to draw one thing, it is easier to draw the next one – there’s no strict order when you draw!
I accentuated the outline of the nose to give it some relief and shade, then moved onto the jaw.
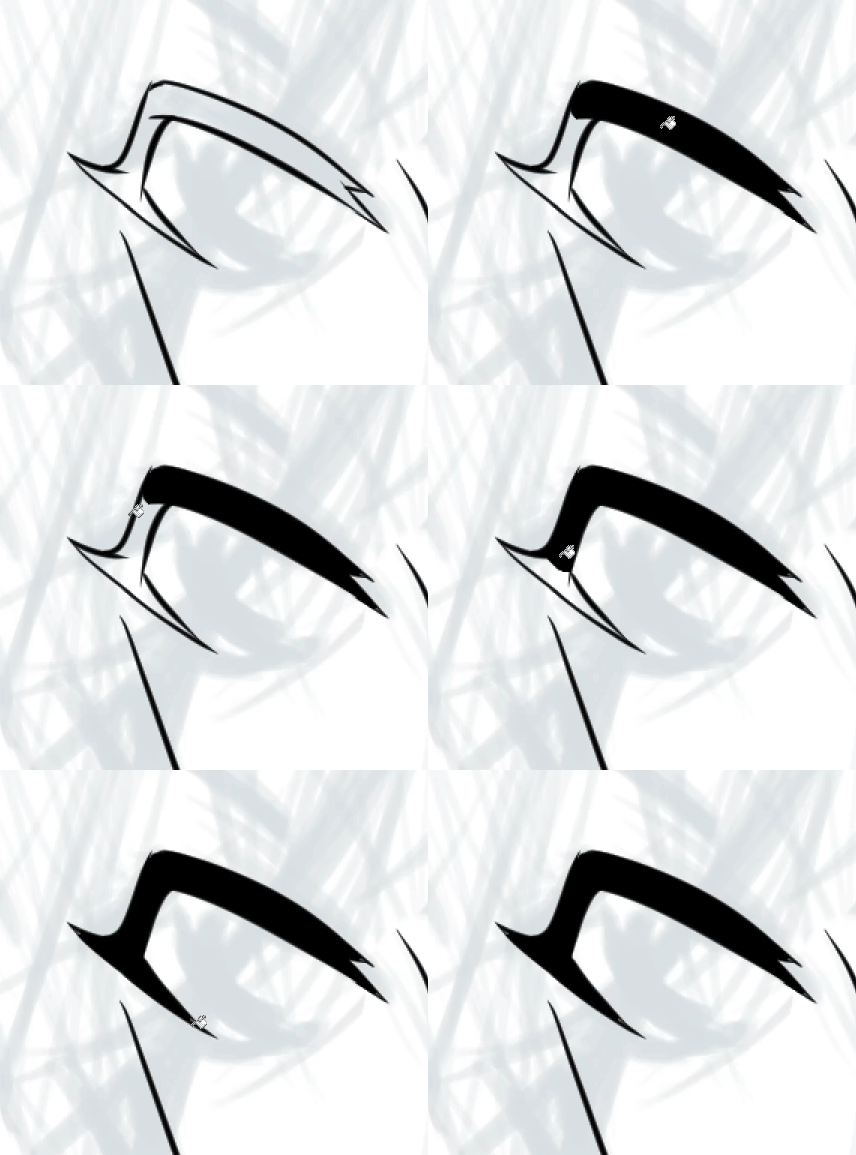
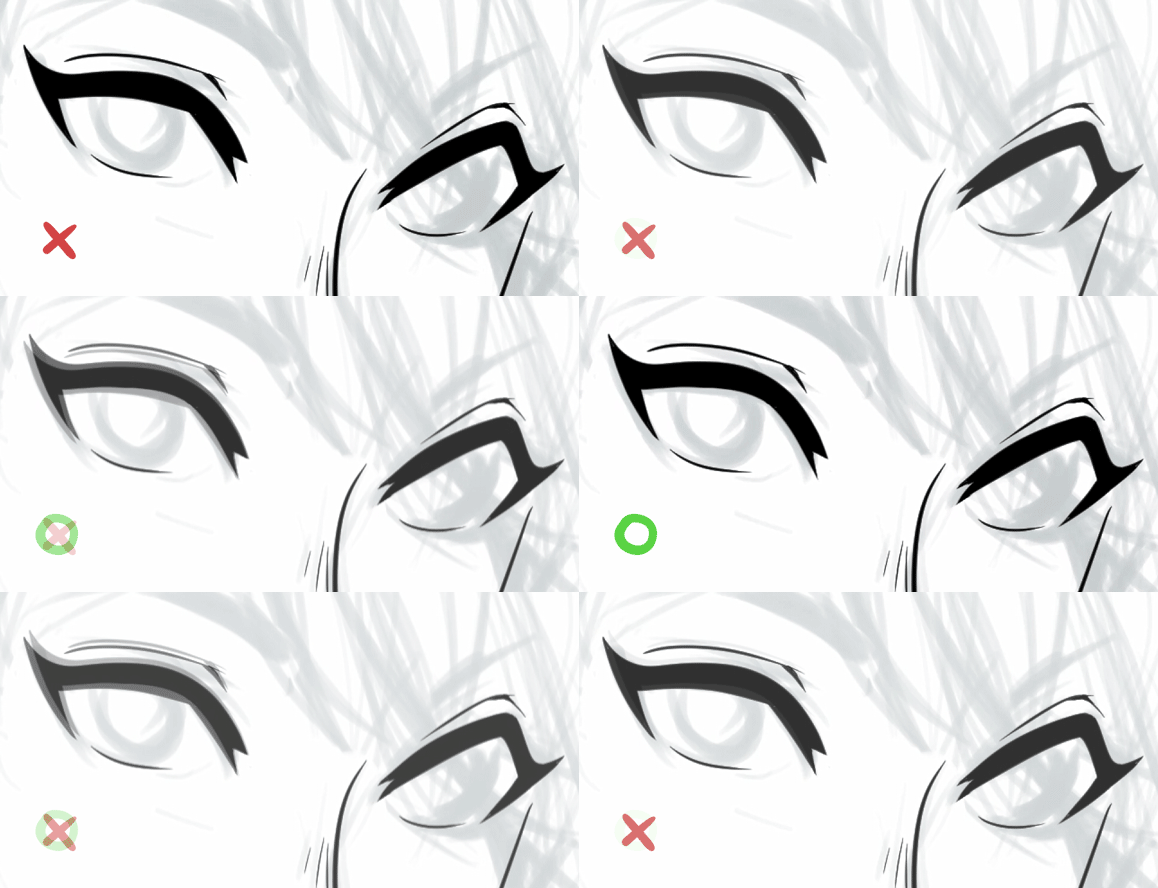
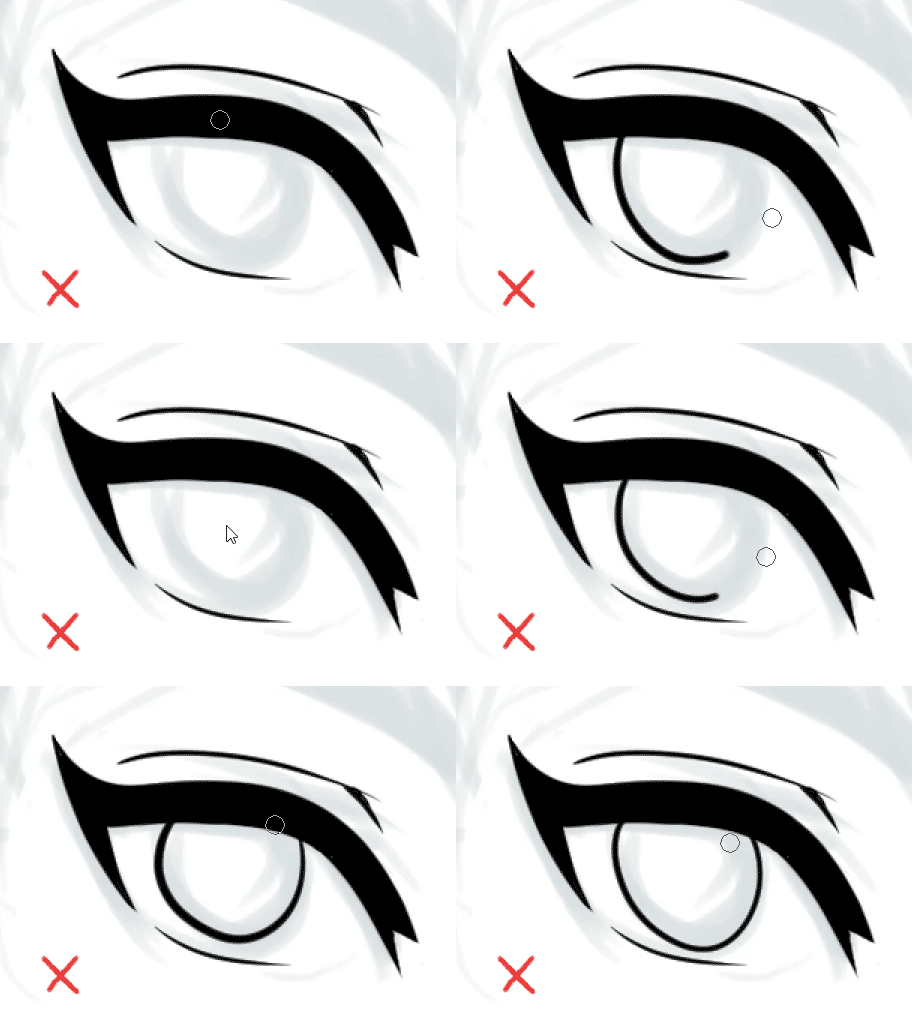
I want her to have a gaze with some weight to it. To give her a strong look and highlight the eyes, we should make the eyelashes nice and thick. It probably won’t look great if you try to draw the whole of the lashes with single strokes, so to help yourself out: draw the outline of the lashes and fill them in with the Fill tool (the one that looks like a paint bucket).
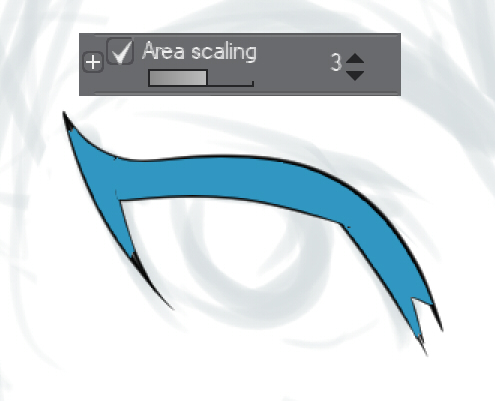
Sometimes this tool leaves blank pixels on the edges, which don’t look great. To fix this problem, you can change the levels in “Area scaling” a few points above 0 and this make sure the fill tool will cover part of the outline and reduce the number of blank pixels when filling.
I’ve just realized that one eye is bigger than the other. The stroke on the outline is decent, though, so instead of erasing and redrawing it, let’s save a bit of time!
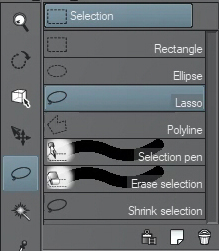
* Transformation tool: I used the Lasso selection and selected the eye I want to modify. Then, pressing Ctrl + T and holding the Ctrl key, I move the corners of the box to get it to the shape I want. Finally, I confirm the changes by clicking OK.
It is good common practice to look at your work from another point of view to detect these kinds of errors as soon as possible. Flipping the canvas horizontally as you work is really helpful:
* The iris: The curve of the iris is really difficult to draw – I’ve never gotten it right the first time. To help things a bit I adjust the line stability level, which I mentioned before, until I get the perfect curve. Don’t suffer without line stabilization!
Here I’ve gone ahead and finished the eyebrows, mouth and pupils, so now I can go and add small details to flesh it out …
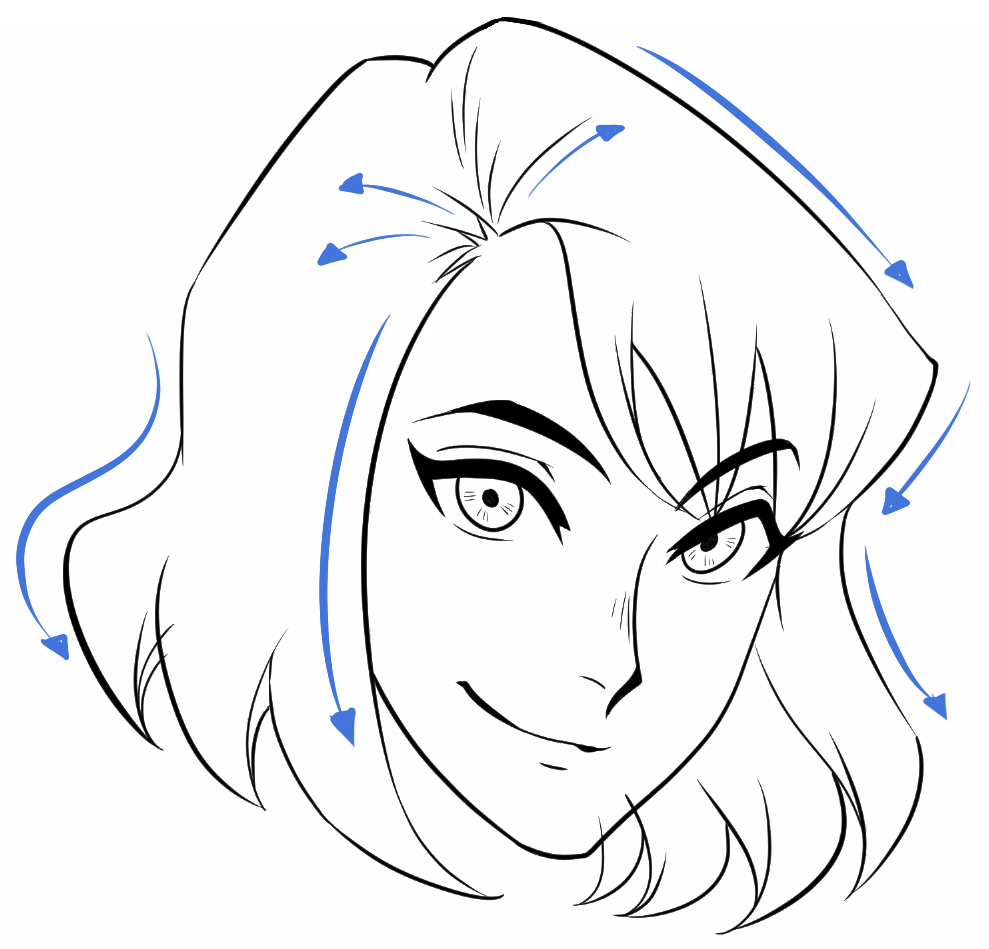
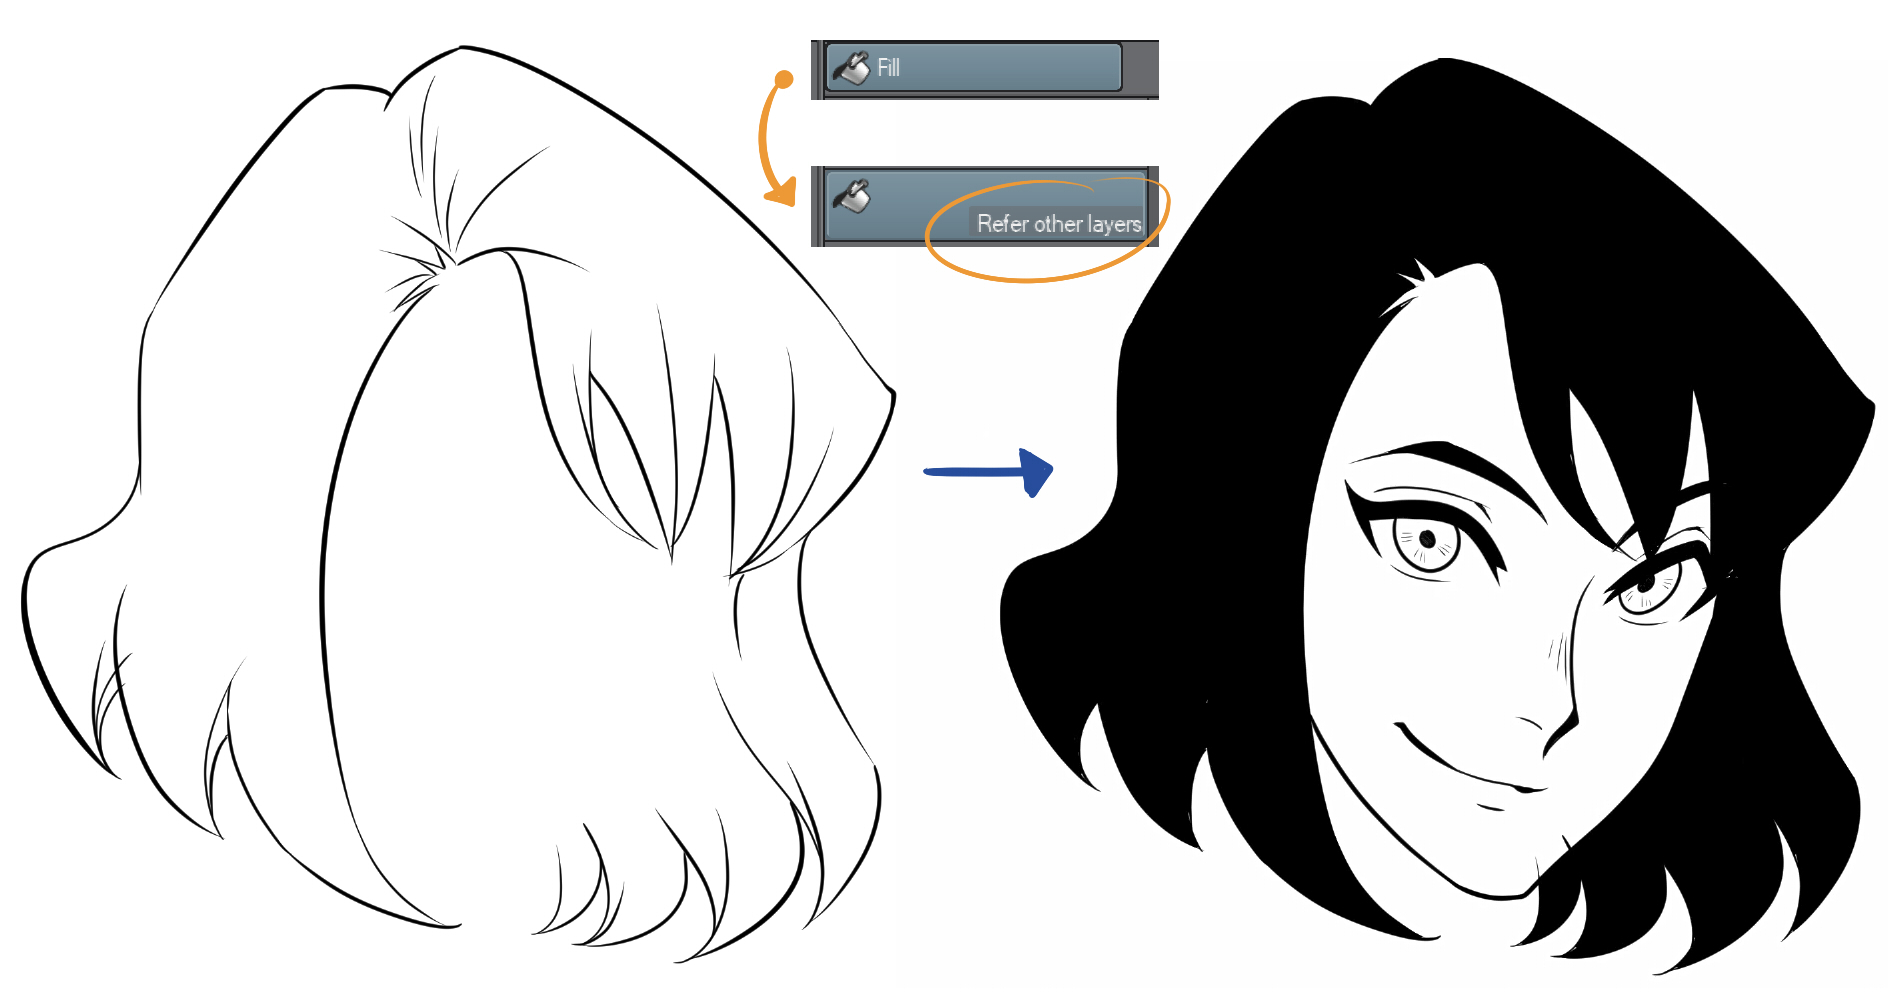
In a new layer, I define the outline of the whole head of hair, starting from the forehead. From the root to the tips, from top to bottom, from one point to another – do it however you like! The important thing is that your line flows with how the hair moves.
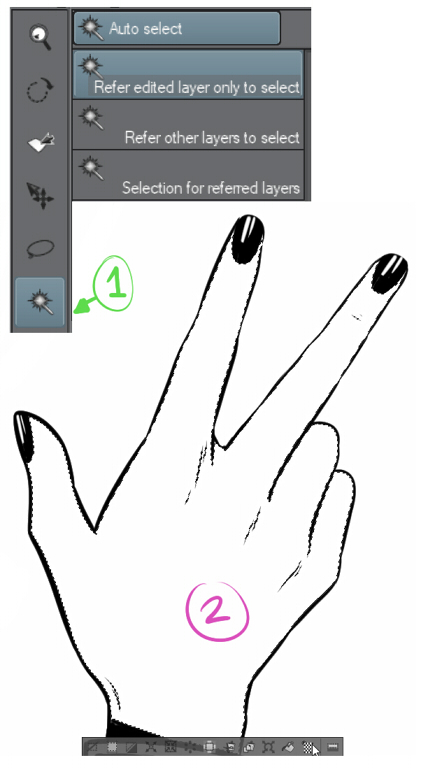
I use the same trick with the paint bucket as before. Remember though, you’re working on a different layer – if you hide the face layer you’ll see that the lines of the hair are not closed, so the fill tool will spill over and fill the entire canvas. To avoid this, click on “Refer other layers” and the program will take into account the other visible layers.
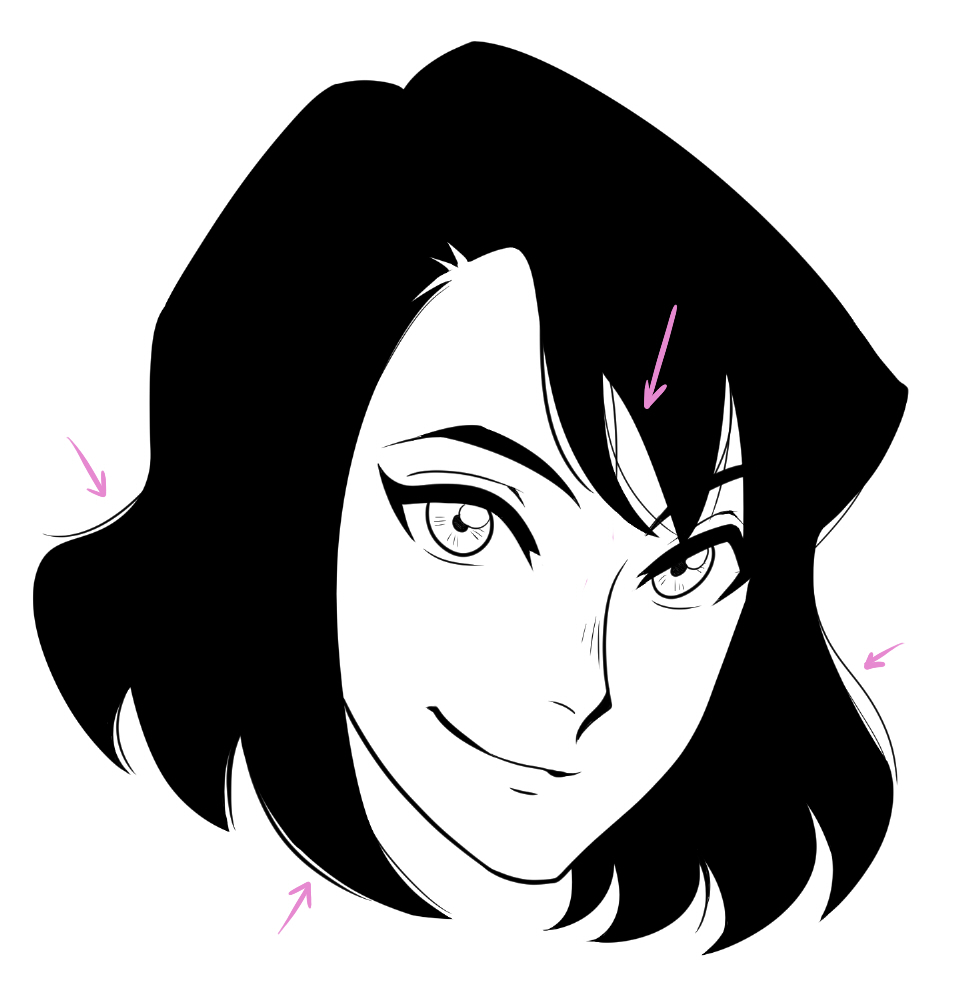
Once you’re done with this, cover any blank pixels with the brush or erase any imperfections that may have been left over.
* Details: This is my favorite part! I add small strands to give it a more natural, relaxed look!
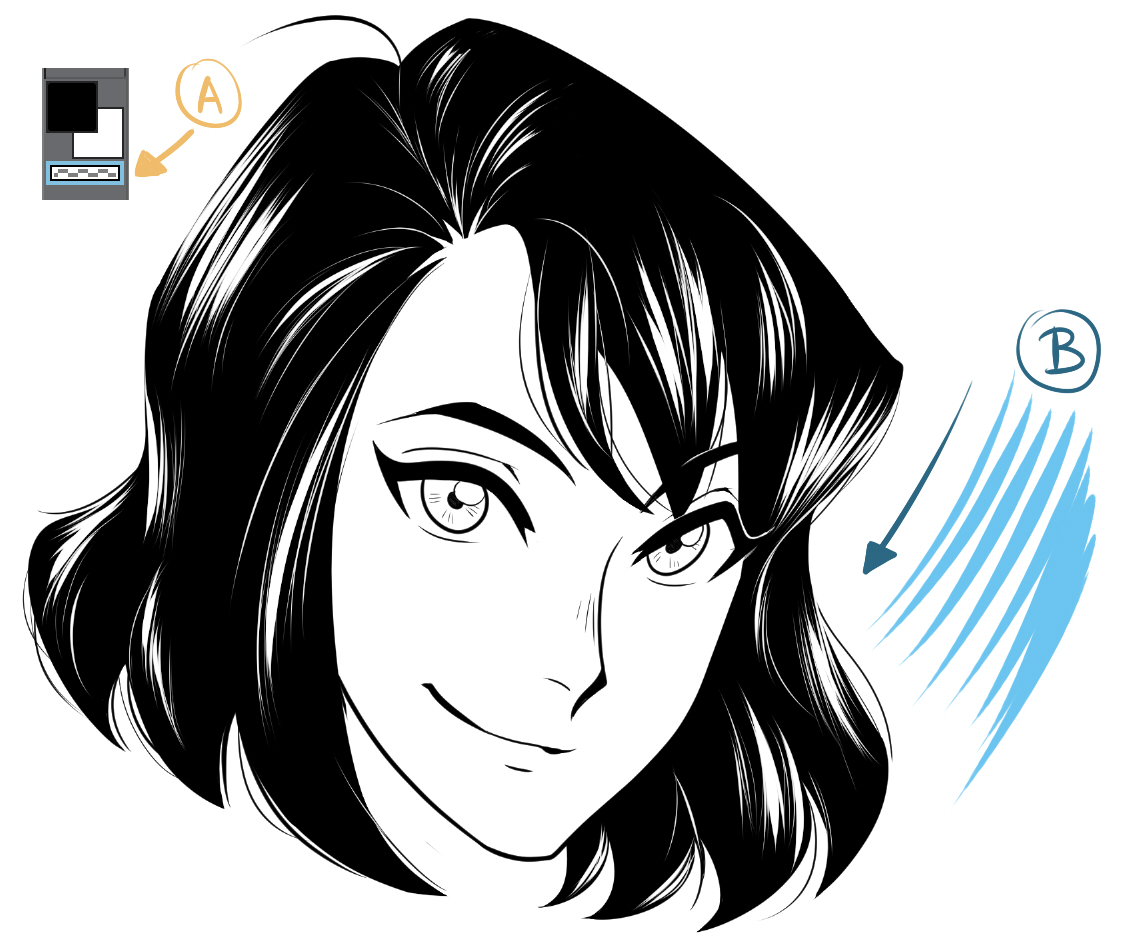
You can see how it comes to life, right? But there’s still something missing – the light. For that, I have another trick that I like to use. Almost all the tools in CSP can act as a “draft”.
This box (A) will make our brush “transparent“. The light will highlight particular tufts of hair and will give the image depth. In the same way, keeping in mind the curved shape of the head, the direction and movement of the hair is key to prevent the figure from looking flat.
(B) Here are the kinds of strokes I tend to use for hair highlights
Clothes
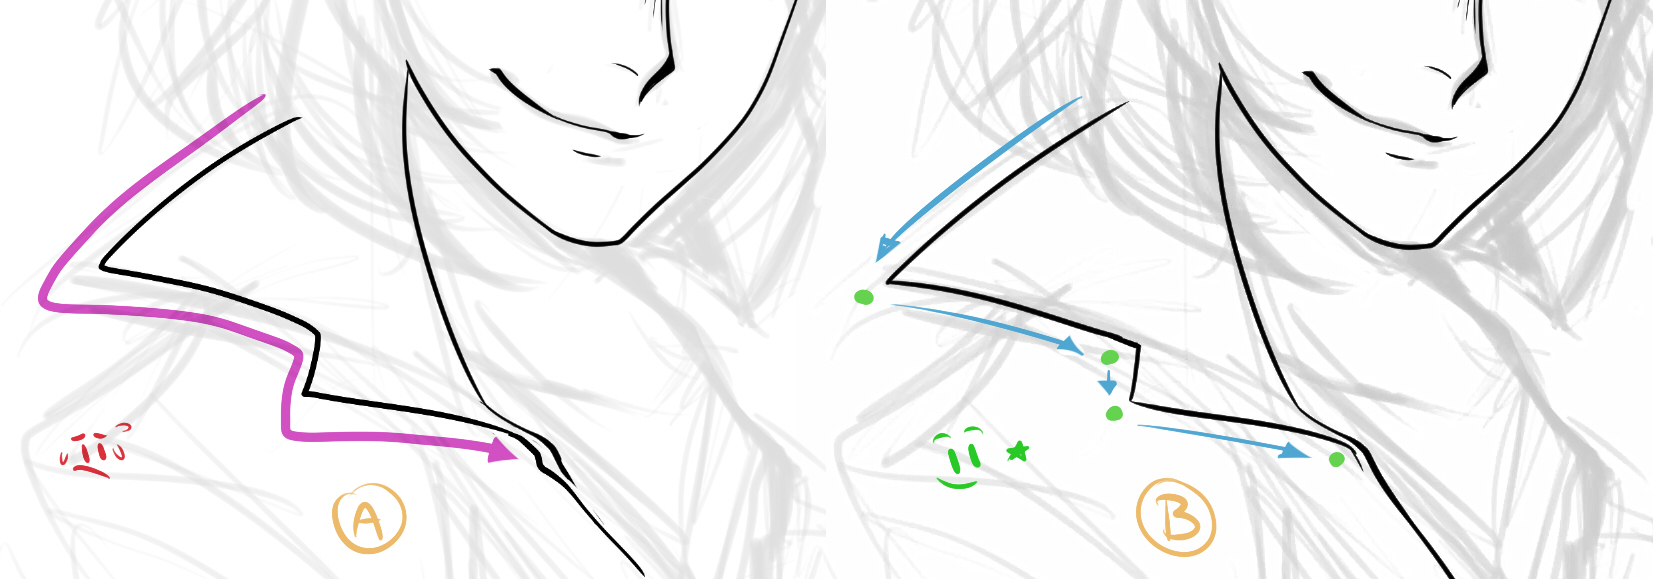
In general, drawing long lines in one continuous stroke is a detriment to the line, because your hand has a limited range with which it can make a fluid line, which shows more when you work with digital media.
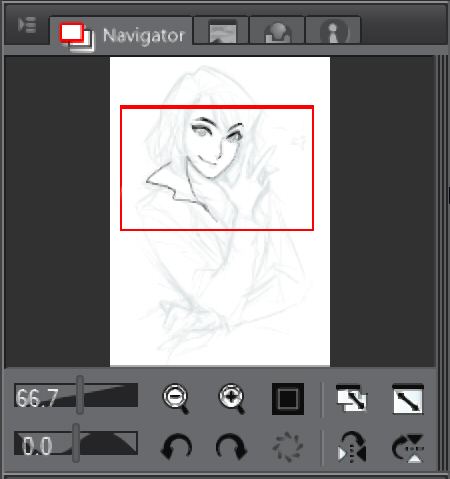
* The navigator panel: When I draw, I find myself drawing the same line countless times, zooming in and rotating the canvas to draw more comfortably. For lines that cover a lot of space, I zoom out and for short lines or lines that require more detail and precision, I zoom as much as I can. Of course, I make sure to rotate the canvas to help free up my range of movement of my wrist, and produce the most natural lines I can.
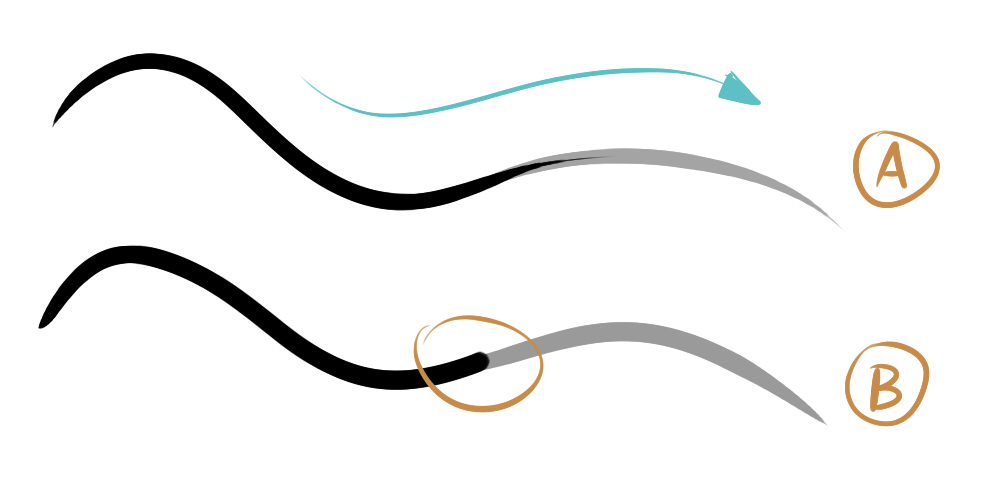
There are always rest points when drawing. These happen naturally when one line finishes and another begins. (A) Here is one continuous line. (B) And here is another where I have stopped one line and started another at the natural rest points. The difference is slight but it clearly looks better.
If you have to stop in the middle of a long line, having a thin tip at the end helps blend it together, so you can continue the line smoothly.
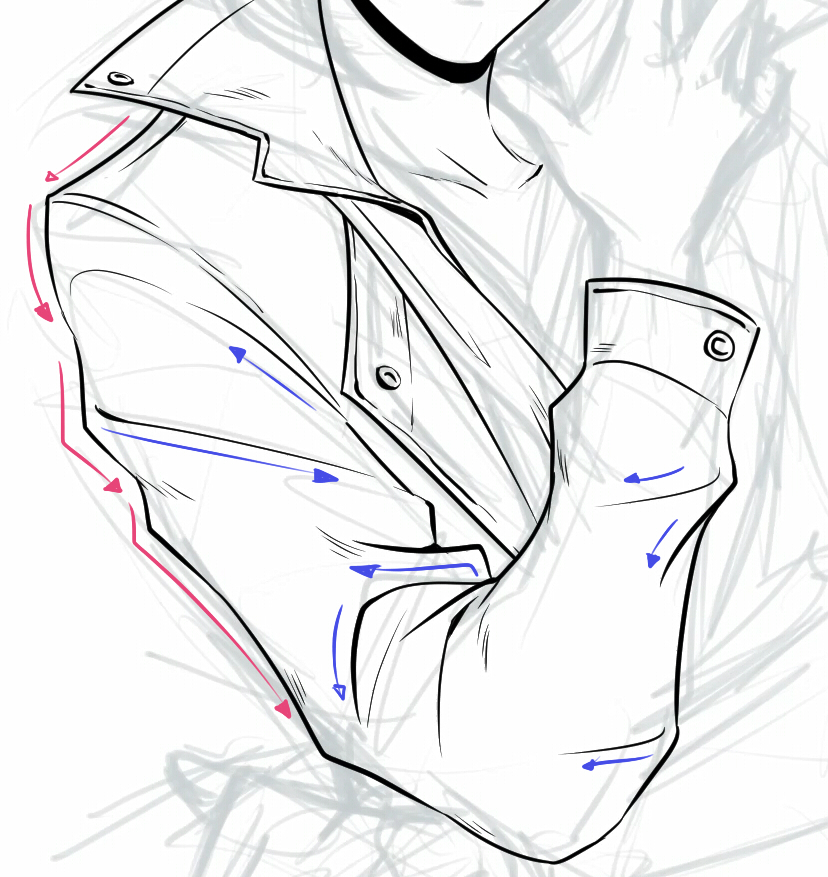
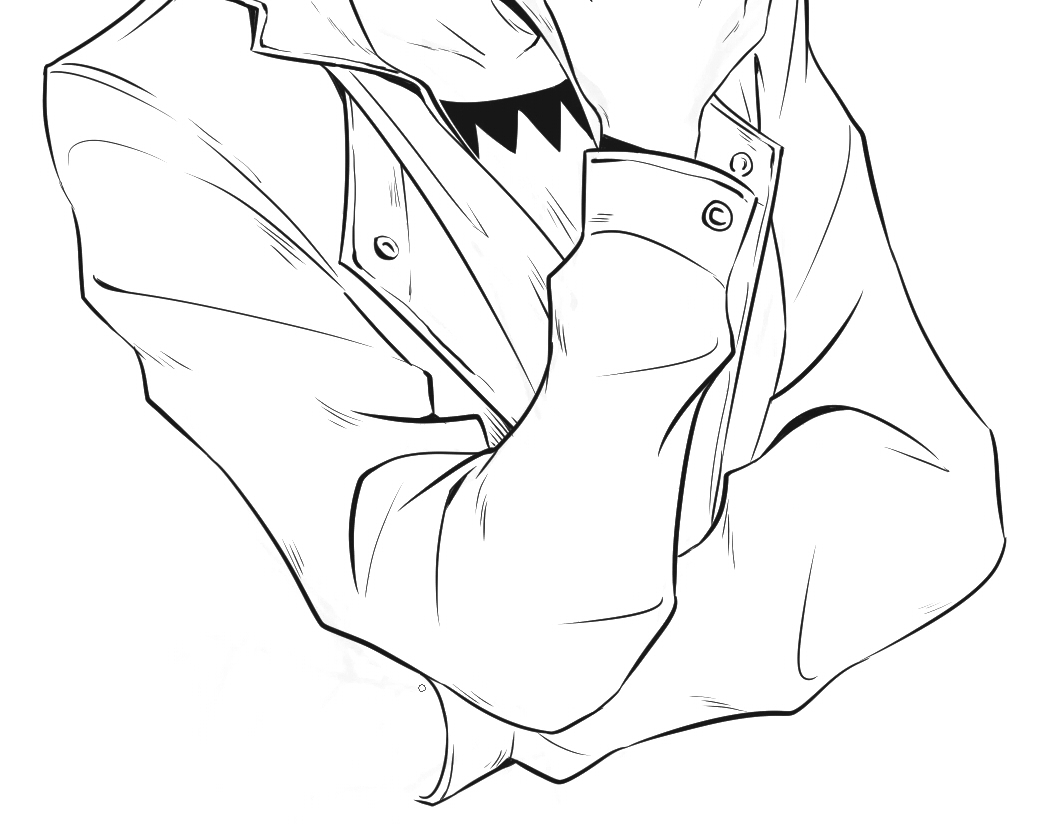
* Folds: These all go in different directions and some are more pronounced or distressed than others. A lot of it depends on the fabric. In this case I want to show that the fabric is thicker, and so I make sure to show that by drawing more pronounced wrinkles. If you do not know how to represent a particular material, you can always use reference photos on the internet. Don’t draw blindly – it’s a good habit to make use of references!
Hands
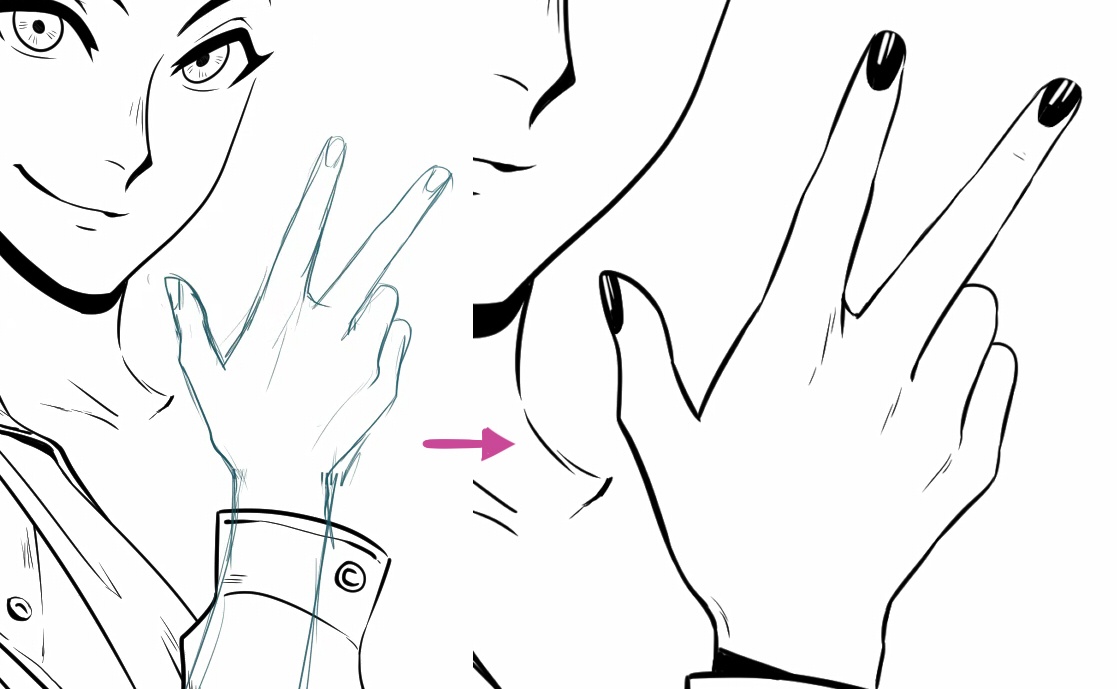
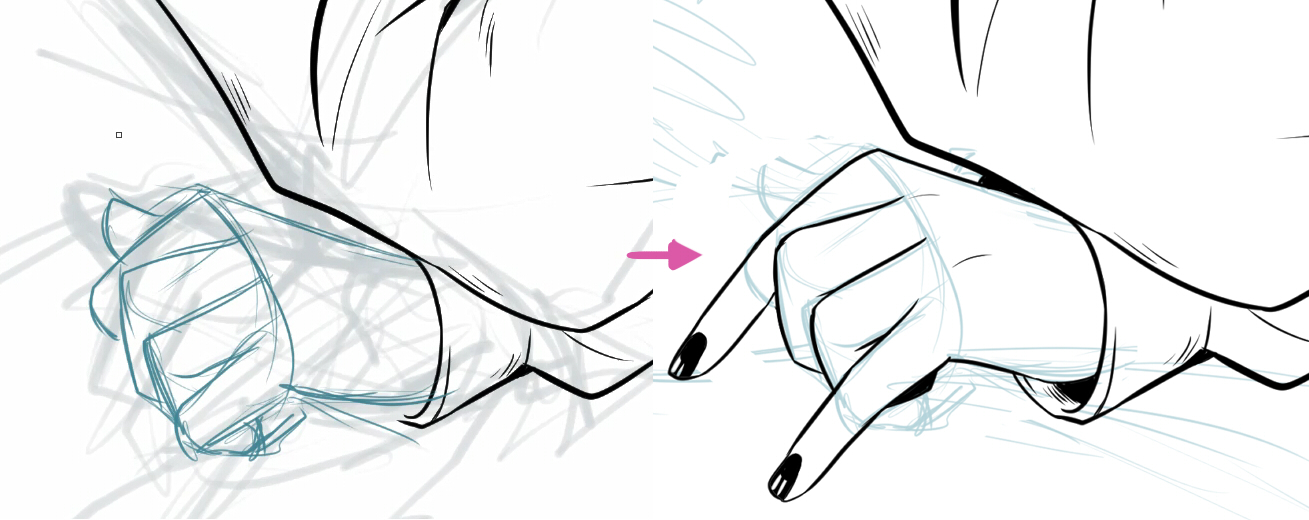
So far the sketch has been a good reference to work from, but it doesn’t work in some parts of the drawing. For example, I’m not convinced by this hand – I tried to draw something decent but … no, it really was not good.
So I drew a new sketch of it and took the opportunity to adjust its position and size. I like the shape more now, and I also liked the idea of painting her nails black.
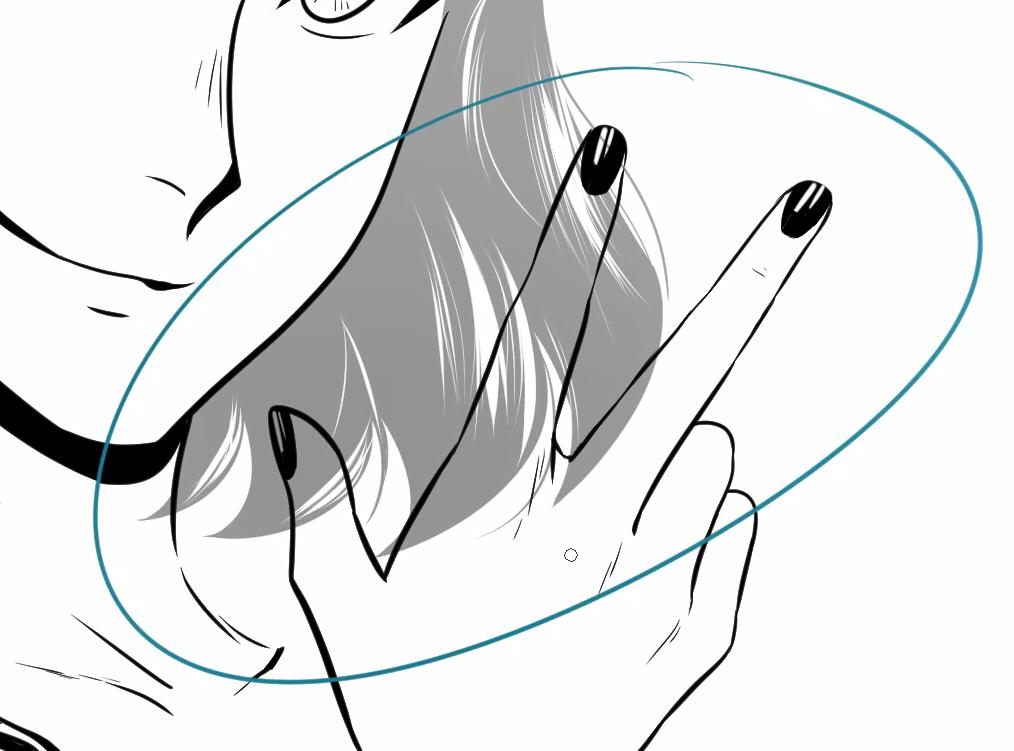
But now I have this problem:
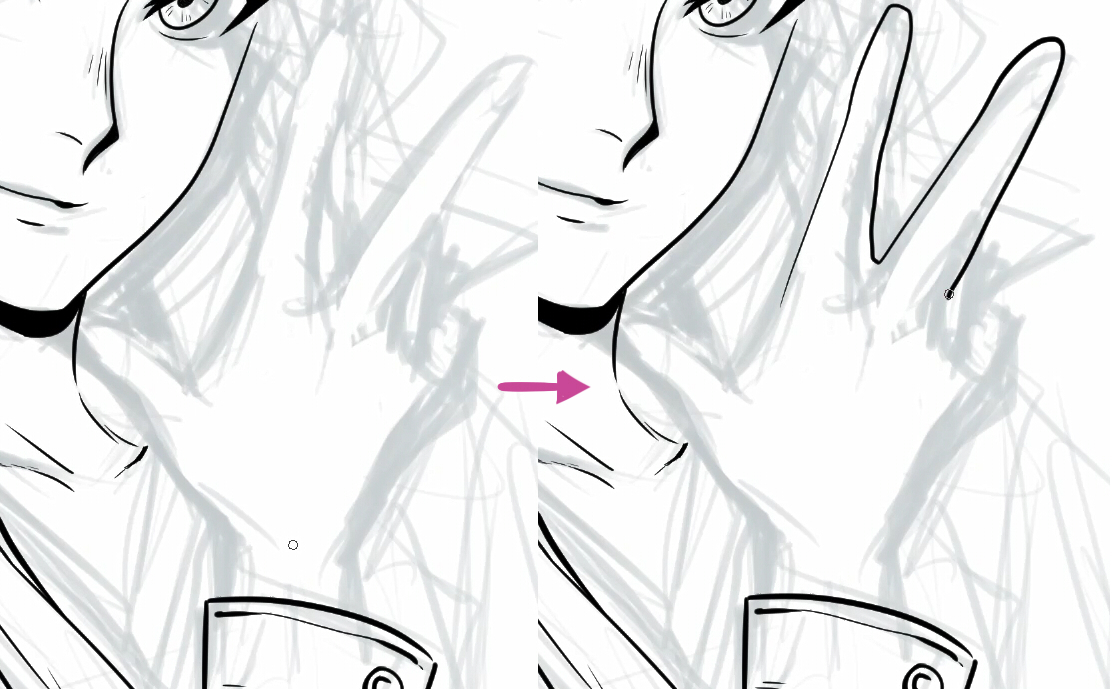
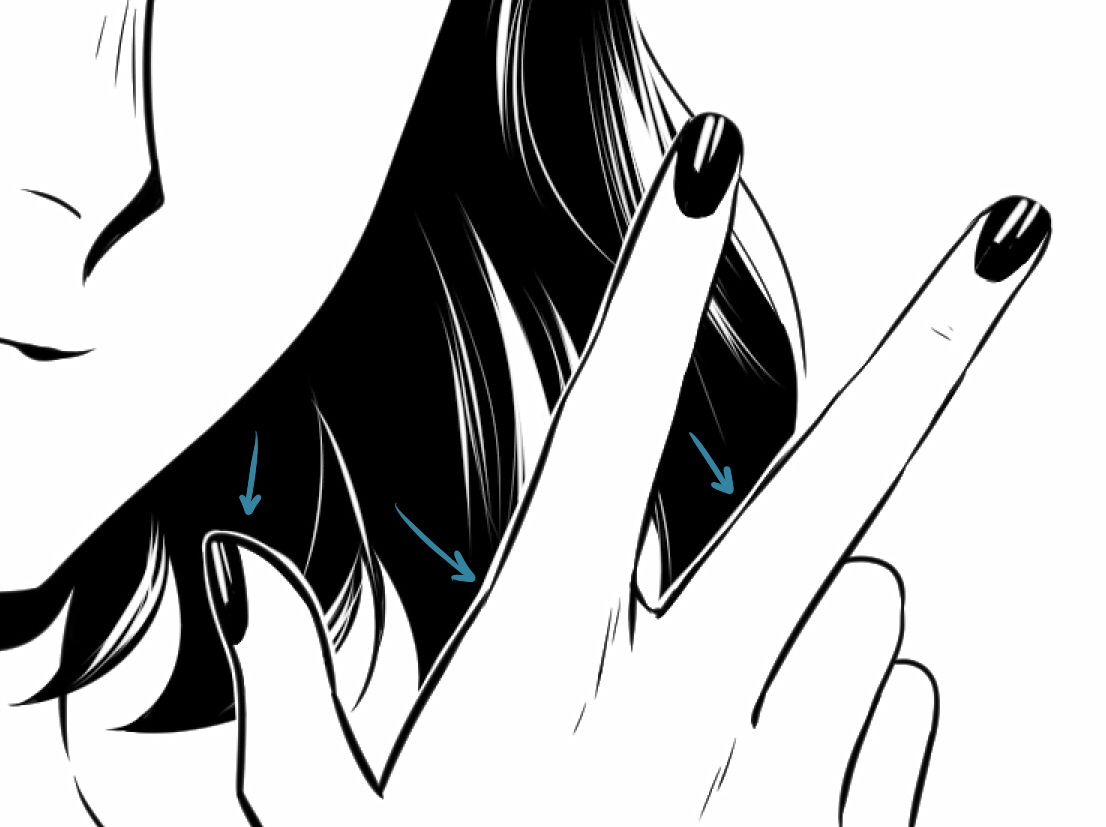
To highlight the hand, I left a small white outline.
I finish delineating the remaining areas, add some details to the blouse, and draw the other arm and hand (which I re-sketched and changed the pose for).
All done!
For my final touches, I added a little lift to the scarf to make the composition more dynamic and fun, a nice star to accompany her gesture and some grey tones.
I hope it is not too much information to digest, but you can always jump to any section that interests you.
CSP has incredibly flexible tools, please do not hesitate to explore them in-depth.
And finally, practice a lot!
If you like, you can check out my social media and portfolio to see some more of my work.
Thank you for reading!
Similar articles
Natural-style Painting Workflow for Character Illustrations
Pen Settings for Anime Art in Any Style
Extracting Scanned Line Art for Digital Coloring
Designing a Dragon-Themed Character
Paint Manga Eyes in 6 Steps
How to Draw Hair
Simple Anime-style Coloring Techniques
Easy Tips for Drawing Eyes
Bring Energy and Life to Your Poses!
How to draw and color anime hair
Top Articles in Category
Essential Tips for Drawing Drapery and Folds
How to draw and color anime hair
Guide to Creating Color Schemes
Bring Energy and Life to Your Poses!
Easy Tips for Drawing Eyes
Anime-Style Skin Coloring Tutorial
How to Draw Hair
How to Draw Anime Eyes
How to Create Pixel Art
Color Theory for Digital Artists
Muscles of the Human Body
Natural-style Painting Workflow for Character Illustrations
Extracting Scanned Line Art for Digital Coloring
Drawing mouths and lips
How to Design Fantastical Dragons with a Touch of Realism
Grayscale to Color: Digital Character Painting
How to Draw Expressive Faces
Easy tips to paint light and shadow
How to Design Characters with Bold Fashion and Strong Silhou…
How to draw a frilly dress with a full skirt and puffy sleev…
How to Draw an Arm
How to Make Appealing Original Characters
Tips for digital outlining for Anime Art!
Designing characters with 7 basic shapes
How to Draw a Nose
Recommended Articles
Learn to Draw Croquis Sketches
Things You Need to Know to Become a Game Illustrator
Exclusive Interview: Lois Van Baarle (Loish)
How to Make Appealing Original Characters
Featured Pro Portfolio: Miroslav Petrov
Sculpting Forms, Using Value, and Brush Introductions
Featured Pro Portfolio: Phil Saunders
3 Reasons to Use Digital Art Software
Five Tips for Getting Noticed Online
Finding and Correcting Drawing Mistakes
Easy Tips for Drawing Eyes
Top Drawing Apps and Software in 2022 (Free & Paid)
ArtStation Marketplace Success Story: Le Vuong
Keyboard Shortcut Guide for Artists
Extracting Scanned Line Art for Digital Coloring
Bring Energy and Life to Your Poses!
Simply Well Drawn: Part 1
How to Make Video Tutorials
Becoming a Concept Artist for a Hollywood Film
Ultimate Guide to Blending Modes
Learn the basics of digital art, from the tools you need to the steps of creating digital artwork.
Read art tutorials and interviews with concepts artists for films, games, and animation.
Learn techniques for creating expressive and fun character art with these tutorials.
Whether you’re creating manga, comics, or webtoons, here you’ll find the best techniques to create your story!
Illustration, concept art, comics, and beyond: find drawing tutorials and art advice that meets every creator’s needs with Art Rocket!
How To Draw Bird Wings
The Etherington Brothers take a closer look at how to draw a bird’s wing! Learn …
How to paint the four elements
Artist Dani Puente explains how to paint digitally the four main natural element…
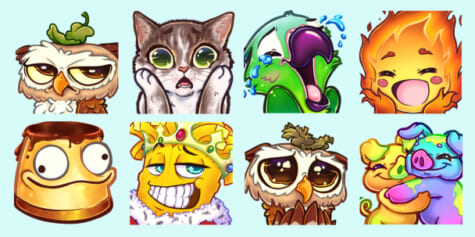
Create funny emotes for exaggerated emotions
Illustrator Julillu shows how to draw facial expressions. By simplifying and exa…
How To Draw Animal Heads & Snouts
The Etherington Brothers show how to draw animal faces with personality using a …
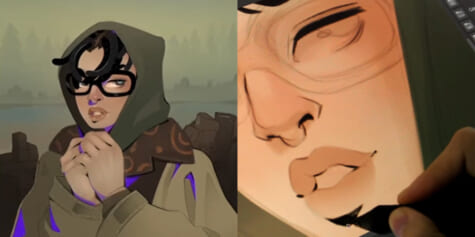
How to draw your own digital Mona Lisa
Cristian Cermeño explains how to draw your own digital Mona Lisa with some fasci…
How To Draw Glasses & Goggles
The Etherington Brothers show how to draw glasses & goggles in the right per…
Simplifying Characters for Webtoons
Webcomic artist Stephinni covers techniques you’ll need to design your own stunn…
The importance of the Silhouette when drawing in black-and-w…
Illustrator Julio Robledo explains how to draw, using only black-and-white, usin…
Natural-style Painting Workflow for Character Illustrations
Illustrator Sunako shows how to create natural-style character illustrations!&nb…
How to Make Video Tutorials
Have you ever wanted to make your own video tutorials and share your knowledge a…
How to design comic characters
Carlos Nieto shows how to design comic characters, from anatomy sketching to col…
Tips for digital outlining for Anime Art!
Artist Eridey explains how to create compelling lineart for anime-style characte…
Easy tips to paint light and shadow
Artist Mili Koey explains how to paint lights and shadows using simple technique…
Creating a Hand-Crafted Style Webtoon
Webcomic artist Stephinni explains how to make a basic webtoon and shares her ti…
How to Draw Explosions
Artist Dani Puente shows how to draw realistic explosions with digital effects s…
My Digital Coloring Process Plus Tips on Useful Features
Artist Nesskain shows their coloring process and how to set useful functions uni…
How to Draw Horses
Artist Dani Puente shows how to draw a horse in profile step by step: from basic…
Model Sheets for Character Designers
Illustrator Julio Robledo explains how to create a model sheet for a character d…
How to draw super detailed anime aesthetic art
Artist Carles Dalmau explains techniques to create charmingly intricate illustra…
How to Draw Various Foliage with a Depth of Field
Comic artist Ann Maulina explains how to draw various foliage types, including b…
How to Draw an Arm
Artist Dani Puente explains how to draw an anatomically correct arm, including i…
How to draw a comic strip with an iPad
Artist Antoine shows how to use the iPad to create a comic strip for Instagram &…
How To Draw A Tree
Learn how to draw freeform tree trunks & roots with The Etherington Brothers…
Painting digital illustrations for Instagram
Cristina Gómez explains how she paints her work in this Instagram digital art tu…
Digital Painting Landscape Photo Studies
Marco Bucci shows how to make the most out of landscape photo studies & digi…
How To Draw Mountains
The Etherington Brothers show how to draw interesting mountain shapes by adding …
Guide to Drawing Shadows
Level up with this guide on light and shade! By changing the type and direction …
How to draw Gems, Crystals, and Gold
Learn how to draw a gemstone’s geometric cut patterns, the natural form of the c…
How to Make Your Characters Pop with Line Quality!
Line quality is an essential aspect to creating engaging line art. In this tutor…
Simple Anime-style Coloring Techniques
An Anime-style Coloring tutorial by Animator Nicca. Take advantage of handy feat…
Creating a Dynamic Landscape Composition with Silhouette
The Etherington Brothers show how to create dynamic landscapes with silhouettes …
How to Draw Hair in Manga and Semi-Realistic Styles
Learn how to draw hair with Esseyli in this tutorial. He will guide you on how t…
Recommended Articles
Bring Energy and Life to Your Poses!
Sculpting Forms, Using Value, and Brush Introductions
Extracting Scanned Line Art for Digital Coloring
Featured Pro Portfolio: Miroslav Petrov
ArtStation Marketplace Success Story: Le Vuong
How to Make Video Tutorials
Easy Tips for Drawing Eyes
Simply Well Drawn: Part 1
Featured Pro Portfolio: Phil Saunders
Five Tips for Getting Noticed Online
Finding and Correcting Drawing Mistakes
Becoming a Concept Artist for a Hollywood Film
How to Make Appealing Original Characters
Keyboard Shortcut Guide for Artists
Exclusive Interview: Lois Van Baarle (Loish)
Learn to Draw Croquis Sketches
Easy Steps to Creating Chibi Characters
Must-Know Tips to Improve Your Tablet Drawing Experience
Things You Need to Know to Become a Game Illustrator
Top Drawing Apps and Software in 2022 (Free & Paid)
Articles of the Day
Top Drawing Apps and Software in 2022 (Free & Paid)
Easy Steps to Creating Chibi Characters
Essential Tips for Drawing Drapery and Folds
Tips for Creating Vertical Scrolling Webtoons
How to draw and color anime hair
Tips for Beginners: Getting Started in Digital Art
Guide to Creating Color Schemes
Bring Energy and Life to Your Poses!
Learn from Anatomy to Improve Your Poses
Easy Tips for Drawing Eyes
Anime-Style Skin Coloring Tutorial
Keyboard Shortcut Guide for Artists
Ultimate Guide to Blending Modes
Simple Anime-style Coloring Techniques
How to Layout Your Comic! Panels, Gutters, and Page Flow
Liven Up Your Line Art With Smooth, Attractive Lines
How to Draw Hair
Top 13 Drawing Tablets of 2022!
How to Draw Anime Eyes
How to Create Pixel Art
Top Concept Art Articles
How to paint the four elements
How to Draw Explosions
An Introduction to Matte Painting
Sci-Fi Environment Tutorial
Creating Visual Narratives and Storytelling
Metal Engravings Made Easy in Digital Painting
Becoming a Concept Artist for a Hollywood Film
Using Overpainting to Create a Dramatic Scene
Digital Painting Landscape Photo Studies
Using 3D Models and Perspective to Create a Fantasy Blacksmi…
Top Comics and Manga Articles
The Difference Between Digital Manga and Hand-Drawn Manga
Simplifying Characters for Webtoons
How to Draw Powerful Sword Fighting for Comic panels & …
Simply Well Drawn: Part 1
How to draw a comic strip with an iPad
Inking Superhero Comics in Clip Studio Paint
How To Draw Mountains
How To Draw Animal Heads & Snouts
How to Draw Comic Covers
Top Tags
Learn the basics of digital art, from the tools you need to the steps of creating digital artwork.
Read art tutorials and interviews with concepts artists for films, games, and animation.
Learn techniques for creating expressive and fun character art with these tutorials.
Whether you’re creating manga, comics, or webtoons, here you’ll find the best techniques to create your story!


