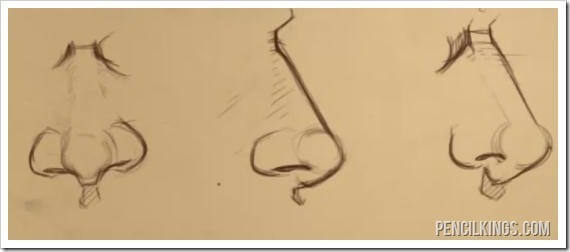
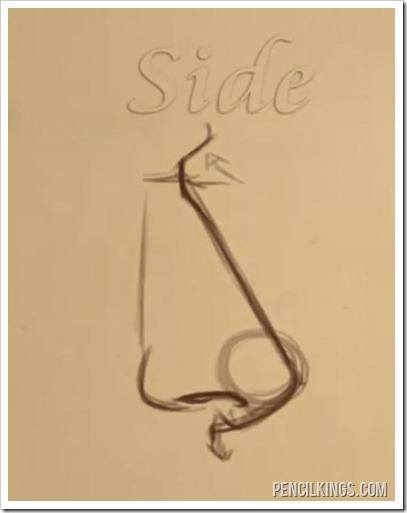
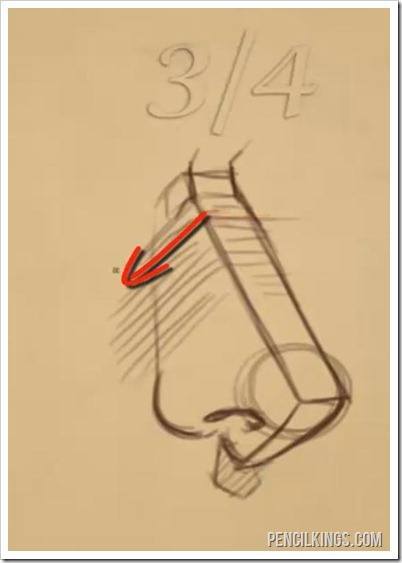
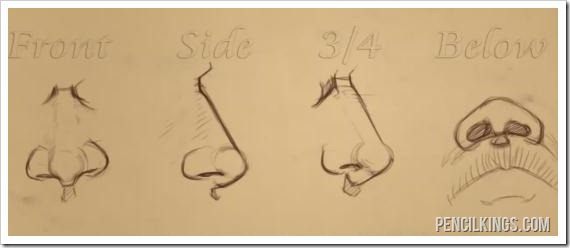
How to draw nose
How to draw nose
How to Draw a Nose – Part 1 – Structure
Why Learning How to Draw a Nose is so Important
Learning how to draw a nose is one of the most important aspects of creating a portrait or a character design. And, if you follow and practice these simple steps, you’ll soon be drawing noses with complete confidence.
In this article, you’ll learn:
And our tutor, Sycra Yasin, will also be showing you how to draw a nose from the bottom view looking up.
How to Understand the Construction of the Nose
Learning to see the nose as a 3D object will help you draw it more easily
Doing these exercises will help you understand the construction of the nose and encourage you to start seeing the nose as a 3D object.
And, once you’ve practiced these simple techniques, you should be able to draw the nose from any angle more easily!
Drawing the Basic Angle of the Nose
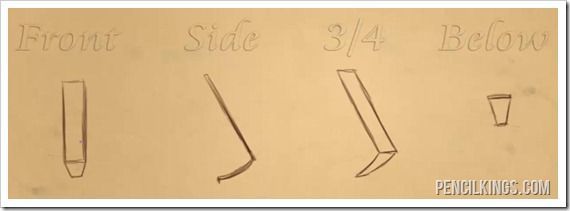
Think of the nose as a series of flat planes
To keep things simple, try and think of the nose as a series of flat planes which look different when viewed from different angles.
In fact, no matter what you’re drawing, it’s always a good idea to break the object down into simple shapes, and then add more detail to these simplified forms as you progress. This is a particularly useful technique to learn if you’re just starting out as an artist.
In this image, you can see the bridge of the nose and the septum. The bridge of the nose is the part which sticks out from your face. The septum is the piece of skin at the bottom of your nose which attaches it to the rest of your face.
At this stage, it’s probably a good idea to look into a mirror and take a good look at the bridge of your nose and your septum.
Do you see how these parts of your nose can be broken down into simple shapes? Good
As you’re no doubt starting to find out, learning how to draw nose really isn’t all that scary after all!
Drawing the Ball of the Nose
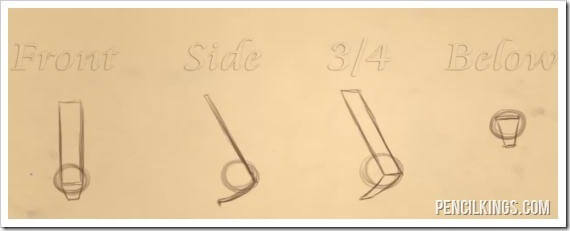
Create the ball of the nose by drawing a circle
The next part of learning how to draw a nose is to add is the ball of the nose. You can draw this as a simple circle, but it’s important to remember this: Even though you’re drawing a 2D circle shape, what you’re actually representing is a 3D shape with depth and form.
Drawing the Nostrils and Flares
Remember to leave a space between the nostril and the flares
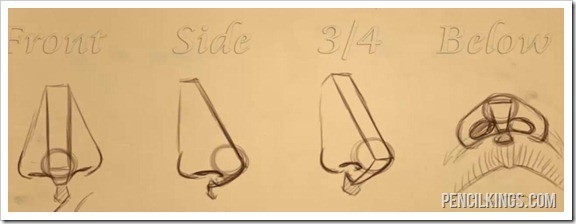
After you’ve drawn the ball of the nose, it’s time to move on to adding the nostrils and the flares of the nostrils.
Now, here’s where learning how to draw a nose can get a little more challenging. Firstly, you’ll need to make sure you leave a space between the nostril and the flare of the nostril like in the illustration above.
Secondly, you’ll need to ensure the nostrils extend towards the ball of the nose in the middle. You’ll also need to leave some space between the nostrils and the septum.
By now, you should have developed a better understanding of how the nose is constructed, and how it’s attached to the face.
When you’re learning how to draw a nose, you’ll also need to take the roundness of the mouth into account. This is because the mouth sits on the curved surface of your skull underneath, and the shape of this will naturally affect the shape of the nose that’s attached to it.
And, talking of attaching the nose to the face, that’s exactly what you’re about to learn how to do!
Attaching the Nose to the Face
The brow bone joins the nose to the face
So how do you attach the nose to the face? Well, at the top of the nose, the underlying structure changes from cartilage to bone.
You can try this out for yourself – just feel your nose with your fingers and and lightly move your nose around.
Can you feel the difference between the soft, bendy cartilage along the bridge of the nose and the hard bone at the top?
This hard piece of bone is your brow bone. It runs from the skull at the top of your nose, and extends vertically before extending outwards to form the brow bone above your nose.
Understanding the Surface Direction of the Nose
Surface direction lines are useful for shading
In this image, you can see the direction of the surface lines on the nose. As these surface lines move from the side of the nose into the cheek, they get smoother.
Because of this, it’s not necessary to draw any hard lines separating the nose from the cheek.
Understanding the surface direction of the sides of the nose comes in really handy for when you want to begin adding more detail to your drawing with lighting and shadow.
Defining the Eye Sockets and the Bridge of the Nose
Defining the edges of the eye sockets helps your nose drawing look more realistic
You’re now ready to start adding some lines to define the eye sockets and the bridge of the nose. Sketch these in lightly, just like in the illustration above. Do you notice how drawing these lines helps to define the shape of the nose and how it sits upon the face?
Use light, diagonal strokes to indicate the line along the bridge of the nose. This will give it a nice, soft effect.
Remembering the Main Parts of the Nose
For the last part of this lesson on how to draw a nose, let’s go back and take a second to memorize the basic parts of the nose. Understanding these key elements will help you draw any type of nose more easily, and you’ll be able to see the differences between various noses more clearly.
The Main Parts of the Nose are:
In our next lesson on how to draw a nose, you’re going to learn more about drawing different types of noses in different styles. And, because you now understand the basic construction of the nose thanks to this lesson, we hope you’ll soon be able to draw endless varieties of noses!
How to Draw a Nose
Drawing something from a reference is one thing, but if you want to draw from memory/imagination, you must really understand the topic beforehand. In this tutorial I will tell you everything you need to know about a human nose: how its anatomy can be simplified to forms and lines, and how to draw it in every view and style without a reference.
1. The Anatomy of a Human Nose
The nose consists of three parts: bone, cartilage, and connective tissue. Its upper half is all made of bone, an integral part of the skull:

The lower half is more complex and consists of:
All these elements can be turned into a 3D form:


Once you understand what this form looks like, you can rotate it and reshape it to create a nose from imagination.


But it’s still not easy to remember! Let’s simplify it to something easier to draw:
2. Nose Shapes
This was a general «recipe» for a nose. But noses vary a lot among people! For example, we can talk about a «masculine» and a «feminine» nose. Traditionally, males are drawn with big, wide, roughly chiseled noses, and females with small, smooth, gentle ones.

If you look at a nose in profile, there are lots of ways you can arrange the elements to create a nose. It can be pointing up or down, round or pointed, straight or humpy. There is not one perfect shape, «default» to all humans!

Noses can also differ in front view. Both the ball and the nostrils can have various sizes and proportions. Also, the nostrils can appear wide or tiny. Because the shape of a nose is mainly genetic, various ethnicities can have their own characteristic shape. Experimenting with the nose shape will therefore help you create unique characters, with a story hidden in their faces (you can make certain characters look related, or show their affiliation to a clan or tribe).

3. How to Draw a Nose in the Side View
Step 1
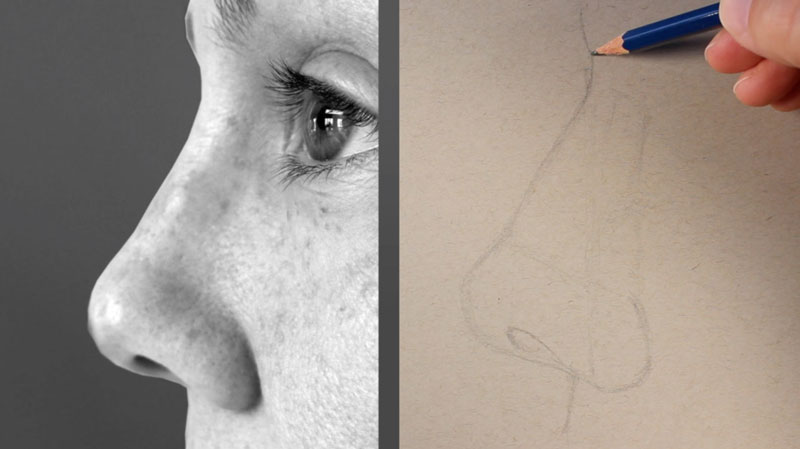
First, sketch the general shape of the nose as you imagine it. This will help you get an idea about the proportions of the elements you’ll need to draw later.

Step 2
Draw the ball in the front according to the shape you want to achieve.

Step 3
Draw the circle for the wing. Adjust its size to your vision.

Step 4
Draw the tiny circle for the septum. It should be placed slightly below the ball, at the back.

Step 5
Draw the nostril. Remember the two parts of it!

Step 6
Outline the bottom of the nose all the way down to the philtrum. «Cut» the upper part of the nose to create the root, and divide the rest roughly into halves.

Step 7
Outline the bridge and the tip.


Step 8
Draw the sides of the nose.


Step 9
Add the details.

Step 10
Draw the final lines and shade it, if you want to.


4. How to Draw a Nose in the Front View
Step 1
Sketch the general shape, adjusting the length and width of your imagined nose.

Step 2
Add the ball at the bottom.

Step 3
Sketch the circular wings.

Step 4
Add the small circle for the septum.

Step 5
Outline the nostrils. Remember that they’re 3D—they bend towards the front.

Step 6
«Cut off» the upper part of the nose to define the root. Mark the border between the two halves of the nose, too.

Step 7
Outline the bridge.


Step 8
Outline the sides.


Step 9
Add the details.

Step 10
Finish the drawing.


5. How to Draw a Nose in Perspective
Although drawing in perspective is considered difficult, there’s actually one rule you need to remember here: rotation from side to front creates an intermediate state between them. So you need to draw all the elements as a transition between one state and the other.
Step 1
Sketch the general shape of the nose. It should be an intermediate shape between the side and the front, depending on the angle of rotation.

Step 2
Draw the ball. Notice it’s almost on the side, but not really.

Step 3
Draw the circular wings. In the side view, they would cover each other. In the front view, there would be a distance between them. Here we have a compromise between these two states.

Step 4
Add the septum. It still needs to be under the ball, behind it, and between the wings.

Step 5
Sketch the outline of the nostrils. Remember the 3D shape!

Step 6
Draw a line along the nose, accentuating its 3D form. «Cut off» the top to create the root, and mark the middle of the bridge.

Step 7
Draw the bridge.


Step 8


Step 9
Add the details.

Step 10
Finish the nose.


6. Nose Styles
Drawing the nose in styles different than realism is pretty straightforward—you simply need to replace shading with lines. You can also ignore almost everything besides the ball, the wings, and the outline of the bridge. The simpler your style, the more elements you can safely ignore.

In cartoon styles, you can exaggerate visible elements of the nose. If the nose is pointed, you can make it almost sharp, if it’s small, you can make it tiny, and so on. This will let you accentuate the difference between the characters and will make drawing them easier.


In manga style, noses are almost non-existent, symbolic, which directly follows the simplification of other facial features (a detailed nose would bring attention to them being unrealistic). The simpler the variation of manga, the simpler the nose, with chibi being the extreme—no need to draw a nose at all!
How to Draw a Nose
JOIN THE VIRTUAL INSTRUCTOR
Get ALL of our courses, ebooks, live lessons, critiques, lesson plans and more today.
The Basics of the Nose
Many people have incorrectly learned how to draw a nose. When you learn something incorrectly, it is even harder to learn how to do it correctly. This is true of anything, not just drawing. Many of us have been taught to draw that «L» shape or perhaps the «w» shape with an extra «u» when we draw a nose.
Drawing noses this way is so far from drawing them realistically. If you are going for a cartoon nose, then that may be a good direction to go. But for a realistic nose, you must really observe your subject.
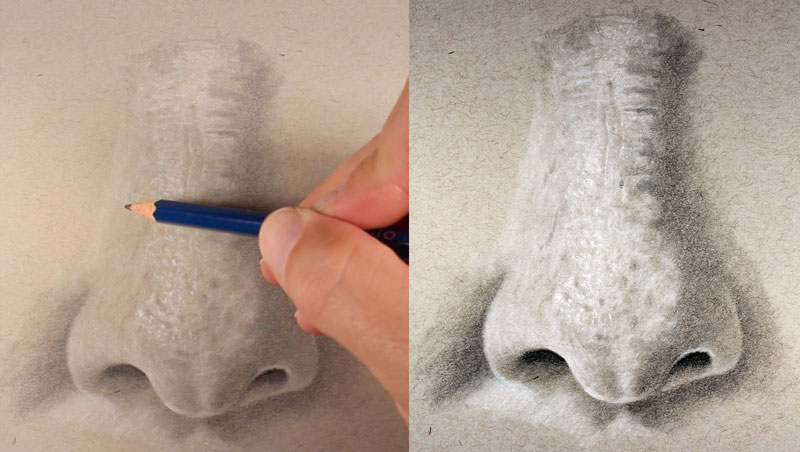
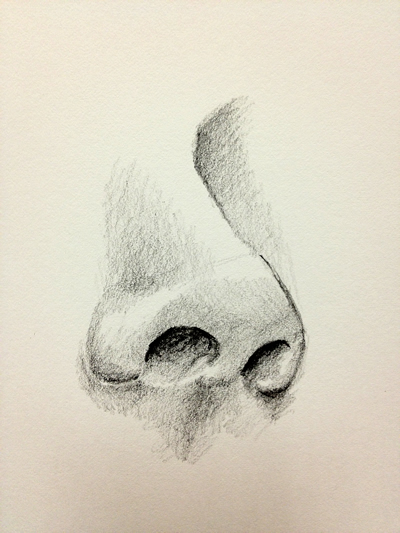
Here’s a look at the finished drawing from the video above.
The Key is Observation
You must closely observe your subject when you draw anything. Drawing noses realistically involves studying the values. The values are what gives us the impression and illusion of the form. Make sure that you include a full range of value when you draw a nose.
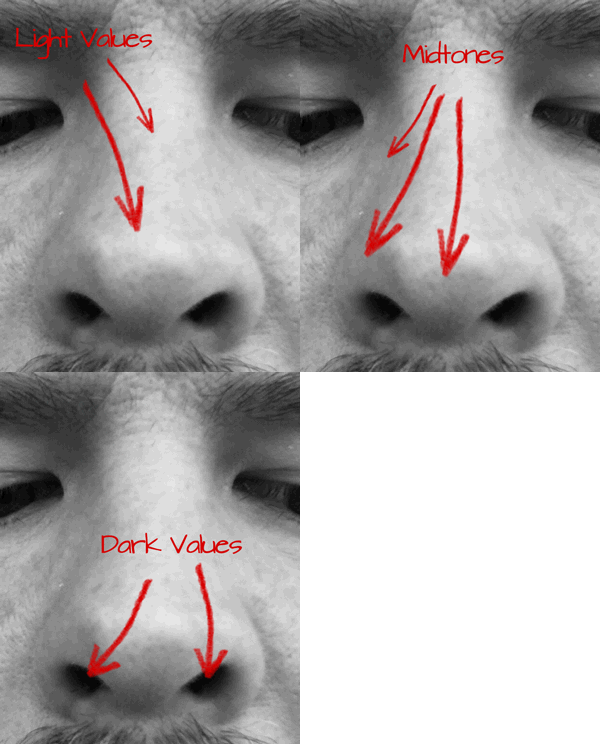
Your drawing must include the darkest shades and the lightest tints and the grays in between. Keep in mind that no two noses will be the same. Observation is really the biggest secret when it comes to drawing.
Try to pinpoint the locations on the nose where these values are located and notice the subtle changes that happen in the highlights (light values), midtones (middle values), and the shadows (dark values).
Drawing a Nose from a Frontal View
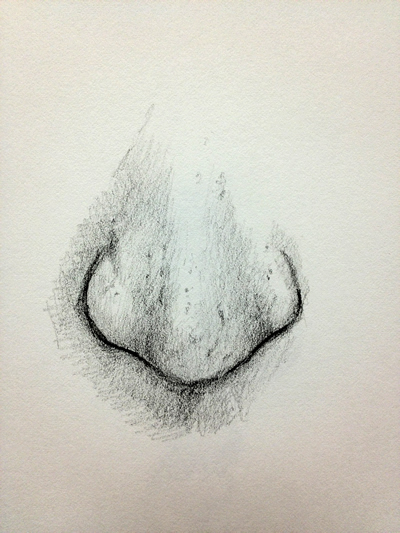
We’ll explore several different options for drawing a nose in this lesson and look at a number of examples. It makes sense to look at drawing the nose from a frontal view first. This way, we can better understand the structure and what we should look for and include in our drawing.
Before drawing any lines, we’ll first examine the form of the nose and how we can simplify it into a system of planes.
Understanding the Planes of the Nose
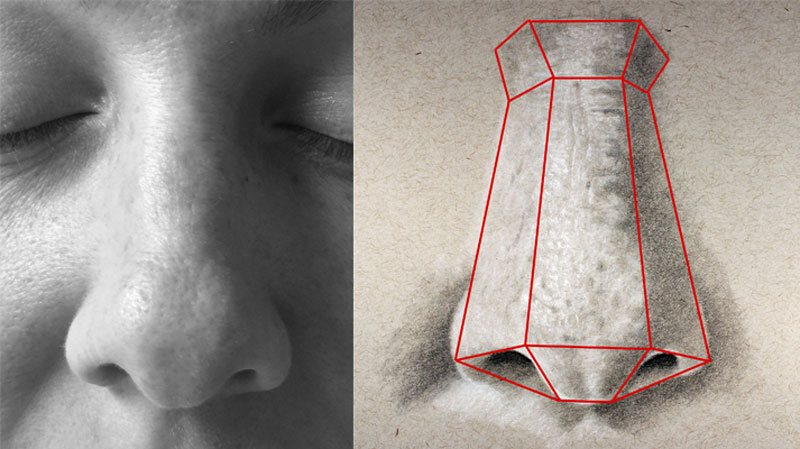
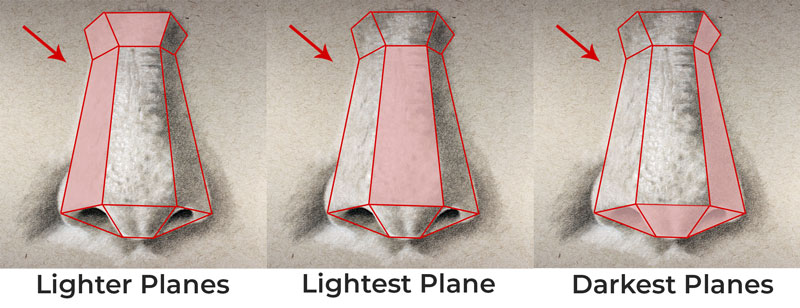
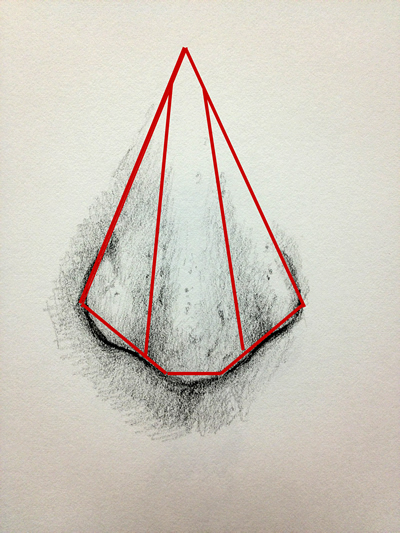
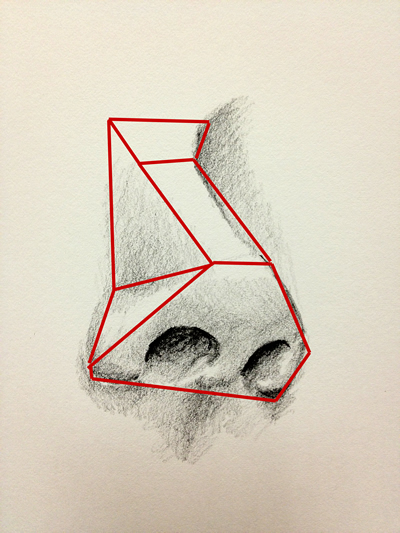
A nose can be simplified into basic planes. You may think of a chiseled form to better understand the planes. Remove the curvature of the nose from your mind and simplify the form into rigid flat planes.
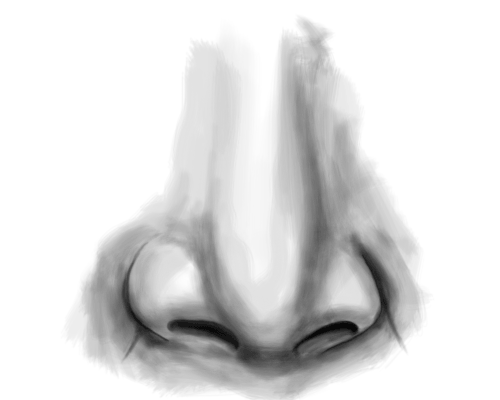
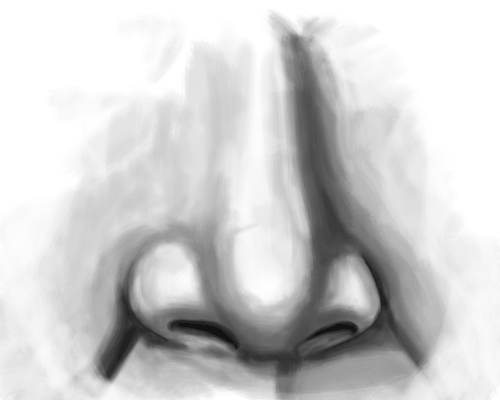
Recognizing the planes not only helps us to draw the form, but it also helps us to understand where we should add shading. It is the shading, or value range, that ultimately leads to the illusion of a 3-Dimensional form.
In the image below, you’ll see an example of a nose from a frontal view, simplified into basic planes. As the form changes direction in space, it creates a new plane. There are three planes designated for the top, three for the middle, and three underneath.
In the beginning stages of the drawing, you may find it helpful to draw these planes first. This way, you can focus on the form before drawing any of the lines for the nostrils or adding tone.
Drawing the Perceived Lines
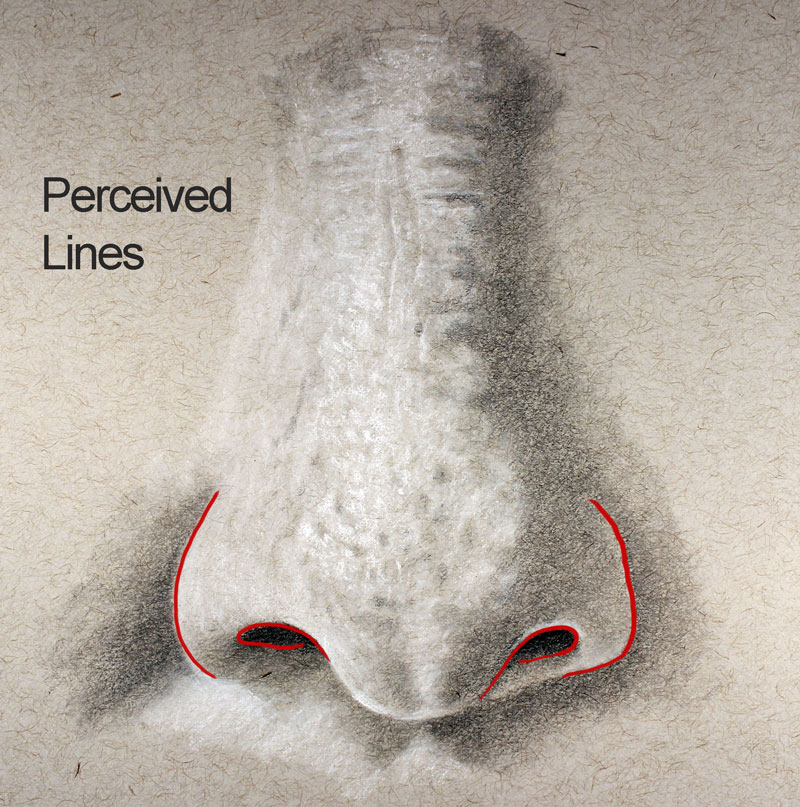
When most of us learn to draw, we start by drawing lines. We use lines to define the boundaries of objects and to add details. So it’s only natural to look for lines when we draw any object.
A nose, however, doesn’t feature strongly defined lines. Our mind simplifies changes in value or contrast into «perceived lines». For a nose, these areas include the shapes of the nostrils and the outer edges of the nostrils. This is simply because we notice strong contrast in value in these locations. In reality, the value changes gradually, instead of creating a defined line.
We can use the planes of the nose to position the perceived lines that we see. Using the outer boundaries of the planes, we can mark the outer edges of the nostrils. We can also use the bottom planes to position the shapes of the nostrils.
Shading the Nose
Understanding the planes of the nose helps us to draw the basic structure and position the «perceived lines», but the planes also perform another important task. We can use these planes to determine the locations of value.
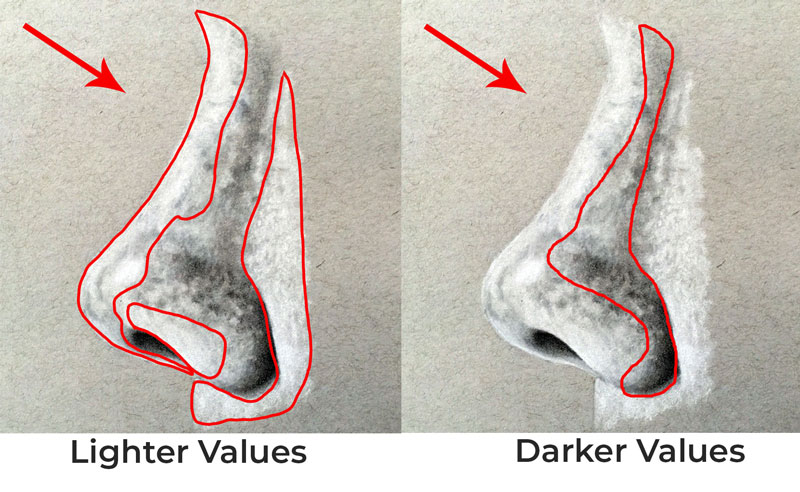
In this example, the light source originates from the upper left corner. This produces lighter values on the left side of the nose, closer to the light source. This means that the plane that faces the light source will be lighter. Darker values are found on the opposite plane on the right side of the nose.
Since our light source is also coming from above, you’ll notice that the planes underneath the nose are also darker. There is, however, a slight highlight in areas here.
The bridge of the nose protrudes outward. As a general rule, most objects that protrude receive more light and are usually lighter in tone. They also usually produce a shadow underneath. In this case, the bridge of the nose is receiving the strongest light. The values developed here should be slightly lighter than the values found on the left plane of the nose.
Now that we have a basic understanding of the locations of value and how dark or light they should be, we can begin the process of shading. However, the term «shading» is somewhat confusing. It suggests that we are only addressing the dark values, or shades. In reality, the process of «shading» is the process of developing a full range of value. This means we should consider both the tints (light values) and the shades (dark values) together.
If you’re working on white paper, you may choose to leave the areas of highlight «open» or address them with a very light application of graphite. If you are working on toned paper, as we see with this drawing, you can add the highlights with a light drawing medium. In this case, a white charcoal pencil is used.
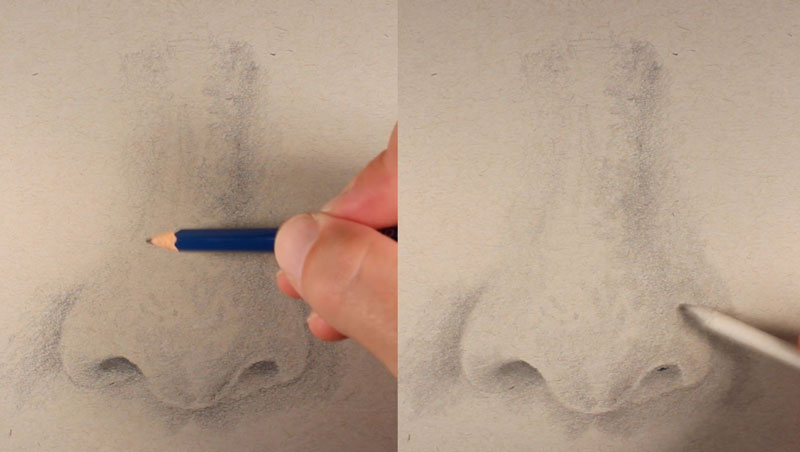
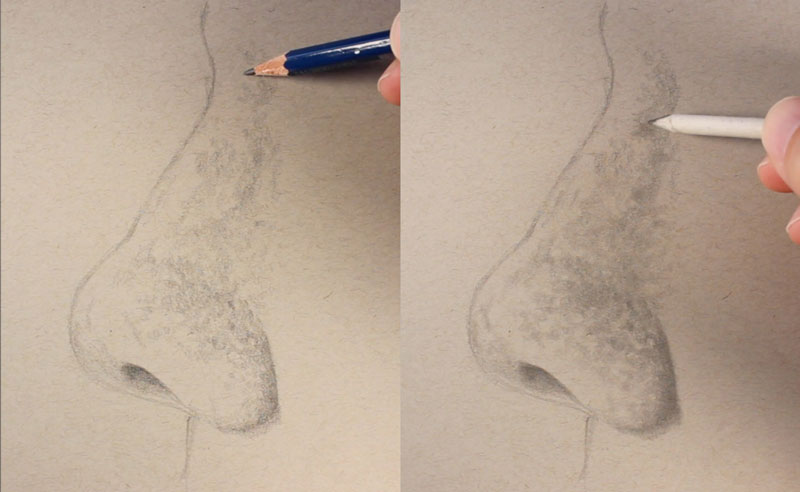
Prior to adding the highlights, we’ll begin with a light application of graphite using an H graphite pencil. This gives us a starting point.
A blending stump is then applied to smooth the texture and work the graphite material into the tooth of the paper.
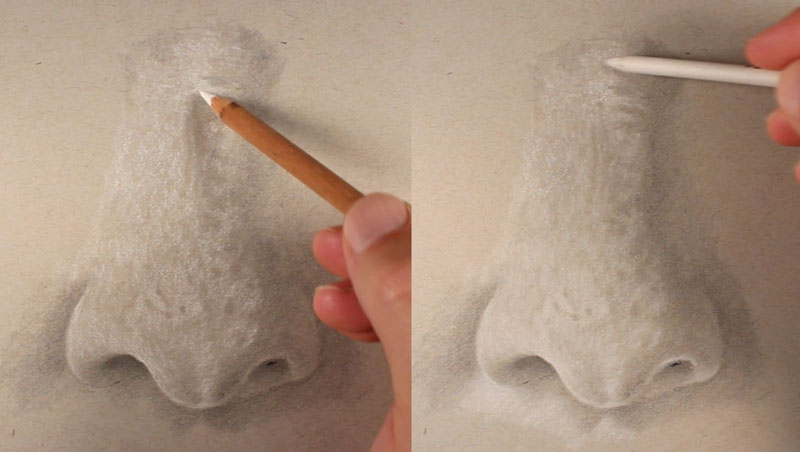
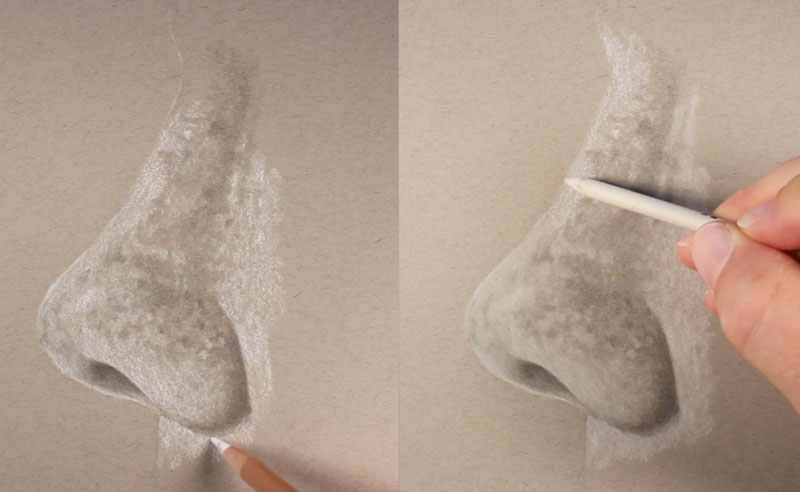
Once the locations of darker value are established with a light application, we can define the highlights with a white charcoal pencil. Again, this application is gently blended with a blending stump.
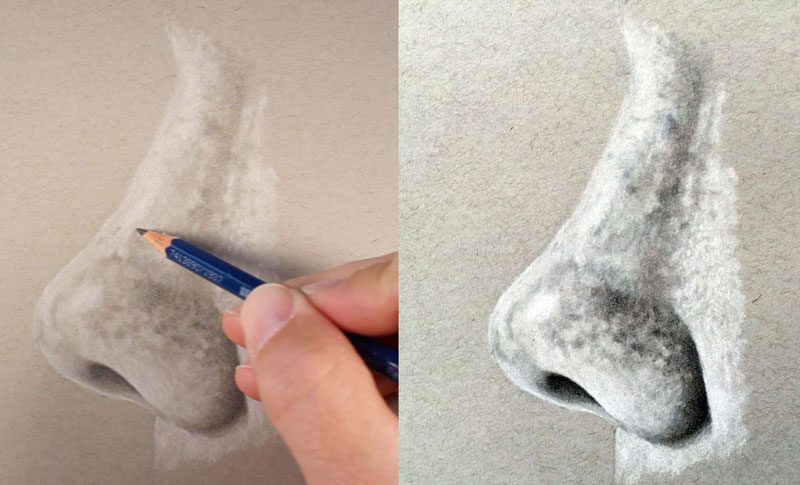
Then it’s a matter of gradually darkening the shades to increase contrast. A softer and darker, graphite pencil is used the darken the areas within the nostrils and the shadows that exist on the right side and underneath the nose.
We can also continue to add highlights, if necessary, to extend the range of value and the contrast. As applications are made, they are gently blended with a blending stump. You’ll notice that as the value is developed the texture of the nose is also developed.
A more in-depth video of this lesson, along with an illustrated ebook can be found in the course, «Portrait Drawing the Smart Way».
Portrait Drawing The Smart Way
«Portrait Drawing The Smart Way» is a complete video course on drawing portraits designed for beginner and intermediate artists.
How to Draw a Nose Step by Step
Here’s the process that we outlined above, simplified and broken down into a step by step approach.
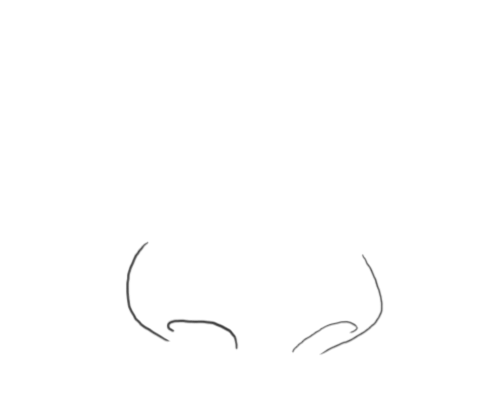
Begin your drawing of a nose by drawing four lines. Two lines are drawn for each nostril and then two more for each edge of the nose.
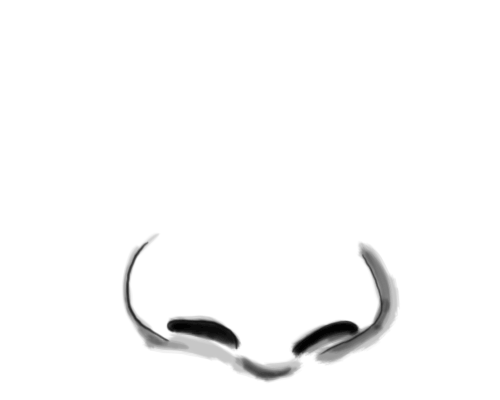
Now you can begin to add darker values where the nose is shaded. Start with the areas that are the darkest and slowly get darker with your pencil.
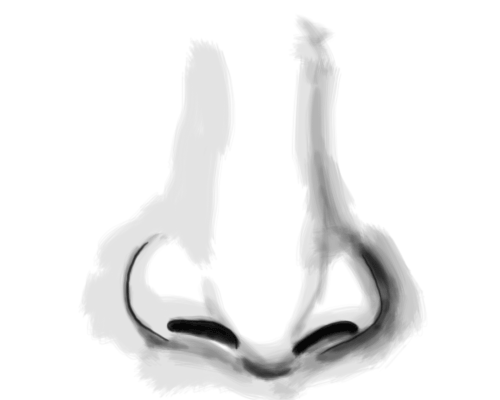
Continue with adding shading to the nose to create the illusion of a light source. Be careful not add more lines. Instead, just concentrate on light and dark areas.
The more value that you add, the more your nose will look realistic. Areas of the nose that are light will look like they protrude, while areas that are dark will look like they go back in space.
As long as you keep looking for the dark and light areas on the nose, and draw what you see, your nose will look realistic.
Once you have a basic idea of how to draw a nose from a frontal view, it’s time to look at drawing a nose from the side.
Drawing a Nose from the Side View (Profile)
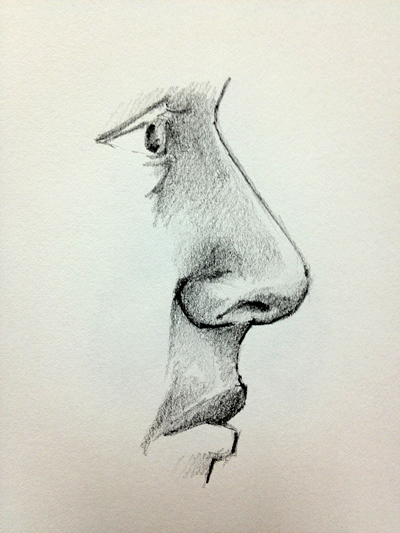
There’s more than one way to draw a nose. In fact, since every nose is different, there are virtually unlimited ways to draw a nose. Next, we’ll take a look at drawing a nose from a side view. This is usually referred to as a profile view.
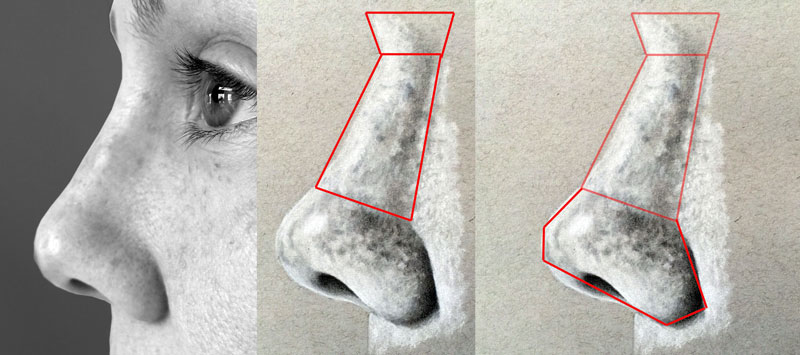
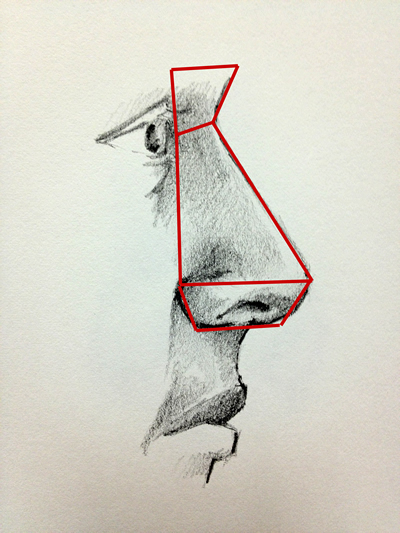
As we did with the frontal view, we’ll first locate basic shapes. When drawing a nose from this angle, it may be difficult to identify the planes, so basic shapes will suffice.
Look for changes in spacial direction to find the most basic shapes. As we see below, the upper portion of the nose can be simplified with two shapes. The lower portion of the nose is simplified into an organic shape that extends downward from the top two shapes.
We’ll draw these basic shapes first to define the form of the nose.
Next, we can draw the perceived lines that we discussed before along with the outer contours. After these lines are in place, we can begin the process of developing the value and texture.
As we develop the value range, we’ll consider the light source. As we see in this example, the light source originates from the left. This creates shapes of different tones on the nose. The bridge of the nose receives the most light. The cheeks are also receiving a fair amount of light. Curiously, the bottom of one of the nostrils is also lighter. This is the result of light reflecting back up from below, producing an area of reflected highlight.
As we did before, we’ll start adding light graphite applications to establish the shapes of the darkest value. These applications are blended with a blending stump to create a smooth texture.
Then we can add the highlights. In this example, we’re again working on a toned drawing surface. This allows us to add the highlights with a white medium like white charcoal. After the initial highlights are added, we can blend them as well.
Now we simply need to darken the value to create a full range and increase the contrast in the drawing. Softer graphite pencils are applied and blended to gradually «push» the tonal range.
For more on this demonstration see the course, «Portrait Drawing the Smart Way».
Now that you’ve got the basic concept down, it’s time to take your skills to an actual subject. This might be a nose that you draw from life, or one that you draw from a photo reference. Either way, the process of drawing will heavily depend on observation.
Take the following drawing for example.
Now look at the planes that can be easily drawn to create the form of the nose.
Here’s another look at the nose from the side view.
Here is the same drawing with the planes highlighted.
Certain angles of the nose can present challenges.
But here again, if you break the nose down into geometric planes, this angle is made easier to draw.
Conclusion
Now that we’ve had at look at several different noses, you are well equipped to draw your own. Just remember the steps we took.
As always, take your time and be patient. With practice, you’ll master the art of drawing noses.
How to Draw the Nose, a Simple Step-by-Step Guide
Drawing the nose involves understanding some simple anatomy. The nose is a complex form and knowing basic anatomy and structure of the nose is an absolute requirement.
The good news is that you do not need to know every single anatomical detail to draw the nose well.
To draw the nose, start with good reference, i dentifying the angle of the head, observe and simplify the nose to a basic shape, then visualize and draw the simplified shape, and finally add details to your drawing.
We will cover all the important parts you do need to know and even how to remember them in an easy way.
Let’s go over drawing the nose with the following steps:
Step 1 – Understanding simple anatomy to draw the nose
When I say simple anatomy I mean simplified anatomy, just enough for the artist to communicate the essence of what they’re drawing.
Visible parts of the nose
Let’s first examine the visible parts of the nose and then talk about what’s underneath.
When drawing the body you need to know what’s underneath, (the muscle, skeletal structure, and joints) to understand what you’re drawing at the surface.
It’s no different with the nose.
Visible parts of the nose consist of the root, the bridge, the tip, the wings (2X), the nostrils (2X), and the septum. I know that Anatomy might sound intimidating at times but it is not so bad with the visible parts of the nose. It is just eight things we have to draw, two of which appear twice:
Let’s talk about the septum, since it’s really important when trying to draw a nose that looks like a nose.
The septum
From the tip, the septum turns down and underneath and runs all the way to the upper lip, it is surrounded by either side with nostrils. The septum attaches to the upper lip, much thinner than it started at the bottom of the tip of the nose, and it attaches with a downward curve. Note that the septum hangs lower at the bottom than the wings of the nose. By doing so, it creates 3 distinct planes at the very bottom surface of the nose. The septum plane, and the two planes surrounding it, which include the nostrils, and the depth of the wings of the nose.
How to best remember the visible parts of the nose
To help organize the structure in your mind, and to more easily remember the different parts, let’s separate these into two groups:
If you draw an imaginary line with your index finger from the top of your nose at the forehead in between the eyes to the very tip of your nose, you have covered the root, the bridge and the tip. That’s our first group.
Our second group is everything that happens underneath and to the sides, the wings the nostrils and the septum.
So the next time you need to remember all parts of the nose to draw, just remember to draw an imaginary line with your index finger from the root of your nose at the forehead through the bridge to the tip. Then, once your index finger is at the bottom of the nose, remember that the wings, nostrils and the septum is the second group. It is an easy way to remember. Try it.
Okay, now we know the visible parts of the nose.
Bone and cartilage of the nose
Before we get to draw, let’s quickly look what’s underneath, because it’s going to help us in drawing the nose. You won’t know that it helps you until you know what’s underneath, and begin to draw the nose yourself. A bit of anatomy knowledge will take you a long way in making a good drawing.
Underneath the nose is two things, bone, and cartilage, (the wings of the nose are mostly fat, but for our purposes, it will make no difference and we can just count them as skin).
There are just 4 parts we need to know for simple anatomy, 1 bone, and 3 cartilage areas.
The bone is appropriately named the nasal bone. This nasal bone consists of two symmetrical parts, which form the origin of the nose. It fuses the nose to the rest of the skull by the way of the frontal bone (at the root) at the top, and maxilla at the sides.
If you are here learning to draw, you are probably a visual learner like me, so check out the illustration of the skull I made below.
The nasal bone extends less than half of the length of the nose. The rest of the nose is cartilage.
For simple anatomy, we only need to concern ourselves with three cartilage sections. To help us learn these areas, I made this diagram:
The upper lateral cartilage, which together with the nasal bone supports the bridge of the nose, and the lower lateral cartilage (also known as the major alar cartilage) which helps support the tip of the nose and ends as the wings start to extend to each side of the nose.
Keep in mind when drawing the tip of the nose that it has a whole different section of cartilage underneath it, different from the bridge. In most people, the tip of the nose stands out from the bridge.
The third cartilage section is called the septal cartilage, which supports the septum. We already talked about the septum in detail. It is important to know its form to draw the nose well. If you don’t get the septum right, the nose won’t look quite right.
That is it for anatomy. Step 1 complete. It wasn’t that bad, right?! Let me know in the comments.
Learn How to Draw Any Type of Human Nose With a Few Simple Steps
Stock Photos from Golubovy/Shutterstock
This post may contain affiliate links. If you make a purchase, My Modern Met may earn an affiliate commission. Please read our disclosure for more info.
In your quest to draw realistic portraits, it’s important that you know how to sketch all aspects of a face. From the eyes to the lips to the nose, each element is important in accurately portraying your subject.
Of all the facial features, the nose is one you might not give a lot of thought. But don’t ignore it—this feature helps define the face. Think back to all the times you’ve remembered someone because of their schnoz. That alone is reason enough for why you should learn how to draw a nose.
Drawing a nose is a great artistic exercise. This particular body part is simple to sketch, but it has distinctive qualities that can make it a challenge to get just right. In this tutorial, you’ll learn the parts of a nose as well as what to look for when drawing it.
Anatomy of a Nose
Before you get started drawing, it’s always helpful to understand the anatomy of what you’ll be sketching. That way, you’ll have a better comprehension of how something moves (or doesn’t move), and you’ll be sure to manipulate it in ways that make sense for its form. For drawing the human body, this means you’ll want to learn how to sketch bones, including the skull. (Depicting a skull is a great exercise and one that is commonly used in drawing classes.)
You only need to know a few essential parts of the nose to have an understanding of its form. There is the nasal bone that is near the top of your nose—in fact, the “root” of the nose is between your eyebrows. From the root, the dorsum (or “bridge”) leads down to the tip of the nose to the nostrils on either side.
It’s here that you’ll want to observe the individual features of the nose. It’s not a complicated body part (especially when compared to the hands or eyes), but there are some things to note before you begin a drawing.
Ask yourself:
How to Draw a Nose Step by Step
Stock Photos from Big Foot Productions/Shutterstock
Make sure you grab your essential art supplies. For this exercise, you’ll want to have at least a few pencils of varying graphite tones, a vinyl eraser, and a sketchpad.
Step 1: Break the nose down into its most basic shapes.
Photo & Art: Sara Barnes / My Modern Met
Once you’ve familiarized yourself with the anatomy of a nose, take a look at the source material of the schnoz you’d like to draw. For this lesson, it is beneficial to sketch several noses to really appreciate just how different this body part can be.
Based on what you know about its features—including the bridge, tip, and nostrils—break them down into basic shapes. Using an HB pencil, you’ll draw a long oval for the bridge and smaller circles for the tip of the nose as well as nostrils. (These elements will overlap, and that’s okay.) While you’re just getting into the basics of how the nose is shaped, make sure you pay attention to the width of its features.
