How to host ftp server
How to host ftp server
How to Install FTP Server on Windows
File Transfer Protocol (FTP) is used in transferring files between computers. If you have used the internet to send files then it’s likely that you used FTP to transfer the data. Today, we will show you how to install an FTP server on Windows Server and Windows 10.
List of content you will read in this article:
FTP has been around since the late 80s and it’s still in use. The File Transfer Protocol (FTP) is used in transferring files between computers. If you have used the internet to send or receive files, then more likely than not, you used FTP or its newer versions such as SFTP to transfer the data.
What is FTP?
The main use of FTP, as the name suggests is to transfer files between two entities. Let me give you an example: If you are working with WordPress and you copy files from your computer to the server, then you will be using FTP.
It’s also occasionally used as a way to share files. One person may upload a file to an FTP server then share a link to it with another person. However, this is no longer the go-to method for people due to cloud-based services.
FTP works pretty simply by using two channels:
The command channel carries information about the task and the data channel transfers the actual files between the two devices. However, nowadays the FTP is not used exactly how it was developed in the beginning.
FTP doesn’t have any security measures in place, which means that the data can be intercepted. However, nowadays we use SFTP or FTPS which is the same FTP protocol but with an added security feature. The terms are different but since FTP has been around for more than 30 years, we still use the same acronym when explaining the file transfer protocol.
Throughout this article, we will show you how to set up an FTP server. We will cover three different methods:
How to Install FTP Server on Windows Server 2019
Note: The following tutorial is based on Windows Server 2019 but the process is pretty similar for other Windows Server versions.
Step 1: Press Windows key + R to open the run box.
Step 2: Into the run box, type ServerManager and click OK (or press Enter).
Step 3: In the newly appeared window, click on Add roles and features.
Step 4: Within the opened wizard, read the first page and click on the Next button.
Step 5: Select the Role-based or feature-based installation radio button and click on Next.
Step 6: Choose the Select a server from the server pool option and pick the server in which you want to install the FTP server and Click on Next.
Step 7: Under Roles, select the Web Server (IIS) checkbox and click on Next.
Step 8: Click on Add Features, however, don’t forget to have the checkbox selected for the Include management tool (if applicable).
Step 9: Keep the default features selected as they are and click on Next.
Step 10: Read the Web Server Roles (IIS) text and click on Next.
Step 11: Under Role services, scroll down until you find FTP Server and select it. Check if all checkboxes are selected as shown below and click on Next.
Step 12: Finally, we are done with the setup wizard. Now, simply click on Install.
Once the installation has finished, close the installation wizard and start using your brand new FTP Server.
How to Install an FTP Server on Windows 10
Follow these simple steps to install an FTP server on Windows 10:
Step 1: Press Windows + R to open the Run box.
Step 2: Within the run box, type appwiz.cpl and click on OK (or press Enter).
Step 3: Click on Turn Windows features on or off from the menu located to the left from the program list.
Step 4: Select the checkboxes exactly as seen in the picture below and click on OK.
Step 5: Once the installation is completed, restart your PC and the installation will be finalized.
Add an FTP Site to Your IIS FTP Server
Once the FTP server is in place you have to add your FTP site to your FTP server. This is how to add an FTP site to the FTP server:
Step 1: Open the Control panel and click on Administrative Tools.
If you will not be able to find the control panel as shown in the picture, click on View By: and select either small icons or large icons. Alternatively, you could also type the following phrase: «All Control Panel Items» into the top search bar.
Step 2: Double click on the Internet Information Services (IIS) Manager shortcut.
Step 3: In the appeared window check the left side panel. Here you will see Sites. Right-click on it and select «Add FTP Site. «.
Step 4: Now, you should enter the FTP site name and the path for the content directory. The path is where your files are stored for transferring purposes. Then, click on Next.
Step 5: Enter the following parameters into the Binding and SSL Settings: IP address as 127.0.0.1; in the SSL section select No SSL. Then, click on Next.
Step 6: Now, you will see the Authentication and Authorization Information options. Here’s what you should do:
Once the appropriate options are selected, click on Finish.
Step 7: Open the File Explorer and type the following “ftp://127.0.0.1/” into the address bar, as shown in the picture:
Step 8: Now, you will see a window similar to the one shown below. Enter the User name and password of your system and click on Log On.
Congratulations! You did it and successfully set up an FTP server on Windows 10.
How to Run an FTP Server with FileZilla
FileZilla Client is a fast and reliable cross-platform FTP, FTPS, and SFTP client with lots of useful features and an intuitive graphical user interface. FileZilla is extremely easy to use and is open-source software that can be downloaded from here.
FileZilla supports FTP, FTP over SSL/TLS (FTPS), and SSH File Transfer Protocol (SFTP). It can run on multiple platforms like Windows, Linux, and macOS. This part of the tutorial will focus on how to set up an FTP server using FileZilla.
Step 1: Download FileZilla onto your computer using the link provided above.
Step 2: Run the installation of FileZilla.
Step 3: Click on I Agree after reading the License Agreement.
Step 4: Select the type of install as Standard and check if all checkboxes are as same as shown in the picture below.
Step 5: Enter the Destination Folder using Browse… and click on Next.
Step 6: Enter the details as shown in the picture below.
Step 7: Choose the default settings, as shown below, for the server interface. You can select the checkbox if you want to start the FileZilla interface once the setup is completed. Then, click on Install.
Step 8: Once the installation finishes, click on Close.
Step 9: The FileZilla interface will automatically open if you selected the option in the last setup wizard screen, otherwise, run it yourself. In the opened window select the Always connect to this server checkbox and keep the Host and Port as seen in the picture below. Then, click on Connect.
If it connects, then congratulations.
Fix “Error, could not connect to server”
However, you might face an error similar to the one seen below. Do not worry, there’s a solution for that.
Step 1: Click on the Users icon in the top menu. In the opened window, under Users, click on Add.
Step 2: An Add User Account window will open. Under Name, enter ”ftp” and click on OK.
Step 3: Enter a password and click on OK.
Step 4: A pop-up saying that you need to share at least one directory will appear. Click on OK.
Step 5: Select Shared folders on the left side panel and click on Add.
Step 6: Select the same folder as seen in the picture below and click on OK.
Step 7: Click on OK again.
Congratulations! You have made it to the end and successfully created an FTP server using FileZilla.
Conclusion
We hope that using one of the methods we described throughout this blog, you were able to successfully install an FTP server on either Windows Server OS or even the traditional consumer Windows operating systems. If you have any feedback or questions, you can let us know in the comments below.
How to Host an FTP Server on Windows with FileZilla
In this guide we’ll take you through the steps to setup a folder on your Windows computer as an FTP repository, using a free program called FileZilla. FTP can be used to easily transfer a lot of files between computers; the FTP repository can be mapped to multiple computers across the Internet so that other people can access the directory right from Windows Explorer.
To start, you’ll need to download FileZilla server, available here.
After downloading the program, you can install it with all of the default settings. FileZilla will install a service that runs whenever Windows boots up, so if you would rather only run the FTP server manually, select the appropriate option from the drop down menu on the third screen:
Apart from that setting, everything else can be left at the defaults for the purpose of this tutorial. Once installation is complete, the FileZilla interface will open. Just click OK when this window pops up right after installation:
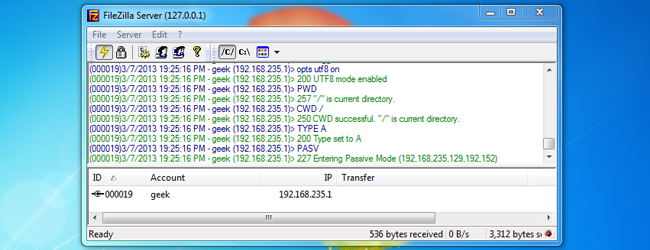
Once the FTP server interface has loaded, we are ready to specify a directory as an FTP repository. If the directory you want to use isn’t already created, minimize the interface and create a folder where you want the FTP share to be. In this tutorial, we are going to use the folder ‘FTP’ on our desktop. Its exact location will be “C:\Users\geek\Desktop\FTP”.
Click on Edit and then Users.
On the left side of the window that comes up, click on “Shared folders.”
Once there, click on “Add” underneath “Users.” Enter the username for an account that another computer will be using to access the repository we’re setting up.
Click OK once you’re done entering the account name, and then click on “Add” underneath the “Shared folders” section. Once you’ve done that, a window like the one below will pop up, use it to select the directory you would like to share as an FTP repository.
Click OK. Now we need to assign the user permissions for this repository. By default, the user we’ve created is able to read files, list directories, and list subdirectories. To give the user further permissions, such as the ability to copy files to this repository, check the boxes beneath ‘Files’ and ‘Directories.’
Click OK once you’re done setting the user permissions.
Securing Your FTP Server
Along with configuring the user(s) with a strong password, there are a few settings within FileZilla that you can configure to further secure your new FTP server.
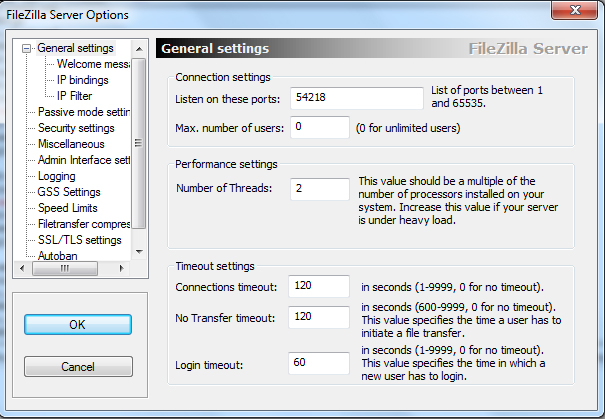
Hackers will constantly scan the internet for hosts listening on port 21, the default FTP port. To avoid being detected by the thousands of hackers constantly scanning for people like you with an FTP server, we can change the port that FileZilla listens on. Go to Edit and then Settings. Under “General settings” you’ll see “Listen on these ports.” It should currently be on 21, but we recommend changing it to a random five digit number (nothing over 65535).
This doesn’t necessarily secure your server, but it obscures it and makes it harder to find. Just remember that anyone determined to hack you will eventually find the port your FTP server is listening on, so further measures must be taken.
As long as you know the IP’s (or at least the IP range) of the computers connecting to your FTP server, you can set FileZilla to only respond to login requests from those IP addresses. Under Edit > Settings, click on “IP Filter.”
In the first box, put an asterisk to block all IP’s from connecting to your server. In the second box, add exceptions to this rule (IP’s or network ranges that should be allowed to connect). For example, the following screenshot shows a configuration in which 10.1.1.120 and the 192.168.1.0/24 (in other words, 192.168.1.1 – 192.168.1.255) IP range would be able to connect:
Along with secure passwords, that should be about all the security your FTP server will need. There is a default Autoban setting already configured in FileZilla, so anyone who tries connecting to your server too many times within a short period will be locked out for a while. To tweak this setting, click on “Autoban” under Edit > Settings, but the default will suffice for most people.
One last note on the security of this FTP server: transmissions are in clear-text, so don’t use plain FTP to transfer anything confidential. SFTP or FTPS can be used for encrypting FTP communications, and it’s easy to setup FileZilla to work with SFTP or FTPS.
Windows Firewall Exception
If you have a third party firewall or anti-virus program, be sure that the port you’ve chosen to run your FTP server on is allowed through it. If you have Windows Firewall enabled, you’ll need to add an exception for the port. Go to your Start menu and type Windows Firewall, then click on “Windows Firewall with Advanced Security.”
Click on “Inbound Rules” in the left column, and then “New Rule…” in the right column. We’ll be allowing a port through the firewall, so select Port when the wizard asks “What type of rule would you like to create” and then click next.
Type in the port you have chosen for your FTP server to run on (default is 21, but in this guide we chose 54218).
Click next three times after entering your port number. Put in a name and description for this exception so it’s easy to find in the future, and then click Finish.
Mapping the FTP Share on another Computer
Now that the FTP server is completely set up, we can have other people connect to it with the user information we provide them (also make sure you have allowed their IP address). Others could always use GUI applications such as FileZilla to connect to your FTP share, or they could map it to their computer so it shows up in Explorer.
Open ‘Computer’ and right click in a blank area, then select “Add a network location.”
The “Add Network Location” wizard will appear, click next twice. Enter the IP address and port of your FTP server, and click next.
Uncheck “Log on anonymously” and enter the username you have configured for your FTP server. Click next twice and then click finish. It should ask you for your password, and then you will be able to browse to the FTP share as if it were a local hard drive.
Set Up an FTP Server on Windows
How to set up an FTP server
FTP functions on a client-server model. The server hosts the files to be shared and the client provides the interface to access, download, or upload files to the file server. The computers transferring the files can be within the same network where the FTP server is configured, as well as outside the network (over the internet). FTP uses two ports, one for connection and one for sending data.
Most organizations prefer passive mode. In this mode, the client initiates both channels; therefore, the organization has little or no alterations to make on the client firewall. The connection is from the client to the server, and the data will be return traffic to the client. Overall, organizations can allow their users (clients) to connect to FTP servers without compromising network security.
Setting up FTP in passive mode
Primarily, the command channel is opened by the client to the FTP server on port 21. The client also opens two random, unprivileged ports on the client (typically a port greater than 1023). We’ll call the first port P and the second port P+1. The FTP client initiates the connection to the server by sending a PASV command. The client connects to the server from port P to server port 21 with the PASV command. The server then opens another unprivileged port Q (any port greater than 1023) and sends the port information back as a reply to the PASV command. Now the client initiates the connection from port P+1 to port Q on the server to start the data transfer.
Opening up channels on FTP client and server
Client side: Data and other communications from the client should reach the FTP server. Make sure you allow outgoing data and other communications from the client to go to the FTP server.
Server side: Port 21 should be open, as it receives the PASV command for initiating the connection. The port used by the server to respond to the client can be anything between Port 22 to 1022. Because the FTP server specifies a random port (anything greater than 1023), those ports should be open for communication.
Prerequisites
“ICACLS «%SystemDrive%\ftp\ftproot» /Grant IUSR:R /T”
«%SystemDrive%\ ftp \ftproot»
Or the path to the root folder should be set as the path for your FTP site. Even the software firewall (like Windows firewall or Symantec) should allow connections to the FTP server.
Enabling FTP in Windows if IIS is not installed
In this example, we’ll use Windows Server 2008 R2 to configure FTP.
If IIS is not installed:
Enabling FTP in Windows if IIS is already installed as a web server
Transferring files
To transfer files, you should add an FTP site. Once the FTP site is enabled, clients can transfer to and from the site using the FTP protocol.
Setting up an FTP site
How does FTP basic authentication work?
Basic authentication means there’s no encryption used. Thus, username/password are sent in clear text. Basic authentication matches the username/password from the Active Directory database. You can also create accounts in IIS. This can be done from under Management Tools in Web Server (IIS) role.
How to setup FTP Server
FTP (File Transfer Protocol) allow clients to transfer/download/upload their files using File Transfer Protocol. FTP is very useful for Shared Hosting Service providers, Internet Service providers etc. to allow their clients to upload/download/transfer files through FTP. In Windows Server 2008 R2 Microsoft FTP 7.5 is available as Role Service for Web Server (IIS 7.5). FTP 7.5 is tightly integrated with Web Server (IIS 7.5). Before installing FTP make sure Web Server (IIS) is installed, refer Install IIS on Windows Server 2008. In this article we are going to see how to setup a shared FTP Server for allowing clients of a Shared Web Server to transfer contents of their websites.
Install FTP for IIS 7.5 on Windows Server 2008 R2
Click Start >> Administrative Tools >> Server Manager. In the Server Manager hierarchy pane expand Roles and then click on Web Server (IIS).
Click on Add Role Services which will launch Select Role Services window as shown below. Select FTP Service and FTP Extensibility services from the list. Click Next.
On Confirm Installation Selections page click Install.
On Installation Results page click Close to exit the Add Role Services wizard.
Check Firewall Rules to Allow inbound FTP Traffic
After installation of FTP Server make sure that there are Inbound firewall rules in place to allow inbound FTP traffic. To check this follow below steps:
Click Start >> Administrative Tools >> Windows Firewall with Advanced Security and then click on Inbound Rules and check if three inbound firewall rules exists as highlighted in below snapshot.
If these rules doesn’t exists then create them.
Create a FTP Site using the FTP Site Wizard
We installed FTP for IIS 7.5 and also checked/created firewall rules to allow inbound traffic necessary for serving FTP services. However without creating a FTP Site, the FTP Server doesn’t listen on port 21 and you can not connect to the FTP Server. Now we will create a Default FTP Site.
Click Start >> Administrative Tools >> Internet Information Services (IIS) Manager.
Expand the Server from server hierarchy pane and then expand sites.
Right click on Sites and then click on Add FTP Site…
Add FTP Site: FTP Site Information
Add FTP Site: FTP Binding and SSL Settings
Add FTP Site: Authentication and Authorization Information
Planning directory structure for FTP Server
The FTP Server we setup above allows all clients to logon to the FTP Server and all FTPUsers are granted access of the ftproot folder (i.e. %systemdrive%\inetpub\ftproot). As we are going to configure a shared FTP Server to allow customers of a Shared Web server to manage contents of their websites and accounts, the directory structure must be planned accordingly. Directories must be organized in such a way so that we can easily manage and allow clients to access their respective directories only. I have designed a directory structure as given below for my shared FTP Server.
Parent Directory (%systemdrive%\HostingSpaces)
The parent directory which will contain sub-folders for each customer. I created %systemdrive%\HostingSpaces directory which will hold a sub-directories in it for each of client.
NTFS Permissions for this directory:
Client’s Home Directory (client1, client2 etc.)
Each shared hosting customer will have it’s own directory created under the parent directory and each directory must be named after Windows Local User account name created for that particular customer. Initially I have two customers respectively client1 and client2 and hence I created two directories client1 and client2 in parent directory (%systemdrive%\HostingSpaces), also create two Windows Local User account client1 and client2 and add them to FTPUsers group as discussed in Local Users, local group and local security policies on Windows Server 2008. Each client’s home directory must be given read/write permissions to that specific customer user account e.g. client1’s home folder is client1 and it must be given read/write permissions to user client1.
NTFS Permissions for these directories:
Content Directories
Client can upload anything to this directory. By default it contains client’s hosted domains here i.e. client1domain1.com, client1domain2.com etc., which will further hold website contents in wwwroot directory, data in data directory and logs in logs directory.
FTP User Isolation
The FTP Site we recently created (Default FTP Site) allows each client session to start in the root directory of FTP Site i.e. %systemdrive%\inetpub\ftproot, because there is not FTP User Isolation configured on this FTP Site so far. By default FTP Site is configured to “Do not isolate users. Start users in: FTP root directory” which allows every ftp session to start in ftp root directory of the FTP Site.
We want to configure FTP Site such that each customer account must have access to it’s own folder only and each customer’s FTP session must start in it’s own home (root) folder named after it’s username. Microsoft FTP support one such FTP User Isolation mode called “Isolate users. Restrict users to the following directory: User name directory (disable global virtual directories)“. This mode requires us to create a folder named LocalUser under root of the FTP Site (%systemdrive%\inetpub\ftproot\LocalUser) which will further contain customer’s home folder (i.e. client1, client2 etc.). However I don’t want to put customers folder in %systemdrive%\inetpub\ftproot\LocalUser folder instead I want to put all those folders in %systemdrive%\HostingSpaces folder. To accomplish this we will need to create a Virtual Directory called LocalUser under recently created FTP Site which will point to physical folder %systemdrive%\HostingSpaces folder. To create Virtual Directory follow below steps:
Create Virtual Directory
Finally configuring FTP User Isolation
Testing FTP Server
We have successfully setup FTP Server and now it’s time to check if everything is working fine. We can check FTP Server connectivity either using ftp command or using any FTP Client like FileZilla Client.
Testing FTP Server using ftp command:
Checking FTP Server using FileZilla FTP Client
We can also check FTP Server by using GUI based FTP client like FileZilla Client. Simply download the FileZilla Client and then install, after installation launch FileZilla.
So that’s it for FTP Server for now. As far as more FTP Server settings are concerned I will be putting it under comments area of this article. Later we will see how to create website in IIS 7.5.
FTP сервер: как подключиться к нему и скачать файлы. Пример создания своего FTP сервера (доступного по локальной сети и Интернету)
Доброго времени!
Решил ответить на вопрос не только в комментариях, но и более развернуто в заметке (+ попутно разобрать еще неск. типовых вопросов по этой теме).
Для справки (чтобы было понятно начинающим о чем пойдет речь) :
Теперь к практике. 👌
FTP: «разбор» по шагам
Как подкл. к FTP серверу и что-нибудь скачать (загрузить)
Windows
Для подключения к FTP серверу понадобятся следующие вещи:
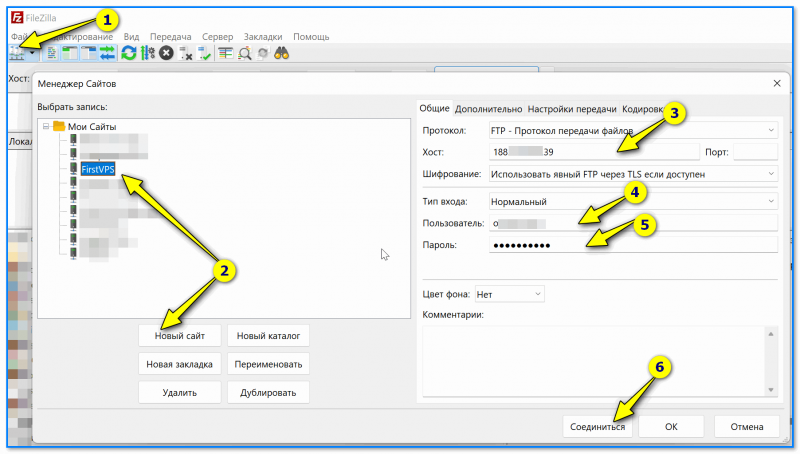
Установка у FileZilla стандартная, поэтому ее опускаю.
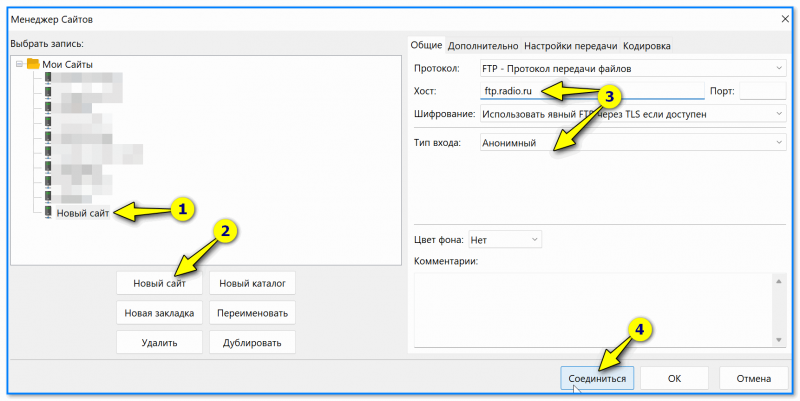
После запуска FileZilla нужно:
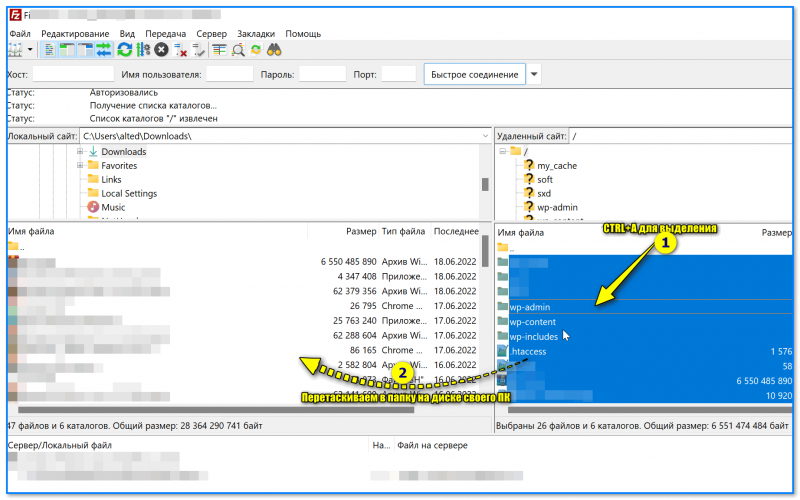
📌 Если данные введены корректно и вы подключились к серверу — то вы увидите два окна: слева — это ваши файлы (папка «Download» в Windows); справа — папка сервера.
Теперь для скачивания файлов с сервера (или загрузки их на него) достаточно их выбрать и мышкой перенести в свое левое окно (см. пример ниже 👇). Сразу после этого должна начаться загрузка (время зависит от вашей скорости интернета и скорости работы сервера)!
В общем и целом, всё просто! 👌
Кстати, неск. популярных ошибок при подкл.:
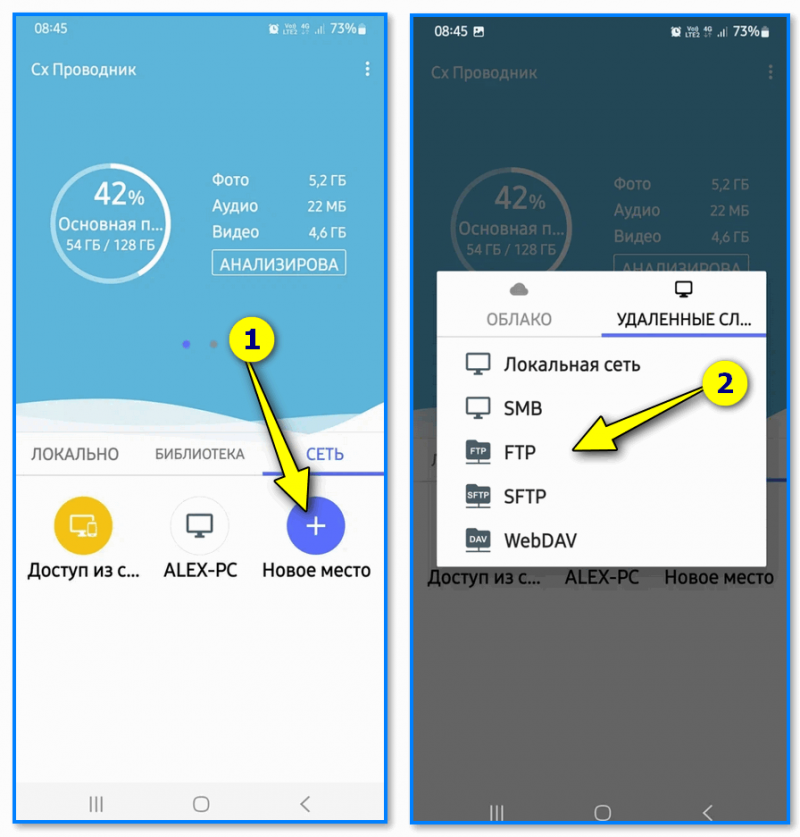
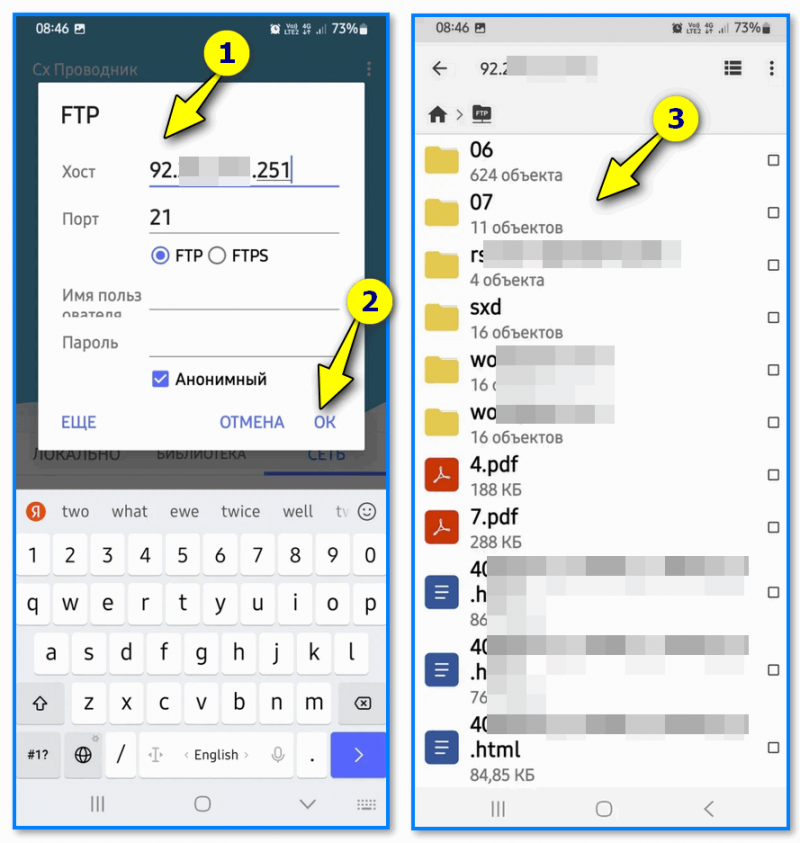
Android
Скриншот. Соединение успешно, можно загружать файлы с FTP
Как создать свой FTP сервер (кратко)
Хочу рассмотреть макс. приближенные к жизни варианты. Чаще всего многие хотят запустить такой сервер либо на домашнем ПК с Windows, либо где-нибудь в Интернете для раздачи своих файлов (я решил показать, как это делается с личным арендуемым VPS // прим.: беспл. варианты не надежны, и надолго их не хватает! А VPS вы можете арендовать даже за 3 руб. в день! ).
Вообще, FTP сервер (в некоторых случаях) очень полезная штука — позволяет подключиться к своим папкам и файлам из любой точки, загрузить их, и использовать! Причем, качать с него можно файлы любых размеров (и при обрыве сети продолжить их загрузку). Согласитесь удобно?! 👌
На своем ПК с Windows (с возможностью подкл. из интернета)
На мой взгляд для этого дела гораздо удобнее использовать сторонние приложения, нежели какие-то встроенные в Windows компоненты. Мне импонирует 📌Xlight FTP Server (ссылка на офиц. сайт). Именно в нем и рассмотрю процесс (установка у программы стандартная, поэтому ее опускаю).
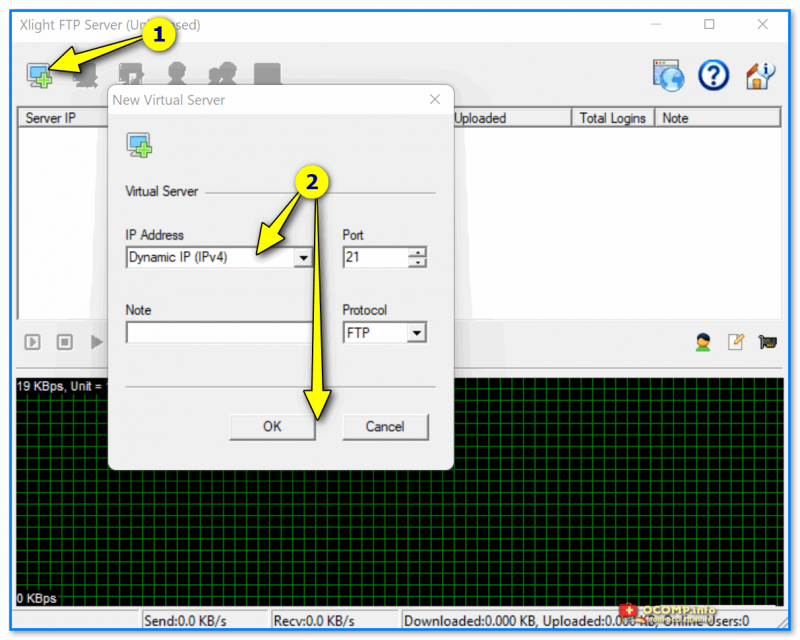
1) Итак.
Скриншот. Xlight FTP-сервер — создаем новый виртуальный сервер
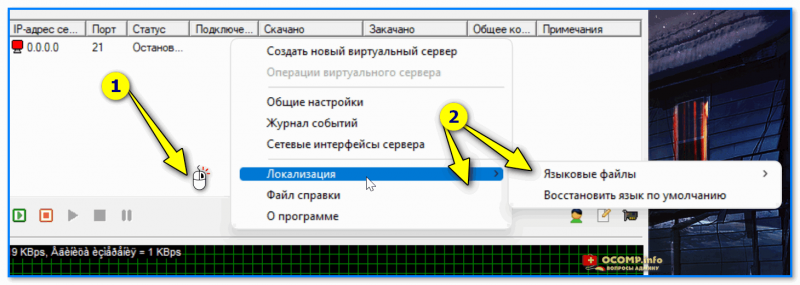
2) Этот шаг можно пропустить. Мы в нем вкл. русский язык.
Для этого в окне программы нужно нажать ПКМ (правую кнопку мыши) по свободному месту и выбрать вкладку «Локализация / Localization» — в списке будет представлено неск. языков, в том числе и «Великий и Могучий. «.
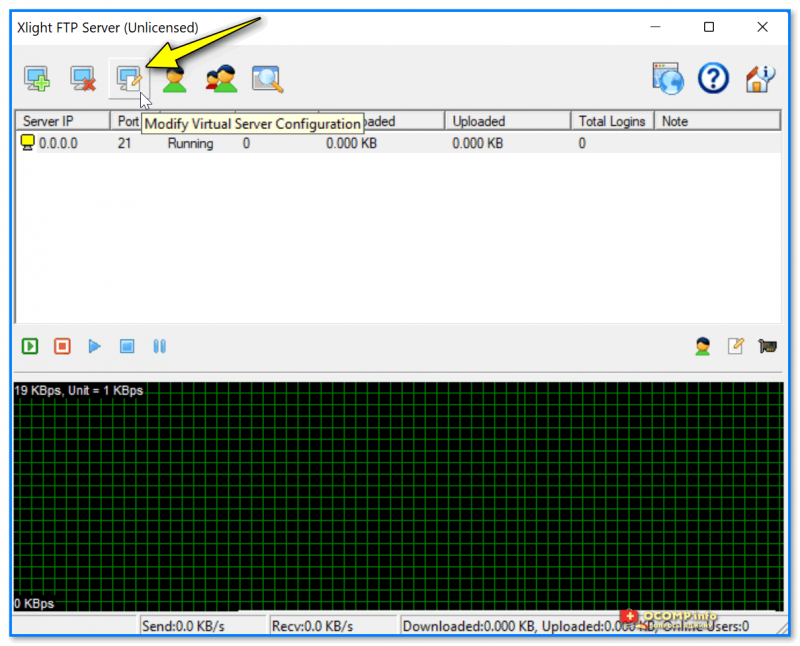
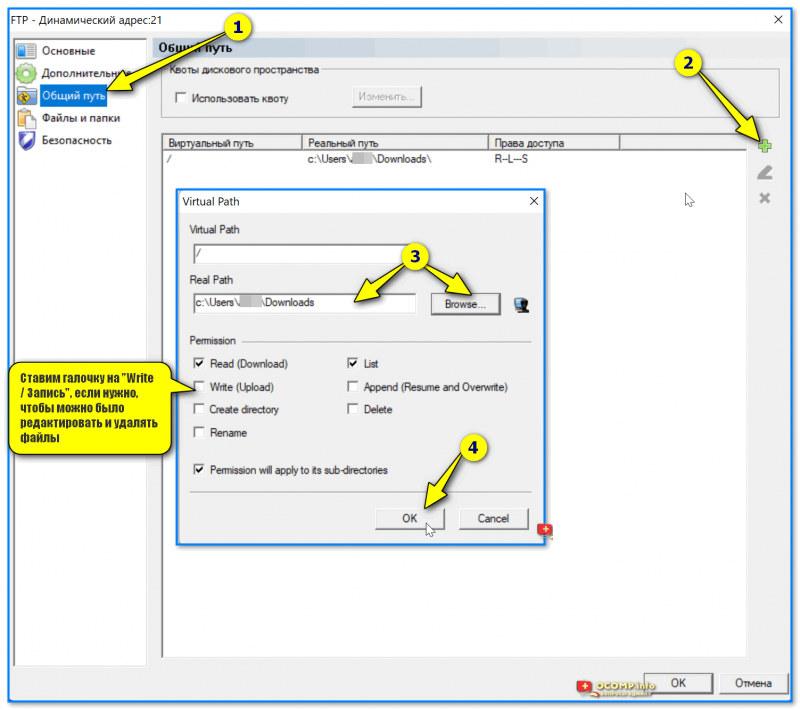
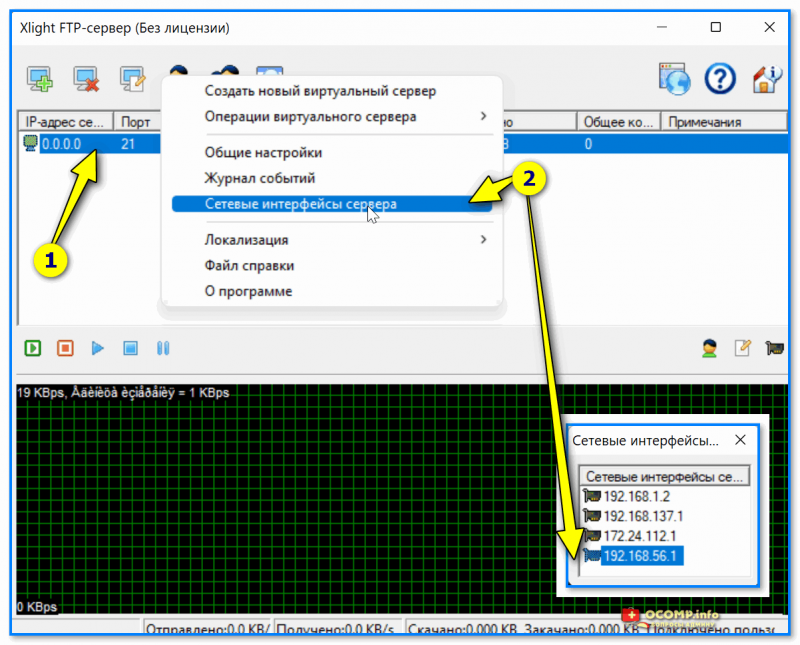
Скриншот. Открываем настройки FTP сервера
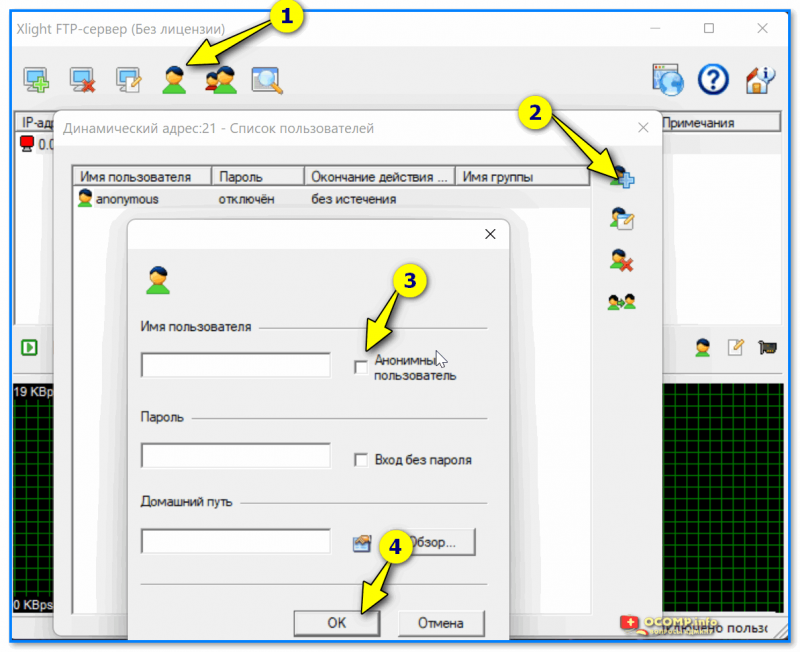
4) Теперь нужно создать пользователя. Для этого нужно кликнуть по значку с человечком, затем на «плюсик», указать логин и пароль (либо указать анонимный вход), и нажать OK.
Скриншот. Создаем анонимного пользователя
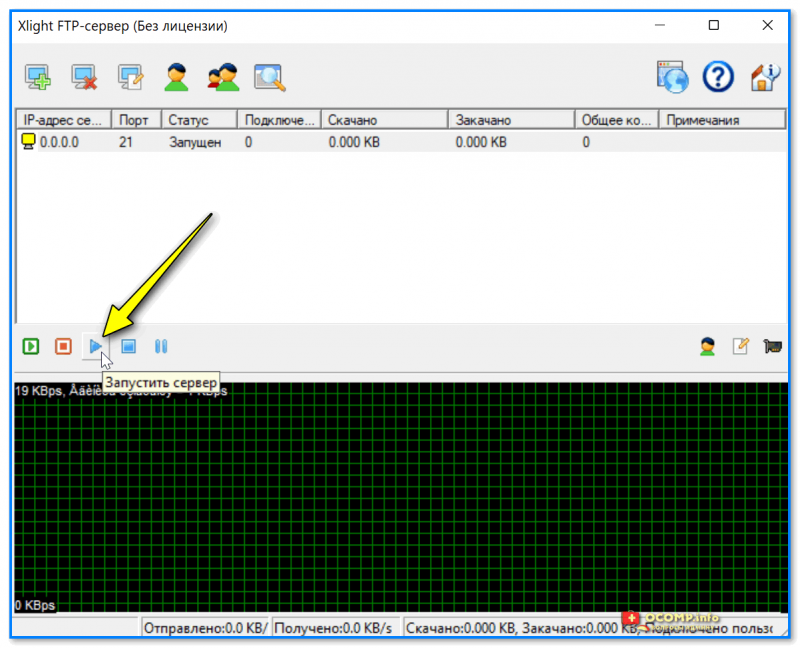
Скриншот. Запускаем сервер!
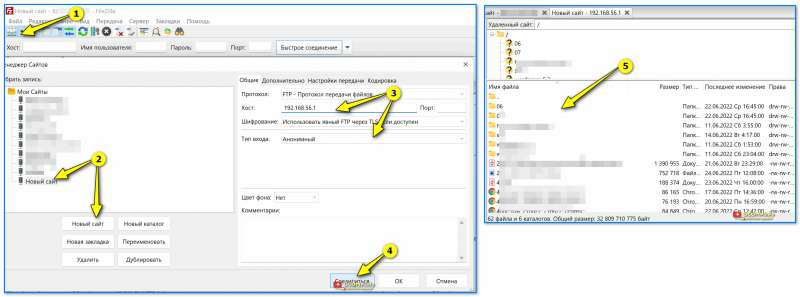
7) Собственно, чтобы подкл. к FTP-серверу по этому IP — достаточно запустить FileZilla, создать новое подключение и ввести этот IP-адрес. См. пример ниже, всё работает! 👌
Важно! Этот IP-адрес (вида 192.168.56.1) вы можете использовать только в своей локальной сети, например, среди ПК и ноутбуков, подключенных к одному Wi-Fi роутеру.
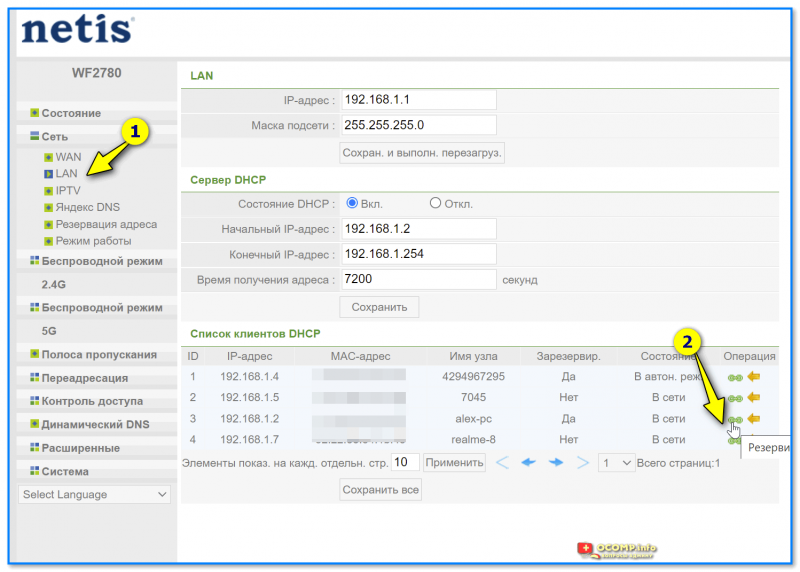
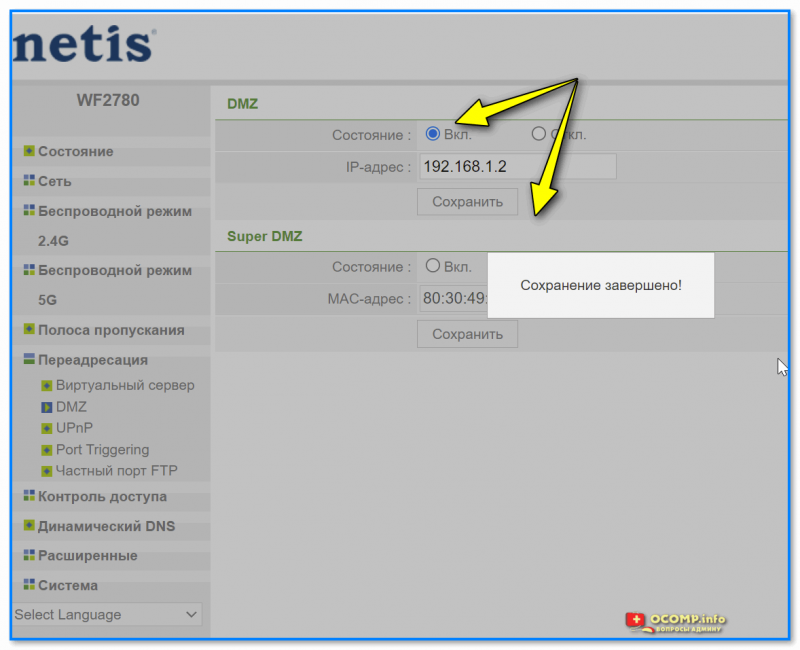
Что нужно сделать для открытия доступа из интернета к FTP серверу:
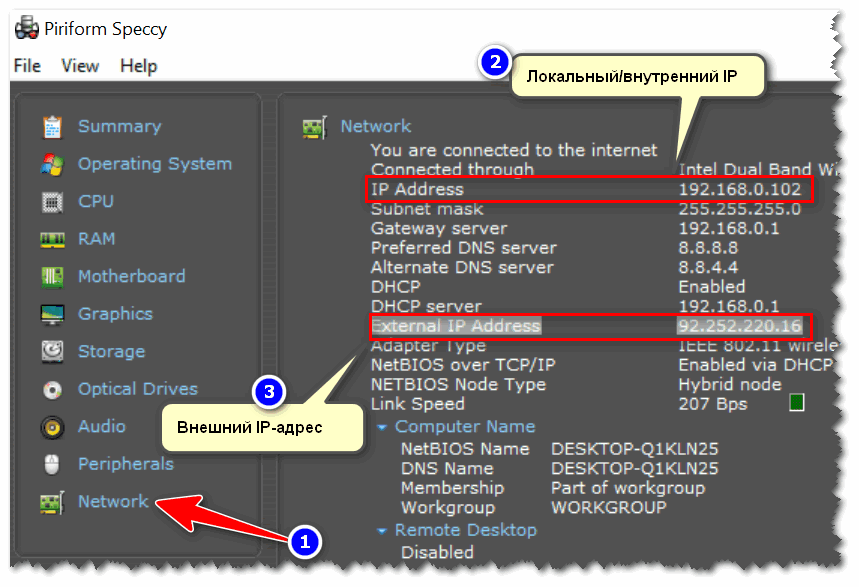
После этих действий по вашему внешнему IP адресу (который мы посмотрели в Speccy чуть выше в заметке) можно будет подкл. к FTP серверу. Задача решена?! 👌
Если у вас VPS сервер с Linux
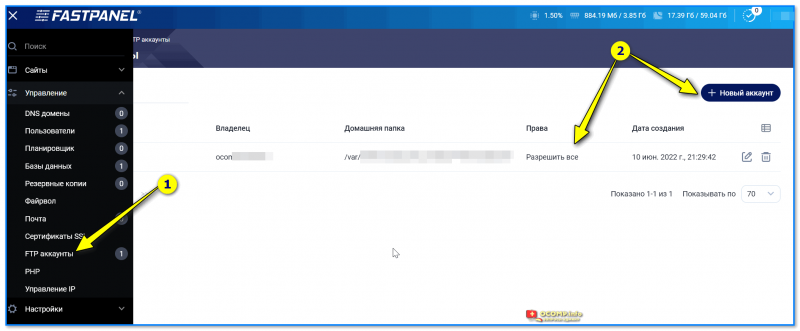
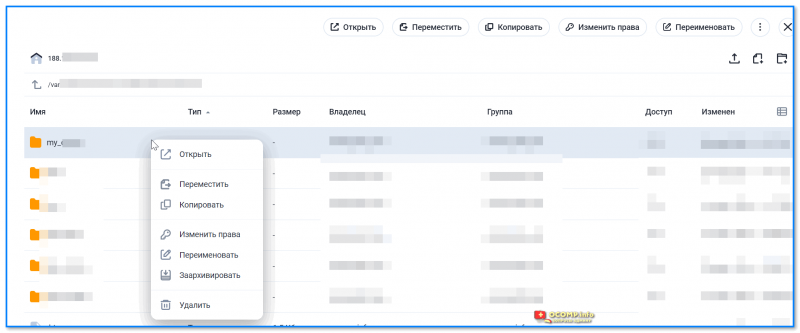
Скриншот. FastPanel для управления сервером
