How to make screenshot on windows 10
How to make screenshot on windows 10
Use Snipping Tool to capture screenshots
Take a snapshot to copy words or images from all or part of your PC screen. Use Snipping Tool to make changes or notes, then save, and share.
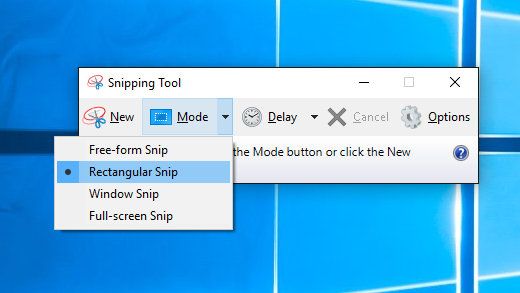
Capture any of the following types of snips:
Draw a free-form shape around an object.
Drag the cursor around an object to form a rectangle.
Select a window, such as a dialog box, that you want to capture.
Capture the entire screen.
When you capture a snip, it’s automatically copied to the Snipping Tool window where you make changes, save, and share.
Open Snipping Tool
Select the Start, enter snipping tool, then select Snipping Tool from the results.
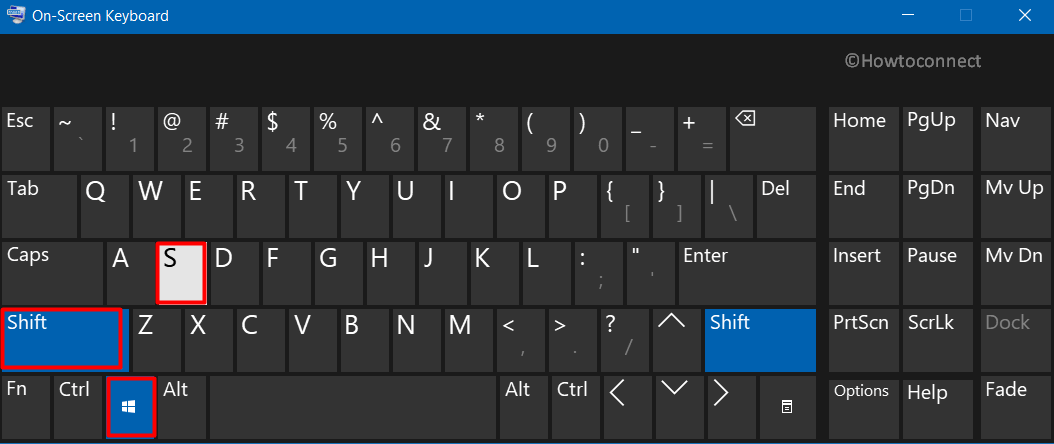
Press Windows logo key + Shift + S.
For Windows 8.1 or Windows RT 8.1
Swipe in from the right edge of the screen, select Search, enter snipping tool in the search box, and then select Snipping Tool from the list of results.
Select Start, then enter snipping tool in the search box, and then select Snipping Tool from the list of results.
Work with your screenshots
With your Snipping Tool open, select one of the following to create and work with your screenshots.
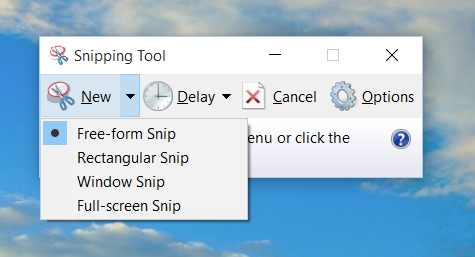
In Snipping Tool, select Mode. In earlier versions of Windows, select the arrow next to the New button. Next, when you choose the kind of snip you want, you’ll see the whole screen change slightly to gray. Then, choosing from anything currently displayed on the screen, select the area of your screen that you want to capture.
After you open Snipping Tool, open the menu that you want to capture. For Windows 7, press the Esc key before opening the menu.
Press Ctrl + PrtScn keys. The entire screen changes to gray including the open menu.
Select Mode, or in earlier versions of Windows, select the arrow next to the New button. Select the kind of snip you want, and then select the area of the screen capture that you want to capture.
After you capture a snip, you can write or draw on or around it by selecting the Pen or Highlighter buttons. Select Eraser to remove the lines you’ve drawn.
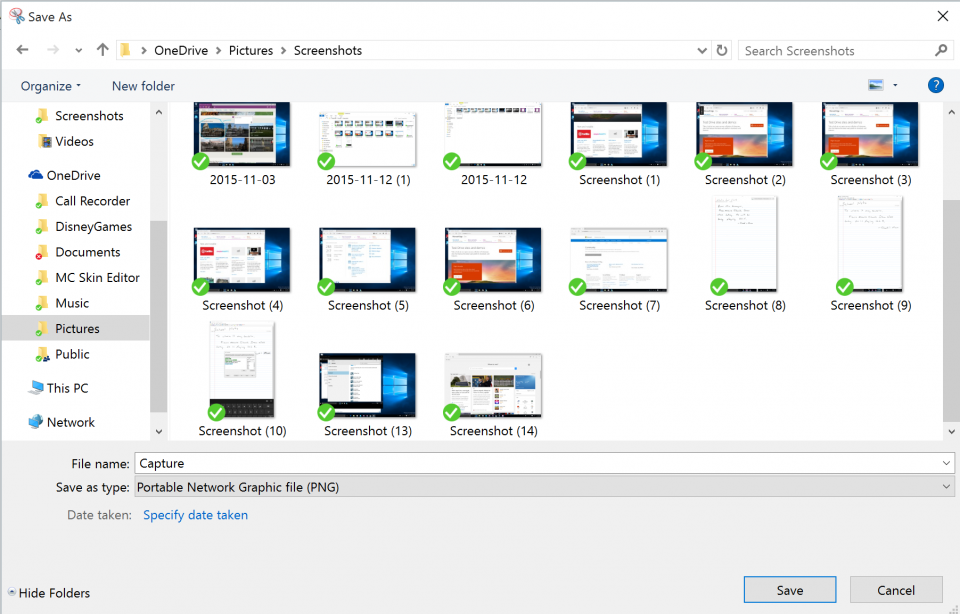
After you capture a snip, select the Save Snip button.
In the Save As box, type a file name, location, and type, and then select Save.
When you capture a snip from a browser window and save it as an HTML file, the URL appears below the snip. To prevent the URL from appearing:
In the Snipping Tool, select the Options button.
In the Snipping Tools Options box, clear the Include URL below snips (HTML only) check box, then select OK.
After you capture a snip, select the arrow next to the Send Snip button, and then select an option from the list.
8 ways to take a screenshot on Windows 10 and Windows 11
Twitter LinkedIn icon The word «in».
LinkedIn Fliboard icon A stylized letter F.
Flipboard Facebook Icon The letter F.
Email Link icon An image of a chain link. It symobilizes a website link url.
If you need to capture a screenshot of something on your computer, both Windows 10 and Windows 11 offer a variety of methods for doing just that.
Whether you want to save the entire screen or just a piece of it, we’ve rounded up all the best ways to take a Windows screenshot.
The Print Screen button
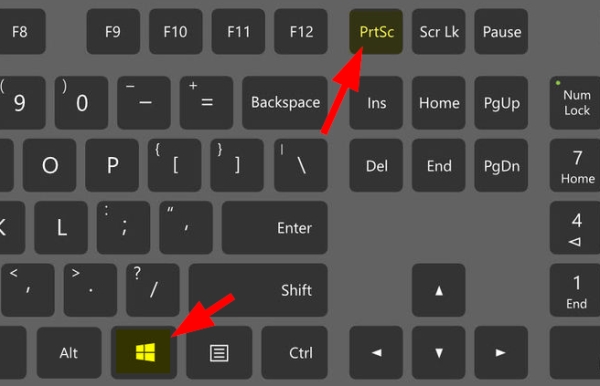
The easiest way to take a screenshot on Windows 10 or Windows 11 is with the Print Screen (PrtScn) key. To capture your entire screen, simply press PrtScn on the upper-right side of your keyboard.
In Windows 10, the screenshot will be copied to your clipboard. To save the file, paste the screenshot into any program that allows you to insert images, like Microsoft Word or Paint.
In Windows 11, pressing the PrtScn button will save the screenshot to your computer’s dedicated Screenshots folder — you can find it by opening the File Explorer and clicking Pictures on the left side. And if you have it enabled, it’ll also save the screenshot to your OneDrive.
The Windows key + Print Screen
To take a screenshot on Windows 10 and automatically save the file, press the Windows key + PrtScn. Your screen will go dim and a screenshot of your entire screen will save to the Screenshots folder.
In Windows 11, pressing the Windows key + PrtScn will save a picture of your entire screen to the Screenshots folder and copy the picture to your clipboard. This will let you immediately paste the picture onto a social media post, art app, and more.
Alt + Print Screen
To capture only the active window you’re working in, press Alt + PrtScn. In Windows 10 this will copy it to your clipboard, so you’ll need to paste it into another program to save it; in Windows 11, it’ll both copy and save it to the Screenshots folder right away.
The Snip & Sketch tool in Windows 10
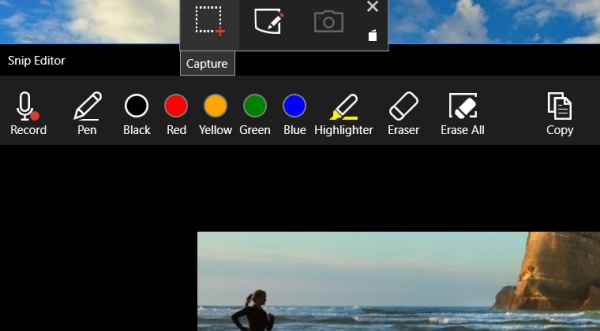
Windows 10’s Snip & Sketch is the best way to screenshot on Windows if you’re looking to customize, annotate, or share your screen captures.
To activate Snip & Sketch, use the keyboard shortcut Windows Key + Shift + S. Your screen will dim and a mini menu will appear at the top of your screen, giving you the option to take a rectangular, free-form, window, or full-screen capture.
With these Snip & Skitch options, you can choose how you’d like to take a screenshot:
| Mode | Function |
| Rectangular | Size a rectangle for your screenshot. |
| Free-form | Draw free-hand with your cursor. |
| Window | Choose a specific window to capture. |
| Full-screen | Grab an image of your entire screen. |
After you capture the screenshot, it’ll be saved to your clipboard and a preview notification will appear in the lower-right corner of your screen.
Click on the preview notification to open the Snip & Sketch app and save, share, or edit the screenshot with the available drawing tools.
The Snipping Tool in Windows 11
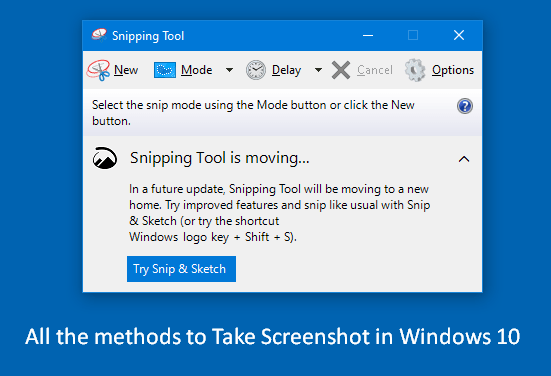
The Snipping Tool exists in Windows 10, but it’s not usually the screenshot tool you’ll want to use. But in Windows 11, the Snipping Tool got a major upgrade, and it’s now the best way to take custom screenshots.
To start the Snipping Tool in Windows 11, you can search for it or just press the Windows Key + Shift + S. Like with Snip & Sketch, your screen will dim and a toolbar of screenshot options will appear at the top of the screen. This toolbar will let you take a rectangular, freeform, full-window, or full-screen capture.
Once you’ve taken your screenshot, it’ll be copied to your clipboard so you can share it right away. And if you click the preview that pops up in the bottom-right corner of your screen, you’ll be able to save and edit it.
The Game Bar
The Game Bar is an overlay you can use within most Windows apps and games to take screenshots and record video. To open the Game Bar, press Windows Key + G.
Quick tip: If the Game Bar doesn’t open, make sure it’s enabled. To enable the Game Bar, search «Game bar settings» and in the menu, toggle on «Record game clips, screenshots, and broadcast using Game Bar.»
On the overlay menu, click the camera icon to capture a full-screen screenshot. You can also record a video clip by pressing the record button, with the option to include audio by clicking the microphone icon.
Screenshots and video clips captured by the Game Bar are saved in PNG format to the Videos > Captures folder. You can also find it through the Game Bar, by clicking «Show all captures» underneath the screenshot and recording buttons.
Power + Volume Up
To take a screenshot on Windows 10 with a Microsoft Surface device, press the Power Button + Volume Up Button. The screen will dim, and your screenshot will save to the Pictures > Screenshots folder.
Important: To take a screenshot on a Surface 3 or earlier, you’ll need to press the Windows Logo + Volume Down Button.
Third-party screenshot apps for Windows
If you’re unsatisfied with any of the built-in Windows methods, there are third-party screenshot tools worth considering, each with their own extra offerings.
How to Take Screenshot in Windows 10
Ways to Take Screenshot in Windows 10 using all the methods such as built-in tools, 3rd party utilities, and browsers.
Oftentimes when working on a computer, the most interesting question that might come to mind is How to Take Screenshot in Windows 10. The need for capturing screen events depends on person to person. Most of the time, it is useful during sharing an image from PC, presentation, education and so on. But each one of you might have a different type of screenshot requirements. Some may want to capture only the active window; whereas a few of them prefer a full-screen snap. Or if you are a game lover, then capturing the achievements with a screenshot might be a preference.
Windows 10 itself includes a wide range of built-in options that satisfy most of the screenshot requirements. However, there are multiple Windows applications, paid or free that lets you take snapshots. So in this article, you will see all the built-in tools, 3rd party apps, and also the way to take screenshots on web pages as well. Let us explore the below section to get familiar with all the methods –
Take Screenshot in Windows 10
Here is How to Take Screenshot in Windows 10 –
Way-1: Using Built-in Tools
Windows 10 includes some impressive tools that let you easily capture the screen happenings. Among them, some are certain keyboard shortcuts as well. Let us explore all of them in detail –
1] Keyboard Shortcut – Print Screen – Quickest and easiest way
The simplest method to take screenshot in Windows 10 requires a tap on the PrtScn key only. After this action, Windows will capture the entire screen and will further save the same in the clipboard. Here are the steps –
2] Windows key + Print Screen
Another easy way to take screenshot in Windows 10 is by using Windows+PrtScn. It does not require any image editor to save the snapshot. By default, it automatically stores it in the Screenshot folder.
3] Windows key + Shift +S
“Win logo+shift+S” immediately launches Snip & Sketch app on the screen. It will dim the screen briefly and the tiny menu will appear on the top of the screen. Just go ahead with the type of snip you prefer to capture.
4] Alt + Print Screen
To take screenshot of an active window, this keyboard shortcut works wonderfully. See the steps below to do the same –
5] Windows Logo + Volume Down (For Surface users)
This method is applicable to users with Microsoft Surface device. Just like people take entire screen screenshot on any smartphone or tablet, here also the physical buttons will do the job.
6] Screen Snip
You will get this Screen Snip option in the Action Center. This will launch the Snip & Sketch app to proceed further.
7] Snipping Tool
This is one of the oldest desktop apps in Windows 10 for taking screenshots. It provides several snipping options with a few editing tools as well.
8] Snip & Sketch
Basically, this is meant to replace the traditional Snipping Tool. As the name suggests, the main function of this tool is to modify the screenshots after you capture them. Similar to Snipping tool, it also provides four types of snip to choose from.
9] Game Bar
Way-2: Take Screenshot in Web Browsers
1] Firefox
2] Chrome
Way-3: Take Screenshot Using OneNote
Microsoft Office OneNote gives you the ability to capture screenshots of web pages or other applications. All you need to do is –
Note – This method is not applicable to the built-in Windows 10 OneNote app.
Way-4: Take Screenshot in Windows 10 Through 3rd Party Tools
Plenty of third-party utilities are available on the Internet that lets you take snapshots. Some of the interesting tools are –
1] Lighshot
2] ShareX
Download the Sharex application first. Install it following the guide suggested on-screen suggestions.
Take Screenshot in Windows 10 –
To snap overall screen – Full screen
To take screenshot with cursor visible of a decided segment – Region.
For recording the movements on system’s screen – Screen recording.
In addition a few more options
To draw the snap for only write up of a web page – Text Capture (OCR)
To snap the complete web page – Webpage capture
Record screen for Animation – Screen recording (GIF)
How to Take a Screenshot on Windows 10
The release of Windows 10 has brought a lot of changes in its displays and performances. Along with the new appearance, there are also some new and cool features. For example, you can now surf the Internet with its new browser Edge and record screen with its Game DVR. If you are willing to show things you’ve discovered on this new operating system, screenshots will be of great help. Also, if you need to ask for troubleshooting, show steps of using an application or collect images for articles about Windows 10, screenshots are always the best way for you. Therefore, this article gives you several methods on how to take screenshot on Windows 10.
Easy Ways to Screenshot on Windows 10
Apowersoft Free Screen Capture
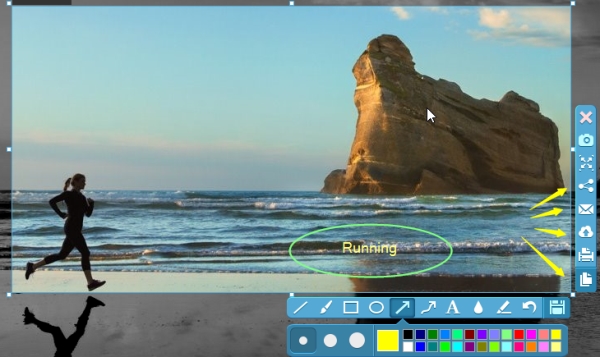
This is a free online screenshot application. It is capable of capturing full screen, active window and particular region of the screen. It also provides a delay time option for capturing drop-down menus or tooltips, then you can set a delay time in its “Options”. Apart from taking screenshot, this tool also provides a quick image editor for you to annotate the screenshot with arrows, lines, and texts. You can also use its blur feature to cover private or sensitive info on the screenshot. What’s more, when the screenshot is done, this tool allows you to copy, save, email, upload or share it directly.
Follow the steps below to learn how to take a screenshot on Windows 10 with this tool.
This application has a pro version which comes with more than 10 screenshot modes, allowing you to capture not only visible things on the screen, but also the contents beyond the screen in a scrolling window. In addition to that, it also has a Task scheduler for you to take screenshots automatically and a Screen recorder for making screencasts by yourself. Try it now by clicking the button below.
Win + Print Screen Key Combination
There is a simple and fast way to screenshot Windows 10. Just press the “Win + Print Screen” key combo. After that, your screen will dim for a moment, and you can then find the screenshot in the “Screenshots” folder under the “Pictures” library. In some cases, the screenshot may also be copied to the clipboard, so you can’t find the “Screenshots” folder in “Pictures” library. Open Paint (input “Paint” in the search box) and paste the screenshot on its blank board, hit “Save” to keep it as an image file on your PC. However, this way only enables you to capture the full screen. And if you want to crop or annotate the screenshot, you have to turn to another accessory application like Paint.
Snipping Tool
This utility is bundled with Windows 7/8/10. It has four screenshot modes for you to screenshot on Windows 10: Free-form Snip, Rectangular Snip, Window Snip and Full-screen Snip. And there is also a very simple image editor for you to edit the screenshot once you’ve taken it. It is worth mention that a new feature is added to this tool in Windows 10. It gives you 1-5 seconds delay in capturing screen. With this feature, you can screenshot pop-up or drop down menus and tooltips.
This is a new screen capture tool developed by Microsoft. It can be installed on any version of Windows. It allows you to capture anything visible on the screen and provides simple editing options like Snipping Tool does. However, it is superior to Snipping Tool in that it has a screen recorder function. You can record your activities in the drawing board of this application.
Conclusion
This post provides several practical ways on how to screenshot on Windows 10. If you need more annotation options or instant uploading and sharing functions, Apowersoft Free Screen Capture is undoubtedly than other tools. And if you want to take automatic screenshots or record screen, then its pro version is the best choice. Click the download button below to give it shot.
Как сделать скриншот в Windows 10?
17 November 2015 | Пресс-Центр
Снимок экрана, или скриншот, может понадобиться в различных ситуациях. Возможно вы захотите показать что-то на своем рабочем столе, запечатлеть момент игры или «остановить мгновение» во время общения в Skype.
По теме: Новые функции в серии постов Советы по Office и Windows 10
Устройства на базе Windows 10 позволяют сделать это различными способами, некоторые из которых унаследованы от прошлых версий нашей операционной системы.
Стандартные решения
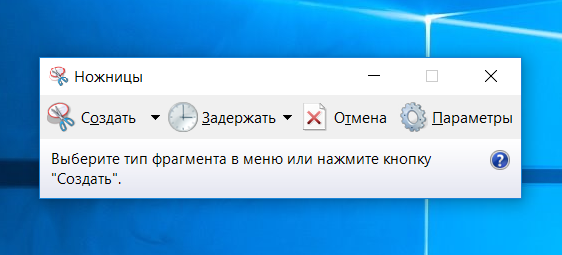
В любом устройстве на Windows 10 есть инструмент «Ножницы». Найти его можно в списке приложений, перейдя во «Все приложения», а потом открыв папку «Стандартные – Windows». Здесь есть различные настройки, ключа формат сохранения (PNG, GIF, JPEG, HTML), выбор области и задержка съемки.
Еще проще воспользоваться горячими клавишами. Нажатие PrtScn влечет сохранение скриншота всего экрана в папке «OneDrive\Изображения\Снимки экрана». Если нажать PrtScn вместе с Alt, будет сделан снимок активного окна, который также сохраняется в облаке.
Если удерживать кнопку Windows и нажать PrtScn, скриншот сохранится в «Этот компьютер/Изображения/Снимки экрана».
Во время игры можно открыть панель Win+G и нажать Win+Alt+PrtScr. Этот снимок отправляется в ваш Xbox. Комбинация Win+N открывает OneNote, а последующее нажатие клавиши с буквой S позволяет вырезать фрагмент экрана и вставить в записную книжку.
Скриншот с планшета
Для моментального снимка экрана пригодится… перо Surface Pen. Двойное нажатие верхней кнопки сохраняет скриншот в соответствующей папке в OneDrive. Однако перо еще и позволяет сразу вырезать нужное. На сделанном скриншоте выделите область проведя от одного угла до противоположного. Как только вы оторвете ручку от экрана, скриншот появится на новой странице в OneNote.
В Surface 3 и Surface Pro 3 самым быстрым способом сделать скриншот было удержание фронтальной кнопки Windows и одновременное нажатие клавиши понижения громкости. Слабо мигание экрана информирует вас, что снимок сделан и сохранен в папке Screenshots. При использовании Surface Pro 4 и Surface Book ввиду отсутствия кнопки Windows, ее место заняла кнопка включения. На Surface Book функция работает независимо от того, подключена клавиатура или отключена.
