How to tune to guitar
How to tune to guitar
How to Tune a Guitar
Perhaps the most frustrating aspect of learning guitar is that it initially seems impossible to play anything that sounds good. While it is true that it takes some time to learn the techniques needed to play songs well, the real reason most new guitarists sound bad is that their guitar isn’t in tune. Here is a guitar tuning tutorial that, with a little practice, should allow you to keep your instrument in tune.
You should tune your guitar every single time you pick it up. Guitars (particularly cheaper ones) tend to go out of tune quickly. Make sure your guitar is in tune when you begin to play it, and check the tuning frequently while you’re practicing, as the act of playing the guitar can cause it to go out of tune.
At first, it may take you five minutes or more to get your guitar in tune, but the more familiar you are with tuning, the more quickly you’ll be able to do it. Many guitarists can get their instrument roughly in tune in about 30 seconds.
Tuning the Sixth String
In order to begin tuning the guitar, you’ll need a «reference pitch» from another source. Once you’ve found a source for this initial pitch (it could be a piano, a tuning fork, another guitar, or any number of other options), you’ll be able to tune the rest of your instrument by using that one note.
Without a reference pitch, you can tune your guitar, and it will sound fine on its own. When you try and play with another instrument, however, you will probably sound out-of-tune. In order to interact with other instruments, being in tune with yourself isn’t enough. You’ll need to make sure that your E note sounds the same as theirs. Thus the need for a standard reference pitch.
Tune your low E string to this note. Repeat the audio track as many times as you need to, in order to try and match the note perfectly.
Tuning to a Piano
If you have access to a piano, you can alternately tune your low E to the same note on the piano.
Look at the black keys on the keyboard of the image above, and notice that there is a set of two black keys, then an extra white key, then a set of three black keys, then a white key. This pattern is repeated for the length of the keyboard. The white note directly to the right of the set of two black keys is the note E. Play that note, and tune your low E string to it. Note that the E you play on the piano may not be in the same octave as the low E string on your guitar. If the E you play on the piano sounds much higher, or lower than your low E string, try playing a different E on the piano, until you find the one closest to your open sixth string.
Now that we’ve got our sixth string in tune, let’s move on to learning how to tune the rest of the strings.
Tuning the Other Strings
Now that we have our sixth string in tune, we need to get our other five strings tuned to that note. Using just a little bit of very basic music theory, we can see how we’ll do that.
We know, from lesson two, that the names of the six open strings are E A D G B and E. We also know, from lesson four, how to count up a string, and find the names of the notes on that string. Using this knowledge, we can count up the low E string (which is in tune), until we reach the note A, on the fifth fret. Knowing this note is in tune, we can use it as a reference pitch, and tune the open fifth string until it sounds the same as the sixth string, fifth fret.
Because this string is in tune, we can assume that this note, A, on the fifth fret, is also in tune. So, we can play the open fifth string, also an A, and check to see if it sounds the same as the note on the sixth string. We’ll use this concept to tune the rest of the strings. Observe the graphic above, and follow these rules to fully tune your guitar.
Steps to Tuning Your Guitar
After you’ve tuned your guitar, check it against this MP3 of a fully tuned guitar, and fine tune it if necessary.
Tuning Tips
Listen to, and play the first note. While the note is still ringing, try humming that note. Continue to play the note, until you’ve managed to match the pitch with your voice. Next, play the second note, and again, hum that note. Repeat this—playing and humming the first note, then follow that by playing and humming the second note.
Now, try humming the first note, and without stopping, moving to the second note. Did your voice go down, or up? If it went down, then the second note is lower. If it went up, the second note is higher. Now, make the adjustment to the second note, until they both sound the same.
This may seem like a silly exercise, but it does often help. Soon, you’ll be able to recognize the difference in pitches without humming them.
As previously mentioned, it’s extremely important to tune your guitar every time you pick it up to play it. Not only will it make your playing sound a whole lot better, but the repetition will allow you to conquer tuning your guitar quickly.
Tuning a Guitar Correctly: A Guide for Beginners
Need to know how to tune a guitar? We’ve got you covered. Let’s dive straight into this essential beginner guide.
You’re at the start of a wonderful journey and we’re so pleased you’re here. 🙂
It’s vital that you learn how to tune a guitar; it’s essential knowledge for a beginner guitarist.
In this free guitar lesson you will learn:
Sound good? Let’s do it.
How to tune a guitar in standard tuning
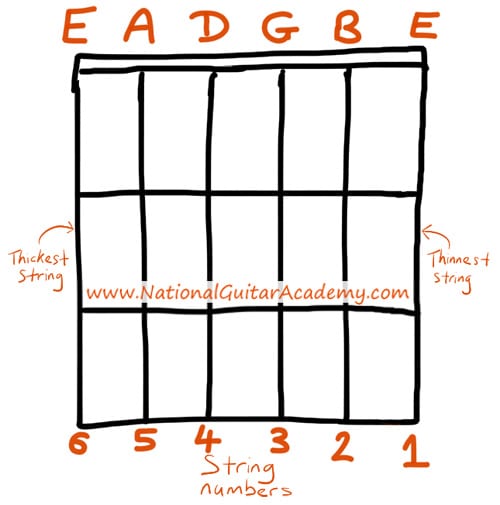
In standard guitar tuning, the notes of the guitar, from thickest to thinnest, are:
E, A, D, G, B, E
(If you don’t understand the above image please read our article «How To Read Guitar Chordboxes In 60 Seconds«. It will make everything clear!)
How to remember the order of the guitar strings
Here are two useful mnemonics to help you remember the order of the six open strings “ E, A, D, G, B, E”.
Pick whichever one you like best, or make up your own. (The sillier the better.)
Now we know the notes we’re aiming for we can tune the guitar
You’ve already learned the first half of how to tune a guitar, well done!
Now we need to look at how to tune a guitar to E, A, D, G, B, E.
How to tune a guitar to E, A, D, G, B, E
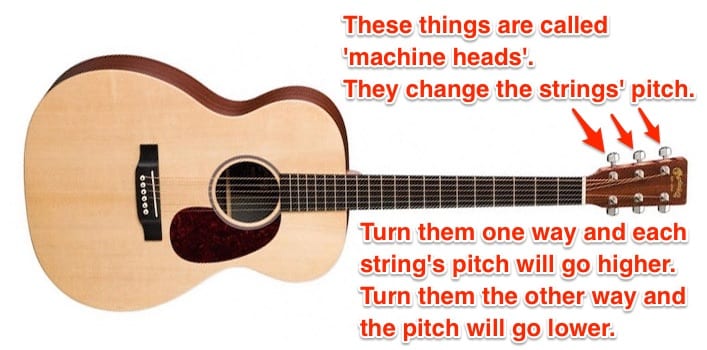
Look at your guitar’s headstock (the thin end of the guitar).
You will see small ‘keys’ that you can turn. We call these ‘machine heads’.
Each guitar string is attached to a machine head of its own. When we turn a machine head, we change the pitch that the guitar string is tuned to.
How do we know what note the guitar string is tuned to when turning the machine heads?
Easy. We use a tuner to tell us! 🙂
If you’re wondering how to tune a guitar with what you have at hand there’s 4 methods (we’ll cover each one in turn):
Learn the 12 EASIEST beginner chords with our famous FREE guide
✓ Stop struggling. Start making music.
✓ This is our most popular guide and it will improve your chord ability quickly.
Our Guitar Courses
Become a better guitarist: Click here to check out our guitar courses
Cool Guitar T-shirts
Look cooler. Check out our merch: Click here to see our merch store
Guitar tuning with an electronic guitar tuner
When people ask me how to tune a guitar I always say the same thing: All things considered, electronic guitar tuners are the best option.
They are fast and accurate. (When you have a decent electronic guitar tuner you simply won’t need to worry about how to tune a guitar again.)
The interface of ALL tuners is broadly the same.
You pluck a note and the tuner shows you the note you played.
The tuner shows you this in three ways:
You need to get the needle in the middle.
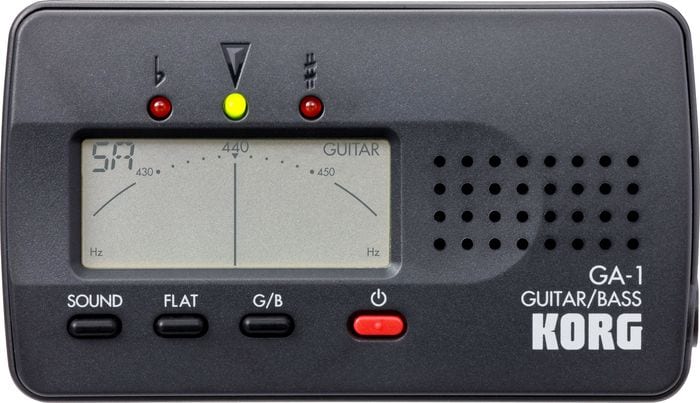
In the picture above the ‘needle’ is perfectly in the middle. (Can you see the thin, black vertical line?)
Because the needle is perfectly in the middle, the green light above it is lit. This note is perfectly in tune!
We can see it’s tuning the A string (the fith string) because in the top left corner it says “5A”.
Got that? Ok, let’s tune up!
1 – Turn the tuner on.
2 – If necessary, tell the tuner the string you want to tune. (Most tuners default to ‘auto-detect’ the strings, but some tuners need to be manually told what string you want to tune.)
Important! If your tuner is manual, then make sure your tuner is ‘listening’ for the correct string that you want to tune. If the tuner is set to ‘listen’ to a different string to the one you are tuning you may overtune the string and it will snap!
3 – Pluck a string.
4 – Look at the tuner. Is the needle in the middle? If not turn the machine head one way or the other.
5 – Pluck again. Which way did the needle go? If it went towards the middle, keep going! If it went away from the middle, turn the machine head in the opposite direction.
6 – Repeat the cycle of A) pluck string B) look at tuner and C) turn machine head until the needle is in the middle.
While tuning, pluck the string a LOT.
Most beginners are quite timid and pluck once and then wait for ages while the tuner ‘listens’ for a note that’s stopped ringing.
Don’t do this. You should pluck, pluck, pluck away!
The more your guitar is ringing out a note the easier it is for the tuner to hear, so pluck lots. (About once a second is ideal.)
If you want to learn more about the notes of the guitar fretboard read our article:
There are 3 different types of electronic tuner.
Ideally, we want you to know how to tune your guitar with all three.
It’s pretty easy: ‘get the needle in the middle’ remains our aim.
Vibration-based electronic tuners
Vibration-based tuners clip on to your guitar’s headstock. I love these!
They are brilliant if you’re in a noisy place as they detect the note’s correct pitch through vibration, so if there’s lots of noise around, it doesn’t affect the tuner (because it isn’t reliant on a microphone).
Once in position and switched ON, they will automatically show you what note your strings is tuned to when you pluck it. (You don’t need to worry about ‘manual’ or ‘auto-detection.)
They are very accurate and have colour LCD displays that are easy to read, even in bright sunlight. (The ‘needle’ is indicated by different colours.)
This is my favourite vibration-based tuner. The Snark.
Microphone-based electronic tuners
Microphone tuners are great and they don’t add any clutter to your guitar headstock like the clip-on vibration-based tuners do.
The only downside is that the microphone must be able to hear the guitar clearly. If there’s other music in the room (or sound from the TV, or whatever) that will throw the tuner off course.
You can use these for all acoustic guitars and if it has a jack input you can use it for electric guitars too.
As with the clip-on vibration-based tuners these sometimes automatically detect strings, but depending on your model you may have to preselect the note manually.
If you want a recommendation, you can’t go wrong with a trusty Korg GA1.
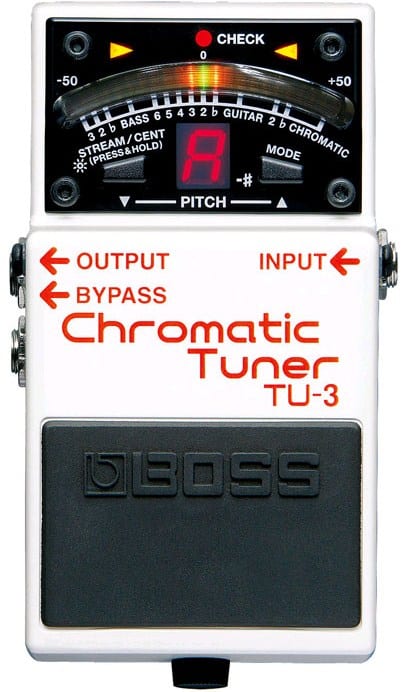
Plug-in and pedal tuners
Plug in tuners are VERY accurate and connect directly to your electric, bass or electro-acoustic guitar via a jack lead.
They are expensive, but awesome. My favourite is the Boss TU3. It’s built like a tank.
Pedals operate like any tuner (the lights represent the ‘needle’), but of course you have to stomp the pedal to activate or deactivate them.
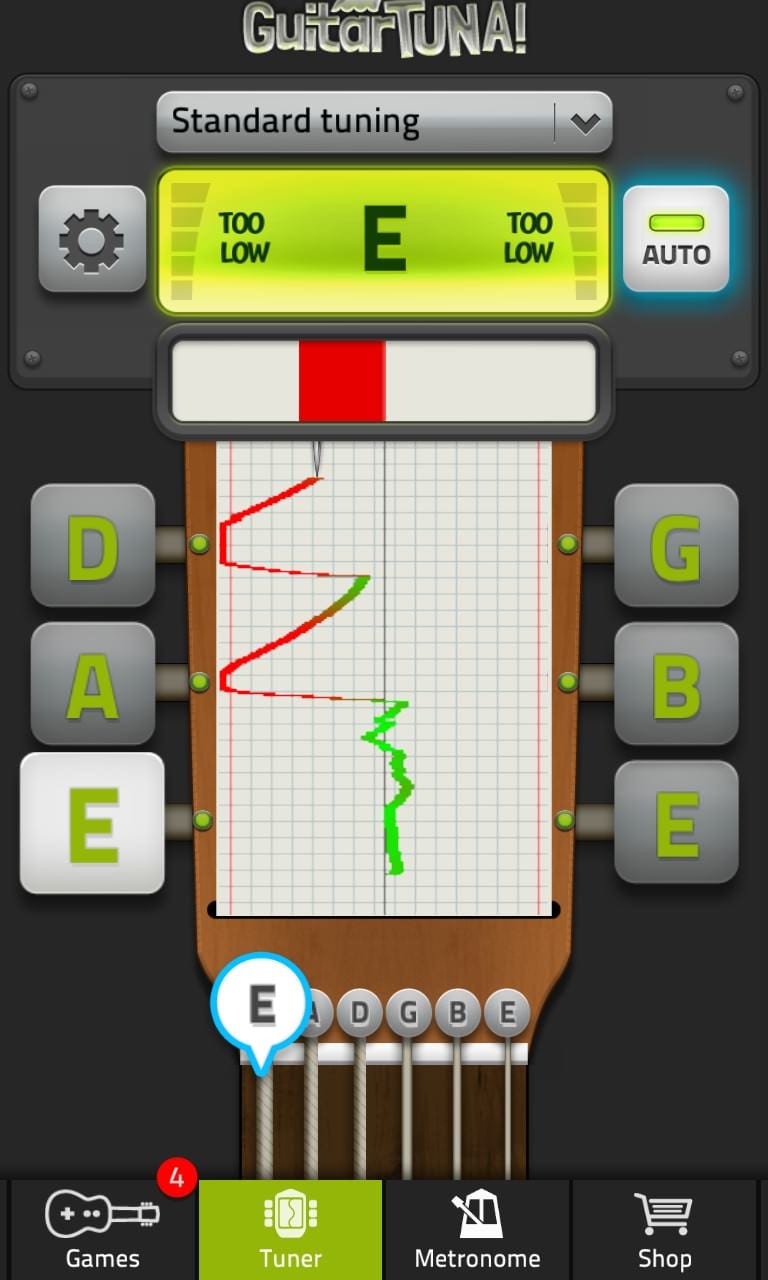
Guitar Tuning with a Smartphone App
There are hundreds of free and paid smartphone apps that are decent. They operate exactly the same as the microphone-based electronic tuners that we covered above.
‘Guitar Tuna’ was good, but it’s getting bloated now. ‘OmniTuner’ is good too.
Search around, the app landscape changes fast and there’s always a new top dog.
How to tune a guitar using other instruments.
If you already play a musical instrument, it’s possible to tune your guitar to it (especially if it has a fixed tuning such as an electronic keyboard).
To learn how to tune a guitar in this way you will need to find E2 A2 D3 G3 B3 E4 on your instrument. (On a keyboard or piano, E2 is two octaves below middle C4.)
You or a friend may need to play each note on your instrument, holding it down as a ‘drone’ so that as you tune your guitar you can listen carefully for the moment the notes start to resonate and sound the same.
(Once you have your low E string, you can tune the others using the below method.)
“Open strings” are strings that are not being pressed (fretted) onto the guitar neck. When you pluck a string without pressing down on any frets, we say you are playing an ‘open string’.
Spock likes guitar.
How to tune a guitar using its own strings (and your ears)
Here is a good 6-step alternative tuning method for ’emergencies’, like if your electronic tuner isn’t to hand and your smartphone’s battery is flat. It’s the ‘anytime, anywhere’ alternate tuning method of how to tune a guitar.
Step 1 – Tune the Sixth string
(All the other strings will be tuned relative to this, so it doesn’t really matter if it’s a little sharp or flat.)
Step 2 – Tune the fifth string
Place your first finger on the fifth fret of the thickest string. This will give you an ‘A’ note that will sound exactly like how you want the open fifth string to sound.
Keeping your finger on the fifth fret, gently pick both the sixth string and the open fifth string, in turn, gradually turning the fifth strings machine head until the two notes are in harmony.
You need to listen carefully here. The two notes will ‘resonate’ when they match.
Step 3 – Tune the fourth string
We’re going to do the same thing again here, except a string higher.
Place your first finger on the fifth fret of the fifth string. This is a D note.
Keeping your finger on the fifth fret, pluck the fifth string and then the open fourth string one after the other, simultaneously turning the fourth strings machine head until the note of the fourth open string chimes like the note of the fifth fret of the fifth string.
Step 4 – Tune the Third String
Same again. Place your first finger on the fifth fret of the fourth string. This gives a G note.
Keeping your finger on the fifth fret, pluck the fourth string and open the third string alternately, turning the third string’s machine head until the third string is in harmony with the fifth fret method of the fourth string.
Step 5 – Tune the 2nd string
Keeping your finger on the fourth fret, pluck the third string and open the second string alternately, turning the second strings machine head until the second string rings brightly with the fourth fret of the third string.
Step 6 – Tune the First String
Tune the thinnest and last string to that, again by turning the first string’s machine head until the tone of the first string dings with the fifth fret of the second string.
6 Top Guitar Tuning Tips
Guitars are more sensitive than most people realise, so bear these things in mind.
1) Tune up EVERY time you play.
This is non-negotiable. As a beginner, your ears won’t be able to tell if your guitar has gone slightly out of tune.
Guitars drift out of tune every day and there is nothing more demotivating for a guitar learner than sounding bad when playing. (I often speak with guitar learners who are feeling down because they think they’re not playing ‘well’, but their guitar is out of tune!)
This isn’t an optional thing. As musicians, we should tune our instruments as part of our routine EVERY time we play.
2) Keep your guitar out of hot places
Your guitar is like any other piece of wood. Temperature affects it. Keep it out of the sun, out of your car on a hot day etc.
Don’t ever rest it against a radiator or any other heat source.
3) Keep your guitar out of cold places
It doesn’t have to be Arctic, even a gentle draft from under a door will nudge your guitar out of tune.
Don’t leave it in your car overnight!
4) Loosen the strings before storage or transport
Loosening your guitar’s strings slightly beforehand allows your guitar to relax and cope with changes in humidity and temperature.
Store your guitar somewhere dry and cool. Away from radiators, air conditioners and any damp conditions.
5) Avoid impacts, big and small
Any kind of bump will knock your guitar out of tune. Of course, if it falls over it will go out of tune, but even little bumps (like a door opening against it) will knock it out.
Also, remember that general play causes your guitar to go out of tune from the constant pressing of your fingers on and off the strings. It happens. It’s normal.
(String-bending solos will always cause a re-tune, too.)
6) Replace your guitar strings regularly.
Dirty, corroded and over-stretched strings become brittle and harder to tune. They also sound terrible!
Change your strings every 6-8 weeks.
What Type of Guitarist Are You?
Take our 60-second quiz & get your results: Take The Quiz
Our guitar courses
How do you want to improve as a guitarist? Click here to check out our guitar courses
Cool Guitar T-shirts
Look cooler. Check out our merch: Click here to see our merch store
Want free guitar tips and video lessons delivered to your inbox?
Join over 200,000 other guitar learners and subscribe to our guitar-tips-by-email service. (It’s free.)
We’ll send you a series of lessons that will move you to the next level of your guitar journey.
Learn how everything fits together quickly, easily and effectively. We share ninja tips (for instant fun!) but also timeless fundamentals that will deepen your understanding.
How to Tune an Electric or Acoustic Guitar (All Methods Explained)
If you’re learning guitar, accurately tuning your guitar is an important skill you need to learn as soon as possible.
Having a slightly out-of-tune guitar can throw off your sense of pitch as well as trick you into thinking you’re not playing things properly.
In this guide, you’ll learn all of the ways you can tune your guitar. You can choose any of the methods covered in this guide or you can learn multiple methods – it’s up to you.
This guide covers tuning a six-string guitar but you can use the same methods for 7-string, 8-string, 12-string guitars, or even bass.
How to Tune a Guitar Basics
While there are different ways you can tune an electric or acoustic guitar, they all lead to the same goal. The idea behind tuning your guitar is to tune each string to a specific pitch so when you play chords or riffs, they will sound correct.
Before you read through the different tuning methods, it’s a good idea to understand the basics of guitar tunings.
Standard Tuning
The most common tuning you will use on an acoustic or electric guitar is called Standard Tuning.
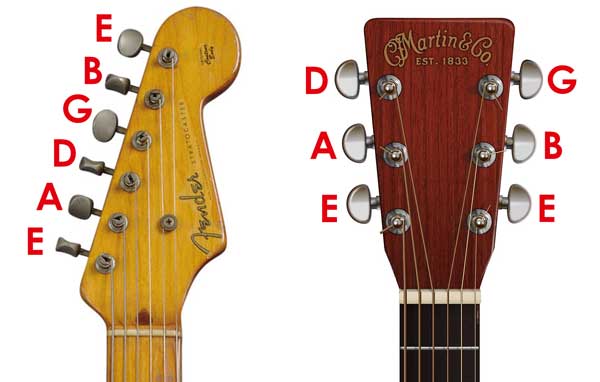
Standard Tuning tunes the six strings on a guitar (from thickest to thinnest) to the pitches: E A D G B E.
As you can see in the above diagrams, both acoustic or electric guitars can be tuned to standard tuning. It doesn’t matter if all of the guitar’s tuning heads are on the same side or split over two sides of the headstock (learn the names of guitar parts in this guide).
The thickest string on the guitar is the lowest sounding string and we tune that to E. Then the next string is tuned to A, then D, G, B, then finally E on the thinnest string.
If you’re a beginner, most of the music you will see will likely use Standard Tuning. So practice tuning your guitar to standard tuning following the methods covered in this guide.
Alternate Tunings
There are a lot of different tunings for guitar and we these ‘Alternate tunings’. The most common alternate tuning is called ‘Drop D’, where we change the low E string down to D (we drop the E string).
If you want to learn a song that uses a tuning other than standard tuning, the transcription or Guitar TAB should tell you what the tuning is.
For example, if the song you want to learn says it is in ‘Drop D’ tuning, you need to change your guitar’s tuning to Drop D Tuning or it won’t sound right.
Tuning your guitar in an alternate tuning isn’t any harder than tuning your guitar to standard tuning. You just need to know what to tune each string to and take your time tuning each string.
Some alternate tunings may require you to change to thicker or thinner guitar strings. This usually happens when you need to tune the strings really low. A lower tuning (eg: Drop B) slackens the strings, so you need to use thicker strings for better tension.
Different Types of Guitar Tuners
There are a few different types of guitar tuners and the right type for you depends on what type of guitar you have and how you would like to tune your guitar.
Let’s have a quick look at the different types of tuners you can buy before we look at how to use each one. I’ll also explain how to tune your guitar without a tuner.
For more information on tuners, check out the Best Guitar Tuners here. In the guide, I talk about features to consider and the best options for each type.
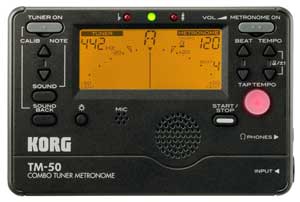
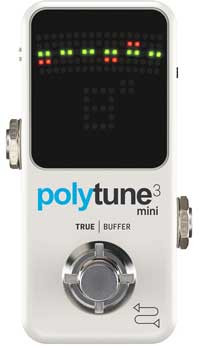
Standalone Tuners
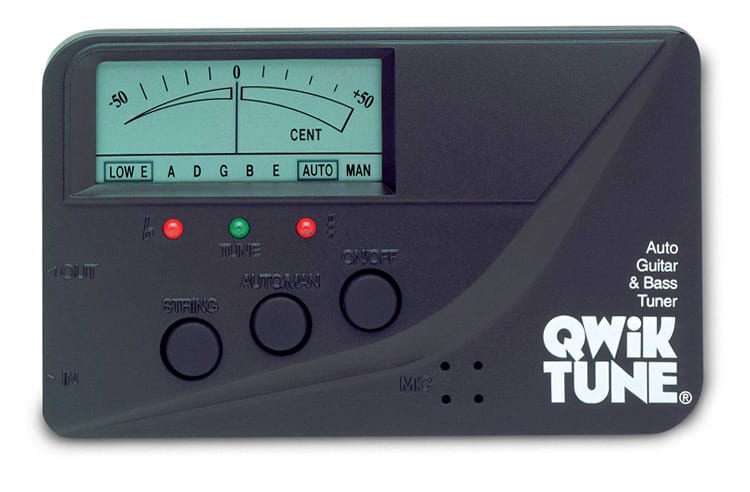
You can buy small devices like the one shown below to tune both electric or acoustic guitars.
These small tuners have an inbuilt microphone to listen to your guitar, or you can plug a guitar into the input jack.
These tuners may suit some guitarists, but most guitarists will probably prefer using a clip-on tuner, tuner pedal, or smartphone app instead.
Tuner Pedals
If you play electric guitar or you plug your acoustic guitar into a rig, you may prefer using a tuner pedal.
Pedals like the above give you a quick way to check your tuning at any time by pressing the footswitch. They’re the go-to option for electric guitarists and incredibly handy if you plan on performing live.
Clip-On Tuners
Clip-on tuners can be handy for both acoustic or electric guitarists. You literally clip them onto your guitar’s headstock and it will sense the vibration in the guitar to detect your string’s pitch.
The big advantage of clip-on tuners is that you can easily tune an acoustic guitar in a noisy environment.
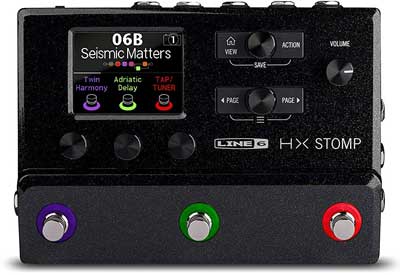
Multi-Effects Pedals
If you have a multi-effects pedal, it will likely have an inbuilt tuner you can use at any time. Most multi-effects pedals will activate a tuner when you hold down a specific footswitch.
The tuners in multi-effects pedals will only work with electric guitars or acoustic guitars that you can plug in.
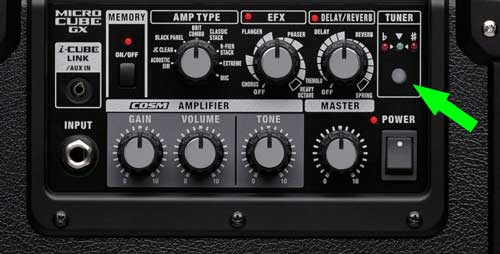
Guitar Amps
Some modern amps have inbuilt tuners you can access by pressing or holding down a button.
While I don’t suggest buying an amp just because it has an inbuilt tuner, it is handy if you don’t like the idea of having to use a pedal to tune your guitar.
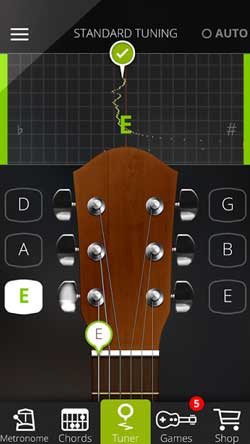
Tuner Apps
There are countless free and paid smartphone guitar tuner apps available that do a great job.
You can use guitar tuner apps to tune either electric or acoustic guitar, but you need to be in a fairly quiet environment for the best results.
Tuning Your Guitar Basic Method
No matter what type of tuner you use, you’ll be following the same basic method for tuning your guitar.
I’ll walk through the steps in tuning your guitar, then you can read the instructions on how to use this method with different types of tuners.
Step 1: Check the String’s Tuning
Start by picking the thickest string closest to you when you hold your guitar. The thickest string on a six-string guitar is tuned to E in Standard Tuning.
Check your tuner to see whether the string is too high (sharp), too low (flat), or in tune.
If it is perfectly in-tune, you can move on to check the next string.
If it isn’t perfectly in-tune, go to step 2 to adjust the tuning.
If you see a different note name on your tuner (eg: D, F, or Eb instead of E), it means your string is way out-of-tune. Take note of whether you need to raise or lower the string to bring it to E. For example, if you see ‘D’ or ‘Eb’ on your tuner, D or ‘Eb’ are both lower than E, so you need to raise the string’s pitch to bring it up to E.
Step 2: Adjust the String’s Tuning
Once you know whether you need to adjust the string up or down, you can start adjusting your string’s tuning.
Start by picking the string. It’s really important that you listen to the string as you adjust the tuning.
Slowly turn the string’s tuning head and listen to how the pitch changes. You should hear the pitch rise or fall. If you don’t hear any change in pitch, make sure you’re turning the correct tuning head. You may snap a string if you don’t realize you’re turning the wrong tuning head.
The direction you need to turn the tuning head depends on the type of guitar and the type of headstock. That’s why you should learn to listen to the string when adjusting the tuning to make sure you’re turning it the right way.
In the above photo, you can see that I need to turn the tuning head anti-clockwise (or away from me) to raise the pitch on the string. But your guitar may be different which is why the best practice is to listen to the string to figure out which way to turn it.
Watch your tuner while you adjust the string to make sure you’re tuning it in the right direction.
Re-pick the string when the tuner starts to have trouble detecting the note or you hear the note start to fade away. Keep picking the string every second or two to keep the string loud enough for the tuner.
As you get closer to bringing the string in-tune, slow your adjustments down. Use smaller adjustments to bring the string closer and closer to perfect tune. Bigger adjustments usually ends up with overshooting and having to adjust the tuning back in the other direction over and over.
If you need to lower the pitch of the string, it’s a good idea to bring it slightly under tune, then tune up to pitch. This can sometimes help avoid the string slipping when you go to play your guitar and bringing it out-of-tune.
Step 3: Tune all Strings
Once the low E string is in tune, move on to the A string and repeat the previous step on that string.
Continue through all strings and bring each one into tune.
Step 4: Re-check all Strings
When you finish tuning all of your strings, go back and check the tuning of all of them again.
You may find that some of the strings have slipped slightly out-of-tune.
This happens due to the change in tension across the neck, the change in tension in the strings, and the type of bridge your guitar uses.
Re-tune all of the strings and check them again.
With some guitars, you will only need to do one pass and everything will hold perfect tune.
Other guitars may take multiple passes – especially if your guitar was really out-of-tune at the start. If you have a guitar with a Floyd Rose bridge, it will likely take you several passes until it starts to hold decent tune. Learn more about tuning a Floyd Rose in this guide.
How to Tune an Electric Guitar With a Tuner Pedal
Whether you use a tuner pedal, or the inbuilt tuner in a multi-effects pedal or a guitar amp, the method for tuning your guitar is the same.
Step 1: plug your guitar into the tuner pedal and make sure it has power.
I’m using a multi-effects pedal for this example, but the same method works with any guitar tuner pedal.
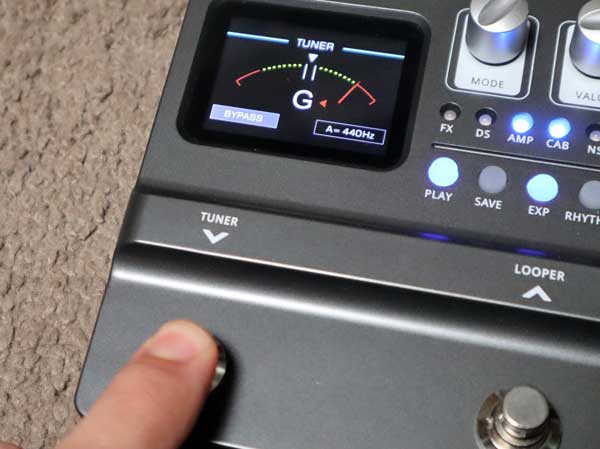
Step 2: activate the tuner by pressing the footswitch or holding down the tuner button on your multi-effects pedal or amp.
With the above multi-effects pedal, you can see that the tuner activates after holding down the left footswitch for a second.
If you’re using a tuner pedal, you should see the display light up when you press the footswitch.
If you’re using a multi-effects pedal or amp, try holding down the button or footswitch labeled ‘tuner’. After a second or two, you should see the tuner appear on the display or LEDs. If this doesn’t work, check your amp or pedal’s manual for instructions.
Step 4: make sure your guitar’s volume knob is turned all the way up, then pick the thickest string closest to you. You should be able to use any guitar pickup without problems, but tuners tend to work best when using a neck pickup. You will tune this thickest string to ‘E’.
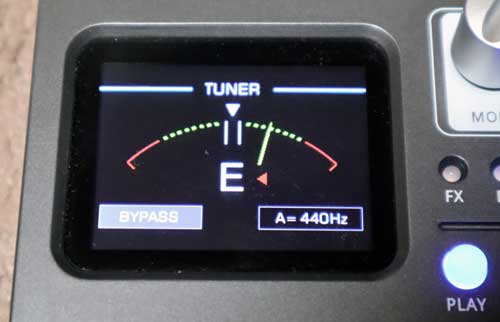
Look at your tuner’s display and whether the string is too high (sharp), too low (flat), or in tune. The above photo shows my E string is a bit too high in pitch as you can tell from the green needle and the red arrow next to the big E.
Here are some examples of what flat, in-tune, and sharp strings may look like (every tuner displays things slightly different):
The tuner should let you know the note it has detected (eg: E) and how close the string is to being in tune. If you see a different note name (eg: D# or Eb), you need to tune up or down until you see E.
Step 5: follow the earlier instructions for tuning your guitar.
Most pedals or inbuilt amp tuners will light up in a different color (usually green) or show something to let you know when the string is in tune.
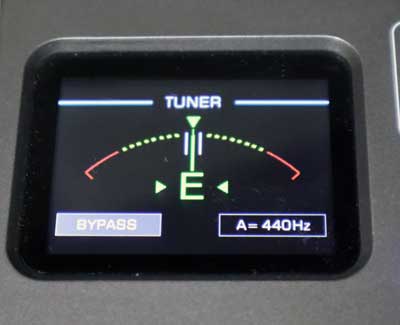
The above photo shows what this multi-effects pedal displays when the string is perfectly in tune. The straight needle and green arrows next to the green E make it clear the string is in tune. Once you feel comfortable with your pedal’s display, you’ll find that you can tune each string faster.
Most tuner pedals will mute your guitar signal during tuning, so remember to disengage the tuner by pressing the footswitch or button to hear your guitar again.
How to Tune a Guitar With a Clip-on Tuner
You can use a clip-on tuner to tune electric or acoustic guitars. The tuner works by sensing the vibration in the guitar, so you can use it in any environment on almost any guitar.
Clip the tuner onto the guitar’s headstock.
If you play a headless guitar or you can’t seem to clip it on the headstock, look for any other position on the guitar you can clip on to. As long as the tuner has a good connection to the guitar, it should be able to sense the vibration of the strings.
Once your tuner is clipped onto your guitar, adjust the screen (if possible) so you can clearly see it while playing.
Turn the tuner on by pressing the power button.
Now you can tune your guitar following the same steps covered earlier. Follow the same steps for acoustic or electric guitar.
How to Tune a Guitar By Ear
Tuning your guitar by ear is possible, but it takes practice to be able to tune accurately.
You tune a guitar by ear by using a reference pitch to tune one string. Then you can use that string to tune the rest of your guitar strings.
As an example, let’s say you know that your low E string is perfectly in tune. Here’s how you can use that string to tune the rest of the strings by ear.
The fifth fret on the low E string is the note A, which matches the pitch of the next open string. You can use this note to tune the open A string.
Pick the 5th fret and compare how that sounds when compared with the open A string.
If the open A string sounds lower in pitch compared to the 5th fret, you need to tune it up. If it sounds higher, tune it down.
Keep comparing the open A string to the 5th fret until they both sound exactly the same in pitch.
Now you can repeat this using the A string’s 5th fret and compare it to the open D string.
Adjust the open D string until it matches the A string’s 5th fret.
Repeat the exact same thing on the next string to tune the G string.
To tune the B string, you need to compare it with the 4th fret on the G string.
All of the other strings are compared against the 5th fret except for the B string. If you remember this, you’ll be able to use this method any time you want.
Finally, tune the high E string by comparing it with the 5th fret on the B string.
If you’re a beginner or intermediate guitarist who has never done something like this before, you might find it difficult to accurately compare the pitch of a fretted note against an open string. The two notes might sound the same to you or you may not be able to tell which one is higher.
The more time you spend working on ear training, the easier this skill will get. Training your ears to detect slight differences in pitch is an important skill if you want to become an accomplished guitarist. Find out about ear training here.
Here’s a diagram showing the fret positions to tune all six strings by ear:
It’s important to remember that this method only works if you can get at least one string in perfect tune. If you have no way of tuning at least one string to a reference pitch, this method won’t work.
This can be a quick way to check your guitar’s tuning, but remember that you get the best results with a tuner.
The problem with this method is that a slight inaccuracy in tuning one string causes all the other strings to go out-of-tune. With practice, you can get really good at tuning a guitar by ear, but it will never be perfect.
How to Tune an Electric Guitar Without an Amp
You can easily tune an electric guitar without an amp. Simply plug your electric guitar directly into a tuner or a tuner pedal. You don’t need your guitar amp to use either type of tuner. You can also use a clip-on tuner and clip it onto your guitar’s headstock.
If you don’t have any other type of tuner available, you might be able to tune your electric guitar with a smartphone app. Hold your smartphone close to your strings in a quiet environment and pick the strings hard enough for the app to detect them.
While an unplugged electric guitar is far quieter than an acoustic guitar, it still emits a sound. So you can still use any tuner that has an inbuilt microphone if you’re in a quiet environment.
How to Tune a Guitar Without a Tuner
If you don’t have a tuner, you can still tune your guitar. The easiest way is to download a free tuner app on your smartphone or tablet. If one isn’t available, you can try tuning your guitar by ear or use another instrument such as a piano for a reference pitch.
Keep in mind that you get the best results when you use a tuner. Most guitar tuners can tell you what your strings are tuned to within a fraction of a cent (the measure of pitch). The human ear isn’t capable of that level of accuracy, even with practice.
The key to tuning a guitar without a tuner is to have something you can use as a reference pitch. A reference pitch is something else with a precise pitch that you can tune your guitar to.
For example, if you have another guitar already in tune, you could listen to those strings to tune another guitar.
The downside of using something else as a reference pitch is if the reference pitch isn’t perfectly in tune. If you tune your guitar to an out-of-tune reference pitch (eg: another guitar that happens to be slightly out-of-tune), your guitar will also end up out-of-tune.
Tuning Guitar With a Piano
If you have a piano nearby, you can use it to tune your guitar. Keep in mind that you will always get the most accurate results when you use a tuner, but it is possible to tune your guitar by ear using a piano.
To tune your guitar using a piano, you need to match the pitch of each open string to the pitch of the correct piano keys.
Here is a diagram showing which keys match the guitar strings:
Once you find Middle C on the piano, remember that the high E string is two white keys to the right. All of the other strings are below Middle C.
This may take some practice, but it’s a great way to train your ears (learn more about ear training here).
Tuning a Guitar FAQs
Here are some common questions you might have about tuning your guitar.
Do You Tune an Electric Guitar the Same as an Acoustic?
Both electric and acoustic guitars can be tuned the same with Standard Tuning or any alternate tuning. While acoustic and electric guitars may feel different to play, they are tuned the same.
How Do I Know if My Guitar is Tuned?
Use a guitar tuner to check if your guitar is tuned. A guitar tuner can tell you which strings are in tune and which ones aren’t. When you play guitar, a good guitarist will be able to tell if the guitar is in tune by how the chords sound.
How Often Do Guitars Need to be Tuned?
All guitars will slowly go out of tune over time and need to be regularly tuned. How often you tune your guitar depends on how often you play, how aggressively you play, and the type of hardware your guitar uses. It’s best practice to check and tune your guitar every time you pick it up to play.
It only takes less than a minute to check if your guitar is in tune and you don’t want to play a guitar if it is out-of-tune. So get in the habit of checking your guitar’s tuning every day you pick it up.
Do Guitars Come Tuned?
Most guitars will come tuned from the factory or store. But you should expect the guitar to slip out of tune during transport. It’s best practice to check your guitar’s tuning when you get it home and re-tune it if needed.
How Much Does it Cost to Get Your Guitar Tuned?
It should not cost anything to tune your guitar and it is simple enough you can do it yourself. Unlike tuning a piano, which costs money and is difficult, it is easy to tune a guitar. Learn to tune your guitar and buy a guitar tuner because your guitar will regularly go out-of-tune.
Some guitar stores offer a ‘tune-up’ service, which covers more than tuning the guitar. These services usually also look at the guitar’s action height, intonation, and truss rod position (links to guides for each).
Is It Bad to Tune Your Guitar a Lot?
No, it is not bad to tune your guitar a lot. It is important you only play guitar when it is in tune, so you need to regularly tune your guitar. Some guitars will fall out of tune faster than others, so it’s okay if you need to tune your guitar a lot.
If you regularly change to different alternate tunings, you’ll find that your guitar goes out-of-tune all the time due to changes in neck tension. This isn’t bad for the guitar, but it can be annoying for you.
Here are some useful guides you might want to check out:
How To Tune A Guitar
How to tune a guitar is probably one of the most important tasks every beginning guitarist should practice. It’s important to always play guitar with a properly tuned instrument and it takes time to learn how to do it. I present here, various methods on how to tune the guitar to standard tuning.
Standard tuning means your guitar is tuned to (from lowest to highest strings) E A D G B E. In standard tuning, the strings are tuned in intervals of a 4th (the distance apart from each other) with the exception of the 2nd string which is an interval of a 3rd apart from the 3rd string. Standard tuning is also based around the pitch of A440 which is considered concert pitch. A440 is the note A above middle C that has a frequency of 440 Hz.
Electronic tuners
The easiest method to tune your guitar is having someone else do it for you. just kidding. well not really. Using an electronic tuner is kind of like having someone else tune your guitar. Did you know, there are actually robotic guitar tuners on the market that do tune your guitar for you? I won’t get into those here though.
Using an electronic tuner basically involves playing a string and watching a screen of some sort that displays the strings current pitch. Then all you have to do is turn your guitar’s tuning peg until the screen reads the correct pitch or get arrows or lines to line up. That is all there is to it. No listening required.
Which electronic tuners is best
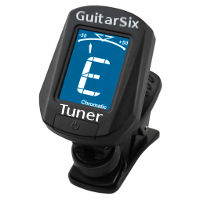
There are various models of electronic tuners out there. There are tuners that you plug into your guitar and some that you don’t. Some are integrated into amplifiers, pedals and other effects. Some like the one pictured above clip onto the guitar head stock. Heck they even make guitar tuner apps for your phone! All of them work about the same and which one is best is the one that is easiest for you to use.
Tuning using reference tones
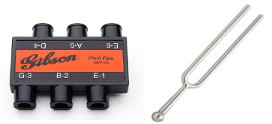
Tuning using reference tones is another common way to tune your guitar. A reference tone is a tone played on another device or in tune instrument that you make your instrument match using your ears ( you want to develop your ears don’t you? ). You can use other guitars, pianos, human voice or devices like pitch pipes or tuning forks to get reference tones. You can even use your own guitar as long as it has at least one string in tune.
Below is a picture of a Gibson guitar pitch pipe and an A440 tuning fork.
Pitch pipes work much like a whistle, you blow into the holes and the specified tone comes out. Pitch forks are struck and then they ring with whatever pitch they are.
How do you make a tone on your guitar match a reference tone?
How do you make two tones match?
This is a good question you may have already asked yourself. Making the two tones match requires a listening skill you must develop. You can only develop this skill through practice and trial and error.
What it comes down to is this:
When the two tones don’t match there is a warble like effect between them. The closer the two tones come to each other in pitch, the stronger the warble effect. When two tones are the same, they hum in a perfect synchronicity that is unmistakable. That is how you know when the two match.
How to tune a guitar to itself
You might be wondering how to tune a guitar to itself. If you have at least one string in tune, you can use it as a reference tone to tune all the other strings. If you don’t have a string in tune, use a reference tone or tuner to get one (step 1) then follow the steps 2-6 below to tune the rest of the guitar strings. Use the below graphic as a guide as you read the steps.
1) Lets pretend you don’t have any strings that are tuned. Get another guitar that is in tune and pluck the A string to use as your reference tone. Tune your A string by turning your tuning key to so that the pitch of your A string matches the other guitar’s A string.
Here is an A string sound you can use as a reference tone.
2) Tune the 6th string to the 5th string by pressing down the note at the 5th fret (on the 6th string) and simultaneously play it and the 5th string. Make the pitch on the 5th fret 6th string match the pitch of the 5th string.
3) Tune the 4th string to the 5th string by pressing down the note at the 5th fret (on the 5th string) and simultaneously play it and the 4th string. Make the pitch on 4th string match the pitch of the 5th string fretted at the 5th fret.
4) Tune the 3rd string to the 4th string by pressing down the note at the 5th fret (on the 4th string) and simultaneously play it and the 3rd string. Make the pitch on 3rd string match the pitch of the 4th string fretted at the 5th fret.
5) Tune the 2nd string to the 3rd string by pressing down the note at the * 4th fret (on the 3rd string) and simultaneously play it and the 2nd string. Make the pitch on 2nd string match the pitch of the 3rd string fretted at the 4th fret. * note that you fret the 4th fret in this step all other steps fret the 5th fret.
5) Tune the 1st string to the 2nd string by pressing down the note at the 5th fret (on the 2nd string) and simultaneously play it and the 1st string. Make the pitch on 1st string match the pitch of the 2nd string fretted at the 5th fret.
Tuning with octaves at the 7th fret
The octaves method to tune is similar to the the previous method of tuning the guitar to itself but uses the octaves (a pitch an order higher) at the 7th fret (or 8th on the 2nd string) to tune. This method is slightly more difficult for beginners because using octaves to tune requires you to determine the same tones but with one being an octave higher in pitch. The note’s pitch at the 7th fret (or 8th on the 2nd) is the same as the string below but one octave higher.
How to tune a guitar with harmonics
You can tune a guitar to itself using harmonics as long as it has either the 6th or 5th string already in tune. This method will work even if you don’t have one of those strings tuned but the guitar as a whole will not be tuned to concert pitch.
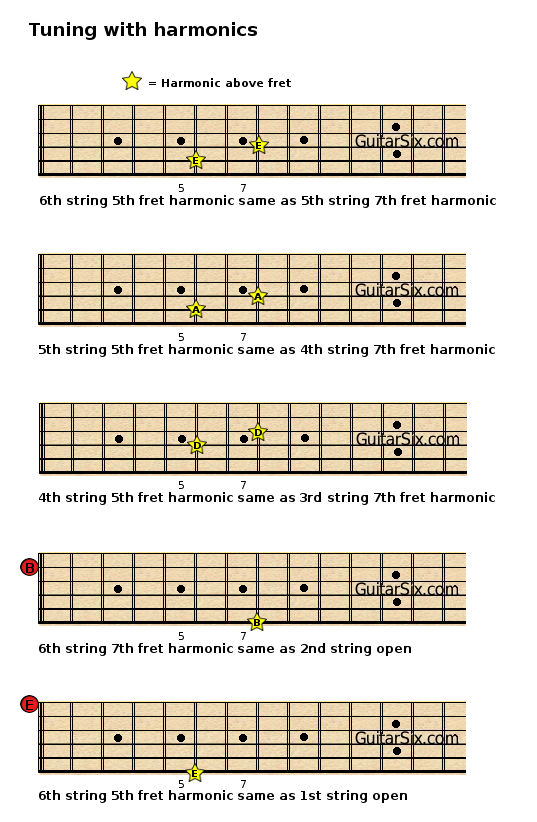
A harmonic is when you lightly touch the string above a fret to produce a bell like sound. It just so happens that there are harmonics at the 5th and seventh frets that are easy to use for tuning. Here are the list of harmonic notes you can use to tune each string:
* E 6th string 5th fret harmonic is same harmonic note as E 5th string 7th fret.
* A 5th string 5th fret harmonic is same harmonic note as A 4th string 7th fret.
* D 4th string 5th fret harmonic is same harmonic note as D 3rd string 7th fret.
* B 6th string 7th fret harmonic is the same note as B 2nd string OPEN.
* E 5th string 5th fret harmonic is the same note as E 1st string OPEN.
Alternate tuning
So far I’ve only described tuning in standard tuning. However you might want to explore alternate tuning as you continue to learn more about guitar. There are many alternative ways to tune a guitar. I’m not going to talk too much about them here but I just wanted to list a few to tickle your curiosity.
In summary
I hope this article has helped you learn about tuning a guitar. Getting good at tuning takes time and practice so stick with it. Someday, you will be able to tune any guitar by ear alone. It’s a valuable skill to have and people will be in awe when they see you do it.
Share a link to this guitar lesson with your friends (right click Permalink > copy or mobile long press > copy)
Online Guitar Tuner
Hello! You have found the fastest and right way to tune your guitar 🎸. The tuning will be done using the free online guitar tuner, working through a microphone on your device. This tuner is suitable for acoustic and for electric guitar.
Standard Guitar String Notes
How to tune a guitar?
Your task is to tune all the strings to the right notes. The notes for each string are shown in the list above.
Guitar tuning does not end here. After you have tuned all the strings in order from the first to the sixth (or vice versa), we recommend checking their sound in the reverse order. The fact is that the total tension of the guitar neck changes if the tension of an individual string is greatly changed. For example, if you tuned the first string, but the others were not very tight, then after setting up all the strings, the first one will be «below» the required level.
Guitar tuning quality
The analysis of the frequency of sound will allow you to fine-tune each string. The tuning quality strongly depends on the frequency response of the microphone, from external noise. Especially for rare cases when there are problems with the microphone, the page contains the sounds of the strings for tuning by ear 👂.
How often do you need to tune the guitar
🔖 Bookmark this site and tuning your guitar will no longer be a problem for you. Have a good playing!
:max_bytes(150000):strip_icc()/200282791-002-56a461db5f9b58b7d0d6b19a.jpg)
:max_bytes(150000):strip_icc()/tuning_keyboard-56a461323df78cf7728217ab.jpg)
:max_bytes(150000):strip_icc()/tuning_fretboard-56a461325f9b58b7d0d6aad7.gif)


