How to use mingw
How to use mingw
Use GNU on Windows with MinGW
MartinHarry on Pixabay. CC0.
If you’re a hacker running Windows, you don’t need a proprietary application to compile code. With the Minimalist GNU for Windows (MinGW) project, you can download and install the GNU Compiler Collection (GCC) along with several other essential GNU components to enable GNU Autotools on your Windows computer.
Install MinGW
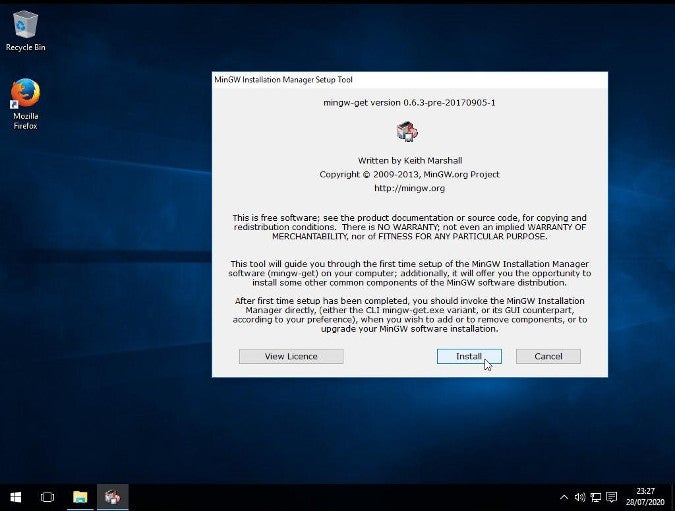
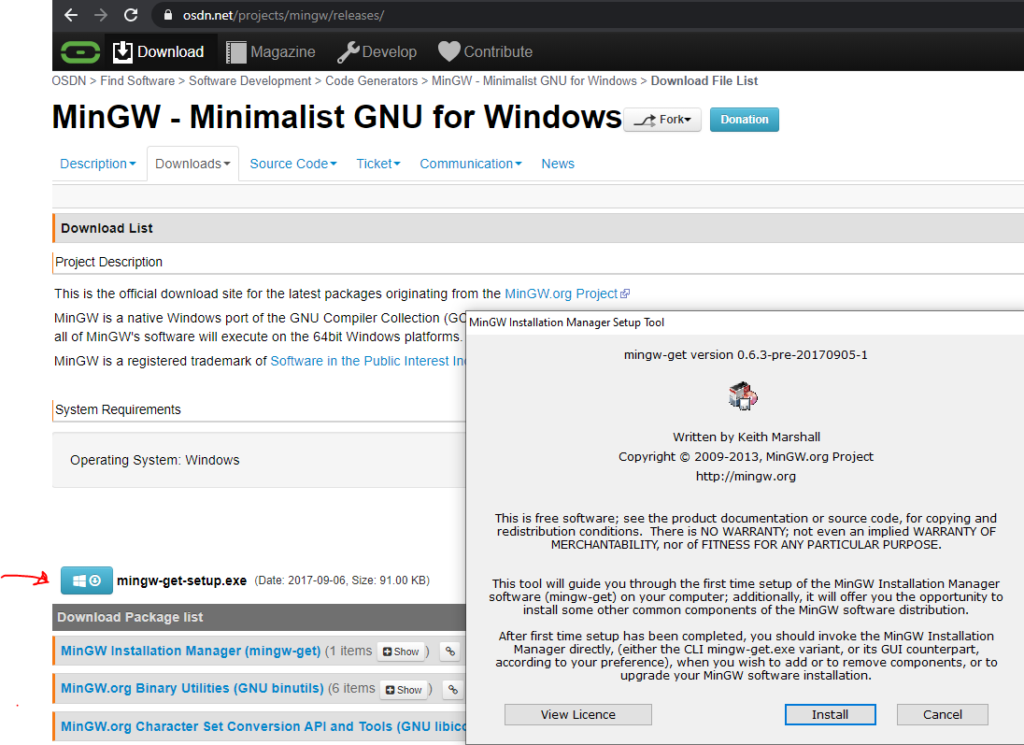
The easiest way to install MinGW is through mingw-get, a graphical user interface (GUI) application that helps you select which components to install and keep them up to date. To run it, download mingw-get-setup.exe from the project’s host. Install it as you would any other EXE file by clicking through the installation wizard to completion.
Install GCC on Windows
So far, you’ve only installed an installer—or more accurately, a dedicated package manager called mingw-get. Launch mingw-get to select which MinGW project applications you want to install on your computer.
First, select mingw-get from your application menu to launch it.
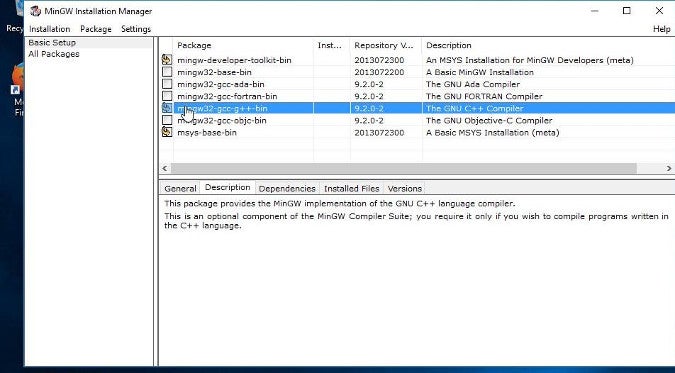
To install GCC, click the GCC and G++ package to mark GNU C and C++ compiler for installation. To complete the process, select Apply Changes from the Installation menu in the top-left corner of the mingw-get window.
Once GCC is installed, you can run it from PowerShell using its full path:
Run Bash on Windows
While it calls itself «minimalist,» MinGW also provides an optional Bourne shell command-line interpreter called MSYS (which stands for Minimal System). It’s an alternative to Microsoft’s cmd.exe and PowerShell, and it defaults to Bash. Aside from being one of the (justifiably) most popular shells, Bash is useful when porting open source applications to the Windows platform because many open source projects assume a POSIX environment.
You can install MSYS from the mingw-get GUI or from within PowerShell:
To try out Bash, launch it using its full path:
Set the path on Windows
Programming and development
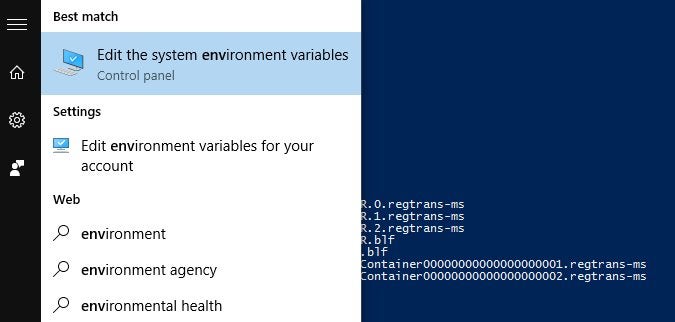
You probably don’t want to have to type the full path for every command you want to use. Add the directory containing your new GNU executables to your path in Windows. There are two root directories of executables to add: one for MinGW (including GCC and its related toolchain) and another for MSYS (including Bash and many common tools from the GNU and BSD projects).
A Preferences window will open; click the Environment variables button located near the bottom of the window.
In the Environment variables window, double-click the Path selection from the bottom panel.
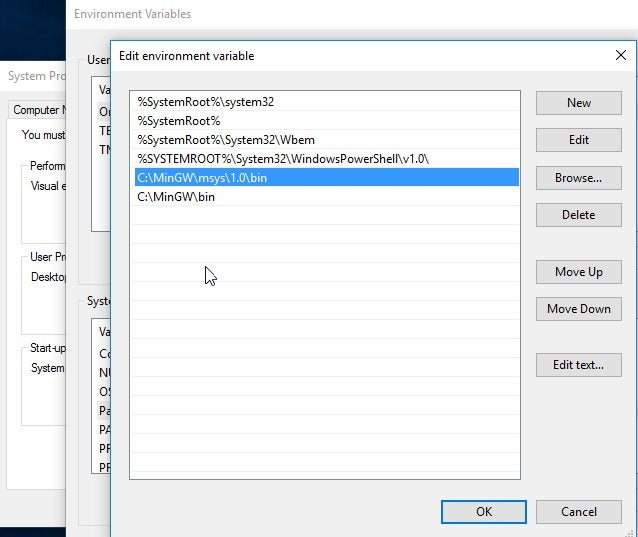
In the Edit Environment variables window that appears, click the New button on the right. Create a new entry reading C:\MinCW\msys\1.0\bin and click OK. Create a second new entry the same way, this one reading C:\MinGW\bin, and click OK.
Accept these changes in each Preferences window. You can reboot your computer to ensure the new variables are detected by all applications, or just relaunch your PowerShell window.
From now on, you can call any MinGW command without specifying the full path, because the full path is in the %PATH% environment variable of your Windows system, which PowerShell inherits.
Hello world
You’re all set up now, so put your new MinGW system to a small test. If you’re a Vim user, launch it, and enter this obligatory «hello world» code:
And, finally, run it:
There’s much more to MinGW than what I can cover here. After all, MinGW opens a whole world of open source and potential for custom code, so take advantage of it. For a wider world of open source, you can also give Linux a try. You’ll be amazed at what’s possible when all limits are removed. But in the meantime, give MinGW a try and enjoy the freedom of the GNU.
How to use printf to format output
Get to know printf, a mysterious, flexible, and feature-rich alternative to echo, print, and cout.
What I learned while teaching C programming on YouTube
Sharing knowledge with others is often a great way to refresh and update your own expertise.
Using MinGW and Cygwin with Visual C++ and Open Folder
Content outdated
Most MinGW installations, however, include much more than just a compiler. Most distributions of MinGW include a whole host of other tools that can be used to build and assemble software on Windows using the familiar GNU toolset. MinGW build environments often contain an entire POSIX development environment that can be used to develop both native Windows software using POSIX build tools and POSIX software that runs on Windows with the help of an emulation layer.
Please download the preview and try out the latest C++ features. You will need to also make sure you install the Linux Tools for C++ workload in addition to Desktop C++ to use these new features. You can learn more about Open Folder on the Microsoft docs site. We are looking forward to your feedback.
Why MinGW
There are three reasons why you might want to use MinGW on Windows. The first is simply compiler compatibility. We all love MSVC, but the reality is that some codebases are designed from the ground up under the expectation that they will be built with GCC. This is especially true for many cross-platform projects. Porting these codebases to support MSVC can be a costly endeavor when all you want to do is get up and running with your code. With MinGW you can be up and running in minutes instead of days.
There is, however, an even more compelling reason to use MinGW than source compatibility with GCC. MinGW environments are not just a compiler, but include entire POSIX build environments. These development environments allow cross-platform projects to build on Windows with few if any modifications to their build logic. Need Make or AutoTools, it’s already installed – if you are using an environment like MSYS2 nearly every tool you might need is only a single package management command away.
Finally, some MinGW distributions such as MSYS2 allow you to build native POSIX software on Windows without porting the code to Win32. This is accomplished by an emulation layer that allows native POSIX tools to run on Windows. This same layer is what allows all your favorite POSIX build tools to run in the MinGW environment.
Install MinGW on Windows
Getting started with MinGW is simple once you have installed the latest Visual Studio Preview. First, you will need to make sure that you select the C++ workload when you install Visual Studio. Next, you will need to download MinGW itself. There are actually many ways to install MinGW. If you are particularly adventurous you can build it from source, but it is much easier to install any of the popular binary distributions. One of the more popular distributions is MSYS2 (getting started guide). A standard MSYS2 installation installs three build environments: POSIX build environments to natively target 32-bit and 64-bit Windows, and an emulation layer to build POSIX software that targets Windows.
If you have a particular project in mind that you are working with, it is also worth checking out if they have any project-specific instructions on how to install MinGW. Some projects even include their own custom tailored MinGW distributions.
Use MinGW with Visual Studio
It has been possible to use GCC based compilers with Visual Studio projects for some time already, but many cross-platform projects that build with MinGW on Windows are not organized into Solution and Visual C++ project files. Creating these assets for a real-world project can be time consuming. To streamline onboarding cross-platform projects into Visual Studio, we now support opening folders directly, and in the latest preview it is easier than ever to use alternative compilers and build environments such as MinGW.
With “Open Folder” you can edit your code with full IntelliSense, build, and debug with the same fidelity as is available with full Solution and C++ project files. However, instead of authoring hundreds of lines of XML you just need to write a small amount of JSON. Even better, you only need to write the JSON for the features you need. For instance, if you only want to edit code in the IDE and stick to the command line for everything else, you only need to write a few lines of JSON to enable IntelliSense.
Edit with Accurate IntelliSense
To get the most out of IntelliSense when using “Open Folder” you will need to create a CppProperties.json file. You can create this file by selecting “Project->Edit Settings->CppProperties.json…” from the main menu.
This file is automatically populated with four configurations: “Debug” and “Release” for the x86 and x64 architectures. If you don’t need all of these configurations you can remove them to reduce clutter. Next, you will need to configure a few options to get IntelliSense that is consistent with your MinGW build.
In each configuration, you may notice an “intelliSenseMode” key. For MinGW and other GCC based compilers you should set this to “windows-clang-x86” or “windows-clang-x64” depending on your architecture.
Next, you will need to add the include paths for your project. Configuration specific include paths can be added to the “includePath” array under each configuration. You can add project-wide include paths here as well but it may be easier to add them to the “INCLUDE” environment variable, by adding an “environment” block to your configuration file as a peer to “configurations”:
Note: MINGW_PREFIX should point to your MinGW installation, if you installed MSYS2 with default settings this directory will be “C:/msys64/mingw64”.
Most GCC based compilers, including MinGW, automatically include certain system header directories. For full IntelliSense, you will need to add these to the include path list. You can get a list of these standard includes by running:
Build with MinGW
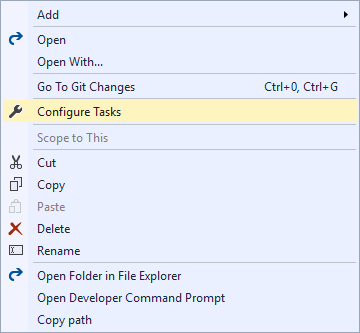
Once you have set up IntelliSense (with “MINGW_PREFIX” and its related environment variables defined and added to “PATH”), building with MinGW is quite simple. First, you will need to create a build task. Right click your build script (or any other file you would like to associate with the task) and select “Configure Tasks”:
This will create a “tasks.vs.json” file if you don’t already have one and create a stub. Since MinGW and its tools are already on the PATH, as configured in CppProperties.json, you can configure the task to use them like this:
This example is simple – it only builds one file – but this can call into Make or any other build tools supported by MinGW as well. Once you save this file, you should have a “Build” option available for any files matched by the “appliesTo” tag.
Selecting “Build” from the context menu will run the command and stream any console output to the Output Window.
Debug MinGW Applications
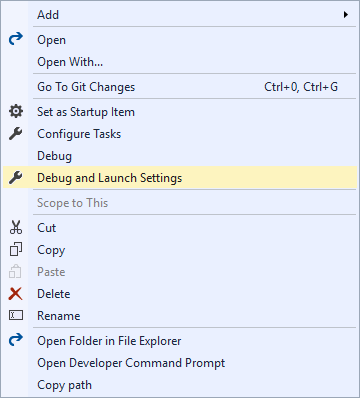
Once you have configured your project to build, debugging can be configured with by selecting a template. Once you have built an executable, find it in the folder view and select “Debug and Launch Settings” from the executable’s context menu in the Solution Explorer:
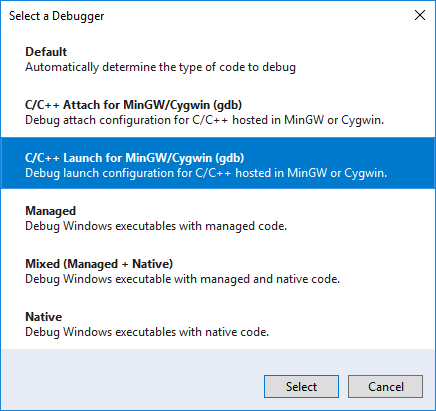
This will allow you to select a debugger template for this executable:
This will create an entry in the “launch.vs.json” file that configures the debugger:
In most cases, you won’t have to modify this at all, as long as you defined “MINGW_PREFIX” in the “CppProperties.json” file. Now you are ready to edit, build, and debug the code. You can right click the executable and select “Debug” in the context menu or select the newly added launch configuration in the debug dropdown menu to use F5. You should be able to use breakpoints and other debugging features like the Locals, Watch, and Autos Windows. If you are having trouble hitting breakpoints, make sure your build command was configured to emit GDB compatible symbols and debugging information.
Finally, to complete the full inner loop, you can add an “output” tag to your build task in “tasks.vs.json”. For instance:
What About Cygwin and Other Compilers in the GCC Family
While we have discussed MinGW specifically in this post, it is worth keeping in mind that very little of the content above is specific to MinGW. These topics apply equally well to other compilers and build environments so long as they can produce binaries that can be debugged with GDB. With minimal modification, the instructions under the “Use MinGW with Visual Studio” section above should work fine with other environments such as Cygwin and even other compilers like Clang. In the future, Open Folder will support an even greater variety of compilers and debuggers – some out of the box, some with a little bit of extra configuration that may be specific to your projects.
Send Us Feedback
To try out the latest and greatest C++ features and give us some early feedback, please download and install the latest Visual Studio 2017 Preview. As always, we welcome your feedback. Feel free to send any comments through e-mail at visualcpp@microsoft.com, through Twitter @visualc, or Facebook at Microsoft Visual Cpp.
If you encounter other problems with Visual Studio 2017 please let us know via Report a Problem, which is available in both the installer and the IDE itself. For suggestions, let us know through UserVoice. We look forward to your feedback!
MinGW + Visual Studio Code. Руководство для старта
Данный текст будет полезен тем, кто давно хотел слезть с иглы тяжеленных IDE, но настройка компилятора под себя – казалось делом неблагодарным и запутанным.
VS Code – это лишь редактор кода. Это не среда разработки – здесь нет встроенного компилятора или дебаггера. Здесь есть только их поддержка. Чем более инструмент универсален – тем сложнее вначале разобраться в его особенностях. Однако, здесь нет ничего невозможного! Если правильно один раз настроить VS Code, то вы получите замечательную среду с помощью которой можно поддерживать различные проекты на совершенно разных языках.
VS Code является легковесным, кроссплатформенным редактором кода. Одной из его главных особенностей является поддержка кучи плагинов. Плагины позволяют расширять технологию IntelliSense (автодополнение кода) на разные языки программирования, добавлять поддержку специфического оборудования, отладчиков и прочее. Очень приятная и гибкая цветовая схема не раздражает даже после многочасового просиживания в процессе работы.
В общем-то поэтому решил написать как подготовить себе приятную среду разработки. В данном случае – под C и C++
Картинки кликабельны. И их максимально много. Если считаете, что что-то слишком очевидно, то пропустите этот момент
Чаще всего используется компилятор gcc. Данный компилятор обычно идет совместно с Unix-осью. Для того, чтобы работать с этим компилятором на Windows, нужно установить некоторые инструменты разработки. Есть два больших и известных проекта, созданных с данной целью:
Главное их отличие в том, что MinGW сосредоточен в основном на компиляторе с некой поддержкой системных команд, в то время как Cygwin старается эмулировать полноценную UNIX-среду.
Обсуждение на Stack Overflow на эту тему
Установка MinGW
Первым делом нужно убедится, что на компьютере уже не установлен компилятор gcc. Нажмем Win+R и вызовем командную строку.
Если компилятор не установлен – выведется сообщение, что программа не найдена. Иначе, можно опустить установку и настройку MinGW и переходить прямо к разделу с настройкой VS Code.
Закрываем консоль (“cmd“) и переходим на официальный сайт проекта MinGW http://www.mingw.org/.
Ищем ссылку “Download” и переходим. Должно открыться что-то подобное, как на рисунке снизу.
Выбираем необходимые нам пакеты. Нам нужен базовый пакет mingw32-base и mingw32-gcc-g++. Отмечаем их
Внимание – приписка 32 в названии не означает работу приложения только и/или нацеленно на 32-битной платформе
После чего применяем внесенные изменения
Видим, что будет установлено/обновлено 24 пакета
Новое окно сообщает об успешном применении изменений
Теперь можем перейти в папку установки и убедиться в том, что все необходимое установлено (g++.exe и gcc.exe)
Выполним проверку установки переменной PATH. Проведем такую же проверку, как и в начале. Нажмем Win+R и вызовем командную строку.
Попросим компилятор вывести его версию следующей командой:
Если все сработало как нужно, то переходим к разделу с настройкой VS Code.
Если в консоли появилась ошибка, то нужно настроить переменную PATH. Это глобальная системная переменная и содержит в себе каталог исполняемых программ. То есть её настройка позволяет запустить программу по имени, не указывая полный путь до исполняемого файла. Их есть два вида – отдельная для каждого пользователя и одна общесистемная, которая доступна каждому пользователю.
Как настроить переменную PATH
Далее в левой колонке жмем “Дополнительные параметры среды“
Далее в “Переменные среды“
Выбираем в списке переменных сред для пользователя выбираем переменную PATH и жмем “Изменить“.
Жмем “Создать” и вписываем полный путь до папки MinGW\bin
Нажимаем “Ок” и снова вызываем командную строку – Win+R – cmd.
Внимание – чтобы изменения переменной PATH вступили в силу, командную строку нужно перезапустить, если она осталась открытой.
Выводим для проверки версию компилятора:
Заодно проверим дебаггер:
VS Code – Hellow World
Скачиваем с официального сайта абсолютно бесплатный VS Code.
Процесс установки опустим – подсказок установщика достаточно
Для корректного автодополнения, дебага и подсказок по документации стоит установить расширение C/C++.
Расширения устанавливаются прямо из VS Code во вкладке “Extensions” или Ctrl+Shift+X. На нижней картинке эта вкладка подчеркнута в левом столбце.
Найдем через строку поиска C/C++ и установим.
Далее создаем папку будущего проекта в произвольном месте на компьютере. Свою назвал “helloworld“. Она будет папкой всего проекта, который вы будете разрабатывать. В VS Code открываем папку используя File > Open Folder…
Откроется проект. Пока он пустой. Создадим первый файл в проекте через File > New File
Чтобы VS Code начал предлагать подсказки по вводу и подсвечивать синтаксис, следует сразу после создания файла сохранить его в необходимом расширении. По сути сейчас вы определяете язык будущего проекта. Нажимаете File > Save… и в открывшемся окне выбираете тип файла. Т.к. наш тестовый проект пишется на Си, выбираем его в выпадающем списке Тип файла.
Теперь при вводе текста будут появляться подсказки с автодополнением. Для подстановки предложенного автодополнения можно нажать Tab. В VS Code достаточно много удобных хоткеев. Посмотреть все быстрые клавиши можно тут File > Preferences > Keyboard Shortcuts
Запишем наш код HelloWorld в файл. В принципе, можно писать любой код – главное, чтобы был вывод в консоль для отладки.
Настройка компилятора
Время перейти к настройке компилятора и дебаггера.
Компилятор позволит из написанного кода собрать рабочее приложение.
Переходим Terminal > Configure Default Build Task…
Мы изначально определили язык программирования (во время сохранения) и VS Code самостоятельно нашел компилятор – нам предложено задать сценарий работы с ним.
Если самостоятельно VS Code не нашла компилятор, то нужно редактировать файл c_cpp_properties.json, который идет вместе с расширением. Именно в данном файле настраивается путь к includePath
Подробнее по ссылке на официальном сайте. Ссылка актуальна на 2020 год.
Кликаем по предложенной подсказке.
Текст файла примерно такой:
Выглядит страшно, как и любой развернутый JSON
Гайд на официальном сайте vscode говорит о том, что этого достаточно, а если что-то идет не так, то отсылают почитать про функционал task.json. К сожалению, если оставить в таком виде, то собирать многофайловые проекты будет невозможно.
Если в вашем проекте будет НЕ больше одного файла, можете пропустить дальнейший текст и перейти к настройке дебаггера. Если планируется работать с несколькими файлами – рекомендую проделать дальнейшие манипуляции.
JSON – это текстовое представление данных/объектов (в основном в JS).
Обычно используется для передачи данных в парах Клиент-Сервер.
Массивы обозначаются квадратными скобками []
Ячейки обозначаются фигурными скобками <>
Обычная запись представляет собой пару ключ-значение через двоеточие:
< “Ключ” : “Значение” >
Значение может быть массивом, ячейкой, массивом ячеек и т.д. – ограничений нет.
Поле tasks содержит массив ( [массив] ), который состоит из ячеек отделенных фигурными скобками и запятыми ( [ <ячейка 1>, <ячейка 2>, <ячейка 3>] ). В нашем случае этот массив содержит одну ячейку.
Создадим еще один элемент в массиве задач (task). Нужно скопировать все что есть в квадратных скобках (task[ вот это ]) и вставить через запятую в конце первой ячейки массива.
Файл должен выглядеть примерно как указано выше. Следите за скобками и запятыми – если где-то будет ошибка VS Code сообщит. Удаляем ячейку “group” на строках 20-23. Этот параметр отвечает за выбор компилятора, который будет запущен по-умолчанию.
Нас сейчас больше всего интересуют строки с 27 по 31.
Изменим значение ячейки “label” на 27 строке на любое название. Пусть будет build c project. Именно по этому имени мы сможем понять какой именно компилятор сейчас выбран.
Ячейка “command” – это команда, которая будет передана в терминал/консоль для старта компиляции. Как мы видим, все правильно, это путь к gcc.exe.
Ячейка “args” – это список аргументов, который будет передан после команды. Не пугайтесь, мы уже это делали. Чуть ранее мы узнавали версию gcc путем передачи аргумента -version.
В итоге, добавленная нами часть будет выглядеть следующим образом:
Подробнее про task.json
Настройка отладчика
Теперь настроим дебаггер или отладчик. Переходим в наш файл с кодом, далее Run > Add Configuration…
Выбираем окружение GDB
Выбираем Сборка и отладка активного файла
Если возникла ошибка и открылось окно, нажмите на нем Abort. Это лишь значит, что не удалось собрать приложение – может быть синтаксическая ошибка.
Далее откроется файл launch.json
Для тех, кто добавлял свой task: Изменим значение preLaunchTask на то название, которое придумали для своего компилятора. В моем случае – это “build c project“. Чтобы не было путаница стоить изменить и поле “name“. Можете как и прошлом примере добавить еще одну конфигурацию запуска в массив конфигураций, оставив первоначальную без изменений.
Запускаем приложение
Снова переходим в созданный файл с кодом и выбираем Terminal > Run Build Task…
Эта команда проведет все шаги компиляции приложения и создаст в целевой папке исполняемый файл с расширением .exe
На картинке выше красным подчеркнут выпадающий список открытых терминалов (без паники – это как несколько cmd-консолей или терминалов в линуксе). Синим (правее красной линии, видно плохо) подчеркнуты элементы управления списком терминалов – их можно добавить, удалить или поставить парочку рядом.
Создадим новый терминал.
Как мы видим, изменился порядковый номер нового терминала. Также видно, что мы находимся в папке с проектом. Отсюда можно вызвать наше скомпилированное приложение. Можно начать набирать его имя и нажать Tab и сработает автодополнение. На каждое следующее нажатие терминал предложит различные подходящие варианты под то, что имелось ввиду. Если предложить нечего – ничего не произойдет.
Вызовем наше приложение. В моем случае:
Замечательно, вывод сработал как надо.
Теперь инициируем отладку/дебаггинг этого приложения, чтобы посмотреть как это работает.
Установим “Breakpoint” или точку останова. Все как в классических IDE.
Запускаем отладку Run > Start Debugging или f5
Выполнение программы было приостановлено в том месте, которое мы пометили точкой останова.
Открылось другое окно редактора, которое специально подготовлено для работы в режиме отладки. В левой части окна появилось четыре секции:
Текущая выполняемая строка подсвечивается и имеет желтый указатель строки
Управление ходом отладки программы тоже удобное и классическое.
Удачного освоения инструмента
How to use mingw
Using GCC with MinGW
In this tutorial, you configure Visual Studio Code to use the GCC C++ compiler (g++) and GDB debugger from mingw-w64 to create programs that run on Windows.
After configuring VS Code, you will compile and debug a simple Hello World program in VS Code. This tutorial does not teach you about GCC, GDB, Mingw-w64, or the C++ language. For those subjects, there are many good resources available on the Web.
If you have any problems, feel free to file an issue for this tutorial in the VS Code documentation repository.
To successfully complete this tutorial, you must do the following steps:
Install the C/C++ extension for VS Code. You can install the C/C++ extension by searching for ‘c++’ in the Extensions view ( kb(workbench.view.extensions) ).
Get the latest version of Mingw-w64 via MSYS2, which provides up-to-date native builds of GCC, Mingw-w64, and other helpful C++ tools and libraries. You can download the latest installer from the MSYS2 page or use this link to the installer.
Add the path to your Mingw-w64 bin folder to the Windows PATH environment variable by using the following steps:
Check your MinGW installation
To check that your Mingw-w64 tools are correctly installed and available, open a new Command Prompt and type:
If you don’t see the expected output or g++ or gdb is not a recognized command, make sure your PATH entry matches the Mingw-w64 binary location where the compilers are located. If the compilers do not exist at that PATH entry, make sure you followed the instructions on the MSYS2 website to install Mingw-w64.
Create Hello World
Add a source code file
Add hello world source code
Now paste in this source code:
Now press kb(workbench.action.files.save) to save the file. Notice how the file you just added appears in the File Explorer view ( kb(workbench.view.explorer) ) in the side bar of VS Code:
You can also enable Auto Save to automatically save your file changes, by checking Auto Save in the main File menu.
The Activity Bar on the far left lets you open different views such as Search, Source Control, and Run. You’ll look at the Run view later in this tutorial. You can find out more about the other views in the VS Code User Interface documentation.
Note : When you save or open a C++ file, you may see a notification from the C/C++ extension about the availability of an Insiders version, which lets you test new features and fixes. You can ignore this notification by selecting the X (Clear Notification).
In your new helloworld.cpp file, hover over vector or string to see type information. After the declaration of the msg variable, start typing msg. as you would when calling a member function. You should immediately see a completion list that shows all the member functions, and a window that shows the type information for the msg object:
You can press the kbstyle(Tab) key to insert the selected member; then, when you add the opening parenthesis, you will see information about any arguments that the function requires.
Remember, the C++ extension uses the C++ compiler you have installed on your machine to build your program. Make sure you have a C++ compiler installed before attempting to run and debug helloworld.cpp in VS Code.
Open helloworld.cpp so that it is the active file.
Press the play button in the top right corner of the editor.
Choose C/C++: g++.exe build and debug active file from the list of detected compilers on your system.
After the build succeeds, your program’s output will appear in the integrated Terminal.
Your new tasks.json file should look similar to the JSON below:
Note : You can learn more about tasks.json variables in the variables reference.
The command setting specifies the program to run; in this case that is g++. The args array specifies the command-line arguments that will be passed to g++. These arguments must be specified in the order expected by the compiler.
The label value is what you will see in the tasks list; you can name this whatever you like.
The detail value is what you will as the description of the task in the tasks list. It’s highly recommended to rename this value to differentiate it from similar tasks.
The play button has two modes: Run C/C++ File and Debug C/C++ File. It will default to the last-used mode. If you see the debug icon in the play button, you can just click the play button to debug, instead of using the drop-down.
Explore the debugger
Before you start stepping through the code, let’s take a moment to notice several changes in the user interface:
The Integrated Terminal appears at the bottom of the source code editor. In the Debug Output tab, you see output that indicates the debugger is up and running.
The editor highlights the line where you set a breakpoint before starting the debugger:
The Run and Debug view on the left shows debugging information. You’ll see an example later in the tutorial.
At the top of the code editor, a debugging control panel appears. You can move this around the screen by grabbing the dots on the left side.
Step through the code
Now you’re ready to start stepping through the code.
Click or press the Step over icon in the debugging control panel.
This will advance program execution to the first line of the for loop, and skip over all the internal function calls within the vector and string classes that are invoked when the msg variable is created and initialized. Notice the change in the Variables window on the left.
In this case, the errors are expected because, although the variable names for the loop are now visible to the debugger, the statement has not executed yet, so there is nothing to read at this point. The contents of msg are visible, however, because that statement has completed.
Press Step over again to advance to the next statement in this program (skipping over all the internal code that is executed to initialize the loop). Now, the Variables window shows information about the loop variables.
Press Step over again to execute the cout statement. (Note that as of the March 2019 release, the C++ extension does not print any output to the Debug Console until the loop exits.)
If you like, you can keep pressing Step over until all the words in the vector have been printed to the console. But if you are curious, try pressing the Step Into button to step through source code in the C++ standard library!
When the loop has completed, you can see the output in the Integrated Terminal, along with some other diagnostic information that is output by GDB.
Sometimes you might want to keep track of the value of a variable as your program executes. You can do this by setting a watch on the variable.
To quickly view the value of any variable while execution is paused on a breakpoint, you can hover over it with the mouse pointer.
Customize debugging with launch.json
There are cases where you’d want to customize your debug configuration, such as specifying arguments to pass to the program at runtime. You can define custom debug configurations in a launch.json file.
You’ll then see a dropdown for various predefined debugging configurations. Choose C/C++: g++.exe build and debug active file.
VS Code creates a launch.json file, which looks something like this:
Change the stopAtEntry value to true to cause the debugger to stop on the main method when you start debugging.
From now on, the play button and kb(workbench.action.debug.start) will read from your launch.json file when launching your program for debugging.
If you want more control over the C/C++ extension, you can create a c_cpp_properties.json file, which will allow you to change settings such as the path to the compiler, include paths, C++ standard (default is C++17), and more.
You can view the C/C++ configuration UI by running the command C/C++: Edit Configurations (UI) from the Command Palette ( kb(workbench.action.showCommands) ).
Here, we’ve changed the Configuration name to GCC, set the Compiler path dropdown to the g++ compiler, and the IntelliSense mode to match the compiler (gcc-x64)
You only need to add to the Include path array setting if your program includes header files that are not in your workspace or in the standard library path.
The extension uses the compilerPath setting to infer the path to the C++ standard library header files. When the extension knows where to find those files, it can provide features like smart completions and Go to Definition navigation.
The C/C++ extension attempts to populate compilerPath with the default compiler location based on what it finds on your system. The extension looks in several common compiler locations.
The compilerPath search order is:
MSYS2 is installed, but g++ and gdb are still not found
You must follow the steps on the MSYS2 website and use the MSYS CLI to install Mingw-w64, which contains those tools.
If you need a 32-bit version of the MinGW toolset, consult the Downloading section on the MSYS2 wiki. It includes links to both 32-bit and 64-bit installation options.
How to compile C program on command line using MinGW?
What command does one have to enter at the command line in Windows 7 to compile a basic C program?
I have a path environment variable set to where MinGW is installed:
I can’t really find any information on where I’m going wrong, and can’t find anything in the official MinGW documentation, as it seems like this is something so simple, sort of an embarrassing question, that it’s figured people know what to do?
13 Answers 13
Trending sort
Trending sort is based off of the default sorting method — by highest score — but it boosts votes that have happened recently, helping to surface more up-to-date answers.
It falls back to sorting by highest score if no posts are trending.
Switch to Trending sort
I have a path environment variable set to where MinGW is installed
Maybe you haven’t set the path correctly?
shows the path to gcc.exe? Otherwise, compilation is similar to Unix:
I’ve had this problem and couldn’t find why it kept happening. The reason is simple: Once you have set up the environment paths, you have to close the CMD window, and open it again for it be aware of new environment paths.
First:
Add your minGW’s bin folder directory ( ex: C\mingw64\bin ) in System variables => Path. visual example
Compile:
Run:
Just set the environment variable to the EXACT path to gcc.exe like this:
When I try to compile I get this error!
gcc: error: CreateProcess: No such file or directory
The result result was this (a blinking underscore):
Now I had an object file of fact.c (fact.o). after that:
You can permanently include the directory of the MinGW file, by clicking on My Computer, Properties, Advanced system settings, Environment variables, then edit and paste your directory.
I have a batch file sh.bat on my Windows 7, in %PATH%:
If you pasted your text into the path variable and added a whitespace before the semicolon, you should delete that and add a backslash at the end of the directory (;C:\Program Files (x86)\CodeBlocks\MinGW\bin
I once had this kind of problem installing MinGW to work in Windows, even after I added the right System PATH in my Environment Variables.
After days of misery, I finally stumbled on a thread that recommended uninstalling the original MinGW compiler and deleting the C:\MinGW folder and installing TDM-GCC MinGW compiler which can be found here.
You have options of choosing a 64/32-bit installer from the download page, and it creates the environment path variables for you too.
My gcc is in «C:\Program Files\CodeBlocks\MinGW\bin\».
I am quite late answering this question (5 years to be exact) but I hope this helps someone.
I suspect that this error is because of the environment variables instead of GCC. When you set a new environment variable you need to open a new Command Prompt! This is the issue 90% of the time (when I first downloaded GCC I was stuck with this for 3 hours!) If this isn’t the case, you probably haven’t set the environment variables properly or you are in a folder with spaces in the name.
Источники информации:
- http://devblogs.microsoft.com/cppblog/using-mingw-and-cygwin-with-visual-cpp-and-open-folder/
- http://programel.ru/articles/mingw-visual-studio-code-%D1%80%D1%83%D0%BA%D0%BE%D0%B2%D0%BE%D0%B4%D1%81%D1%82%D0%B2%D0%BE-%D0%B4%D0%BB%D1%8F-%D1%81%D1%82%D0%B0%D1%80%D1%82%D0%B0/
- http://github.com/microsoft/vscode-docs/blob/main/docs/cpp/config-mingw.md
- http://stackoverflow.com/questions/10661663/how-to-compile-c-program-on-command-line-using-mingw

