How to draw cartoon eyes
How to draw cartoon eyes
How to Draw Cartoon Eyes made with simple lines
Drawing appealing cartoon eyes is probably the most difficult thing to do. Eyes are the window to the soul and so many things can be said using only a quick look. You can also notice the same phenomenon is the wonderful world of 3D animation. Characters often don’t feel realistic because eyes look lifeless or too shiny. That’s why learning to create believable eyes is definitely something you should aim for.
Performance of eyes can vary from one creature to another. We already know what our eyes are capable of, but did you know that even in the middle of the night, an owl can see a prey move from a distance of 200 feet? That dogs don’t see colors very well? They mostly see things in black, grey and white. Some creatures like worms don’t have any eyes at all.
Studying the real thing before proceeding with the tutorial
It’s always a good idea to study the subject of a tutorial before proceeding with the step-by-step lesson. In this case, let’s take a look at the picture of a real human eye. First, you can see a basic eyebrow on top of this one (1). Only a few hairs are needed to illustrate this part of the body.
Next, you need to sketch the upper (2) and lower (3) eyelid using long curved lines. Eyelashes (5) are also connected to these two basic parts. Finally, in the center of the eye, a large pupil (4) can be seen. This one can be green, brown or blue. Eyes are filled with textures and reflections which make this specific area more difficult to get right.
let’s convert this picture into shapes and lines
To understand a little bit better what we are dealing with, let’s convert the picture into a basic illustration. You can see that eyebrows are made from several short straight lines. Eyebrows can be light, dense or even much longer than the eye itself. Both eyelids are represented by long curved lines.
A few eyelashes are created on top and bottom of the eye. Speaking of the eye, this one is drawn using an unusual shape. The left side is round while the right side is pointed. The pupil is made from a large circle (in blue) and a small dot (in black). Great! Now that we are more familiar with this part of the body, let’s draw one!
Drawing cartoon eyes using basic elements
First, draw a large circle to form the pupil of the eye. Then, sketch an oval shape near the bottom of the previous addition. The left side is perfectly round while the right side is sharp and pointed. Inside the pupil, draw two more small circles. You can now erase the part of the pupil that is visible outside the eye. On top of the image, draw a long eyebrow. Small lines are added on the left side of this new shape.
Under the eye, create a tiny eyelid. A few eyelashes are sketched on top of the eye. Complete this step by adding a few basic colors. Remember that this is a cartoon version of an eye. That’s why you can skip a few elements and still end up with an appealing result.
Drawing cartoon eyes using a few additional examples
Eyes can be made using a wide variety of techniques. If you are looking for something simple, but still effective, then dots are more than enough (1). If you want to create a more expressive character, adding two oval shapes can also be a good alternative (2).
The last four examples are incorporating more features and are closer to reality. The fifth one even includes basic textures inside the pupil and a large reflection near the right. We used the fourth image for our step-by-step lesson.
I hope you had fun learning to draw cool cartoon eyes using the tutorial on this page. Don’t hesitate to use more realistic models to achieve your goal. Meanwhile, you can also try more fun lessons from this site featuring simple and complex eyes made from basic elements. Have fun!
How to Draw Cartoon Eyes
Introduction: How to Draw Cartoon Eyes
Today, I was illustrating a children’s book about food and how it affects your body. This book explains the food pyramid, so I decided to draw cute anime food items along with the theme. When it was time to draw the vegetables, I had an idea. This idea was to draw anime eyes and a carrot (a super hero carrot that was improving the eye’s sight). To do this, though, I would need to know how to draw anime eyes. Try as I may, I could not grasp the concept of the eye, so I came up with my own cartoon-like eye. Please enjoy this, and I hope you too learn how to draw this simple eye.
Step 1: Gather Your Materials
To draw an eye, you will need.
Step 2: Draw a Guide
To make drawing an eye as easy as possible, youmay want to draw a rectangle with room for the eyes so that they are identical. I have an issue with making my eye drawings symmetrical, but I find it much easier to do when I have a guide to assist me. You can use a ruler for this or anything with a straight edge.
Step 3: Outline of the Eye
A cartoon eye has a basic shape that is actually quite simple to draw. To draw the basic outline, draw a circle. Then, add curved lines to both sides of the circle to make an eye shape. Erase the lines from the circle that are left in the middle. Now, we can move onto the pupil, shines, and iris.
Step 4: The Pupil, Shines, and Iris
Inside the eye, draw a large circle towards the top to make the iris, or the colorful part. Then, draw a circle about a third of the size of the iris for the shine. Finally, draw a smaller circle beneath the shine for the pupil.
Step 5: Adding the Eyelashes
Next, you have to add eyelashes. To do this, add a curved «tail» to the eye, which is like a cat tail that you can make with mascara. Then, add a few eyelashes to the top of the eye and the bottom. Add a few lines for parts of the face such as the eyelid for a more realistic touch.
Step 6: Now Draw the Eyebrow
Eyebrows can change the whole eye, as with different angles, the eye can represent different emotions or expressions. For example, if the eyebrow is high and arched, the eye seems surprised or shocked. When the eyebrow is low above the eye and curved downward, it can represent anger. Choose which emotion you wish to express in your drawing and draw the eyebrow accordingly.
Step 7: You Are Done!
Be the First to Share
Did you make this project? Share it with us!
How to Draw Cartoon Eyes
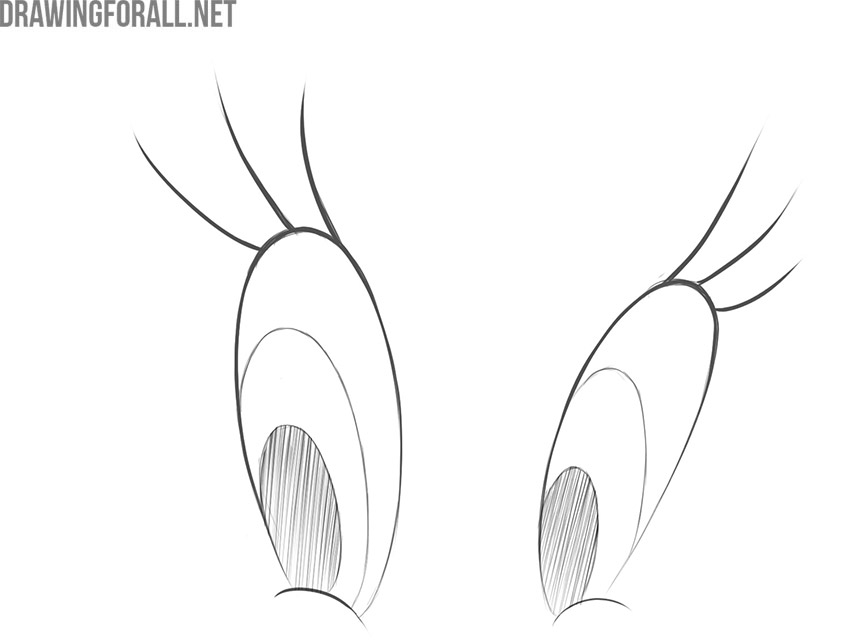
In this very simple step by step drawing guide, we will tell you how to draw cartoon eyes. This is not some exact instruction, but just a listing of the basic principles of drawing cartoon-style eyes. With this drawing lesson, you can draw cartoon eyes of very different cartoon characters. We hope you find our drawing tutorial, which consists of seven easy stages, really helpful.
Step 1
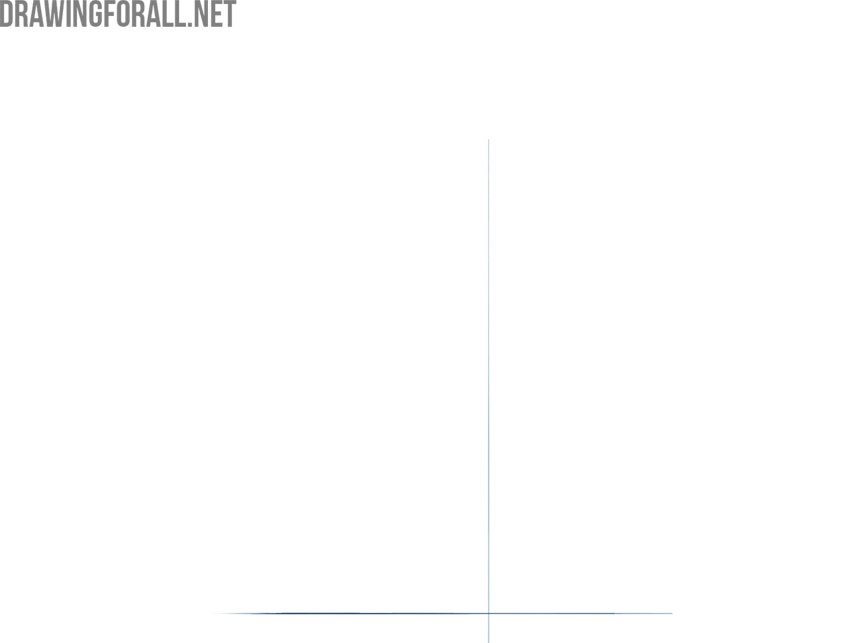
So, we start the guide on how to draw cartoon eyes. Before you start drawing, try looking at the drawing and notice unusual details. In our case, we see long and vertically elongated eyes. Therefore, we draw a vertical line along the entire length of the paper sheet and a horizontal line that is very low. Use very light lines at the beginning.
Step 2
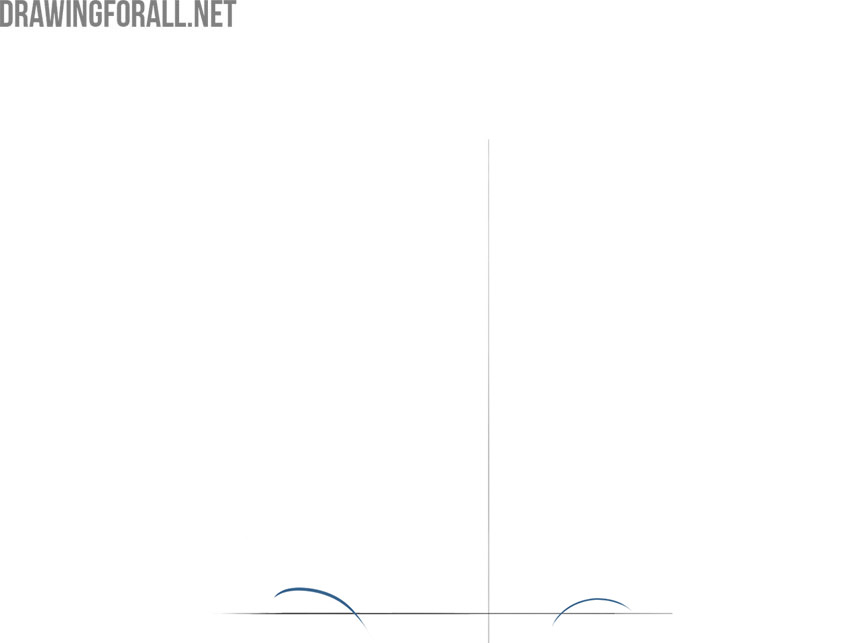
Before you start drawing the outlines of the eyes, it will be great to outline the lower boundaries of these outlines. In our case, the lower borders are small, rounded cheeks. Draw these cheeks using the horizontal line from the previous step. It looks like two small mounds.
Step 3
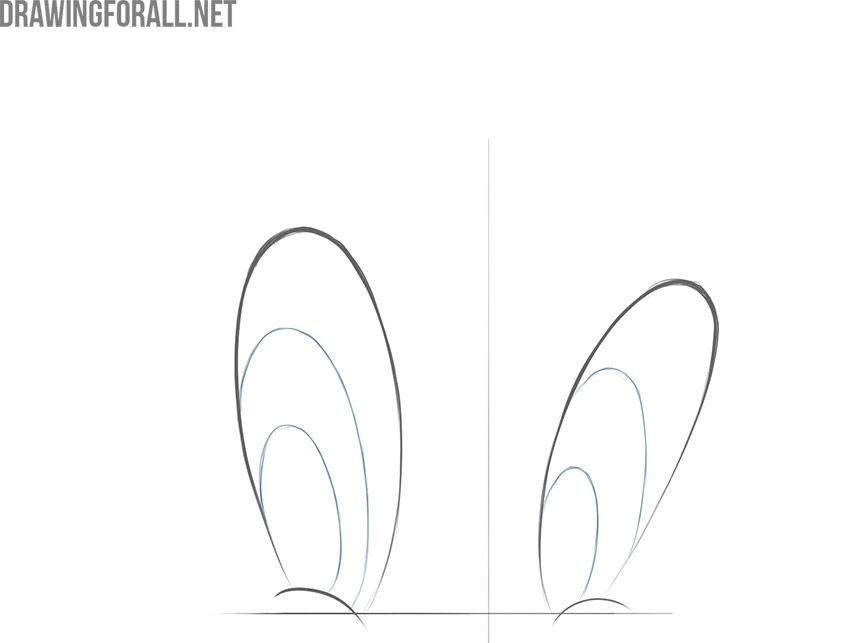
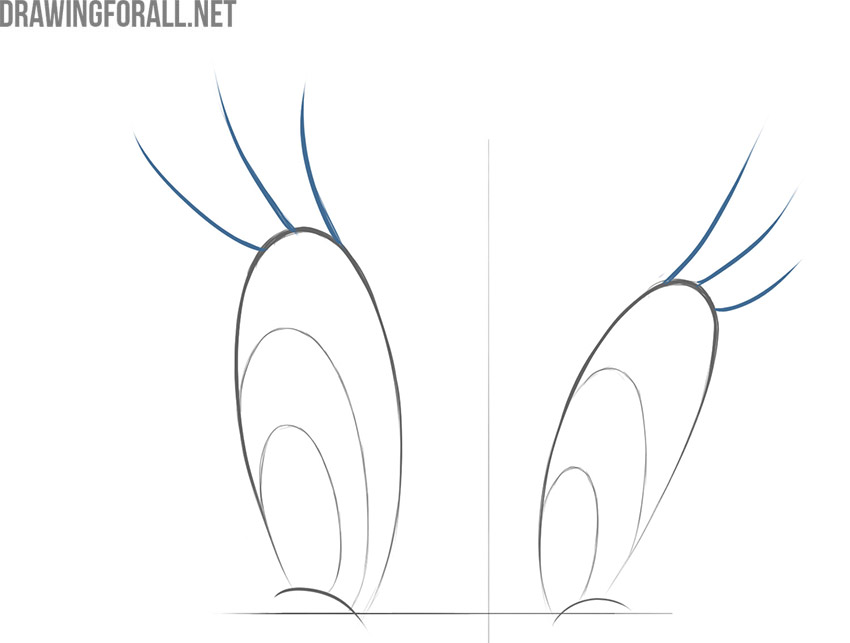
Now let’s draw the outlines of the eyes themselves. These are two asymmetrical ovals that widen significantly upward. Note the position of these ovals in relation to the vertical line. As you can see, the ovals have different sizes and different distances from the vertical line, drawn at the very beginning.
Step 4
And now there will be a very important and responsible step. We mean drawing the cartoon pupils. The eyes can have different shapes of the outer contours, but the location of the pupils must be the same. This greatly affects the direction of the gaze.
Step 5
Check the shapes and outlines that were drawn earlier. This is really very important. If you haven’t made any mistakes, you can draw the eyelashes. The lashes appear as three curved, flowing lines that taper towards the top.
Step 6
As a rule, in the penultimate step, we pay attention to drawing shadows. However, now we are drawing cartoon eyes, so for now we’ll just shade the pupils. Use dense, sweeping, single-layer hatching for this.
Step 7
In this step, you can double-check the correctness of all shapes and outlines. After that, you can erase all the guide construction lines drawn earlier, to make your cartoon eyes drawing look more finished. Congratulations, this is a great job!
You can leave your cartoon eyes drawing like this, or color it. You can also try to repeat the whole process of drawing cartoon eyes, but give them a different shape. To do this, you can use different references from the Internet or images of your favorite cartoon characters.
So, we have completed this cartoon eyes drawing lesson. We hope you didn’t encounter any problems while working with our guide. If you get a strange or incorrect result, you can write to us about it in the comments. We will definitely answer you and help you sort out this error. We will also be glad to have any feedback or opinion on our social networks.
How to Draw Cartoon Eyes
How to Draw Cartoon Eyes, In this tutorial, we’ll discuss the basics of drawing cartoon eyes, how eyes work, and how you could use these concepts to develop and experiment with stylistic renditions of the eye.
For additional guidance, I recommend looking at live or photographic references, even if your goal is not to draw realistically or from life. A mirror can also be a great way to get a quick glance at proportions and how the face generally “works“.
How to Draw Cartoon Eyes, Tutorial by Daisy Ein
Learn also:
#1 Understanding Cartoon Eye Basics
Understanding Cartoon Eye Basics
Even when drawing stylistically, it is still important to note how the eye itself works. I like to think of this as a case of knowing the rules so you can effectively break them.
So, let’s start with the eyeball. Generally speaking, the eyeball is a spherical shape. Note, we are not necessarily talking about the eye as it normally looks on the human face—just the ball. Note the rounded surface here, indicated with some simple cross contours in pink.
Leave a ReplyCancel reply
You must be logged in to post a comment.
#2 Step
However, we obviously don’t normally look at eyes this way—without eyelids and independent of the face. Why, then, should we consider the eye’s shape?
Well, I like to think about the relationship between eyeballs and eyelids much like fabric on an object—eyelids wrap around the eye. They are not flat or straight on the eye. Instead, they’re rounded, going around the spherical shape of the eye. This premise is illustrated in blue, below.
Leave a ReplyCancel reply
You must be logged in to post a comment.
#3 Step
Take note of the upper and lower eyelid. The shape of the eyes and the eyelids will vary from person to person. Notice how the examples in blue, below, are not straight lines. They still keep the rounded nature of the eye’s surface in mind.
Leave a ReplyCancel reply
You must be logged in to post a comment.
#4 Step
The iris is the round shape in the eye that typically has color. The pupil is the dark, round shape inside the iris. It expands and contracts, typically in response to light. Humans have round pupils, but you may see other shapes in different animals. Cats, for example, have slit-like pupils.
Leave a ReplyCancel reply
You must be logged in to post a comment.
#5 Step
Generally speaking, eyes tend to be an equal distance apart, with about one eye’s distance in between. Again, this is in terms of realistic proportions—stylistic works may exaggerate these proportions.
Keep in mind, however, that «breaking the rules» can have mixed results! For example, larger eyes might turn out visually appealing, but eyes that don’t have a strong, visual relationship to each other could come off as unusual or visually awkward (unless that’s what you’re going for!).
How to Draw Eye Expressions Step by Step
This tutorial shows how to draw eight different eye expressions in a cartoon style with six drawing steps for each of them.
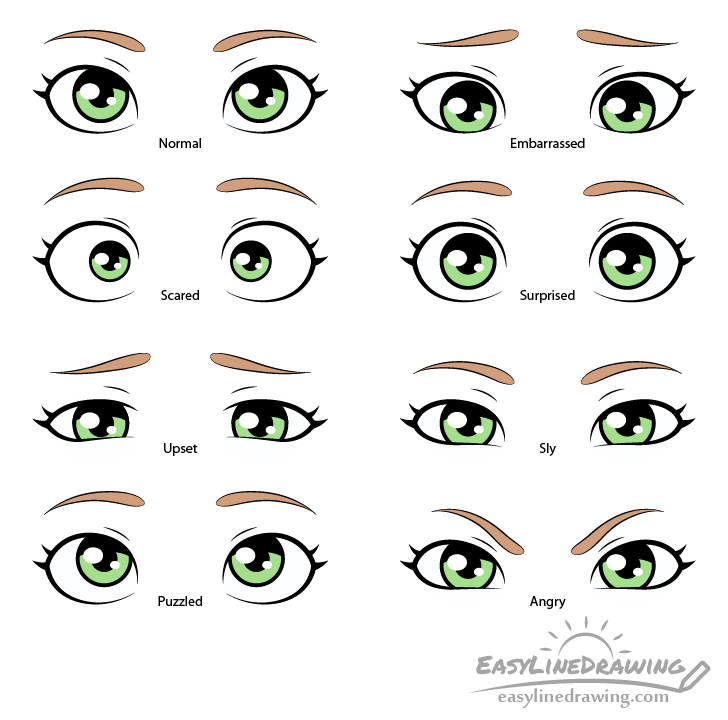
You can see a preview of the different expression in the example above.
This tutorial is more advanced (but should still be fairly easy) than some of the other ones here on EasyLineDrawing in that it has more detailed and in depth drawing instructions and explanations. It’s also fairly long and while you don’t need to go through every expression it is recommended that you read the instruction for drawing the first pair of eyes (normal eye expression) before looking at the others. The reason for this is that the normal expression is the one that all of the other ones are based on. For example when the instructions are to draw the eyes wider or make the irises smaller it means in relation to their normal state. The first example also has more detailed drawing instruction where the rest are somewhat simplified to avoid repetition.
Also as already mentioned the eyes in this tutorial are drawn in a style that is fairly common to cartoons and fairly stylized characters. For drawing an entire face in this type of style see:
Please note that the lines in all of the steps of this tutorial have been made dark so that they are easier for you to see. You should however start the drawing in pencil (unless drawing digitally) and make lights lines that can be easily erased in case you need to tweak things or make a mistake. You can darken your lines once you feel that everything looks right. For this particular tutorial it may be best to use a thin black marker to eventually go over your lines and to shade in the dark areas of the eyes. You can however also do it with the pencil.
How to Draw a Normal Eye Expression Step by Step
This first example is of the eyes in their normal/relaxed state. When the instructions for the other expressions say to draw the eyes wider/narrower, etc… That means in relation to these.
Step 1 – Draw the Outlines of the Eyes
As these are stylized/cartoon eyes draw them much wider and larger than you would real eyes.
Begin the drawing with an outlines of their outer shapes. These outlines will also partially act at the eyelashes.
Make the outlines thicker towards the outer ends of the eyes and thinner towards their inner ends. Leave a little gap in the outline at the inner ends as well.
Also draw each eye to be angled slightly downwards towards the middle of the face (the inner end should be lower down than the outer end).
Step 2 – Draw the Irises
Make the irises round and fairly large. Position them so that they are just slightly covered by the upper eyelids and are a little bit up from the bottom eyelids.
Step 3 – Draw the Eyebrows
Above the eyes add the eyebrows. Draw each of these in a smooth curve with thicker inner ends and pointy outer ends. You can angle them just a tiny bit inwards as well.
Step 4 – Draw the Pupils/Highlights
Inside each eye draw the pupils overlapped by the highlights (light reflecting from the eyes). Position the pupils directly in the center of the irises and make them round in shape.
Next draw a pair of oval highlights overlapping the outlines of the pupils and erase the parts of the pupils where the two overlap. Position the highlights on the opposite sides of each pupil with one higher up than the other. Also make one highlight larger and the other one smaller.
Step 5 – Add the Eyelids, Eyelashes and Shading
Just a tiny bit above the eyes give a hint of the upper parts of the eyelids with a pair of curved lines. You can have these curves pretty much follow the shape of each eye.
Once you add the eyelids you can shade the outlines of the eyes, upper areas of the irises and the pupils black or pencil shading. As mentioned at the start of the tutorial a good way to do this (if drawing on paper) is with a think black marker but you can also do it with the pencil.
Afterwards also trace over the rest of the lines using the marker darker pencil lines. However you DO NOT need to trace over the outlines of the highlights, you can leave these with light pencil outlines. Not having a dark outline around the highlights can them appear lighter and more like actual reflections. This is however optional as some cartoon styles do draw dark outlines around the highlights as well. So if you like the black outlines you can add them.
Next add some individual eyelashes to the outer corners of each eye. As these are stylized lashes you only need a few and you can make them fairly thick. You can again quickly outline the eyelashes with a pencil and then fill them in with black using a marker or shade them in with the pencil.
Step 6 – Color the Eyes
To finish the drawing color the pupils and the eyebrows. In this case the pupils will be green and the eyebrow brown as these colors go well together. Also be sure to leave the highlights white. If you chose to not have dark outlines around them you can carefully erase any visible pencil outlines so that they are completely white like in the above example.
Once done you should have a finished drawing of a cartoon pair of eyes.
How to Draw an Embarrassed Eye Expression Step by Step
This next set of eyes can be used to show an embarrassed expression or a guilty look.
Step 1 – Draw the Outlines of the Eyes
Draw the outline of the eyes with the upper eyelids just a tiny bit lower than for the normal expression. Meaning that the top curve of their outline should be slightly flatter.
Usually the upper eyelids tend to lower when the eyes are looking down (like they will be in this case).
Step 2 – Draw the Irises
To show that the eyes are looking down draw the outlines of the irises much lower than you would for eyes that are looking straight ahead. They should be partially covered by the bottom eyelids while leaving a tiny bit of space between them and the upper eyelids.
Step 3 – Draw the Eyebrows
Draw the eyebrows in reverse of their normal curve with their inner ends lifted up.
Step 4 – Draw the Pupils/Highlights
Draw the pupils at the center of the irises being overlapped by the highlights. While the entire inner part of the eye will be shifted down you can keep their position in relation the irises same as for a normal expression.
Step 5 – Add the Eyelids, Eyelashes and Shading
Add a hint of the upper part of the eyelids with a curved lines just a bit above each eye. Next either fill in the outlines, upper parts of the irises and pupils with a black marker or shade them in with the pencil. Afterwards darken your lines either again with the marker or with the pencil. Tracing over the outlines of the highlights is however optional.
Finally also add in some eyelashes to the outer corners of the eyes.
Step 6 – Color the Eyes
To finish color in the eyes and eyebrows but leave the highlights white.
How to Draw a Scared Eye Expression Step by Step
This example is of a scared or startled expression of the eyes.
Step 1 – Draw the Outlines of the Eyes
Draw the eyes wide open with their upper eyelids raised and their bottom eyelids lowered. Overall this will make the shape of the eyes much rounder.
Step 2 – Draw the Irises
Draw the irises much smaller than for a normal expression and position them fairly close to the inner ends of each eye (towards the middle of the face).
While in normal eyes the size of the irises does not change in cartoon eyes drawing them smaller can help emphasize a scared look.
Step 3 – Draw the Eyebrows
Draw the eyebrows higher up with their inner ends raised.
Step 4 – Draw the Pupils/Highlights
As the irises will be drawn smaller you will need to draw the pupils and highlights smaller as well.
Step 5 – Add the Eyelids, Eyelashes and Shading
Above each eye add a hint of the upper part of the eyelids. As the eyes are wide open you can draw the eyelid curves very close to the outlines of the eyes. Once done fill in the outlines, upper parts of the irises and pupils with a black marker or shade them in with the pencil. Next darken your lines by tracing over them with the marker or pencil. Tracing over the outlines of the highlights is optional.
Finally add a hint of eyelashes to the outer corners of each eye.
Step 6 – Color the Eyes
Finish the drawing by coloring the irises and eyebrows. Also remember to keep the highlights white.
How to Draw a Surprised Eye Expression Step by Step
This example is of a surprised expression which is very similar to the scared.
Step 1 – Draw the Outlines of the Eyes
Similar to the scared expression draw the eyes much wider than normal.
Step 2 – Draw the Irises
Unlike the scared expression draw the irises the same size as you would for a normal expression.
Step 3 – Draw the Eyebrows
Draw the eyebrows higher up and with their inner corners raised.
Step 4 – Draw the Pupils/Highlights
Inside each eye draw the pupil overlapped by a pair of highlights, same as you would for a normal expression.
Step 5 – Add the Eyelids, Eyelashes and Shading
Add a pair of curves (one above each eye) to show a hint of the upper parts of the eyelids. Again same as for the scared expression draw these closer to the outlines of the eyes than normal.
Fill in the outlines, upper parts of the irises and pupils with a black marker or shade them in with the pencil. Next trace over your lines with the marker or pencil as well. Again, tracing over the outlines of the highlights is optional.
Afterwards add in a hint of eyelashes to each eye (as shown in the example).
Step 6 – Color the Eyes
Finish the drawing by coloring the irises (leave the highlights white) and eyebrows.
How to Draw an Upset Eye Expression Step by Step
This example is of upset or sad eyes.
Step 1 – Draw the Outlines of the Eyes
For this expression make the eyes much narrower and draw their inner ends much farther apart than normal.
Also tilt the overall shape of the eyes in the opposite direction so that now they have their inner ends raised and outer ends lowered.
Step 2 – Draw the Irises
A large portion of both the upper and lower part of the irises should be covered by the eyelids (more so for the lower part).
Step 3 – Draw the Eyebrows
Draw the eyebrows in reverse of their normal curve with the inner ends raised and slightly closer together than normal.
Step 4 – Draw the Pupils/Highlights
Draw the pupils in the center of the irises overlapped by the highlights same as normal.
Step 5 – Add the Eyelids, Eyelashes and Shading
Add a pair of lines to show the upper part of the eyelids. As the eyes are drawn narrowed position the eyelid lines higher up in relation to them. Next fill in the outlines, upper parts of the irises and pupils with a black marker or shade them in with the pencil. Afterwards darken your lines again with either the marker or pencil. Tracing over the outlines of the highlights is optional. Once done you can also add in some eyelashes to the outer corners of each eye.
Step 6 – Color the Eyes
Finish the drawing by adding some color to the irises and eyebrows. Again remember to keep the highlights white.
How to Draw a Sly Eye Expression Step by Step
This example is of a sly expression like when a character is plotting something.
Step 1 – Draw the Outlines of the Eyes
For this expression draw the eyes much narrower than normal with the upper eyelids lowered and the lower eyelids raised.
Step 2 – Draw the Irises
Draw the irises with a good portion of both tier bottom and top being covered by the eyelids.
Step 3 – Draw the Eyebrows
You can draw the eyebrows same as for a normal expression.
Step 4 – Draw the Pupils/Highlights
Draw the pupils in the center of the irises with overlapping highlights (same as normal).
Step 5 – Add the Eyelids, Eyelashes and Shading
Add a hint of upper part of the eyelids above the eyes. As the eyes are narrower draw the eyebrow farther up in relation to them than you would for a normal expression.
Fill in the outlines, upper parts of the irises and pupils with a black marker or shade them with the pencil. Next trace over your lines again with either a marker or pencil. Tracing over the outlines of the highlights is optional.
Finish this step by adding a pair of eyelashes to the outer corners of each eyes (as shown in the example).
Step 6 – Add Color
Finish the drawing by applying some color to the irises and eyebrows (remember to keep the highlights white).
How to Draw a Thinking Eye Expression Step by Step
This example can be used for showing a thinking, daydreaming or puzzled expression of the eyes.
Step 1 – Draw the Outlines of the Eyes
For this expression draw the eyes open wider than for a normal expression but not as wide as for the scared/surprised ones.
Step 2 – Draw the Irises
Draw the eyes rolled up by positioning the irises further up and slightly closer together than normal. A good portion of their upper end should be covered by the eyelids.
Step 3 – Draw the Eyebrows
Draw the eyebrows somewhat raised with their inner ends higher.
Step 4 – Draw the Pupils/Highlights
Position the pupils in the center of the irises overlapped by the highlights (same as normal).
Step 5 – Add the Eyelids, Eyelashes and Shading
Draw a curve above each eye to give a hint of the upper part of the eyelids. As the eyes are wide open position it closer to their outlines than you would for a normal expression.
Fill in the outlines, upper parts of the irises and pupils using a black marker or shade them in with the pencil. After that also trace over your lines again with the marker or pencil. Tracing over the outlines of the highlights is optional. Next add a some individual eyelashes to the corner of each of the eyes.
Step 6 – Color the Eyes
Finish the drawing by adding color to the irises (leave the highlights white) and eyebrows.
How to Draw an Angry Eye Expression Step by Step
This example can be used to show an angry or “ticked off” expression of the eyes.
Step 1 – Draw the Outlines of the Eyes
For this expression draw the yes much narrower than normal and with the inner ends of their upper eyelids lowered even further.
Step 2 – Draw the Irises
Draw the irises with a good portion of their tops and bottoms covered by the eyelids.
Step 3 – Draw the Eyebrows
Draw the eyebrows much lower down with their inner ends lowered past the upper curve of the eyelids.
Step 4 – Draw the Pupils/Highlights
Draw the pupils in the middle of the irises being overlapped by the highlights same as normal.
Step 5 – Add the Eyelids, Eyelashes and Shading
Add a hint of the upper part of the eyelids above each of the eyes. While normally these would be higher up in relation to narrowed eyes in this case they are also being pushed down by the eyebrows so you can draw them lower down.
Fill in the outlines, upper parts of the irises and pupils with a black marker or shade them with the pencil. Afterwards once again use either a marker or pencil to darken your lines by tracing over them (tracing over the outlines of the highlights is optional).
Finish this step by adding a pair of eyelashes to the outer corners of each eyes (see example).
Step 6 – Color the Eyes
Finally add some color to the irses and eyebrows to finish the drawing. Also remember to keep the highlights white.
Conclusion
Due to the variety of examples and the detailed drawing steps this tutorial is quite long. To reduce the amount of repetitive drawing instructions the first example provides the most detailed breakdown of the drawing process with the rest focusing more on how the different parts of the eyes shift based on a given expression. For this it was recommended at that start of the tutorial that you read over the drawing instruction for the “normal eye expression” example before going into any of the other expression. If you may have missed it again it’s recommended that you go back and read over those drawing instructions if you want a better understanding of why things are drawn a certain way. Other than that hopefully this tutorial helped you get a better understanding of how to draw different kinds of eye expressions in a cartoon style.
If you liked this tutorial you might also want to try some of the following:


