How to draw chibi body
How to draw chibi body
Easy Steps to Creating Chibi Characters
Have you ever drawn stylized mini versions (“chibis”) of your characters? Small and cute chibis are great for illustrations or for printing on keyrings and other accessories. In this tutorial, I’ll show you some tips for drawing chibi characters and preparing the image file for printing as keyrings or other items.
What’s a Chibi?
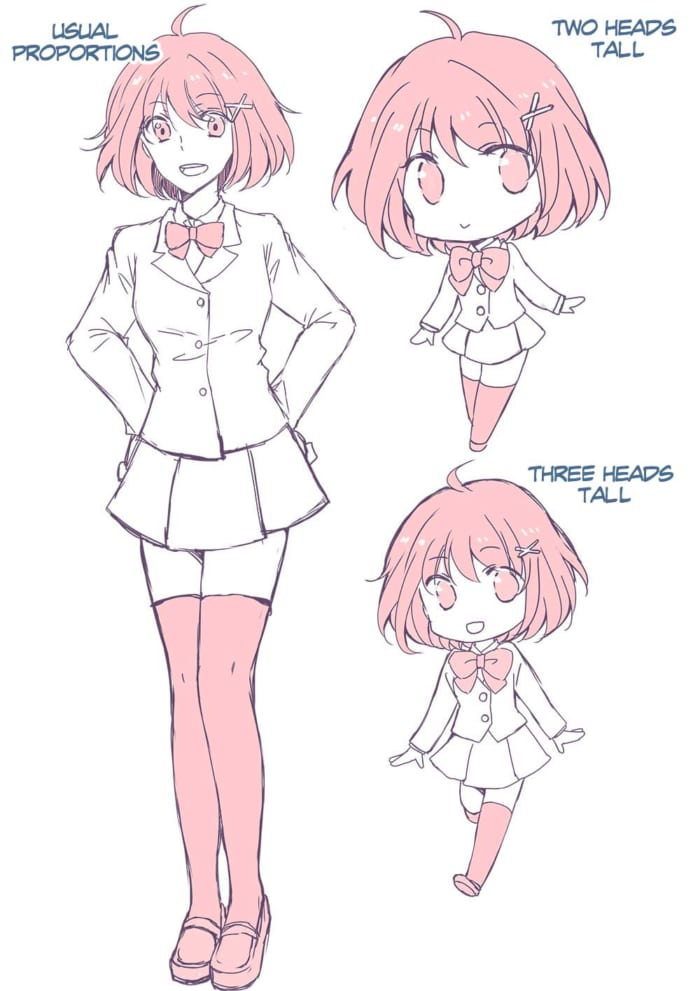
A chibi is a form of stylized character drawing that originates in Japan. Chibi characters are usually between two and four heads tall.
They are often used on merchandise for popular anime series. With huge, distinct facial expressions, they are also useful when good at creating a fun or cute atmosphere.
In this tutorial, I will teach you how to draw chibi characters.
Once you know how to draw chibis, you may find it much easier to draw these cute characters compared to typically proportioned characters.
Notes for Drawing Chibi Characters
● Chibis have uniform size and shape
Most chibi characters are around the same size and body shape, regardless of the gender, face size, height, body shape, and age of the original design.
In other words, a six-head-tall girl and an eight-head-tall man would have the same body shape as a two- to three-head-tall chibi character.
If you learn the main points of drawing chibis, you can create any character in this style.
● Find points that make the characters stand out
Even though chibi characters have the same basic body shape, you need to find a way to differentiate between multiple characters.
You can bring out the character’s personality by emphasizing the essential features of each character. In particular, the eyes, hairstyle, and clothing.
●Focus on balance
Chibi characters can be anywhere from two to four heads tall, but I’ll use two-head-tall chibis for these examples.
There isn’t a rule on the proportions, and people will have different preferences on how they draw chibis. To start with, try to learn how to draw one particular proportion.
Once you learn how to draw a chibi, you can apply the same principles to versions with slightly different body proportions.
There are a few differences based on the proportions, which we’ll cover in the body section later.
Drawing the head
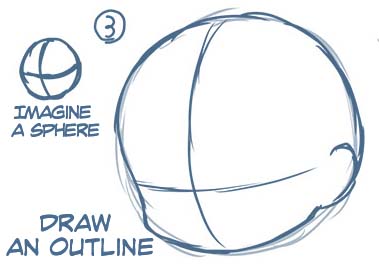
● The head is a sphere, not a circle
The first step of a chibi character is the head.
When drawing a chibi character, focus on the overall roundness and remember that the head is spherical.
Most people think of chibis as a 2D stylization. But actually, there are many chibi anime dolls as well, such as “Nendoroid” from Good Smile Company, Inc. Try to think of your chibi character in a 3D space.
The head is round and large compared to the body.
….In fact, so big that I’m not sure how the head is supported!
A chibi character with a sense of depth will appear much cuter, so keep the 3D space in mind as you draw.
●Drawing the head (two-head-tall version)
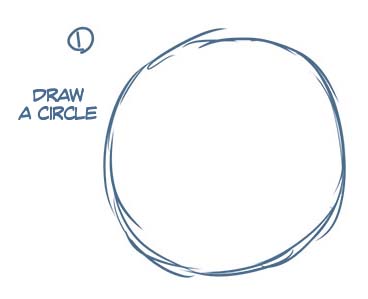
1. Draw a circle
First, draw the rough outline as a circle.
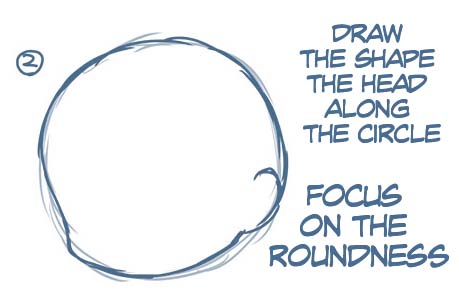
2. Draw along the circle
Draw the outline of the head around the circle.
One feature that differentiates a chibi from a typical human is the lack of sharp edges around the jawline. I mentioned earlier that you should focus on the roundness, as most parts of chibi character are soft and round. I replace the sharp jawline with a smooth curve.
3. Draw guides
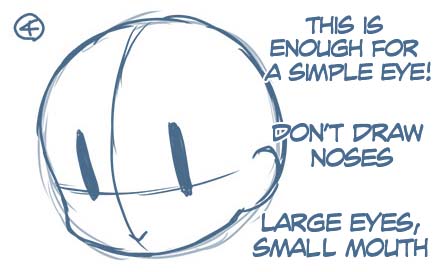
Draw guide lines for placing the eyes and mouth.
As I mentioned earlier, since the head is a sphere, draw the guide following the shape of a ball instead of flat paper. (You can imagine the curve of the latitude and longitude lines of the earth as an example of this.) The eyes of a chibi are quite large, so place the horizontal line for the eyes slightly lower.
4. Draw the eyes and mouth
Draw the character’s eyes and mouth. The eyes of a chibi express the most emotion, so draw them very large.
For some comical expressions, the eyes are drawn only with straight lines.
The mouth is small, and you can often omit drawing the nose. You can also use a small dot to represent the nose.
Since I will change all sharp edges into a curve, I omit sharp parts such as the nose.
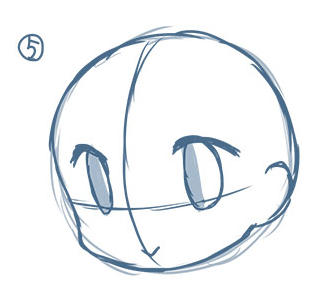
5. Draw details of the eyes
Make the eyes neater and add some more detail compared to the previous simple eyes.
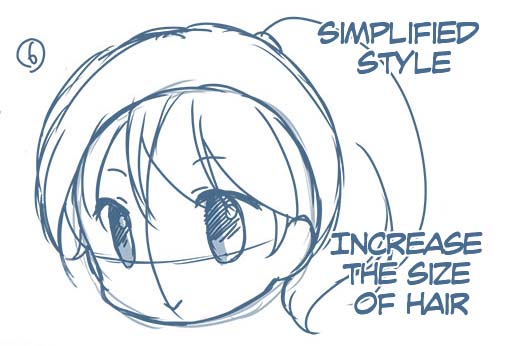
6. Draw the hair
Draw some hair for your chibi. First, draw a voluminous shape of the hair around the outline of the head.
It’s a good idea to use a simplified hairstyle compared to the regular-sized character. Use soft tips for the ends of the hair.
Now the head is finished.
Compared to a regular face, keep the lines as simple as possible.
The key to creating a chibi character is to reduce information while leaving the key features.
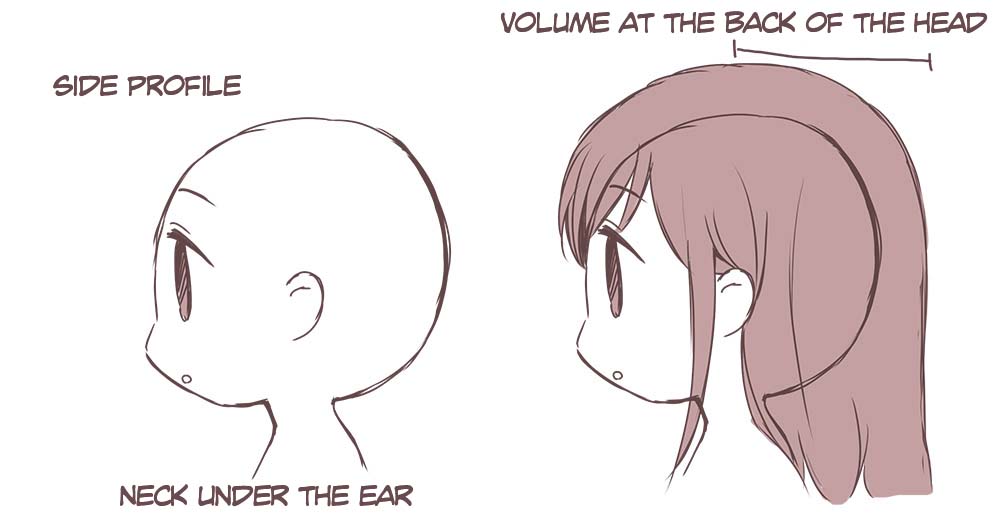
When drawing the side profile, keep in mind the spherical shape of the back of the head.
The position of the neck is slightly tricky when drawing a side profile. You can place the neck under the ear.
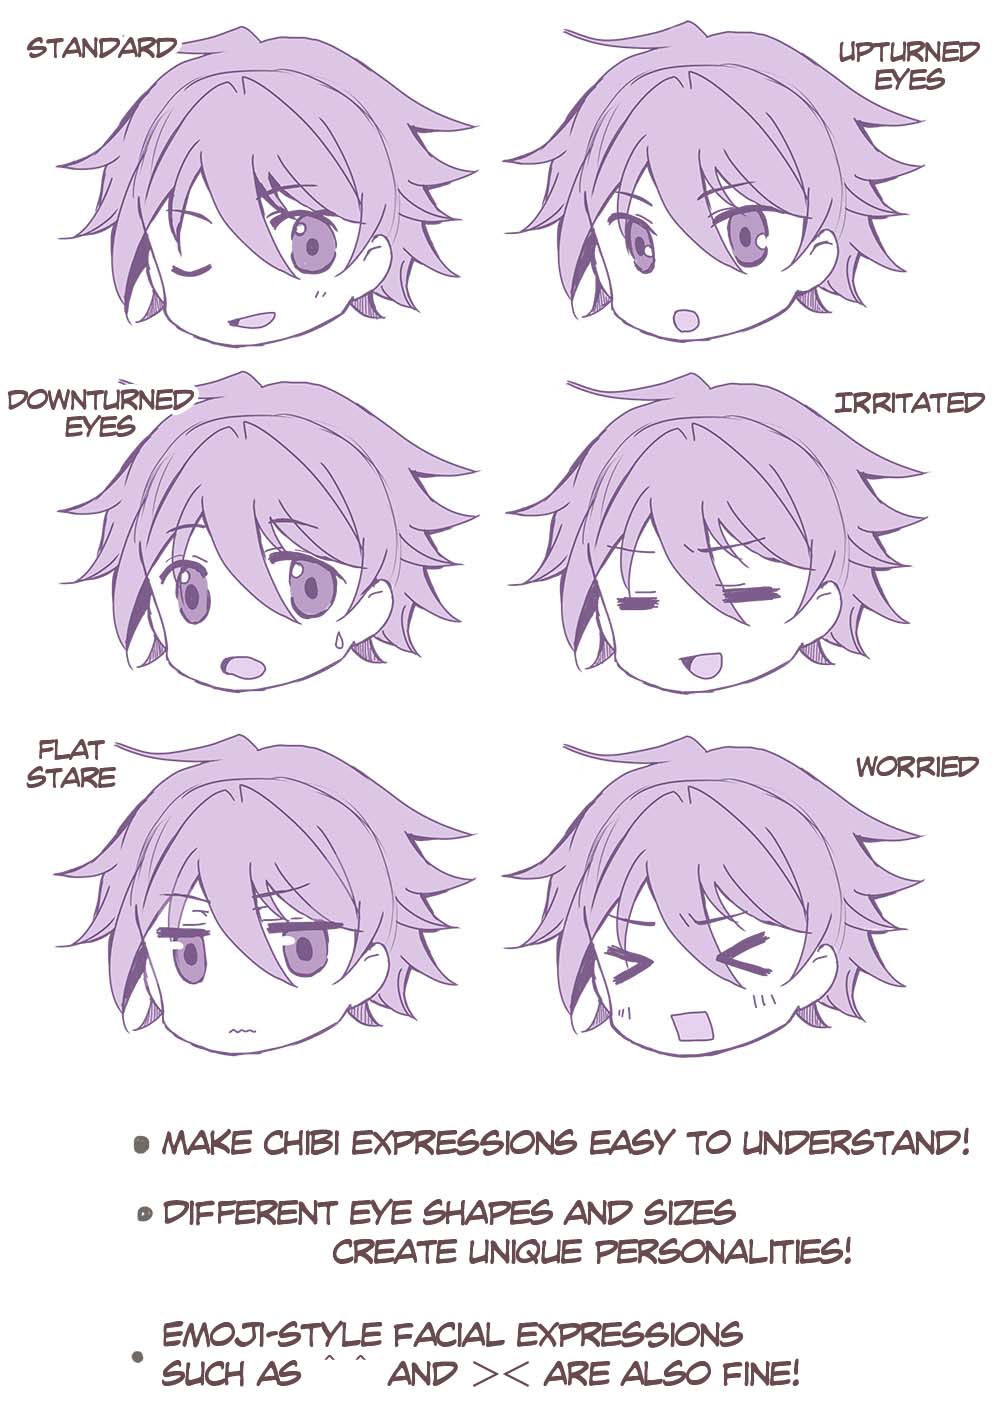
● Emotion comes from the eyes
Chibis have huge eyes that express their characteristics and feelings. Does the character have upturned or downturned eyes? Does the character have round eyes or thin eyes?
The eyes are the most important, as they can create a totally different effect with expressions.
Chibis can have exaggerated features for a comedic effect, so don’t be afraid to push their expressions to the extreme.
Since they are so tiny, you can bring out the childish aspects of the characters.
Drawing the Body
● Ignore the skeleton when drawing the body
When drawing a chibi body, focus on softness, and ignore the usual rules of bones and joints.
When I say “softness,” I mean a squishy and soft feeling like a stuffed animal. You don’t need to worry too much about the skeleton frame or joints.
Of course, knowing the basics of how the body works will affect the drawing, but you do not have to be strictly bound to these principles. Since the body is already too small to support the head, you can ignore some rules of physics when you draw. This freedom is one advantage of chibi characters.
● Drawing the body
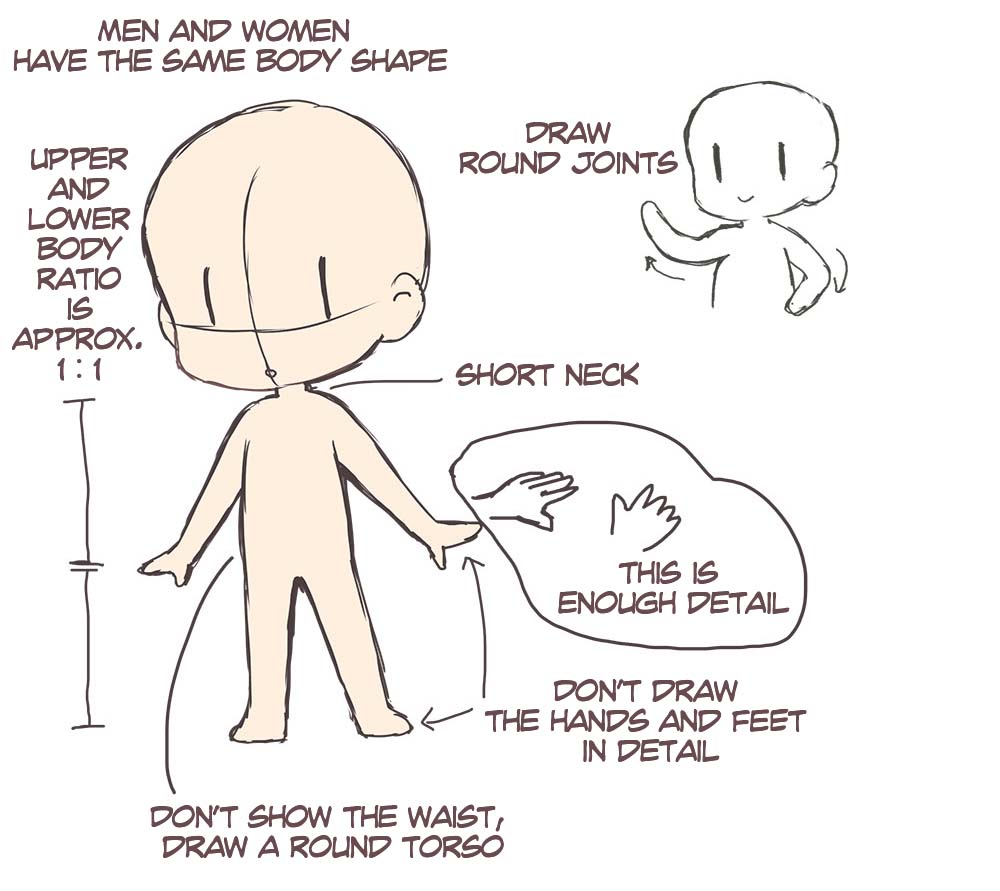
A 1:1 balance between the torso and legs will create a well-balanced body.
With that said, you don’t need to obey any specific rules for chibi characters!
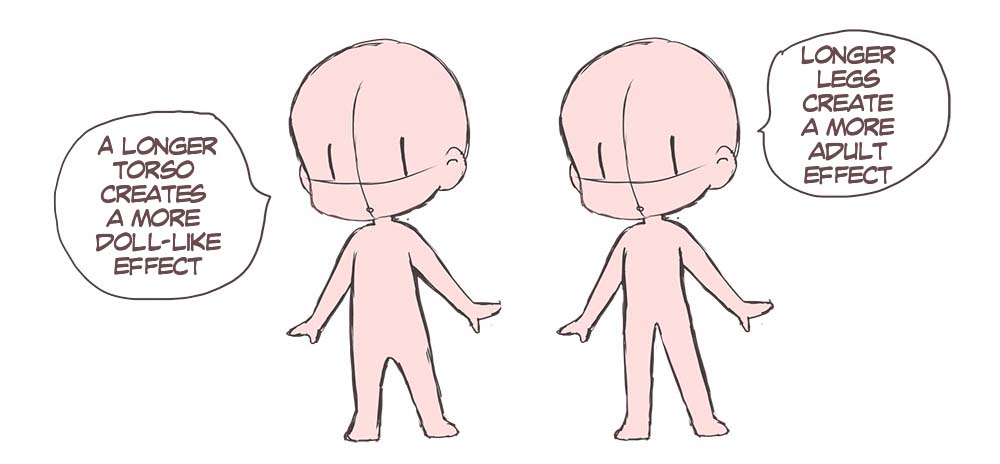
A longer torso will make the chibi look cuter and more doll-like.
Longer legs create a more mature effect, even with the same head-to-body ratio.
Choose whichever proportions you prefer.
・ Neck
The neck can disappear with a two-head-tall character.
If you draw the neck, keep it short and thin.
You should omit any unneeded parts on a chibi character, so you don’t have to draw the neck.
However, make sure the head and body connect at the right position.
・ Shoulders
Drawing broad shoulders creates a more rugged effect and reduces the cuteness.
Sloping shoulders suit both male and female chibi characters.
・ Torso
On a normally-sized drawing, a woman might have a defined figure, but you can ignore those features for a chibi character.
If the character has some defining characteristic, you can draw that.
The main element of chibi characters is cuteness. A detailed body shape would be too realistic, so they are typically drawn with a childlike body.
・Arms and legs
Slender limbs will make the character look too mature, so keep the arms and legs relatively thick, ignoring realism with the joints and muscles.
You can make the legs thinner towards the feet, or keep the thickness consistent.
You can decide whether or not to draw the fingers and toes, but the chibi can look a little odd with detailed fingers. I recommend dividing the hand into two shapes: the thumb and the four fingers. You can consider drawing the hands and fingers in more detail if the character is three heads tall.
Note: When drawing a three-head-tall body, you should define the shape more clearly than a two-head-tall body.
In particular, by drawing curves around the chest, waist, and hip, the character will look more mature than with a two-head-tall body.
Express more personality!
● Maximize and emphasis unique features
Now that you can draw a chibi, let’s focus on bringing out the character’s personality.
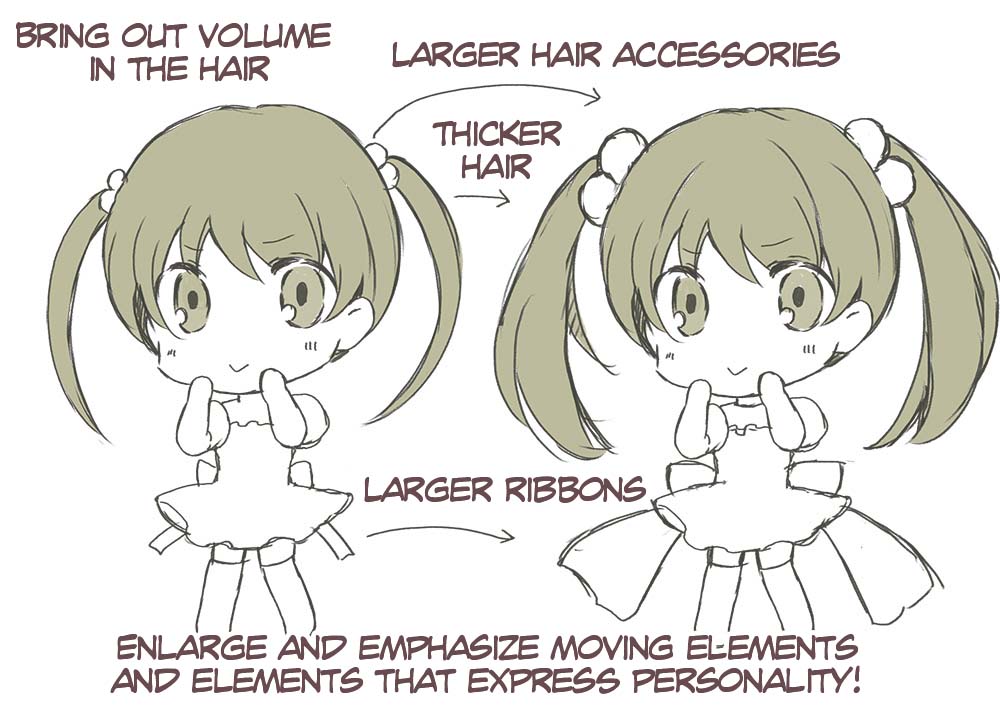
Mini characters have identical body shapes, so it can be hard to distinguish between them at a single glance. How can we differentiate between characters? The answer is, of course, exaggerate the character’s features!
For example, if the character wears glasses, draw them larger. If the character has long hair, make it even longer. The same applies to the clothes of the character.
In this way, you can clearly distinguish the different characters you draw.
Changing the hair is useful in many cases.
If you increase the amount of hair, make it resist gravity, or make the character’s hairstyle more unique, it will change the character’s appearance.
Did you enjoy my tutorial?
As I mentioned at the beginning, if you learn how to design a chibi character by yourself, you will be able to draw more characters with the same body shape. You can also apply the tips for drawing the face and the body to other chibi characters.
Based on the same body shape, you can differentiate between characters by drawing different hairstyles, eye shapes, and clothes.
And since chibi characters can ignore gravity, you can draw poses that are usually impossible.
Always prioritize the cuteness of the character over the realism of the pose.
BONUS: How to create accessories
Creating a zine or a comic is pretty complex, so why not start with creating small items?
Today, I will explain how to prepare art for acrylic keychains, which are easy to make and look cute with chibi characters!
(You can make most other acrylic goods, such as acrylic stands, in the same way.)
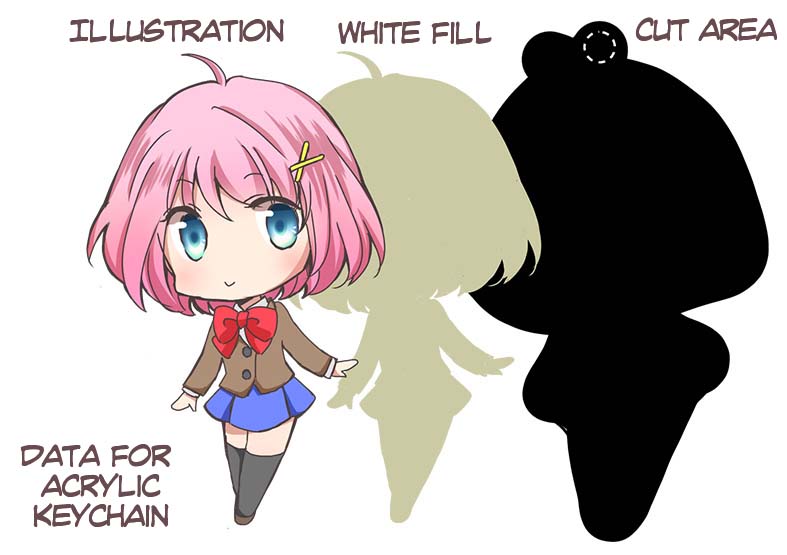
An acrylic keychain usually requires three separate data, depending on the printing vendor template.
Open the template, and paste these images on separate layers, usually the following:
・Artwork
・White fill
・Cut area
Then, send the data to the printing vendor.
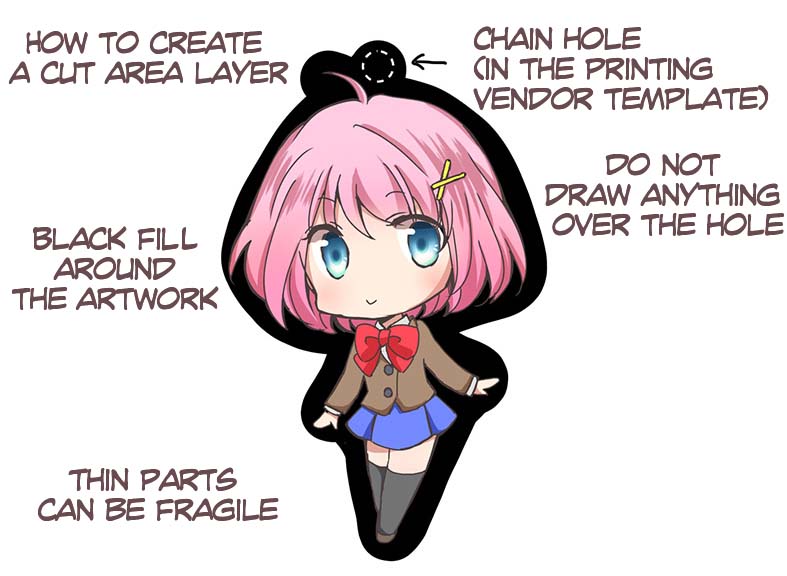
At the top, indicate where to place the hole for the keyring chain.
Make sure you don’t draw anything over the hole.
The white fill is the base color under the illustration.
Without this white base, the illustration will be printed directly on the transparent acrylic, which makes the colors appear translucent and hard to see.
To print your illustration as you created it, make sure to create a white fill layer.
It is easy to create this data – create a duplicate of the illustration layer and fill it with a solid color. The printing vendor will print this layer in white.
Because it sits under the illustration, the shape should be a silhouette of the artwork. If you want certain parts to appear transparent, you can remove the white fill on those parts.
Cut area shows where the acrylic board will be cut.
The layer can be purely black. Fill the area surrounding the illustration in black.
Avoid creating a complex cut border, as the keyring maker may not be able to cut it.
Once you know how to prepare data for an acrylic keychain, you can make other acrylic accessories in the same way!
Make sure you understand the size of each item.
Similar articles
How to Make a Girl’s Face Look Cute
Simply Well Drawn: Part 1
The Difference Between Digital Manga and Hand-Drawn Manga
Simply Well Drawn: Part 2
Simply Well Drawn: Part 3
Simply Well Drawn: Part 4
Bring Energy and Life to Your Poses!
How to Layout Your Comic! Panels, Gutters, and Page Flow
How to draw and color anime hair
How to Draw Hair in Manga and Semi-Realistic Styles
Top Articles in Category
Easy Steps to Creating Chibi Characters
Tips for Creating Vertical Scrolling Webtoons
How to Layout Your Comic! Panels, Gutters, and Page Flow
How to Draw Hands and Feet
Creating a Hand-Crafted Style Webtoon
How to draw a comic strip with an iPad
The Difference Between Digital Manga and Hand-Drawn Manga
Simplifying Characters for Webtoons
Inking Superhero Comics in Clip Studio Paint
Simply Well Drawn: Part 1
How to Draw Powerful Sword Fighting for Comic panels & …
How To Draw Mountains
How to draw Gems, Crystals, and Gold
How to Draw Comic Covers
How To Draw Animal Heads & Snouts
How to Draw Bottles & Glasses
How To Draw A Tree
How To Draw Bird Wings
Creating a Dynamic Landscape Composition with Silhouette
How To Draw Glasses & Goggles
Recommended Articles
Featured Pro Portfolio: Phil Saunders
Easy Tips for Drawing Eyes
Things You Need to Know to Become a Game Illustrator
Top Drawing Apps and Software in 2022 (Free & Paid)
Must-Know Tips to Improve Your Tablet Drawing Experience
Becoming a Concept Artist for a Hollywood Film
Keyboard Shortcut Guide for Artists
ArtStation Marketplace Success Story: Le Vuong
Exclusive Interview: Lois Van Baarle (Loish)
Finding and Correcting Drawing Mistakes
Easy Steps to Creating Chibi Characters
Bring Energy and Life to Your Poses!
Ultimate Guide to Blending Modes
Sculpting Forms, Using Value, and Brush Introductions
3 Reasons to Use Digital Art Software
Five Tips for Getting Noticed Online
How to Make Appealing Original Characters
How to Make Video Tutorials
Simply Well Drawn: Part 1
Learn to Draw Croquis Sketches
Learn the basics of digital art, from the tools you need to the steps of creating digital artwork.
Read art tutorials and interviews with concepts artists for films, games, and animation.
Learn techniques for creating expressive and fun character art with these tutorials.
Whether you’re creating manga, comics, or webtoons, here you’ll find the best techniques to create your story!
50+ Free Chibi Art & Drawing Tutorials For All Skill Levels
The chibi art style is just plain adorable. It’s derived from a Japanese term describing the process of “making something shorter”.
If you’ve ever looked into chibi work that description should make plenty of sense.
But you don’t have to learn the chibi art style on your own. That’s why I put together this list of fun chibi tutorials that anyone can follow. These are all free tutorials from YouTube and you’ll find lots of variety.
A complete noob at drawing and a pro artist could both follow these tutorials and learn a whole lot. If you’re trying to chibify your drawings keep this post bookmarked for future reference ‘cause there’s a lot of content to go through.
5 Ways to Draw Chibis
YouTuber Nautica Williams teaches you how to draw many different styles of chibi characters in this video.
It’s basically the perfect introduction for anyone who’s wanted to do chibi drawings before, but never quite found their “groove” with the style.
Regular chibi work has a unique style but there are variations on that. With Nautica’s video you’ll start with a few styles to try out some different ways to approach the artwork.
3 Bored Students at School
The fastest way to learn something is to do practice exercises.
That’s the main goal here with a 20-minute guided video tutorial on chibi drawing.
You’ll learn how to create a chibi art scene with 3 bored anime-style students hanging out at school.
Follow along the whole way and I guarantee you’ll learn a thing or two.
Yamio Chibi Tutorial
Sometimes the best content comes in strange packages. That’s how I’d describe this incredible tutorial featuring a guided chibi drawing lesson.
It spans about 30 minutes long and you’re studying from someone who never does any narration. That’s kind of difficult if you’re trying to draw and watch at the same time.
But you can either run split-screens with the video and your drawing software taking up 50% of the monitor… or you can run two monitors. I know, tough options.
This specific video uses Photoshop and Paint Tool SAI so if you have either of those programs you’ll be good.
Chibi Eyes Tutorial
When you look over chibi artwork there’s one specific feature that jumps out: the eyes.
Every single chibi drawing I find online has some crazy looking eyes. If you’re struggling to nail down the eye design have a look at this video.
It’ll teach you how to design chibi eyes from start to finish with plenty of guidance for newbies.
Female Chibi Head Tutorial
Another area you should focus on is the head. Typically most chibi characters have larger heads with odd proportions.
Check out this 10-minute clip teaching you how to draw a chibi head from scratch.
It covers most aspects of the female head but you can apply these lessons to both genders and mostly all ages too.
5 Top Tips For Drawing Chibis
The YouTube channel Chibi Village released this short video offering 5 awesome chibi drawing tips over 5 minutes.
Seems pretty simple right? Well it mostly is simple since chibi drawing is fairly easy to pick up.
But these tips will help you get there faster with less stress. I think that’s what every artist is looking for.
Chibi Girl In PJ’s
Now moving back into the more practical side of things we have this drawing tutorial on a little chibi girl wearing pajamas.
Want to master the chibi art style? Well then you’ll need to draw characters many times over to get the feel for it.
Try saving this video for later and follow along every week, every couple weeks, whatever you can do. Repetition breeds success.
Learnin With Bin – Chibis!
The popular BinOfTrash YouTube channel has a bunch of great drawing tutorials.
But few are as detailed or clearly explained as this free clip. It totals about 15 minutes of runtime discussing the absolute basics of chibi art.
Definitely a solid starting point for novices who want to draw fun chibi work fast.
Chibi Hatsune Miku
Hatsune Miku is one of the most recognized characters in the anime/manga style.
And thanks to Mark Crilley’s chibi video you can learn how to chibify Miku from start to finish.
It’s a lengthy video with just over 30 minutes of real-time audio instruction guiding you along the way. But by the end you’ll have quite a sense of accomplishment and the work to show for it.
How To Draw Chibi Hair
Earlier I mentioned the difficulties of chibi eyes. But those are usually the easiest features to start with.
If you want to draw chibi hair then check out this video. It’s a massive tutorial spanning almost a full hour of content focused on this one area.
But you’ll learn how to draw chibi hair in 6 different ways so it’s the best intro for beginners.
6 Ways To Draw Chibi Hair
Want another way to tackle chibi hair techniques? Then check out this brief video which is really an awesome follow-up to the previous video.
This vid also covers 6 techniques for chibi hair just like the one I mentioned above.
But in this video you’ll work traditionally with pencil and paper. This might be easier for anyone who doesn’t have a tablet and prefers working in graphite.
Chibi Edward Elric
Fullmetal Alchemist is one of the more popular animes that caught on with English-speaking audiences. That means the character Ed Elric is widely known among anime fans.
If you want to draw some chibi FMA art have a look at this video.
It only shows you one way to draw Eric but you’ll study everything including his hair and his distinct outfit.
Draw a Chibi Autumn Scene
This tutorial gets a little more detailed focusing on an entire autumn scene in chibi form.
Mark Crilley once again walks you through the process in a step-by-step fashion. He shows you how to draw the characters, arrange your lines properly, and how to color the scene with colored pencils.
A truly fantastic video for learning chibi through live example.
How To Draw Chibi Characters
If you’d like a little more variety then try this character tutorial focused on chibi art.
You’ll learn how to draw a few chibi-styled characters from scratch in a short time.
You can do this with any digital art software so it’s not about the tools here, but rather the focus and attention to detail.
Surprised
Facial expressions are tough to match and they’re especially tough for anime-style artwork.
But if you have a look at this drawing tutorial you can learn to make a surprised anime girl expression from start to finish.
This mixes the chibi style with traditional anime but the techniques can be applied to all chibi work.
Crying
In a similar manner as the previous video have a look at this one also focused on expressions.
Here you’ll learn to draw a crying girl with a very exaggerated face. This all comes down to understanding the art style and knowing how to replicate those faces.
The more you practice something like this, the more comfortable you’ll be with similar expressions.
Devious
We’ve also got a funny devious chibi character with one heck of a facial expression.
This isn’t something you’ll pull out all the time but it’s a really fun project. I do think it’s reasonable for beginners to work with this tutorial and still keep up no problem.
Just follow Mark’s advice along the way and pause the video if you need time to catch up.
Kiss On the Cheek
I’d call this video a fun mix of anime and chibi styles.
But at the end of the 20 minute tutorial you will absolutely have a better understanding of the chibi style & how to draw your own characters with strong linework.
Draw Chibi Facial Expressions
I wanted to find a tutorial covering all major facial expressions but there isn’t any single “best” tutorial for that.
Instead I did find this short video covering a bunch of chibi expressions over 2 minutes.
This won’t make you a master of chibi drawing but it will show you the various chibi expressions and how to approach them.
Drawing Chibi Step by Step for Beginners
Artist & author Christopher Hart has published hundreds of books across many different styles. He’s taught cartooning, illustration, and plenty of manga-style books that blend nicely with chibi art.
If you want instructions from a pro check out this chibi video featuring Chris Hart. It runs about 6 minutes long and it’s the best way to move into chibi work from scratch.
The step-by-step process does move quickly so it helps if you already have foundational skills developed. But even a novice could re-watch the video to pick up these lessons.
Chibi Detailed Lesson
Getting a little more technical we have this lengthier guide to chibi drawing.
Over a total of 17 minutes you’ll learn how to draw chibi characters in a step-by-step fashion. The goal by the end is to have the process in your mind with some familiarity & comfort.
You certainly won’t be an expert after this video but you should have a clearer idea of chibi drawing techniques.
Tips and Tricks: Chibi Basics
I’m a sucker for videos that cover unique art tips.
And that’s exactly what you’ll find in this 40-minute video talking about basic chibi drawing techniques.
You can pick this up from any skill level and learn a lot along the way. But these tips are best applied to your practice work so don’t try taking this all in at once.
Save it and keep coming back to it over time. You’ll be surprised how much you can improve.
Draw Sasuke
Redoing character designs can be some of the coolest exercises for artists.
If you’re a Naruto fan then you’ll probably enjoy this chibi drawing video teaching you how to draw Sasuke from start to finish.
The final version is pretty darn impressive and the artist does a great job chibifying this little guy.
Draw Harley Quinn
Going in another direction we have this Harley Quinn tutorial ready & waiting for chibi lovers around the world.
This one’s long totaling just over 20 minutes of step-by-step instruction.
You can find your own reference photos online if you want to follow along with a different photo too.
But when you’re brand new just follow this tutorial exactly to get the hang of it.
Halloween Chibi Witch
If you’re in the Halloween spirit and want to create a neat chibi piece then check out this video.
Over 9 minutes you’ll watch YouTuber Debby Arts draw a super adorable chibi witch girl.
You not only get to learn how to draw the character but also how to color and polish up the final piece.
Santa Chibi
In the spirit of seasonal drawings we also have this cool santa tutorial chibifying the man(er, woman?) from the north pole.
This one video is quite a bit different since it’s sped up and doesn’t feature too much voice over content. So you’d really need to watch the screen to follow along.
Not to mention the final design is a girl version of Santa Claus that looks crackerjack. How progressive!
Belle Chibi Version
Another tutorial by Debby Arts teaches you how to draw chibi Belle from Beauty and the Beast.
The final piece is magnificent and it’s a really unique pose for Belle. You can also tell at a glance that the design is definitely in the chibi style.
Replicate this tutorial as best you can because I do think you’ll pick up some practical drawing ideas along the way. And it’s a great place to start if you want to draw Disney characters in your own style.
Wolfboy
So you want something a little more creative than cartoon characters. Well how about a wolf boy in chibi form?
This quick chibi tutorial runs about 11 minutes long and shows you how to draw a little boy dressed as a wolf.
It’s a fun guide but it’s only meant to be the first pass.
Use this mostly as a guide to learn your pencil techniques and move onto coloring when you’re ready.
Chibi Minecraft Steve
Lovers of Minecraft will absolutely enjoy this chibi tutorial focusing on Steve from Minecraft.
It does move rather fast so you have to keep your eyes on the screen. Don’t worry if you get lost, just pause and rewind to catch up.
If you put in an honest 30-60 minutes of practice with this video I guarantee you’ll see yourself making progress.
Chibi Goku
Chibi Goku is perhaps the least threatening character redesign compared to the original.
But if you wanna draw Goku in chibi form this video has you covered. It’s a much longer video than the previous one totaling about 13 minutes for the whole drawing.
Dragon Ball Z fans who love chibi art should definitely make time to work through this classic tutorial.
Chibi Sora
If you’re more of a Kingdom Hearts person then why not dive into this Sora tutorial.
It’s not the best quality video but the final result is gorgeous. It’s probably one of the most creative chibi designs I’ve seen.
Absolutely worth your time if you love the KH series and can work through the potato quality video.
Chibi Tidus(FFX)
Final Fantasy is perhaps the largest RPG on the planet. And if you’re an FFX fan then you’ll certainly enjoy drawing Tidus in chibi form.
The tutorial guides you along the process from initial sketching to detailed coloring.
Unfortunately there is no voiceover so you have to make this into your own tutorial as you work through it.
Chibi Cloud and Tifa(FFVII)
With the announcement of an FF7 remake there is plenty of excitement from FF fans.
And if you wanna show your excitement with art you can follow this video for some FF7 chibi goodness.
It’s a really fun design with Cloud and Tifa riding on a Chocobo—all chibi of course.
Kawaii Pokémon
I won’t say this tutorial is 100% chibi but it still belongs in this list.
The style is similar and the colors feel right, but there is something a little off about the designs.
Either way this quick video teaches you how to draw cute chibi-ish Pokémon from start to finish.
Granted we did cover other tutorials on drawing Pokémon but those just aren’t as fun or chibified.
Chibi Goth
For a truly unique character design check out this chibi goth video.
It shows you how to design a simple goth character from start to finish, all using just a pencil and paper.
Not everyone will like this style but if you do it’s certainly worth mimicking.
Captain America
Who doesn’t love Captain America? He’s a patriotic superhero with glutes for days.
And in this video you’ll learn how to turn that muscular man into a tiny chibi creature.
Super fun with a really cool end result, but note this video moves fast and it’s not exactly step-by-step. You’ll have to put in a little work to follow along.
Jason Voorhees
The deranged star of Friday The 13th makes his way into chibi form in this tutorial.
Over 10 minutes you’ll get to see exactly how Jason can become a cartoon of his former self(literally).
Pretty easy to follow along and the video quality is superb.
Fionna from Adventure Time
Adventure Time is one of the best cartoons with some of the most creative artwork on TV.
Fionna is the counter to Finn and she’s probably the most fun to chibify. You can learn how in this tutorial if you’re willing to follow along.
It blasts music most of the way but you can mute the video while just copying what’s on screen.
Smurfette
Out of all the little blue Smurfs in the village, I think we can agree Smurfette is the cutest.
If you’d like to make her even cuter try following this video.
You’ll have a chibi Smurfette on your paper in no time and you can even use this style to draw some of the other Smurfs.
Princess Daisy
The infamous Princess Daisy gets chibified in this tutorial by the YouTube channel Chibi License.
They publish a ton of guides and tutorials for beginners who want to draw spot-on chibi characters.
Just note part of this video runs at a higher speed so you have to watch closely to follow along.
N from Pokémon
After searching for 15-20 minutes I couldn’t find any better anime character tutorials than this one featuring N from Pokémon Black & White.
He’s a newer character and not someone that you’d definitely know about if you never played the later games.
However his design is perfect for chibi since he’s got a lot of features to accentuate.
Total Shock!
I’m adding this tutorial into the mix because it shows you how to design shocked characters in a unique way.
You can take these lessons and apply them to any other characters you draw. Most of the time facial features are easy to swap if you know what you’re doing.
Note the background is not part of the tutorial so that’ll take a bit more practice to really get it down pat.
Lips For Manga & Anime
While this video doesn’t exactly focus on chibi alone, it does focus on the anime style with a very particular feature: human lips.
These are tricky in anime because they vary from a line to a more complex shape.
In this video you’ll learn how to draw lips over a full 40 minute session. Perfect for anyone who wants to draw chibi, anime, manga, or anything similar.
Chibis Wearing Animal Outfits
The furry community loves animal outfits in their drawings. But even non-furry fans can add cute little costumes onto their characters.
Have a look at this video spanning just over 8 minutes long. It’ll teach you not only the basics of chibi drawing, but also how to draw chibi with some neat animal costumes.
It doesn’t get more absurd and more adorable than this.
Draw Chibi in 2 Ways
Everybody likes real-time tutorials because they’re more exact and easier to follow.
That’s what you’ll find in this 15-minute video teaching you how to draw 2 distinct styles of chibi characters.
If you’ve made it this far into the list you’ve probably already seen a couple videos you like. But I do recommend saving this one too because it’s packed with oodles of info.
Draw Yourself As A Chibi Character
Let me start by saying that drawing yourself in any form is just hard.
It requires a lot of practice doing self portraits and learning to draw from life. So a 7 minute video isn’t going to replace all of that experience.
But if you want a place to start check out this tutorial on chibifying yourself. It really does help if you already have some artistic prowess but it’s worth a try no matter what your skill level.
Photoshop Chibi Tutorial
So you wanna go digital and start drawing awesome chibi art on your computer.
Adobe Photoshop is the premiere choice for most people and it’s why I’ve added this 20-minute video into the list.
You can learn how to draw chibi features all day long with some paper and a pencil. But that won’t always translate to drawing software so these kinds of video tutorials really do help.
Chibi Skin Coloring Tutorial in SAI
Here’s one more software-oriented tutorial with a focus on Paint Tool SAI.
Note that SAI is very popular in Japan so it makes sense that chibi artists would frequently use this program. And if you want to learn skin coloring with SAI get a look at this tutorial.
It’s pretty quick with just about 8 minutes of runtime but you’ll learn a lot from this video.
And the skin coloring techniques can apply to pretty much any software outside of SAI too.
Chibi Ice Climbers(Speedpaint)
Let’s wind down the list with a few speedpaint videos. These aren’t full tutorials but they are super fun to watch and educational if you can follow along.
I really like this speedpaint created by YouTuber JisuArt. It’s a full chibi version of the Ice Climber characters, two snow parka’d kids from the video game of the same name.
Whether you loved the game or never played it in your life, this speedpaint is well worth a watch from start to finish.
Chibi Link(Speedpaint)
Now this is a video game character everyone should recognize. Link from The Legend of Zelda gets the chibi treatment in this 8-minute speedpaint.
Again this is a sped-up video and it’s not meant to be a clear step-by-step tutorial.
But if you’re able to follow along you can replicate this same design on your own. The whole tutorial runs in Photoshop so if you already paint in Adobe software you’ll be familiar with the interface.
Chibi Knight(Speedpaint)
Here’s one final character design tutorial running in Clip Studio Paint. The video spans just over 10 minutes but it works like a speedpainting video.
Artist Rothana shows us how he designs a chibi knight character from start to finish in Clip Paint Studio. This includes the initial line work, digital inking work, and the whole digital painting tutorial.
If you’ve never done any chibi work before then these speedpaint videos will be intimidating. And that’s okay!
Maybe save these for later and start with some of the easier vids I mentioned in the beginning of this post.
But it doesn’t matter what kind of chibis you want to draw or where you’re starting from. I guarantee there’s a few tutorials in this list that’ll help you improve.
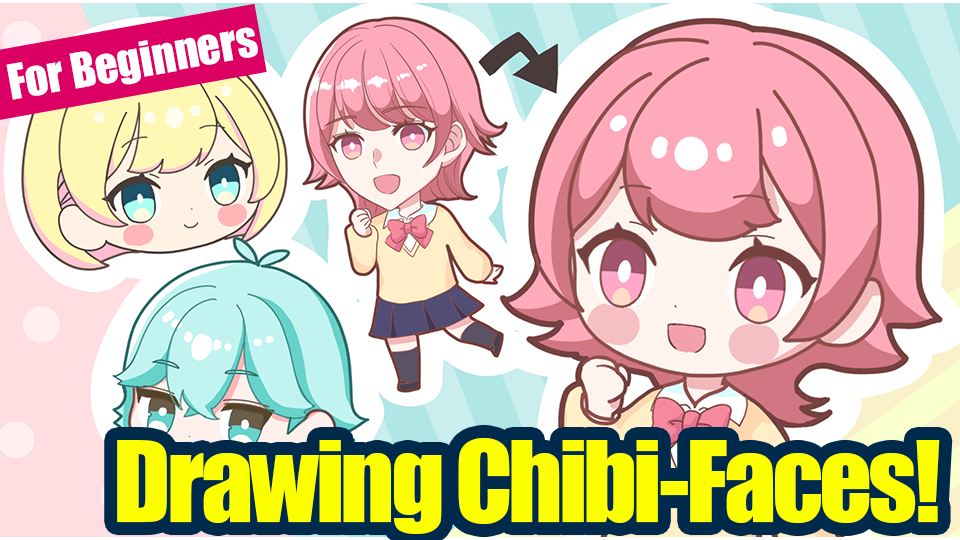
【For Beginners】Illustrating Chibi-Character Faces!【Tips on drawing eyes and hairs too!】
The simple and eye-catching chibi characters are easy to make into goods like acrylic key chains, and because they are so small that many people want to try drawing them for a quick start.
In this article, we’ll take a look at how to draw the face of a “chibi-chara”.
1. 3 Tips in drawing Chibi-Chara faces
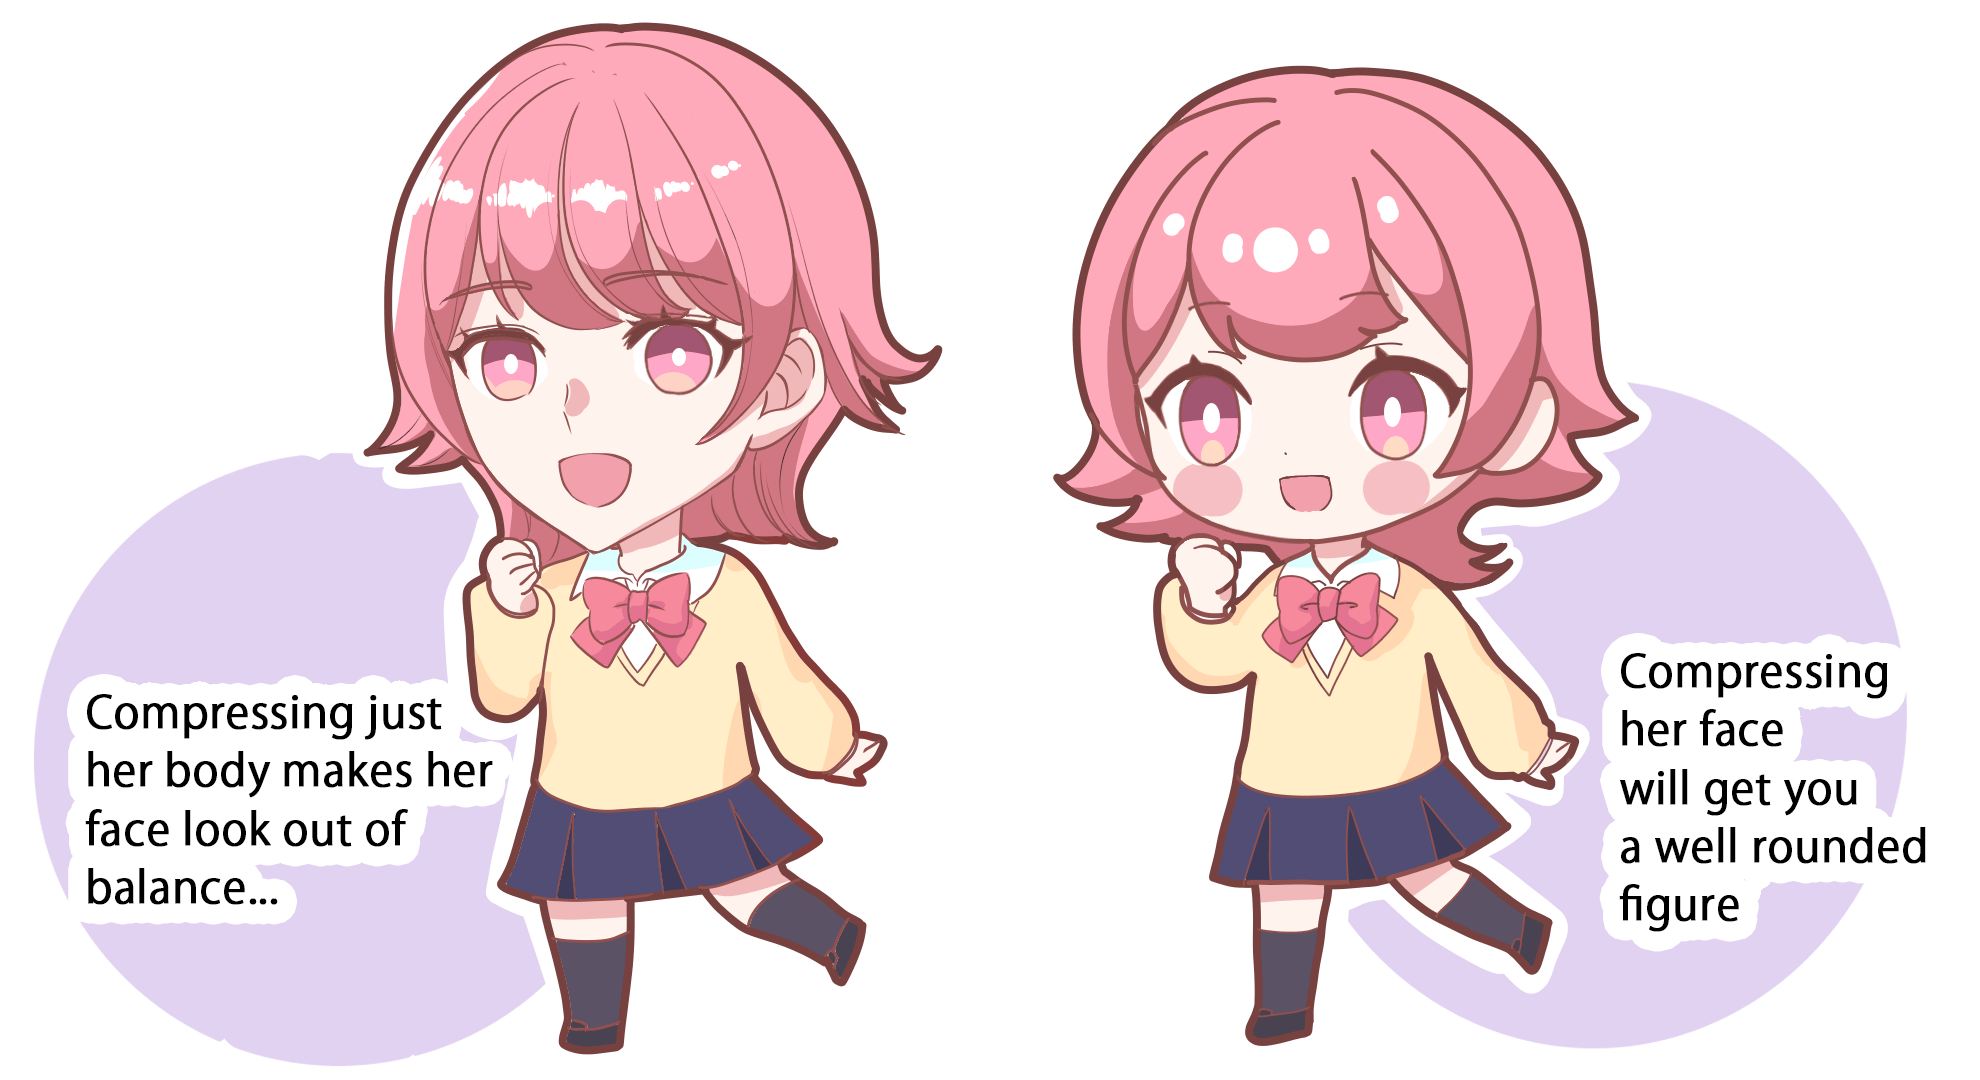
When drawing a chibi character, simply compress the character’s body.
Don’t forget to shrink not only the body but also the face like the image on the right below, or else the size of the face and body will be out of balance and awkward like on the left image.
When compressing the face, the three key points are
・Keep the outline round and simple.
・Make the face parts more round.
・Draw hair in thick strands.
Let’s take a look at each of these three points in detail while actually drawing the chibi character’s face.
2. Draw the head size
Now, let’s start drawing the face of a chibi character.
There are many different types of chibi characters, but this time I’d like to draw a face that fits a character about the length of two full heads.
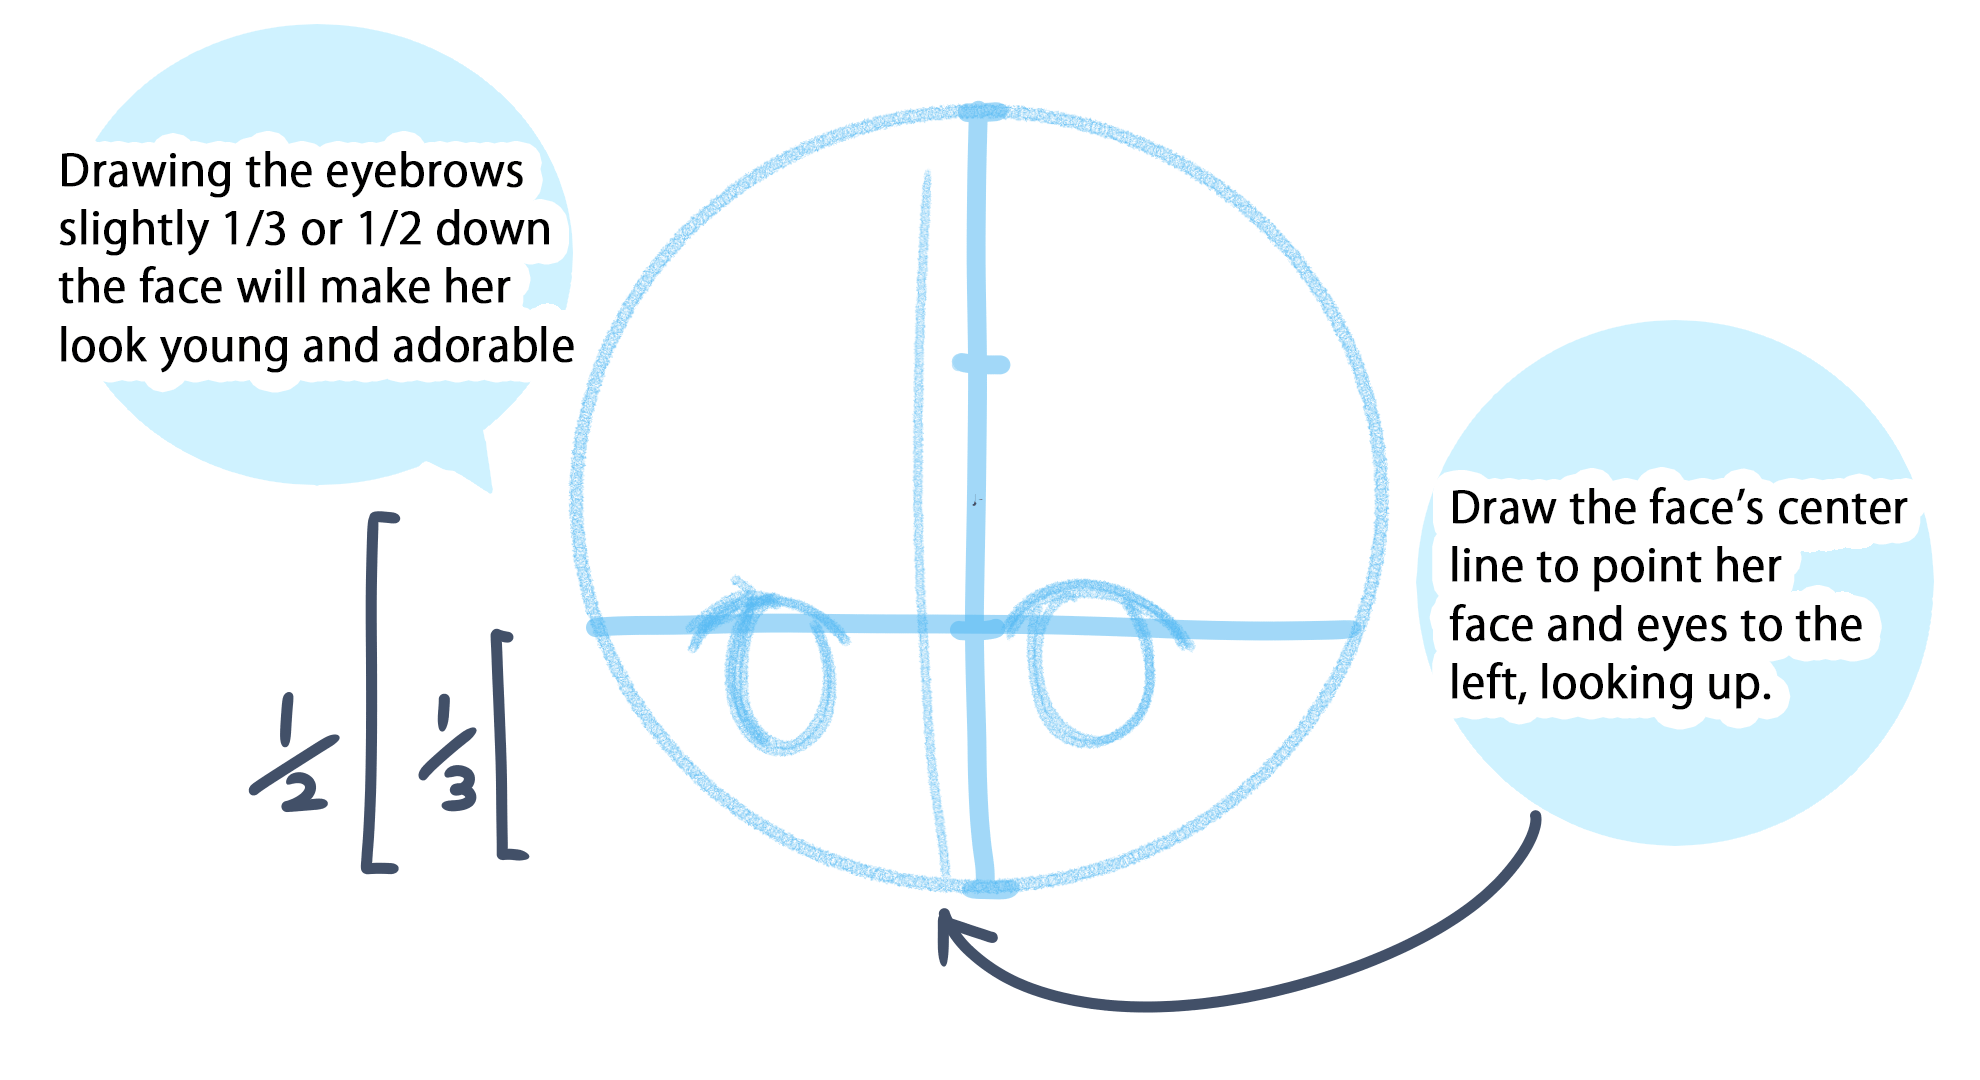
① Draw a circle
First, draw a circle to determine the approximate size of the face.
② Decide where to place the eyes
I usually draw the eyes of a chibi character a little lower than halfway down the face, or about a third of the way down.
Here I wanted to make her look cute, so I drew a cross about a third of the way down.
(I also draft the approximate shape of the eyes at this point.
Drawing the eyebrows slightly below one half of the face will make her look young and adorable. Also, the center line of the face is added slightly left of the cross to draw her eyes and face looking towards the left.
3. Draw the outline
Once the head size has been drawn, it is time to draw the outline.
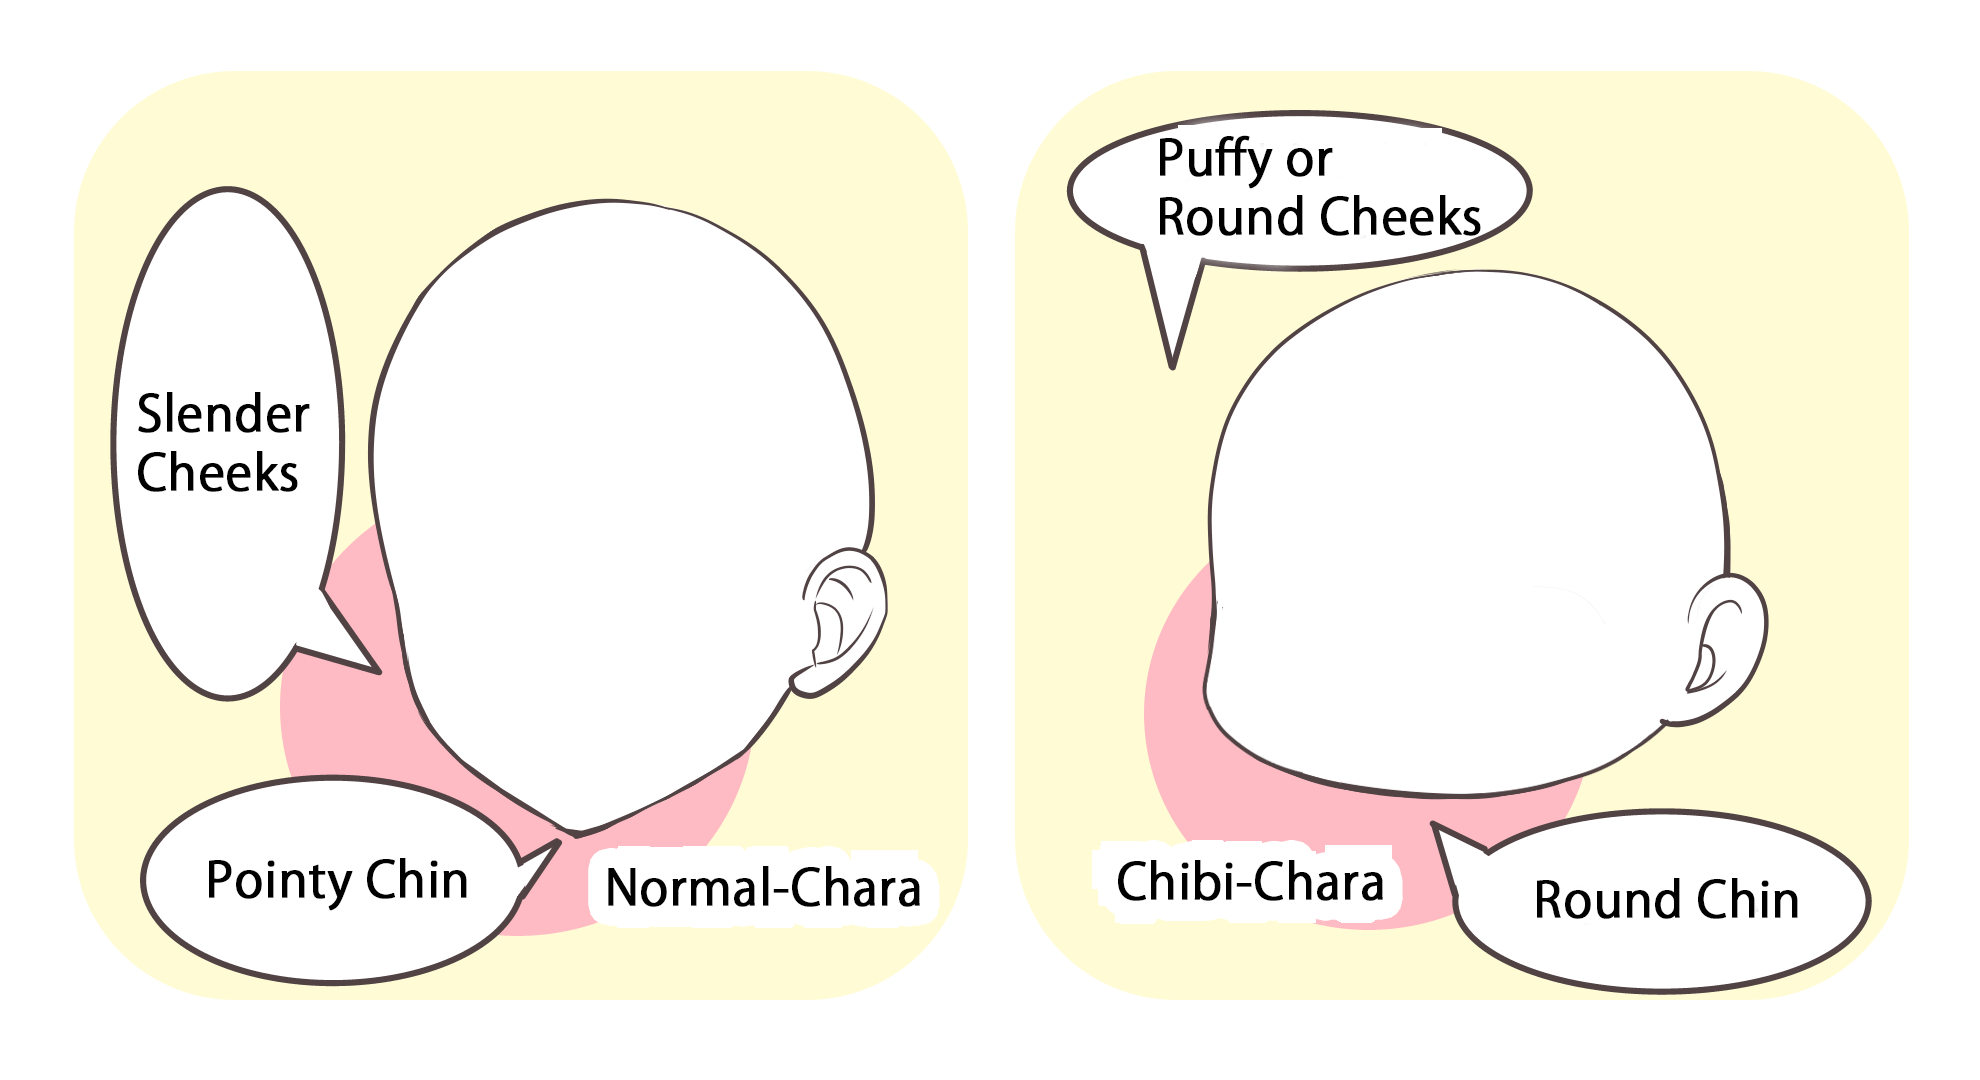
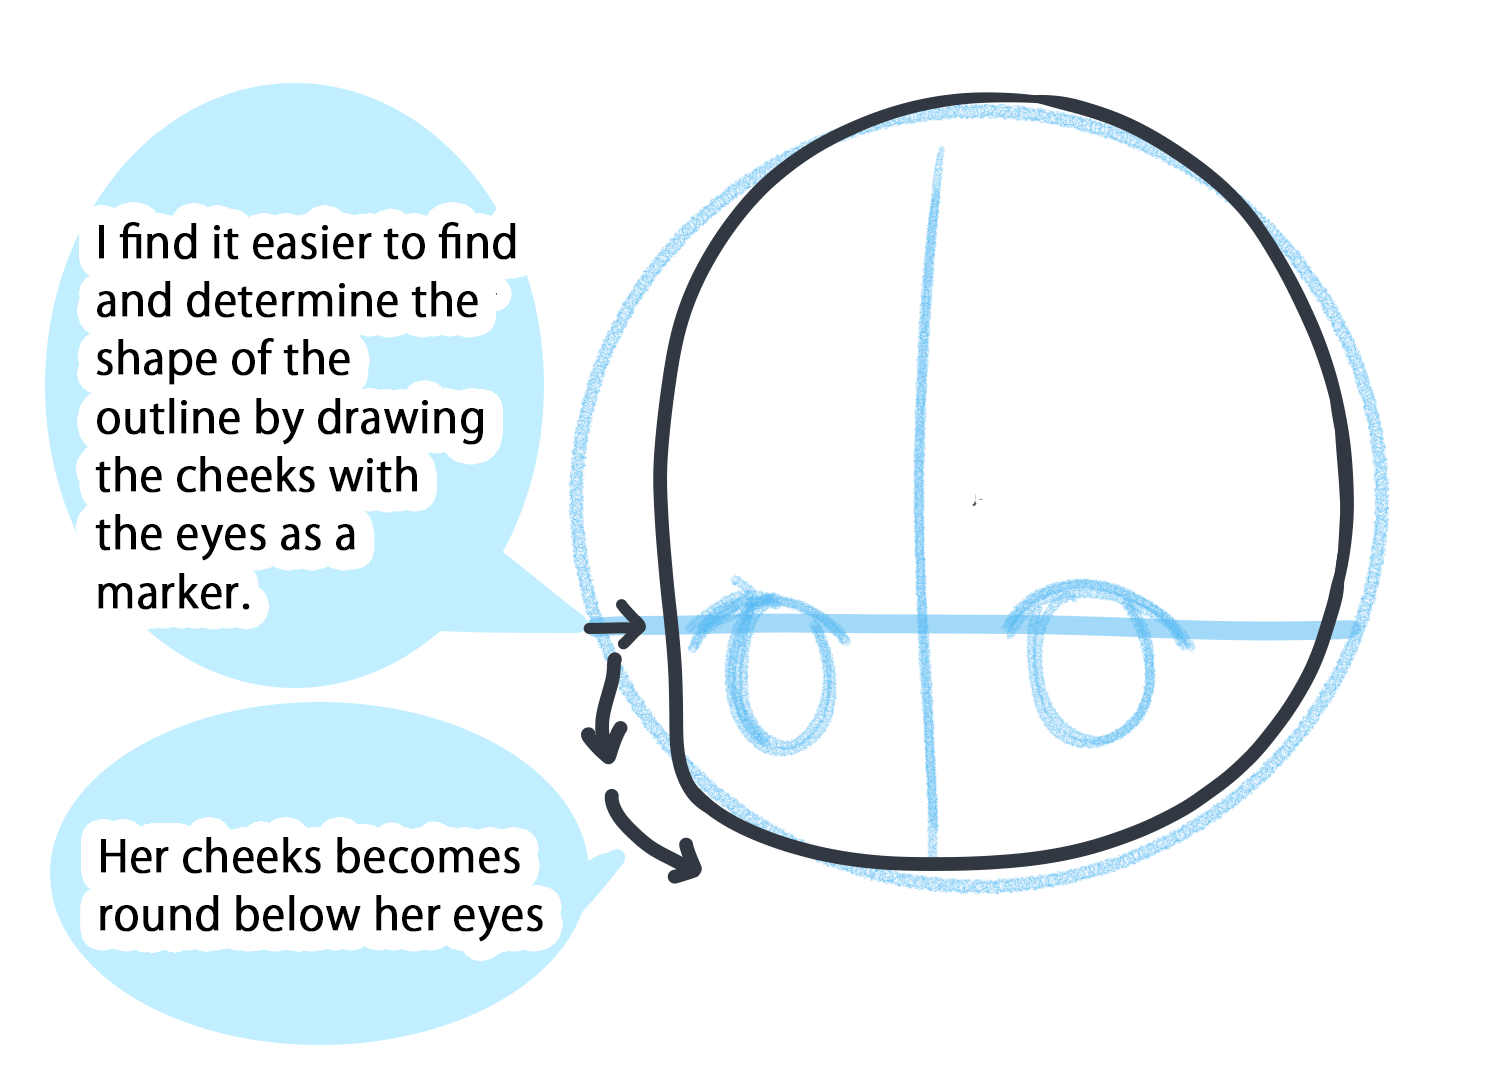
The key to drawing the outline for a chibi-chara is to make it rounder and simpler than when drawing a normal character.
Round off the pointed chin and draw the cheeks well rounded to give the character a cute and cozy look.
【Various Outline Patterns】
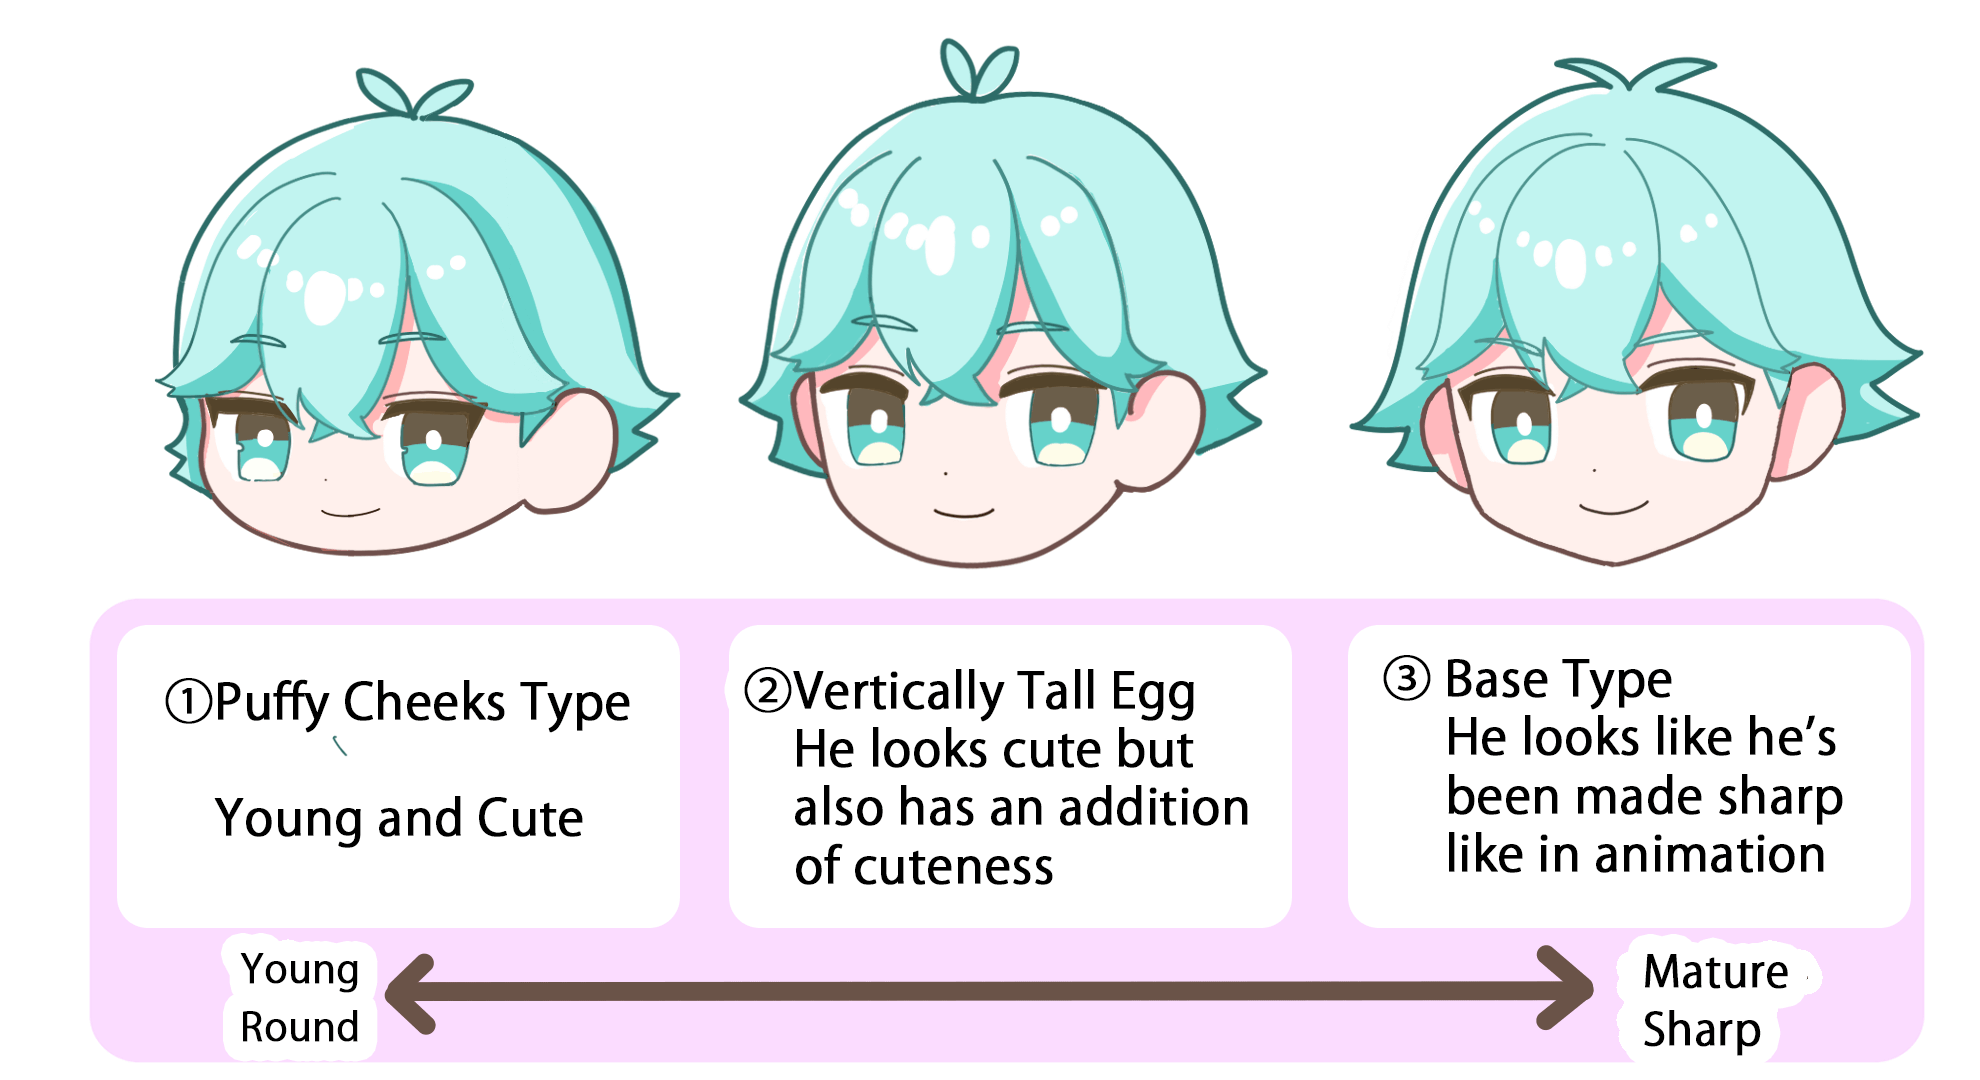
There are many different patterns of chibi characters, starting with the round type like the one above, there are also those that are a little longer and more mature, and those that are a little sharper and more cartoonish.
Choose the pattern you want to draw according to the personality of the character you want to make into a chibi-chara and for what purpose (If its for novelty goods or a four-koma manga).
4. Draw parts of the face
Once the outline is drawn, it is time to draw the face parts.
The key to drawing the eyes, nose, and mouth is to make sure they are simplified.
How exactly do you do it?
・Reduce the amount of detail.
・Emphasize the parts’ characteristics (e.g., puffy eyes, round eyes).
・Adjusting the size, etc.
In this way, you can get a good balance between the small sized body and the characters’ unique features.
(*This compressing method can be used not only for face parts, but also for other parts of a chibi character.)
Now, let’s take a closer look at how to draw each part.
① Draw the eyes
Now, let’s draw the eyes.
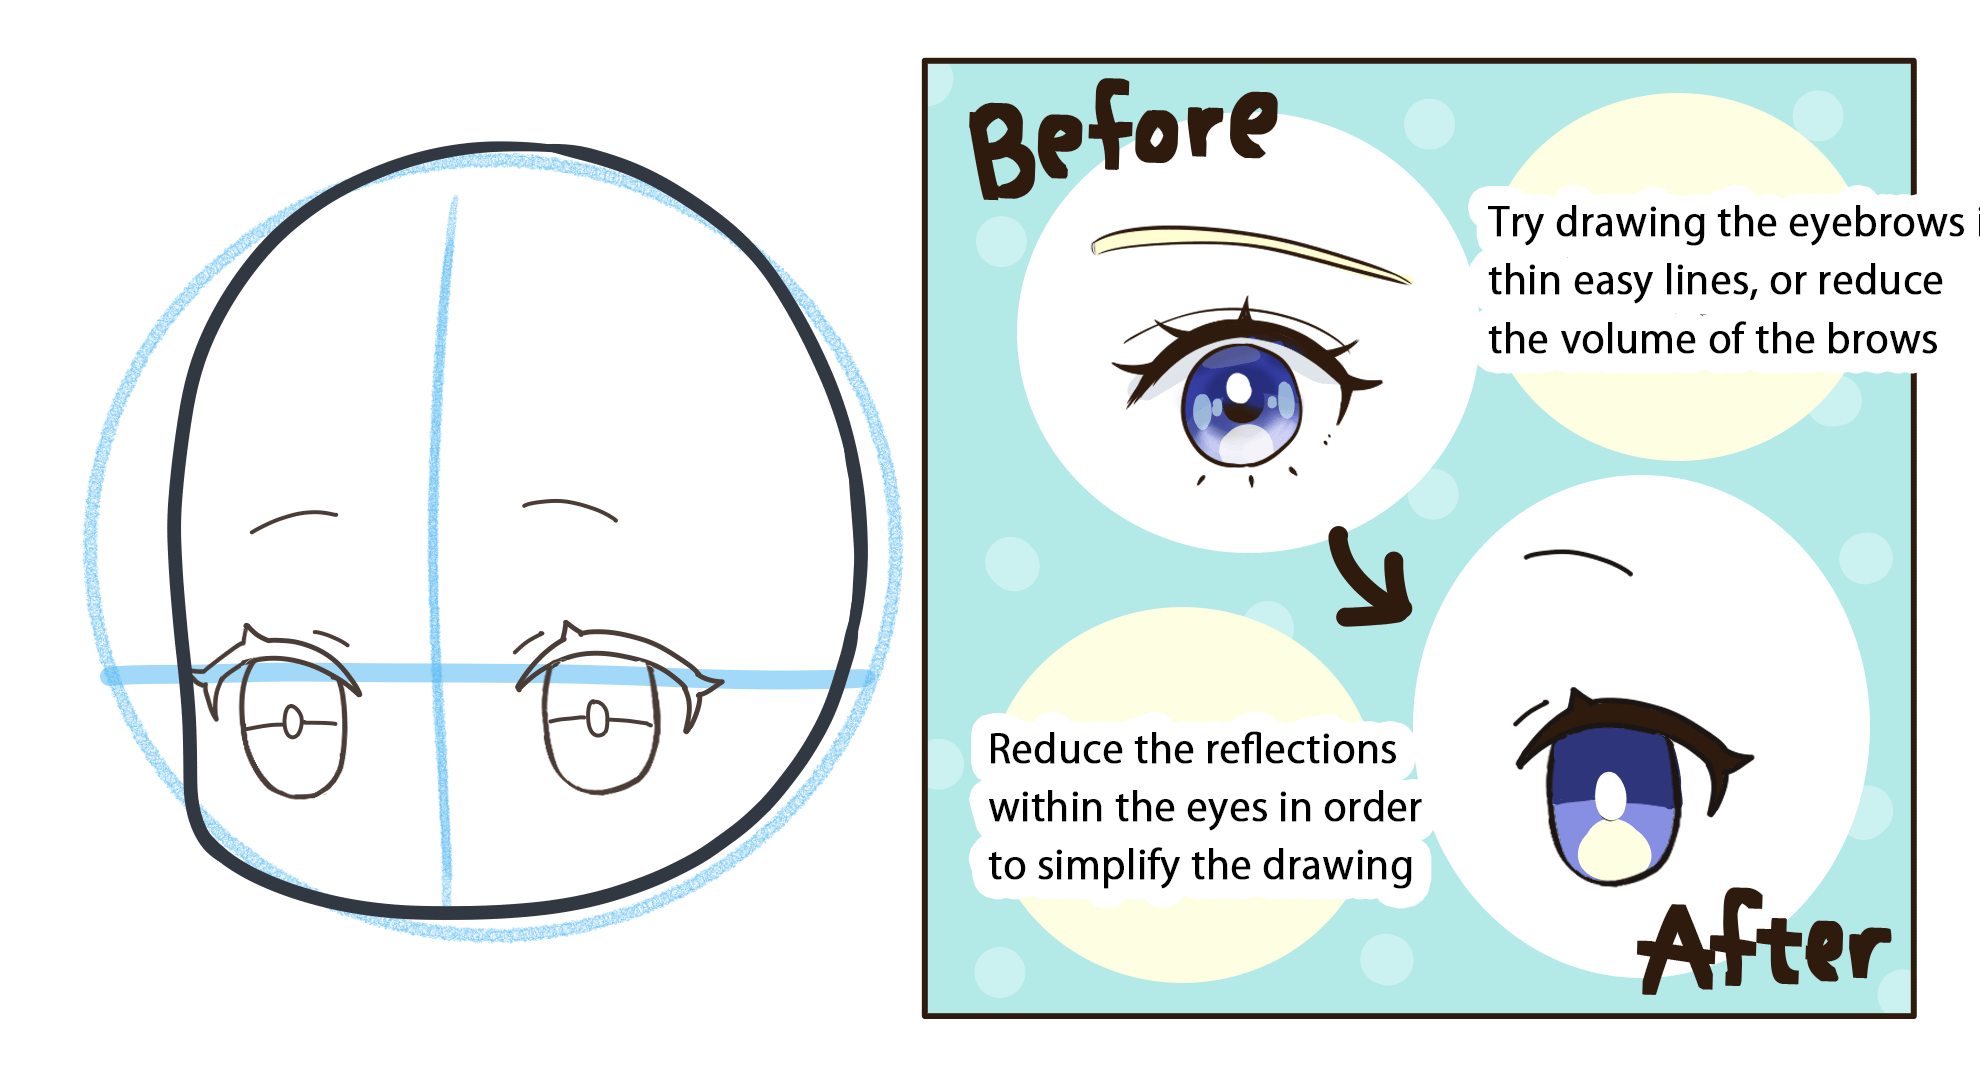
When drawing the eyes, the main areas to be compressed are as shown below.
(The part to reduce the detail description)
・The reflection of the eyes
・Curved eyelashes and other detailed expressions
(Emphasis)
・Characteristics of eyes (long, round, etc.)
・The size of the eyes.
After that, look at the balance of the face and make the upper eyelashes thicker or adjust the eye sizes to give them a stronger look.
How small the character should be is different for each person, so please take this as an example and draw the way you like.
② Draw the Mouth and Nose
Once the eyes are drawn, it’s time to draw the nose and mouth. 
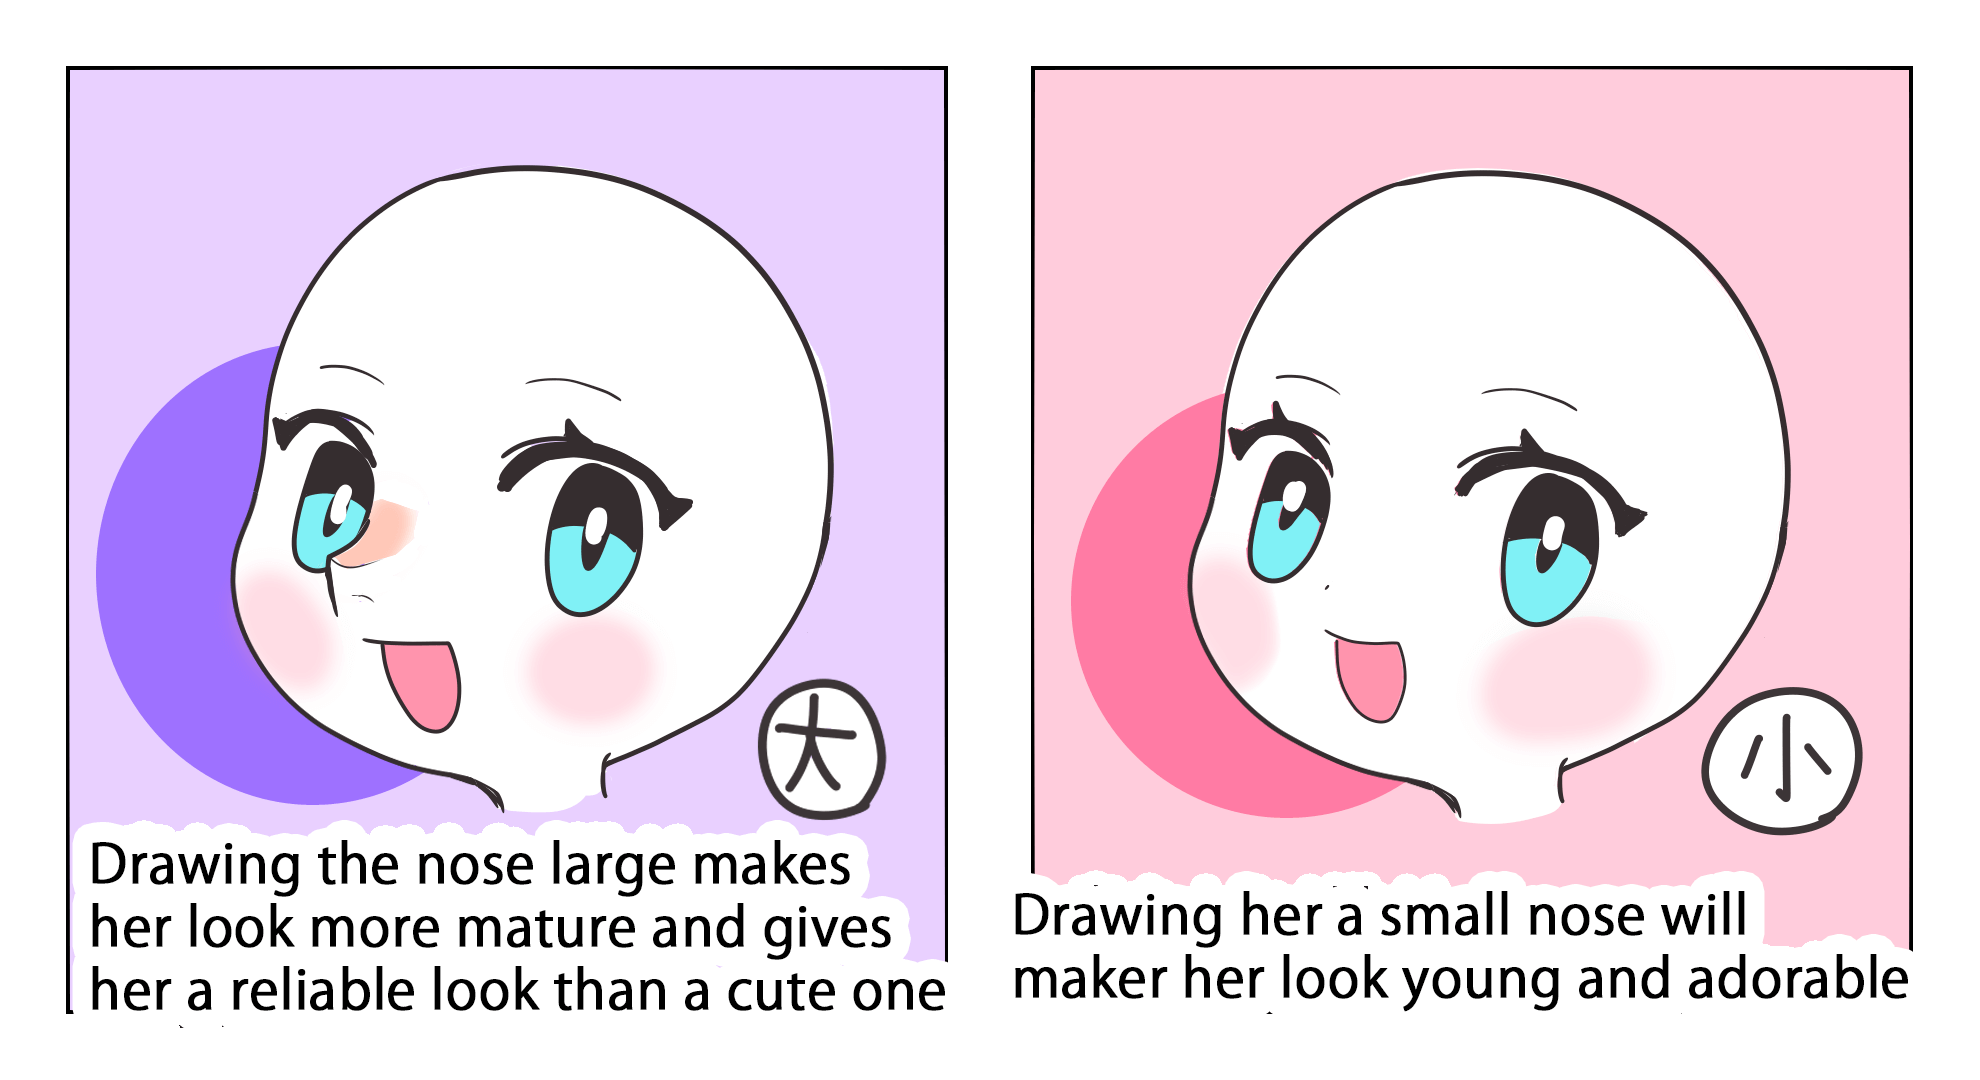
Drawing the nose tightly will decrease her childishness and look more realistic. So for chibi characters, I recommend drawing the nose as small as possible or not drawing it at all.
As with the nose, the mouth should be drawn small, but you may want to draw them large for men or dynamic characters.
③ Move face parts around
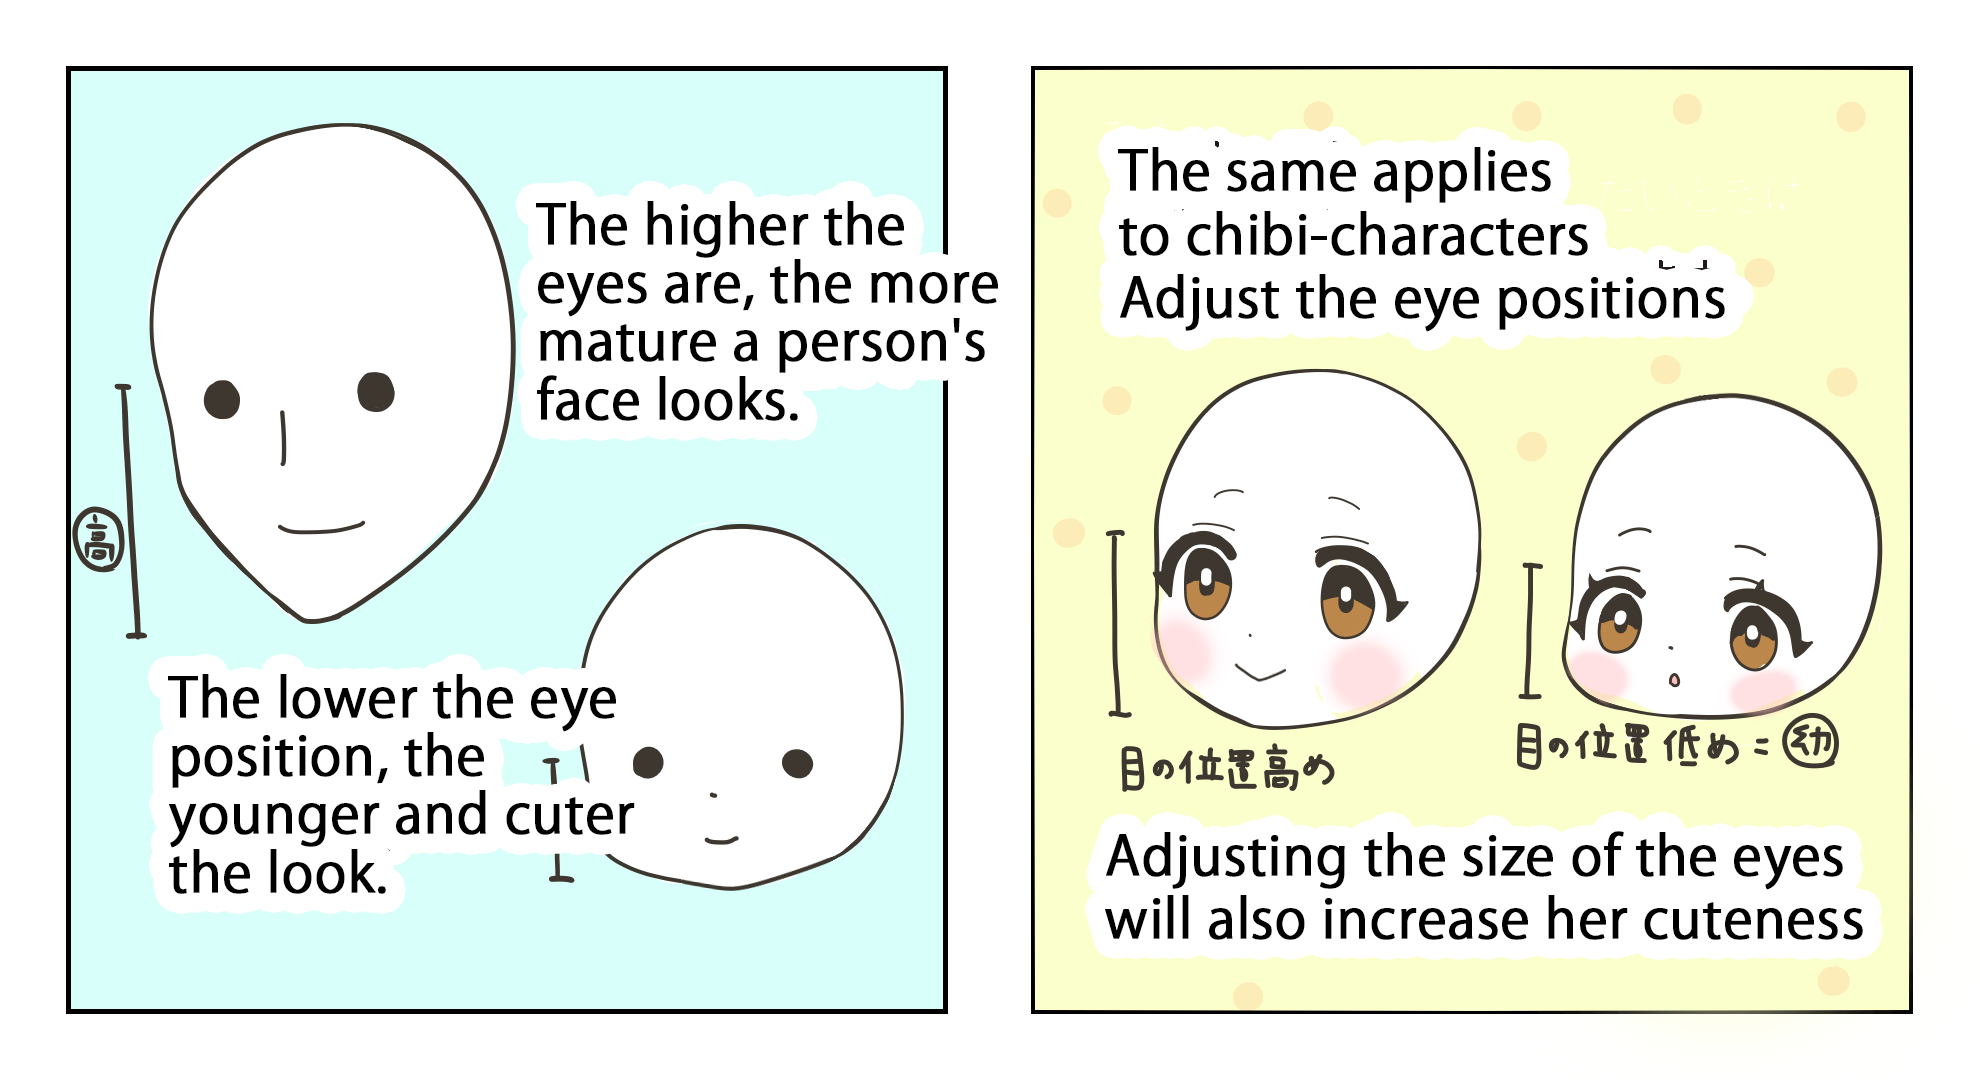
In addition to deforming the eyes, nose, and mouth, changing the location of these parts can also change the impression of the face.
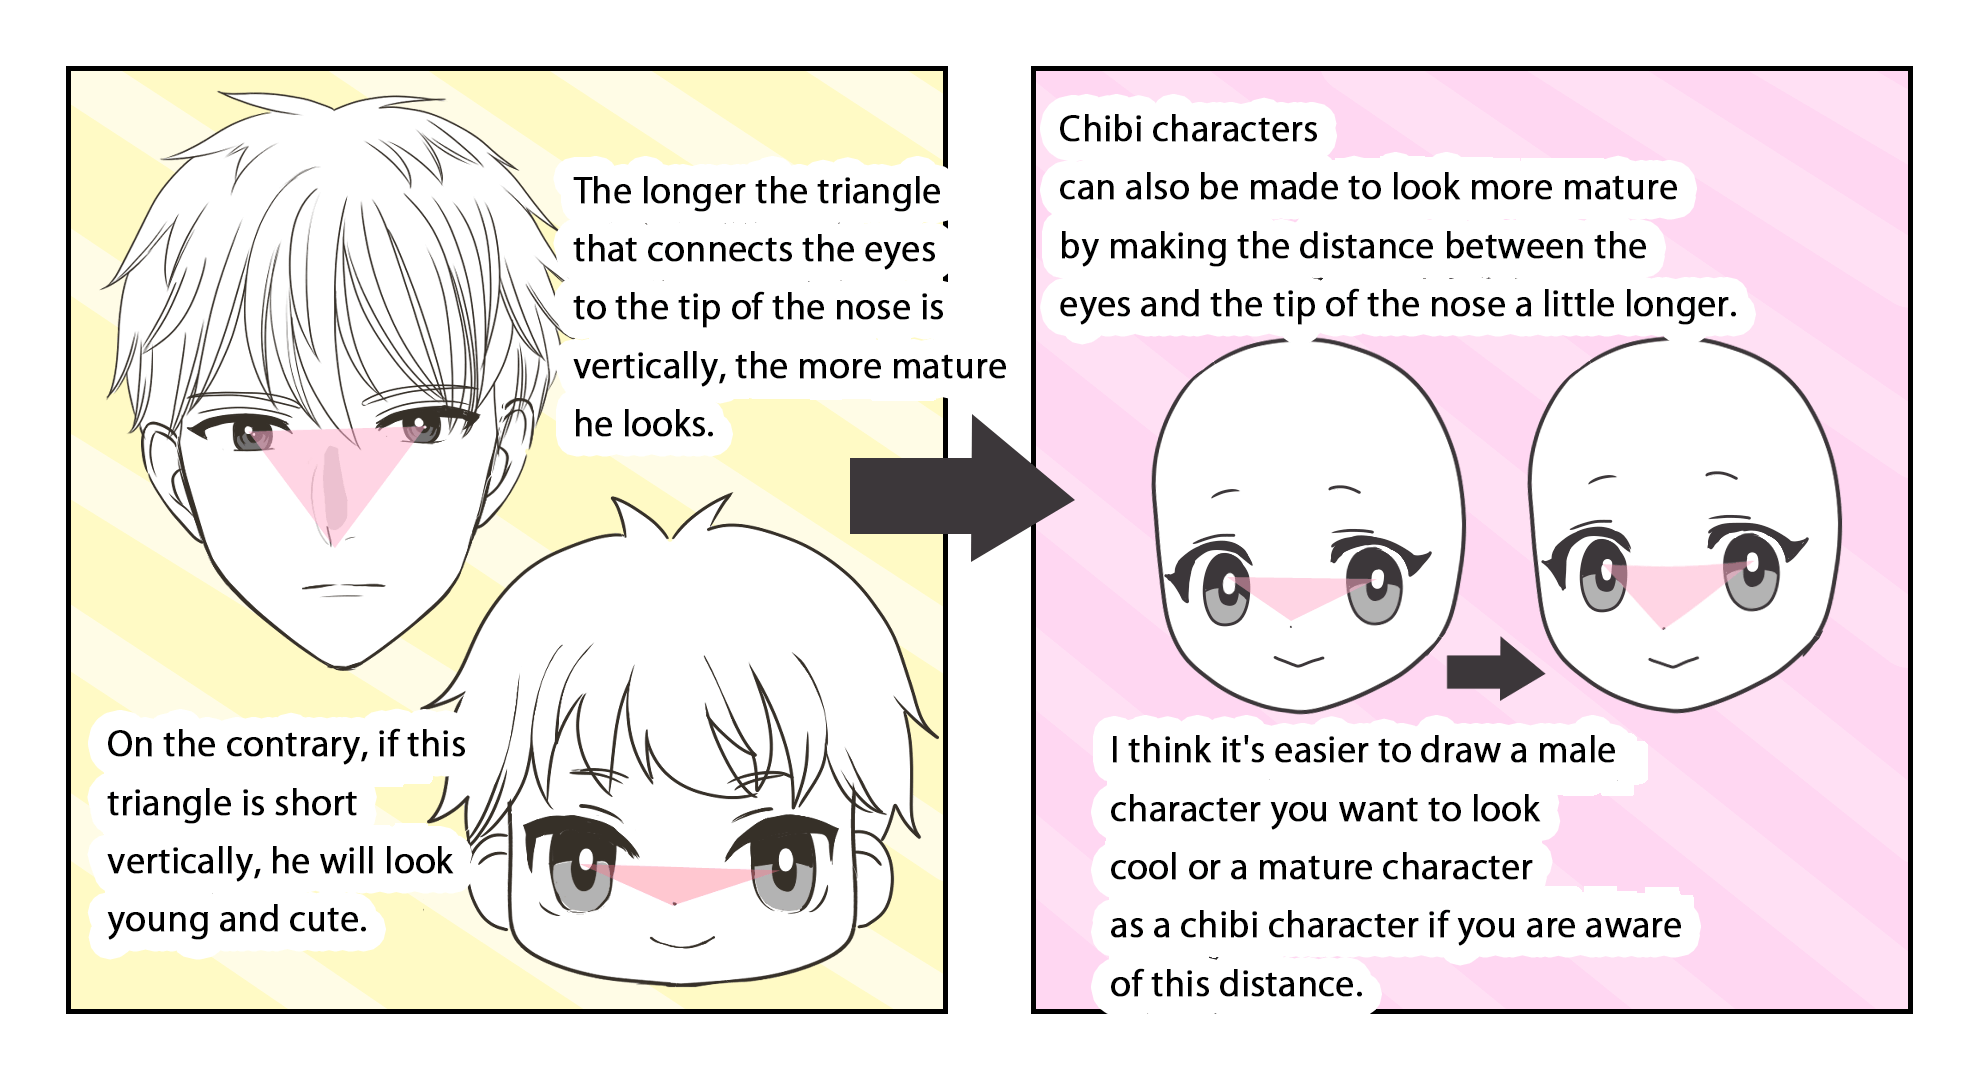
For example, a longer distance from the eyes to the nose and mouth gives a more mature impression, while a shorter distance gives a more childish impression.
Also, if the eyes are positioned high, it will look mature, and if they are positioned low, it will look young and cute.
5. Draw the hairs
Lastly, let’s draw the hairs.
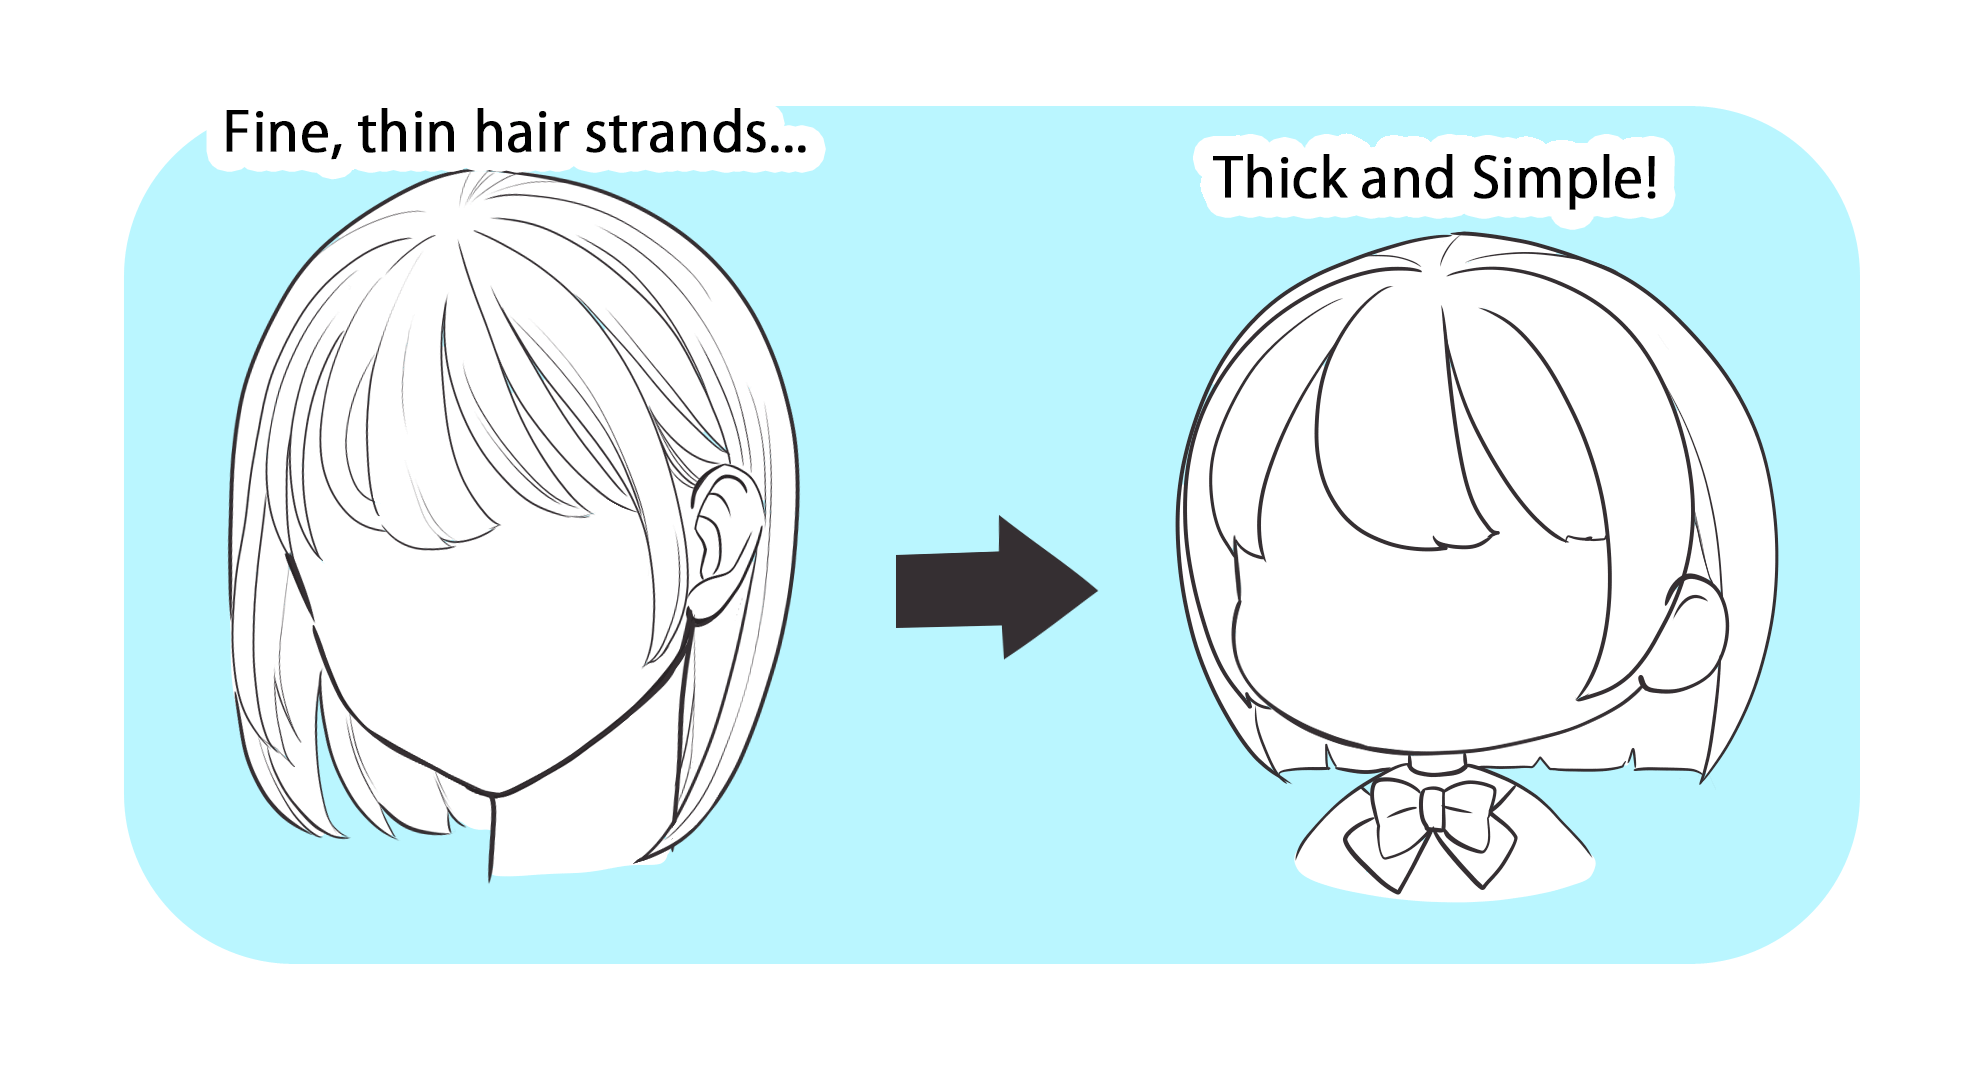
For chibi characters who are generally shrunk in a simple way, the hair is also simplified to reduce the amount of drawing.
Drawing thick hair strands and reducing the drawing of fine lines will give a simple and easy illustration.
In addition, you can bring out more of the character’s personality by drawing various hairstyles with a strong emphasis on their shapes.
6. Completion
Once the draft is done, you can clean it and color. 
(Text・Pictures/sakaki)
\ We are accepting requests for articles on how to use /
How to Draw Chibi!
Introduction: How to Draw Chibi!
This project shows you how to draw a child—chibi style!
Chibi is a way of drawing were the features are exaggerated to be small and cute.
You’ll need: A pencil (or pen) and a piece of paper.
Step 1: The Head
Draw a fat, upside-down «U». Then draw an ear on the left side. Below that, draw a connecting line like in the picture.
Step 2: The Eyes
Next, draw the cheek bone. It should connect to the other half of the face you drew before. Then, draw the neck. When you’re done with the neck, draw the eyes. You can draw them however you like, but this is how I prefer to draw them.
Step 3: Eyes Continued
Now fill in the eyes. I draw three circles, then connect them. For the «background» of the eyes, I make it fade away at the top. As for the hair, you can draw bangs, side bangs, parted, however you want.
Step 4: The Face
Now for the face. Under the eyes, draw little «tick-marks». On the same line as those, draw a small little nose. Directly below the nose, draw the mouth. Draw the mouth however you want; smiling, sad, whatever. I like to make a small little smile. To make her expression even more priceless, add slightly curved eyebrows. This makes her look innocent. Add the rest of the hair however you like.
Step 5: Body & Clothes
It’s time for the body. You can do any type of shirt, dress, swimsuit, etc. In this picture, I drew a tank top with a t-shirt under it. For the hands, they look like skinny mittens. All that will change in the next step. There are many things you can do with hands; peace sign, waving, fists, etc. I like to draw chibi’s with hands down in a proper position. You can see the beginning of a skirt coming through.
Step 6: Hands
Now putting fingers on the hands. In the «body» of the «mitten» add a couple of long streaks to indicate the different fingers. On the smaller part of the «mitten», add a fingernail. That becomes the fingernail of the thumb.
Step 7: Finishing Touches
You’re almost done! Add a little detail to the clothes, then draw the legs. This girl has really long legs:). The shoes are flats, and their pointing out. Never, ever, EVER draw shoes that are pointing left or right. Nobody stands like that! Once you do the shoes, you’re done! Admire your work. Ta-da!
Be the First to Share
Did you make this project? Share it with us!
How to Draw a Fat and Simple Chibi
Introduction: How to Draw a Fat and Simple Chibi
Hey guys! This tutorial is made for beginners. Or people who are new to the chibi concept. It’s a very easy tutorial and I hope you guys have fun following it. I’m also deeply sorry about the quality of then images. Scanning is too much work considering that my scanner takes forever to load. Feel free to share your drawings in the comment box below!
Approx. Time: 5-10 mins. Maybe even less.
Step 1: Head
Start by drawing a circle. In this tutorial, you’ll be drawing chibis sideways. Draw a line around the circle slightly below half of it. Draw another line down from the center of the chibi’s head and work your way down.
Step 2: Modify Head
Now add a little bump to the side of the face. Make sure it’s a little bump. Try to make it noticeable too.
Step 3: Add Body
Now draw in the fat body. You won’t need any measurements or grids or tracing paper. Just start the body from somewhere near the center of the circle. Give it an outward curve for the upper body. Then go straight down for the legs. The arms start of tiny and enlarge towards the hands.
Step 4: Guiding Line
Draw another line around the head. The space in between these two lines will help you tell how big the eye’s are going to be. Of course, you won’t be using ALL the space inside for the eyes. The top line is just for you to see where your chibi’s fringe would fall.
Step 5: Hair
Now. Add in the hair! I know, weird hair. But be creative with your hairstyles! Give it an afro if you want. I’m making my chibi a girl (obviously). This tutorial is made to teach you how to draw a chibi form not the design.
Step 6: Eyes
Now for the eyes. As I mentioned before, this is about the chibi form, not the design. Tips for the eyes: Do not make the eye on the farther side of the face the same size. Instead, try making it thinner but keeping the same height.
Step 7: Clothes
Step 8: Facial Features
Add the nose on the intersection. Again, make it a little bump. I prefer to position the mouth under the nose but that’s just me. The position is up to you.
Step 9: Darken Outlines
Darken all the outlines. In my case, the face.
Step 10: Feet
For those who dislike ‘peg’ legs, give the chibi a little bump at the feet.
Step 11: Erasing
Erase all the sketch lines. Or at least TRY to. To be honest, this step took me the longest due to my fat eraser.
Step 12:
Tada! Color it in or shade it in and you’re done! I prefer to shade but again, personal opinion.
Hope this helped you!
End of Tutorial
15 People Made This Project!
Did you make this project? Share it with us!
